WordPress Theme Development: Creating the header and making our theme translation ready
Hi and Welcome!
This is Part 3 of the 9 part Course about developing a WordPress theme from scratch.
Here is the access to the other parts of the Course in the sequential order:
- Developing a WordPress Theme From Scratch
- WordPress Theme Development: The best way to enqueue scripts and styles
- WordPress Theme Development: Creating the header and making our theme translation ready (Current Part)
- WordPress Theme Development: Site footer with social navigation, dynamic copyright statement
- WordPress Theme Development: The Loop, the main content, Google Fonts, and the Custom Fields
- Building a WordPress Theme From Scratch: Internal Pages
- WordPress Theme Development: Building the Blog
- WordPress Theme Development: Search page, 404 error template, Custom Queries, and custom post types
- WordPress Theme Development: WordPress Customizer and it’s API
WordPress theme development is all about taking control over the tons of tiny bits of the Website.
How to add theme support for the Title tag
WordPress ships with a ton of theme features and these theme features save a lot of time for the theme developers.
Just like any other application software, WordPress doesn’t enable all the theme features because that could affect the performance of our WordPress website.
This is because a WordPress theme decides what should get displayed on each webpage of our website.
So, It is totally in our control as the theme developers to enable and support these features by utilizing them in our themes to make it easy for us and the client.
Also, the theme features we need to utilize varies from project to project.
For example, ‘custom-logo’ is a theme feature we might want to support.
This feature allows the client to upload a custom logo with ease and as theme developers, we can easily pull the URL of the client uploaded logo inside our theme’s template file and display it to the frontend users via the <img> tag.
But a recent client of mine did not want to utilize an image logo at all. Since SVG is the new trend, He wanted to use an SVG logo instead of a png version.
But WordPress doesn’t allow us to upload the SVG file because of security concerns.
So I did not enable ‘custom-logo’ theme feature at all. Instead, I manually put the SVG inline inside the header.php file.
The Title Tag is a theme feature too
WordPress site is not a Static HTML/CSS site. We cannot manually put the <title> tag for every webpage.
Although WordPress is capable of generating the <title> tag automatically from a page/post title, it prefers not to do it. And it leaves the <title> tag generation to us as the theme developers.
Previously, we used to call wp_title() function inside the <head> element of the header.php file, for example:
<title><?php wp_title( '|', true, 'right' ); ?></title>This function dynamically generates the <title> tag based on the page/post title. I really love this WordPress function.
But since WordPress version 4.1, WordPress made it a theme feature. And there got to be a big reason for this change but I never really bothered to know why. Probably because of the conflict between the plugins and the themes.
Anyway, the document title is a keystone for the site’s SEO success. And no client never ever said to ignore SEO. Also, If you notice the browser tab, there is this ugly URL instead of the site name followed by the page name.
So, let’s fix this by enabling the ‘title-tag’ theme feature.
Introducing the add_theme_support() WordPress function
The add_theme_support() function allows you to enable the use of a theme-feature inside your theme.
It accepts two parameters.
add_theme_support( $feature, $arguments );The $feature parameter
With this parameter, you are telling the WordPress that “Hey! I want my theme to support this particular feature”
add_theme_support( 'title-tag', $arguments );
The $arguments parameter
This parameter allows us to fine-tune the feature to our project needs. For example, let’s just say that you want to support the ‘custom-logo’ feature but you also want to restrict the client to upload a logo with 100x50px dimensions. The parameter will let you achieve just that.
We will put this example to use when we add theme support to the ‘custom-logo’ feature.
after_theme_setup action hook allows you to add theme support for any feature
WordPress allows us to support a theme feature only when WordPress is done setting up the theme internally. To give us the green signal, WordPress triggers the after_theme_setup action hook as soon as it is done with the theme setup.
So, to support a theme feature all we have to do is hook into this action hook.
Let’s add theme support to the Title tag
Open up the functions.php file and put the following code at the end of it.
function nd_dosth_theme_setup() {

        // Adds <title> tag support
        add_theme_support( 'title-tag' );

}
add_action( 'after_setup_theme', 'nd_dosth_theme_setup');
Let’s break it down.
Nothing special going on in here.
We defined a custom action called nd_dosth_theme_setup and hooked it to the after_theme_setup action hook. And inside our custom action, we are just calling the add_theme_support('title-tag') function. That’s all.
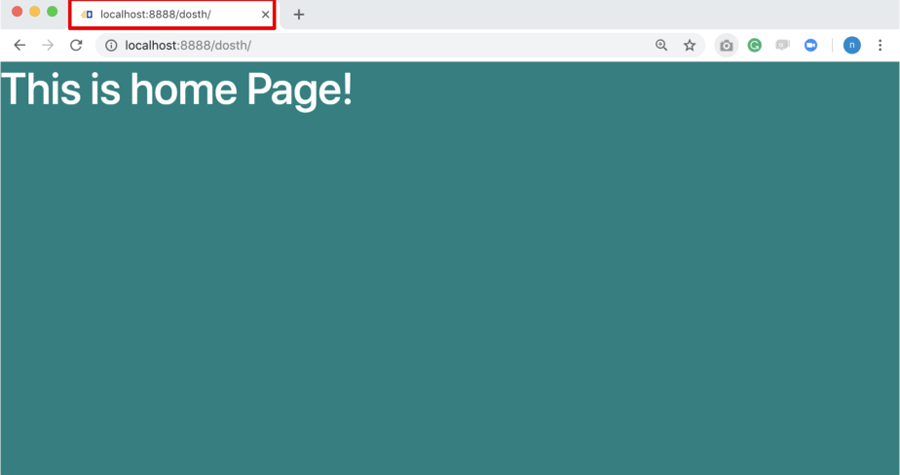
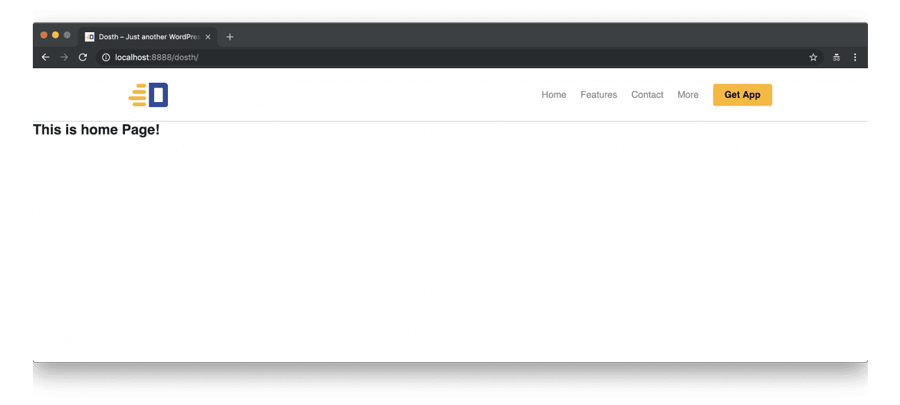
Now if we switch back to the Homepage in the Browser, we can indeed see a title on the tab instead of a URL.
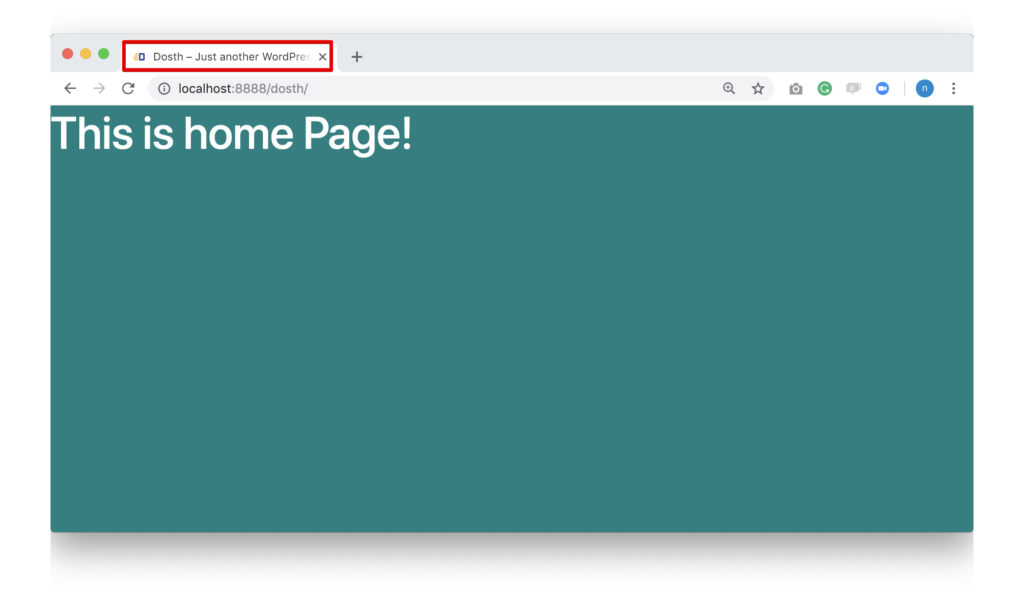
And if you notice, WordPress by default uses the site name and tagline of our WordPress website for the <title> tag of the home page. For the internal pages and posts, WordPress uses the title of blog post / page. We will see this when we build our internal pages.
WordPress also allows us to modify the <title> tag dynamically for just about any page or post. We will learn how to do this in a future lesson.
Here is the final functions.php file for this lesson:
<?php
function nd_dosth_enqueue_styles() {
    wp_enqueue_style(
        'normalize',
        get_stylesheet_directory_uri() . '/assets/css/normalize.css',
        array(),
        false,
        'all'
    );
    wp_enqueue_style(
        'bootstrap',
        get_stylesheet_directory_uri() . '/assets/css/bootstrap.min.css',
        array(),
        false,
        'all'
    );
    wp_enqueue_style(
        'main-stylesheet',
        get_stylesheet_uri(),
        array('normalize', 'bootstrap'),
        "1.0",
        'all'
    );
}
add_action( 'wp_enqueue_scripts', 'nd_dosth_enqueue_styles' );

function nd_dosth_enqueue_scripts() {
    wp_enqueue_script(
        'main-js',
        get_stylesheet_directory_uri() . '/assets/js/main.js',
        array('jquery'),
        '1.0.0',
        true
    );
}
add_action( 'wp_enqueue_scripts', 'nd_dosth_enqueue_scripts' );


function nd_dosth_theme_setup() {

    // Adds <title> tag support
    add_theme_support( 'title-tag' );

}
add_action( 'after_setup_theme', 'nd_dosth_theme_setup');
Alright, For now, we are done with the <head> element.
Next, we will continue to build the Header portion of our site by focusing the <body> tag.
WordPress Theme Development: Introducing the body_class() template tag
Now, let’s move on and deal with the <body> tag.
To give us some dynamic control over the styling of any webpage, WordPress provides us with a body_class() template tag and this template tag echoes out the classattribute with some really handy classes to the opening <body> tag.
Note: Utilizing this function is not mandatory while developing a theme.
This function accepts a single parameter in the form of a PHP string or a PHP array so that you to attach your own custom classes to the list of dynamic WordPress generated classes.
Usage of this function with a PHP string as its first parameter.
<body <?php body_class('no-js some-custom-class-name'); ?>>
Usage of this function with a PHP array:
<body<?php body_class( array( 'no-js', 'some-custom-class-name' ) ); ?>>
You can use both the above techniques to attach multiple custom classes to the <body> tag.
Anyway, let’s try it out.
Open up the header.php file and replace the plain <body> tag with the following code:
<body <?php body_class('no-js'); ?> id="site-container">
Here is the final header.php file for this lesson:
<!DOCTYPE html>
<html <?php language_attributes(); ?>>
    <head>
        <meta charset="<?php bloginfo( 'charset' ); ?>">
        <meta name="viewport" content="width=device-width, initial-scale=1">
        <link rel="profile" href="http://gmpg.org/xfn/11">
        <link rel="pingback" href="<?php bloginfo( 'pingback_url' ); ?>">

        <?php wp_head(); ?>
    </head>
    <body <?php body_class('no-js'); ?> id="site-container">
If you notice, I also added an ID to the body element.
I also want to attach a single custom no-js class name to the <body> tag, so I went with a PHP string. We will remove this no-js class with Javascript.
It’s a handy little trick to determine whether the Javascript is enable in the browser. If you are an experienced frontend developer, you are already familiar with this technique.
Now, let’s go back to the browser and view the page source of our Homepage.
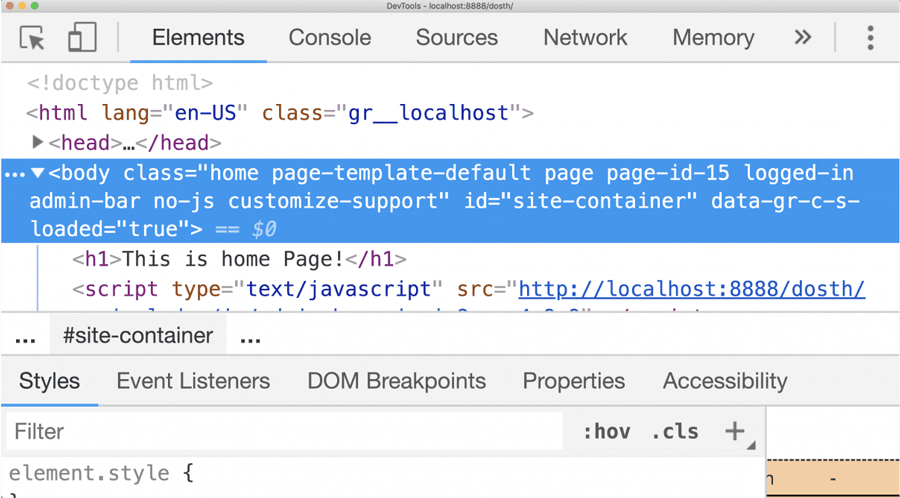
Woah! WordPress is logically echoing a lot of HTML classes and it generates these classes based on a lot of factors.
If we watch them closely, these classes will convey more information about a particular webpage. So, let’s quickly run through these classes.
- The
homeclass tells us that the webpage is the Homepage of the website. This applies to a static front-page and a front-page with blog posts. - The
page-default-templateclass tells us that WordPress is using the default template to render this webpage. This class is specific to the WordPress pages. If you are looking at a webpage with a single blog post, you will be seeing apost-default-templateclass instead. - The
pageclass tells us that this is a WordPress page. If you looking at a webpage with a blog post, you’ll be seeing a class name of post instead. - The
page-id-15class tells us that this is a WordPress Page with ID of 15. - The
logged-inclass tells us that we are logged in as a user. This applies to every user of our website, even the front-end user of our website. For example, Woocommerce as an e-commerce plugin allows the visitors of your e-commerce website to login and purchase the products. Woocommerce uses the WordPress user management system internally to manage user accounts. - The
no-jsis our custom class - The
customize-supportclass tells us that WordPress relied on the Admin Dashboard -> Appearance -> Customize panel to generate some of the HTML mark up of this webpage. And in our case, WordPress is using the Customize panel to generate the favicons. - WordPress echoes out the
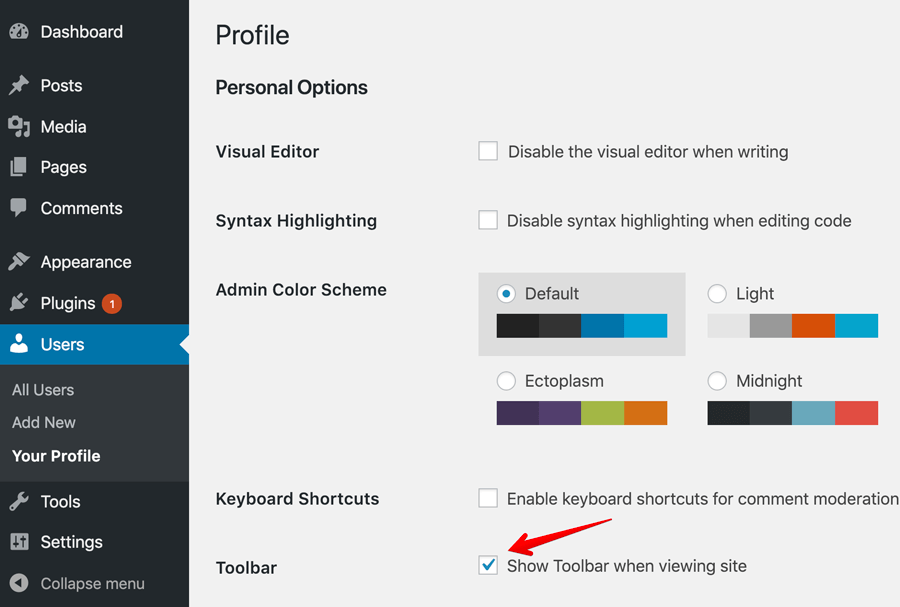
admin-barclass only if the user is logged in and “Show Toolbar When viewing site” option is turned on inside the user profile.
Important Realization: The final list of classes that WordPress generates using the body_class() template tag changes from webpage to webpage and it is totally up to you to utilize these classes to style the webpage.
If you don’t want to use these automatically-generated classes, you can remove the remove the body_class() function from the <body> tag.
Anyway, I use these classes to style a webpage differently from others and I use these quite extensively on every WordPress project.
Trust me, these classes will become a lifesaver in a ton of real-world situations.
However, there is one problem.
What if you want to remove some of the classes that body_class() function is generating?
What if you want to add more classes based on a condition?
Because we are dealing with PHP now, we can determine the user-agents like chrome browser and machines like iPhone to add appropriate classes to the body tag.
If we add classes like that in the development phase, we can easily fix cross-browser issues, right?
To achieve this, you have to learn and implement WordPress Filter Hooks. You can use the following guide:
Please continue reading the article only after you are done with the above guide. Once you are done with the above guide, you should be able to add browser-specific classes to the body tag.
WordPress Theme Development becomes easy of if you master WordPress Hooks.
Next, let’s deal with the Markup of the header.
Before we write our markup, let’s take a look at our site’s header design.

It is a very minimal Header design. The Header design is divided into two columns. We will be outputting logo on the left and navigation menu on the right.
Writing the HTML markup for a WordPress website is exactly the same as writing the markup for a plain HTML/CSS website.
So, go back to the header.php file and put the following HTML markup right after the body tag:
<header role="banner">
    <div class="container">
        <div class="row">
            <div class="col-sm-4">
                <div class="logo">
                </div>
            </div>
            <div class="col-sm-8">
                <nav class="primary-navigation">
                </nav>
            </div>
        </div>
    </div>
</header>
This is all the markup we need for creating a good-looking header.
I achieved the two column layout using the Bootstrap classes.
<div class="logo"> is the place where we will be outputting the logo.
<nav class="primary-navigation"> is the place where we will be outputting our site’s primary navigation.
So, next, we will deal with the site’s logo.
How to add the custom Logo to our WordPress website
I don’t need to tell you the importance of a Logo for a website. Logo acts a virtual face to any online or offline business.
So, it is extremely important that we provide an easy way for the client to upload and change the site logo at any time and place. And, we can achieve this in a ton of different ways.
For example, we can put the logo inside our theme’s assets/images directory and echo it out like this:
<img src="<?php echo get_template_directory_uri() . '/assets/images/logo.png' ?>" alt="Company Name" />At the end of the day, all we need is the URL of the logo so that we can give it to the image tag.
Most of the beginner theme developers use the above technique and they ask the client to replace the site logo image inside the assets/images directory. If you dig up some old themes in the market, you can still see this.
But, you shouldn’t use this technique. We have to make our client’s life easier by providing an upload logo image button instead of saying “Hey Client! Go the theme directory and upload your logo with a specific file name.”
And, previously, you have also learned that ‘custom-logo’ theme feature provides us with the upload logo button. So let’s enable the support for the ‘custom-logo’ theme feature.
Open up the functions.php file and put the following highlighted code inside the nd_dosth_theme_setup action, like this:
function nd_dosth_theme_setup() {

    // Add <title> tag support
    add_theme_support( 'title-tag' );

    // Add custom-logo support
    add_theme_support( 'custom-logo' );

}
add_action( 'after_setup_theme', 'nd_dosth_theme_setup');
Alright, this tells WordPress that our theme supports an uploadable custom logo and forces WordPress to provide an upload logo section inside the Site Identity Options Panel.
So, let’s go to the Admin Dashboard -> Customize -> Site Identity Options Panel and check it out.
Now that we have a button to upload the site logo, let’s upload the following logo:
The size of the above logo is 140x88px. This is a 2x version of the actual logo and we should always upload a 2x logo version to support retina mobile devices and retina desktop/laptop monitor.
Now, I am not going to suggest you upload 2x version of every image. I only suggest this 2x image strategy for the logo. Because a few extra kilobytes of a logo image does not really impact your frontend page load speed.
Also, I am not going to brag that the theme we are building is retina ready. WordPress has nothing to do with the retina devices.
If you want your WordPress website to be retina ready, use SVGs or Font-Icons.
Anyway, back to the task at hand.
If we uploaded the logo, WordPress will provide us with a chance to crop the image and I will skip cropping because I already properly cropped the logo inside Adobe Photoshop.
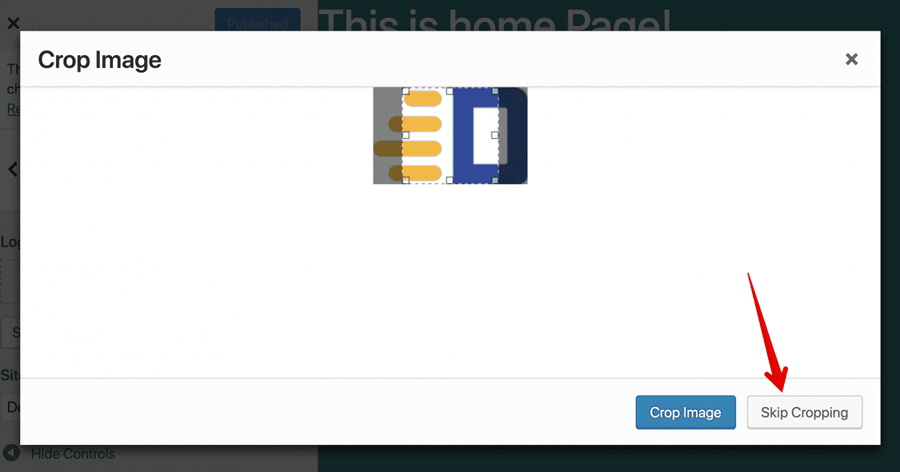
Once you have uploaded the logo, hit the publish button at the top to save the changes. Anyway, you can always change your mind by removing or changing the logo at a later point in time.
So, What next? Where and How does WordPress displays this logo?
Our job is only half done
Unlike the “title-tag” feature, WordPress is not going to display this logo automatically. It just doesn’t know where to display it. So, we have to tell it.
It is our responsibility as the theme developer to query this logo image from the database and display it on the frontend webpage using the theme template files. This is how we truly add theme support for some features. ‘custom-logo’ theme feature is the best example for this case.
the_custom_logo() function will display the custom logo anywhere you want
WordPress provides us with the the_custom_logo() function to display the logo.
This only responsibility of this function is to generate the following markup:
<a href="http://localhost:8888/dosth/" class="custom-logo-link" rel="home" itemprop="url">
     <img width="140" height="88" src="http://localhost:8888/dosth/wp-content/uploads/2019/01/dosth-logo-2x.png" class="custom-logo" alt="Dosth" itemprop="logo">
</a>
As you can see, this function generates an HTML image link. The link points the users to the Homepage of our website and the image source is the URL of the logo we just uploaded.
How convenient?
So, go back to the header.php file and call the above function inside the <div> with class logo.
<div class="logo">
     <?php the_custom_logo(); ?>
</div>
Now let’s test this out by visiting the Homepage in the browser.
Of course, It Works! But convenience always comes at a cost.
Let’s take over the control with the manual method
There is one problem in the above image link markup. If you notice the <img> tag, you can see the width and height attributes on it. And the width and height attributes on the <img> tag forces us to write CSS in a limited way. It also limits the responsiveness of the image.
In my opinion, It is better we generate the above Logo Image link markup manually by taking the full control.
It is not straightforward. But don’t you worry, always remember that WordPress has our back :P
Let’s take a look at the above image link markup one more time:
If you notice the image link markup in the above figure, there are only three pieces of dynamic information that needs to be pulled from the database.
- URL of the Homepage
- Image URL of the Logo
- Site Name
“Hey! Why Should we pull the above information from the database, we know all the values, Can’t we just hard-code them?”
No! Don’t ever do that. WordPress is a dynamic CMS and our clients love WordPress because it easily allows them to modify all the above pieces of information with just a few clicks.
Some clients even ask me to change the website name. It is a fair request. We should never hard-code any values that a client can change via the Admin Dashboard. It is a very bad theme development practice.
Anyway, if we can pull the above URLs and site name from the database, we have all the necessary information to re-create the above markup manually.
And we can use the following WordPress functions to get access to the information we need:
home_url()function returns the Homepage URL of the WordPress site.get_theme_mod('custom-logo')function call returns the image ID of the custom logo. Yep, in WordPress every image upload will have a unique ID. And if we provide this image ID to thewp_get_attachment_image_src()function, it will return the full URL of our custom logo.bloginfo()function returns a whole lot of information about of WordPress site and Site name is one of them.
Now, let’s put the above WordPress functions to the practice.
Go to the header.php file and replace the following code:
<div class="logo">
     <?php the_custom_logo(); ?>
</div>
With this:
<div class="logo">
    <?php if( has_custom_logo() ):  ?>
        <?php
            // Get Custom Logo URL
            $custom_logo_id = get_theme_mod( 'custom_logo' );
            $custom_logo_data = wp_get_attachment_image_src( $custom_logo_id , 'full' );
            $custom_logo_url = $custom_logo_data[0];
        ?>

        <a href="<?php echo esc_url( home_url( '/' ) ); ?>"
           title="<?php echo esc_attr( get_bloginfo( 'name' ) ); ?>"
           rel="home">

            <img src="<?php echo esc_url( $custom_logo_url ); ?>"
                 alt="<?php echo esc_attr( get_bloginfo( 'name' ) ); ?>"/>

        </a>
    <?php else: ?>
        <div class="site-name"><?php bloginfo( 'name' ); ?></div>
    <?php endif; ?>
</div>
“Ouch! What is that?”
Don’t panic. Nothing much happening in there! You’ll agree with me if we break it down piece by piece.
And, if you switch back to the browser, you’ll still see the same out.
Anyway, Let’s start with the IF/Else statements.
The IF Condition
Before we output the markup for the logo, we must always check if the logo has been uploaded in the first place. So, we are performing the check with the help of a WordPress conditional tag called:
has_custom_logo();The above WordPress function returns true only if the custom logo is uploaded. If not, it returns false.
In our case, we have uploaded the logo, so the above function will return true and WordPress will process the code inside the IF condition and outputs the image link markup to the browser.
Now, a conditional tag is nothing but a PHP function which returns a true or false. Nothing more than that. And we can only use a conditional tag only inside a conditional statement like IF, ELSE IF, WHILE, etc.
Remember the Template Tags? WordPress divides its functions into categories so that we can easily find them and discuss them with our fellow developers :P
Anyway, what if the logo is not uploaded or removed for some reason?
The ELSE Condition
If the logo is not uploaded, we can not a show empty space in the place of the logo, right? So, just as a fallback, we need to output the name of the site using:
bloginfo( 'name' );
WordPress pulls the site name from “Site Title” option set in Admin Dashboard -> Settings > General and echoes it to the browser. Simple.
Inside the IF Condition: Getting the custom logo image URL
If we are inside the IF condition, that means someone has uploaded the custom logo inside the Admin Dashboard -> Customize -> Site Identity Options Panel.
To display this custom logo, we need to get its URL first. And getting the URL of the custom logo involves the following steps:
Step 1: Get the Image ID and save it to a variable
$custom_logo_id = get_theme_mod( 'custom_logo' );As I have mentioned in a previous lesson, WordPress provides a unique ID to every image that has been uploaded to the media library. And, we need the image ID of a particular image to get its URL.
So, we are getting the Image ID for the custom logo using:
get_theme_mod( 'custom_logo' );And we are saving it to the $custom_logo_id variable.
Now if we var_dump() the variable like this:
var_dump( $custom_logo_id );We can see the actual ID of the logo image on the Homepage:
See? The ID of the image we have uploaded for the logo is 18.
Pro Tip: It is always a good idea to var_dump any WordPress function that returns something. It makes thing easy to debug if something goes wrong.
Step 2: Now let’s use this ID to get the custom logo Image data
$custom_logo_data = wp_get_attachment_image_src( $custom_logo_id , 'full' );In the above line, using the wp_get_attachment_image_src() WordPress function, we are getting the custom logo like its dimensions, URL etc. and we are saving these details to the $custom_logo_data variable.
Now, let’s var dump the $custom_logo_data variable to examine what wp_get_attachment_image_src() is returning.
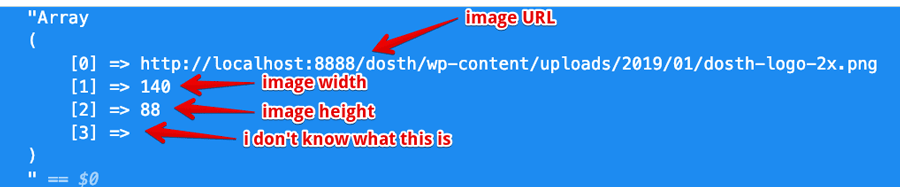
Ah! It is returning an array.
The first item inside the array is the image URL that we need. So remember this.
The second and third items are width and height values in pixels respectively. We can use these values to set the width and height attributes on the <img> tag. But we are not doing that.
Now let’s take a look at the wp_get_attachment_image_src() WordPress function more closely. We will be using this function quite a lot when we build the blog portion of the website.
For starters, It accepts three parameters.
1)The $image_id Parameter – integer
We must provide the ID of the image and it must be a numerical value.
So, In our case, we provided the $custom_logo_id variable as the first argument.
2) The $image_size Parameter – string or array
WordPress automatically generates various thumbnails sizes for every uploaded image. So, We need to specify the image size that we are interested in. If we don’t specify the image size, by default, WordPress gives us the image data for the thumbnail version of the actual uploaded image.
And here is the full list of the default image sizes that WordPress generates.
- small – smaller thumbnail with 100x100px
- thumbnail – 150x150px ( Square )
- medium – 300x300px (maximum width or height is 300px)
- large – larger thumbnail (maximum width or height is 1024px)
- full – the original image with the actual dimensions
When it comes to the logo, we need a high-quality one. So, it is a good idea to go for the full size. This is why in our case, we are providing a string with a value ‘full’. By providing the value ‘full’ we are telling WordPress that “Hey! I want the image data of the actual full image that I have uploaded.”
Now, instead of one of the images sizes mentioned above, we can also specify custom image dimensions in the form of an array. For example:
$custom_logo_data = wp_get_attachment_image_src( $custom_logo_id , array( 100, 50 ) );In the above example, we are instructing WordPress to return us the image by cropping it to 100x50px. We will be seeing this in practice when we build our blog’s archive pages.
3) The $icon Parameter – boolean (true or false)
Ah! It is not that important. I never really used it. This parameter is by default set to false. So, don’t worry about it :P
Step 3: Extract the URL from the custom logo Image data
$custom_logo_url = $custom_logo_data[0];From step 2, we know that the URL is inside the first item of the array returned by the wp_get_attachment_image_src() WordPress function.
So, we are just storing the value of the first item of the $custom_logo_data array inside the $custom_logo_url variable.
That’s it, we finally have the URL of the custom logo. Its time to put it to use.
Inside the IF Condition: Let’s sanitize and use the logo URL
<img src="<?php echo esc_url( $custom_logo_url ); ?>"
     alt="<?php echo esc_attr( get_bloginfo( 'name' ) ); ?>"/>
Let’s take a look at the src attribute and the esc_url() function
If you notice the src attribute in the above code, we are sanitizing the URL before echoing it to the browser. We are using the esc_url() WordPress function to sanitize the URL.
We can also directly echo the URL without sanitizing it. But, it is ideal to not trust any piece of data in the World of the Internet. Even if it is coming from your own site’s database. Who knows, your database could have been compromised by a Hacker.
So, before we output any data from the database to the browser, it is always a good idea to sanitize it.
“Woah! Stop! What is sanitization? Tell that first!”
Introduction to Data Sanitization in WordPress
Data Sanitization is just a security precaution. It is a process of escaping or removing potentially malicious content from the data if it exists. In the case of our URL, the esc_url() function checks if the URL is valid. If it is valid, it returns the URL as is. But, If it is not valid URL, it escapes and removes any malicious characters that shouldn’t be used inside a URL.
“I understand the removing part! But What the heck is escaping?”
Escaping just means turning invalid data into HTML entities so that they are harmless. For example, a hacker can put a script tag inside the URL and attempt a Cross Site Scripting ( XSS ) attack.
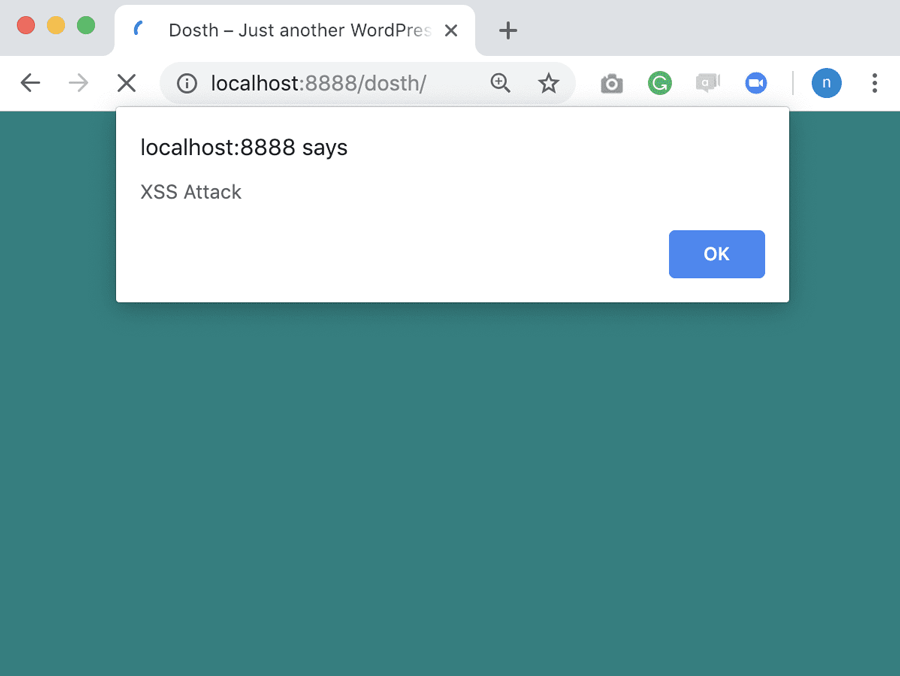
Common, let’s try out the following code. You can put this code anywhere inside the <body> element
$url = "https://www.usablewp.com/<script>alert('XSS Attack')</script>";
echo $url;
If we echo the above URL directly to the browser, It is basically an XSS attack and you’ll see the following alert in the browser:
Now let’s sanitize the above malicious URL using the esc_url() function like this:
$url = "https://www.usablewp.com/<script>alert('XSS Attack')</script>";
echo esc_url( $url );
And this is output you’ll see:
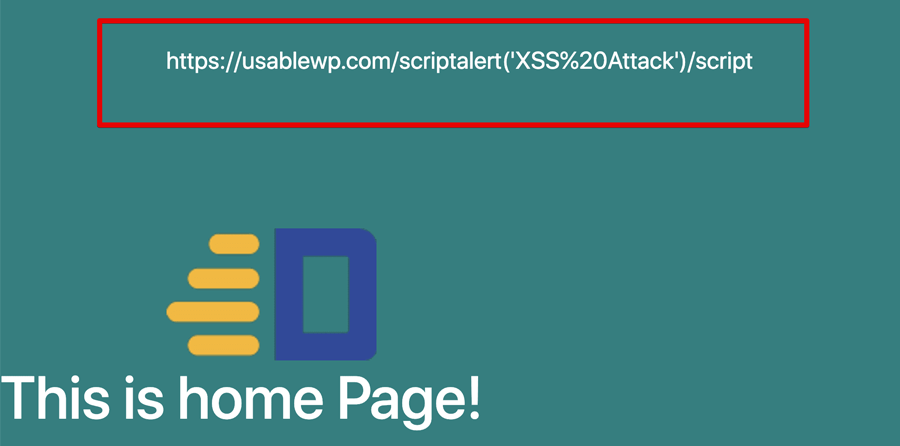
If you notice the above URL, the esc_url() function removed the less than( < ) and greater than( > ) symbols from the URL all together.
With those symbols missing, the browser fails to recognize the <script> tag and doesn’t execute it.
So, the humble user of our Website doesn’t see any browser alert window.
Also, Spaces doesn’t belong in a URL. So, esc_url() function turned the space into %20 HTML Entity. This is character escaping in action.
WordPress ships with tons of sanitization functions. We will be going through them when the time comes.
Let’s shift our focus to the alt attribute and the esc_attr() function
<img src="<?php echo esc_url( $custom_logo_url ); ?>"
     alt="<?php echo esc_attr( get_bloginfo( 'name' ) ); ?>"/>
We are sanitizing and echoing out the Site name inside the alt attribute using the esc_attr() and get_bloginfo() functions.
Just like URLs, We must sanitize any dynamic data before we echo it inside an HTML attribute and the esc_attr() function does just that.
“Hey! Why are you using the get_bloginfo() instead of the bloginfo()function?”
There is one important difference between the get_bloginfo() and the bloginfo()functions.
The bloginfo()function echoes out the data instead of returning it. Because this function is directly echoing the data, we can not sanitize or manipulate the data.
The get_bloginfo()function just returns the value instead of echoing it. Because this function returns the data, we can sanitize or manipulate the data to fit our needs.
So, in our case, we need to sanitize the Site title before echoing it. Hence, we are going with the get_bloginfo()function.
That’s all about the <img /> tag.
Inside the IF Condition: Linking the site logo to the Homepage
Let’s take a look at the href attribute and the home_url() function
<a href="<?php echo esc_url( home_url( '/' ) ); ?>"
   title="<?php echo esc_attr( get_bloginfo( 'name' ) ); ?>"
   rel="home"><img src="<?php echo esc_url( $custom_logo_url ); ?>"
        alt="<?php echo esc_attr( get_bloginfo( 'name' ) ); ?>"/>

</a>
It is a common pratice to link the site logo to the homepage of the website. The internet users accepted and got habituated to this practice as well.
So, we are wrapping the Logo inside a hyperlink that takes the user to the Homepage of the website.
We are getting the URL of the HomePage using the home_url()function and then sanitizing the URL using the esc_url()function.
By default, the home_url()function returns the Homepage URL without the trailing slash at the end of the URL. For example, if you are using MAMP, this is what you get:
http://localhost:8888/dosth
But, you can change this by using the parameters that the home_url()function accepts.
And this function accepts two parameters.
1)The $path Parameter – string
Using this parameter, we can attach any path relative to the Homepage URL.
In our case, We are using this parameter to just add the trailing slash ( / ) at the end of the URL.
http://localhost:8888/dosth/
<a href="<?php echo esc_url( home_url( '/' ) ); ?>">
2)The $scheme Parameter – string
The parameter deals with the Protocol of the URL. You can provide “http”, “https” and “relative” as values for this parameter.
Frankly speaking, We don’t use this parameter that often in our local development environment. So, I did not provide the parameter at all.
But this parameter becomes extremely useful if we are migrating our website to HTTPS from HTTP.
If we use HTTPS as the second parameter for the home_url()function like this:
<a href="<?php echo esc_url( home_url( '/', 'https' ) ); ?>">
This is the output we get:
https://localhost:8888/dosth/
Instead of
http://localhost:8888/dosth/
The title attribute
<a href="<?php echo esc_url( home_url( '/' ) ); ?>" title="<?php echo esc_attr( get_bloginfo( 'name' ) ); ?>"
   rel="home"><img src="<?php echo esc_url( $custom_logo_url ); ?>"
        alt="<?php echo esc_attr( get_bloginfo( 'name' ) ); ?>"/>

</a>
You already know what is happening with the title attribute. We are just printing the Site name inside it by sanitizing it.
And that is all you need to know about manually outputting the custom logo.
Here is the final fheader.php file for this lesson:
<?php
/**
 * The header for our theme.
 *
 * Displays all of the <head> section and everything up till <div id="content">
 *
 * @package Dosth
 */
?>
<!DOCTYPE html>
<html <?php language_attributes(); ?>>
    <head>
        <meta charset="<?php bloginfo( 'charset' ); ?>">
        <meta name="viewport" content="width=device-width, initial-scale=1">
        <link rel="profile" href="http://gmpg.org/xfn/11">
        <link rel="pingback" href="<?php bloginfo( 'pingback_url' ); ?>">

        <?php wp_head(); ?>
    </head>
    <body <?php body_class('no-js'); ?> id="site-container">
<header role="banner">
    <div class="container">
        <div class="row">
            <div class="col-sm-4">
                <div class="logo">
                    <?php if( has_custom_logo() ):  ?>
                        <?php
                            // Get Custom Logo URL
                            $custom_logo_id = get_theme_mod( 'custom_logo' );
                            $custom_logo_data = wp_get_attachment_image_src( $custom_logo_id , 'full' );
                            $custom_logo_url = $custom_logo_data[0];
                        ?>

                        <a href="<?php echo esc_url( home_url( '/', 'https' ) ); ?>"
                        title="<?php echo esc_attr( get_bloginfo( 'name' ) ); ?>"
                        rel="home">

                            <img src="<?php echo esc_url( $custom_logo_url ); ?>"
                                 alt="<?php echo esc_attr( get_bloginfo( 'name' ) ); ?>"/>

                        </a>
                    <?php else: ?>
                        <div class="site-name"><?php bloginfo( 'name' ); ?></div>
                    <?php endif; ?>
                </div>
            </div>
            <div class="col-sm-8">
                <nav class="primary-navigation">
                </nav>
            </div>
        </div>
    </div>
</header>
Now that we are done with the HTML markup of Site Logo, next, we will fix the styling of the Header.
Let’s style the header.
Open up the style.css file and remove everything from it except the comment with theme information. I made you add dummy styles just for the sake of testing the file. Real styles that goes inside the style.css file starts from this lesson.
This is my current style.css file after removing everything from it except the comment with theme information.
Now, add the following CSS to the style.css file.
/************************************************************
----------------------OUTLINE OF STYLES----------------------
1.General Styles
2.Header Styles
**************************************************************
*************************************************************/
body {
-webkit-animation: bugfix infinite 1s;
font-family: 'Lato',sans-serif;
font-size: 16px;
}
p {
line-height: 1.5;
font-size: 14px;
}
a,
a:visited {
text-decoration: none;
}
a:hover,
a:focus,
button:focus,
input[type="submit"]:focus,
input[type="search"]:focus {
text-decoration: none;
outline: 0;
}
ul,
ol {
margin: 0;
padding: 0;
}
ol {
list-style-type: decimal;
list-style-position: inside;
}
ul {
list-style: none;
}
label {
cursor: pointer;
}
img {
max-width: 100%;
}
.screen-reader-text {
position: absolute;
left: -9999px;
}
h1,
h2,
h3,
h4,
h5,
h6 {
font-weight: bold;
}
h1,
h1 a,
h2,
h2 a,
h3,
h3 a,
h4,
h4 a,
h5,
h5 a,
h6,
h6 a {
margin: 0;
}
h1 {
font-size: 24px;
}
h2 {
margin-bottom: 30px;
}
h2,
h2 a {
font-size: 30px;
}
h3 {
margin-bottom: 22px;
}
h3,
h3 a {
font-size: 20px;
}
h4,
h4 a {
font-size: 18px;
}
h5 {
font-size: 16px;
}
h6 {
font-size: 15px;
}
iframe {
width: 100%;
}
.fl {
float: left;
}
.fr {
float: right;
}
.seperator {
margin: 0 3px;
}
blockquote {
border-left: none;
margin-bottom: 10px;
}
.firstcharacter {
float: left;
font-size: 60px;
padding-top: 4px;
line-height: 56px;
padding-right: 20px;
}
.highlighter {
display: inline-block;
padding: 2px 6px;
color: #fff;
}
.highlighter.grey {
background-color: #5e666b;
}
.clearfix:after {
content: ".";
visibility: hidden;
display: block;
height: 0;
clear: both;
}
.parallax-image {
background-repeat: no-repeat;
background-position: center center;
background-attachment: fixed;
background-size: cover;
}
.box-shadow {
box-shadow: 2px 2px 0px 0px rgba(0, 0, 0, 0.75);
}
.box-shadow-negative {
box-shadow: -2px -2px 0px 0px rgba(0, 0, 0, 0.75);
}
button {
cursor: pointer;
}
/*-------------------------------------------------------------------------------
2.Header styles
-------------------------------------------------------------------------------*/
header[role="banner"]{
height: 92px;
border-bottom:1px solid #ccc;
}
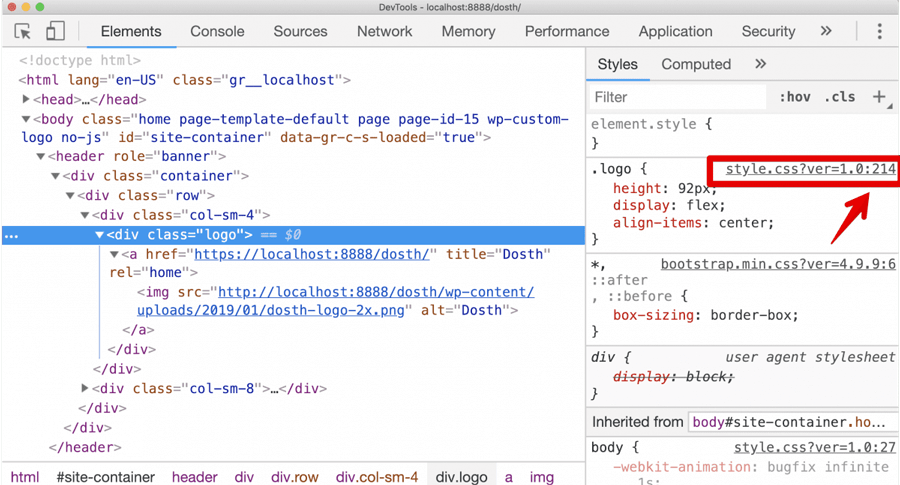
.logo{
height: 92px;
display: -webkit-box;
display: -ms-flexbox;
display: flex;
-webkit-box-align:center;
-ms-flex-align:center;
align-items:center;
}
.logo a {
font-size: 20px;
display: block;
}
.logo a img {
width: auto;
max-height: 43px;
border: 0;
}
If you are planning not to use pre-processors like SCSS or LESS, your style.css file can get pretty big. So, it is better to have a good outline of what’s inside the file. This is helpful for quickly jumping to a particular location of the file and adding a quick style.
On the other hand, we can also use chrome’s style inspector to precisely find out the line number of the style rule that you want to modify.
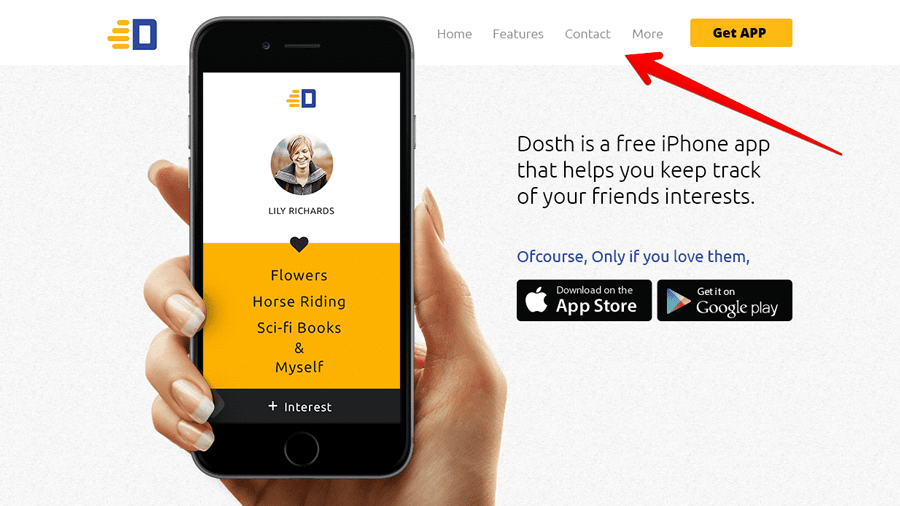
Anyway, if we visit back to the Homepage in the browser, the header portion is now looking much cleaner.

Our next stop is the creation of the Header navigation menu. But before we create our navigation menu, we must create pages, right?
“Yes!”
so, we will do exactly that in the next.
Let’s create some pages
Before we deal with the primary navigation of our website, we have to create pages so that we can add these pages to the primary navigation.
So, let’s create the pages with the following Titles.
- Features
- About
- Contact
- Get App
- Press Kit
When it comes to a real-world project, you don’t have to create pages at this stage of theme development.
But, in my case, I always create pages at the very early stages of the project and the reason behind it is simple.
As an Experienced Freelancer, It is totally my choice to accept a project based on its status and I always request my clients to only involve me once the design, pages and their content are finalized.
So, creating pages at the early stages works for me.
At the end of the day, WordPress is a CMS which allows its users to easily manage the site’s pages and content. So, we can always play around Pages panel.
Now we have everything to deal with the primary navigation of our site. So, next, we will create our first WordPress menu for the Header.
Creating a custom menu in WordPress
In the world of WordPress, we call the navigation menu in the above picture as a “Custom Menu”
Custom menus are also a theme feature.
So, creating and outputting a full-fledged custom menu is probably the easiest job while developing a WordPress website.
But before output anything, we must have a custom menu with items in it, right?
So, go to the Admin Dashboard -> Appearances -> Menus
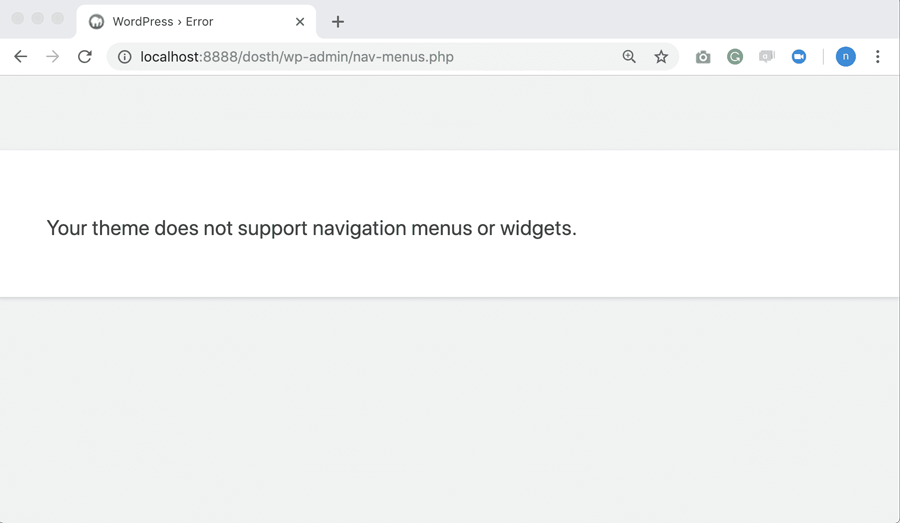
And Bang! WordPress threw an error.
It says that our theme doesn’t support navigation menus and widget. We will be dealing with the widgets a bit later. For now, let’s add theme support for menus.
So, open up the functions.php file and put the following code inside the nd_dosth_theme_setup action:
// Add Custom Menus support
add_theme_support( 'menus' );
Here is the final nd_dosth_theme_setup action after adding the above code.
function nd_dosth_theme_setup() {

    // Add <title> tag support
    add_theme_support( 'title-tag' );

    // Add custom-logo support
    add_theme_support( 'custom-logo' );

    // Add Custom Menus support
    add_theme_support( 'menus' );

}
add_action( 'after_setup_theme', 'nd_dosth_theme_setup');
Now, if we come back to the Admin Dashboard -> Appearances -> Menus panel, the error is gone and to our surprise, WordPress has already put all our site pages as menu items in the default menu.
If you don’t know how to add items to the menu, please read the following guide.
https://www.usablewp.com/create-a-menu-in-wordpress/
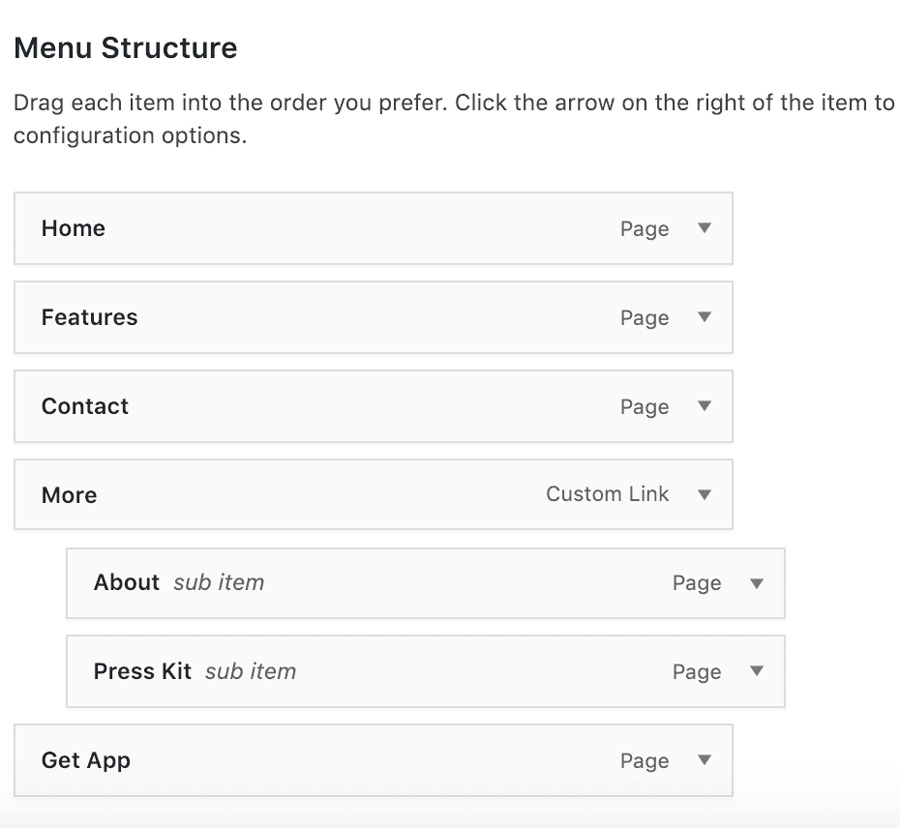
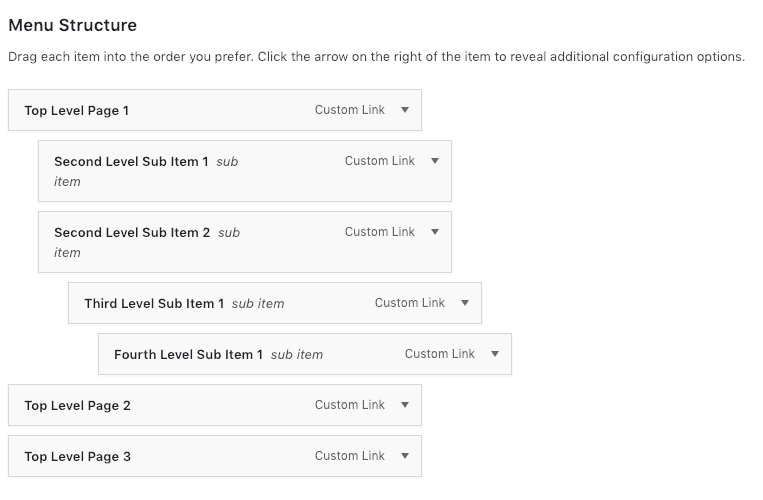
Here is the final Menu structure that we need to building. If you follow the above guide, you’ll build the same menu as seen in the below screenshot.
Next, let’s output this menu.
Understanding Display Locations: How to output a custom menu in WordPress
we created the custom “Header Menu” and if we want to output this menu to the browser using our theme, we have to register and use a Display Location inside our theme and then assign this menu to that Display Location.
“Woah! Stop! What is a Display Location?”
Ah Sorry! A Display Location is nothing but a place inside our theme where we put the code that outputs a custom menu to the browser.
“I did not get it!”
Sorry, My Bad. Generally speaking, If you see the placement of navigation menus on any website, you’ll find them in the following four places.
- Top bar
- Header
- Footer
- Beside page’s main content
And as a theme developer, we can control what elements go inside the above-mentioned sections of a webpage, right?
And, one of these elements is a navigation menu And it is also our responsibility to give more control to the client over the placement of the menus on a webpage.
So, what we should do is, we have to register multiple Display Locations in our inside our theme, and at these Display Locations we allow the clients to display whatever the custom menu they create.
In other words, by creating Display Locations for menus inside our theme, we are telling our clients that “Hey! This theme allows you to output a menu inside the header, footer, etc. “
And the client/Administrator of the site can find these Display Locations when they are creating the Menu.
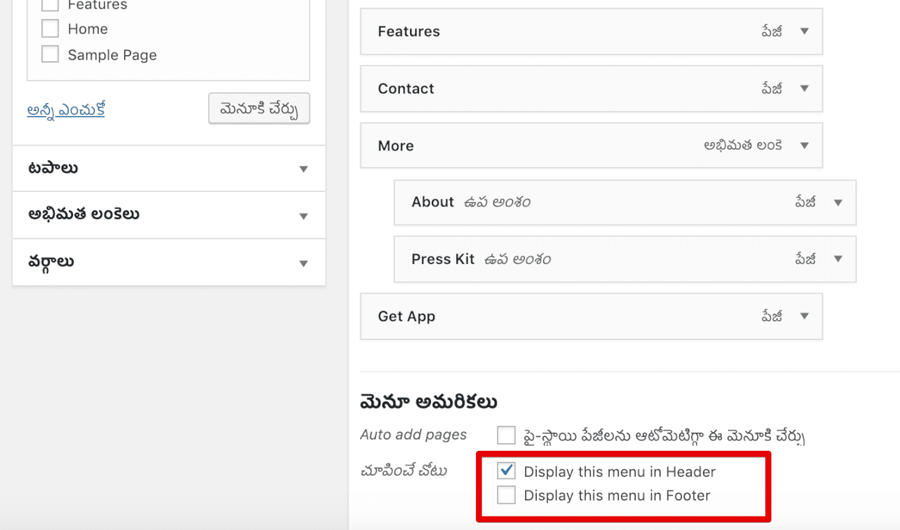
They can find this option under Menu Settings section which is located directly underneath the Menu Structure section of a particular custom menu.

If you observe the above screenshot, right now, there are no Display Locations to select because we did not register them inside our theme yet.
And if you take a look at our Homepage Design, you can see two navigation menus. One in the Header and one in the Footer.
So, we will start by registering two display Locations inside our theme.
Introducing the register_nav_menus() WordPress function
The register_nav_menus() WordPress function helps us to register multiple Display Locations at the same time.
It also enables theme support for custom menus. So you don’t have to use:
add_theme_support( 'menus' );So, open up the functions.php file and remove the above code from the nd_dosth_theme_setup action:
Next, we need to register two Display Locations.
So, put the following code inside the nd_dosth_theme_setup action:
// Register Display Locations
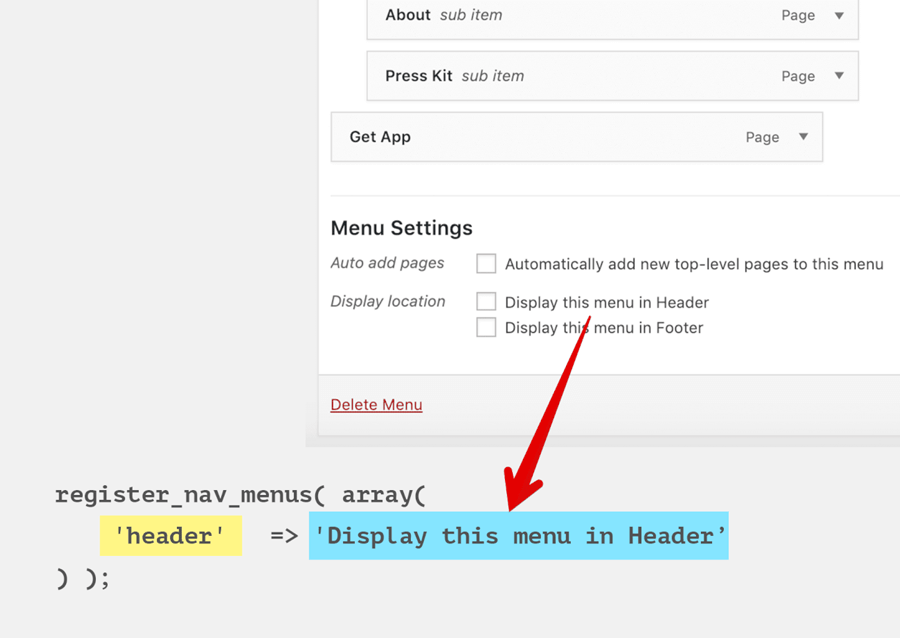
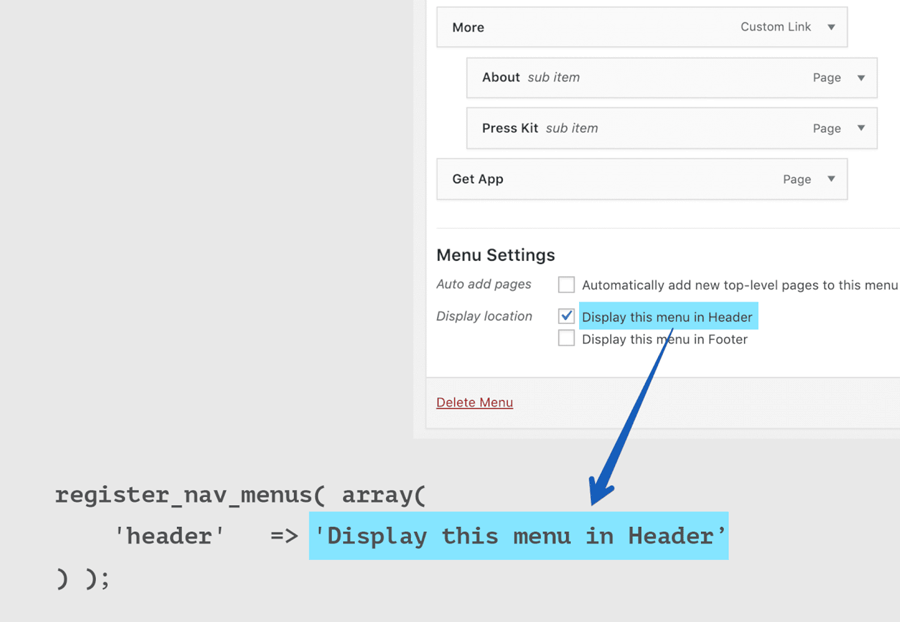
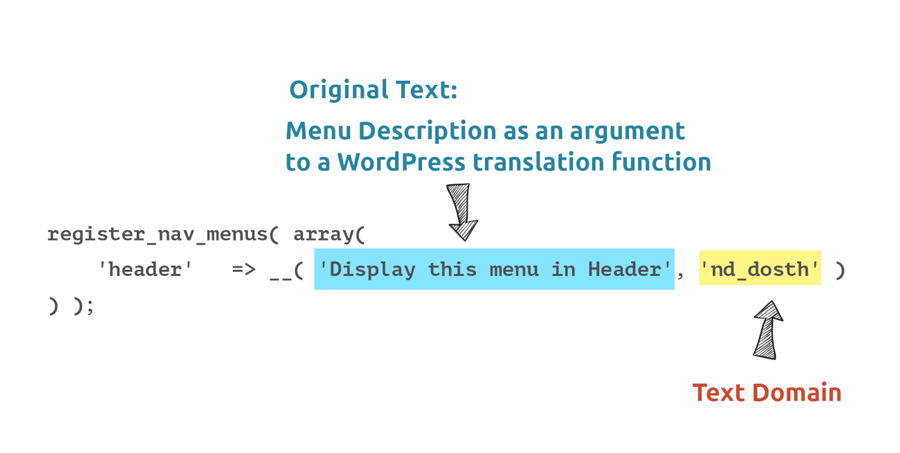
register_nav_menus( array(
'header' => 'Display this menu in header',
'footer' => 'Display this menu in footer',
) );Here is the final nd_dosth_theme_setup action after adding the above code.
function nd_dosth_theme_setup() {
// Add <title> tag support
add_theme_support( 'title-tag' );
// Add custom-logo support
add_theme_support( 'custom-logo' );
// Register Navigation Menus
register_nav_menus( array(
'header' => 'Display this menu in Header','footer' => 'Display this menu in Footer',
) );
}
add_action( 'after_setup_theme', 'nd_dosth_theme_setup');
Now, let’s break it down.
The register_nav_menus() function accepts an Associative array. Every item in this array will be registered as a theme’s Display Location. In our case, we are registering multiple Display Locations.
And, For each Display Location, we have to provide a self-descriptive Display Location ID as the key and a client-friendly description as the value to the key so that we can easily recognize and use them.
Both Display Location ID and Description must be a proper PHP string.
Now, just to confirm that WordPress is not throwing an error about the theme support for menus, Let’s go back to the Admin Dashboard -> Appearance -> Menus in the browser and check it out.
If you kept the Menus Panel in your browser tab opened, refresh it.
First of all, Pretty cool. No error.
And, to our surprise, we didn’t have to select the “Header Menu” manually. WordPress will automatically loaded this menu by default. This is because the “Header Menu” is the only menu we have created so far.
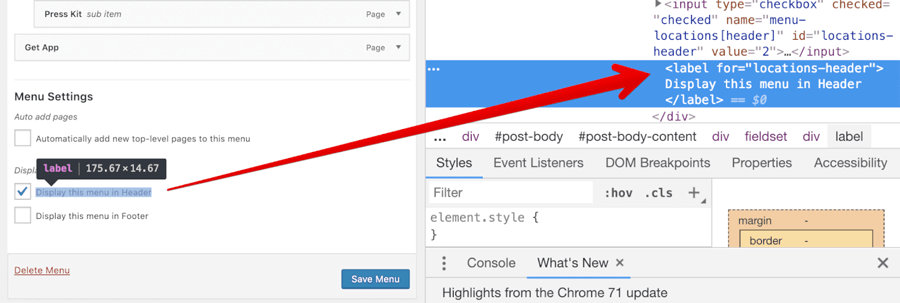
So, if you scroll down to the Menu Settings Section of the “Header Menu”, you’ll find our newly registered Display Locations as well.
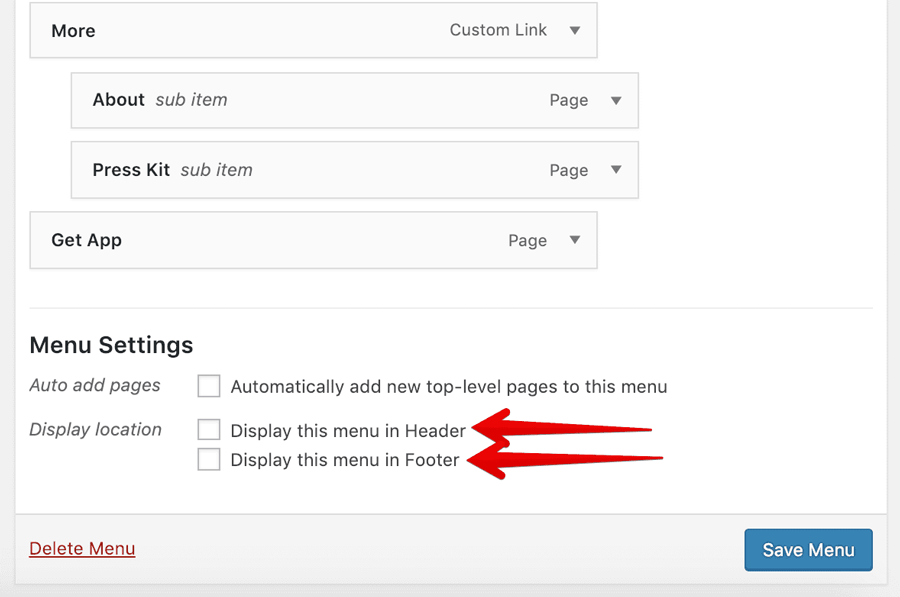
If you notice, WordPress is using the description of the Display Location instead of the ID.
This is why we have written a client-friendly description for Display Location.
So, where do you want to display this “Header Menu”?
“Now, you started asking stupid questions! According to the design, in the Header!”
Yes! So let’s go ahead and choose “Display this menu in Header” choice for Display Location option and save the menu.
“Hey! Is it possible to assign the “Header Menu” to multiple Display Locations?”
Of course, Yes. As long as a Display Location is not occupied by any other custom menu. And we have to deal with this pretty often.
Most of the designs I get have the same Navigation items inside Header and Footer portions of a webpage.
We are almost there!
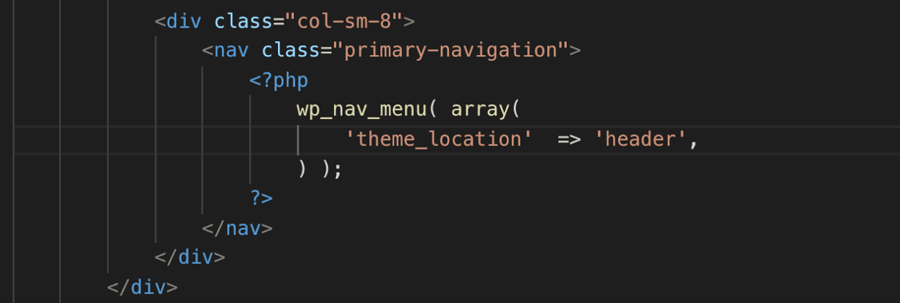
Assigning a custom menu to a registered Display location doesn’t really output the menu to the browser. We have to manually create a Display Location inside our theme’s template files.
The wp_nav_menu() WordPress function acts as a Display Location. It also takes the responsibility of outputting a custom menu to the browser.
So, open up the header.php file and put the following code inside the <nav> element with the class name “primary-navigation”:
<?php
    wp_nav_menu( array(
        'theme_location'  => 'header',
    ) );
?>
As usual, let’s break it down.
Again, Nothing much is going on in the above code.
The wp_nav_menu() function accepts a single associative array with a lot of arguments. But out of all, “theme_location” is the most important argument.
The “theme_location” argument accepts a Display Location ID that we have registered.
In our case, we have provided “header” as the Display Location ID and The wp_nav_menu() function outputs whatever the custom menu that is assigned to the “header” Display Location ID to the browser.
Here is how everything is linked:
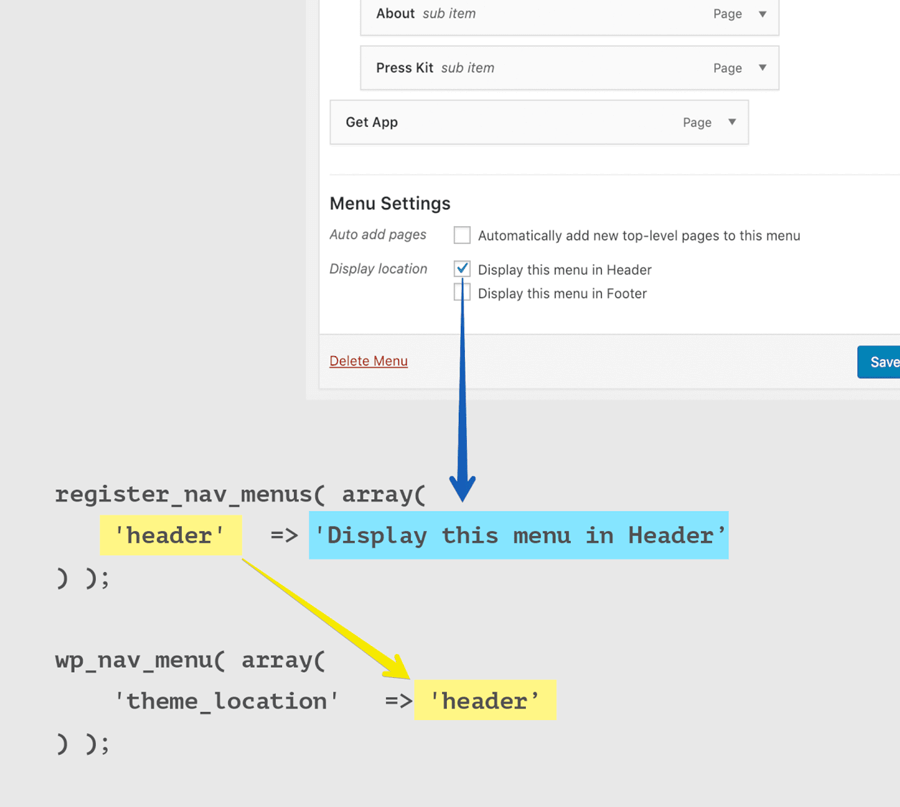
Makes Sense?
So, if everything works correctly, we must see the “header” navigation menu inside the header portion of the site. So, let’s switch back to the browser and visit the Homepage of our site.

And Bingo! We linked everything perfectly. All thanks to the powerful WordPress menu system.
“Hey! Everything is ok, but you only taught us how to use the”theme_location” argument. What about the others? are they completely useless? “
No. They are useful. Most of them deal with the customization of the HTML markup of the menu. I will quickly talk about three other arguments that I regularly use. These might come in handy for you too.
The ‘items_wrap’ Argument
Oh! we forgot to see what markup is getting generated for the navigation menu. Let’s take a look at it.

So, by default, WordPress is using an unordered list markup ( <ul></ul> ). And also there are tons of class names for every menu item.
This markup is totally fine. But what if we want to render our menu using the the ordered list markup ( <ol></ol> ) or perhaps just a basic <div> tag with a bunch of <a href='#'> tags?
The items_wrap argument allows us to do just that. But this argument is pretty limited to container level HTML elements.
What if you want more control over the markup?
The ‘walker’ Argument
You can change the entire structure of the of navigation menu with this argument. You can change every piece of it. How do you think the WordPress mega menus are built? Using this argument alone.
Now, practically explaining the above two arguments is out of scope for this book. So, I have written a multiple highly-detailed articles explaining these arguments individually.
The ‘depth’ Argument
This is better shown than explained.
This argument accepts numbers from 0 – 3 ( Ideally ) but some clients even want the fifth level sub-items.
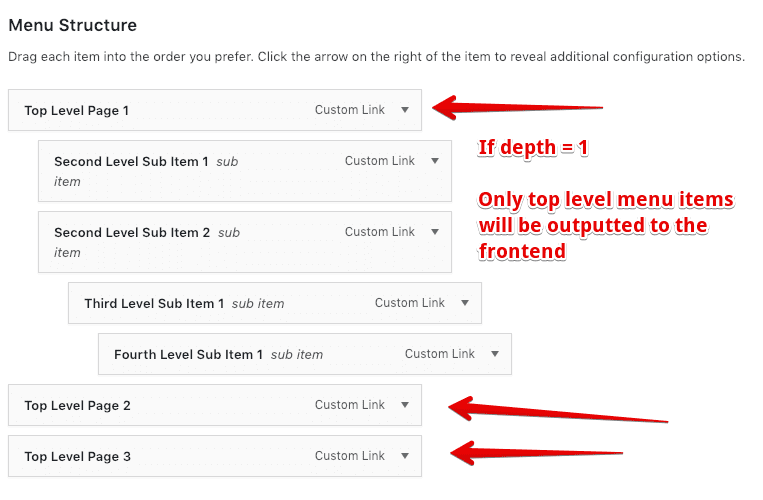
If we set this argument to a value of 0, all the levels of menu items that are present in the Menu structure will get outputted to the browser. Period.
If we set this argument to a value of 1, only the top-level menu items will get outputted to the browser.
If we set this argument to a value of 2, along with the top-level menu items, second level menu items will get outputted to the browser too. But not the third level and fourth level menu items.
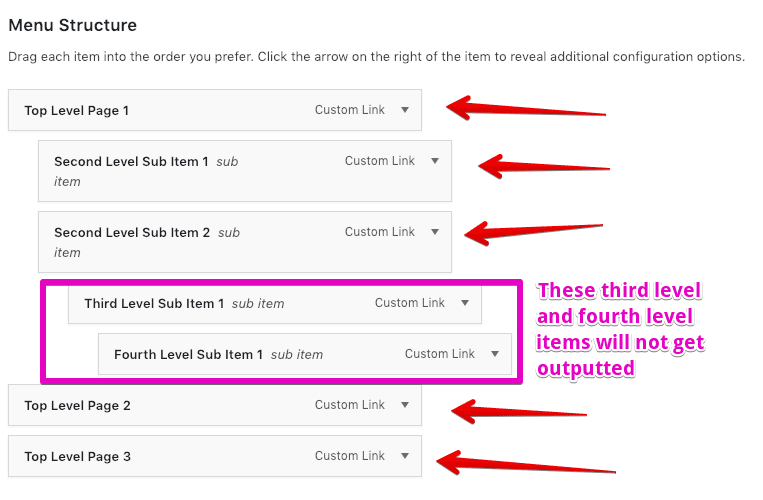
If we set this argument to a value of 3, WordPress will also output the third level menu items leaving behind the fourth level, if it exists. That’s all. You get the idea, right?
For more details about the other arguments, you can go to the function’s codex page.
https://developer.wordpress.org/reference/functions/wp_nav_menu/
Don’t worry, just play around them. If something goes wrong, just remove the problematic arguments from the array and keep it clean.
Next, We will make our first step towards making our theme “Translation Friendly”.
WordPress Internationalization: Making our WordPress theme translation ready
I made a mistake.
Our theme added a piece text to the “Menus” panel inside the Admin Dashboard.
“What’s the problem with that?”
Oh dear! It’s a very big problem. Let me show it.
To demonstrate the problem, I switched the language of our Dosth website to my native language, Telugu.
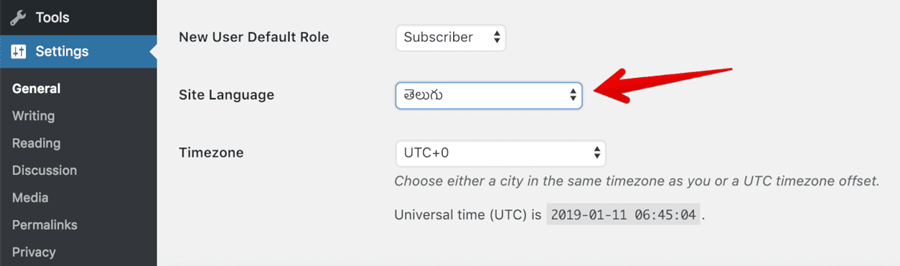
Then I went back to the Menus panel and this is how it looks like now:
Do you see the problem?
Every piece of text on the screen is now in the Telugu language except the text we added ourselves.
We created pages and added titles to them ourselves. WordPress did not translate them.
We added the “Display Location” description text ourselves inside our theme. Again, WordPress did not translate them.
And, WordPress did not magically translate our text because there is a tedious and specialized process involved in translating a piece of text added by us.
Forget about translating the text we added using the Admin Dashboard. For example, Page title, Page Content, Categories, etc. Translating a Page’s content is entirely a different process from translating the text in a theme and it is out of the scope of this course.
But, as a theme developer, let’s discuss the process of translating the general text inside a theme.
It takes Four steps to translate.
Step 1) Making our theme translation ready (Internationalization)
We make a theme translation readyby wrapping our theme’s general client readable text inside WordPress Translation functions.
For example, instead of typing the client readable text like this:
echo 'Display this menu in Header';
We wrap the text inside a WordPress Translation Function like this:
_e('Display this menu in Header','unique_theme_id');
That’s all it takes to make our theme’s text translation ready. It is not at all complicated process.
This entire process of making a theme ( or plugin ) translation ready is called Internationalization or i18n for short.
So, next time, whenever you read or hear the word Internationalization or i18n, remember that it is just a process of making our theme/plugin translation ready. That’s all.
Speaking of terminology, WordPress Translation functions are also called “gettext” functions.
Step 2) Extracting the translatable text from our theme
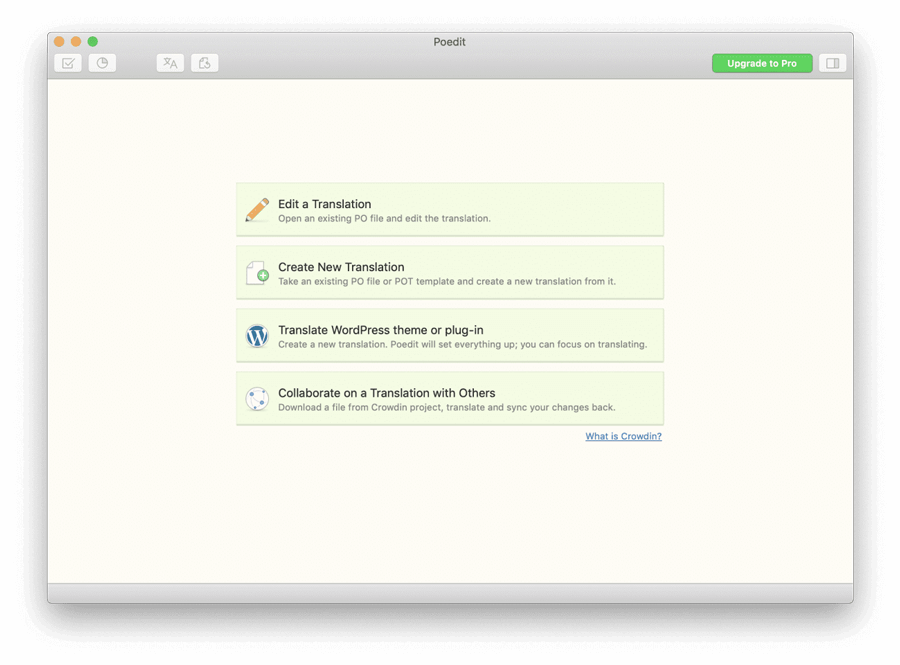
Once we make our theme translation ready, we have to extract the translatable text inside our theme into a POT ( Portable Objects Template ) file. This can be done using the infamous poedit tool.
Next, this POT file is sent to the translators.
Step 3) Doing the Actual Translation (Localization)
Once the translators receive this POT file, they will use a tool like poedit to adapt our theme’s original text for regional or local consumption.
Now, there are two types of translation.
1) Literal Word to Word Translation: I also call this “Crappy Translation”. In this type of translation, words are simply substituted from one language to another with some basic context. That’s all. No proper sentence formation and no proper grammar.
2) Localization or L10n: I also call this “Heartful Translation”. It is more about adaptation instead of simply substituting the words. In this type of translation, translators take a specialized approach so that the local language translation hits the target local language readers with the right feels and the emotion.
To achieve this nativity, translators often need to modify the original text to match the grammar and the sentence constructs of the local language. They also take local cultural preferences into account.
Back to the process of translation, Once the translators are done with the translation, be it localization or literally word-to-word, they provide us back the PO ( Portable Object ) file. It is just a text file that contains the original texts from our theme and their translations.
Now, if our site is getting translated into multiple languages, we will receive multiple PO Files from the translators. Not just one.
Finally, These PO files is compiled into their respective MO( Machine Object ) files.
“Woah! What is an MO file?“
An MO file contains the exact same contents as a PO file. The only difference is that:
- A PO file is a human-readable file
- An MO file is not for humans. It is for computers. Computers can read an MO file faster when compared to a PO file.
Step 4) Place the MO File inside our theme
Once we have access to the MO File of a local language, we have to place this inside our theme, preferably inside a directory of its own. Theme/Plugin developers generally names this directory as “languages”.
Finally, we have to tell WordPress where this MO File is located inside our theme.
That’s all. WordPress and the Web server will take care of the rest for us.
Don’t worry, You don’t have to take care of the actual translation (Localization)
Generally speaking, as a theme developer, you don’t really have to translate your theme into other languages unless you have time and proficiency in other languages. Also, You don’t really get time to do the translation yourself. People hire you to get their WordPress Website done. Not to do the translation. Similarly, if the client wants to get the translation done, he/she will hire someone else who does the translation for their living.
So, Translation is something that we don’t perform that often as developers.
But we have to make our theme translation ready. No exceptions for this.
Get it?
“Yep! But I have three questions”
Shoot!
“Do we have to translate programmatic PHP IDs and HTML markup too?”
No. We only translate general text that would be read by a normal user of our website. For example, clients, administrators and our website visitors.
PHP IDs, HTML markup like classes, attributes are the things we feed to the browser or a server. Normal users can not see them unless they view the page source, right?
So, No!
“Alright! I understand that we have to make our theme translation ready. I will do it if I am developing a multi-language website. But, what if I am developing a single language website? Most of the websites only support a single language, right? “
How can you be so sure that your client only wants to provide his/her website in a single language? The client can change the requirement of the website at any time. This is because there is no way we can judge the future readers of a website. Not even the client.
Also, it doesn’t hurt to develop your theme in a future proof way, right? Trust me, it is really easy to make a theme translation ready. You’ll see that in a moment. You won’t believe how easy it is.
“Whatever! I am convinced. How do we make our theme translation ready( Internationalize )?”
Simple, First of all, Inside our theme, we need to wrap every custom text inside a WordPress translation function.
A) What does exactly a WordPress Translation function do?
A Translation function either echoes or returns the translated version of the original text.
If the translated version is not available or if the theme is not even translated in the first place, the translated function either echoes or returns the Original text we fed it. That’s all.
That’s pretty much what a translation function does. No other responsibilities.
Translation functions are basically divided into two categories.
A.1) Introducing the __() translation function and its family
The __() WordPress translation function just retrieves the translated text for use at a later point in WordPress execution but doesn’t echo the text. It is totally up to us however we want to use it. We usually provide this retrieved text as a value to a function’s argument so that WordPress will echo it at some appropriate location. The Display Location description we saw above is the best example. Every time we want to echo some general descriptive text inside the Admin Dashboard, we have to use this function or its family.
The usage of __() function
Let’s use this function to fix the mistake I made in the last lesson.
Open up the functions.php file and replace the following code:
register_nav_menus( array(
    'header'   = 'Display this menu in Header',
    'footer'   = 'Display this menu in Footer'
) );
With the below code:
register_nav_menus( array(
    'header'   => __( 'Display this menu in Header', 'nd_dosth' ),
    'footer'   => __( 'Display this menu in Footer', 'nd_dosth')
) );
Not only the __() function, but all the WordPress translation functions accept at least two parameters for sure. The Original text and the Text Domain.
The purpose of the WordPress Text Domain
For people who translate, The Text Domain is a unique ID that tells them the origin of a text that needs to be translated. Simply put, it answers the following questions:
- Where is this text coming from? Is it From a theme? If so, Which theme?
- Or, is it From a plugin? If so, Which plugin?
- Or is it from the WordPress core itself?
Also, we must use a single Text Domain for our entire theme or plugin. And to avoid any conflicts with other themes and plugins the Text Domain must be unique.
So, in our case, I provided nd_dosth as the text domain and It is a unique ID for our theme and chances of getting the conflict with other themes and plugins is pretty rare.
“Hey! How can you be so sure that our theme text domain is unique?”
I mean what are the odds of the client installing a theme or plugin which uses the same Text Domain as our theme?
“Pretty much rare!”
Correct!
That’s all you need to know about the text domain.
Introducing the family of __() function for who cares about the security
If you think from the security perspective, all the translated text that the translators are providing is an untrusted data, right?
What if the translator is a disguised malicious hacker?
So, it is always a good idea to sanitize the text that we receive from the translators.
And the friends of __() function will help us achieve just that. They does whatever the __() function does. But they add a security layer on top it.
Let’s take a look at the couple of them
- The
esc_html__()translationfunction returns the translated text by escaping out any malicious HTML if present. - The
esc_attr__()translationfunction returns the translated text that is suitable to be outputted as an HTML attribute value.
There are more, but these are the most widely used secured translation functions.
Anyway, let’s put these to use.
If you remember, WordPress is outputting the Display Location description text inside the Menus panel. And it is being outputted inside the label.
This tells us that we have to use esc_html__() translationfunction for this text.
So, Switch back to the functions.php file and replace the following code:
register_nav_menus( array(
    'header'   => __( 'Display this menu in Header', 'nd_dosth' ),
    'footer'   => __( 'Display this menu in Footer', 'nd_dosth')
) );
With the below code:
register_nav_menus( array(
     'header'   => esc_html__( 'Display this menu in Header', 'nd_dosth' ),
     'footer'   => esc_html__( 'Display this menu in Footer', 'nd_dosth')
 ) );
In the above code, we replaced the __() function with the esc_html__() function. That’s all. We did not touch anything else.
Now, we can happily sleep during the nights.
A.2) Introducing the _e() translation function and its family
There is only one difference between the _e() and __()WordPress translation functions.
The _e() WordPress translation function retrieves the translated text and echoes it instead of returning it.
This is the only difference. The usage and everything else is the same for this family of translation functions too.
The usage of _e() function
If we are echoing some readable text to the front-end visitor, we shouldn’t use the following basic echo statement any more.
echo 'Read More';Instead, We should echo using the _e() function, for example:
_e( 'Read More', 'text-domain' );Introducing the family of _e() function for who cares about the security
Let’s take a look at the couple of them
- The
esc_html_e()translationfunction echoes the translated text by escaping out any malicious HTML if present. - The
esc_attr_e()translationfunction echoes the translated text that is suitable to be outputted as an HTML attribute value.
We will put these translation functions to use when we build our blog. When we build our blog, we need to echo some important text to the frontend using our theme.
B) Again, Our Job is only half done!
We are using the WordPress translation functions to retrieve the translated text for the user readable text. Great!
If at all our theme is translated into other local languages, How do these translation functions retrieve the translated text in the first place?
They are not going to do this automatically. We have to load the translated files before the translation functions try to retrieve the translated text.
And, the load_theme_textdomain() WordPress function allows us to do just that.
We already learned that all the translated text is stored inside a language-specific MO file inside our theme. And we can load all the translated Mo files using the load_theme_textdomain() function.
This function loads the translated files if they exist and returns a boolean true to tell us it has successfully loaded the translation files. On the opposite side, It returns false if our theme is not translated. So, it doesn’t throw any errors if our theme is not translated.
Important Realization: It is important that you must still call the load_theme_textdomain() function even if your theme is not translated. We are making our theme translation ready no matter what. It is the only way that our theme is future proof.
Also, We have to load these translated files as soon as WordPress is done with the theme setup. So, we need to call this function from within an action that we hooked to the after_theme_setup action hook.
So go back to the functions.php file and put the following code at the beginning of the nd_dosth_theme_setup action:
/*
 * Make theme available for translation.
 * Translations can be filed in the /languages/ directory.
 */
load_theme_textdomain( 'nd_dosth', get_stylesheet_directory() . '/languages' );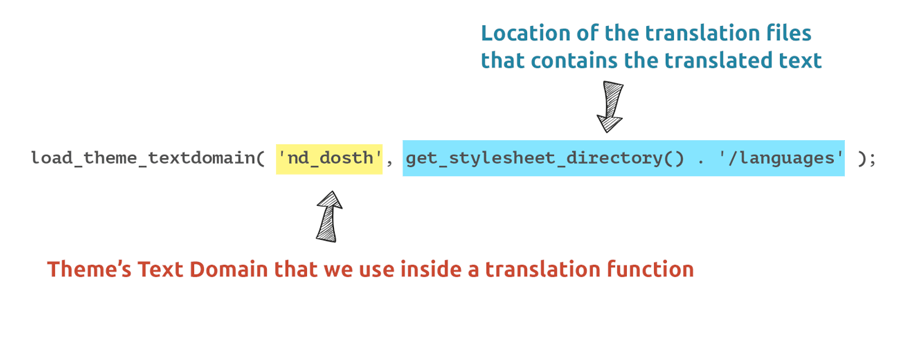
This function accepts two parameters.
- Text Domain of the theme.
- Location of the language-specific translation files that contains the translated text.
In our case, we are telling WordPress that “Hey! our theme’s Text Domain is ‘nd_dosth’ and the theme related translation files would be located inside the ‘language’ directory located at the root level of the theme itself. So, use these pieces of information to correctly load the translation files if they exist! “
Here is the final nd_dosth_theme_setup action after adding the above code:
<?php
function nd_dosth_theme_setup() {

 /*
  * Make theme available for translation.
  * Translations can be filed in the /languages/ directory.
  */
  load_theme_textdomain( 'nd_dosth', get_stylesheet_directory() . '/languages' );

  // Add <title>: tag support
  add_theme_support( 'title-tag' );

  // Add custom-logo support
  add_theme_support( 'custom-logo' );

  // Register Navigation Menus
  register_nav_menus( array(
   'header' => esc_html__( 'Display this menu in Header', 'nd_dosth' ),
   'footer' => esc_html__( 'Display this menu in Footer', 'nd_dosth')
  ) );
}
add_action( 'after_setup_theme', 'nd_dosth_theme_setup');
C) Create the “languages” directory and once you think that the theme development is complete, generate the PO file.
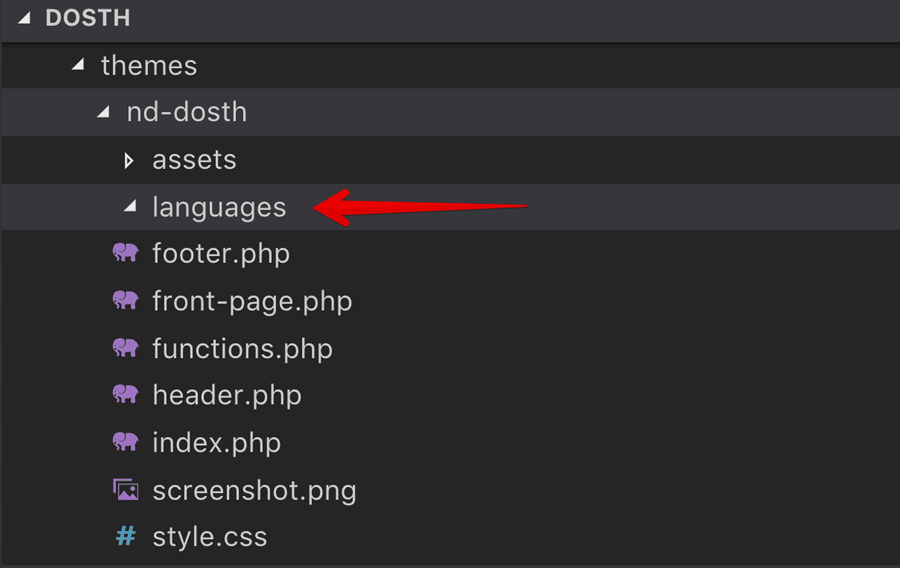
In the previous step, We told WordPress that the theme related translation files would be located inside the languages directory. But we did not create this directory yet! So let’s create it at the root level of the nd_dosth theme.
Here is our theme’s updated directory structure for this lesson:
Now, we shouldn’t generate the PO file yet! We are at the early stage of theme development. And we can’t keep generating the PO file every time we add some general text.
So, it is a better idea to generate this file only when the client asks you. And for the purposes of this course, we will conclude our course by generating this very file.
That’s it. That’s all we need to do to make our theme translation ready.
Remember that making our theme translation ready is a continuous journey. It only ends if the project is dead. So, what we have seen in this lesson is just the tip of the iceberg.
We just made our baby steps into the world of WordPress translation concepts.
Next, we will style our header navigation and implement the menu dropdown functionality using the Superfish Javascript plugin.
How to style the WordPress menu
We did not style our header navigation yet! Right now, it looks like this:
And if we take a look at the underlying markup, it looks like this:
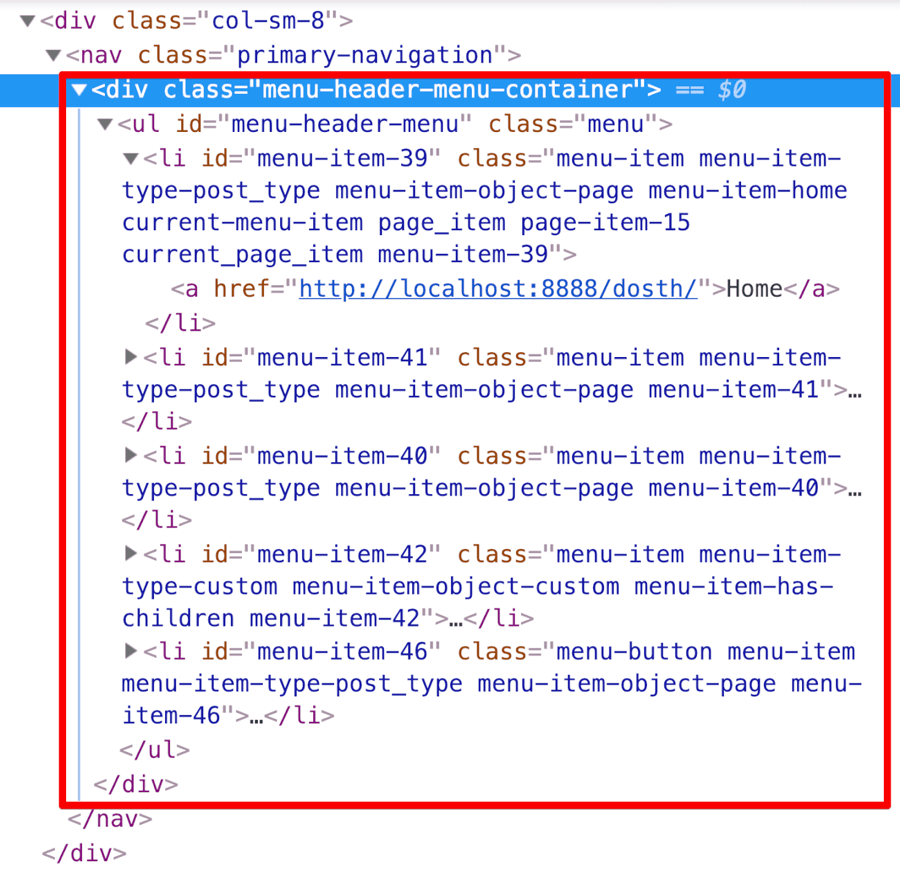
If you notice, it is a pretty standard navigation menu markup. And you can style it any way you want. You don’t need to style it in a special way just because WordPress is generating it.
So, let’s style our header menu by adding the following CSS to the style.css file.
/*-------------------------------------------------------------------------------
  4.Common Menu Styles
-------------------------------------------------------------------------------*/
.menu li {
    position: relative;
}
.menu li:hover > ul, .menu li.sfHover > ul {
    display: block;
}
.menu li:hover > a, .menu li a:focus {
    color: #fdb813;
}
.menu li ul {
    position: absolute;
    display: none;
    top: 100%;
    z-index: 1000;
    width: 150px;
    left: 1px;
    background-color: #f3f3f3;
}
.menu li ul a {
    display: block;
    text-transform: capitalize;
    border-width: 1px;
    line-height: 32px;
    font-size: 0.875em;
    color: #222;
}
.menu li ul a:hover, .menu li ul a:focus {
    background-color: #dadada;
    color: #222;
}
.menu li ul ul {
    left: 100%;
}
.menu li ul li {
    text-align: left;
}
.menu li ul li:last-child a {
    border-bottom: 0;
}
.menu a {
    display: block;
    padding-left: 10px;
    padding-right: 10px;
    color:#878787;
}
.menu > li {
    display: block;
    float: left;
}
.menu > li:last-child {
    margin-right: 0;
}
.menu > li > a {
    -moz-transition: 0.3s all;
    -webkit-transition: 0.3s all;
    transition: 0.3s all;
}
.menu-button{
    height: 92px;
}
.menu-button a{
    line-height: 38px;
    border-radius:4px;
    padding:0 20px;
    background-color:#fdb813;
    color: black;
    font-weight: bold;
    font-size:16px;
    margin-left:10px;
    position: relative;
    top: 50%;
    -webkit-transform: translateY(-50%);
    -moz-transform: translateY(-50%);
    transform: translateY(-50%);
}
.menu-button a:hover, .menu-button a:focus{
    background-color:#6e551a;
    color:white;
}
/*-------------------------------------------------------------------------------
  5.Header Menu Styles
-------------------------------------------------------------------------------*/
.primary-navigation{
    height: 92px;
    display:-webkit-box;
    display:-ms-flexbox;
    display:flex;
    -webkit-box-pack: end;
        -ms-flex-pack: end;
            justify-content: flex-end;
    -webkit-box-align: center;
        -ms-flex-align: center;
            align-items: center;
}
.primary-navigation .menu > li:not(.menu-button) >  a{
    line-height: 92px;
}
.current-menu-item a{
    color: #fdb813;
}
After adding the above CSS, here is how our header looks in the browser.
There is one more thing we need to take care of.
We have to indicate our website visitors which page on the website they are currently on.
A common technique we use to solve this problem is styling the current page’s menu link a bit differently from others.
Styling the current page link in the header menu
Styling the current page link is a very big problem when we build websites using plain HTML / CSS. It is tedious. But with WordPress, it is a piece of cake. WordPress adds some special classes to the custom menu markup so that we can easily achieve this.
We are currently on the home page. so let’s style the Home menu link a bit differently.
Once again, let’s take a peek into the markup of the Home menu link.
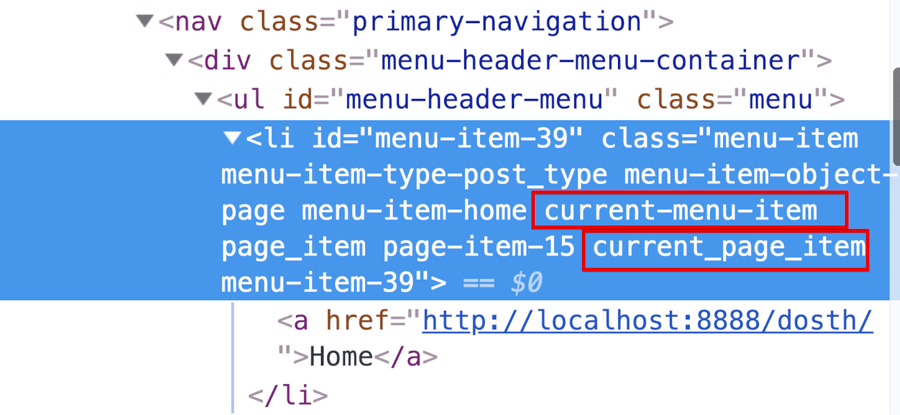
if you notice, WordPress added two special classes indicating that the Home menu link is the current page.
- The current-menu-item class
- The current_page_item class
To get our job done, we can add the same style to both the above classes, but that is unnecessary. The current_page_item class is generated only when the user visits a page.
This class doesn’t show up if we are on a category archive. tn the other hand, The current-menu-item class is a generic class which covers any current menu link, not just pages.
So, let’s style the current menu link by adding styles to the current-menu-item class. Put the following CSS code inside the the style.css file.
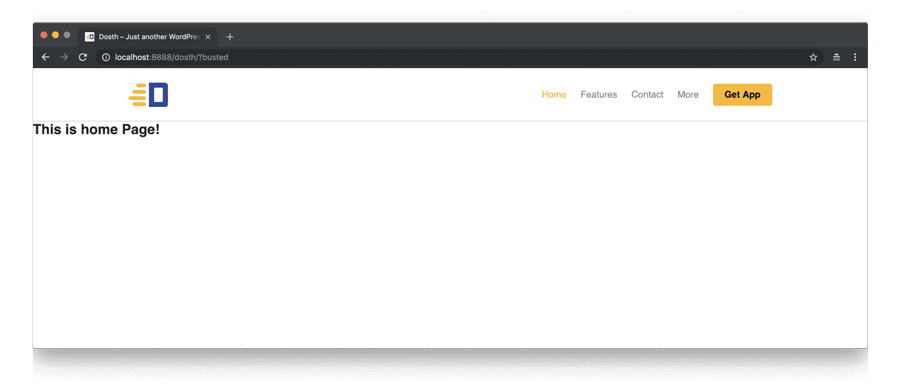
.current-menu-item a{
   color: #fdb813;
}
Now, if we switch back to the Home page in the browser and refresh it, Our current menu link is now styled in yellow!
WordPress saves us a lot of time, isn’t it?
Now, let’s take care of the dropdown links. If you remember, we tucked some pages inside the “More” link.
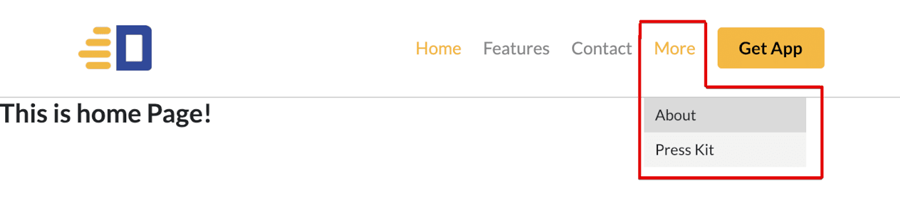
Since we can not totally depend on Javascript to display dropdowns, as a fallback, we have implemented a CSS based dropdown. This is the reason why the dropdown menu is working if you put your cursor on the More link.
CSS based dropdown is great, but it is not accessible for people with disabilities. For example, try to access the “More” dropdown by using your keyboard.
You can not!
This is where the Superfish Javascript plugin comes in. It allows us to create accessible dropdown menus. So go ahead and visit https://superfish.joelbirch.co/and download the latest superfish zip file. Extract it so that you can copy the necessary files to our theme.
copy the superfish.cssfile to the assets/css directory.
Then, copy the superfish.min.jsfile to the assets/js directory.
Also, copy the bootstrap.min.jsfile to the assets/js directory.
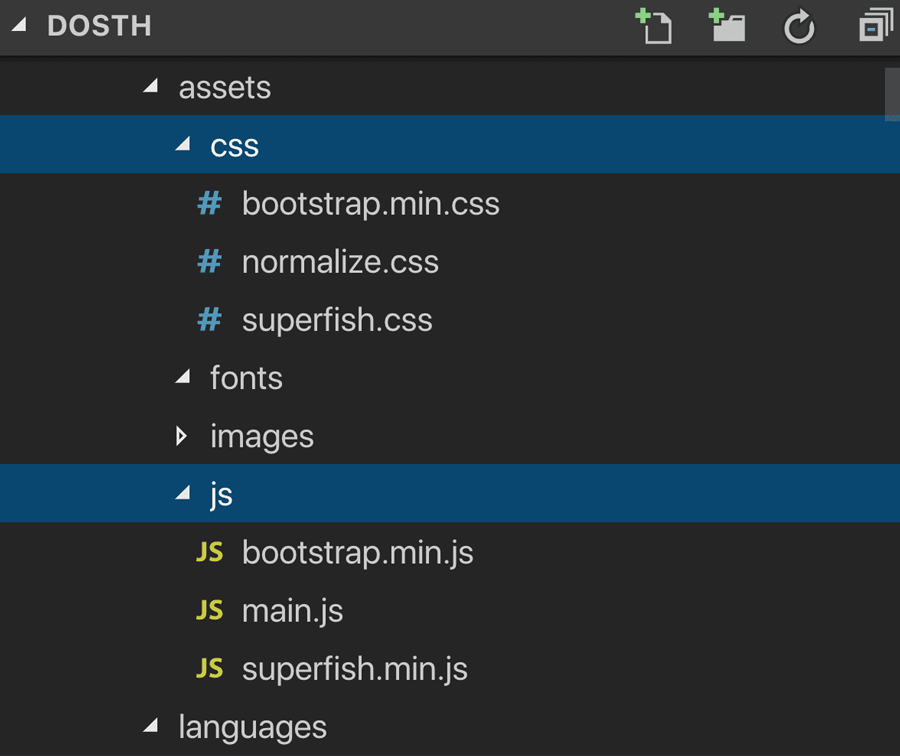
And here is the updated version of the assets directory inside visual code editor.
Now that we have everything set up, go ahead and enqueue the superfish.cssfile and superfish.min.jsfile.
You already know how to enqueue both scripts and stylesheets. So, here is the updated nd_dosth_enqueue_stylesaction from the functions.phpfile.
<?php
function nd_dosth_enqueue_styles() {
    wp_enqueue_style(
        'normalize',
        get_stylesheet_directory_uri() . '/assets/css/normalize.css',
        array(),
        false,
        'all'
    );
    wp_enqueue_style(
        'bootstrap',
        get_stylesheet_directory_uri() . '/assets/css/bootstrap.min.css',
        array(),
        false,
        'all'
    );
    wp_enqueue_style(
        'superfish',
        get_stylesheet_directory_uri() . '/assets/css/superfish.css',
        array(),
        false,
        'all'
    );
    wp_enqueue_style(
        'main-stylesheet',
        get_stylesheet_uri(),
        array('normalize', 'bootstrap'),
        "2.0",
        'all'
    );
}
add_action( 'wp_enqueue_scripts', 'nd_dosth_enqueue_styles' );
The Superfish stylesheet is a third-party stylesheet, so I enqueued it just before our main stylesheet. Also, if you notice, I did not update the dependencies array of our main stylesheet. This is another neat technique for controlling the enqueue order. Since we are calling the Superfish plugin’s enqueue function just before the main stylesheet’s enqueue function, WordPress enqueues the Superfish stylesheet just before the main-stylesheet.
And, here is the updated nd_dosth_enqueue_scriptsaction from the functions.phpfile.
function nd_dosth_enqueue_scripts() {
    wp_enqueue_script(
        'superfish',
        get_stylesheet_directory_uri() . '/assets/js/superfish.min.js',
        array('jquery'),
        '1.0.0',
        true
    );
    wp_enqueue_script(
        'main-js',
        get_stylesheet_directory_uri() . '/assets/js/main.js',
        array('jquery'),
        '1.0.0',
        true
    );
}
add_action( 'wp_enqueue_scripts', 'nd_dosth_enqueue_scripts' );
The same enqueue order technique is being applied here too. Both our main script and the Superfish plugin depends on the jQuery plugin, so I added jQuery as a dependency to the Superfish plugin as well. And because we are calling the Superfish plugin’s enqueue function before the main script’s enqueue function, WordPress enqueues the Superfish plugin just before the main script.
Now that we have enqueued the Superfish script and the stylesheet, let’s initialize it inside our main.jsfile.
Open up the main.jsfile and put the following code init:
(function($){
   /* If this line runs, it means Javascript is enabled in the browser
    * so replace no-js class with js for the body tag
    */
   document.body.className = document.body.className.replace("no-js","js");


  /* -----------------------------------------------------------------*/
  /* Activate accessible superfish
  /* -----------------------------------------------------------------*/
  $('.primary-navigation').find('.menu').superfish({
      smoothHeight : true,
      delay : 600,
      animation : {
         opacity :'show',
         height  :'show'
      },
      speed : 'fast',
      autoArrows : false
  });

})(jQuery);
Let’s break it down.
First of all, we are replacing the “no-js” class with “js” class on the <body> tag. If you remember, we added the “no-js” class using the body_class() function call in the “Introducing the body_class() template tag function” lesson.
Next, we are initializing the Superfish plugin. And this is pretty much how we use any third-party javascript plugin inside our WordPress theme. Nothing special.
Now if you try to access the dropdown menu of “More” menu link using a keyboard, you can access it with ease.
And with this, we are done with the desktop version of the header.
We’ll deal with the mobile responsive menu once we are done with the footer of our site.
So, next, we will see what it takes to build a footer of a WordPress website.


 © 2026 UsableWP. A project by Naresh Devineni.
Amazing tutorial, infact not just a tutorial, Its a whole book written about Wp Theme Development,, One of the best info about WP theme development.
I wish you had made tutorialls about Woocommerce theme Development