WordPress Theme Development: Search page, 404 error template, Custom Queries, and custom post types
This is Part 8 of the 9 part Course about developing a WordPress theme from scratch.
Here is the access to the other parts of the Course in the sequential order:
- Developing a WordPress Theme From Scratch
- WordPress Theme Development: The best way to enqueue scripts and styles
- WordPress Theme Development: Creating the header and making our theme translation ready
- WordPress Theme Development: Site footer with social navigation, dynamic copyright statement
- WordPress Theme Development: The Loop, the main content, Google Fonts, and the Custom Fields
- Building a WordPress Theme From Scratch: Internal Pages
- WordPress Theme Development: Building the Blog
- WordPress Theme Development: Search page, 404 error template, Custom Queries, and custom post types (Current Part)
- WordPress Theme Development: WordPress Customizer and it’s API
WordPress theme development is not complete without custom queries, creating template files for search and 404 pages. In this part, we will learn to do just that.
First, let’s learn about how to implement custom search form.
WordPress Theme Development: Introducing the search.php for rendering search results
We have dealt with the search form while building the sidebar of the blog.
Be it a custom search form or widget based search form, if you search for something, WordPress will first look for search.php file at the root level of the theme directory.
Because we did not create this file yet, WordPress is currently using the index.php file to render the search results.
Again, if you want to use index.php file for search results too, nobody is stopping you!
All you have to do is add another ELSEIF Condition like this at the top of the index.php file to tell the visitor that they looking at the search results page.
<?php if ( is_home() ) : ?>
    <h1 class="page-title"><?php single_post_title(); ?></h1>
<?php elseif( is_search() ): ?>
    <h1 class="page-title"><?php _e( 'Search results for:', 'nd_dosth' ); ?></h1>
    <div class="search-query"><?php echo get_search_query(); ?></div>
<?php endif; ?>
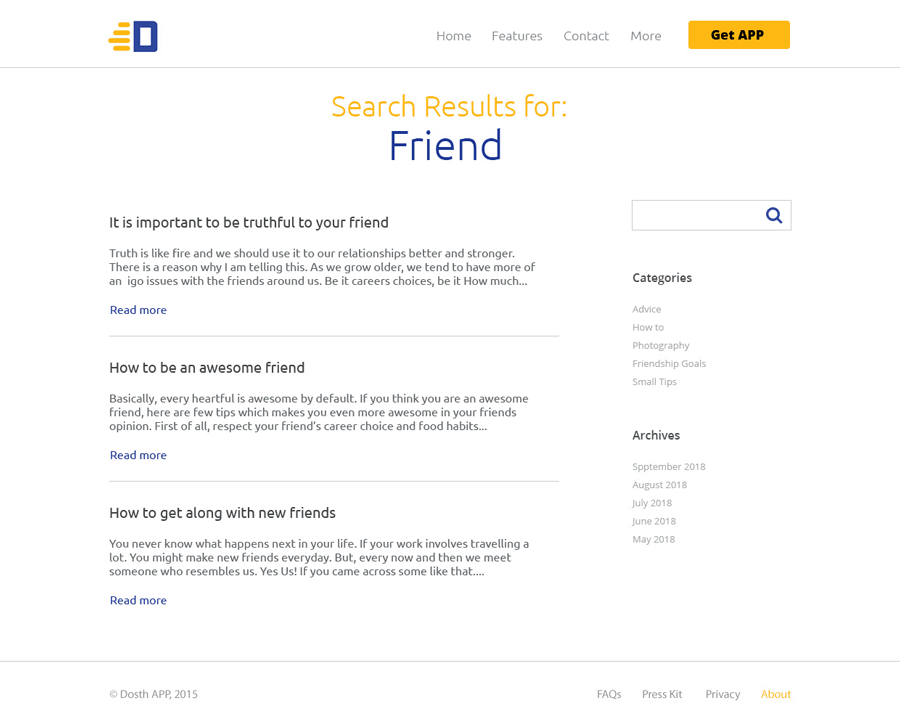
But, let’s create and use the search.php file for rendering the search results. It is a good practice. Also, the design looks totally different from the “Blog” page. So, we have to write a totally different markup.
Here is the updated theme directory structure after creating the search.php file:
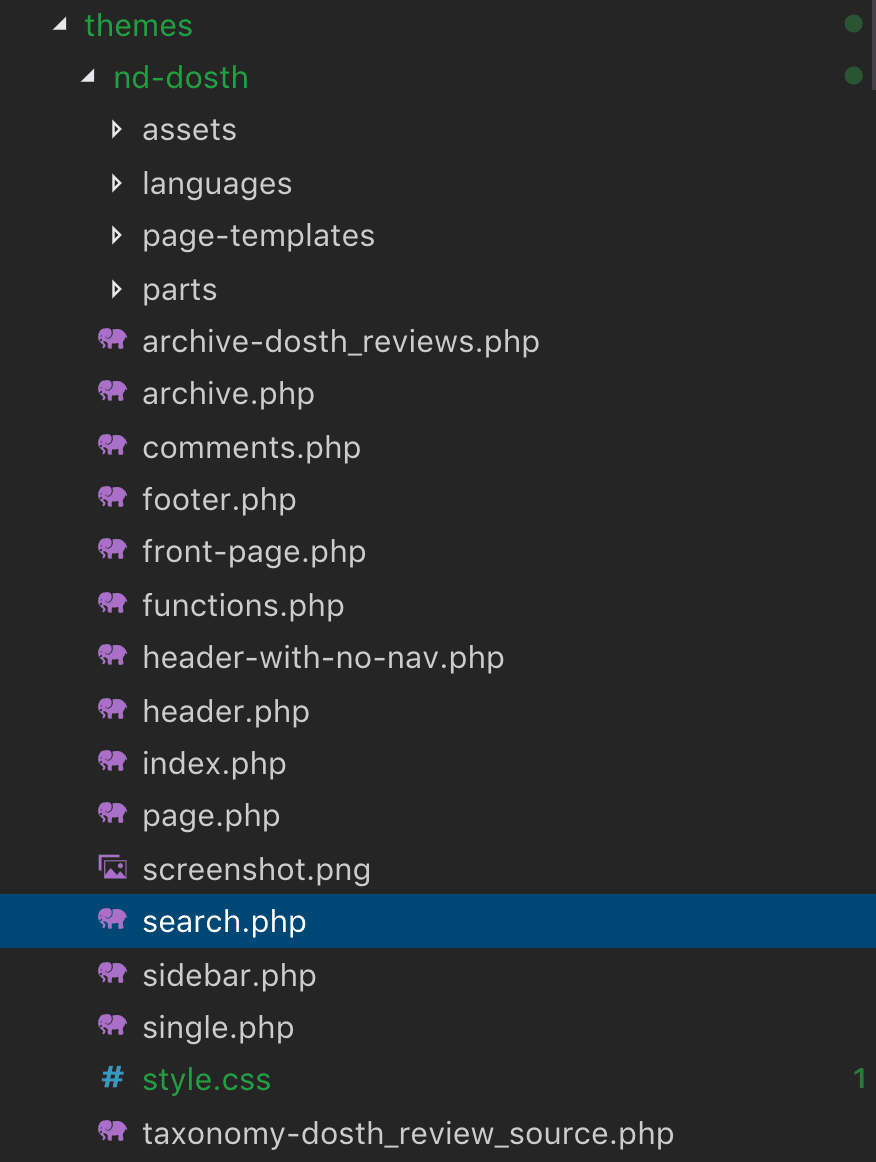
Now, put the following code inside the search.php file:
<?php
/**
 * The Search template file
 *
 * @link https://developer.wordpress.org/themes/basics/template-hierarchy/
 *
 * @package Dosth
 */
get_header();
?>
<div class="content-container">
    <h1 class="page-title"><?php _e( 'Search results for:', 'nd_dosth' ); ?></h1>
    <div class="search-query"><?php echo get_search_query(); ?></div>
    <div class="container">
        <div class="row">
            <div class="search-results-container col-md-8">
            <?php if ( have_posts() ): ?>
                <?php while( have_posts() ): ?>
                    <?php the_post(); ?>
                    <div class="search-result">
                        <h2><?php the_title(); ?></h2>
                        <?php the_excerpt(); ?>
                        <a href="<?php the_permalink(); ?>" class="read-more-link">
                            <?php _e( 'Read More', 'nd_dosth' );  ?>
                        </a>
                    </div>
                <?php endwhile; ?>
                <?php the_posts_pagination(); ?>
            <?php else: ?>
                <p><?php _e( 'No Search Results found', 'nd_dosth' ); ?></p>
            <?php endif; ?>
            </div>
            <div id="blog-sidebar" class="col-md-4">
                <?php get_sidebar(); ?>
            </div>
        </div>
    </div>
</div>
<?php get_footer(); ?>
Again, Nothing new except for the get_search_query() function beneath the title.
As the name suggests, the get_search_query() function returns whatever the search keyword that we have typed inside the search form.

Also, the_posts_pagination() function is working its magic for search results page too!
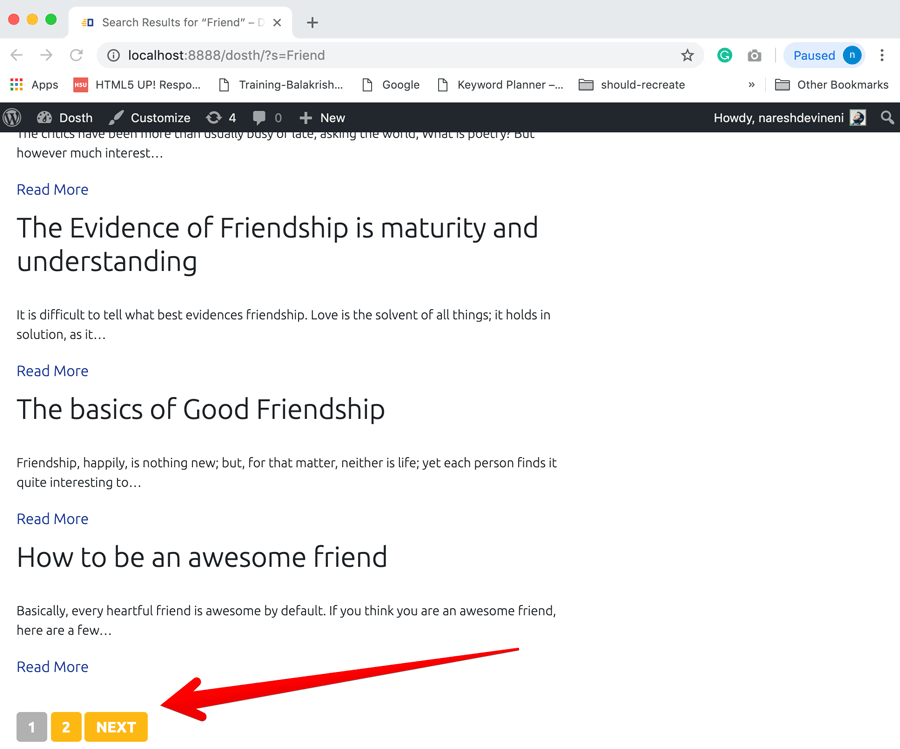
Awesome! isn’t it?
This is the best thing about WordPress. As a theme developer, all we have to do is create template files by writing suitable markup. That’s all. The Loop and every other WordPress function work the same for all kinds of post types, taxonomies and last but not least, search results.
Anyway, add the following CSS to the end of the style.css file to bring some much-needed prettiness to the Search Results page.
/*-------------------------------------------------------------------------------
  22.Search Results Styling
-------------------------------------------------------------------------------*/
.search-results .page-title{
    background-color:transparent;
    color:#fdb100;
    font-size:36px;
    padding-bottom:0;
}
.search-results .search-query{
    color:#1a3794;
    font-size:56px;
    text-align: center;
    margin-bottom:50px;
}
.search-result{
    padding-bottom:30px;
    margin-bottom:30px;
    border-bottom:1px solid #ccc;
}
.search-result h2{
    font-size:20px;
}
.search-result p{
    font-size:16px;
}
And here is the updated look of the search results page in the browser:
If you don’t really like how the default search functionality, please read the following article from the insightful WPMUDEV:
4 Powerful Ways to Improve WordPress Search So It Doesn’t Suck
Next, we will learn how to render a 404 page.
WordPress Theme Development: How to build a 404 page with a custom search form
There could be many reasons why a particular user could end up on a 404 error page of a website.
Maybe the user entered an invalid URL. Maybe the user is trying to access an article from your site via google search results but you recently deleted the article.
The list goes on and on.
The bottom line is, it is important that we style 404 error page properly and send the user in a proper direction after the mishap.
And, WordPress gives us, the theme developers, a chance to craft a perfect 404 page by letting us create a template file called:
404.php
Yep, all we have to do is create the 404.php file and put whatever we want to in it.
No Loop. We can’t use the Loop inside the 404.php template file because we are not creating a page inside the admin dashboard to host the content of 404 error page, right?
So, if you want to put some error message inside your 404 pages, one option is to hard-code it.
The other option is using the theme options to let the client edit the errors messages.
For now, we will go hard-coding the static text. In the next module, we will learn how to use WordPress customizer to make this hard-coded text editable in the admin dashboard.
Common, go ahead and create the 404.php template file at the root level of our theme directory and put the following code in it:
<?php
/**
 * The template for displaying 404 pages (Not Found)
 *
 * @package Dosth
 */
get_header();
?>
<div class="content-container">
    <h1 class="page-title"><?php _e( 'OOPS! You took a wrong turn :(', "nd_dosth" ); ?></h1>
    <div class="container">
        <div class="row">
            <div class="col-md-12">
                <div class="big-404-page">
                    <?php _e( '404', "nd_dosth" ); ?>
                </div>
                <p><?php _e( "But that's totally ok, Can't blame yourself.", 'nd_dosth' ); ?></p>
                <p><?php _e( "Anyway, the page you are looking for doesn't exist any more or might never existed.", 'nd_dosth' ); ?></p>
                <div class="menu-button">
                    <a href="<?php echo esc_url( t ); ?>" title="<?php echo esc_attr( get_bloginfo( 'name', 'display' ) ); ?>" rel="home">
                        <?php _e( 'Go Home', 'nd_dosth' ); ?>
                    </a>
                </div>
                <div class="or"><?php _e( 'or', 'nd_dosth' ); ?></div>
                <?php get_search_form(); ?>
            </div>
        </div>
    </div>
</div>
<?php get_footer(); ?>
As you can see, except for two dynamic functions, the above code is Just plain HTML with some hard-coded text wrapped inside WordPress translations.
To test out a 404 page, all you have to do is try to access a page that doesn’t exist on your site. For example:
http://localhost:8888/dosth/wow
We did not create any page called wow, right? So WordPress is redirecting us to the 404 error page!
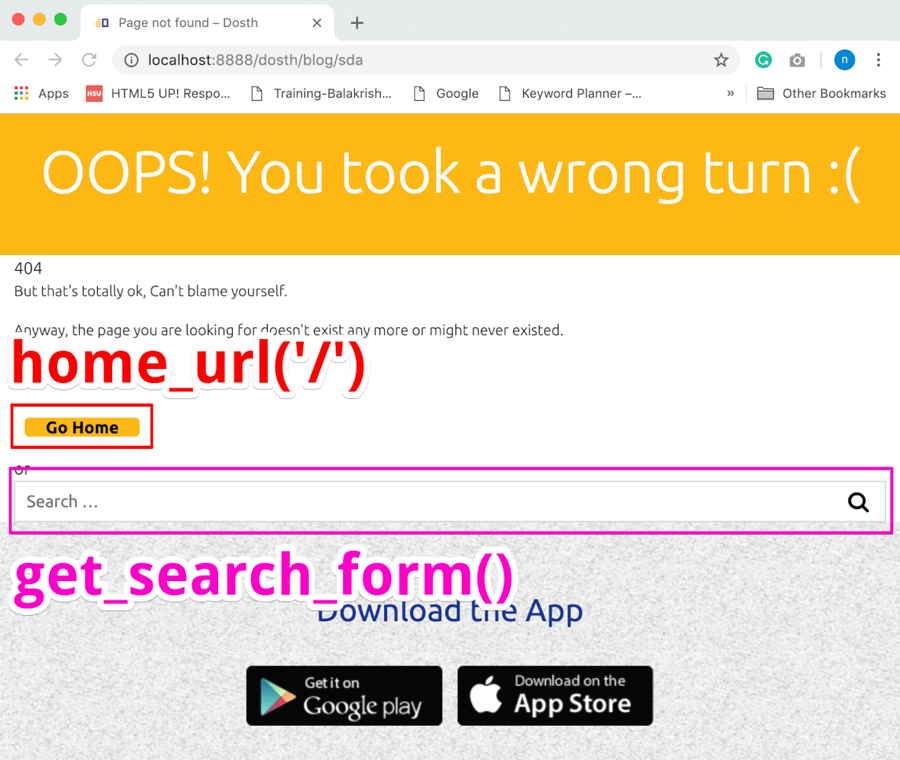
Anyway, If you observe the above code, we are facilitating the user to go back to the Homepage by providing a link to the Homepage using the home_url('/') function and then asking the user to try the search form with the help of:
get_search_form()
Introducing get_search_form()
The only responsibility of the get_search_form() function is to output the search form. We generally use this function if we want to output a search form with the help of the Search Widget.
But, what if you want to customize the markup of the search form?
The secret is, the get_search_form() function first looks for the searchform.php template file inside active theme to output the form code, and only if it can not find it, it outputs the default code.
If you take a look at the source code of get_search_form() function, you can see exactly what is going on. The source code is located inside /wp-includes/genetal-template.php file:
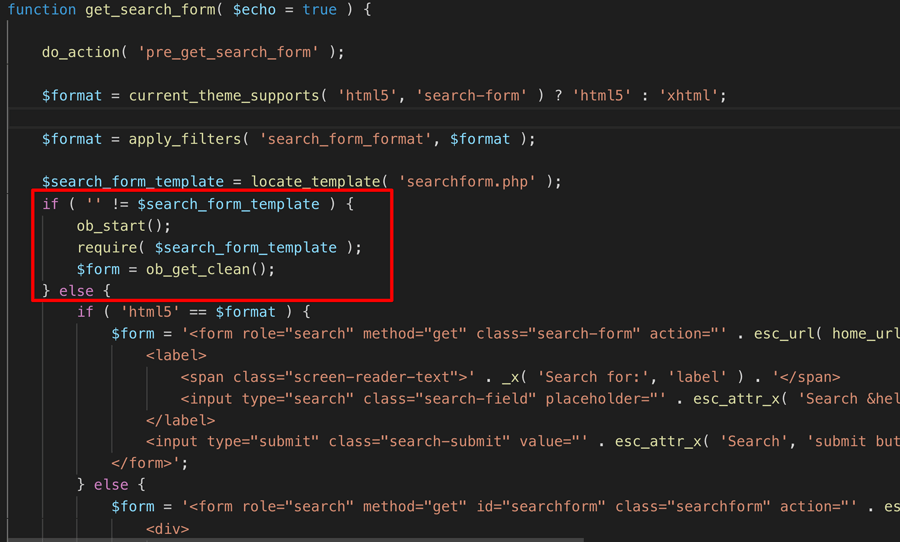
As you can see, first, it is looking for the searchform.php template, if the template file is not found, it is outputting HTML5 Form if our theme supports HTML5, otherwise, it is simply outputting the HTML4 Form.
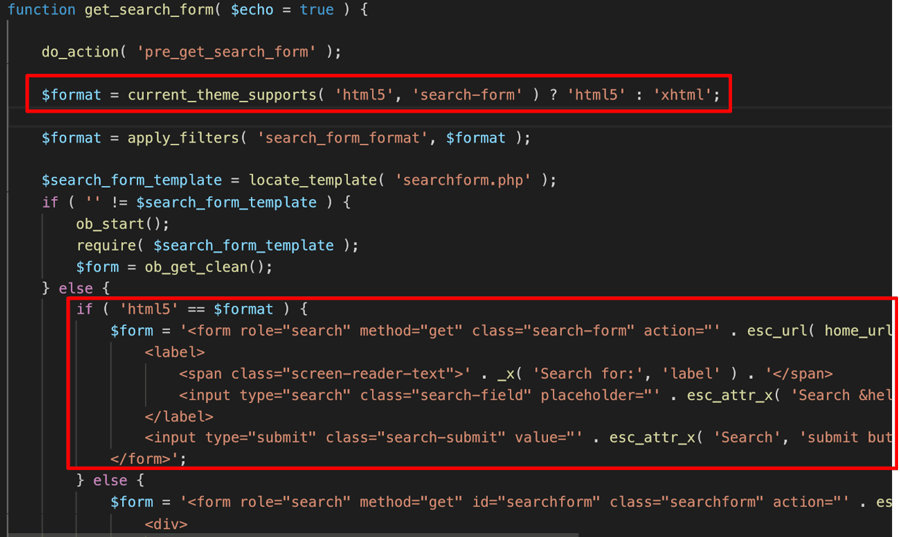
What’s interesting here is, If you observe the HTML Form code that WordPress is outputting in the absence of template file, it is a very simple piece of code and we can just copy and paste this code inside the searchform.php template file and then customize it according to our needs.
And the best thing here is, It just works great!
Let’s create a custom search form
Common, go ahead and create the searchform.php template file at the root level of our theme directory and put the following code in it:
<?php
/**
 * Template for displaying search forms in Dosth
 *
 * @package Dosth
 */
?>
<form role="search" method="get" class="search-form" action="<?php echo esc_url( home_url( '/' ) ); ?>">
    <label>
        <span class="screen-reader-text"><?php _x( 'Search for:', 'label', 'nd_dosth'); ?></span>
        <input type="search" class="search-field" placeholder="<?php echo esc_attr_x( 'Search Articles', 'placeholder', 'nd_dosth' ); ?>" value="<?php echo get_search_query(); ?>" name="s" />
    </label>
    <input type="submit" class="search-submit" value="<?php echo esc_attr_x( 'Search', 'submit button', 'nd_dosth' ); ?>" />
</form>
All I did is:
- Copied the HTML5 form code from the
get_search_form()function definition - Replaced PHP concatenation with the PHP tags
- Modified the “placeholder” text for the search field and added the translation text domain.
That’s all. It is not wrong at all to copy the code this way from the WordPress core. In fact, if you observe the searchform.php template file from the “Twenty Sixteen” default theme, you’ll find exactly the same code.
Now that we have created the searchform.php template file, from now on, whenever you call the get_search_form() function, WordPress will output whatever the code inside this template file. So, careful!
Anyway, let’s break the above code.
The most important aspect of any HTML form is the “method” and “action” attributes.
Because this is a search form, we are using the “GET” method. Just like Google.
<form role="search" method="get" class="search-form" action="<?php echo esc_url( home_url( '/' ) ) ?>">
And for the action attribute, we are outputting the URL of the Homepage. I honestly don’t know the reason behind this, but this is the way WordPress works!
<input type="search" value="<?php echo get_search_query(); ?>" name="s" />
Next, WordPress named the search field as “s” and then using the get_search_query() function to output the query that the user has previously has searched for.
Finally, there is a simple submit button.
Pretty short and easy to understand search form, right?
And, this is pretty much how we create a custom search form in WordPress.
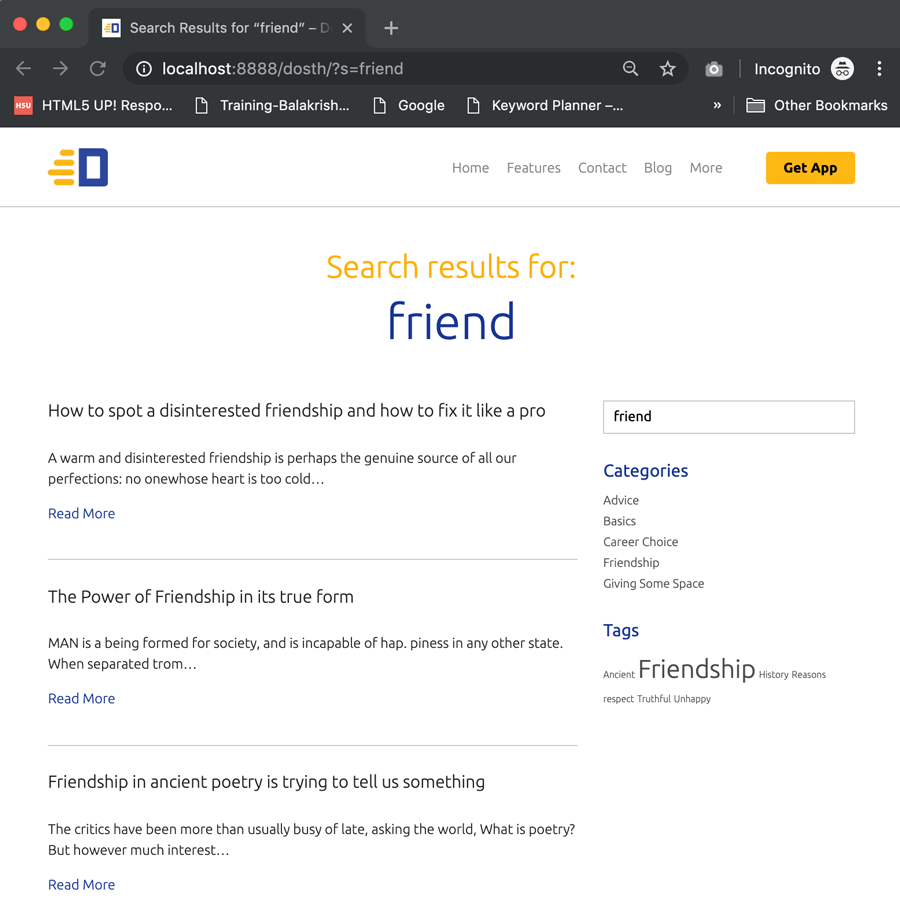
If you now look at the search form inside the “Page not found” page, the placeholder of the search form will now read “Search Articles” instead of “Search …” because WordPress is using the code inside the searchform.php template file to render the search form.

Get it?
Now, add the following CSS to the end of the style.css file to style the “Page not found” error page:
/*-------------------------------------------------------------------------------
  23.404 Page Styling
-------------------------------------------------------------------------------*/
.big-404-page{
    font-size:100px;
    text-align:center;
}
.error404 .page-title{
    background-color:#dc3545;
}
.error404 p{
    text-align: center;
}
.error404 .menu-button{
    text-align: center;
    height: auto;
    margin-top:30px;
}
.error404 .menu-button a{
    display:inline-block;
}
.error404 .or{
    text-align: center;
    margin-bottom:20px;
}
.error404 .search-form{
    max-width:300px;
    margin:0 auto 30px;
}
And here is how 404 error page looks like in the frontend:

Wait! There is a side-effect
Don’t worry! It is a positive side effect!
Remember? We have placed a Search widget inside the sidebar of our Blog page and other archive pages, right?

This Search widget also uses the same get_search_form() function internally!

So, the Search Widget is now outputting the form code inside the searchform.php file.
Because of this, If you update the code inside the searchform.php file, all the search forms on the site will get updated too!
How convenient? I really love this.
And, that’s pretty much how you deal with the search forms in WordPress.
Next, Let’s learn about custom queries and their basic usage inside our Custom theme.
WordPress Theme Development: Introducing Custom Queries
Every Blog post will have some related articles to it and WordPress doesn’t have a predefined function to output those related articles. But they are a very important feature for a blog post.
Also, some times, you might want to display some blog posts at the bottom portion of the Homepage to keep the visitors engaged on the site. Again, WordPress doesn’t have a predefined function to achieve this.
Although there are no predefined WordPress functions for the above requirements, WordPress provides us something more powerful!
Custom Queries!
WordPress allows us to query the posts we need using a custom query.
You can write a custom query for any post type. Using custom queries, you can output the content of pages, blog posts, custom post types like a book, etc., anywhere on the site.
“So, how do we write a custom query? Do we have to use MySQL and write database queries?”
Don’t worry! You don’t even have to touch the MySQL. WordPress provides with something more powerful and convenient.
Introducing the WP_Query class
One of the main responsibilities of the WP_Query class is to query the database and fetch the requested posts.
WordPress uses the WP_Query class to create the main query based on URL requested and outputs the contents of this main query with the help of the Loop we placed in our template files.
In other words, the main query that we discussed in the previous modules is an instance of the WP_Query class.
So, to create a custom query, all we have to do is create a new instance of the WP_Query class with a bunch of arguments which determine what posts must be fetched from the database.
And this custom query is not at all different from the main query. Both are instances of WP_Query class. Both do the same thing.
The only difference is that WordPress created the main query instance by deeply analyzing the URL and we will create the custom instance based on our requirement.
This is better shown than explained.
Common, let’s use the WP_Query class to output three blog posts at the end of our Homepage.
Open up the front-page.php file and put the following code just before the end of the Loop, that is, just before the ENDWHILE statement:
<?php
    $blog_posts_query = new WP_Query(
        array(
            'post_type' => 'post',
            "posts_per_page" => 3
        )
    );
?>
First of all, we are instantiating the WP_Query class and passing it an array of arguments which tells what posts to retrieve from the database.
In our case, we are telling WP_Query class to retrieve posts belonging to post type of “post” (blog posts) and with the help of “posts_per_page” argument, we are telling to retrieve only three posts.
The result of this WP_Query class instantiation is a WP_Query Object which contains all the information about the query and most importantly, the content of three blog posts.
And, we are storing the resulted WP_Query object inside the $blog_posts_query variable. So, this variable now contains all the information we need to output. You can see it if you var_dump the $blog_posts_query variable.
Anyway, how do we extract and output the blog posts from the WP_Query Object a.k.a $blog_posts_query variable?
Using the Loop to output the blog posts from the custom WP_Query object
Yep! say hello to the Loop again!
The Loop works on top of the following two WordPress functions, right?
have_posts()andthe_post()

If you view their source code, for example, the source code of have_posts(), you can tell that the have_posts() function is just a wrapper for the have_posts()method of the main $wp_query.
$wp_query->have_posts();
This $wp_query is the main query we are talking about. And this is a WP_Query object too!
So, all along the way, we are technically using the $wp_query object inside all our template files and our template files are outputting whatever the information that the $wp_query object contains.
For example, if we use the following Loop instead of the current Loop inside our template files, everything will still work as is.
<?php global $wp_query; ?>
<?php if ( $wp_query->have_posts() ): ?>
    <?php while( $wp_query->have_posts() ): ?>
        <?php $wp_query->the_post(); ?>
        /* Loop Code Goes Here */
    <?php endwhile; ?>
<?php endif; ?>

The key takeaway here is, We are extracting the content from the main query ( $wp_query ) by looping through it with the help of have_posts()method belongs to the WP_Query class.
$wp_query->have_posts();
WP_Query::have_posts();
And because of the fact that our custom $blog_posts_query object is an instance of the WP_Query class, we can also loop through our $blog_posts_query with the of help have_posts()method belongs to the WP_Query class.
$blog_posts_query->have_posts();
The only difference is that WordPress created the $wp_query object by deeply analyzing the URL and we manually created the $blog_posts_query object based on our requirement.
So, $blog_posts_query has access to all the Loop methods like have_posts() and the_post()too!
Common, let’s test this out.
Go ahead and put the following Loop code right after the above query and just before the end of the existing Loop:
<?php if( $blog_posts_query->have_posts() ): ?>
    <?php while( $blog_posts_query->have_posts() ): ?>
        <?php $blog_posts_query->the_post(); ?>
        <?php the_title('<h1>', '</h1>'); ?>
    <?php endwhile; ?>
    <?php wp_reset_postdata(); ?>
<?php endif;  ?>
<!-- end of custom query loop -->

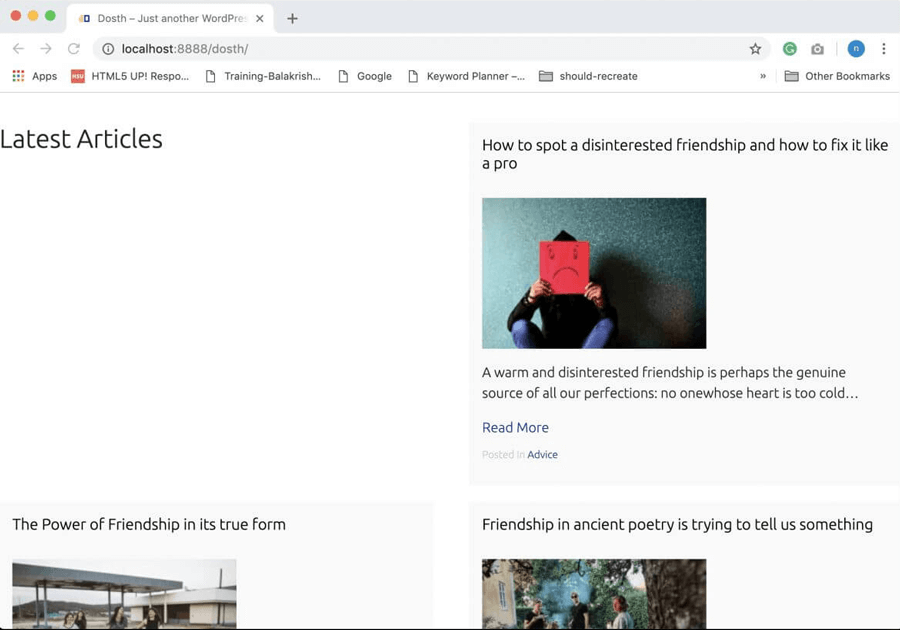
If we now open up the site’s Homepage in the browser, we should see the titles of the three most recent blog posts:
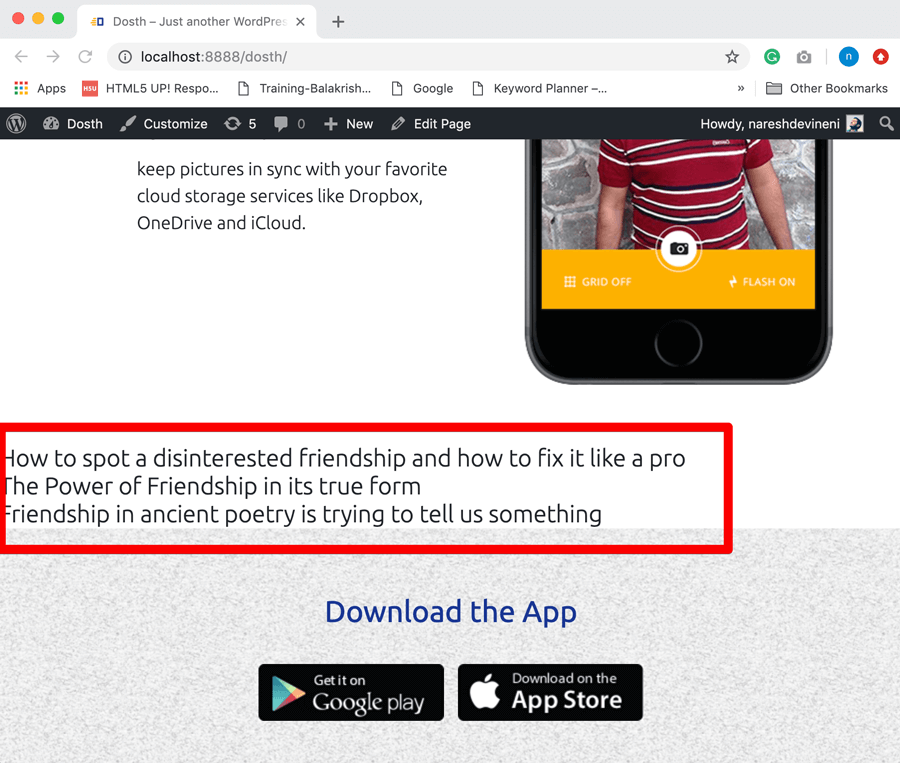
See, everything works seamlessly, right?
So, the bottom line is, the main query that WordPress creates and the custom queries that we create are the same! The only difference is who creates them and what posts they contain.
Now, replace the custom Loop we just added with the following code:
<?php if( $blog_posts_query->have_posts() ): ?>
    <section class="blog-posts">
        <h2><?php _e( 'Latest Articles', 'nd_dosth' ); ?></h2>
        <?php while( $blog_posts_query->have_posts() ): ?>
            <?php $blog_posts_query->the_post(); ?>
            <?php get_template_part( 'parts/blog', 'index' ); ?>
        <?php endwhile; ?>
        <?php wp_reset_postdata(); ?>
    </section>
<?php endif;  ?>
<!-- end of custom query loop -->
Nothing complex going on. Just added some bootstrap classes for the layout purposes and using the blog-index.php template part for rendering individual blog post’s content.
“Hey! what is that wp_reset_postdata() function doing?”
Oh! Thanks for reminding!
Do not forget to reset post data
The thing is if you notice the above code, we have placed a custom loop inside the main loop. We call this as a nested loop.
And, Just like the Main Loop, the nested Loop affects the global $post variable too.
If you remember, for every iteration of the Loop, the_post()method overrides the global $post variable.
And if you notice, the nested custom loop is calling the the_post()method as well.
And this is a problem because of the fact that all the template tags that we use inside the Loop depend on this $post variable.
For example, before our custom nested Loop got executed, the global $post variable contains the Homepage information, right?
And because we created a Nested Loop, this original global $post variable is overridden inside the custom Loop and by the time we are done with our custom Loop, the global $post variable contains the information about the third blog post rather than the Homepage.
And there are chances that we might output some more Homepage content after displaying these blog posts too.
So, we are calling the wp_reset_postdata() function after the custom query loop to restore the global $post variable to its original state, that is, a state which contains the Homepage content.
If you did not understand, just put the above custom query Loop right underneath the the_content() function and remove the wp_reset_postdata() function and see how it breaks the content of the Homepage.

Ah! Disaster!
WordPress is not displaying all the following sections of the Homepage at all.

If you still did not understand, just remember to put wp_reset_postdata() whenever you write a custom loop.
Anyway, here is the final front-page.php file for this lesson:
<?php
/**
 * The front page template file.
 *
 * If the user has selected a static page for their homepage, this is what will
 * appear.
 * Learn more: http://codex.wordpress.org/Template_Hierarchy
 *
 * @package Dosth App
 */

 get_header();
 ?>
<?php while( have_posts() ): ?>
    <?php the_post(); ?>
    <div class="actual-content above-the-fold">
        <div class="container">
            <div class="row">
                <div class="col-sm-12">
                    <?php the_content(); ?>
                </div>
            </div>
        </div>
    </div>
    <section id="watch-dosth-in-action">
        <h2><?php echo get_post_meta(get_the_ID(), 'second_section_headline', true ); ?></h2>
        <div class="section-content">
            <?php echo get_post_meta(get_the_ID(), 'section_two_content', true ); ?>
        </div>
    </section>
    <section id="section-three">
        <h2><?php echo get_post_meta(get_the_ID(), 'section_three_title', true ); ?></h2>
        <div class="section-content">
            <?php echo get_post_meta(get_the_ID(), 'section_three_content', true ); ?>
        </div>
    </section>
    <section id="app-feature-one">
        <img src="<?php the_field('feature_one_image'); ?>" />
        <div class="section-content">
            <?php echo get_post_meta(get_the_ID(), 'app_feature_one_content', true ); ?>
        </div>
    </section>
    <section id="app-feature-two">
        <img src="<?php the_field('app_feature_two_image'); ?>" />
        <div class="section-content">
            <?php the_field('app_feature_two_content'); ?>
        </div>
    </section>
    <?php
        $blog_posts_query = new WP_Query(
            array(
                'post_type' => 'post',
                "posts_per_page" => 3
            )
        );
    ?>
    <?php if( $blog_posts_query->have_posts() ): ?>
        <section class="blog-posts">
            <h2><?php _e( 'Latest Articles', 'nd_dosth' ); ?></h2>
            <?php while( $blog_posts_query->have_posts() ): ?>
                <?php $blog_posts_query->the_post(); ?>
                <?php get_template_part( 'parts/blog', 'index' ); ?>
            <?php endwhile; ?>
            <?php wp_reset_postdata(); ?>
        </section>
    <?php endif;  ?>
    <!-- end of custom query loop -->
<?php endwhile; ?>
<?php get_footer(); ?>
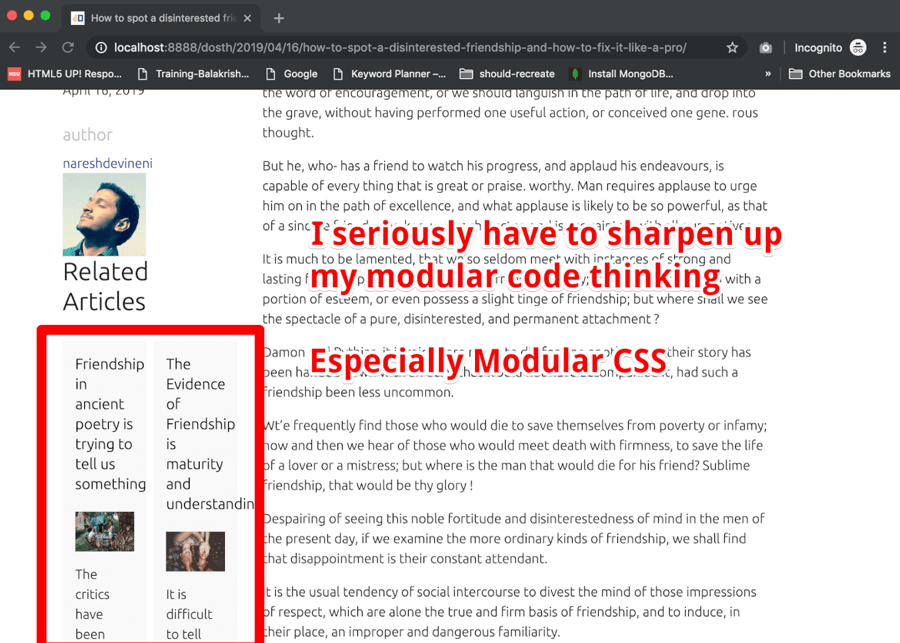
Ouch! This doesn’t look nice at all!
The expectation is that whenever we use a template part to render a modular section on any page of the site, it should look the same.
The reality is, my intention of writing modular code is half baked.
Applying some CSS will fix the styling part!
Note: This is just a quick fix. Not a future proof solution in any manner.
Go ahead and put the following CSS inside the style.css file:
/*-------------------------------------------------------------------------------
  19.Homepage Blog List styling
-------------------------------------------------------------------------------*/
.home .blog-posts h2{
    width:100%;
    text-align:center;
}
.home .blog-posts{
    max-width:1000px;
    margin:50px auto;
}
.home .blog-posts .blog-post h2{
    text-align:left;
}
@media only screen and (min-width: 767px){
    .home .blog-posts .blog-post {
        width: 33%;
    }
}
And here is the output in the browser:
The problem still lies underneath
We did not fix our code’s modular issues.
The fix I made is called the dirty fix which covers up the issue pretty well from a looking-good standpoint but compromises the web development standards.
The issue with using the blog-index.php template part for rendering a blog post on the Homepage is, in Homepage, all the main headings are H2. So, I made the “Latest Articles” heading H2 as well.

But if you notice, the blog-index.php template part uses H2 heading for the individual blog post’s title as well. I took this decision because, inside the blog posts index page, the main heading of the page is H1 heading, so, rest of the article titles must be in H2 tags.

The bottom line is, we still want to use the blog-index.php template part for the homepage as well, but we want the blog post titles to be in H3 tags.
We can fix this problem in a lot of ways, but if you don’t have much time, it is a good idea to take the help of conditional tags.
So, go ahead and open up the blog-index.php template part and updated the blog post title section like this:
<?php if( is_front_page() || is_single() ): ?>
    <h3><a href="<?php the_permalink(); ?>"><?php the_title(); ?></a></h3>
<?php else: ?>
    <h2><a href="<?php the_permalink(); ?>"><?php the_title(); ?></a></h2>
<?php endif; ?>
In the above code, we are wrapping the blog post title with H3 tag if the requested page is a Static Homepage or a Single post page.
If anything else, we are wrapping the title with H2 tag.
Simple fix! But works nicely for our needs currently.
Here is the final code for blog-index.php template part:
<div class="blog-post">
    <?php if( is_front_page() || is_single() ): ?>
        <h3><a href="<?php the_permalink(); ?>"><?php the_title(); ?></a></h3>
    <?php else: ?>
        <h2><a href="<?php the_permalink(); ?>"><?php the_title(); ?></a></h2>
    <?php endif; ?>
    <?php if ( has_post_thumbnail() ) :
        $featured_image = wp_get_attachment_image_src( get_post_thumbnail_id( get_the_ID() ), 'dosth-blog-thumbnail' ); ?>
        <div class="blog-post-thumb">
            <a href="<?php the_permalink(); ?>"><img src="<?php echo $featured_image[0]; ?>" alt='' /></a>
        </div>
    <?php endif; ?>
    <?php the_excerpt(); ?>
    <a class="read-more-link" href="<?php the_permalink(); ?>"><?php _e( 'Read More', 'nd_dosth' ); ?></a>
    <?php $categories = get_the_category(); ?>
    <?php if ( ! empty( $categories ) ) : ?>
        <div class="posted-in">
            <span><?php _e( 'Posted In', 'nd_dosth' ); ?></span>
            <a href="<?php echo get_category_link( $categories[0]->term_id ); ?>">
                <?php echo $categories[0]->name; ?>
            </a>
        </div>
    <?php endif; ?>
</div>
With this change, the markup standards are correct on our Homepage too!
Good Job!

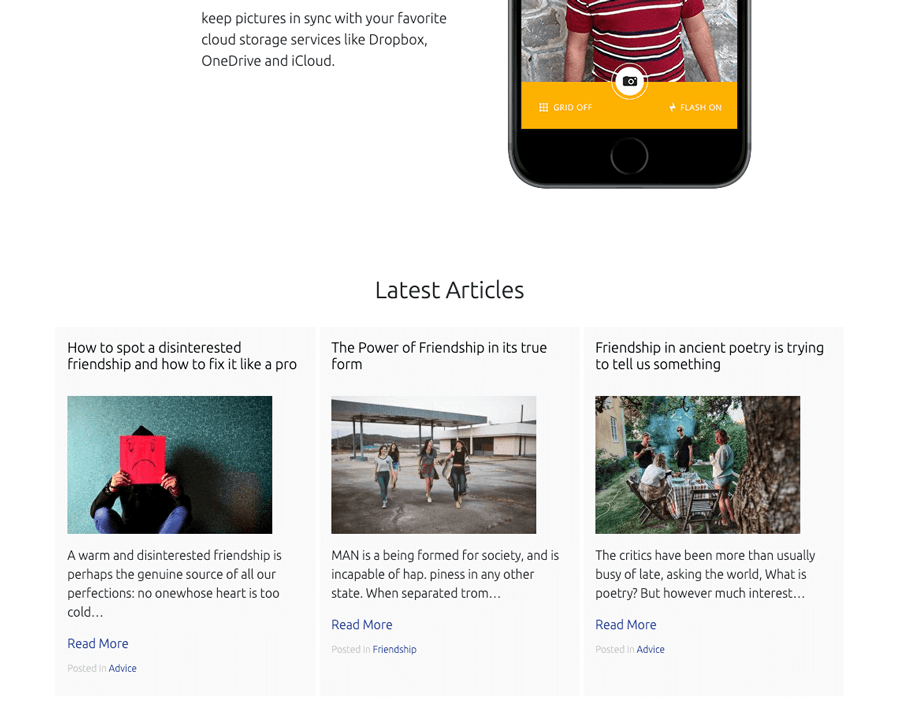
And here is the output in the browser:

Now the only thing we need to do is, add styling for the H3 tags in our CSS. We Just need to change the color and reduce the font-size a bit.
So update the line no: 859 and 863 inside the 13.Blog Index / Archive Styling section of the style.css file like this:
.blog-posts .blog-post h2 a,
.blog-posts .blog-post h3 a{
    color:black;
    font-size:18px;
}
.blog-posts .blog-post h2 a:hover,
.blog-posts .blog-post h3 a:hover{
    color:#1a3794;
}
After applying the above changes, the blog posts on the Homepage will look exactly like blog posts on the Blog index/ archive pages.
Next, we will write a custom query to output related articles on a single blog post page.
WordPress Theme Development: Learning to work with advanced custom queries
Open up the single.php file and put the following code at the end of the left sidebar code. To be precise, right underneath the div element with “post-author” class.
<?php $category_term_list = wp_list_pluck( get_the_category(), 'slug' ); ?>
<?php
    $related_posts_query = new WP_Query(
        array(
            'post_type' => 'post',
            "posts_per_page" => 2,
            'post__not_in' => array( get_the_ID() ),
            'tax_query' => array(
                array(
                    'taxonomy' => 'category',
                    'terms' => $category_term_list,
                    'field' => 'slug',
                )
            )
        )
    );
?>
<?php if( $related_posts_query->have_posts() ): ?>
    <section class="blog-posts related-articles">
        <h2><?php _e( 'Related Articles', 'nd_dosth' ); ?></h2>
        <?php while( $related_posts_query->have_posts() ): ?>
            <?php $related_posts_query->the_post(); ?>
            <?php get_template_part( 'parts/blog', 'index' ); ?>
        <?php endwhile; ?>
        <?php wp_reset_postdata(); ?>
    </section>
<?php endif;  ?>
You already know what’s happening with the Loop.
But let’s dismantle the custom query piece by piece. Don’t worry. It’s easy!
We are showing related articles of the current post based on the categories of the current post.
For example, if the current post is assigned to the “Advice” category, we only want to display related articles that are assigned to the “Advice” category.
So, first, we are getting all the categories of the current post and extracting the slugs of all the categories from the result using:
<?php $category_term_list = wp_list_pluck( get_the_category(), 'slug' ); ?>
The get_the_category() function returns the categories of the current post as an array of WP_Term objects.
For example, if a blog post is assigned to the “Advice”, “Friendship” and “Love” categories, the result of get_the_category() function looks like the following array:
array(3) {
    [0]=> object(WP_Term)#1216 (16) {
        ["term_id"]=> int(5)
        ["name"]=> string(6) "Advice"
        ["slug"]=> string(6) "advice"
        ["term_group"]=> int(0)
        ["term_taxonomy_id"]=> int(5)
        ["taxonomy"]=> string(8) "category"
        ["description"]=> string(0) ""
        ["parent"]=> int(0)
        ["count"]=> int(6)
        ["filter"]=> string(3) "raw"
        ["cat_ID"]=> int(5)
        ["category_count"]=> int(6)
        ["category_description"]=> string(0) ""
        ["cat_name"]=> string(6) "Advice"
        ["category_nicename"]=> string(6) "advice"
        ["category_parent"]=> int(0)
    }
   [1]=> object(WP_Term)#1216 (16) {
        ["term_id"]=> int(5)
        ["name"]=> string(6) "Friendship"
        ["slug"]=> string(6) "friendship"
        ["term_group"]=> int(0)
        ["term_taxonomy_id"]=> int(7)
        ["taxonomy"]=> string(8) "category"
        ["description"]=> string(0) ""
        ["parent"]=> int(0)
        ["count"]=> int(2)
        ["filter"]=> string(3) "raw"
        ["cat_ID"]=> int(7)
        ["category_count"]=> int(2)
        ["category_description"]=> string(0) ""
        ["cat_name"]=> string(6) "Friendship"
        ["category_nicename"]=> string(6) "friendship"
        ["category_parent"]=> int(0)
    }
   [2]=> object(WP_Term)#1216 (16) {
        ["term_id"]=> int(5)
        ["name"]=> string(6) "Love"
        ["slug"]=> string(6) "love"
        ["term_group"]=> int(0)
        ["term_taxonomy_id"]=> int(9)
        ["taxonomy"]=> string(8) "category"
        ["description"]=> string(0) ""
        ["parent"]=> int(0)
        ["count"]=> int(1)
        ["filter"]=> string(3) "raw"
        ["cat_ID"]=> int(9)
        ["category_count"]=> int(1)
        ["category_description"]=> string(0) ""
        ["cat_name"]=> string(6) "Love"
        ["category_nicename"]=> string(6) "love"
        ["category_parent"]=> int(0)
    }
}
In the language of WordPress, the word “Category” is a taxonomy and the individual categories like “Advice”, “Friendship” are the terms of the “Category” taxonomy.
Since the blog post is assigned to three terms, the array returned by get_the_category() function has three terms in the form of WP_Term object.
If you notice, there is a “slug” property for every term and using the wp_list_pluck() function, we are plucking out that “slug” for every term.
<?php $category_term_list = wp_list_pluck( get_the_category(), 'slug' ); ?>
If you now var_dump the $category_term_list() function, this is what you’ll see:
array(1) {
  [0]=> string(6) "advice"
  [0]=> string(10) "friendship"
  [0]=> string(5) "basic"
}
Anyway, the bottom line is, we will give this array to the Custom Query so that it fetches the posts that are assigned to these terms belonging to “Category” taxonomy.
Next comes the custom query itself.
$related_posts_query = new WP_Query(
    array(
        'post_type' => 'post',
        "posts_per_page" => 2,
        'post__not_in' => array( get_the_ID() ),
        'tax_query' => array(
            array(
                'taxonomy' => 'category',
                'terms' => $category_term_list,
                'field' => 'slug',
            )
        )
    )
);
You already know what’s happening with the first two arguments of the custom query.
The “post__not_in” argument is used for excluding a particular post from the query result.
'post__not_in' => array( get_the_ID() )
In our case, we are giving the ID of the current blog post that the visitor is reading. We don’t want to display the current blog post inside the related articles, right?
Remember, we placed the custom query inside the main loop of the single blog post page. So, we can still access all ID of the current blog post using the get_the_ID() function.
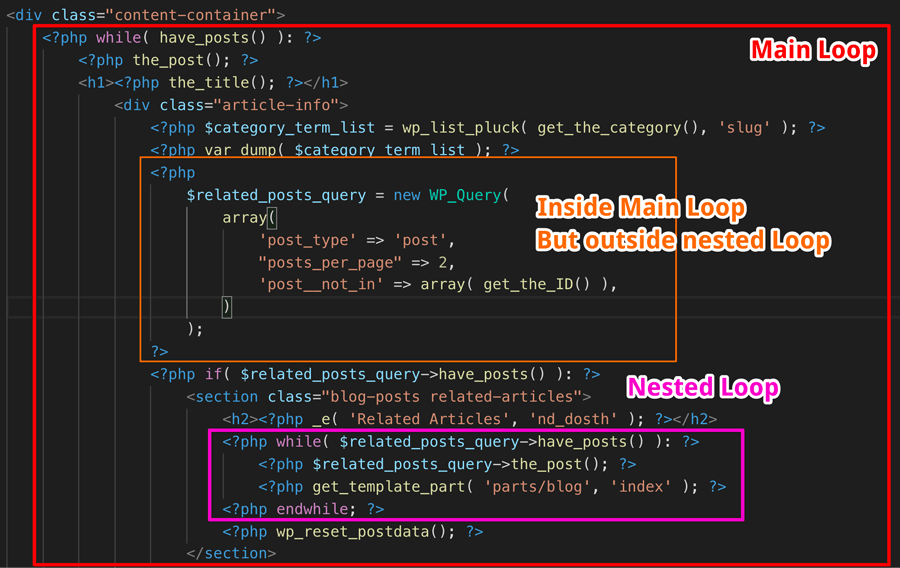
In the above screenshot, I omitted some important parts of the single.php file for demonstration purposes. So don’t take it literally!
$related_posts_query = new WP_Query(
    array(
        'post_type' => 'post',
        "posts_per_page" => 2,
        'post__not_in' => array( get_the_ID() ),
        'tax_query' => array(
            array(
                'taxonomy' => 'category',
                'terms' => $category_term_list,
                'field' => 'slug',
            )
        )
    )
);
Next, we are providing the “tax_query” argument instructing custom query to fetch posts only belonging to the taxonomy “category” with the help of:
'taxonomy' => 'category'
Then, we are further filtering down the posts to specific terms from the taxonomy “category” by providing the terms list that we plucked earlier.
'terms' => $category_term_list
The $category_term_list variable contains “slugs” of the categories, right?
We have to tell this to WordPress. So, we are specifying that the category term list we have provided contains slugs of the categories with the help of:
'field' => 'slug'
That’s pretty much how you would craft complex custom queries in WordPress.
If you now visit any single blog post in the frontend, two related articles will show up and both of them belong to the same category of the current blog post.
“Hey, What If I want to display related articles based on Tag taxonomy along with the Category taxonomy?”
Easy! Visit the codex page for WP_Query for more questions and practice. It will answer all your questions and you’ll keep visiting this page throughout your WordPress career!
https://codex.wordpress.org/Class_Reference/WP_Query
Here is a different approach to achieving the same result:
Here is the final single.php file for this lesson:
<?php
/**
 * The template for displaying all single posts
 *
 * @link https://developer.wordpress.org/themes/basics/template-hierarchy/#single-post
 *
 * @package Dosth
 */
get_header();
?>
<div class="content-container">
    <?php while( have_posts() ): ?>
        <?php the_post(); ?>
        <?php if ( has_post_thumbnail() ) :
            $featured_image = wp_get_attachment_image_src( get_post_thumbnail_id( get_the_ID() ), 'full' ); ?>
            <div class="full-width-featured-image" style="background-image:url(<?php echo $featured_image[0]; ?>);">
                <h1><?php the_title(); ?></h1>
            </div>
        <?php endif; ?>
        <div class="container">
            <div class="row">
                <div class="article-info col-md-3">
                    <?php $categories = get_the_category(); ?>
                    <?php if ( ! empty( $categories ) ) : ?>
                        <div class="posted-in">
                            <h4><?php _e( 'Posted In', 'nd_dosth' ); ?></h4>
                            <?php the_category(); ?>
                        </div>
                    <?php endif; ?>
                    <div class="published-on">
                        <h4><?php _e( 'Published On', 'nd_dosth' ); ?></h4>
                        <?php the_date(); ?>
                    </div>
                    <div class="post-author">
                        <h4><?php _e( 'Author', 'nd_dosth' ); ?></h4>
                        <a class="author-archive" href="<?php echo esc_url( get_author_posts_url( get_the_author_meta( 'ID' ) ) ); ?>">
                            <?php the_author(); ?>
                        </a>
                        <?php echo get_avatar( get_the_author_meta('ID')  , 100 ); ?>
                    </div>
                    <?php //custom query starts here ?>
                    <?php $category_term_list = wp_list_pluck( get_the_category(), 'slug' ); ?>
                    <?php
                        $related_posts_query = new WP_Query(
                            array(
                                'post_type' => 'post',
                                "posts_per_page" => 2,
                                'post__not_in' => array( get_the_ID() ),
                                'tax_query' => array(
                                    array(
                                        'taxonomy' => 'category',
                                        'terms' => $category_term_list,
                                        'field' => 'slug',
                                    )
                                )
                            )
                        );
                    ?>
                    <?php if( $related_posts_query->have_posts() ): ?>
                        <section class="blog-posts related-articles">
                            <h2><?php _e( 'Related Articles', 'nd_dosth' ); ?></h2>
                            <?php while( $related_posts_query->have_posts() ): ?>
                                <?php $related_posts_query->the_post(); ?>
                                <?php get_template_part( 'parts/blog', 'index' ); ?>
                            <?php endwhile; ?>
                            <?php wp_reset_postdata(); ?>
                        </section>
                    <?php endif;  ?>
                    <?php //custom query ends here ?>
                </div>
                <div id="actual-article" class="col-md-8">
                    <?php the_content(); ?>
                    <?php get_template_part( 'parts/post', 'navigation' ); ?>
                    <?php comments_template(); ?>
                </div>
            </div>
        </div>
    <?php endwhile; ?>
</div>
<?php get_footer(); ?>
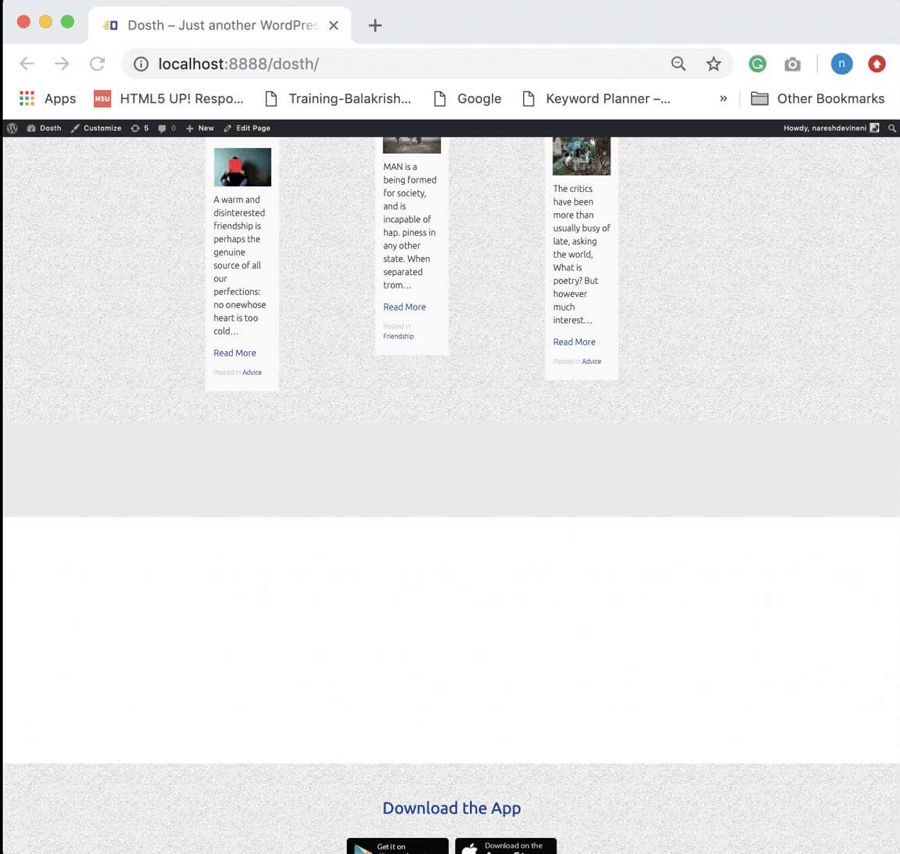
And, here is output in the browser:
Let’s fix this quickly by adding the following CSS to the end of the style.css file:
/*-------------------------------------------------------------------------------
  20.Related Blog List styling
-------------------------------------------------------------------------------*/
.single .related-articles .blog-post{
    width:100%;
}
.single .related-articles h2{
    font-size:25px;
    margin-bottom:15px;
    margin-top:30px;
    color:#1a3794;
}
And here is the output that I am proud of:

We are finally done with the blog completely.
Next, let’s discuss Custom Post Types. It’s really important that we clear the air.
Introduction to Custom Post Types
Every Homepage of a site will have some extras in it along with the main content. And, a Testimonials/Reviews section is the best example of a Homepage extra.
But for theme developers like us, the actual question is:
“How do we build this Reviews section on the Homepage? How do we let the client edit and manage the content of these reviews?”
We can not use Custom Fields or the WordPress default post types like Post or Page. Their purpose is different.
Reviews thrive businesses. Reviews are an integral part of any site that promotes a service or a product.
So, most of the time, we will end up showcasing reviews all over the site. Not just on the Homepage.
So, we have to use a Custom Post Type for managing the Reviews and Custom Queries to display them where ever we want on the frontend.
But! Let me be blunt here.
Custom post types doesn’t belong inside a theme. It is a not a theme feature.
The client could change the theme any time and if we create a custom post type inside a WordPress theme, the Client would lose access to the Custom Post type and its posts.
So, you should always register Custom Post types inside a plugin. If you want to interested in learning more about Custom Post types, read the following guide.
In the next part, we will wrap up the entire course of WordPress Theme Development by talking about WordPress Customizer API.
So, I will see you in the next part.


 © 2026 UsableWP. A project by Naresh Devineni.