Developing a WordPress Theme From Scratch
Hi and Welcome!
This is Part 1 of the 9 part Course about developing a WordPress theme from scratch.
Here is the access to the other parts of the Course in the sequential order:
- Developing a WordPress Theme From Scratch (Current Part)
- WordPress Theme Development: The best way to enqueue scripts and styles
- WordPress Theme Development: Creating the header and making our theme translation ready
- WordPress Theme Development: Site footer with social navigation, dynamic copyright statement
- WordPress Theme Development: The Loop, the main content, Google Fonts, and the Custom Fields
- Building a WordPress Theme From Scratch: Internal Pages
- WordPress Theme Development: Building the Blog
- WordPress Theme Development: Search page, 404 error template, Custom Queries, and custom post types
- WordPress Theme Development: WordPress Customizer and it’s API
WordPress powers more than 35% of the websites on the internet and for a good reason. Our Clients and content managers love it as It gives them an “easy to work with” interface to manage their website content.
But what about web developers?
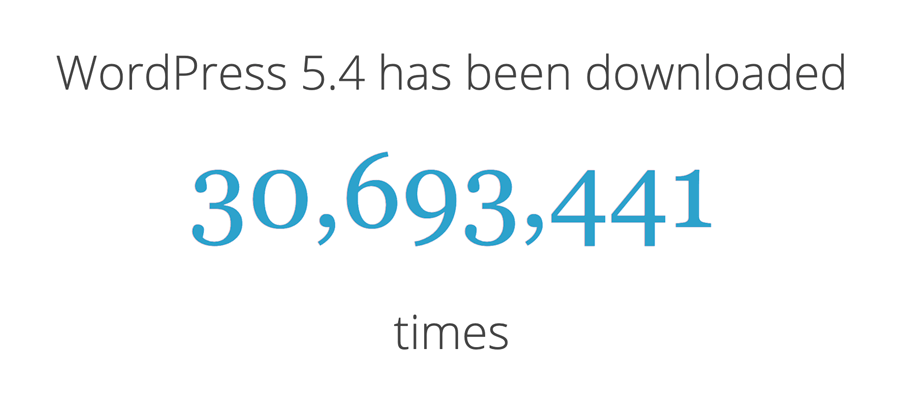
Did you look at the number?
That is just for the version 5.4. Isn’t this a huge market?
Here is a more serious fact.
WordPress is dominating other content management systems by taking over 60% of the CMS market share. Not just because it has an easy to use interface for our clients.
It also gives developers the ultimate control to create just about any kind of website by giving a lot of pre-written code for creating complex and flexible dynamic websites.
WordPress also lets us re-use the code from our previous WordPress projects. Sometimes, you only have to change HTML and CSS to have a completely different looking website.
WordPress theme code re-usability will let you craft WordPress websites at a rapid pace.
So, in this guide, you’ll learn how to create a mobile app promotion WordPress website by developing a WordPress theme from scratch.
In this process, you’ll also learn how WordPress plugins and themes work together.
This guide is designed for someone who is already familiar with HTML, CSS, PHP, Databases, and the concept of Web Servers.
I also assume that you have some idea about WordPress and Its components like Themes, Plugins, and WordPress Dashboard.
You don’t have to be an expert PHP developer. If you know the basics of the PHP language like what functions are and what they do, that would be more than enough.
But if you just know PHP and have no clue about the WordPress ecosystem, I strongly recommend reading the following guide first:
How to create a WordPress website
To follow along with me, you must have to install WordPress locally on your computer, if you don’t know how to do that, please read the following tutorial next:
How to install WordPress Locally
If you finish the above WordPress tutorial, you’ll have a WordPress website installed locally on your computer.
From here on wards, I will assume that you already have a WordPress Website up and running on your local computer.
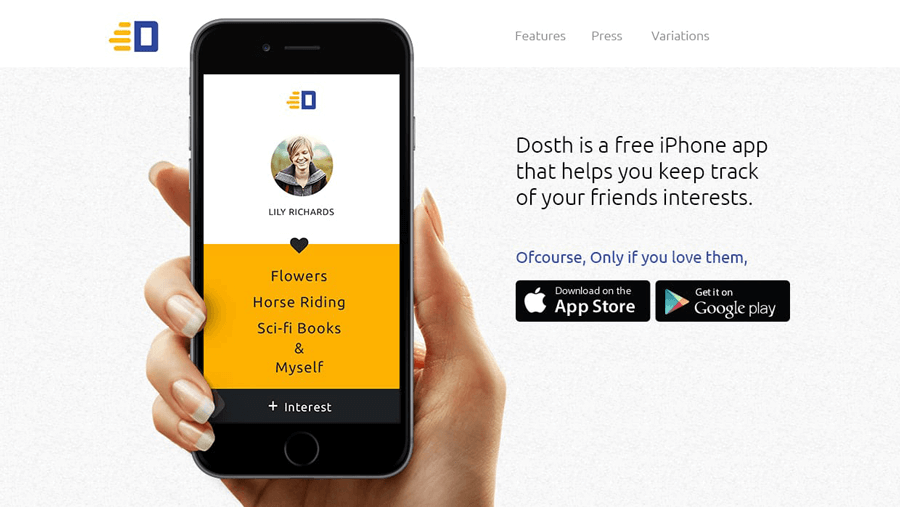
All through this guide, We will be developing a custom WordPress theme for a fictional Mobile App website called “Dosth”.
So, I named my main WordPress folder as “dosth”. Please remember it.

Foundations of WordPress Theme Development
In this module, we will learn the basics of a WordPress theme and its surroundings.
What is a WordPress Theme?
If you compare one website with the another, you’ll realize that every website has a
- Logo
- Navigation for accessing internal pages like about us and contact us
- Some text-based content
- More than a dozen articles
- A footer with copyright information and few links
Although the elements that make up the website are same, the way we design them makes all the difference.
For example, a simple change to font, layout, and color combinations would make the website look entirely different, and this is what the WordPress theme development is all about.
A WordPress theme controls how a website looks for its visitors.
It deals with the layout, colors, fonts, HTML Markup, and CSS. In one word, WordPress theme development is all about the “Frontend Styling” of a website.
This means, changing from one theme to another, will change the design of the website.
For example, let’s take a look at these two designs.

The elements like Logo, navigation, content and the image in the above two designs are exactly the same.
But both the designs look entirely different because of the way those elements are organized and styled.
A WordPress theme for web developers is like Photoshop for Web designers.
The only difference is Web designers uses the Photoshop Interface to craft beautiful designs and WordPress theme developers use PHP, HTML, and CSS to code beautiful, accessible and user-friendly interfaces.
So, in my opinion, a WordPress theme is much more than just front-end styling.
WordPress provides a lot of pre-written code and a robust template hierarchy system to its theme developers.
So, as a theme developer, you should learn how to use that pre-written code to pull content from the database and display it to the user using the template hierarchy system.
Technically Speaking, A WordPress Theme is nothing but
- A bunch of template files with a lot of HTML and PHP.
- One main CSS stylesheet in the name of style.css
- Few Javascript files
- Few images
- Few PHP files controlling how the theme handles navigation, images, and other common website stuff.
Where does a WordPress Theme live?
wordpress-project-folder -> wp-content -> themes
As you can see, WordPress has a dedicated and fixed location to look for themes.
So, for developing a WordPress theme, we have to create our own WordPress theme directory under the “themes” directory.
For Windows MAMP users, it is:
C Drive -> mamp -> htdoc -> wordpress-project-folder -> wp-content -> themes
For macOS MAMP users, it is:
Applications -> MAMP -> htdocs -> wordpress-project-folder -> wp-content -> themes
Now that you know where does a WordPress Theme resides, it is also essential to have a good understanding of the folder and file structure of a WordPress project to get more out of the theme development.
WordPress Project Folder & File Structure
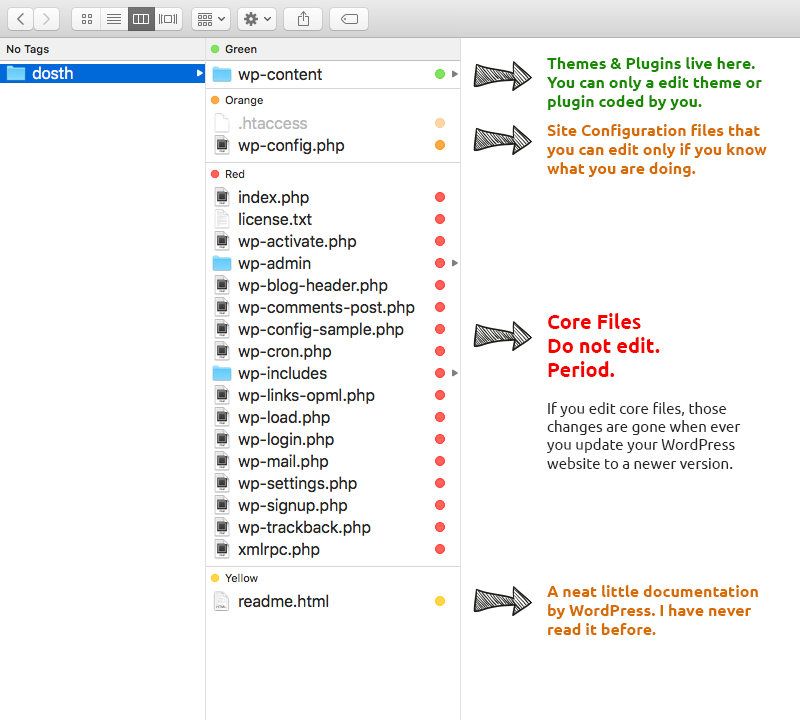
Files inside a WordPress project can be divided into four sections. Let’s go through them one by one.
The wp-content Folder
This is our playground. This is where we keep our themes, plugins and this is where WordPress keeps entire site backups and uploads you made using the WordPress admin dashboard.
The “wp-content” folder is the only folder that you should consider backing up because it contains all your website content except the text content.
Text content is stored in the database. If this folder is gone, you are gone with it.
Along with the themes and plugins that you have developed, you will also find themes and plugins developed by others.
Please do not edit the plugins developed by others.
The plugins are just like WordPress core files.
If the plugin developer releases a better version of the plugin by fixing bugs or security loopholes, you must update the plugin for good and when you do that, whatever changes you made before updating the plugin are gone.
The same applies to the themes as well. There are two types of themes in WordPress.
Parent Theme and Child Theme.
If you are purchasing a theme from marketplaces like StudioPress or ThemeForest, chances are you’ll be installing both the parent theme and child theme and they’d suggest making edits to the child theme.
Just Like plugins, a theme developer from the above-mentioned marketplaces could release multiple versions of the parent theme by fixing bugs or layout issues.
This WordPress tutorial is all about creating a Parent theme.
Now, let’s take a peek inside the wp-content folder.
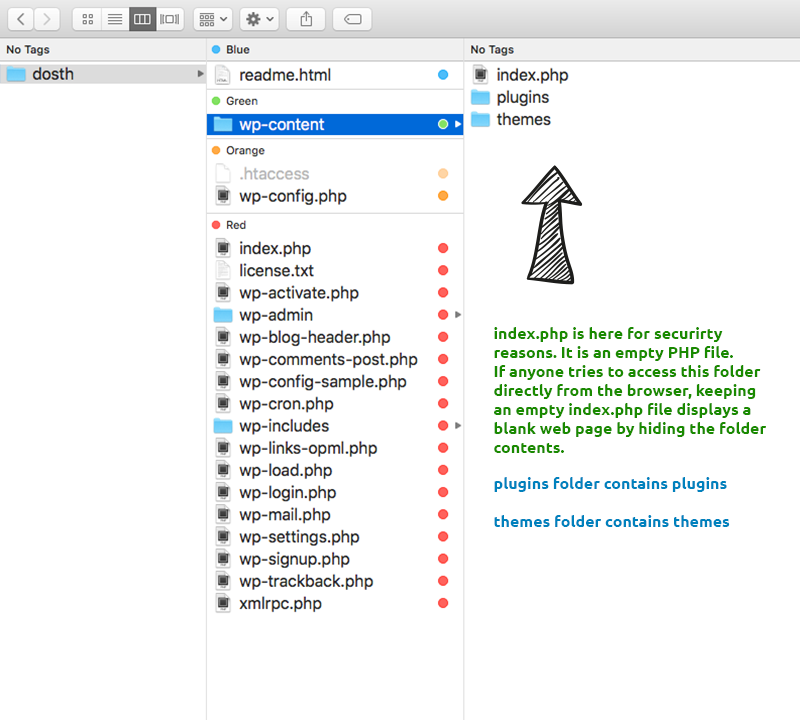
The wp-content folder holds an index.php, plugins folder and themes folder.
The purpose of the index.php file in the wp-content folder, plugins folder and themes folder
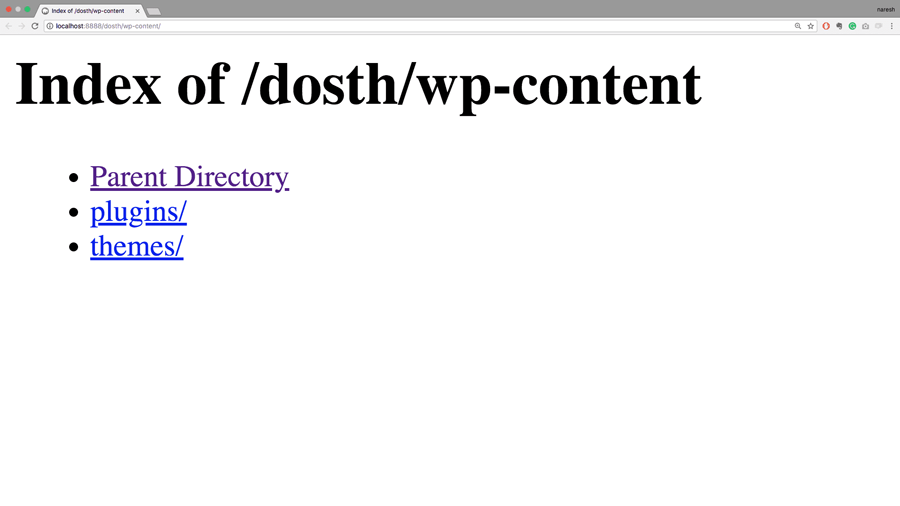
For starters, Let’s go ahead and visit the wp-content folder from the browser.
MAMP users go to http://localhost:8888/dosth/wp-content
What did you see? A blank web page with no content.
“Hey! Wait. I am a novice PHP developer. Why a Blank Page?”
This is the default behavior of any PHP running web server. When we visit the wp-content folder from the browser, here is what happens:
- the browser sends a request to the server.
- The server receives the request, processes it by taking a look at the URL and finds out that there is no file mentioned at the end of the URL. So, it looks for index.php file automatically.
- If the index.php file is found, it returns the contents of the index.php file to the browser. If the index.php file is not found, it reveals the contents of the wp-content folder.
- Since our wp-content folder has an index.php, the server starts processing the index.php.
- The index.php file has only a single PHP comment saying “Silence is golden” and nothing else, so, the server ignores that PHP comment and sends back a response to the browser with no content.
- Browser processes the response and finds out there is nothing to render. Hence renders you an empty webpage.
Now let’s go ahead delete the index.php file temporarily from the wp-content folder.
Did you see what just happened? We exposed our project folders and files to potential hackers and this is bad.
Now put back index.php from your trash folder or whatever and refresh the browser. You’ll see an empty page again.
So, long story short, the purpose of and an empty index.php is to hide the inner folder and file structure of whatever that is inside. In our case, theme and plugin folders.
The purpose of the WordPress plugins folder
A plugin is nothing but a bunch of PHP files extending the functionality of the WordPress.
Whenever we download a plugin from the WordPress admin dashboard, WordPress puts the downloaded plugin inside the Plugins folder.
If you would develop a plugin, it goes into this folder as well.
A plugin can be a single index.php or it can be a bunch of files inside a separate plugin folder.
You’ll also find an index.php file protecting the folder contents.
The purpose of the WordPress themes folder
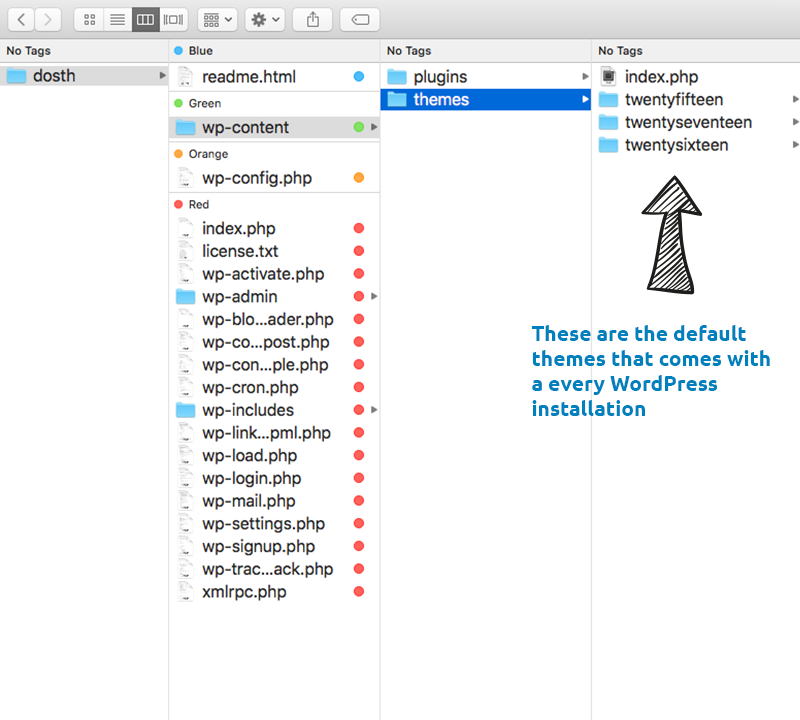
As I mentioned at the beginning of this module, themes developed by you and other programmers go inside this folder.
Again, be careful when you edit themes that are not yours.
Every WordPress installation comes with some default themes. I started my WordPress journey by playing with them.
Because a WordPress theme is nothing but a bunch of PHP, CSS and javascript files, unlike plugins, a theme cannot be a single file. It must be a folder with at least three files.
You’ll also find an index.php file protecting the folder contents.
The Configuration Files
.htaccess and wp-config.php are known as configuration files.
The .htaccess file
The .htaccess help us configure the web page redirects and search engine friendly URLs. It is generated when we are installing WordPress.
It also allows us to put restrictions on what files can and cannot be accessed inside our WordPress installation. So, it also deals with the security of our wordpress website up to a certain level.
The .htaccess file is capable of doing much more; you’ll learn more about this file in the near future.
Important Note: This file is only useful if you are using an Apache server. There is an alternative server to Apache called Nginx and Nginx use nginx.conf instead of .htaccess.
Another Important note for MAMP users: MAMP allows you to change from Apache to Nginx whenever you want. So if you have decided to switch between Nginx and Apache, make sure you use the correct configuration file to save your wordpress installation from breaking.
The wp-config file
The wp-config file is more like a combination of settings and a preferences file. It holds the database connection information like username, password. It lets you turn on or off your PHP debugging.
There is more to this file than database settings. So, in the future lessons, we will be visiting this file from time to time.
The Core Files
The core files contain the actual wordpress functionality.
And right now, there are thousands of developers who are working hard to make WordPress better by adding new features and fixing bugs and security holes.
This is the reason why we receive at least one WordPress software every month.
Every time you update your WordPress installation, modified or not, the core files will get replaced with a complete set of new files.
So, do not ever edit these core files for any reason. You’ll not only lose your changes, but you might also break your website functionality.
If you want to modify or extend the functionality of the WordPress, WordPress allows you to do that using Actions and Filters.
Without Actions and Filters, none of the plugins on WordPress.org would exist. That’s how powerful they are.
That is all.
Now that you have enough knowledge about the surroundings of a WordPress theme, you are good to develop a WordPress theme.
Now let’s start developing your first theme ;)

Beginnings of a WordPress Theme
As I mentioned in the introduction, A WordPress theme is nothing but a bunch of template files, CSS files, Javascript files and few custom PHP files.
So, for a theme to be valid and to function correctly, it must be a folder that contains at least three files.
The three important files
- index.php, a template file that wordpress uses to generate the final web page if no other appropriate template file is found.
- functions.php is optional, but essential as it lets you:
- Create navigation menus,
- Include custom php files for custom functionality
- Control the sizes of images used on the entire website
- Include your CSS and Javascript files in a time-saving yet standard friendly way.
- And a lot more
- style.css, the main stylesheet with theme information in the form of a CSS comment and all the CSS rules you write for your website, should go in here.
Alright, enough theory, let’s start building our first theme.
Since themes reside under the directory wp-content/themes, It is time to open the folder dosth/wp-content/themes inside a code editor. I am using Visual Studio code; you can use your favorite.
Create the theme folder
Inside the folder dosth/wp-content/themes, create a new theme folder and name it nd-dosth.
Generally, you create themes for a client who might end up downloading other themes from the market.
So, it is always a good idea to give a unique name to your theme. I usually keep namespace nd- in front of my theme names, “nd” is my name initial.
Also, a theme name must be URL friendly, So, do not use spaces in your theme names. Use _ (underscore) or – (hyphen instead).
“Hold on! Hold on! Why should a theme name be URL friendly?”
You are familiar with HTML, right? When you link an external CSS file in the head tag, you will use a path that looks something like this http://dosthapp.com/assets/css/style.css
Similarly, for WordPress, since the style.css file resides inside a theme folder, the final link would be http://dosthapp.com/wp-content/themes/nd-dosth/style.css. Not only the style.css file, but this also applies to every file that is publicly accessible on your wordpress website. For example, your theme’s javascript files and images.
Create the index.php, style.css and functions.php files
Now go inside the newly created theme folder and create the index.php, style.css, and functions.php files.
Open up the style.css file and write a special comment with the theme information
style.css file is the main stylesheet file of your theme. It should be placed at the root level of your theme ( wp-content/themes/nd-dosth ) and not inside any other sub-directory of your theme.
If the WordPress couldn’t find a style.css file at the root level, It considers your theme as incomplete, and it won’t let you activate the theme, and it also lists your theme inside Broken Themes section of Admin Dashboard -> Appearance ->Themes panel.

The Special Comment
Comments at the top of a file have a special purpose in WordPress and the style.css file must start with a comment with some general information about the theme. Let’s take a look at it.
/*
Theme Name: Dosth
Theme URI: https://www.usablewp.com/themes/dosth
Author: Naresh Devineni
Author URI: https://www.usablewp.com
Description: Dosth App is the theme designed to teach WordPress Theme Development. You can play around and you can use this for commercial and personal projects.
Version: 1.0.0
License: GNU General Public License v2 or later
License URI: http://www.gnu.org/licenses/gpl-2.0.html
Text Domain: dosth
Tags: two-columns, right-sidebar, flexible-header, accessibility-ready, custom-colors, custom-header, custom-menu, custom-logo, editor-style, featured-images, footer-widgets, post-formats, rtl-language-support, sticky-post, theme-options, threaded-comments, translation-ready
This theme, like WordPress, is licensed under the GPL.
Use it to make something cool, have fun, and share what you've learned with others.
*/
Although the above CSS comment is self-explanatory, let’s take a look at the comment line by line. (*) means mandatory.
- Theme Name (*) is the name of your theme.
- Theme URI is the URL where users can find more information (Usually, Documentation ) about the theme.
- Author (*) should be Your name or Your organization’s. You are the person who is coding this theme, right?
- Author URI is the URL where users can find more information about you or your organization.
- Description (*): A short description of the theme.
- Version (*): The version, written in X.X or X.X.X format.
- License (*): The license of the theme. Since WordPress is downloadable under GNU Public Licence, most people would argue a theme must have the same license. But you can go rogue :P
- License URI (*) is the URL where other people can learn more about the theme’s license.
- Text Domain (*) is used to uniquely identify your theme’s text during translation of the website content to other languages.
- Tags: Words or phrases that allow users to find the theme using the tag filter. A full list of tags is in the Theme Review Handbook. This is generally useful If you or your client installed tons of themes or If you are distributing your theme on WordPress.org
Alright, now, let’s see how WordPress puts this information to use.
Open up your browser and Go to the Admin Dashboard:
http://localhost:8888/dosth/wp-admin
Note: From here onwards, when I ask you to visit the admin dashboard, you must visit http://localhost:8888/dosth/wp-admin
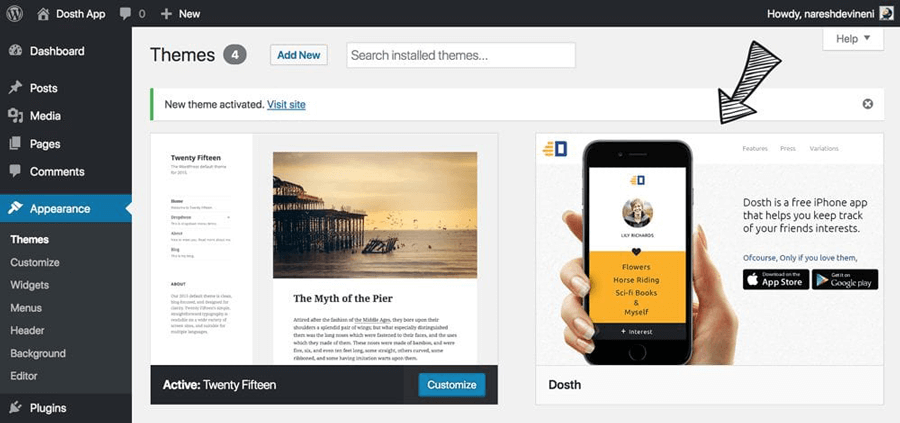
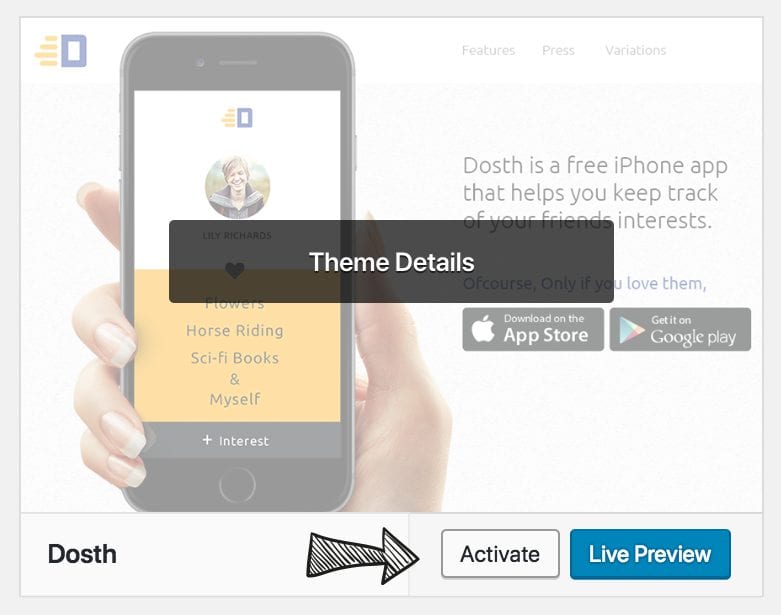
Now Inside Admin Dashboard, Go to Appearance -> Themes. Find the theme that you are developing (Dosth), and put your mouse cursor on it so that you click on the Theme Details button.
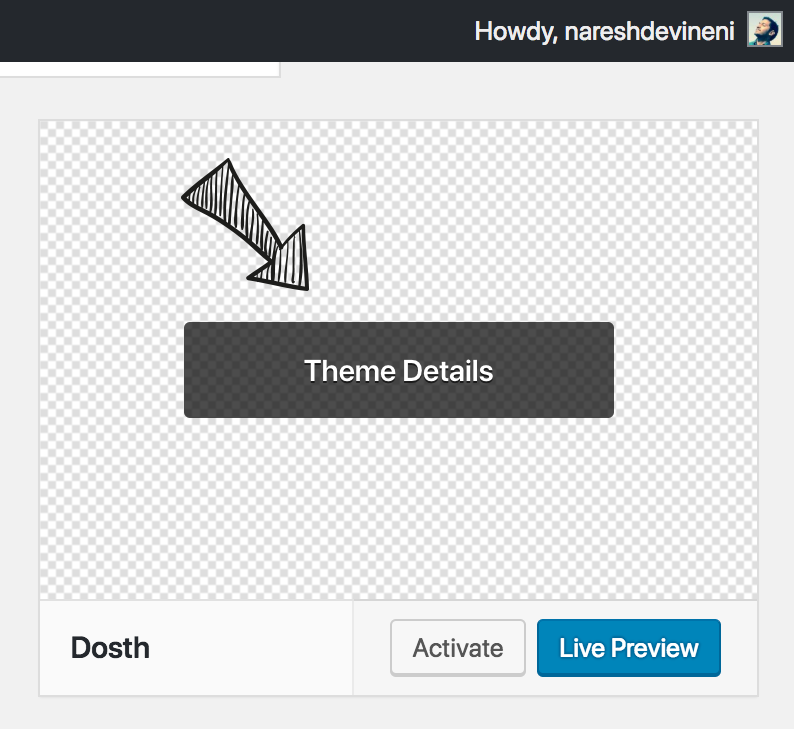
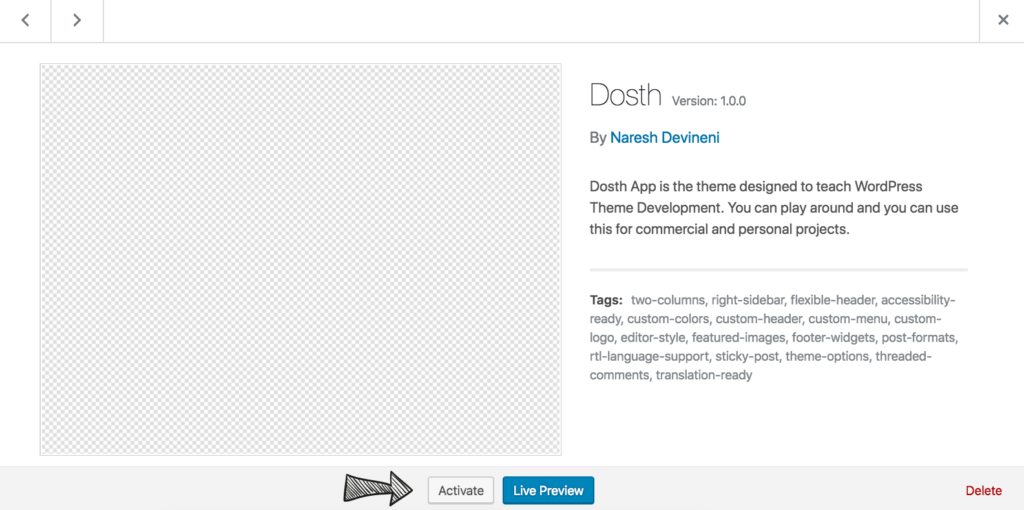
Voila! WordPress is using the style.css file’s comment to display information about the theme for users so that they won’t get stuck.
You can also distribute your styles into multiple CSS files. It is not that you are restricted to use a single style.css file.
The purpose of the WordPress theme screenshot and how to use it
If you notice, other themes in the Themes dashboard panel has a screenshot showing how our website looks when they are activated.
You can quickly add a screenshot to your theme by placing a screenshot.png file inside our theme’s root directory ( wp-content/themes/nd-dosth ).
A screenshot must be 880 x 660px png image file.880 pixels wide and 660 pixels in height. You can create the screenshot using your favorite image editor like Adobe Photoshop.
For this course, I have already created a screenshot.png file. So, Download the below image and place it at the root level of your theme.

Now if you refresh the WordPress Dashboard, you can see that the screenshot.png file is put to good use by WordPress.
How to activate a WordPress theme
Although you have an empty index.php file, Since theme folder has a style.css file with theme information comment at the top, you can technically activate your theme. So, go ahead and activate the theme by clicking on the “Activate” button.
Activated or not, You can also hit “Live Preview” button to find out how a website looks with your theme activated.
If we look at our website by visiting http://localhost:8888/dosth URL, all you would see is a blank web page with no content.
The reason is simple, the theme’s index.php file is empty.
So, to test if our theme’s index.php file is indeed used by WordPress, let’s put some basic HTML inside it, you can copy and paste the below code.
<!DOCTYPE html>
<html lang="en-US">
    <head>
        <title>Dosth App - Home Page</title>
        <meta charset="utf-8">
        <meta name="viewport" content="width=device-width, initial-scale=1">
        <style>
            body{
                background-color:teal;
                color:white;
            }
        </style>
    </head>
    <body>
        <h1>Hi, Howdy! This is the website's home page</h1>
    </body>
</html>
Now, refresh the browser.
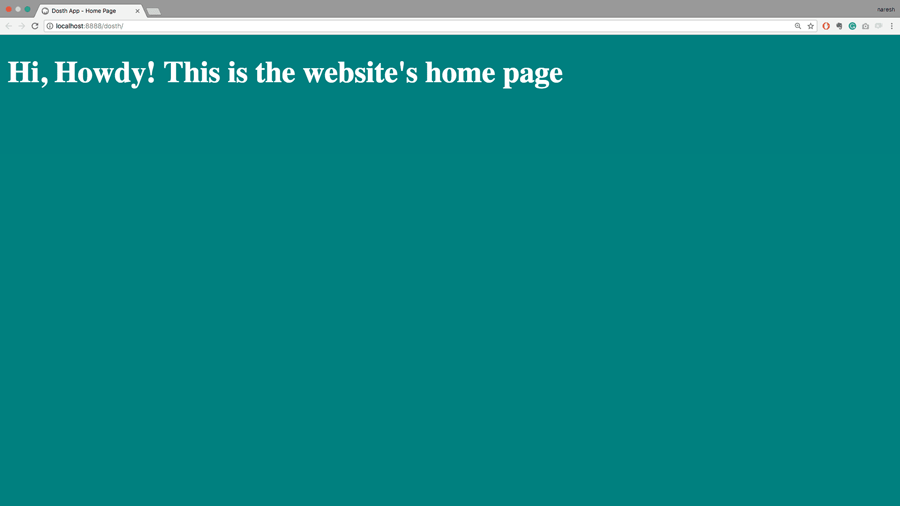
Did you see that? WordPress is processing and displaying the contents of the index.php file to the visitors of our dosth website.
Although you could technically use index.php to render every page on your website, It is just a backup file that wordpress uses to generate the final web page if no other appropriate template file is found.
To give you the ultimate the control on HTML markup and visual presentation of your website, WordPress expects you to create specifically named template files to render your website’s homepage, internal pages, blog page and so on.
For example, When a user visits our site homepage, WordPress looks for front-page.php at the root level of an activated theme.
If wordpress fails to find front-page.php inside our theme folder, then and then only It uses index.php file to render our home page.
Almost every WordPress website you create would have pages for different purposes and understanding how to deal with them in a WordPress way helps us code better and more controllable WordPress websites.
Just to recap, we have created four files in this lesson, so your theme directory ( wp-content/themes/nd-dosth ) should contain the following files:
- index.php
- style.css
- functions.php
- screenshot.png
Next, you’ll learn how WordPress works when someone visits our website and we’ll also take a look at the WordPress template hierarchy( List of WordPress template files and the order that WordPress follows to choose one ).
How WordPress Works
Code Modularity and Code Reusability are the two most important features of WordPress Development. Together, they also improve our code readability.
So, before we code our home page or any other web page using WordPress for that matter, it is essential to understand how WordPress puts together the final Web Page for our website visitors to see.
The Overview of how WordPress generates a web page’s HTML
It all starts with you typing a website URL and into the web browser and hitting enter. For example https://www.usablewp.com
- As soon as you hit enter, Browser checks for the internet connection. If your computer has an internet connection, your computer takes control from the browser and contacts the Domain Name System (DNS) servers and provides them the domain name.
- DNS servers act as a phone directory. They have the IP addresses of the all the available web servers in the world and Domain names associated with them. Once they find a match, They provide the matching server IP address to our computer and our computer hands it back to our web browser.
- Once web browser has the IP address of UsableWP’s web server, it will send it a request asking for a web page. The Web Server receives the URL you entered into the browser along with other request information. It takes a look the URL and checks if there is a file name in the URL.
- Since there is no file name in https://www.usablewp.com, Server starts executing the WordPress core starting with the index.php file. From here onwards, WordPress takes the control.
- WordPress core accesses the requested URL from the server. It parses the URL by dividing into bits and pieces to figure out what you were trying to access.
- For example, if the requested URL is https://www.usablewp.com, WordPress figures out that you are trying to access the home page.
- If the requested URL is https://www.usablewp.com/articles, WordPress figures out you were trying access the Articles page
- If the requested URL is https://www.usablewp.com/category/tips, WordPress figures out you were trying access the all the blog posts from the Tips category.
- You get the idea right??
- Once the WordPress figures out what you were trying to access based on the URL, it pulls out the relevant content from the database.
- If the requested URL is https://www.usablewp.com, WordPress pulls Homepage content from the database.
- If the requested URL is https://www.usablewp.com/category/tips, WordPress pulls all the blog posts that belong to Tips category.
- Once the content from the database is retrieved, WordPress uses the Template hierarchy logic to choose a template file from the active theme. WordPress.org gives us a handy template hierarchy reference in the form of an image. Go ahead and open that up.
- If the requested URL is https://www.usablewp.com/category/tips, WordPress finds out that you are trying to access blog posts within “Tips” category and:
- Looks for a template file in the active theme’s directory that matches the category’s slug. In our case, the category slug is “Tips”, So WordPress looks for a template file named
category-tips.php.
A slug is just a “URL and Database friendly” name of our “Tips” category. The primary motto of a slug is simple. It helps website visitors to guess what a web page is about by taking a glance at the URL. - If
category-tips.phpis not found, then WordPress looks for a template file namedcategory-{id}.php. Every category in WordPress comes with a unique numerical ID. An ID is generated by WordPress after creating a particular category. For example, if the Tips category has the ID of let’s just say 10, then WordPress looks forcategory-10.phpfile - If
category-10.phpfile is not found, then WordPress will look for a generic category template file,category.php. - If
category.phpis missing, then WordPress will look for a generic archive template,archive.php. - If
archive.phpis also missing, then WordPress will fall back to use the default theme template file,index.php.
- Looks for a template file in the active theme’s directory that matches the category’s slug. In our case, the category slug is “Tips”, So WordPress looks for a template file named
- If you are looking at template hierarchy reference, you could see that WordPress chooses template files starting from the left-most side of the diagram.
- You must use the filenames suggested by the WordPress when creating template files, otherwise, WordPress fails to recognize them, hence it doesn’t end up using them. Don’t worry, you don’t have to memorize them. Instead, bookmark the template hierarchy reference.
- Now, I could go through the entire template hierarchy, but that is boring ain’t it? We will go through it in detail as we build our website pages.
- If the requested URL is https://www.usablewp.com/category/tips, WordPress finds out that you are trying to access blog posts within “Tips” category and:
- After choosing the template file, WordPress passes the database content to it and processes the code inside the template file to generate final HTML.
- Once the final HTML is generated, the server takes that and sends as a response to the browser.
- Once the browser gets the HTML, it goes through it line by line and paints the final web page on to the screen.
That’s all. Nothing complicated. At the end of the day, the browser receives the plain HTML, CSS, and Javascript.
Unless caching is involved, It is important to remember that, the entire WordPress core files are being executed everytime you access a page, even if you refresh the same page.
For example, let’s just say, you are on the Homepage of UsableWP’s website and have decided to contact us by clicking on the contact link available on the primary navigation of the website.
The entire 11 step process that I mentioned above, repeats.
Basically, That’s how the web works. The web page life cycle starts as soon as the browser receives a response from the server and ends when the user closes the browser tab or browser itself.
The important realization about WordPress Template Hierarchy files
It is important to realize that, you don’t have to create every file from template hierarchy reference. You can avoid creating all the fallback files and create only the first preference files like front-page.php and generic template files like page.php.
For example:
- Most the small business websites will have the same UI design of all the internal pages like About, Contact us etc. In this scenario, you can create page.php and use it render all those internal pages.
- If all the categories like freebies, design tips etc. have the same UI design, use category.php for rendering all those category pages.
- You learn more about these decisions while coding our Dosth App theme
Our choices for the template files differ from project to project. At the end of the day, it all boil downs to Project needs. If you want more control over markup, use template hierarchy reference to create more files for more purposes.
Now that you understand how WordPress works from a high-level point of view and how it uses templates and template hierarchy for rendering the final web page, you are ready to start coding your WordPress theme.
Next, we will learn how to create a static Homepage of a WordPress Site.

How to build the Homepage of a WordPress Website
Let’s take a look at our home page design and its associative WordPress files.
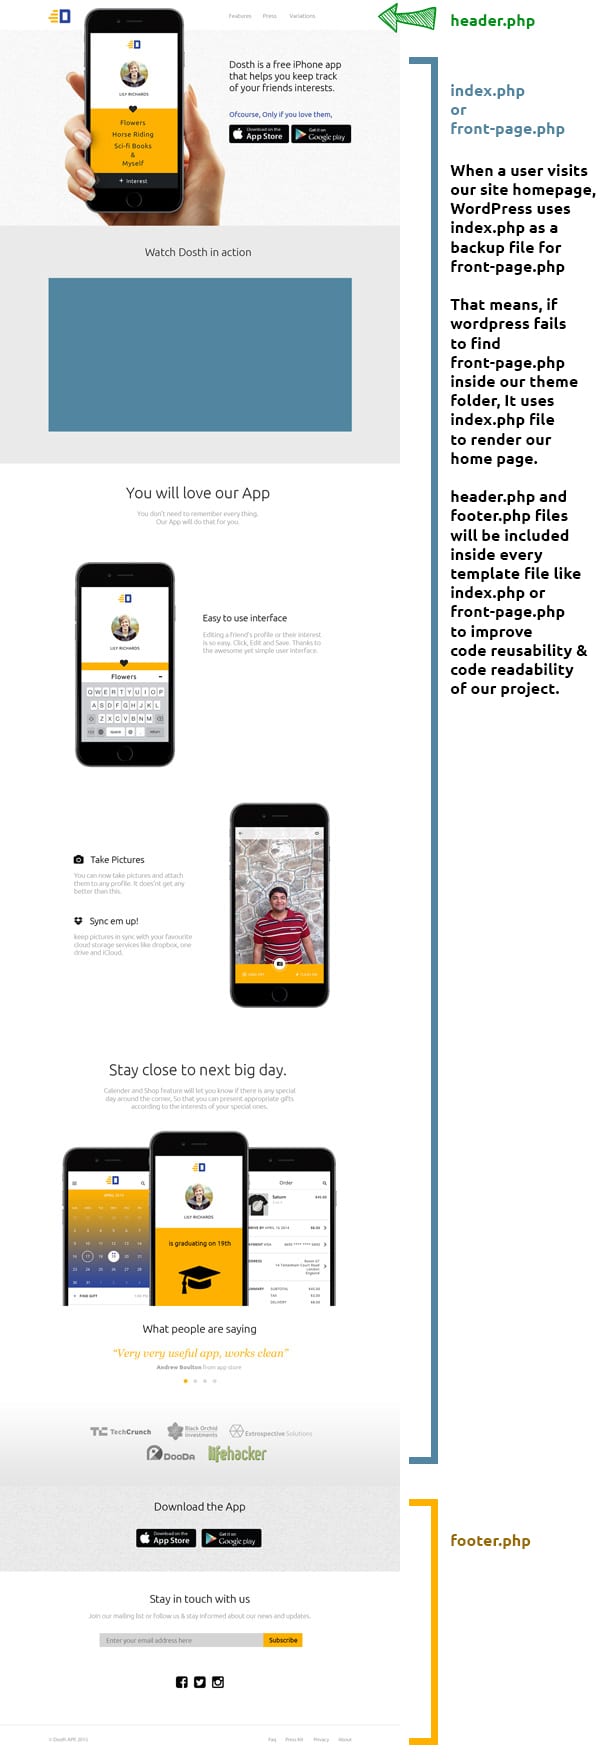
Header and Footer Files
Every website has a header and footer, and from a design perspective, they look same on every page of that website.
So, it makes complete sense to put them in their own separate files so that we re-use them in other internal pages along with our homepage.
WordPress allows us to create modular header and footer sections by letting us create header.php and footer.php files.
1) The header.php file contains all the markup that goes inside a typical website header.
- HTML5 doctype, meta tags, stylesheet links
- The markup for displaying Logo and Navigation
- Typical header content that is present on every page of the website. For example, logo, navigation.
2) The footer.php file contains all the markup of typical footer portion of a website.
- Any closed HTML tags that we opened in the header.php file. For example,
</body></html> - script tags
- Typical footer content that is present on every page of the website. For example, a copyright statement.
Creating the header and footer files is not mandatory, WordPress doesn’t force you to create them in any way.
But it suggests you create those files for improving code modularity and reusability.
These header.php and footer.php files will be included inside every template file like index.php or front-page.php to render header and footer portions of the webpage.
“Haha! Whenever there is a change in the header and footer of my client’s website, I used to edit every HTML file of the project. Now, I don’t have to go through that. Thanks to PHP and WordPress”.
Exactly! Code modularity is more a PHP feature. But WordPress takes it a step further with easy to use functions like get_header() and get_footer().
Yikes! Did I reveal the spoilers?
The front-page.php file for Static Home Page
When it comes to WordPress, it allows us to have two types of home pages.
- A Home Page with latest blog articles. Matt’s Website is the perfect example of a Home Page full of blog articles. Between, he is the founder of WordPress <3.
- A Static Home Page with sections like “our services”, “Our Team”, “App Features”. Did you saw the above design? It is a perfect example of a Static Home Page.
WordPress uses
- The front-page.php file for rendering a static home page
- The home.php file for rendering a blog based home page
The header.php and footer.php files will be included inside the front-page.php file to render header and footer portions of the Homepage. The markup for the main content of the Homepage goes directly inside the front-page.php
Also, we are using the word “Static” for a reason. Once the content is finalized, the content like App Features, Services list etc. will stay same and rarely need any edits. So every time when someone visits our website’s homepage. They will stay the same.
And this is the complete opposite of a Homepage with only the latest blog articles. Depending on how often an author publishes articles on the blog, the content of the website’s homepage is never the same. Get it?
Since our Dosth App website’s homepage is designed to showcase information about Mobile App with sections like “App Features”, “App Download” buttons and Since they are less likely to change for days to come, it comes under a “static page”.
Let’s create them
Now, that you understand the responsibility of the above mentioned three template files, let’s create these files inside our nd-dosth theme directory ( wp-content/themes/nd-dosth ).
- header.php file
- footer.php file
- front-page.php file
After creating these three files, your theme directory contains the following files:
- index.php
- style.css
- functions.php
- header.php
- footer.php
- front-page.php
- screenshot.png
Let’s put some basic HTML code inside the header.php and footer.php files
Open up the header.php file and place the following code in it:
<!DOCTYPE html>
<html lang="en-US">
    <head>
        <meta charset="utf-8">
        <meta name="viewport" content="width=device-width, initial-scale=1">
    </head>
    <body>
Nothing much going on in the above HTML code.
Although we have opened <html> and <body> tags, we did not close them. The closing </html> and </body> tags must be placed at the end of the webpage. The closing </html> tag marks the end of the webpage.
So, which template file holds the footer portion of a webpage?
“footer.php file”
Correct! So, open up the footer.php file and put the closing </html> and <body> tags in it.
   </body>
</html>
For now, We are just closing the tags that we opened inside the header.php file.
I can’t stress this enough. During WordPress theme development, it is quite common to forget to close an HTML element after opening it.
This happens because we are working on multiple template files to render a single webpage.
So, be alert.
Let’s deal with the front-page.php file
Open up the front-page.php file inside your code editor.
Almost every WordPress template file starts with a PHP comment explaining the purpose of the file.
Sometimes it is mandatory, sometimes it is not. But having a comment at the opening of the every template file helps other coders who get access to these template files.
So type the following comment inside your front-page.php file.
<?php
/**
 * The front page template file.
 *
 * If the user has selected a static page for their homepage, this is what will
 * appear.
 * Learn more: http://codex.wordpress.org/Template_Hierarchy
 *
 * @package Dosth App
 */
The above comment is self-explanatory. It is saying what front-page.php file does.
Next, since every HTML web page starts with a Doctype, you have to include the header.php file just after the above comment.
In a tradition PHP project, you have to use require_once() or include() functions to include contents of one file into another.
But WordPress gives us the following handy functions to include one file inside another.
- get_header() is used to include header.php file inside other template files like index.php, front-page.php, page.php, etc.
- get_footer() is used to include footer.php file inside other template files like index.php, front-page.php, page.php, etc.
- get_template_part() is used to include a particular chunk of content markup or PHP code inside all the template files.
WordPress gave these handy functions a fancy name called Template Tags.
Introducing WordPress Template Tags
Don’t panic. It is just a buzzword. Simply put, A template tag is a PHP function that instructs WordPress to “do” or “get” something.
For example, get_header() template tag gets the header.php file from the active theme and includes it inside other template files.
Now, WordPress ships with a ton of template tags for every purpose and only some of the template tags deal with the files.
The lot of them pull and display tiny pieces of content from the database. In fact, most of the functions that you are going to use inside the template files are template tags.
Here is the full list of template tags from the WordPress Codex:
https://codex.wordpress.org/Template_Tags
Important Realization: You can use the template tags only inside the template files. That means you can not use the template tags inside functions.php or any other custom PHP code files that you are including inside functions.php file.
Back to the front-page.php file
So to include header.php file inside front-page.php file, call get_header() function just after the PHP comment and end the PHP tag.
<?php
/**
 * The front page template file.
 *
 * If the user has selected a static page for their homepage, this is what will
 * appear.
 * Learn more: http://codex.wordpress.org/Template_Hierarchy
 *
 * @package Dosth App
 */

 get_header();
 ?>
Now, we’ll place some dummy HTML markup just to test if WordPress is front-page.php for our Homepage. So, type the following text after the PHP end tag.<h1>This is home Page!</h1>
And finally, after the dummy text,
- open the PHP tag
- Include the footer.php by calling get_footer() function call.
- Close the PHP tag
The final front-page.php file looks like this:
<?php
/**
* The front page template file.
*
* If the user has selected a static page for their homepage, this is what will
* appear.
* Learn more: http://codex.wordpress.org/Template_Hierarchy
*
* @package Dosth App
*/
get_header();
?>
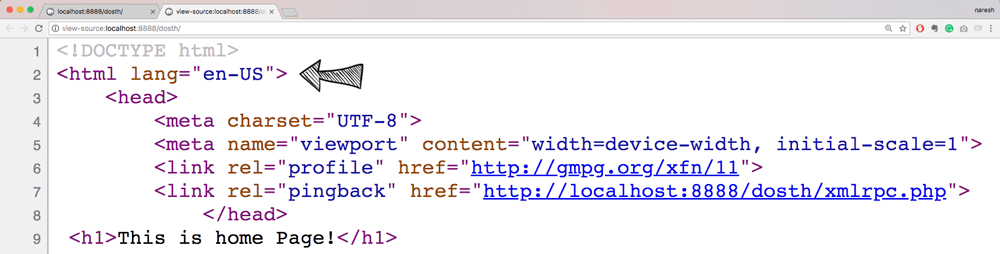
<h1>This is home Page!</h1>
<?php get_footer(); ?>
HTML and PHP get along well. You can open and close PHP tags unlimitedly.
Alright, it is time to test our front-page.php file. Go ahead and open up the Homepage of our Website in the browser. If you are using WAMP omit “:8888″ section from the URL.
http://localhost:8888/dosth/
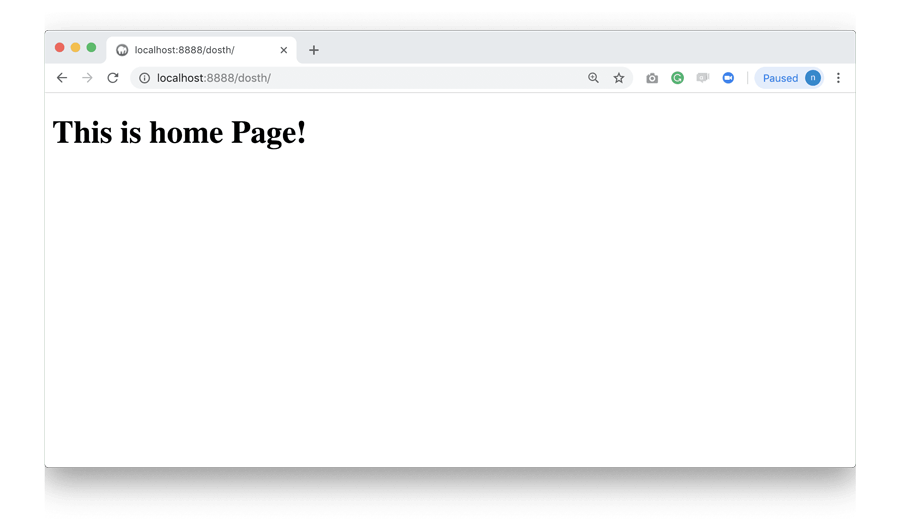
Ah! WordPress is indeed using front-page.php for the home page.
If we take a look at the page source, we can also see the markup from header.php and footer.php files
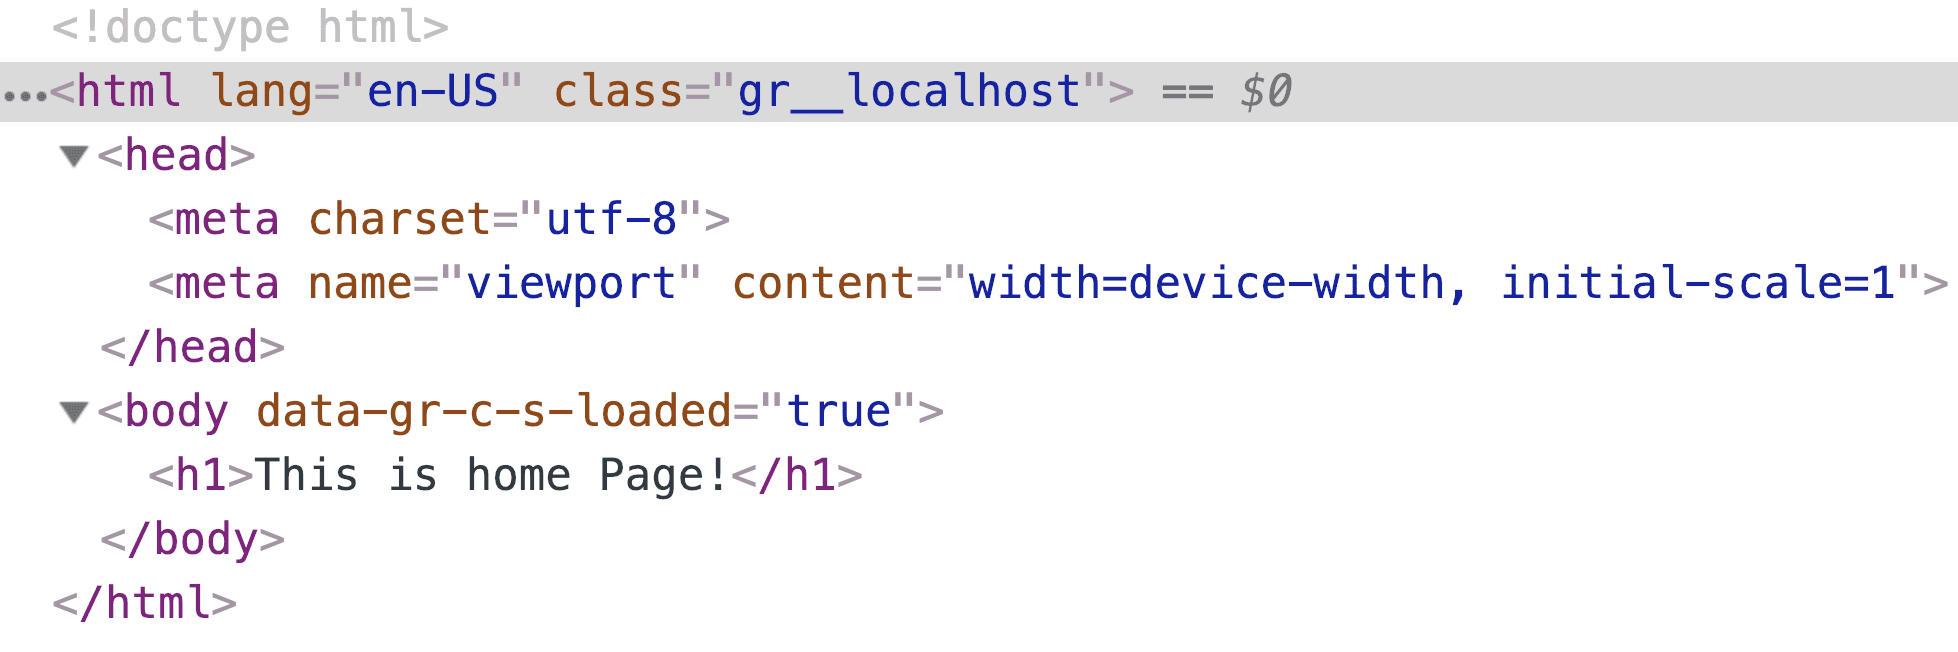
Now, let’s map the above Homepage’s page-source with the files from our nd-dosth theme.
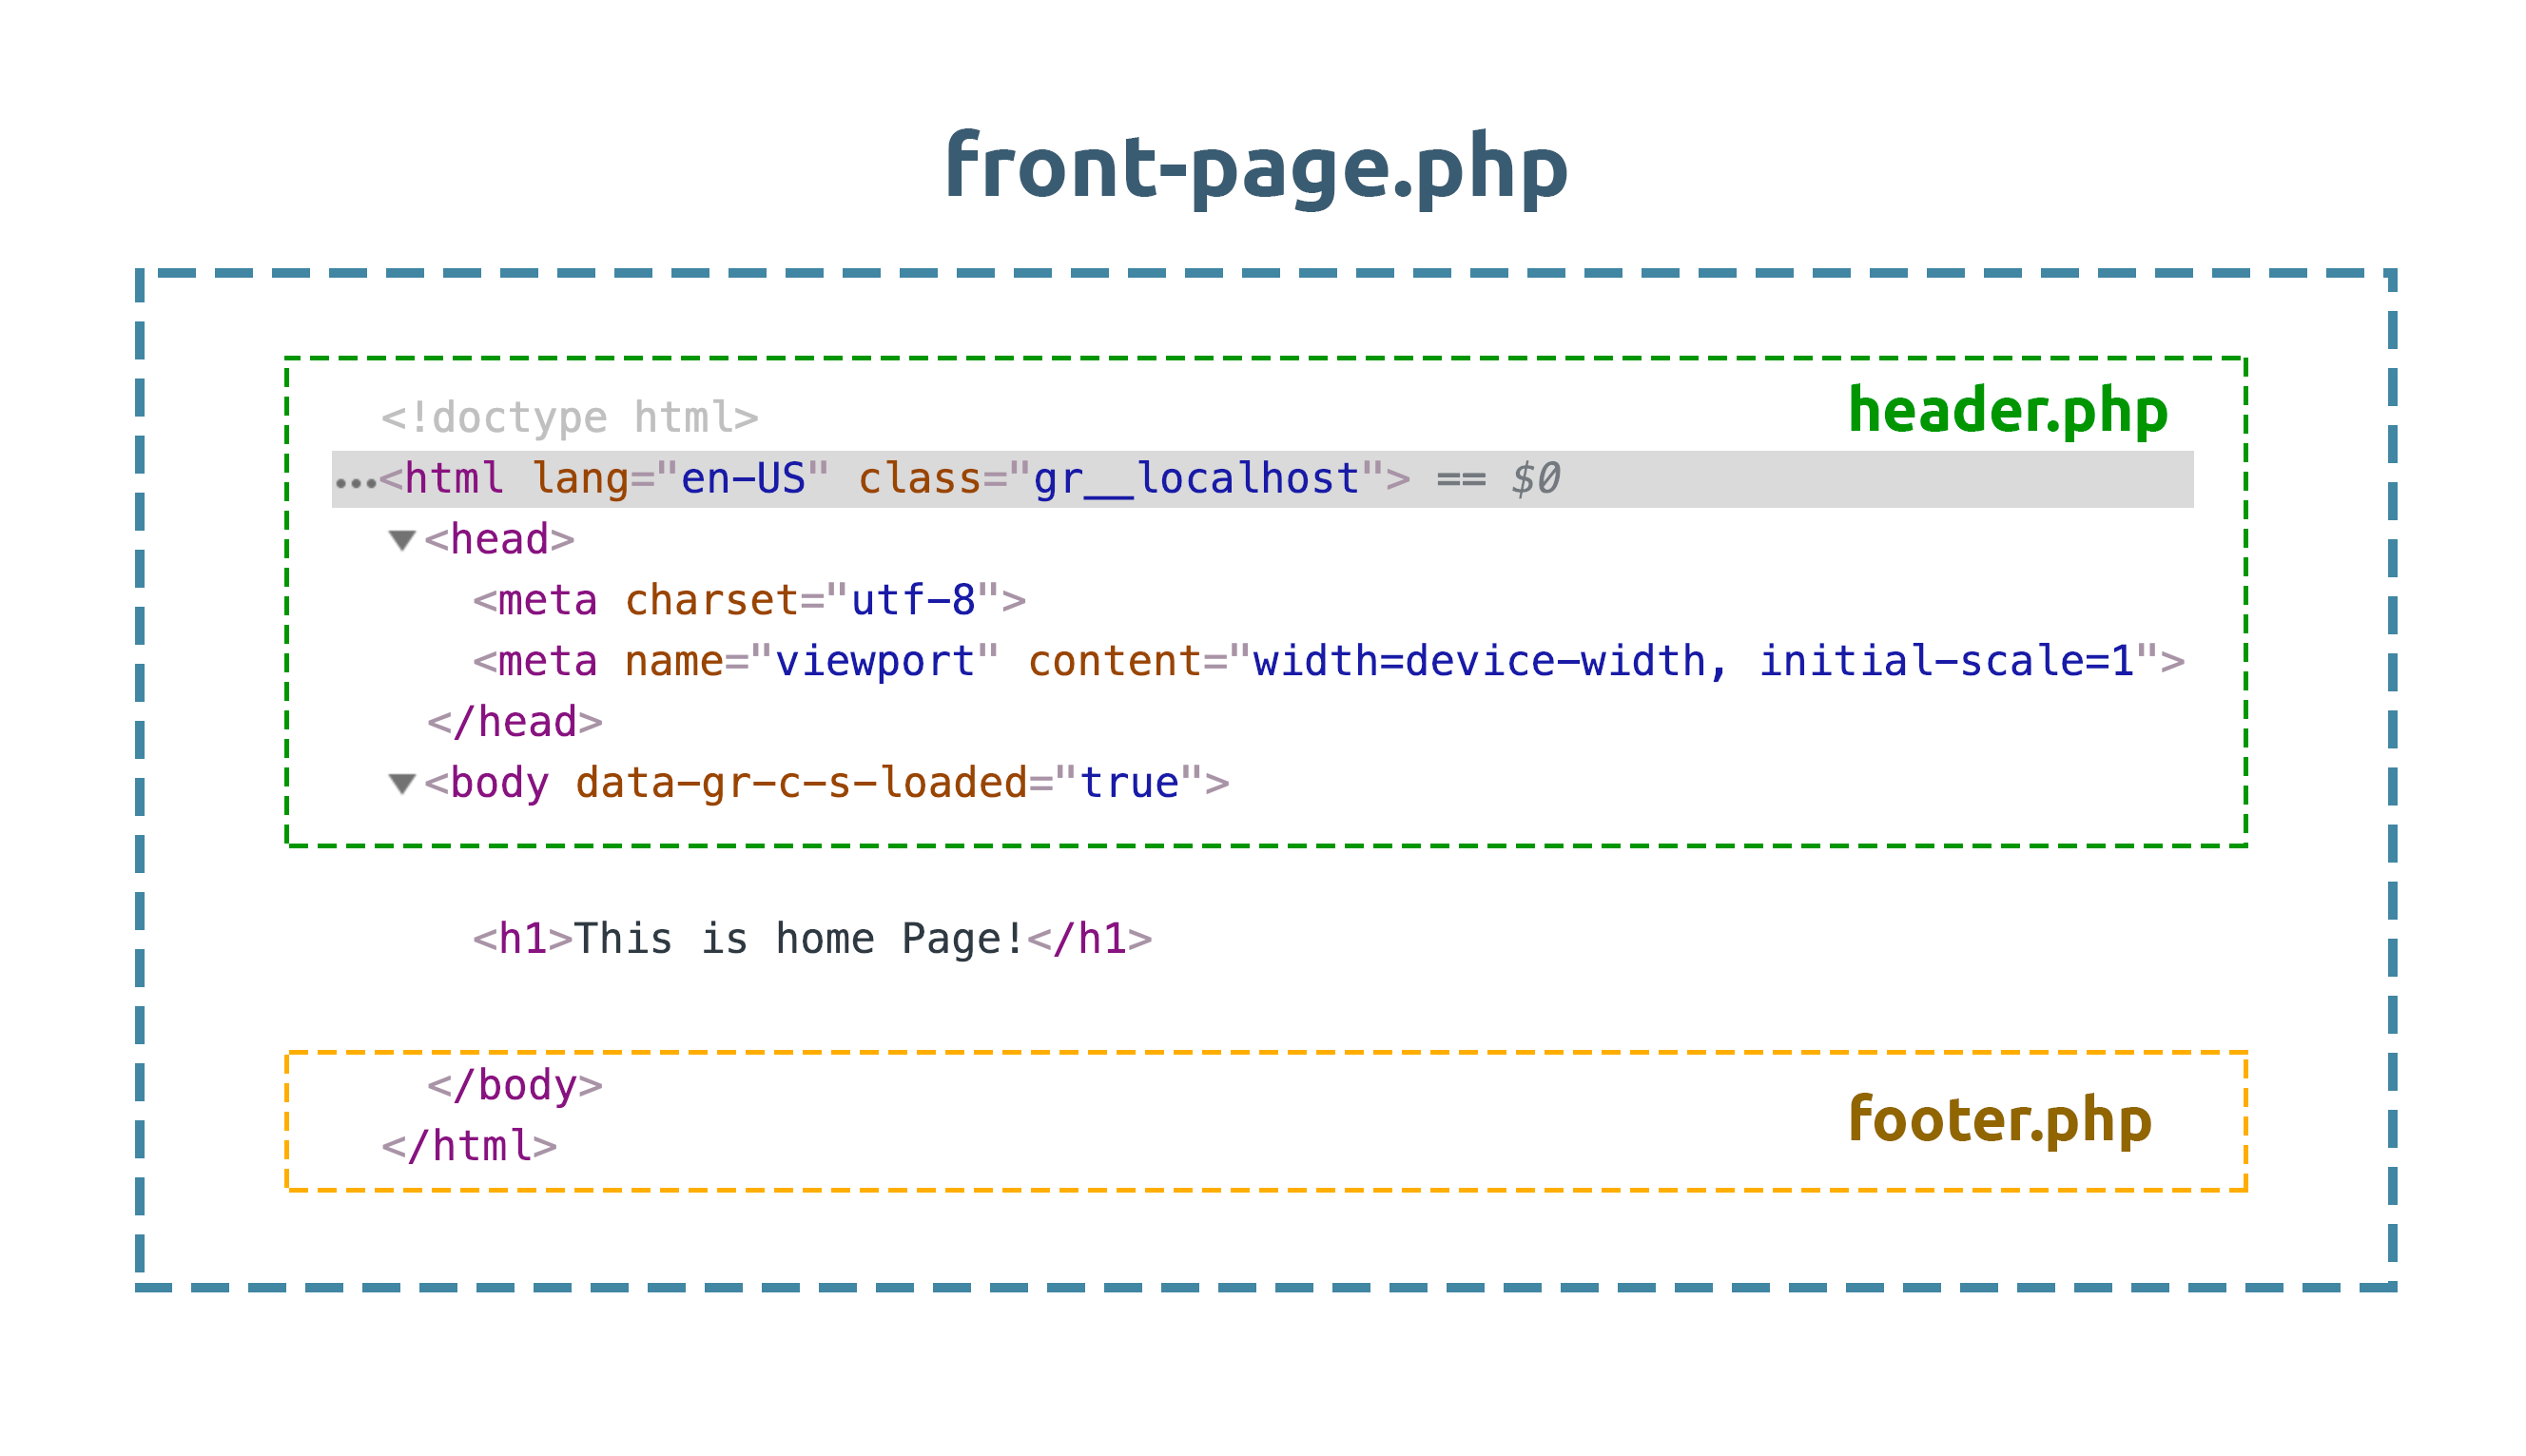
See that? This is how WordPress stitches the final webpage together and sends it to the browser.
Now, You have to tell WordPress which type of homepage you are going after. By default, WordPress uses front-page.php to display the latest blog posts.
But we need a Static Homepage.
You can change the default WordPress behavior by changing a simple radio button setting inside the WordPress Admin Settings panel and you’ll learn how to do this next.
How to set WordPress Homepage
Setting up a Static WordPress homepage involves two steps.
- Create a new page using WordPress Admin -> “Pages” panel
- Link the newly created page to “A static page” option under:
WordPress Admin -> Settings -> Readings -> Homepage Displays.
By doing this, you are telling WordPress that “Hey I want a Static page for my homepage and use the Title, content, custom content fields and Feature Image of the selected page when generating the final home page that website visitors see”
Get it? My bad, a lot of theory! Now let’s see this in action.
Step 1: Create a WordPress “Home” Page
You already know how to create a WordPress page, right?
Go ahead and create a page and name it “Home”.
I always choose to give “Home” as the title because this page holds primary content for the homepage. It also helps me quickly recognize it later.
We will revisit this page soon to enter some content and add feature image.
Step 2: Link the newly created page to “A static page” option
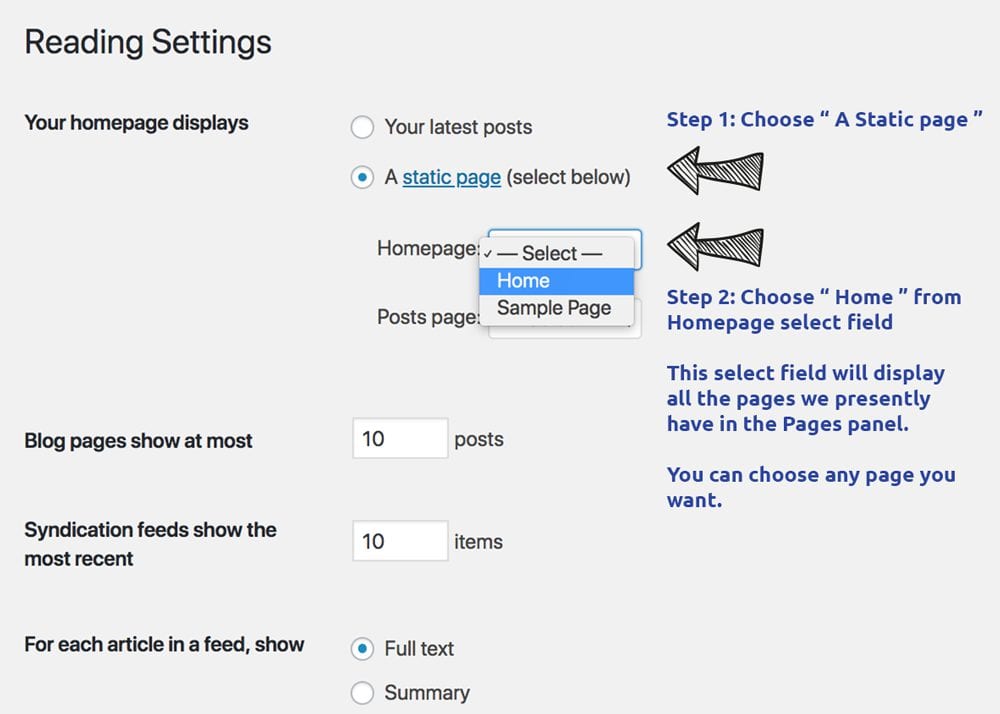
For now, let’s go ahead and open up Settings -> Readings from the WordPress Admin menu
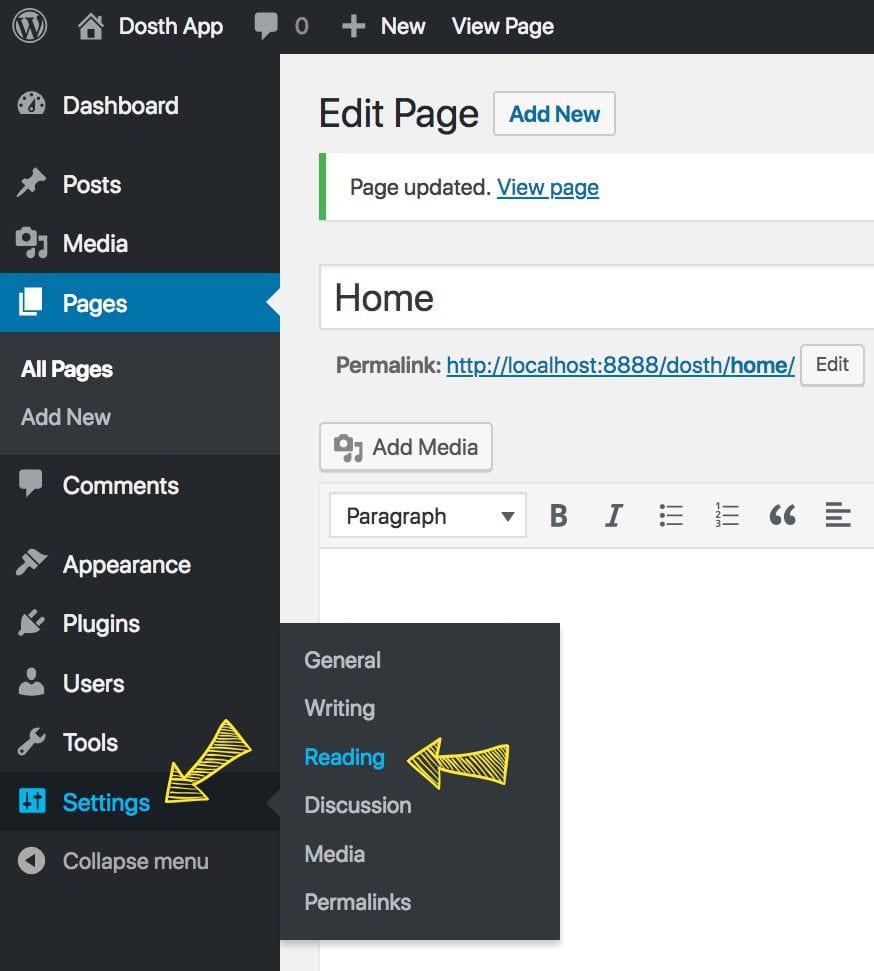
At the top of the page, you’ll find “Your homepage displays” section. Choose “A Static page” and then click on “Homepage” drop-down field.
It displays every page with “Publish” status. You can choose any page you want.
Select The “Home” page which you created a few moments ago and hit “Save Changes” button.
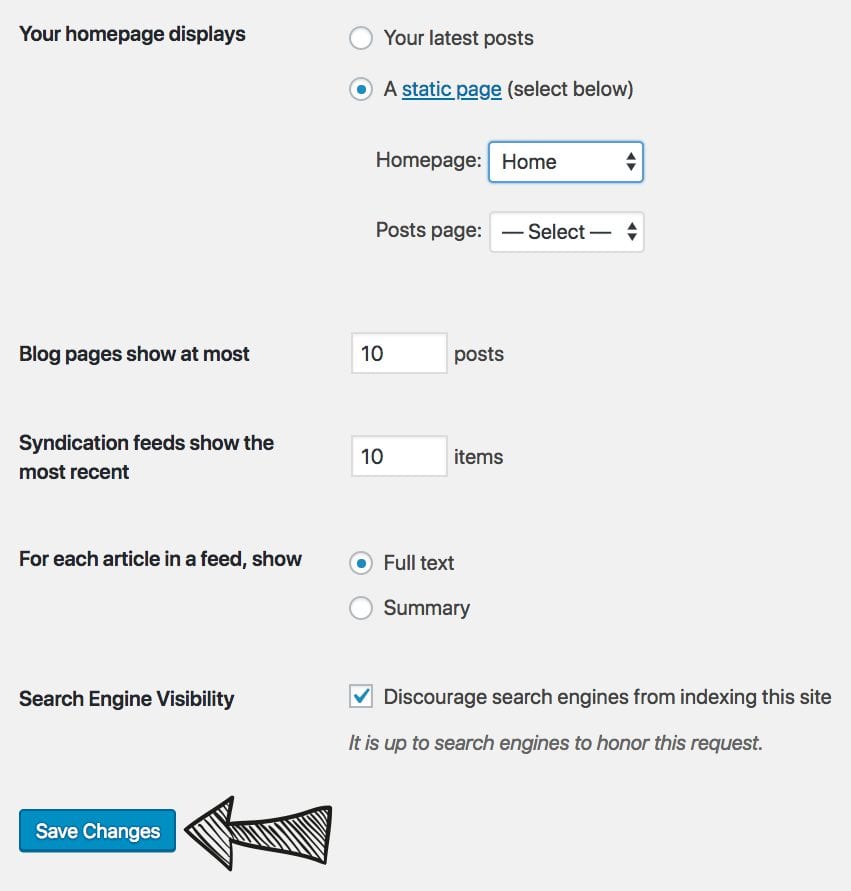
“Hey! I can also see the “Sample Page” in the Dropdown, What is the purpose of that?”
Since our WordPress installation is fresh, WordPress comes with a default “Sample Page” so that beginners can play around it. Ignore that.
If possible delete the “Sample Page”.
Now, that you have successfully configured home page settings, next, we will build our home page piece by piece starting with the main header of the website.
The Action plan for building the standards-friendly WordPress Homepage
Be it Action hooks or Sidebars, Almost 80% of the total WordPress theme developments concepts revolves around and header and footer of a WordPress site.
So, we will be spending quite a bit of time building the header and footer.
“But, what about the main content of a page?”
It’s too damn easy. All you have to do is learn a concept called “The Loop” and you are good to go. But building the header and footer portions of a WordPress forces you to understand almost all the important concepts of WordPress.
So, first we will build the header, then footer and finally, we will learn how to build the main content of the Homepage by mastering the “The Loop”.
Then, we will use these skills to build the rest of the site at a very rapid pace. The only time taking thing here is CSS. Simply put, we will start slow, but we will pick up the pace at the middle of this course.
So, please spend a lot of time on header and footer and proceed forward only after fully understanding the important concepts. If you are stuck, please do message me at any point.
With that being said, let’s start building our site’s header.
WordPress Theme: Building the “head” tag
Building the header of a website not just means adding a logo and navigation that our site visitors see, It is much more than that.
Open up the header.php file from the active theme ( wp-content/themes/nd-dosth/header.php ) and let’s replace the existing code with the following code:
<!DOCTYPE html>
<html <?php language_attributes(); ?>>
    <head>
        <meta charset="<?php bloginfo( 'charset' ); ?>">
        <meta name="viewport" content="width=device-width, initial-scale=1">
        <link rel="profile" href="http://gmpg.org/xfn/11">
        <link rel="pingback" href="<?php bloginfo( 'pingback_url' ); ?>">
    </head>
    <body>
Now, let’s go through it line by line.
1) The Doctype
Let’s start with <!DOCTYPE html> . If you have done any amount of HTML coding, you would be familiar with its doctypes.
They tell the web browser what kind of document the file is so that the web browser correctly parses the HTML as you intended it.
In our case, We are telling the browser we used HTML5 to code our web page.
HTML5’s doctype is forward-compatible and straightforward. That means even if we are using future versions like HTML6 or HTML7, we can still use <!DOCTYPE html> .
2) The Language Attribute
<html <?php language_attributes(); ?>>
Is not just an opening <html> tag.
See the language_attributes() PHP function? It tells the natural language of the web page to the browser.
It aids accessibility by helping assistive technologies like screen readers to choose correct voice profiles and accents.
Now, let’s watch how a screen-reader is making good use of the attributelang on YouTube. Notice how it changes the accent and voice profile.
For more information, Adrien Roselli has penned a fantastic article on the attribute lang. Do read it.
Now let’s see what language_attributes() PHP function is generating.
Save the header.php file and open up Homepage in the browser:
http://localhost:8888/dosth
Visually, you will see this nothing but same old “This is home Page!” text.
But if you view the source of the page, based on the language you have chosen during WordPress installation, you could see the attributelang="en-US" on the html tag.
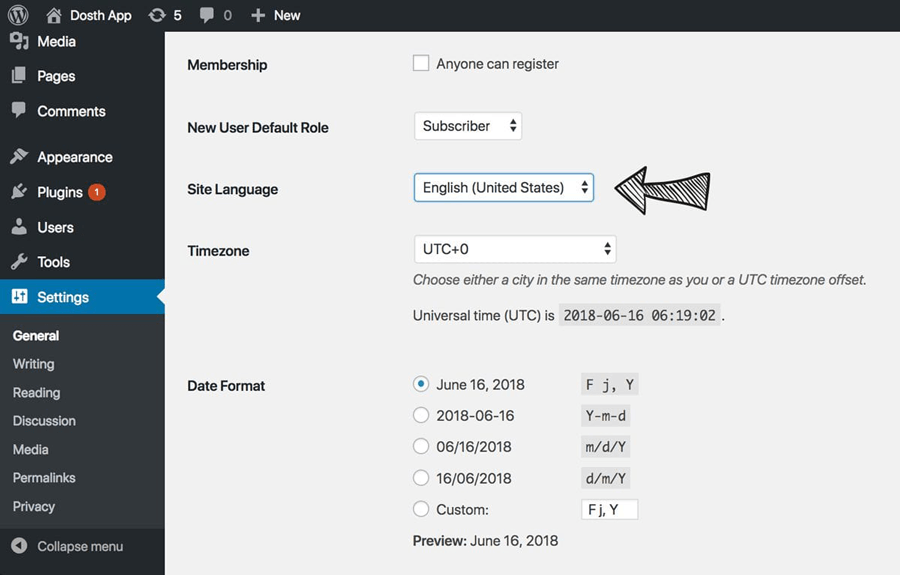
You can also change the website language by going to:
Admin Dashboard -> Settings -> General -> Site Language
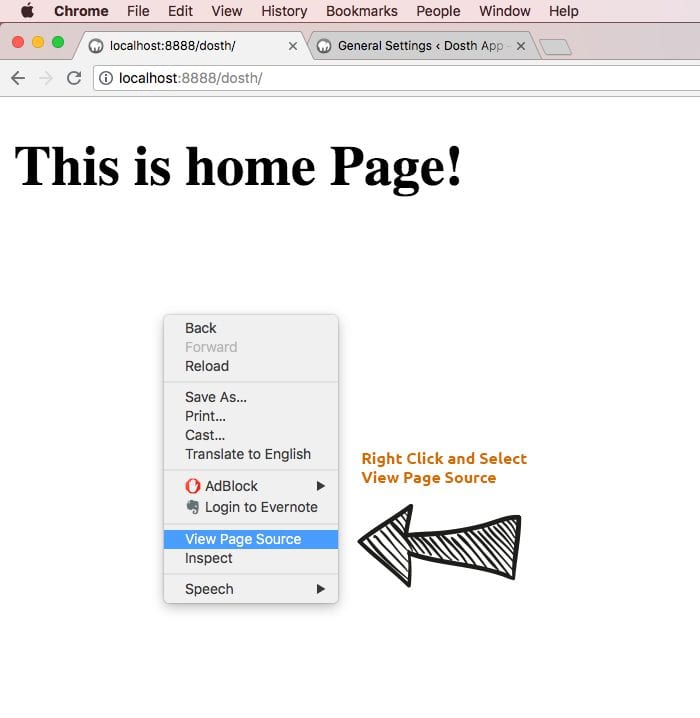
“Hey, How to View Page Source? :D”
For Google Chrome and Firefox, You can right click and select “View Page Source”.
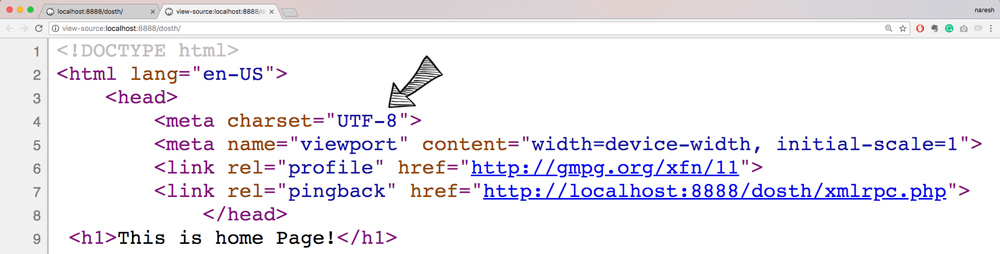
3) Now, let’s jump into the head element. We are outputting the character set of the document using bloginfo( 'charset' ). Now let’s see what output it has generated by viewing page source.
Introducing the bloginfo() WordPress function
As the name suggests, bloginfo()function retrieves a single piece of your website information from the database and echoes it to the browser.
This WordPress function accepts a single parameter which tells WordPress what information it should echo to the browser.
And, ‘charset’ is one of the values that bloginfo()function accepts.
We will learn more about this WordPress function as we progress through the course.
If you are curious, you can see the full list of parameter values in the following WordPress Codex page:
https://developer.wordpress.org/reference/functions/bloginfo/
And, if you have no idea about “Charsets”, please read the following in-depth guide where I explained everything in a detailed fashion:
Introduction to Character Set and Character Encoding For WordPress Users
3) The Viewport Meta Tag
Ahh, Finally we are moving on to the next HTML meta tag inside the <head> element.
<meta name="viewport" content="width=device-width, initial-scale=1">
The viewport meta tag allows us to activate responsive web design.
If you forget to include this meta tag with width="device-width" value, your website will look same on desktop browsers and mobile browsers with a couple of significant differences:
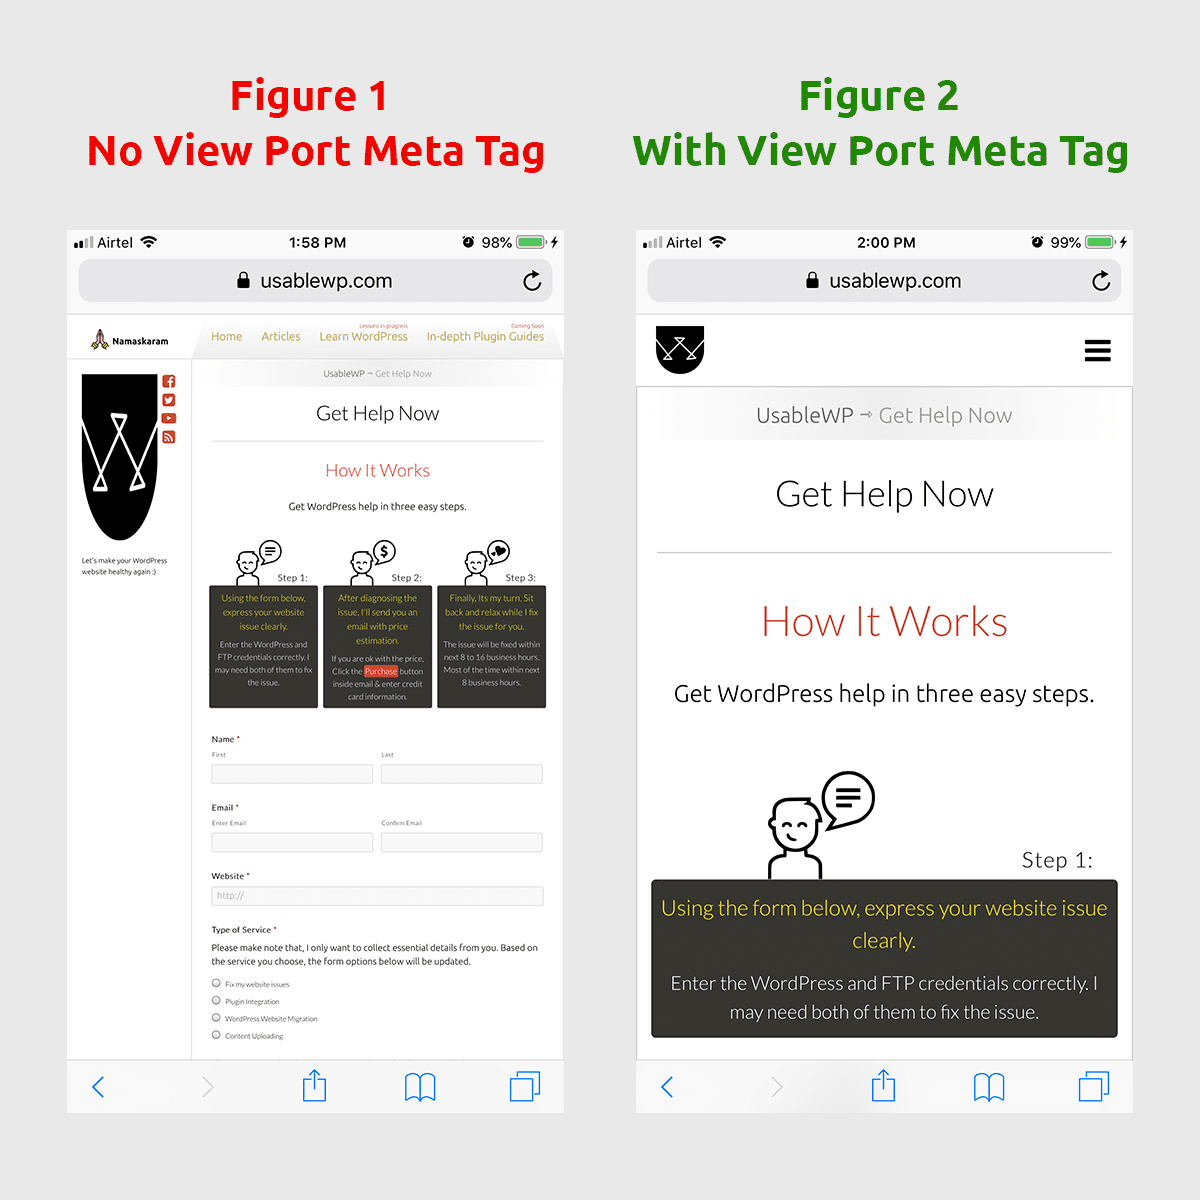
We are using iPhone 7 Plus’s Safari browser.
The image on the left represents a webpage without a viewport meta tag. The iPhone 7 Plus’s screen width is 414px. But it is behaving as if it has 1280px width.
The image on the right represents web page with <meta name="viewport" content="width=device-width, initial-scale=1"> tag.
By seeing the content="width=device-width" value, the mobile browser now thinks it has to stick to the device’s actual screen size, 414px and adjusts the layout of the elements on the web page accordingly.
"initial-scale=1"Tells the mobile browser about the initial zoom level of the webpage. For example, if we set it to 2, the mobile browser renders the web page in the following way!
- Your CSS media queries are no longer accurate.
- On mobile browsers, your website will look like the 2x scaled-up of the above screenshots.
Next comes:
<link rel="profile" href="http://gmpg.org/xfn/11">.
For the time being, let’s call this the XFN Link Tag. If you have no clue about this, please read the following tutorial to understand deeply about XFN Link Tag:
Demystifying WordPress’s mystery XFN link tag
4) The Pingback URL
The next and final link tag in the line is:
<link rel="pingback" href="<?php bloginfo( 'pingback_url' ); ?>">
This link tag enables Pingbacks on your website.
Simply put, Pingbacks notify you when someone from another website links to one of your blog posts or pages.
I know this explanation is a bit vague. You’ll understand pingbacks better if we practically use them in our WordPress blog.
So, we’ll come back to Pingbacks when we start working on our blog. Fair Enough?
When you are building a WordPress theme, you are building a website at the same time, so, It is essential to have a solid understanding of the above-mentioned concepts.
Next, let’s see how to add favicon inside the <head> tag.
How to change WordPress favicon
If you don’t know what favicons are, they are the little icons you see all the time without even knowing that they are favicons.
You can see them on the browser tabs. In fact, if you open up 10 browser tabs at the same time, Favicon helps you quickly recognize the tab you want to visit back.
If properly configured, We can also use the favicon as an App Icon on our mobile device’s home screen. It acts as a visual bookmark which allows us to access a web page quickly.
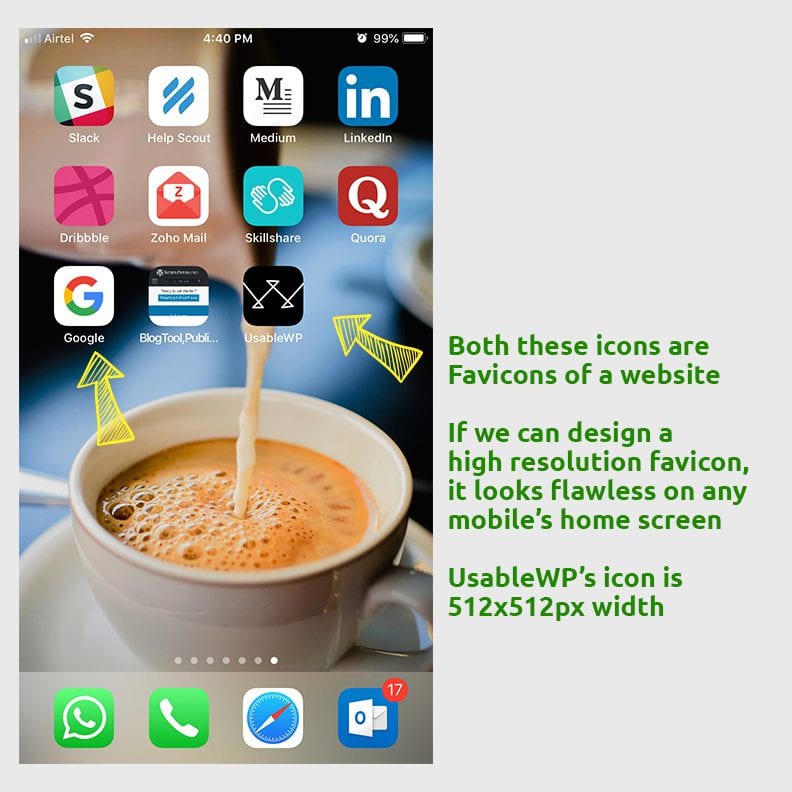
It looks amazing, right?
So, how do we add a favicon to our WordPress website?
It is simple, all you have to do is go to:
Admin Dashboard -> Appearance -> Customize -> Site Identity
By default, the Site Identity options panel will let you add or change your website name, Tagline and site Icon. You’ll also learn how to add more options to the panel at a later point in this course.
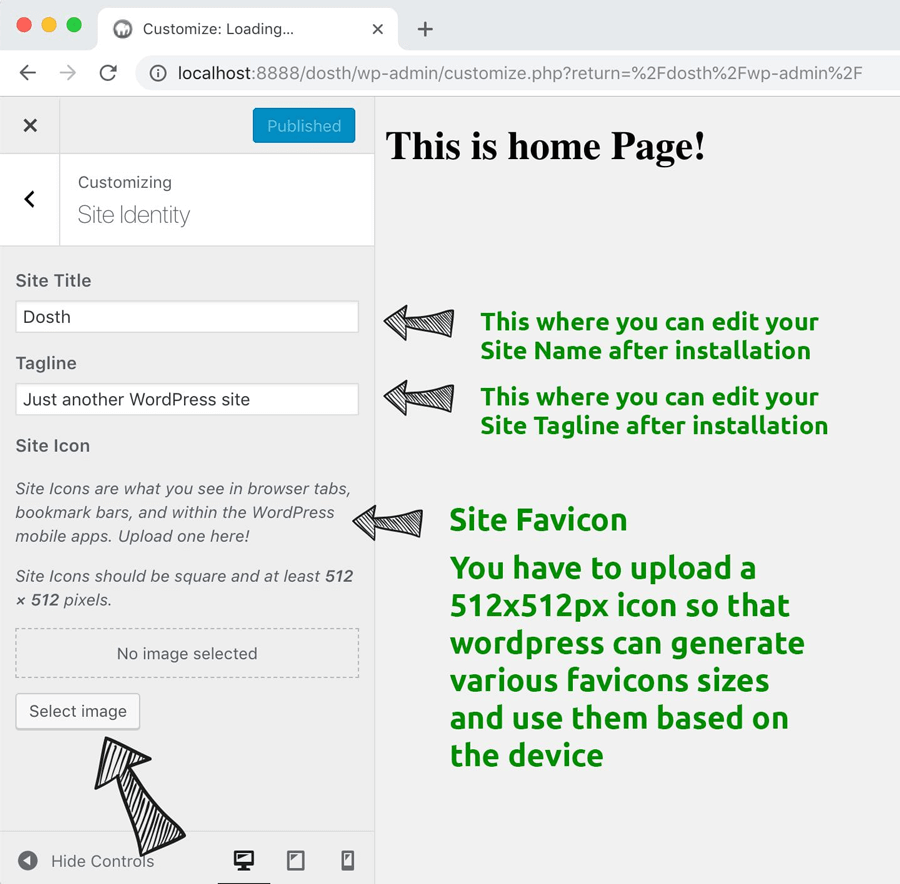
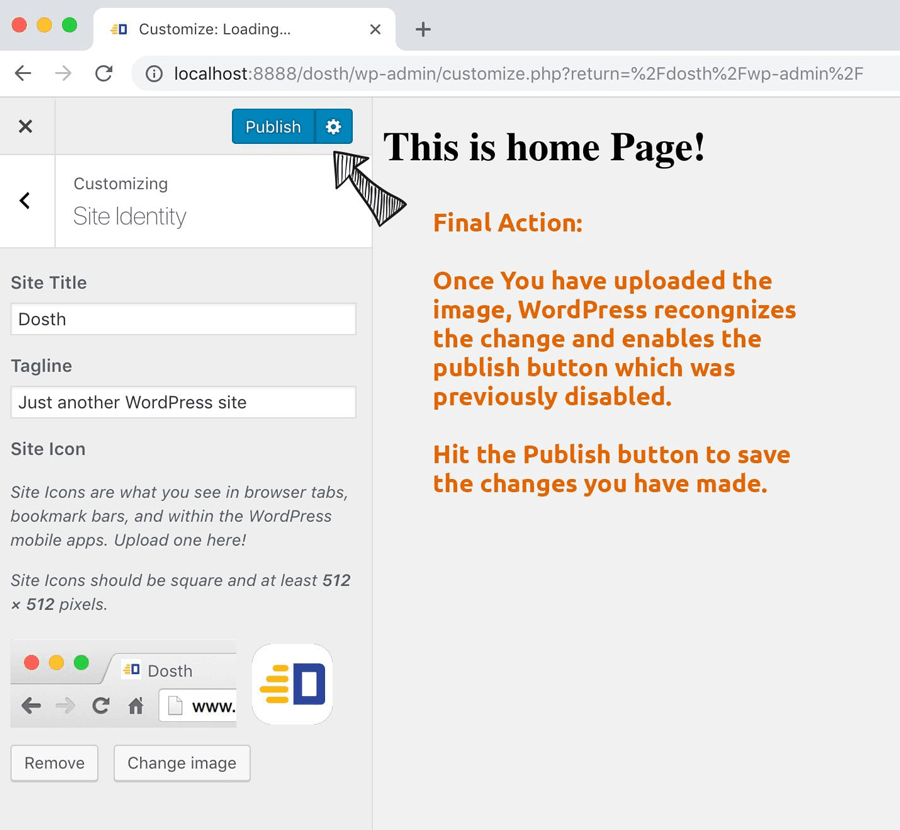
Also, pay attention to the Publish button at the top of the options. We did not modify any of the fields inside the Site Identity options panel yet, so the publish button is currently disabled.

Anyway, Under the Site Icon section, Click on the Select Image button, choose a 512x512px png icon that represents your brand, and click on the Publish button to save changes.

For the purposes of this course, you can download the below image and upload it.

“Hey! A 512x512px icon is quite big both in dimensions and file size. Why does WordPress recommend such a big image size for such a small icon?”
Good question! Visitors access your website using a variety of devices with various screen sizes which demands you to provide various icon sizes for the favicon.
Some of them are retina screens and some of them are regular non-retina screens. It could be a mobile, tablet, phablet, laptop, or a desktop with various operating systems like Windows, macOS, Android, IOS, etc.
Before 2016, I used to add a code similar to the code that you see below. The following HTML covers every single device that is out there as of 2018
<link rel="apple-touch-icon-precomposed" sizes="57x57" href="apple-touch-icon-57x57.png" />
<link rel="apple-touch-icon-precomposed" sizes="114x114" href="apple-touch-icon-114x114.png" />
<link rel="apple-touch-icon-precomposed" sizes="72x72" href="apple-touch-icon-72x72.png" />
<link rel="apple-touch-icon-precomposed" sizes="144x144" href="apple-touch-icon-144x144.png" />
<link rel="apple-touch-icon-precomposed" sizes="60x60" href="apple-touch-icon-60x60.png" />
<link rel="apple-touch-icon-precomposed" sizes="120x120" href="apple-touch-icon-120x120.png" />
<link rel="apple-touch-icon-precomposed" sizes="76x76" href="apple-touch-icon-76x76.png" />
<link rel="apple-touch-icon-precomposed" sizes="152x152" href="apple-touch-icon-152x152.png" />
<link rel="icon" type="image/png" href="favicon-196x196.png" sizes="196x196" />
<link rel="icon" type="image/png" href="favicon-96x96.png" sizes="96x96" />
<link rel="icon" type="image/png" href="favicon-32x32.png" sizes="32x32" />
<link rel="icon" type="image/png" href="favicon-16x16.png" sizes="16x16" />
<link rel="icon" type="image/png" href="favicon-128.png" sizes="128x128" />
<meta name="application-name" content=""/>
<meta name="msapplication-TileColor" content="#FFFFFF" />
<meta name="msapplication-TileImage" content="mstile-144x144.png" />
<meta name="msapplication-square70x70logo" content="mstile-70x70.png" />
<meta name="msapplication-square150x150logo" content="mstile-150x150.png" />
<meta name="msapplication-wide310x150logo" content="mstile-310x150.png" />
<meta name="msapplication-square310x310logo" content="mstile-310x310.png" />
Imagine If you have to generate all those images, How painful is that? I used to go through that pain. But you don’t have to.
You are learning and creating WordPress websites in 2019.
Instead of providing various favicon sizes upfront, WordPress eliminates the burden for you by automatically generating different favicon sizes and the necessary HTML <head> element markup by detecting the device and its properties like OS, screen size, etc.
Let’s see it in action.
For example, if you are opening up the website in a MacBook Pro Retina model or a Laptop that is running Windows 8 or 10, it will generate the following markup for the favicon.
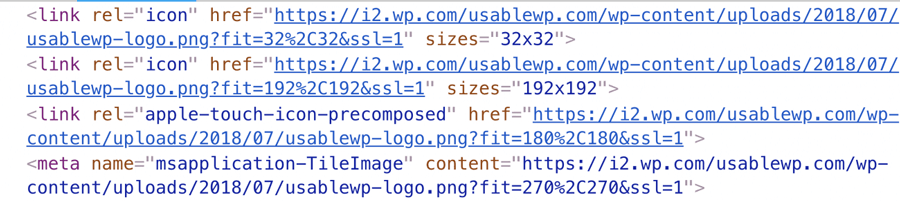
Quick Info: Notice the msapplication-TileImage meta tag? This meta tag is used when we try to pin a website to the Windows 10/8 Start window
Feeling lucky?
Now, let’s go ahead and test the favicon icon by visiting the Homepage of the website.
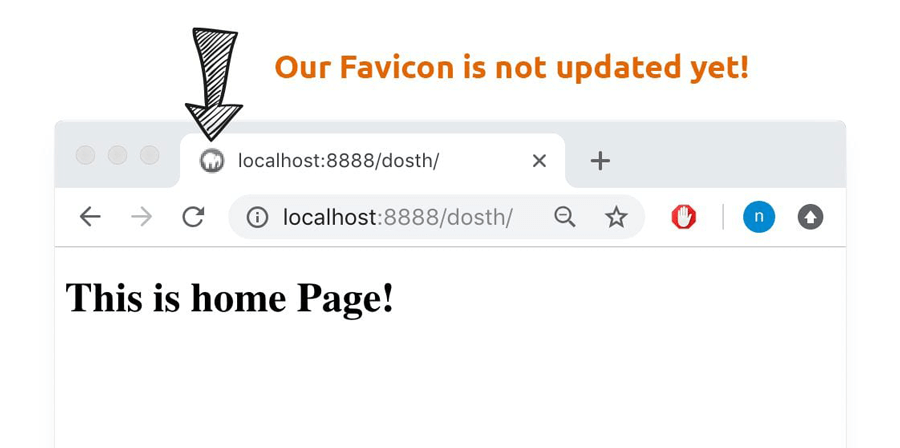
Oh! We can not see the favicon on the browser tab. What could go wrong?
If we view the page source, the favicon markup is not even generated by WordPress.
And it is happening for a reason! We have uploaded the icon, but, WordPress needs one more instruction from us “The Theme Developers”.
Sometimes WordPress relies on certain hooks to generate the markup.
For example, in the case of the favicon, the markup must be present inside the <head> element for the browser to recognize and use the icon.
But WordPress doesn’t guess where we put the <head> element.
After all, we are the theme developers and WordPress gives us the ultimate control over the HTML markup.
So, we need to explicitly tell WordPress that “Hey WordPress, this is the <head> element of the webpage, feel free to generate any kind of HTML markup that goes inside this <head> element”.
And how do we tell that? Introducing the wp_head() function!
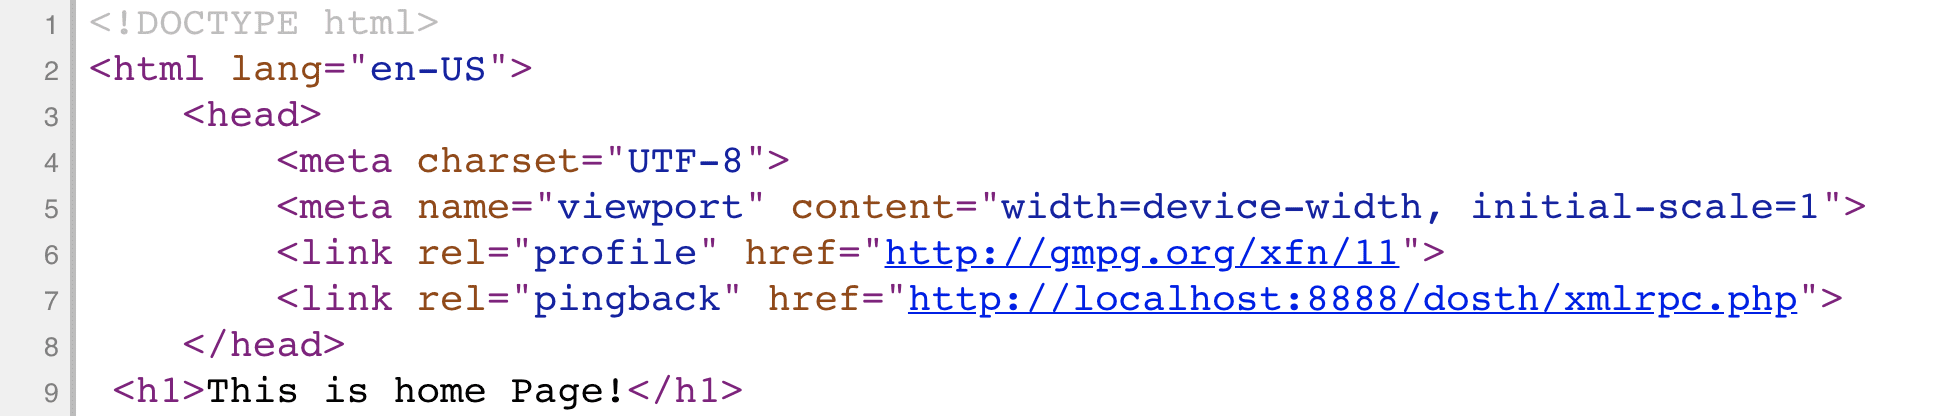
Go back to the Code Editor, open up the header.php file inside the nd-dosth theme, and place the wp_head() function just before the closing </head> tag, like this:
<head>
   <meta charset="<?php bloginfo( 'charset' ); ?>">
   <meta name="viewport" content="width=device-width, initial-scale=1">
   <link rel="profile" href="http://gmpg.org/xfn/11">
   <link rel="pingback" href="<?php bloginfo( 'pingback_url' ); ?>">

   <?php wp_head(); ?>
</head>
Now, go back to the browser and refresh the Homepage (http://localhost:888/dosth).
Tada! Now we can see the favicon.
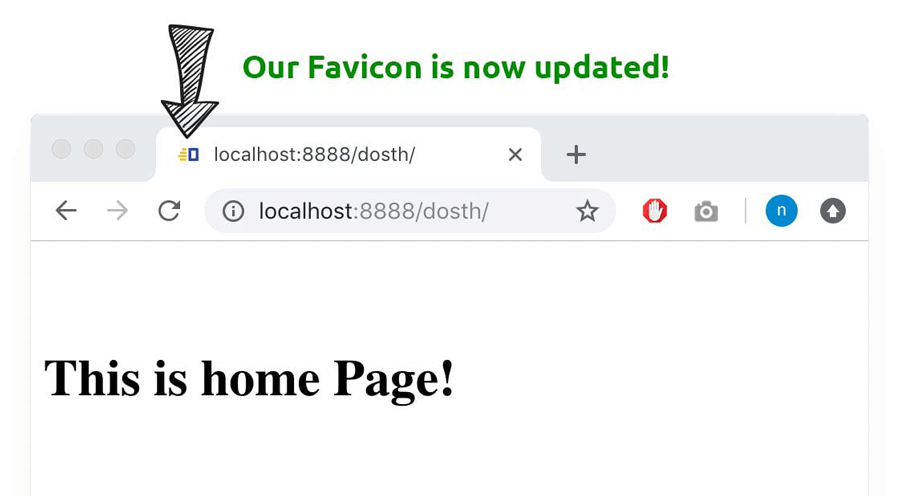
Also, if we take a look at the page source now, we can see the favicon related markup as well as a ton of other scripts and styles.
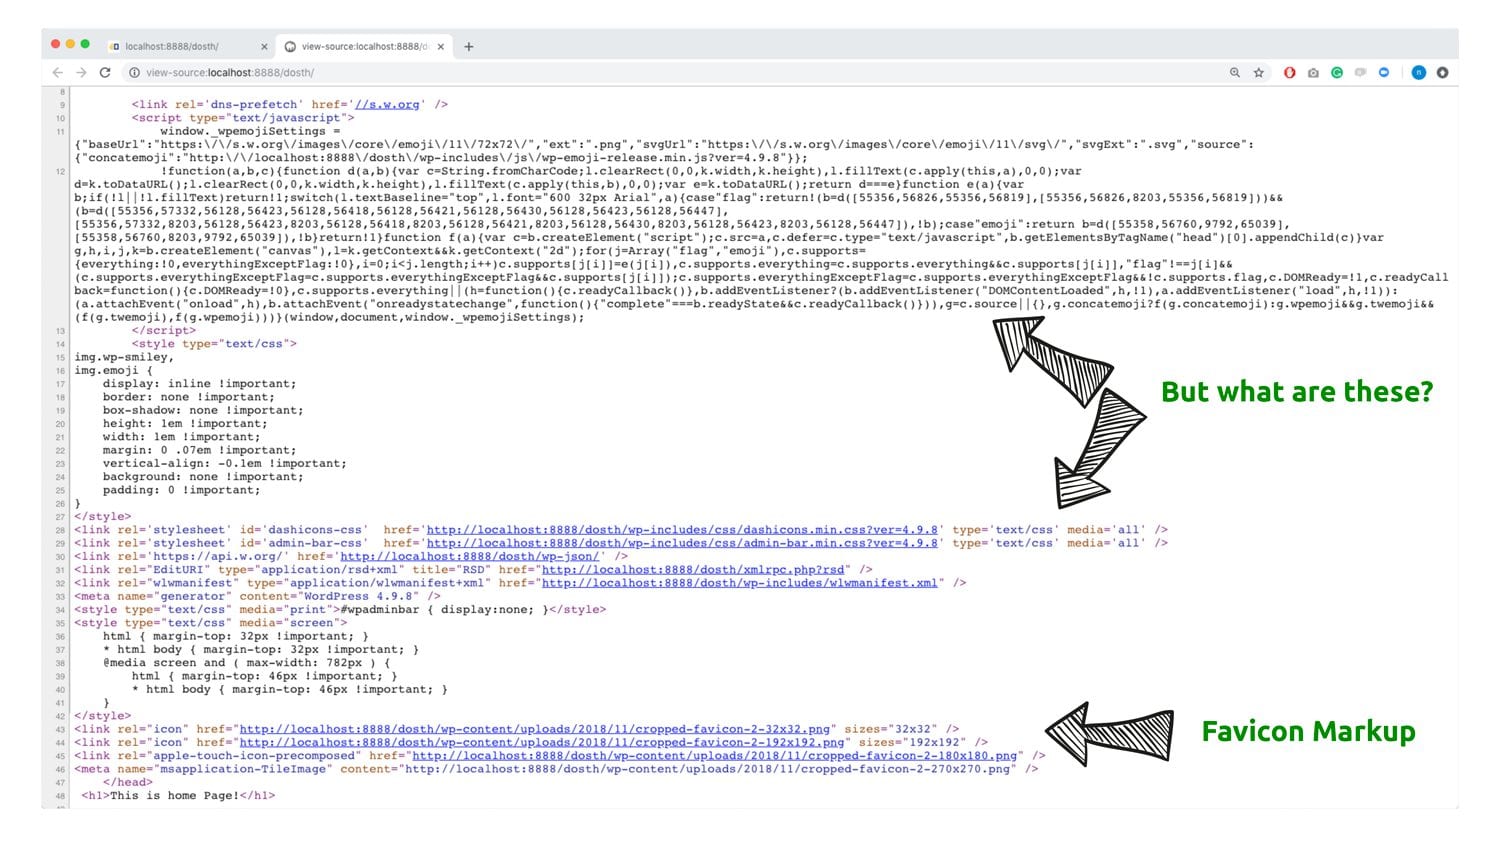
“Hey! What’s happening? WordPress generated all that markup just because I placed the wp_head() function inside the <head> element ?”
You got it right! Yes, WordPress generates all that markup once we place the wp_header() function inside the <head> element.
As you can see, there is more to the wp_head() function than just generating the favicon markup.
To understand more deeply about the wp_head() function and WordPress action hooks in general, please read the following master guide. It opens up a whole new WordPress world in your head.
Come back here only when you are done understanding the above article.
It’s very important to proceed forward because, in the next part, we will learn how to load scripts and styles using the WordPress Enqueue system.
From here on, I assume you are familiar with WordPress Action Hooks and Filter Hooks.
Things will speed up from here on! Get Ready!

Previous Article
 © 2026 UsableWP. A project by Naresh Devineni.
Hello!
I higly recommend Your site for my friend that are beginner in WP.
But, please check misprint on this page after paragraph:
“Just to recap, we have created four files in this lesson, so your theme directory ( wp-content/themes/nd-dosth ) should contain the following files:”
Below this paragraph change name of the one file:
“screenshop.png” to “screenshot.png”
Hi,
Great article Naresh. Learning a lot but found some typos here and there. Other than that, fantastic website to learn WordPress.
If anyone is facing the following error on mac
“Unable to Create Directory wp-content/uploads. Is its Parent Directory Writable by the Server in WordPress”.
There are lot of fixes you can try by googling but the fix that worked for me was
> Create an “uploads” folder in wp-content
> Give Read & Write permissions to the uploads folder.
> Refresh the wp-admin page and try uploading favicon again.
Cheers,
Shah