Master WordPress Hooks – The Ultimate Guide(2023)
WordPress hooks are awesome!
Without them, there is no WordPress at all in my opinion.
There are two types of hooks in WordPress.
- Action Hooks
- Filter Hooks
Let’s first talk about WordPress Action Hooks.
The wp_head() hook is a classic example of WordPress Action hooks.
Not only WordPress, even the plugins that extend WordPress rely on wp_head() to place their scripts and styles inside the <head> element.
That means, every plugin that uses CSS or Javascript to style and modify the frontend output would be broke if there is no wp_head() inside the active theme’s header.php file.
So, how does the wp_head() work?
How it allows us “the theme developers” and “the plugin developers” to inject code into the <head> element?
These are the very important questions that you should ask yourself to develop better and usable WordPress themes and when you have questions like that, the only place where you can find the correct answer is the source code of the core WordPress files.
It not only helps you understand how the WordPress works, but it also helps you make better decisions based on the situation.
So, without further ado, let’s take a peek into the source code of the wp_head() function.
Table of Contents (Steps for mastering WordPress Hooks)
“Alright, how exactly do we see the source code of a predefined WordPress function?”
Fair Question! You can read any WordPress function’s source code in easy two ways:
1) Google the Function name and look for developer.wordpress.org search result. Trust me, this is the quickest and trustworthy way.
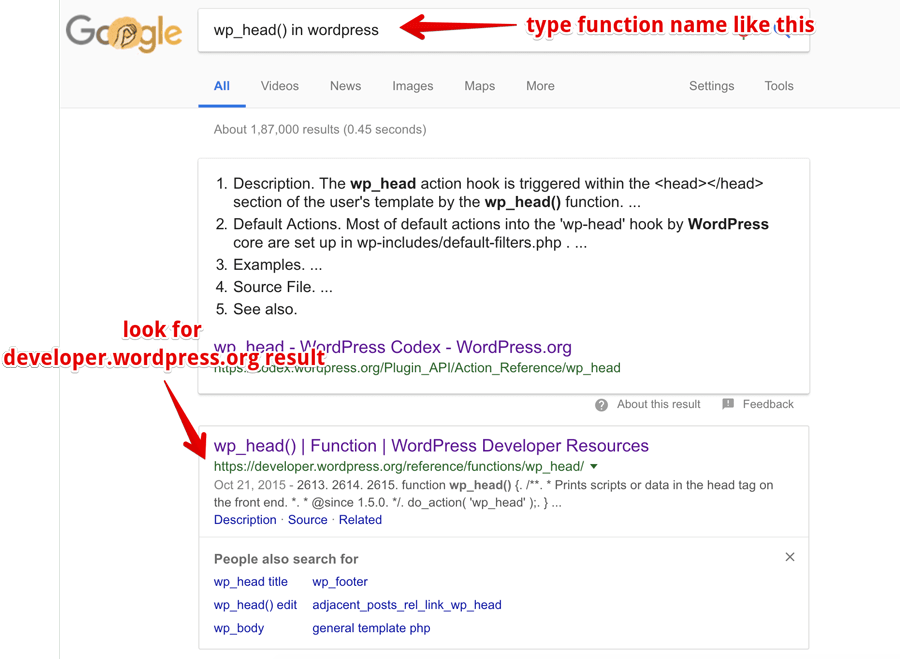
2) Use your code editor and search for “function wp_head()”. Now, it is important that you put the word function because we are looking for the function definition.
Anyway, It can be found inside the wp-includes directory. Common go ahead, I am not going anywhere :P
Did you find it? Here is the source code of wp_head() function:
function wp_head() {
    /**
     * Prints scripts or data in the head tag on the front end.
     *
     * @since 1.5.0
     */
    do_action( 'wp_head' );
}
“Wait! It only has a single executable line. How is that soo powerful?”
do_action( 'wp_head' );
Well, if you notice, that single piece of code is telling us something. Look at the function name, It says do action.
Look at the comment above it. It says “Prints scripts or data in the head tag on the front end.”
This is WordPress way of telling us “Hey! I am giving you a chance to perform an action here, at this very position.
That means you can execute your own code which can either output some HTML markup or some data at this very position, and you can even write some complicated code which modifies the way I behave. “
Simply put, do_action('wp_head')is an Action Hook and trust me, an Action Hook, in general, is very powerful.
WordPress Hooks: Action Hooks
WordPress provides us Action Hooks at certain points of its running/execution to give us the ability to extend or modify the core functionality of the WordPress itself and it does so by allowing us to take actions at those certain points.
do_action('wp_head') is the simplest example of a WordPress Action Hook.
It allows us to take an action while WordPress is putting together the final <head> element.
Now, you don’t have to say do action wp head action hook if you are having a conversation with your fellow developer.
Every Action Hook is called with its name. In the above example, 'wp_head'is the name of the action hook.
So, You can just say “Hey! wp head action hook is awesome!“
And, 'wp_head'action hookis just one out of 200+ action hooks that WordPress ships with. WordPress gives you the ultimate control over its ecosystem by providing an action hook at every corner.
And this is the reason why WordPress plugins and themes exist. More precisely, If it is not for Action Hooks, none of the themes in the WordPress repository would exist.
“Oh! that is insightful. But, what is an action? And how do we take an action anyway?”
WordPress Action
A WordPress Action is nothing but a custom PHP function with a bunch of code which either outputs or modifies some HTML markup or some data or you can even send an email using the popular wp_mail()function.
The below custom function is the simplest example of an action. The only responsibility of the below action is to output Google Analytics Code.
<?php
function nd_dosth_add_google_analytics_code_to_head() { ?>
    <!-- Google Analytics -->
    <script>
        (function(i,s,o,g,r,a,m){i['GoogleAnalyticsObject']=r;i[r]=i[r]||function(){
        (i[r].q=i[r].q||[]).push(arguments)},i[r].l=1*new Date();a=s.createElement(o),
        m=s.getElementsByTagName(o)[0];a.async=1;a.src=g;m.parentNode.insertBefore(a,m)
        })(window,document,'script','https://www.google-analytics.com/analytics.js','ga');

        ga('create', 'UA-XXXXX-Y', 'auto');
        ga('send', 'pageview');
    </script>
    <!-- End Google Analytics -->
<?php }

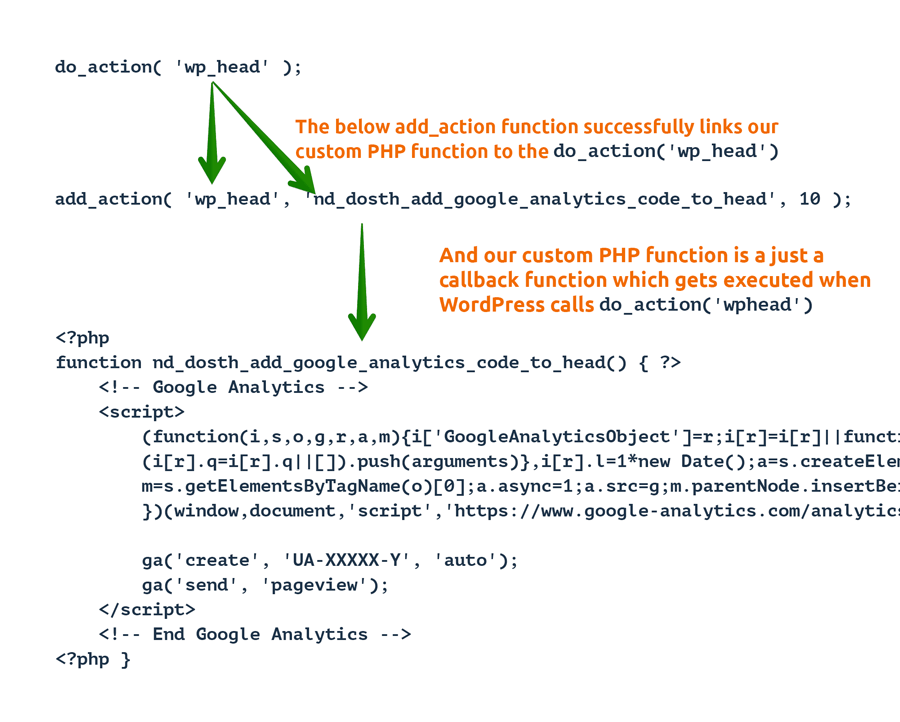
add_action() does the job of linking an Action Hook with our Action so that we can execute our action at the right time and right place
We use add_action() function to hook/attach an action like to an Action Hook like 'wp_head'. All you have to do is provide the name of the Action Hook as the first parameter and an Action as the second parameter, for example:
add_action( 'wp_head', 'nd_dosth_add_google_analytics_code_to_head', 10);
Internally, WordPress uses Action Hooks too
Yes, WordPress is utilizing the do_action( 'wp_head' ) function to generating the favicon markup if we uploaded the favicon using the Site Identity options Panel and this makes me curious. If WordPress is able to do that, so do we! right? And, there are many things that we might want to put inside the <head> element. For example:
- You may have to add Google Analytics code right before the closing
</head>tag as per your client’s request - You want to include common Stylesheets and Javascript.
- You can write a custom plugin which adds social sharing meta tags like
<meta name="twitter:card" content="summary"> - And so on…
Let’s try out WordPress Action Hooks
Now, Let’s go ahead and see it in live action. We’ll be outputting the Google Analytics code to the <head> element.
Open up the functions.php the file of your active theme and paste the following code.
<?php
add_action( 'wp_head', 'nd_dosth_add_google_analytics_code_to_head', 10 );
function nd_dosth_add_google_analytics_code() { ?>
    <!-- Google Analytics -->
    <script>
        (function(i,s,o,g,r,a,m){i['GoogleAnalyticsObject']=r;i[r]=i[r]||function(){
        (i[r].q=i[r].q||[]).push(arguments)},i[r].l=1*new Date();a=s.createElement(o),
        m=s.getElementsByTagName(o)[0];a.async=1;a.src=g;m.parentNode.insertBefore(a,m)
        })(window,document,'script','https://www.google-analytics.com/analytics.js','ga');

        ga('create', 'UA-XXXXX-Y', 'auto');
        ga('send', 'pageview');
    </script>
    <!-- End Google Analytics -->
<?php }
“Hey! You have put add_action()function first followed by the function definition. Are you sure this is the correct order?”
It doesn’t matter where you declare your functions in PHP in most cases and WordPress takes this a step forward by function definitons as callbacks.
As long as our custom function definition and the add_action()function stays inside functions.php file, the order doesn’t really matter. You’ll learn the reason behind it in a moment.
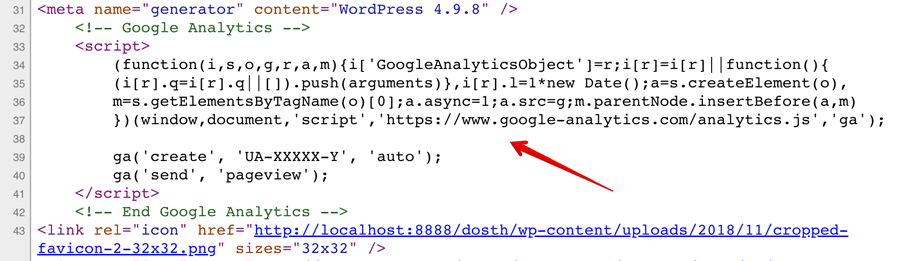
Here is the output of the above in the browser when you visit your website:
We can attach an unlimited number of actions to a single Action Hook and we can certainly control their execution order with the priority parameter.
We can attach any number of actions to a single Action Hook.
There is no limit.
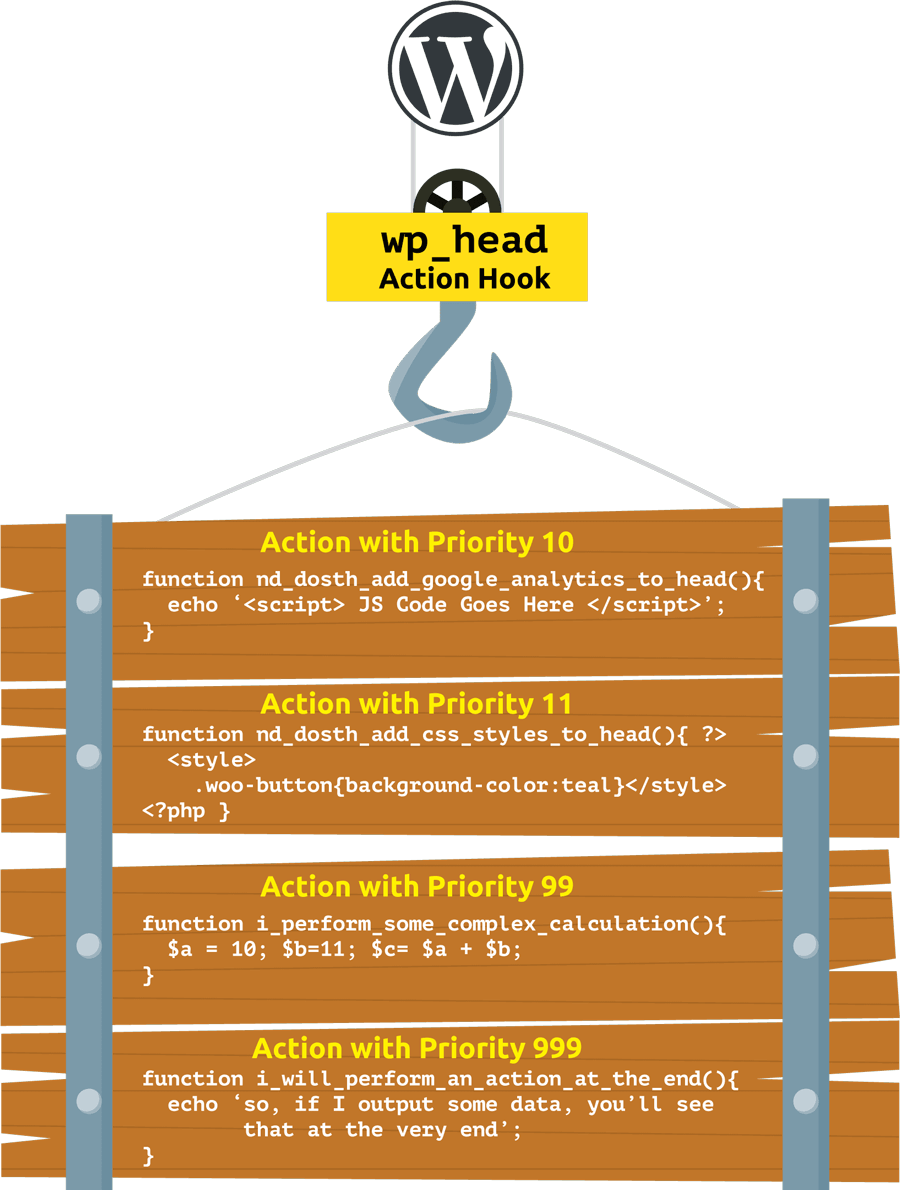
All the actions are processed by WordPress based on the priority that we have provided for individual action.
An Action with Priority 1 will be executed first and action with priority 999 will be executed last. If two actions have the same priority, WordPress will execute the actions in the order it found them.
You can specify the priority of individual action by filling the third parameter of the add_action() function.
For example, in the below code, the priority of the action is 10. By the way, if you don’t specify the priority, 10 is the default for any action.
add_action( 'wp_head', 'nd_dosth_add_google_analytics_code_to_head', 10 );
Common, let’s try out the priority parameter. This time, let’s add some basic styles right after the Google Analytics code.
Because the priority of action which is printing the Google Analytics code is 10, we should use a number that is higher than 10.
So, you can any number that is higher than 10. For example, 11, 12, 99 or you can even take the liberty and go for 999. It’s a liberal world I say!
So, put the following code anywhere inside the functions.php file.
The position doesn’t really matter because you are controlling the order of execution using the priority parameter.
add_action( 'wp_head', 'nd_dosth_add_css_styles_to_head', 11 );
function nd_dosth_add_css_styles_to_head() { ?>
    echo '<style>body{ background-color:teal }</style>';
<?php }
If you notice, this time I went with the priority of 11.
Now, let’s go back to the Homepage in the browser and view the page source.
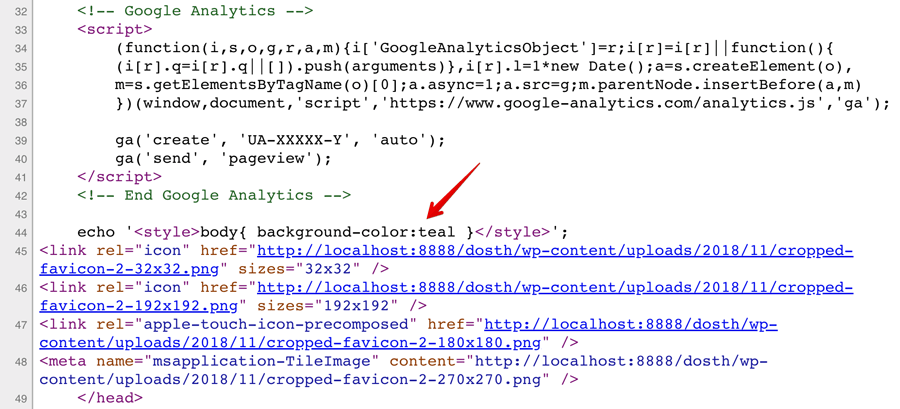
The priority parameter is indeed working.
In fact, to prove the point that the order doesn’t really matter, I have put the above code at the beginning of functions.php file.
Also, if you notice, WordPress is printing out the Favicon markup at the very end, that means out of all the actions that are attached to the wp_head Action Hook, the action which is generating the favicon markup has the least priority.
Of course, you can still take control and print some markup right above the closing </head> tag. All you have to do is play with the priority number.
Here is my final functions.php file for this article:
<?php
add_action( 'wp_head', 'nd_dosth_add_css_styles_to_head', 11 );
function nd_dosth_add_css_styles_to_head() { ?>
    echo '<style>body{ background-color:teal }</style>';
<?php }

add_action( 'wp_head', 'nd_dosth_add_google_analytics_code_to_head', 10 );
function nd_dosth_add_google_analytics_code_to_head() { ?>
    <!-- Google Analytics -->
    <script>
        (function(i,s,o,g,r,a,m){i['GoogleAnalyticsObject']=r;i[r]=i[r]||function(){
        (i[r].q=i[r].q||[]).push(arguments)},i[r].l=1*new Date();a=s.createElement(o),
        m=s.getElementsByTagName(o)[0];a.async=1;a.src=g;m.parentNode.insertBefore(a,m)
        })(window,document,'script','https://www.google-analytics.com/analytics.js','ga');

        ga('create', 'UA-XXXXX-Y', 'auto');
        ga('send', 'pageview');
    </script>
    <!-- End Google Analytics -->
<?php }
Also, if you notice, both the above actions are echoing out some markup to the <head> element.
But they are doing so using two different PHP ECHO techniques. There might be some performance trade-offs between them, but, at the end of the day, it is all about code readability that matters to most of the Developers.
I prefer the latter (the Google Analytics function definition in the above code) because it is more clean, readable and it allows you to write the markup without worrying about the quotes.
More examples of an Action Hook:
wp_footer Action Hook
The action hooks names are always self-descriptive. This action hook will let us take an action when WordPress is putting together the Footer of the website. This action hook is commonly used for including the Javascript in the footer.
publish_post Action Hook
This action hook will let us run some PHP code as soon as we publish a post.
Not all action hooks will let us output markup. Some of the action hooks are generally used to communicate with a third party API like Twitter or add more user roles to the WordPress admin area.
The publish_post action hook is the best example of the API communication scenario. We usually use put this action hook to use when the author wants to tweet about the post as soon as it got published.
And, the list goes on and on. In fact, action hooks are divided into more than a dozen categories. Take a peek at them by visiting the WordPress codex’s Action Reference page.
Get it?
Still confused? Sorry, my bad!
Understanding the WordPress execution flow could make it more clear
Don’t worry. Let’s bust the confusion by understanding the execution flow of WordPress at a highly simplified level by omitting all the unnecessary details like the existence of a child theme and some internal tasks:
1) It all starts with a user accessing our website’s imaginary homepage in the browser
http://localhost:8888/dosth
2) As soon as the user hits enter, the browser does its job and sends the request to the server asking for the home page.
3) The server receives the request and starts executing the WordPress core starting with the index.php file in the root directory:
Application/MAMP/htdocs/dosth/index.php for MAC/MAMP usersC:/wamp/www/dosth/index.php for windows/wamp users
From here onwards, WordPress takes the control.
4) WordPress connects to the database server and continues to load up and go through the individual internal files.
5) Once all the core WordPress files are loaded, WordPress will then load all the plugins.
6) Once the plugins are loaded, WordPress will then load the active theme’s functions.php file before any other template file that contains HTML markup. It does so because all the custom code which adds additional features to the theme goes inside the functions.php file.
In our case, the active theme is wp-content/themes/nd-dosth.
Anyway, so, as soon as WordPress loads up the functions.php file, it goes it through line-by-line and figures out that there are multiple add_action() function calls belonging to the same action hook called wp_headand it memorizes that “Oh! the theme developer is trying to perform multiple actions inside the <head> element and I need to execute those actions as soon as I execute the do_action( 'wp_head' ) function”.
add_action( 'wp_head', 'nd_dosth_add_css_styles_to_head', 11 );
add_action( 'wp_head', 'nd_dosth_add_google_analytics_code_to_head', 10 );If you are coming from the world of Javascript, both the actions are just callback functions which will get executed when WordPress comes across and executes the do_action( 'wp_head' ) function.
Note: At this phase of WordPress execution, WordPress has not yet touched the template files like header.php or frontpage.php. So, it has no clue when and where it will find do_action( 'wp_head' ) function call.
7) WordPress continues its journey by parsing the URL. After parsing the URL, WordPress figures out what the user is trying to access.
Then, WordPress uses Template hierarchy logic to choose a template file from the active theme.
In our fictional case, the user trying to access the static Homepage of the website.
So, WordPress loads the front-page.php file and starts processing it to generate the final webpage markup.
8) While processing the front-page.php file, it first line it finds is the get_header() function and executes it.
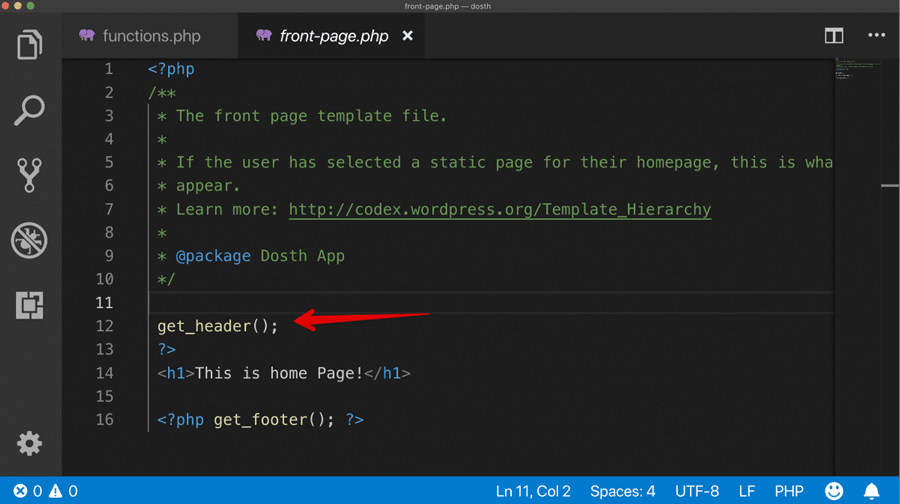
The primary purpose of the get_header() function is to load up header.php file from the active theme.

So, once the WordPress loads up the header.php file and starts processing it, it comes across the wp_head() function and executes it.
Pro Realization: Remember, by the time WordPress starts processing the template files like header.php file, it has already loaded and processed all the core files, plugin files, and our active theme’s functions.php file.
So the functions definitions like get_header(),language_attributes() and wp_head() are already loaded and we can execute them directly.
Remember?
WordPress comes with a lot of predefined functions and all we have to do is use them inside our theme without worrying about their scope.
9) As soon as WordPress executes the wp_head() function, it will run into the do_action('wp_head') function and realizes that
“Oh! There we go. I finally came across the do_action('wp_head') function and its time to execute all the actions that are hooked into it. “
WordPress stores all the functions that must be executed at this point in an array and it goes through it one by one and executes all of them based on their priority.
In our case: From the functions.php file perspective, nd_dosth_add_google_analytics_code() action (a callback function) will get first executed as it has a priority of 10 and as soon as it gets executed, the Google Analytics code will be outputted to the inside of the <head> element.
WordPress will then continue to execute all the actions with a priority of 10 (some plugin might add its own action with a priority of
10 ) and once it finally runs out of all the actions with priority of 10, finally it executes the nd_dosth_add_css_styles_to_head()action callback which has a priority of 11 and outputs our custom styles at some place after the Google Analytics code.
11) Execution of all the actions that belong to 'wp_head' action hook will mark the end of the wp_head() function call and WordPress comes back to header.php file to process the rest of the file and once it reaches the end of it, it comes back to the to the front-page.php file, it will process the rest of the file and sends the final markup to the browser.
12) Finally, the browser renders the markup to the user.
The above execution flow applies to each and every page on our WordPress website
We have to realize that wp_head action hook gets triggered every time a user tries to access any webpage on our website.
This is because we will be using the same header.php file that triggers the wp_head action hook to render the header portion of every other webpage on our WordPress website.
So, Unless caching is involved, the entire 12 step process that I mentioned above repeats every time you access a page, even if you refresh the same page.
The only thing that might change is step 7 from the above execution flow. In this step, based on what webpage URL user is trying to access, WordPress uses Template hierarchy logic to choose a template file from the active theme.
For example, if the user is trying to access a blog post, WordPress will look for the single.php file instead of front-page.php file.
But, since we will be using the same header.php file to render the header portion of blog post as well, wp_head action hook still gets triggered and WordPress will echo same styles and Google analytics script to the <head> element of this blog post.
Don’t worry! If you do not understand the above explanation, you’ll surely grasp it when we build the other pages of our website.
And, That’s it for this lesson. You’ve come a long way.
Now you know almost everything about the WordPress Action Hooks.
If you still don’t get it, that’s totally ok.
When you are learning new concepts, often you might have to read multiple articles from the multiple authors.
You might learn many new things that I missed in here. So, go browse the internet for more insights into WordPress Action Hooks.
WordPress Hooks: Filter Hooks
WordPress also ships with another type of hooks called Filter Hooks.
While action hooks allow us to execute an action at a certain point of WordPress execution, Filter hooks allow us to get and modify a piece of WordPress data before it is saved to the database or rendered on the browser.
It is important that we have control over the markup and content that WordPress is generating for us. Be it CSS classes, menus, page content, media, etc.
And, WordPress Filter Hooks allow us to achieve just that.
Filter hooks help us filter the data that WordPress is generating for us.
Technically, Filter hooks allow us to get and modify a piece of WordPress data before it is saved to the database or rendered to the browser.
Just like Action Hooks allows us to add actions at the certain points of WordPress execution, Filter Hooks allows us to add filters to a piece of data at certain points of its execution.
That’s all. Nothing else.
Just like Action Hooks, we can attach any number of filters to a particular filter hook with the help of add_filter() function.
Just like Action Hooks, Filter hooks are understood better when you try them practically.
We already have a problem at hand.
Using the capabilities of PHP, I want to detect the operating system of the user’s computer and add appropriate CSS class to the list of classes that body_class() function is generating.
But how we do that?
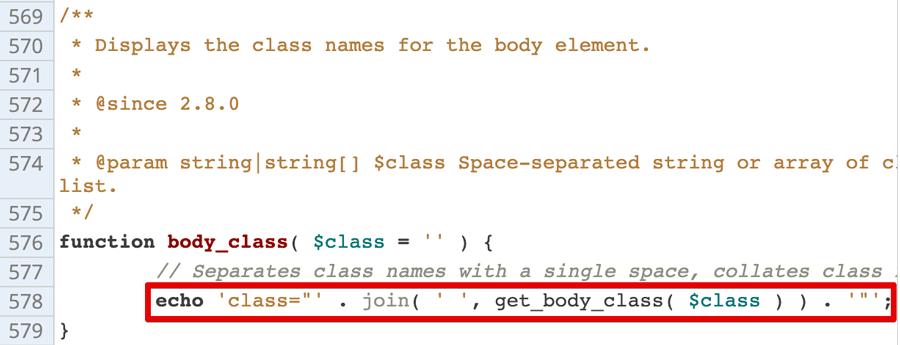
Common, let’s view the source code of the body_class() function to figure out what we can do:
https://core.trac.wordpress.org/browser/tags/5.1.1/src/wp-includes/post-template.php#L576
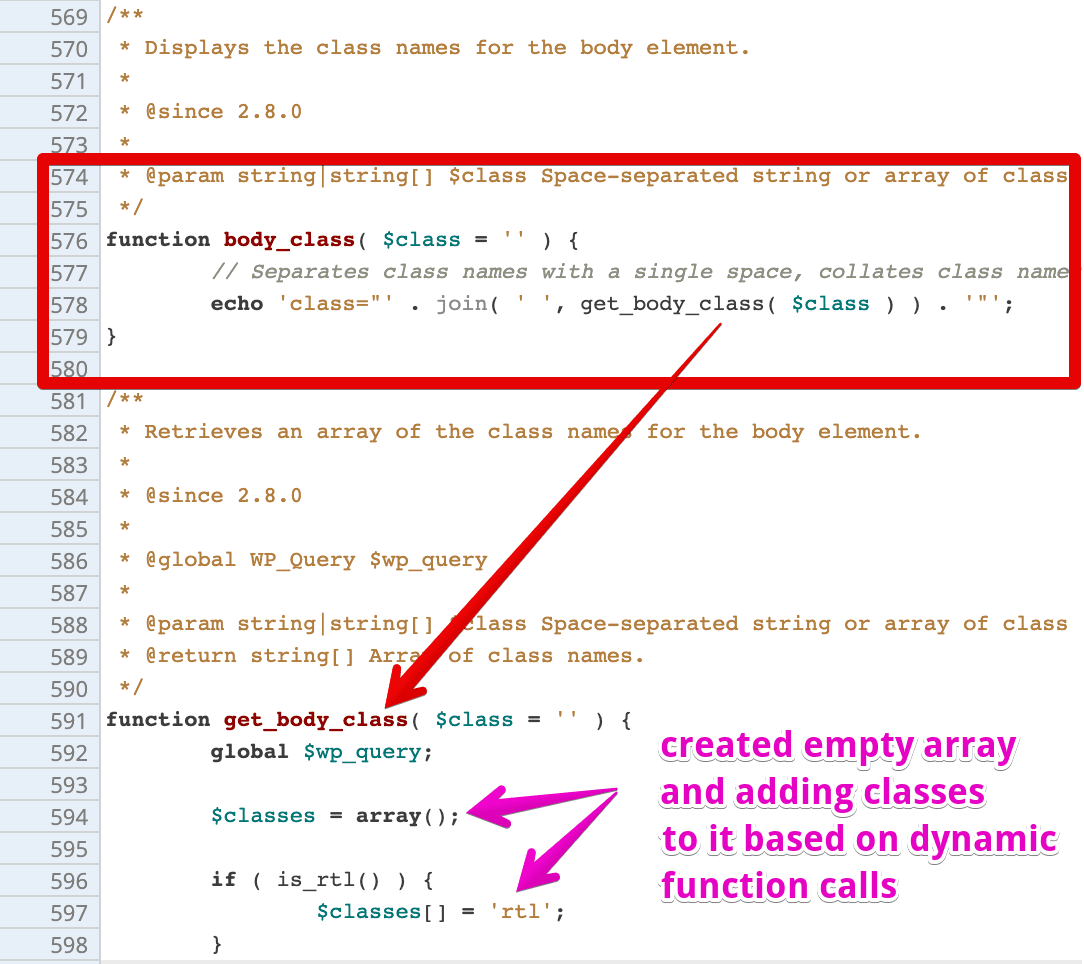
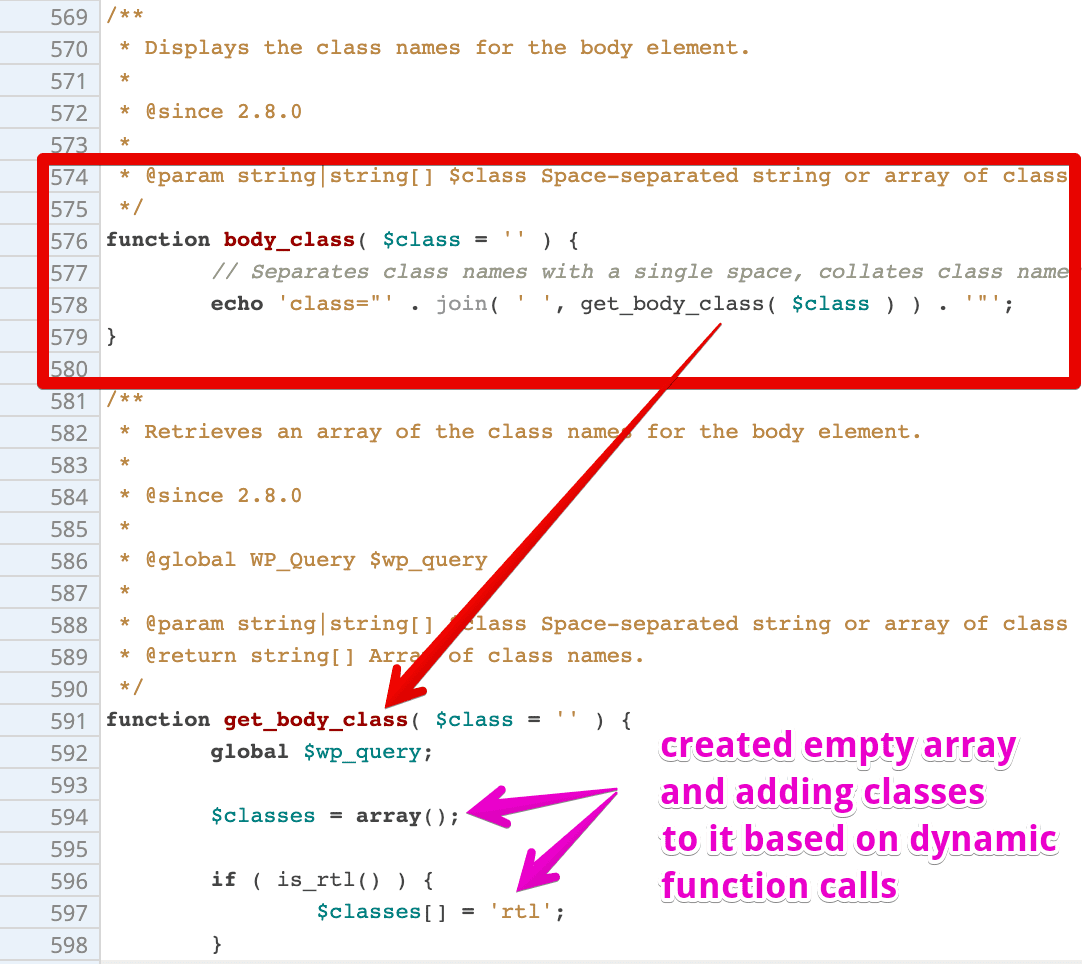
It turns out that, the body_class() function is getting the final list of classes from the get_body_class() function and the source code of the get_body_class() function is right underneath it.
If you observe the source code of the get_body_class() function, you can see how WordPress is generating all those classes we have discussed in the previous lesson.
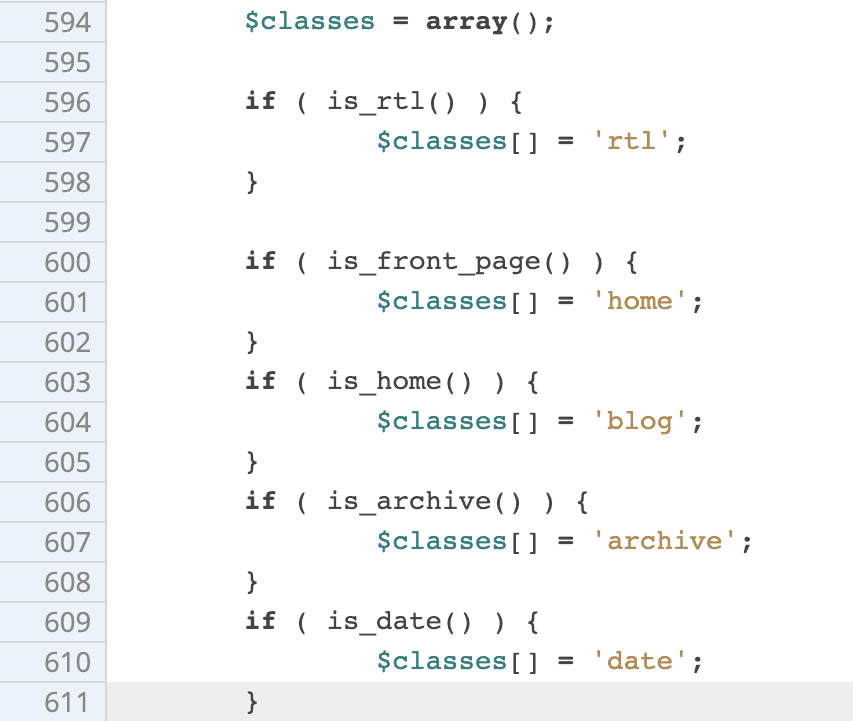
Basically, the get_body_class() function is creating an empty array called the $classes array and adding CSS classes to this array based on some dynamic function calls.
So, now, technically, the $classes array is a piece of WordPress data, Right? It contains all the dynamic classes that get outputted to the body tag.
And the good thing about WordPress is, it helps us filter ( modify ) this $classes array by providing us a filter hook called body_class.
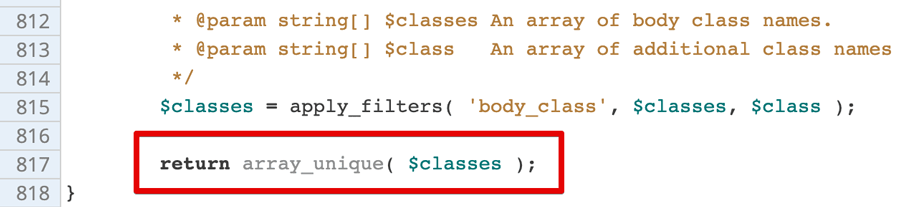
If you scroll down to the end of the get_body_class()function source code, we will find what we are looking for:
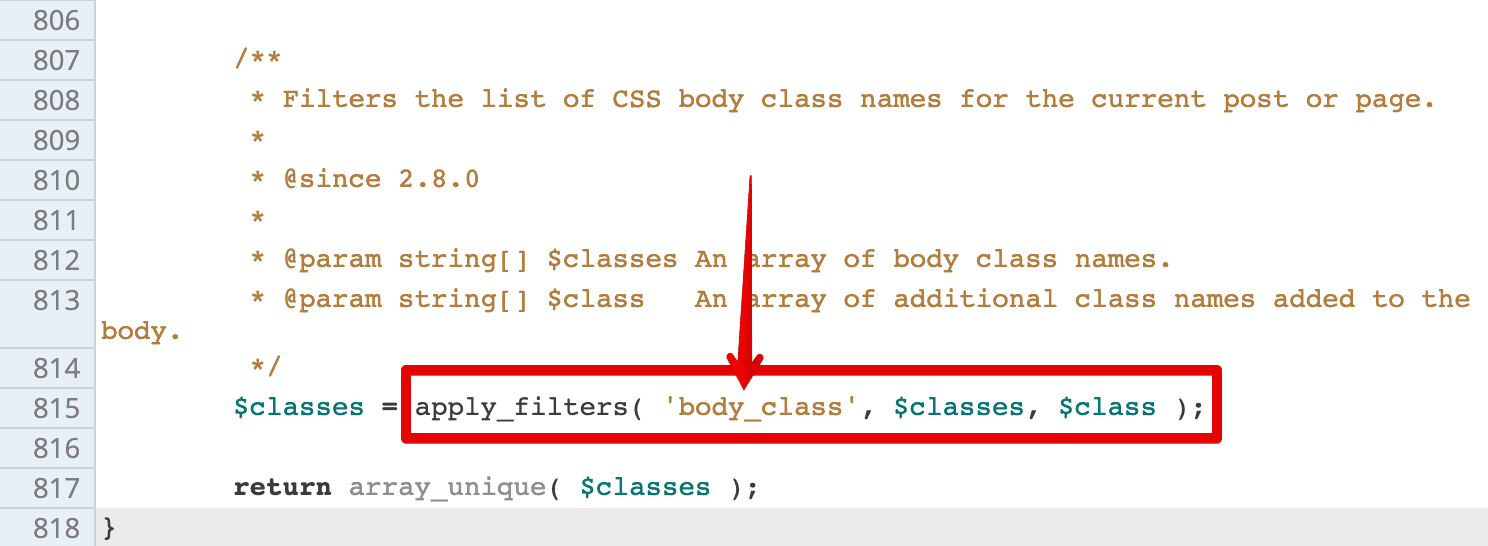
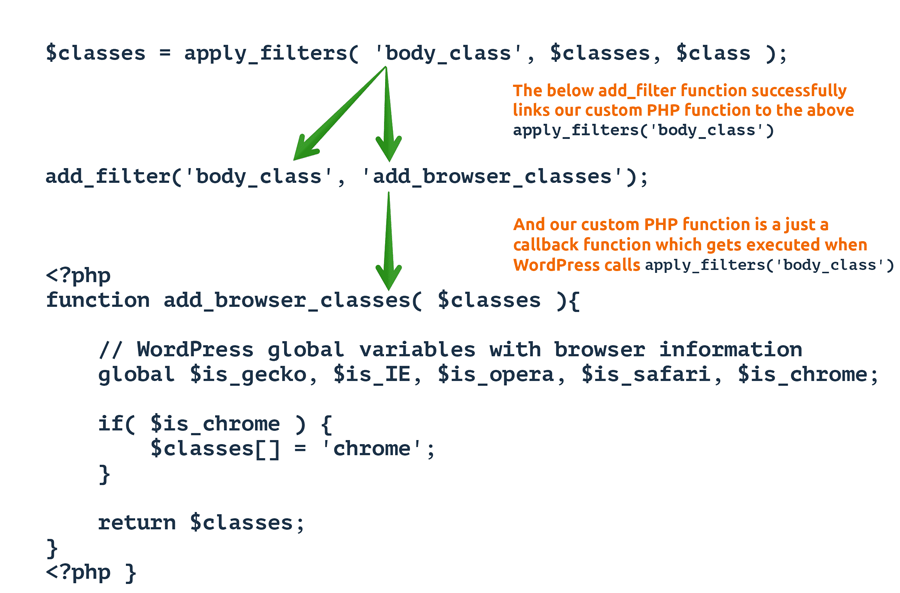
As you can see, just before returning the $classes array back to the body_class() function, get_body_class()function is triggering the body_class filter hook with the help of apply_filters() function, giving us a chance to add our own set of dynamic classes
The apply_filters() function of filter hooks is similar to do_action() function of action hooks.
While do_action() function triggers all the actions hooked into a particular action hook like wp_head, The apply_filters() function triggers all the filters hooked into a particular filter hook like body_class.
But, there is one important difference.
Unlike actions that are linked to action hooks, Filters that are linked to a particular Filter Hook will receive the data as the argument so that we can modify the data and return it back.
You can see this in the above code. The apply_filters() function is sending the $classes array to the filters attached to the body_class filter hook.
Alright, enough talking. Let’s see this in action.
Go ahead and open up the functions.php file of your active theme and put the following code in it:
/*----------------------------------------------------------*/
/* Adds new body classes
/*----------------------------------------------------------*/
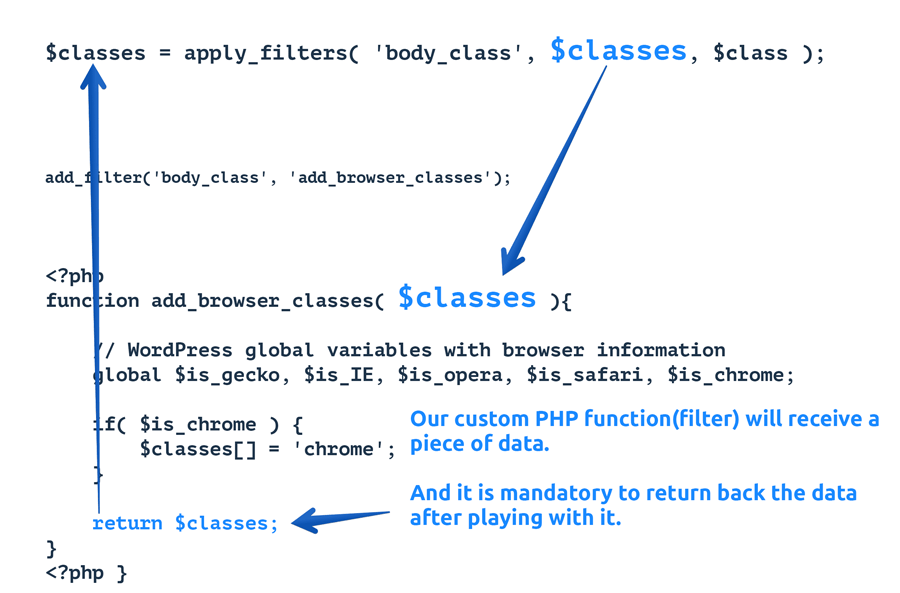
add_filter('body_class', 'add_browser_classes');
function add_browser_classes( $classes ){
// WordPress global variables with browser information
global $is_gecko, $is_IE, $is_opera, $is_safari, $is_chrome;
if( $is_chrome ) {
$classes[] = 'chrome';
}
elseif( $is_gecko ){
$classes[] = 'gecko';
}
elseif( $is_opera ) {
$classes[] = 'opera';
}
elseif( $is_safari ) {
$classes[] = 'safari';
}
elseif( $is_IE ) {
$classes[] = 'internet-explorer';
}
return $classes;
}
Nothing much going on in the above code.
We created a filter called add_browser_classes and attached it to the body_class filter hook.
The add_browser_classes filter receives the $classes array from the apply_filters() function in the get_body_class() function.

And inside the add_browser_classes filter, first, we are gathering some browser-based global variables provided by WordPress.
// WordPress global variables with browser information
global $is_gecko, $is_IE, $is_opera, $is_safari, $is_chrome;
Then, we are using a bunch of IF conditions to check for a particular browser.
Next, we are checking for the chrome browser and if it is a chrome browser, we are adding the class “chrome” to the $classes array,
if( $is_chrome ) {
    $classes[] = 'chrome';
}
Next, we are doing the same for the remaining browsers.
Note: We are appending new classes to the array. We are not creating a new array by removing existing classes.
And Finally, we are returning back the updated $classes array.
return $classes;
Now, the body_class() function uses this updated $classes array to output the classes to the body tag.
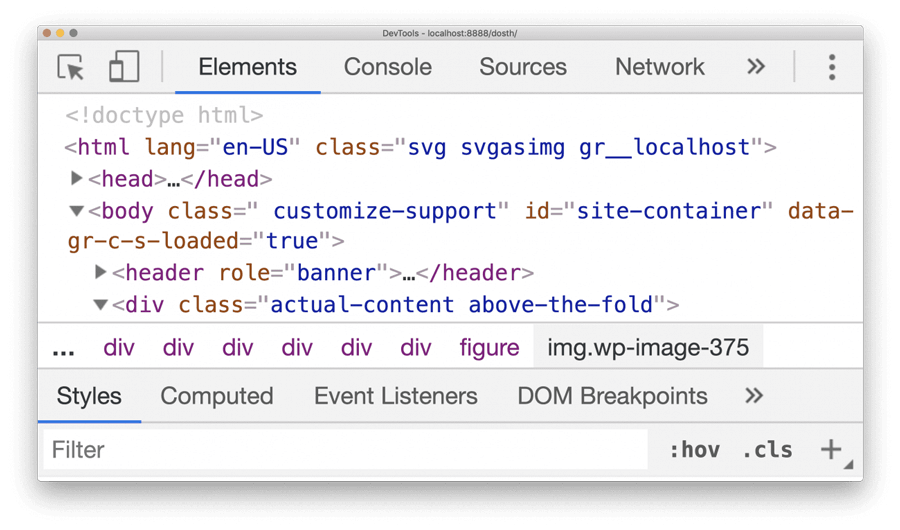
So, we should see browser-based classes on the <body> tag. Let’s go back to the browser and view the page source of our Homepage.

Ah! There we go. It’s working.
I visited the Homepage using the chrome browser and WordPress has added the class “chrome” to the body tag.
Get It?
We will be working with filter hooks all the time. Here is a full list of filter hooks available in WordPress:
https://codex.wordpress.org/Plugin_API/Filter_Reference
The most commonly used filter hooks are:
- body_class
- the_content
- the_excerpt
- excerpt_length
We will deal with the above filter hooks when we build our blog.
You do not always have to append the data, you override it
When working with filter hooks, no matter what filter hook it is, you will always receive some data in the form of a variable.
It’s up to you whether to append new data to the or erase the existing data and put the new data.
In the case of body_class filter hook, we appended more classes to the existing classes because we want to keep those dynamic classes from WordPress.
But this is not always the case. Some times you just want to replace the existing data with yours.
For example, if you want to remove all the classes added by WordPress and just keep your dynamic classes, you can do something like this:
add_filter('body_class', 'add_browser_classes');
function add_browser_classes(){
    return $my_custom_classes = array( 'my-own-css-class', 'i-dont-want-other-classes' );
}
In the above code, because we have decided to erase all the dynamic classes from WordPress, we are not interested in the $classes array, so we are not even using it inside our filter.
Instead, we built our own $my_custom_classes array with a couple of classes and returning it back. Now WordPress will output these couple of classes only.
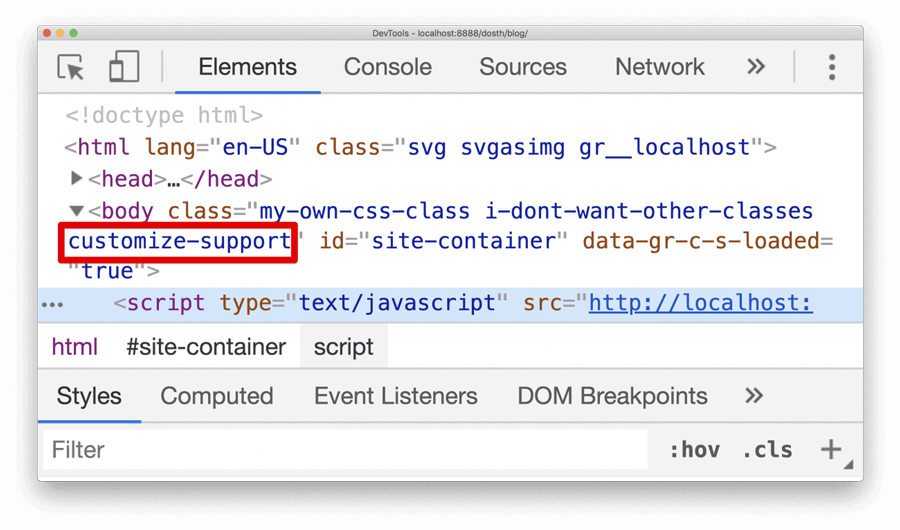
Did you see that? We were successful in removing dynamic classes and just outputting the classes we need.
We still see the “customize-support” class because the filter related to this class is being executed after our add_browser_classes filter.
If you want to remove this class too, you have to play around with the priorities.
WordPress Filters are prone to accidents, and they are dangerous
If you accidentally return an empty variable from your filter, we will end up not displaying data at all.
In worst case scenarios, if a filter hook is saving changes to the database, we end up tampering or destroying the data altogether.
For example, in the below code snippet we are accidentally emptying the array just before returning it.
function add_browser_classes( $classes ){
    // WordPress global variables with browser information
    global $is_gecko, $is_IE, $is_opera, $is_safari, $is_chrome;

    if( $is_chrome ) {
        $classes[] = 'chrome';
    }
    return $classes = array();
}
In the above case, We ended up removing all the body classes. Even the body classes that we and WordPress added.
This could break the site because we could be writing CSS and JS dependent on the body classes.
So, always make sure you return data correctly.
Always remember to return the data from your filter
The whole point of a filter is to modify a piece of data according to our requirement and return it.
If you forget to return the data, WordPress will throw a warning like this:

If debugging is turned off, you’ll never find this warning, and you’ll be banging your head figuring out the reason behind the code failure or why the site broke!
So, be careful!
Still confused? Sorry, my bad!
Warning: To understand the following flow, you need to have a good understanding of PHP functions or functions in general.
Understanding the WordPress execution flow could make it more clear about Filters
1) It all starts with a user accessing our website’s imaginary homepage in the browser
http://localhost:8888/dosth
2) As soon as the user hits enter, the browser does its job and sends the request to the server asking for the home page.
3) The server receives the request and starts executing the WordPress core starting with the index.php file in the root directory.
From here onwards, WordPress takes control.
4) WordPress connects to the database server and continues to load up and go through the individual internal files.
5) Once all the core WordPress files are loaded, WordPress will then load all the plugins.
6) Once the plugins are loaded, WordPress will then load the active theme’s functions.php file before any other template file that contains HTML markup.
As soon as WordPress loads up the functions.php file, it goes it through line-by-line and figures out that there is an add_filter() function call belonging to the filter hook called body_classand it memorizes that saying:
“Oh! the theme developer is trying to perform a filter for the body_class() function and I need to execute this filter as soon as I execute the apply_filter('body_class') function”.
add_filter('body_class', 'add_browser_classes');
Note: At this phase of WordPress execution, WordPress has not yet touched the template files like header.php or frontpage.php. So, it has no clue when and where it will find apply_filter( 'body_class' ) function call.
7) WordPress continues its journey by parsing the URL. After parsing the URL, WordPress figures out what the user is trying to access.
Then, WordPress uses Template hierarchy logic to choose a template file from the active theme.
In our case, the user trying to access the Homepage of the website and So, WordPress loads the front-page.php file and starts processing it to generate the final webpage markup.
8) While processing the front-page.php file, this first line it finds is the get_header() function and executes it.
The Primary purpose of the get_header() function is to load up header.php file from the active theme.
So, once the WordPress loads up the header.php file and starts processing it, it comes across the body_class() function and executes it.
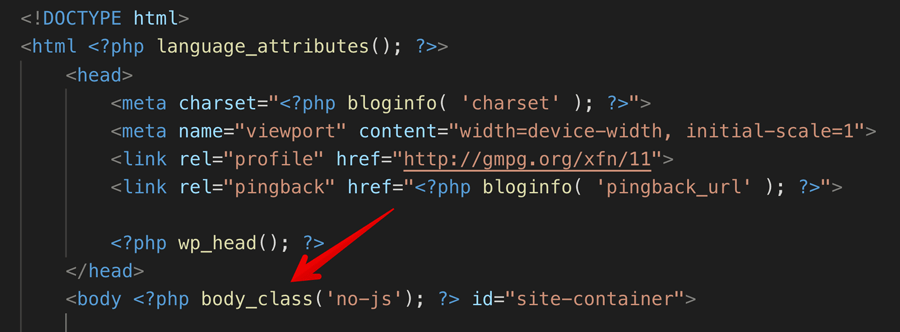
9) As soon as WordPress executes the body_class() function, it will run into the get_body_class() function.
Now, WordPress stops the execution body_class()function temporarily and starts executing the get_body_class()function and as the execution progresses, various dynamic classes are added to the $classes array.
Once WordPress reaches the end of the get_body_class()function, it will decide to give us, the developers, a chance to add our own set of dynamic classes triggering body_class filter hook via the apply_filters('body_class') function.
It also passes the $classes array to the registered filters of body_class filter hook.

As soon as the filter hook is triggered, WordPress stops the execution of get_body_class()function temporarily and executes all the filters attached to the filter hook one by one.
WordPress stores all the filters that must be executed at this point in an array and it goes through it one by one and executes all of them based on their priority.
In our case, from the functions.php file perspective, add_browser_classes() filter (a callback function) will get executed and receives the $classes array and as soon as it gets executed, based on IF Conditions, a browser class will be added to the $classes array received.
Finally, the $classes array will be returned back to the apply_filters('body_class') function call of get_body_class()function and saved to the $classes array.
Now, the control flow is back to the get_body_class()function from the add_browser_classes() filter.
WordPress will continue the execution of the get_body_class()function and will finally return the $classes array back to the body_class()function.
Now the control flow is back to the body_class()function.
And finally, body_class()function joins all the classes in the $classes array and outputs them to the <body> tag.
11) This marks the end of the body_class() function call and WordPress comes back to header.php file to process the rest of the file and once it reaches the end of it, it comes back to the front-page.php file, it will process the rest of the file and sends the final markup to the browser.
12) Finally, the browser renders the markup to the user.
Important Realization: This is why you need to return back the data when dealing with the filters.
Final Thoughts and Conclusion
And that’s pretty much you deal with WordPress Hooks.
I hope this guide clears all the confusion about WordPress Action Hooks and Filter hooks.
If you are interested in mastering the WordPress Theme Development from scratch, please read the following guide:
Developing a WordPress theme from scratch
If you want to more in-depth articles, please visit the blog.
If you didn’t understand something, please post a comment using the Comment Box below.
I will see you in my next article. Have a good time :)


 © 2026 UsableWP. A project by Naresh Devineni.
Wonderful article, thank you!
Excellent explanation. Have not found this especially the dozen or so steps explained so beautifully!!!! Thank you so much.