How to create a WordPress Website (2020)

Are you ready to learn how to create a WordPress website?
Unlike other articles on the internet, I am not going to tell you that you’ll be creating a site in less than an hour.
Even I can’t create a WordPress website in less than one hour even after years of experience. There are a lot of things that we need to think about and take care of.
So, It takes time and effort to create a good looking and reliable site, even if it is WordPress. Keep that in mind.
Table of Contents (Steps for creating your website)
- How much does it cost to create a WordPress Website?
- What is Website Hosting?
- So, What is a Domain Name?
- Choosing a Good Web hosting company
- Get Web hosting and register a Domain
- Setup WordPress through the web host
- Design your website
- How to set up the Homepage of a WordPress site
- How to create a contact form in WordPress
- What is WordPress Shortcode and how to use it
- How to manage a plugin in WordPress
- How to create a WordPress Blog
Now, let’s get started with the most important question.
How much does it cost to create a WordPress Website?
This is the first question that comes into everyone’s mind when talking about creating a WordPress website.

To be frank, there is no right answer because it’s completely different from website to website based on its purpose.
But, since you are learning to create a WordPress website on your own and you are just getting started, here are the list total expenses for the first year:
| Service Name | Budget |
| Domain Name Registration | 15.95$ per Year |
| Website Hosting | 71.40$ for the first Year |
| Domain Privacy | 12.00$ per Year |
| Total Expenses | 99.35$ for the first Year |
For web hosting, I am specifically mentioned “for the first year” because the renewal price will be different from the second year.
For Siteground’s Grow Big plan, the renewal price is 143$ from the second year. This might change in the future.
If you don’t want to spend a single penny and still want to learn WordPress by creating a website using it, that is totally possible too.
The following guide teaches you how to install WordPress locally:
https://www.usablewp.com/install-wordpress-locally/
But for the world to see your website, you need to purchase two things at least:
- Web Hosting
- Domain Name
Let’s talk about Web hosting and Domain Name first so that you’ll understand why you need to spend any money on them.
What is Website Hosting?
Web hosting is nothing but a service that lets people across the globe access your website and It does so by providing you a Web Server and an interface (cPanel) that makes managing your Web Server a piece of cake.
As part of the service, it also allows you to purchase a domain name and link that domain name to a Web Server.
So, What is a Web Server?
Hey! Don’t get scared by the word “Web Server”.

A Website is nothing but a collection of interlinked web pages and files stored in a single folder.
And, that folder is stored on a publicly accessible computer called a “Web Server” or just a “Server”. That’s all.
Every time you enter a URL into the web browser, the web browser finds out the Web Server based on URL and sends a request to it asking for a web page.
As soon as a Web Server receives that request, it processes the request and sends back a web page as a response to the browser.
Typically, A Web Server is a special computer box with no mouse, no keyboard and comes installed with special software that processes tons of simultaneous site visitor requests at the same time.
Technically, you could turn your computer into a Web Server too. But you can not maintain it from your home.
Our home is not free from the power cuts and our home’s internet connection could be interrupted due to heavy rains.
As you can see, you need to consider a lot of factors when you are planning to create a web server yourself. It’s a lot of maintenance.
On the other hand, People access your website from all over the world at any point in time. So, making it 24/7 access possible is really important.
This is why a Web Server that stores your website folder must always be connected to the internet.
And this is where a Web hosting company like SiteGround comes in.
They sell you a ready-made Web Server to host your website and they will make sure that it is always connected to the internet so that your website can be accessed from any part of the world, all the time.
Now comes another important question. How do people from the internet access your website?
Short Answer. Using a Domain Name!
So, What is a Domain Name?
Just like us “Humans” have names that we use to recognize and greet each other, every Web Server has a name. After all, How can anybody access your website without one?
By default, every web server has a unique name that looks something like this:
159.34.14.12
It is called an IP Address (Internet Protocol Address). But it is not human-friendly, is it?
We browse many websites in our day to day lives. For example, we check our Email using Gmail, We searching for information using Google.
Imagine having to type out 123.12.134.12 every time for accessing Google. Although we humans are good at dealing with numbers, it is tough to remember IP address for hundreds of websites we use from time to time.
To solve this problem, smart people who made the World Wide Web possible came up with an easily recognizable coverup to IP addresses and called it “Domain Name System” or a “DNS” for short.
So by using Domain Name Systems, every web server is linked to a Domain Name. So, instead of typing 123.12.134.12 for accessing the Google website, you can type google.com directly and the DNS will take care of the rest.
Another example, this website’s domain name is usablewp.com
Easy enough?
It’s important to remember that DNS is not a replacement for IP addresses. It’s merely a convenience. You can still access google using the IP address. Without IP addresses, there is no internet.
Now that you understand the role of a Domain Name and a Web Server, the role of a Web Hosting Company becomes even more clear.
Simply put, A Web Hosting Company:
- Lets you buy a web server from them
- Lets you buy a Domain Name from them
- It provides a cPanel to manage both Web Server and Domain Name easily.
- Takes care of DNS management
- Connects the Domain name to a Web Server
- Protects your website from hackers up to a certain level
- Manages the SSL Certificate
- And offers a lot more
This also says one more important thing.
It is important to choose a good Web hosting company.
Step 1 Choosing a Good Web hosting company (Spoiler: Siteground)
If you are learning how to create a WordPress website, you should also learn how to choose a good web hosting company.
This is crucial.
There are tons of Web hosting companies on the internet. But not all web hosting companies are created equal when it comes to the quality of services and customer support expectations.
It is a very competitive market. So, every hosting company does the sweet-talking to persuade you and provides a ton of discounts when you are getting started. But you shouldn’t fall for that.
Some of them are good at providing Website hosting services. For example, no matter what, they will always keep your website up and running with 99.99% of the site uptime. But they fail at providing good customer support experience.
Some of them provide good customer support. But they fail at web hosting by providing us with outdated and slow software.
Outdated software not only slows down your website but also lets hackers enter into your website stealing your information.
So, it is vitally important to choose a good Web hosting company that provides us with:
- Fast page load speed time
- 99.99% site uptime
- Proper Security
- Reliable Customer Support that exceeds expectations
I recommend Siteground Hosting until your website get’s 100k visitors per month.
And, as a developer who has been developing WordPress websites for the past 10 years, I tried almost all the popular Web Hosting companies on the internet.
And, I finally got convinced that Siteground is indeed the best Web hosting that my clients love because of the Website speed, security, uptime, and exceptional customer support.
I use Siteground for my personal websites too.
Don’t take my word for it. Siteground is voted as #1 in a lot of Facebook polls. Here are a few of them. You can click on the individual images to visit the actual polls.


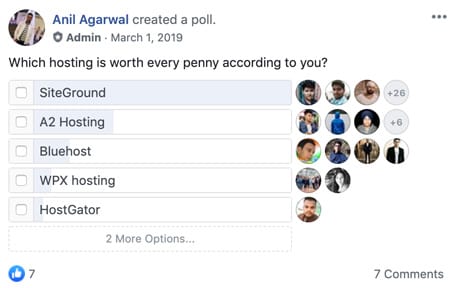


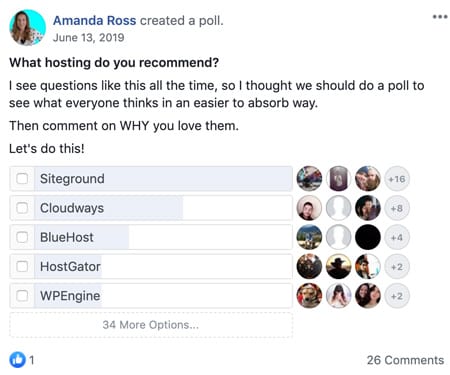


As you can see, Siteground came on top with a great majority.
It’s not even a close competition in most of the cases and It’s the people’s choice when it comes to fast and reliable WordPress website hosting.
Even Yoast, a popular WordPress SEO plugin-based company moved its website to Siteground in 2017 and made an official announcement on Twitter.

I am not trying to sell Siteground hosting to you.
As an experienced web developer, many clients and managers value my recommendations and proceed forward blindly. And, it is always my responsibility to guide them in the right direction.
Their trust in me is important to me. So, I only recommend the services that I trust and use in my day to day life as a web developer.
I am doing the same with you. I am recommending Siteground to you because it does a good job.
And, it doesn’t mean you have to spend 99$ to start reading this article. It completely changes depending on what you are trying to get out of this guide.
This guide is aimed at a small business owner or an individual person who is trying to build a reliable website for their potential customers to visit. So, it uses Siteground as a recommended web host.
But if you can’t afford 99$ and If you want to cut the expenses by any margin, you can try any other web host who is currently providing Domain Name Registration and Domain Privacy for free for the first year.
However, I don’t recommend doing this just to cut costs because I and my clients had bad experiences with other web hosts in terms of site uptime and site maintenance. It’s a long story.
But after I moved all my client websites to Siteground, I have seen significant improvements in terms of Website Speed, security and maintenance. Hence, in my opinion, it’s worth every penny of that 99$.
For some reason, if you don’t like Siteground service or you are just reading this guide to gain some experience with WordPress website building, Siteground offers a 30-day money-back guarantee. So, you are in good hands :)
Another Scenario.
If you don’t have long term goals with your website and if you are just trying to learn how to build a WordPress site, you can forget about the Domain name and Web Hosting purchase and instead you can learn how to install WordPress locally on your computer and get started for totally free.
So, It’s totally up to you.
Having said that, the whole purpose of this guide is to help you learn how to create a reliable WordPress site and launch it for the world to see it without worrying about the site uptime, speed, security or any other petty issues that eat away a lot of time.
So, the next step is about purchasing the Web hosting and the Domain Name from the Siteground.
Step 2 Get Web hosting and register a Domain
Full disclosure: We earn a commission if you end up purchasing Siteground hosting through our referral links in this guide. This helps us to keep UsableWP up and running and up-to-date. Thanks for your support.
Note: The steps explained below should be similar for all most all the reliable web hosting companies. So, try to read everything even if you are not going with the Siteground.
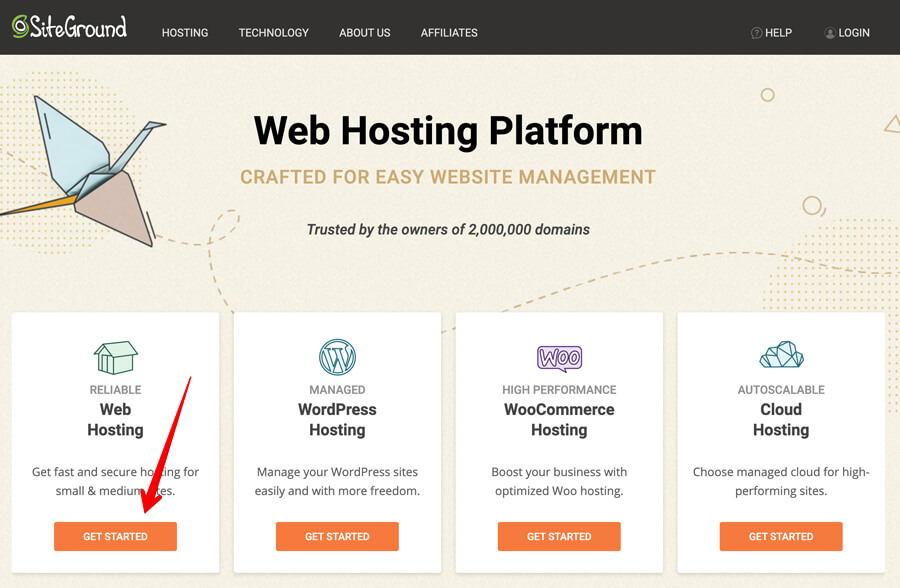
1. Go to www.Siteground.com (or any other Web Host) and choose a hosting plan
Once you land on the Homepage of the www.Siteground.com, click on the “Get Started” button from the “Reliable Web Hosting” card.
It’s time to choose a plan.

If you are on a tight budget, you can go with the StartUp plan. It still comes with kickass features like:
- Free and Good Quality SSL certificate which adds secured HTTPS protocol before the URL instead of the standard HTTP protocol
- Free Daily Backups and Content Delivery Network
But I’d recommend going with GrowBig plan because it comes with better server resources which improve the site speed and provides us with a staging site that lets us experiment with new features on the site without the worry breaking the original site.
A staging site is nothing but a clone of the original website which you can create with one single click and test the WordPress plugin updates and theme updates without destructing the original website.
Trust me, a staging site will save us a lot of time when it comes to the maintenance tasks related to WordPress in general.
Having said that, if you are expecting a lot of visitors or if you think that your website could go viral for some reason, go with GoGeek plan.
That’s my favorite plan because, for an additional 60$, I can get more power which supports more unique visits for the month.
Anyway, the price difference between all the plans is negligible. So, pick any plan that fits your budget by clicking the “Get Plan” button.
For the purposes of this guide, I am going with the GrowBig plan.
2. Choose Domain Name

If you already own a Domain Name from a different registrar like GoDaddy, go with the “I already have a Domain” option.
If not, stick with the “Register a New Domain” option and choose the right domain name for your website. For example, if you are creating a business website, the domain name should be yourcompanyname.com
If you are creating a personal portfolio website, it’s a good idea to have your name inside the domain name. For example, yourname.com
Always remember, choosing the right domain name for your website improves branding from the user’s viewpoint.
Also, try to stick with top-level domains extensions like .com, .org, .net and country-specific extensions like .co.uk, .in, .us, etc because internet users trust them when compared to new domain extensions like .company, .tech, .club, etc.
And, go with these new extensions only when you can’t get the domain name you are looking for with .com, .org or .net
P.S. The final amount of expenses will change based on the domain extension you choose in this step. So, keep an eye on that.
Once you have entered the Domain Name, click the “Proceed” button to move forward to the next step.
3. Enter Account and Client Information
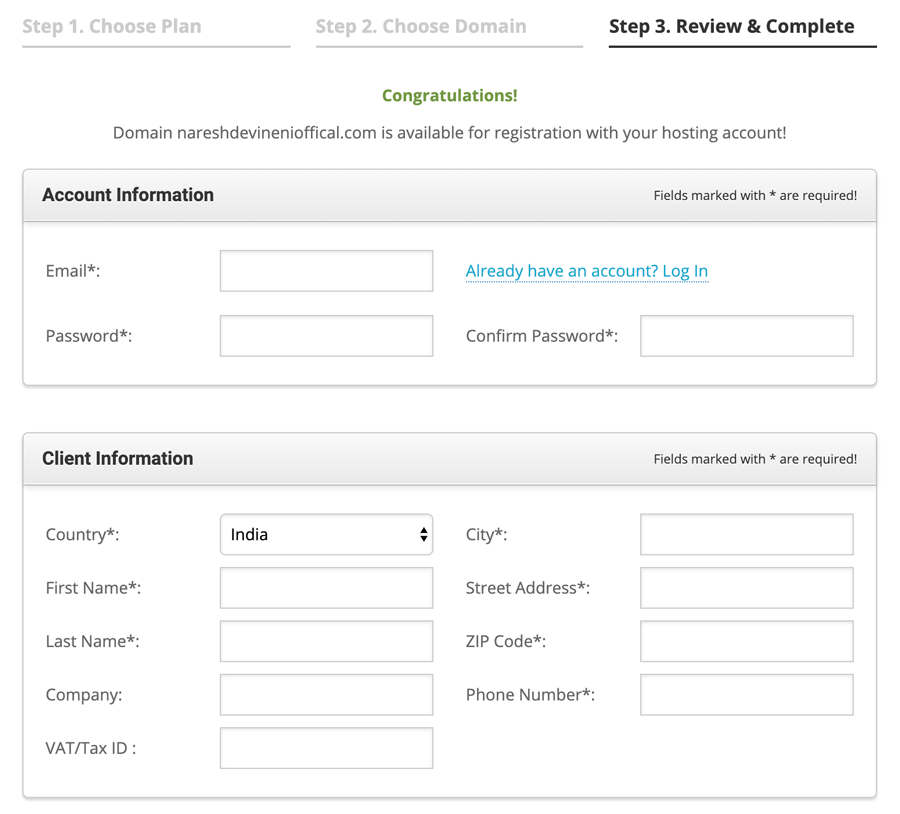
Enter the email and password for the account information and please use a strong password by including special characters with the combination of numbers, uppercase and lowercase characters.
You can also use a site like https://strongpasswordgenerator.com/ to generate your password.
The fields under the “Client Information” section are self-explanatory. Fill them out and scroll down to the payment information form.
4. Enter Payment Information
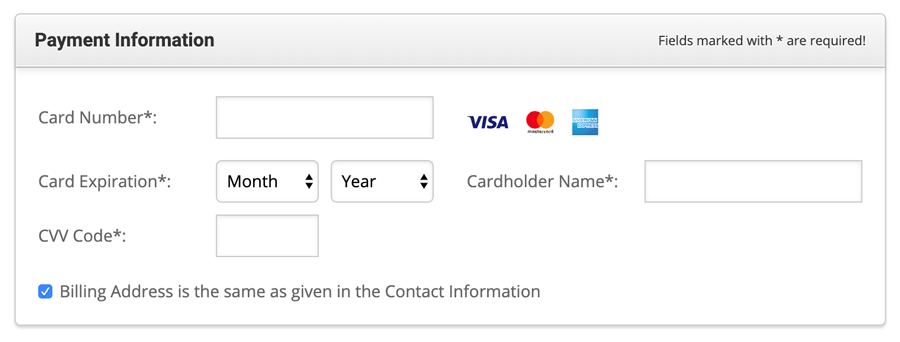
Security Tip: Please don’t save your card details in the browser.
5. Review the Purchase information and Pay

Pick the correct Data Center
First, let’s talk about the “Data Center” option located under the “Hosting Services” sub-section.
The “data center” is the location where your website and files are stored. So, always choose a data center that is closer to the location of people who access your website frequently.
The closer the website files are located to your users, the faster they will be delivered. This is how the internet works. So, if the majority of your website visitors are from the USA, choose “USA” as your data center.
By default, Siteground is smart enough to figure out the closest data center based on which country you are registering from.
But just in case it got it wrong, click on the little “refresh icon” located next to the country name and pick a different data center.
Choose the right period for hosting renewal
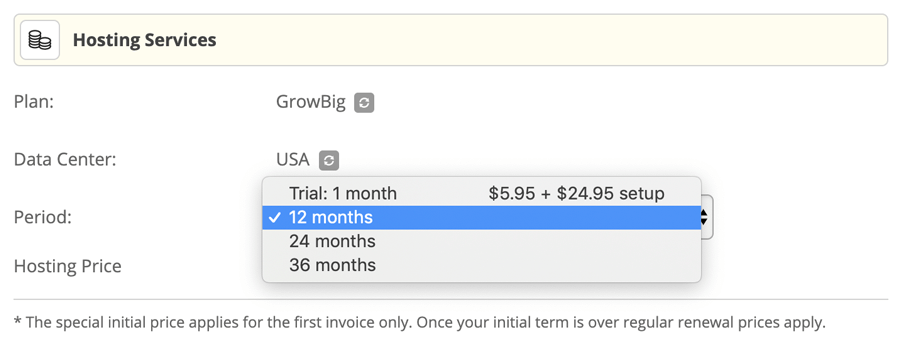
If you are on a tight budget and just reading this guide for gaining experience with WordPress, I’d recommend going with the “Trail: 1 Month” option and see if you are serious about your website.
But, if you are serious about your website and have long term goals, “12 Months” is a good period to start with.
And, I don’t recommend going with 24 months or 36 months period because your website could grow in terms of visitors and none of the web hosting plans on the Siteground might be sufficient to handle your growth.
So, the “12 Months” period is just about right for a lot of scenarios.
Next comes the “Extra Services” section.
Selecting Domain Privacy hides your personal information from the public access
Previously, you have entered the “Account and Client” information, right?
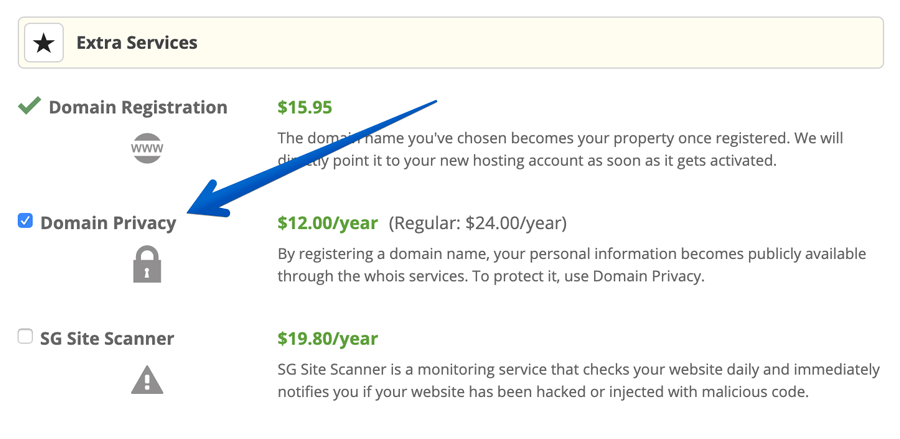
If you do not choose the “Domain Privacy” by paying 12$ to the domain registrar like Siteground, the client information you have entered in the previous step would be displayed to the public when someone asks for it.
This is not Siteground specific. It applies to all the domain registrars. For example, GoDaddy as well.
If you don’t have any problem with displaying your personal account information to the public, you can save the 12$ and move forward.
But if that is sensitive information, just pay the 12$ and it gives you peace of mind for the first 12 months.
Please Remember that Domain Name Registration and Domain Privacy are renewed every 12 months.
And these prices might change every year. Usually, they go up when it comes to Domain Privacy if you are buying it at a discounted price and you can’t skip this.
Opting for regular site scans (Optional)
One last inside under the extra services is “SG Site Scanner”. SG stands for Siteground.
If you select this option, Siteground will scan your website on a daily basis for any kind of virus or malicious code and informs you immediately so that you can take action.
For 20$ per year, that’s a pretty good deal because it saves me a lot of time. So, I personally use this my self on all my sites.
If you don’t have any budget constraints, just select this option and make the final payment. If not, I’d recommend the following free site scanner from Sucuri.
You have to manually visit the above link every couple of days and make sure that your site is not indeed infected. This is a good practice that you can’t skip.
Please remember that the above free scanner is not a fully functioning scanner. Since Sucuri’s scanner is a remote scanner, it has limited access to your site and results are not guaranteed.
P.S do not install any WordPress plugin that does this kind of scanning for you. They usually affect the performance of your site.
6. Complete the purchase and Log into Siteground
Take a good look at all the information that you provided and make the payment.
Once the payment is done and the registration process is complete, log into the Siteground dashboard with the email and password that you have entered in the Account Information section previously.
Uff, Half of the battle is now done :)
Step 3 Setup WordPress through the web host
Most of the web hosts who follow standards will provide us with a “One Click WordPress Installation” feature inside the Control Panel of the Hosting Dashboard and we will use that feature to install and setup WordPress.
So, the steps that I am about to show you for installing WordPress is common for any modern web hosting company.
1. Go to control panel and look for WordPress installer
Once you have logged your hosting account’s Dashboard, go to the cPanel or any custom panel and look for WordPress Installer shown in the below screenshot and click on it to go to the WordPress setup screen.

Note: Both the above WordPress icon buttons will help us create a WordPress website in the same way.
2. Click on the “Install” tab from the WordPress set up screen
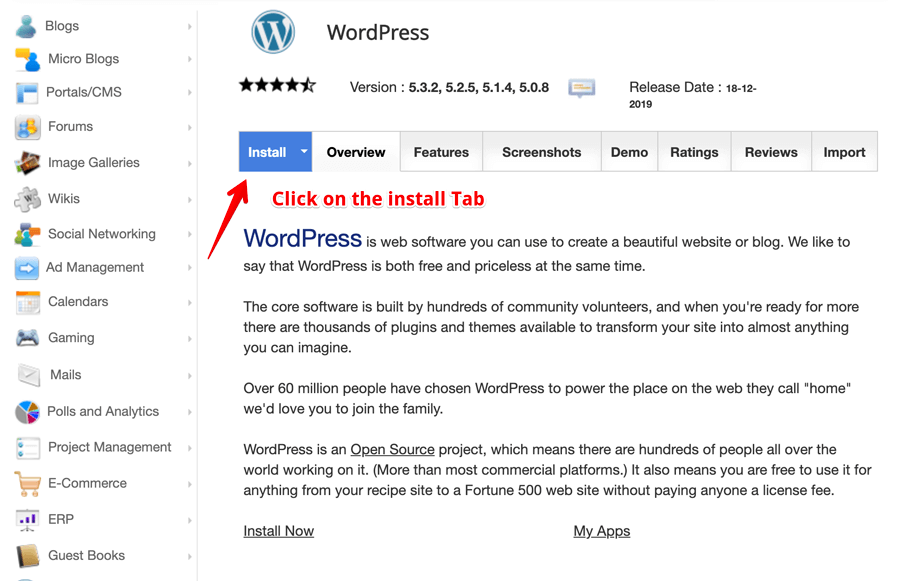
Note: This step might differ from Host to Host
3. Fill in the WordPress installation options and click the Install button
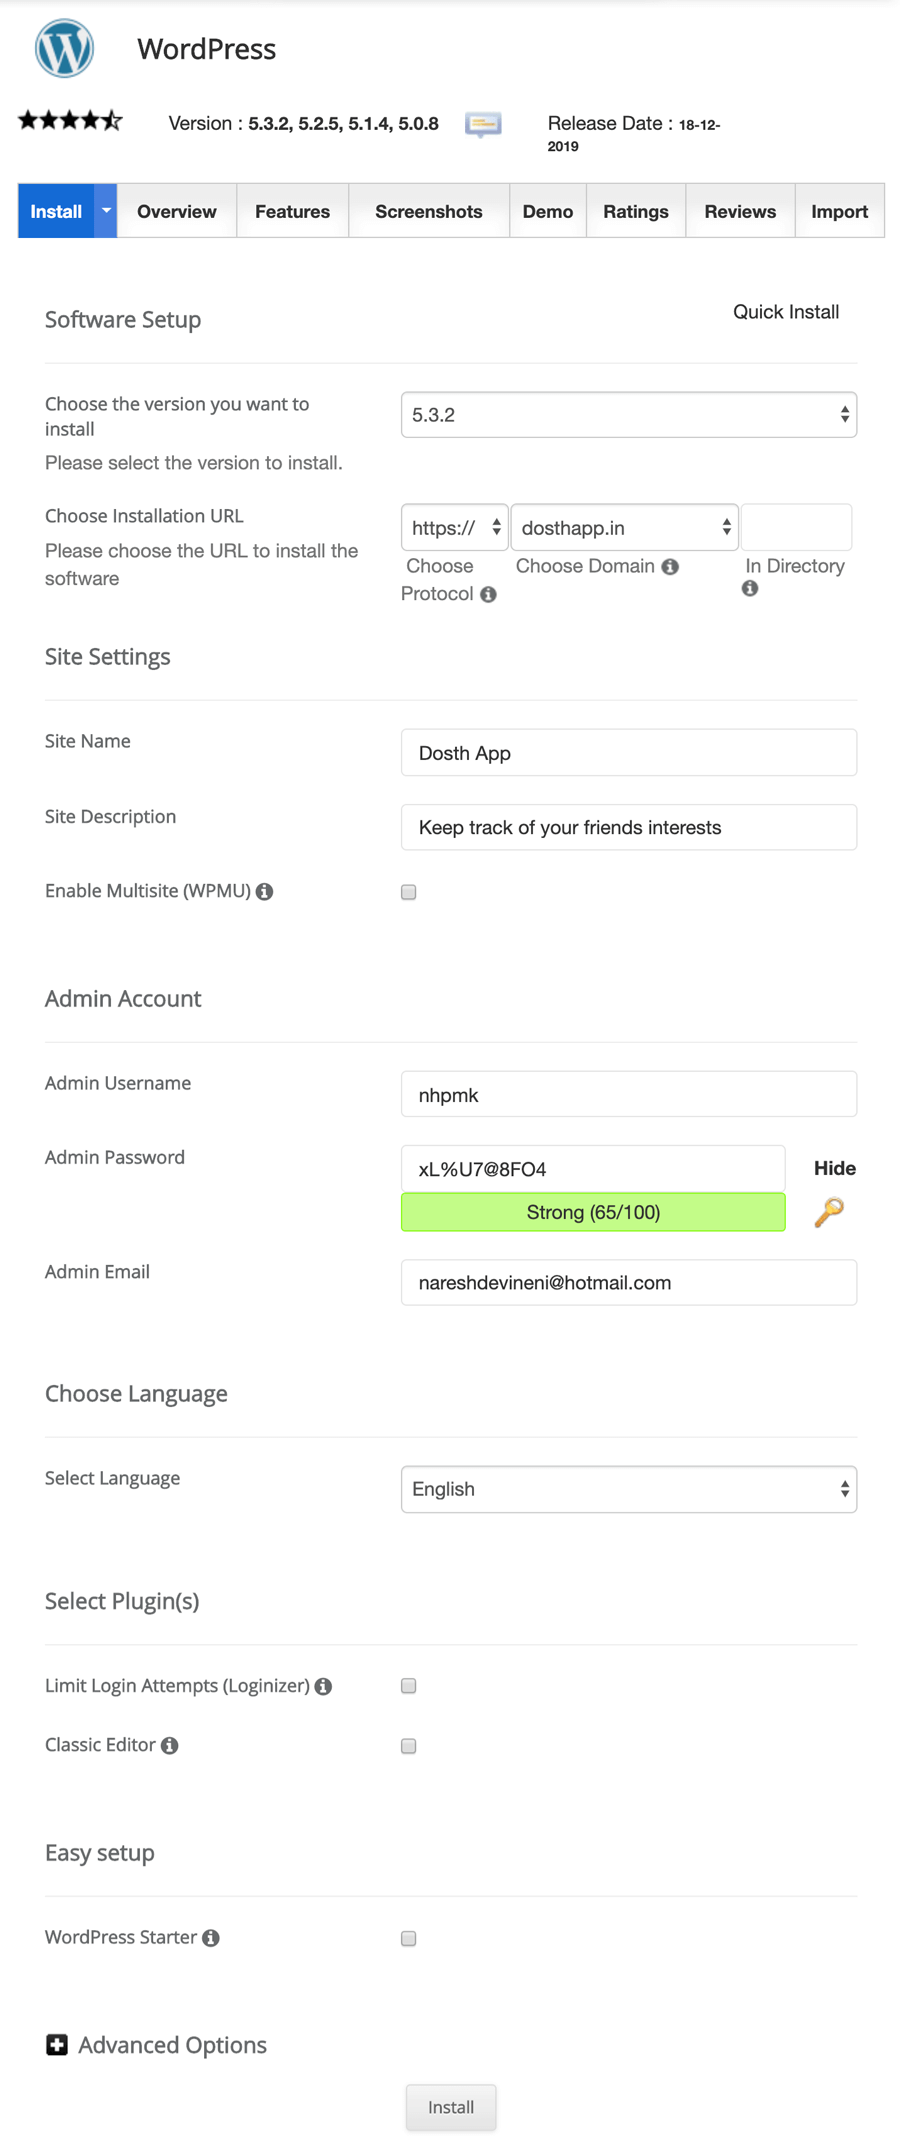
WordPress Software Setup
First of all, The WordPress installer will choose the latest version of WordPress software by default.
So there is no point in fiddling around with that.
Next, Siteground installs a free Let’s Encrypt SSL certificate by default for every domain name that you register with them.
So, for the “Choose protocol” option, keep “HTTPS” as is.
If you are facing any kind of problem with this option, just contact Siteground support or read the following article from the Siteground Knowledgebase:
https://www.siteground.com/tutorials/getting-started/install-a-certificate/
And finally, choose the domain name for your WordPress website.
Based on the number of domain names that you are pointing towards your web hosting, you’ll find multiple domain names under the “Choose Domain” option.
Since we are building a Mobile App promotion website, I registered the dosthapp.in and selected it for this option.
Site Settings Section
Enter the site name and tagline here by changing the default text. Both these settings are used throughout the site.
Anyway, you can always change these settings later by logging into the actual WordPress dashboard and you can change these any number of times you want.
Fill in WordPress Admin Credentials and click “Install” button
Next comes the “Admin Account” section.
Put in a good username, a strong password, and your email address.
You’ll be using these credentials for logging into WordPress Dashboard itself. So, remember them or use a service like 1Password.
For the “Choose Language” option, If your default language is not English, choose a different language and ignore the rest of the options as we don’t need to worry about them.
Finally, review all the details that you have entered and install WordPress by clicking on the “Install” button.
And bang! You have now installed WordPress successfully for the first time :)
Now comes the fun part.
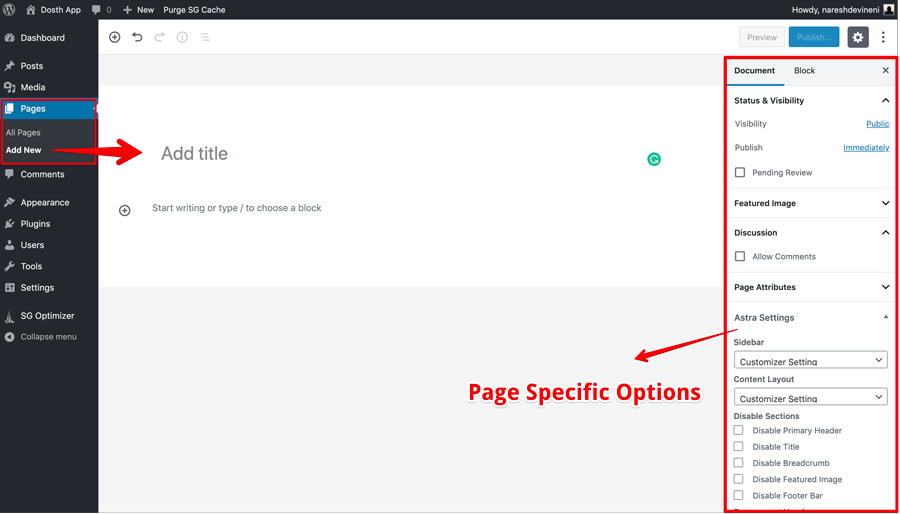
Step 4 Design your website
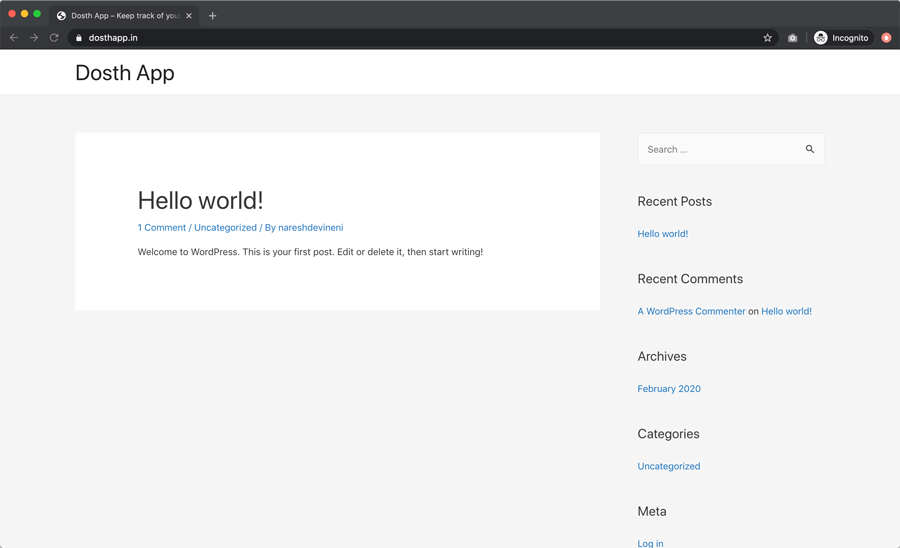
Once you have installed WordPress successfully, visit the website by typing the domain name in the URL and you’ll see a very basic website site.
Congratulations, you are making progress ;)
Next, let’s talk about something called a “WordPress Theme”.
If you compare one website with the another, you’ll realize that every website has a
- Logo
- Navigation for accessing internal pages like about us and contact us
- Some text-based content
- More than a dozen articles
- A footer with copyright information and few links
Although the elements that make up the website are the same, the way we design them makes all the difference.
For example, a simple change to font, layout and color combinations would make the website look entirely different, and this is what a WordPress theme is all about.
A WordPress theme controls how a website looks for its visitors.
It deals with the layout, colors, fonts, HTML Markup and CSS.
In one word, a WordPress theme is all about the “Frontend Styling” of a website.
This means, changing from one theme to another, will change the design of the website completely.
By default, WordPress ships with a couple of default themes and the most recently released default theme will be active on the site when WordPress is installed. This is why our site has that basic look.
So, let’s change this basic look and feel of the website by installing a new “WordPress Theme”.
1. Log in to the WordPress Dashboard
To install a theme, the first thing we have to do log into the WordPress Admin Dashboard. You can access the dashboard by attaching the “/wp-admin” slug to the end of your website URL like this:
https://yourwebsite.com/wp-admin
Replace the yourwebsite.com with your site’s domain name. Mine is dosthapp.in, so the final URL for accessing the admin dashboard would be:
https://dosthapp.in/wp-admin
Once you hit enter, you’ll see a login form.
Log in using the username and password that you have created during the “WordPress Installation” process.
As soon as you log in, WordPress will greet you with this dashboard:

2. How to Choose and install a good WordPress theme
WordPress is an open-source CMS software and is backed up by a powerful community of contributors.
So, currently, there are 1500+ free WordPress themes available from various genres. Some of these are customizable up to great lengths.
You can install them, play around with them any time you want.
If you don’t like a particular theme, you can delete it and install a different theme that fits your needs and you can do this in a snap.
All thanks to the user-friendly nature of WordPress theme management.
You can also purchase a premium WordPress theme from a market place like themeforest.net.
The primary difference between a premium theme and a free theme is customization options. That’s all in many cases.
I recommend starting out with a free theme. This way, you can gain some knowledge about how WordPress themes work and behave in general.
Once you are comfortable with some free themes, then you can make the right decision when choosing a premium theme.
Choosing a good WordPress theme
When it comes to picking a good WordPress theme, be it free or premium, experience matters a lot.
And, for the purposes of this guide, we will be going with a free theme called “Astra”. So, go to:
Admin Dashboard -> Appearance -> Themes
And click on the “Add New” button to search and install a new theme.

As soon as you click on the “Add New” button, WordPress will display 15 featured themes.
If you don’t like any of them, you can filter the themes by using other filters available on the navigation bar.
For example, you can filter the themes by feature by clicking on the “Feature Filter” link.

Let’s use the “Search Themes” field to search for “Astra” and voila, you can find a theme named “Astra” in the search results.

Click anywhere on the “Astra” box to preview the theme. Here is a pro-tip, always preview the theme before installing it :)

The Bad News
One problem with free themes in general is, When you are previewing a theme using the WordPress dashboard, they look nothing like the thumbnail images that we were drolling at.
WordPress only lets us preview the blog portion of the theme because of some limitations.
We can definitely achieve the look of the thumbnail, but since it’s a free theme, we have to put in some work to make our website look like the thumbnail.
This is where a premium theme comes in.
Premium themes provide us with a preview that matches the thumbnail and comes with a one-click demo data import feature which will let us achieve the look that we expecting with a click of a button.
This is one of the customization features that I was talking about previously.
Anyway, I don’t want you to spend any more money. So, let’s come back to free themes.
When choosing a free theme, it is important to take various factors into consideration. Not just the design.
Factors that you must take into consideration when choosing a new theme to your WordPress site:
- Theme’s last updated date – Theme developers usually release new versions of their theme by fixing bugs and adding new features. If the theme’s last updated date is less than a month, then the developer is making an active effort to update the theme with new standards and this is a really good sign.
- The number of active installs – this tells how many websites are currently using a particular theme. If the number is high, that means it is trustable.
- The number of 1-star and 5-star ratings – It always a good idea to read both 1-star and 5-star reviews. They will tell us a lot of details about the theme than the theme’s description itself.
- Is it the right fit for your website? – Just because the design of the theme looks good, it doesn’t mean it fits your website niche. For example, if you are planning to create a food blog, you shouldn’t choose a design that is suitable for a technology blog.
If we apply the above considerations to the Astra theme:
- It has a 5-star rating based on more than 3000+ reviews
- It is currently installed on 600,000+ websites.
- The last updated date of the theme is one month ago, so the developers behind the theme are actively maintaining it.
- Finally, it is a multi-purpose theme, so it fits our Mobile App Promotion site perfectly
Great, isn’t it? So, let’s just go ahead and install it :)
Install the Astra WordPress theme
You can install it by clicking the “Install” button.
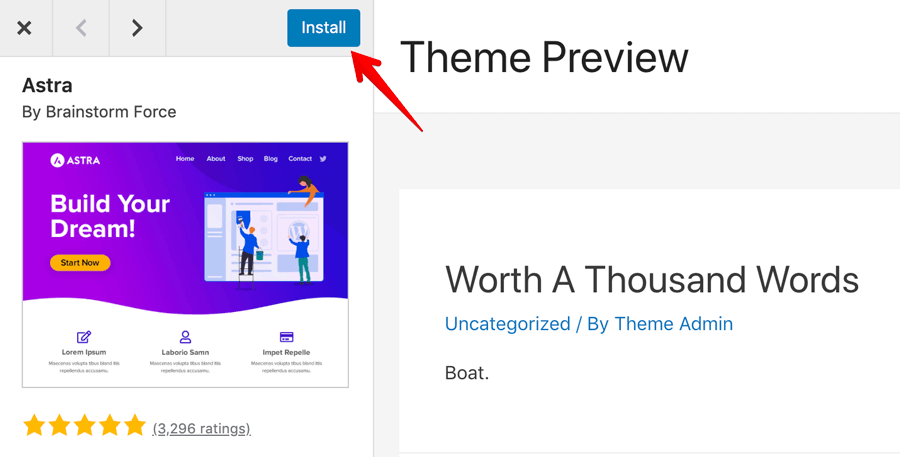
Technically, installing the theme is not enough, so we have to activate it to complete the installation.

And here is how our site looks like once the Astra theme is installed and activated on the site.
I know. It still looks like a basic site. As I said before, creating a good WordPress website takes time.
But don’t worry. Once we start building out the header, main content and, footer sections of the site, it will look great eventually.
Anyway, take some time off and come back. And once you come back, let’s start with building out the header.
3. Building out the site header
Every website header will have two things in common:
- Website Logo
- Website Navigation
To upload the logo, go to:
WordPress Dashboard -> Appearance -> Customize -> Header -> Site Identity
And then click on the “Select Logo” box to upload the logo.
You are now inside the Customize panel of WordPress.
So, you’ll find other customization options too and feel free to play around them because you can always revert them back.
Back to the logo. If you don’t have any logo ready yet and if you care about branding, don’t use cheap freelance services to get the logo done.
A logo is the face of your online identity. So get yourself a good one.
If you know no one, I recommend Pradeep Gangireddy His logo designs speak for himself and got him many awards.
For now, you can use the following logo if you want to:
You can also download the content from https://dosth.usablewp.com
Feel free to copy the text and images from it.
Anyway, You can also reach the logo and other options in two other ways.
1. Astra theme comes with its own page for theme options and you can access it by going to:
WordPress Dashboard -> Appearance -> Astra Options
Matter of fact is, almost every WordPress theme will provide it’s customization options inside the WordPress Customize panel itself.
WordPress built this Customize panel just for customization options and it became a standard that almost every theme developer will and should follow.
2. Clicking on the little “Pencil Icon” that is located right next to the Site Title. It will take you to the correct option.
This applies to other options too. Neat and convenient isn’t it?
Set the Logo Width
Once you have uploaded the logo, set its width. I have set it to 70px but you can play around with it.
Set the Site Icon aka favicon of the website
Right underneath the logo option, you can find the Site Icon ( Favicon ) option.
If you don’t know what favicons are, they are the little icons you see all the time without even knowing that they are favicons.
And here is the icon that I have prepared for you to upload:

Next, I don’t want to display the Site Title or Site Tagline beside the Logo, so, I have turned off both “Display Site Title” and “Display Site Tagline” options.
Please remember to save the changes by hitting the “Publish” button. I can’t stress this enough :)
Please remember that these options are specific to the Astra theme. Other themes might provide these options at a different place and some themes might not provide these options at all.
Anyway, we are now done with the Logo. Next, let’s create the navigation of our site.
Currently, we don’t have any pages on site. So, we have to create pages first and then the navigation menu in the header.
How to create pages in WordPress
Adding pages to your WordPress site is easy!
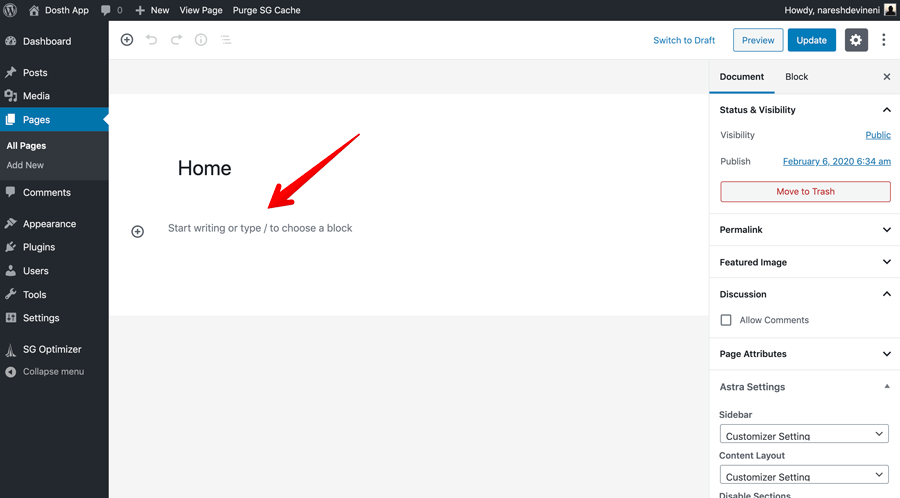
To create your first page, go to:
WordPress Dashboard -> Pages -> Add New
We are creating the Homepage first, so add the title as “Home” and hit the publish button to make the page live. We will add content later.
Next, create two other pages with titles “About Us” and “Contact Us”. Again, we will add content later to these pages.
We have created these pages just for the sake of building the navigation menu.
So, if you now visit the site on the frontend, you’ll see these newly created pages as part of the navigation.

But I don’t really like the order of these navigation items.
I want the Home link to appear first in the order.
But currently, this navigation menu is being automatically generated by WordPress and in order to take control, we have to create a new navigation menu ourselves.
In the terminology of WordPress, we call this navigation menu just “Menu” and WordPress comes with a powerful “Menu” management system.
So, in order to create a new menu, Go to:
WordPress Dashboard -> Appearance -> Menus

Next, Just like WordPress says, Give the menu a name.
I am gonna name this menu “Header Menu” because I am creating this menu to display it in the header.
Also, WordPress puts this menu name to good use inside widgets.
If you notice, the options on the left side of the screen are greyed out. You can not use this interface until you create the menu.
So, click on the Create Menu button.
As soon as you hit this button, WordPress will reload the page and this time, the options on the left side of the screen are accessible.
Next, add the newly created pages to the “Header Menu” menu by selecting the checkbox next to them and then click on the “Add to Menu” button to add them to the menu.

Once these pages are added to the menu, change their order by dragging and dropping and then click on the “Save Menu” button to save the changes made to the menu.

If you now go to the frontend portion of the site, you’ll notice that the order is still the same.
This means that Astra Theme is not using the newly created menu.
It’s not Astra Theme’s fault.
We have to be more Specific with WordPress by telling it to use the menu at a particular location of the site and these locations are defined by a WordPress theme.
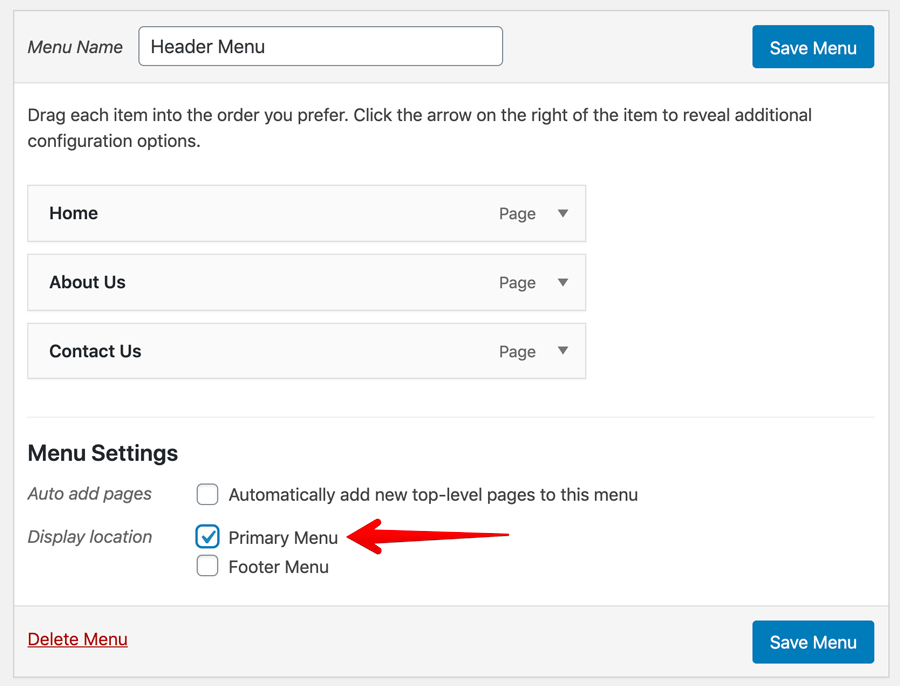
If you observe the Menus panel, you’ll find a section dedicated to “Menu Settings” and under this section, there is a setting called “Display Location”.
It is this setting that dictates where a particular menu must be displayed.
And, When it comes to the Astra theme, it comes with two locations where you can display a menu.
- Primary Menu
- Footer Menu
Primary Menu “Display Location” is linked to the menu in the header.
So, Checking the “Primary Menu” location will display this menu in the header portion of the site.
If you want to display the same menu in the footer as well, just check the “Footer Menu” location too.
That’s all you have to do to display a menu at different locations of the site <3
To learn more about the WordPress Menus, please read the following In-depth article:
https://www.usablewp.com/learn-wordpress/home-page/creating-a-custom-menu-for-the-header/
P.S Don’t forget to save the menu.
Anyway, if you now review the frontend, the order is as expected and we are officially done with the header portion of the site.

That’s pretty much how you build the header of any WordPress Site.
Theme options and their locations might differ between themes, but almost all themes take the same approach.
Next comes designing and adding the content for the pages we have created.
4. Add content to your WordPress site
When someone says content in terms of a Website, It means the content of a particular page or a blog post that goes in between the header and footer portions of the site.
And, when it comes to WordPress, adding the content to a page or blog post is really easy.
We can build the content and design of a WordPress page using:
- Gutenberg Editor (Default)
- A standalone page builder, For example, Elementor, Beaver Builder, etc.
By default, WordPress ships with a page builder called Gutenberg Editor and it allows us to add content to the page easily.
You can also create some basic layouts with it as it comes with many ready-made blocks.
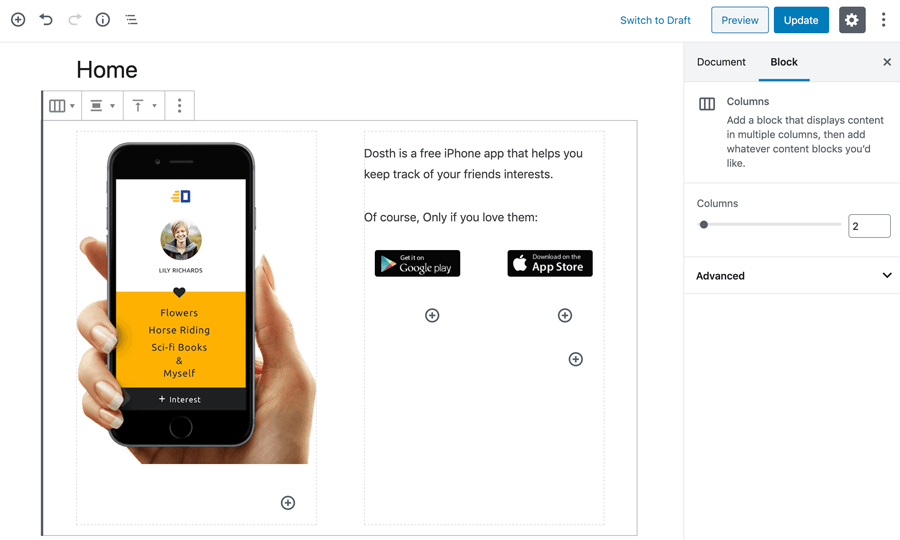
But one problem is, Some pages on the site like Homepage demands complex layout with design and it becomes difficult to built such designs with Gutenberg editor alone because it is not a full-fledged page builder.
To overcome this problem, non-techy users will use stand-alone page builders like Elementor and Beaver builder.
There is nothing wrong with using either of these approaches. It just depends on the design complexity at the end.
My best advice? If you are thinking about performance, using the Gutenberg editor is ideal.
The reason is simple.
Third-party page builders like Elementor are plugins and they generate a lot of unnecessary HTML Markup when compared to the Gutenberg.
Teaching about how to use the Gutenberg editor or the Elementor Page builder is out of the scope of this guide. So I have written in-depth guides about them separately.
To learn how to build the content using the Elementor Page Builder, please read:
https://www.usablewp.com/elementor-tutorial/
And, to learn how to use Gutenberg editor to design a page, please read:
https://www.usablewp.com/wordpress-gutenberg-editor/
This guide can wait until you finish one of the above guides. Don’t skip them by thinking that Gutenberg or Elementor page builders are hard to use, they are the easiest.
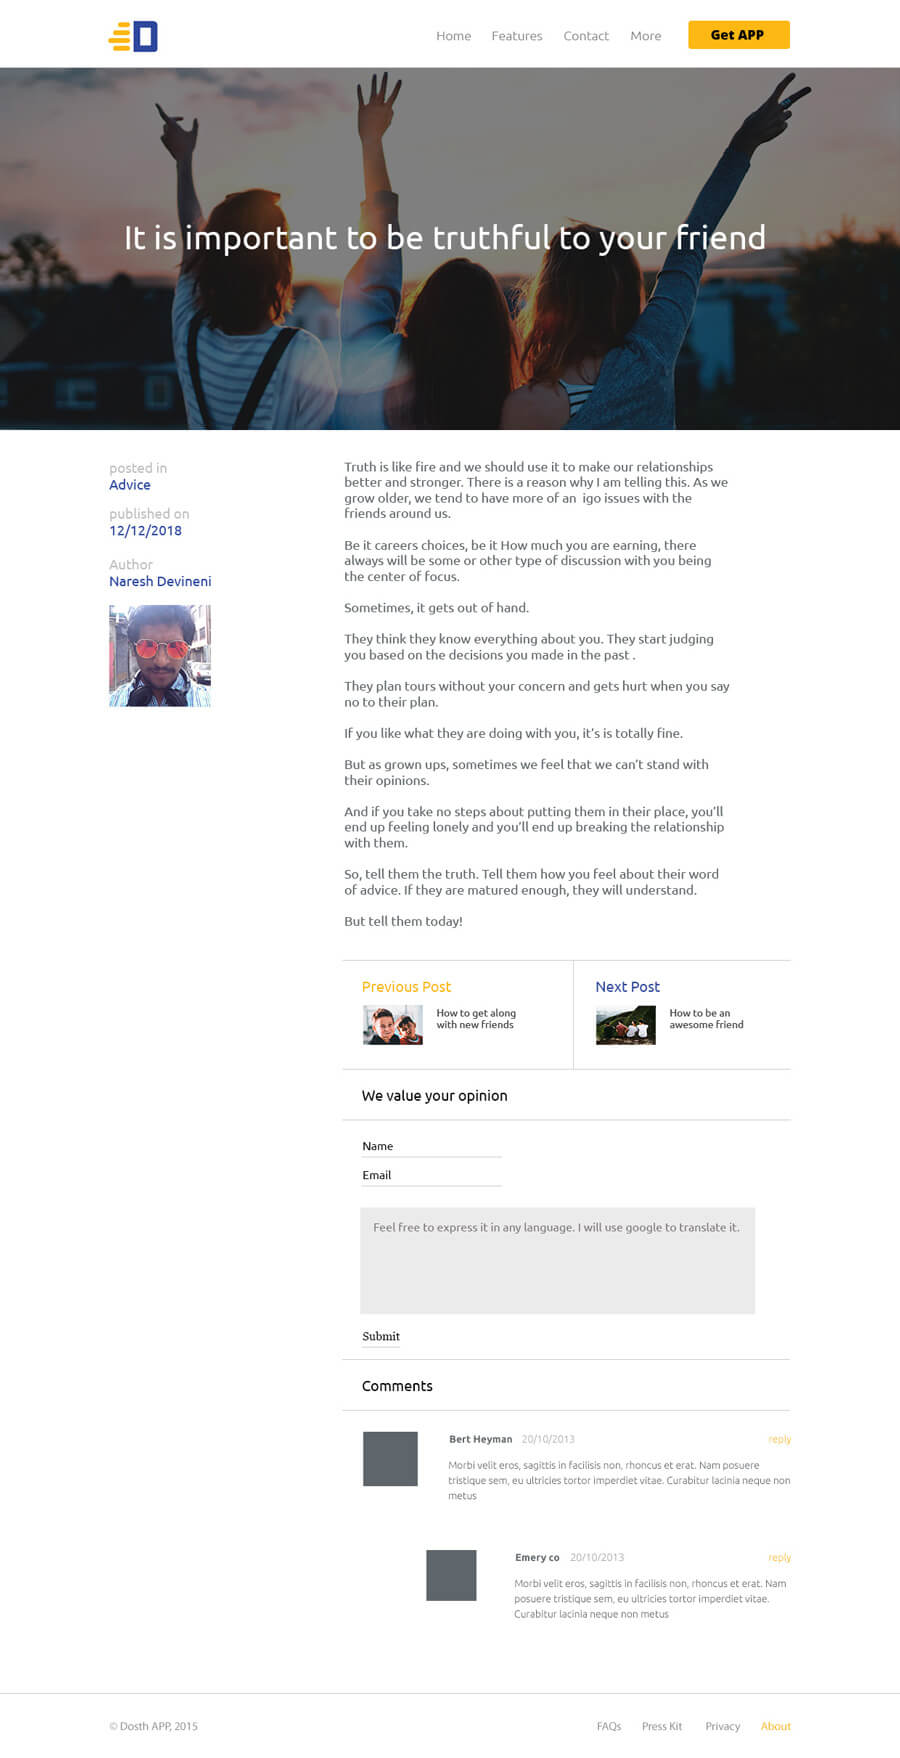
For the purposes of this guide, I went ahead with the Elementor page builder to build out the Homepage and the About us page content.
Now, if you look at the Homepage of the website, you still see the same basic “Hello world” blog posts index.
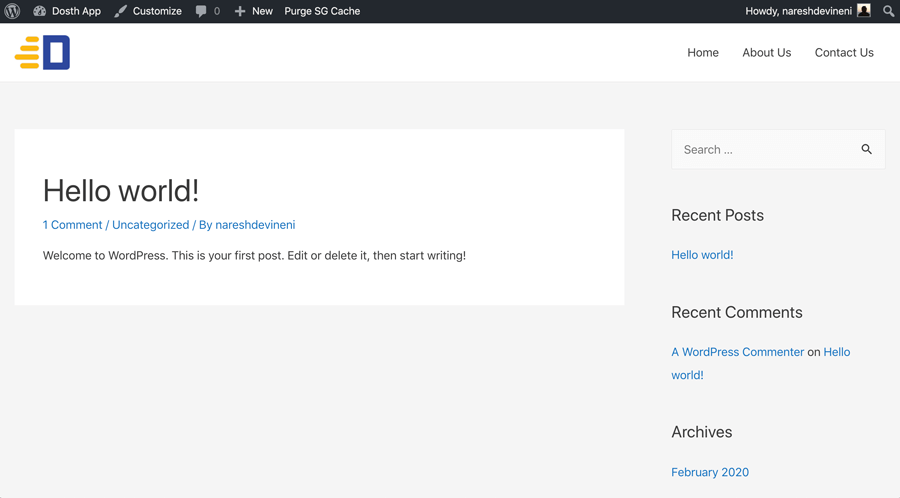
Why is that?
This is because although we have created the “Home” page, we did not tell WordPress to use it as the Website’s Homepage (Frontpage).
And we will do that next!
Step 5 How to set up the Homepage of a WordPress site
Before we do anything else, you need to understand four types of pages in WordPress:
- Static Page
- Static Homepage
- Blog posts archive or index page
- Single Blog Post page
What is a Static Page?

In terms of WordPress terminology, a static page is nothing but a page and it is not a blog post or any related to a blog.
We are calling it static because we don’t perform updates on these pages that often. Some static pages stay the same for a long period to come.
For example, the “About US” page is a static page.
Unless a new content manager comes and says in that the current “About” content sucks, we keep the same text for years to come.
The same thing applies to the “Contact Us” page. We only change the address in it only when we shift to a different office.
So, we call these pages as static, hence the name “Static Page”.
What is a Static Homepage?
By default, WordPress displays a list of blog posts on the Homepage. But it also allows us to set a static page as the Homepage ( front page ).
Any static page that is set up as a Homepage can be called a Static Homepage. That’s it. Nothing more. Nothing less.
What is a Blog posts index/archive page?
Any URL of the website which displays a list of blog posts can be called a Blog posts Index/archive page.

When it comes to a blog posts index page, blog posts from all the categories are displayed.

But it comes to an archive page, blog posts from a particular category, date, month or a tag are displayed.
For example, if it is a sports blog, then there will be a separate archive for categories like Football, Tennis, etc.
And, if the blog is old enough, there will be an archive for November 2019, December 2019, January 2020, etc. where all the blog posts published in those months are displayed.
Single Blog Post page
Finally, a single blog post page which displays a single blog post’s content entirely.
Let’s put this knowledge to good use
Now that you understand the different type of pages in WordPress, if you now go to:
WordPress Dashboard -> Settings -> Reading
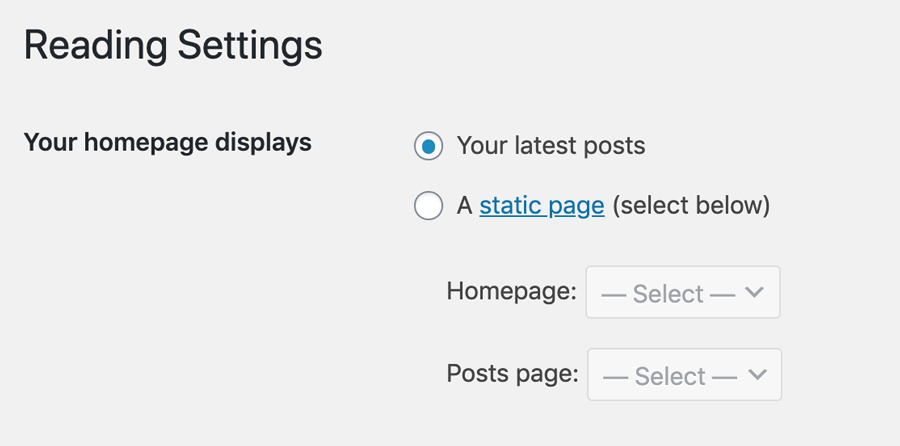
The very first setting “Your Homepage Displays” makes total sense to you now. Here, WordPress is asking what kind of page do you want as the Homepage.
As you can see, currently it is set to “Your Latest Posts”, that’s why you are seeing the “Hello World” blog post on the Homepage of the site.
And, we want the “Home” page that we have created as our homepage, right?
What kind of page is it? A static page!
So, we should just click on the “A static Page” option and then select “Home” under the “Homepage” option.
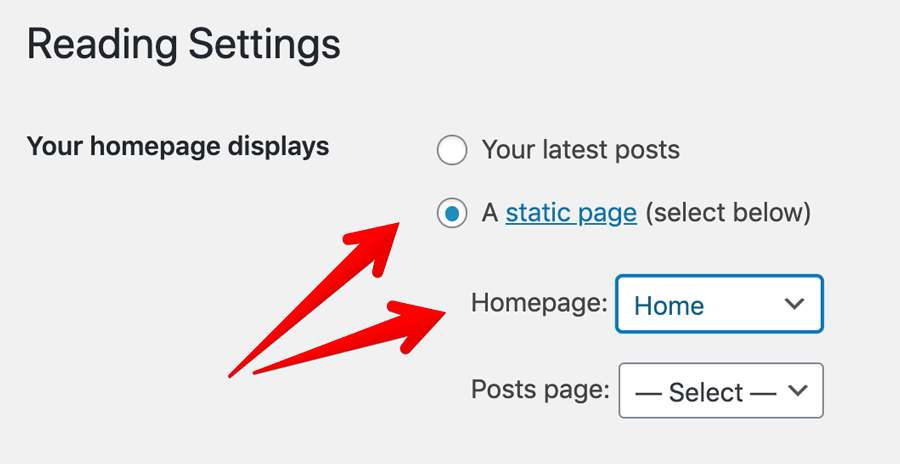
Finally, click the “Save Changes” button to save the changes and that’s it. This is how we set the Homepage of a WordPress website by choosing what you want to showcase on your Homepage.
If you now go the frontend and refresh, you can no longer see the blog posts index anymore. Instead, you’ll see a neatly designed static page.
Next, we will see how to extend WordPress functionality by installing and using plugins.
By default, WordPress doesn’t ship with a contact form functionality.
But we still need a contact form for our website, right?
This is where “WordPress Plugins” come in.
Step 6 How to create a contact form in WordPress
Speaking from a website creator perspective, When you create a WordPress website, there is no way you can skip creating a contact form, right?
After all, every website needs a contact form.
But how do we add contact form to our WordPress site?
WordPress doesn’t ship with a Contact Form functionality.
But one great thing about WordPress is, it allows us to extend its functionality and add new features using “Plugins”.
There is a plugin for every need.
Most of them are free and only some of them are premium.
All thanks to the great open source community behind WordPress.
Gravity Forms (Premium)
When it comes to forms, there are a ton of free and premium plugins out there.
I personally use a premium plugin called Gravity Forms on all the sites that I create because of its email delivery rate and reliable nature.
Gravity forms allow us to create complex forms in a matter of minutes with a ton of field types and easy to use drag-and-drop form builder interface.
When it comes to contact forms, email delivery rate is the primary factor because when someone submits a form and you didn’t get it in your inbox, you are losing a potential customer, right?
Now, the email delivery rate depends on a lot of factors and we don’t have control over a lot of them.
Only the web host and the plugin we choose are in our control.
You have already chosen a Good Web Host.
So, why not choose a good plugin that guarantees a high email delivery rate? Hence Gravity Forms.
For the purposes of this course, I will be using a free plugin called WPForms.
But if you have decided to go with Gravity Forms, Greate decision!
WPForms (Freemium)
Not everybody can afford Gravity Forms even though it’s worth it.
If that is the case, I’d recommend the WPForms plugin.
It is another great form plugin and it’s a freemium plugin.
That means, it’s let’s us create a basic form with some basic fields for free and if you need more features, you need to purchase the premium version of the plugin.
Since we are creating a simple contact form, a free version of the WPForms plugin is a great choice if you are on a budget.
So, let’s install it.
How to Install a Plugin in WordPress
Installing a plugin in WordPress is easy. Go to:
Admin Dashboard -> Plugins -> Add New
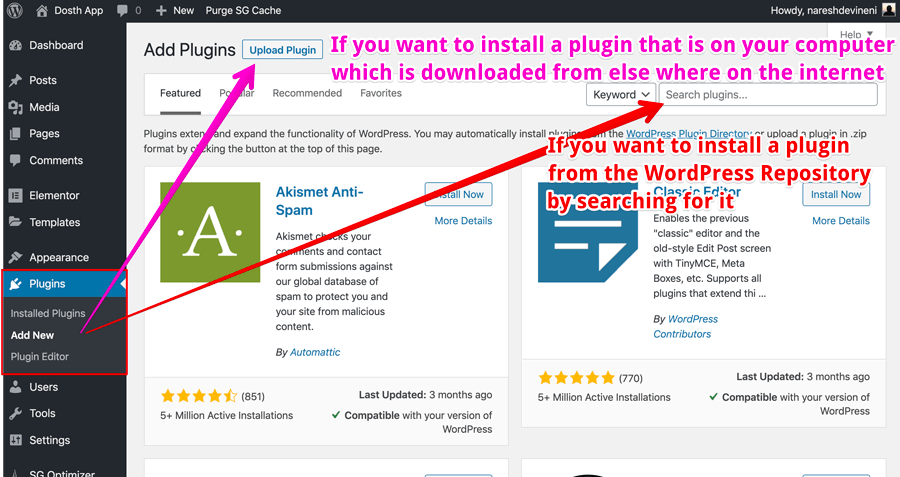
Now, there are two ways to install a WordPress plugin.
1. Installing a plugin by searching for it using a name or feature
Searching and installing a plugin is the most common way of installing a WordPress plugin.
If you notice, there is a search box on the “Add New” screen.
So, all you have to do is search for a plugin and once you get results, skim through them and then click on the “Install Now” button.
Just like themes, once the plugin is installed, you have to “Activate” the plugin to complete the installation.
This search technique only works if you want to install a free plugin that is registered and uploaded to the WordPress Plugin Repository.
You can even ask the support questions related to particular plugin here:
https://wordpress.org/support/
Now, go ahead put this knowledge to good use by installing the free WPForms plugin using the search feature.
Type WPForms inside the search box and install the plugin.
Once the plugin is installed and activated, the plugin will take you to its “Welcome Screen” within the WordPress dashboard and there you’ll find a youtube tutorial that will help you build forms using the plugin.

However, sometimes, you want to install some premium plugins like Gravity Forms and you can not find it inside the free WordPress Plugin Repository.
So, how do we install a premium plugin?
2. By uploading the plugin in the form of a zip file

Premium plugins like Gravity Forms are downloaded from their own website like https://gravityforms.com and you’ll be downloading the plugin file in a zip format.
This applies to custom plugins developed by developers whom you hire too.
So, to install a premium plugin or a custom plugin, you’ll have to use the “Upload Plugin” button which is located on the top-left-hand corner of the screen.
Got it?
How to create a Contact form using WPForms Lite (Free Version of WPForms)
Now that you have installed the WPForms plugin. Let’s go ahead create a contact form.
Go to: Admin Dashboard -> WPForms -> Add New
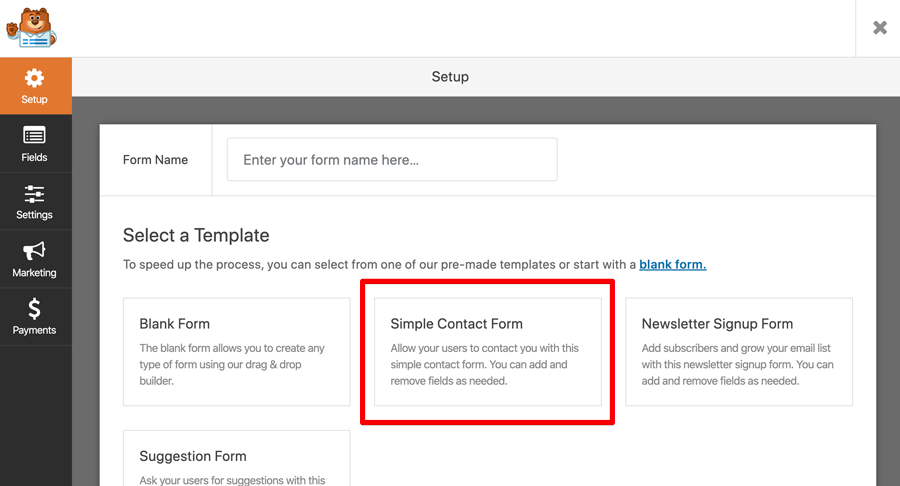
Unlike other form builder plugins for WordPress, WPForms allows us to choose between a blank form and several other pre-made templates.
We can use the “Blank Form” option to create a form from scratch.
But, if you want to save some time, you can choose some of the existing pre-made templates that WPForms ships with.
I want to save some time and one of those pre-made templates is a contact form.
So, why not just use it?
Come on, click on the “Simple Contact Form” box to create a basic contact form.

And, as soon as you click on it, WPForms goes ahead and creates a contact form with Name, Email and Message fields.
On the right-hand side, you can see the form preview and on the left-hand side, you can see the fields that you can use to create the form.
The form is looking nice, but, I want to collect the Phone number too.

To do that, I am gonna click on the “Numbers” field and as soon as I click on it, WPForms will add a new field at the end of the form on the right-hand side.
But since we want to place the phone number field right underneath the “Email” field, we can drag and drop it to re-order the field position inside the form.
Next, I want to rename the label from “Numbers” to “Phone Number”.
So, to change the label or any settings related to a particular field, just click the field to open up its options.

As soon as you click on the field, WPForms will switch to the “Field Options” tab on the left-hand side of the screen.
And, inside this “Field Options” tab that is specific to the “Numbers” field, you’ll find the “Label” option.

As you can see in the above screenshot, I have changed the label to “Phone Number”.
If you want to add a description, please go ahead, the “Description” option adds a small piece of text right underneath the form field.
I don’t want to force the user to provide his/her phone number, so, I have left the “Required” option as is ( turned off ).
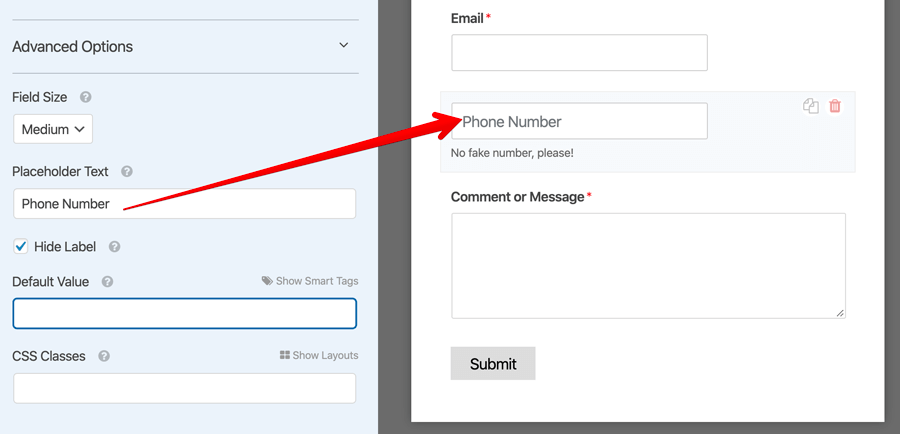
Also, if you notice, there is an “Advanced Options” section right underneath the basic options.
For aesthetical reasons, It is common these days to have placeholders instead of labels on top of the fields.
So, if you want to remove the label and add a placeholder for a particular field, Go to the “Advanced Options” section and configure the field accordingly.
Now, remember, If you want to go with a placeholder instead of the label, maintain consistency with other fields.
Don’t have placeholder for one field and label for the other. Just don’t mix them up.
Anyway, that’s pretty much how you create a contact using WordPress plugin “WPForms”.
Once you are done creating the form, hit the “Save” button located on the top-right hand corner of the screen to save the changes.
Easy enough, right?
Creating a contact form is different from displaying it on the “Contact” page.
And to display the form, WPForms provides us with something called a “Shortcode” and we will learn about WordPress shortcodes next.
Step 7 What is WordPress Shortcode and how to use it
A WordPress Shortcode is nothing but a small piece of code that outputs a form, calendar, e-commerce products, etc. on the frontend.
A Shortcode is usually created by a plugin or theme author to make it easy for us the non-techies to display some complex functionality on the frontend without having to reach out to the developer for help.
Sometimes, some dynamic plugins like WPForms, Gravity Forms, etc. generates these shortcodes on the fly for us.
For example, When we created the contact form using the WPForms plugin in the previous step, the plugin automatically generated a shortcode for us to display the form anywhere on the site.
This is better shown than explained.
If you are following along, we are still at the “Simple Contact Form” screen that we have been working on.

And, at the top-right-hand corner of the screen, right beside the “Save” button, there is this “Embed” button.
If you click on it, WPForms will provide you with a shortcode that looks like this:
[wpforms id="786"]
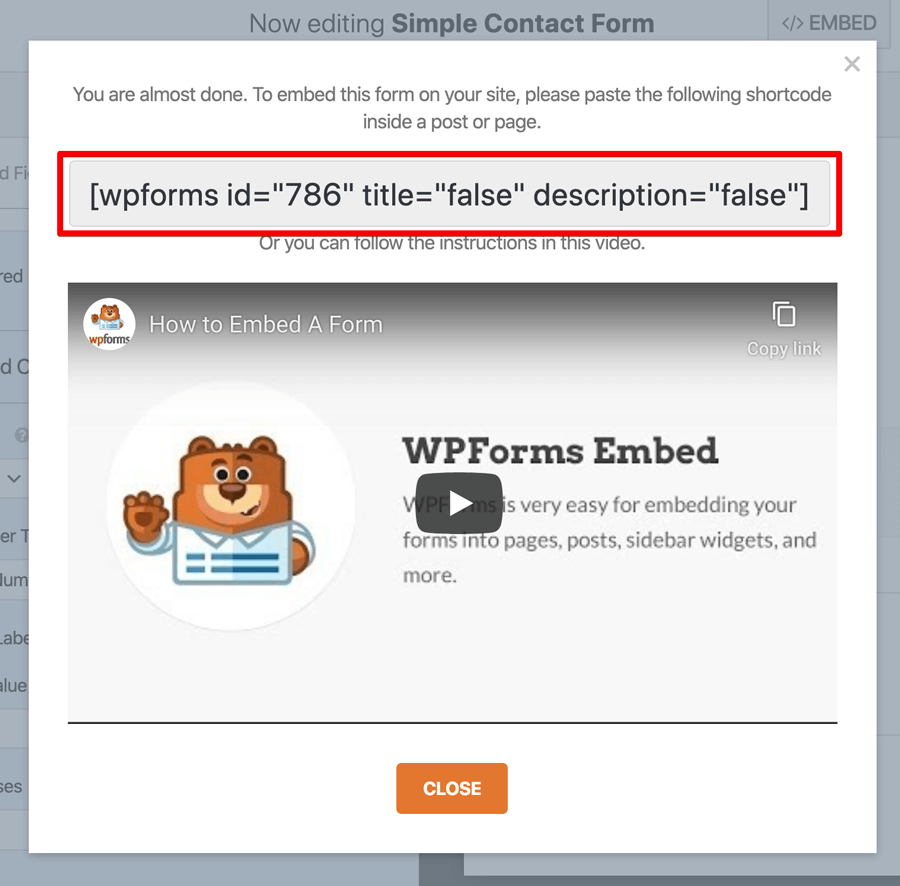
That’s how a shortcode looks like. It starts with “[” and ends with “]“.
For some reason, if you forget those opening and closing square brackets, the shortcode is not going to work. Period.
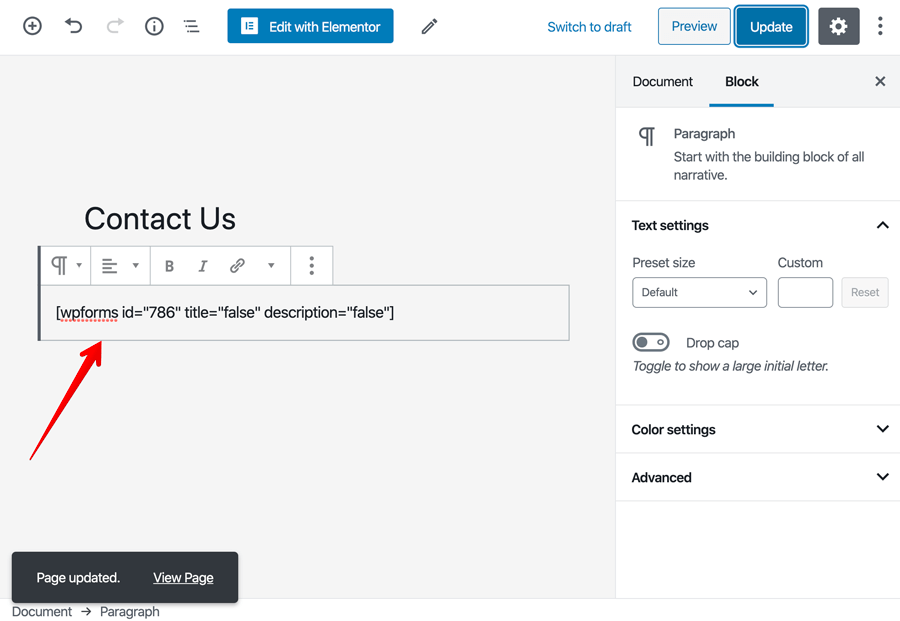
Anyway, now let’s use the above shortcode to display the form inside the Contact Page.
How to use a WordPress Shortcode
First, copy the shortcode from the Popup.
Next, go to: Pages -> Contact Us -> Edit
And finally, paste the shortcode inside the content editor of the page and don’t forget to update the page.
Now, if you notice, the shortcode we pasted have three parameters.
[wpforms id="786" title="false" description="false"]
The shortcode parameters helps us modify the output of the shortcode.
For example, The “id” parameter instructs the WPForms plugin to output a certain form.
The thing is, everytime we create a form, WPForms allocates a unique ID to it so that we can output the form we need using the shortcode.
Similarly, the “title” parameter helps us hide the title of the form from the frontend if we don’t need it.
These parameters change based on the shortcode and it’s plugin or theme. Not all shortcodes some with same parameter options.
This applies to any kind of shortcode. Be it custom created or plugin created shortcode.
And, lastly, some shortcodes do not come with parameter options at all.
Simply put, the developer of the shortcode thinks that there is no need to modify the output of the Shortcode.
That’s all. That’s pretty much how you should use a shortcode.
You can also use shortcodes inside some widgets and all page builders like Elementor allows you to paste shortcodes inside most of their elements.
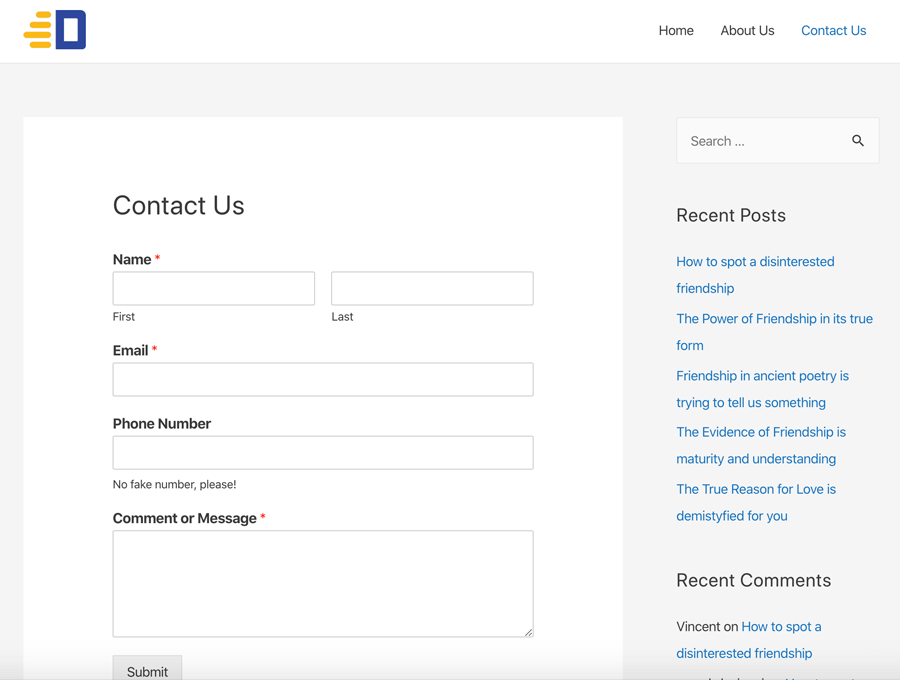
Anyway, If you now view the Contact Page on the Frontend, you’ll see a fully functioning contact form that works perfectly and you have created that in less than 5 minutes.
All thanks to the power of WordPress plugins and Shortcodes.
Introducing one of the most commonly faced problems with Shortcodes
Sometimes, A Shortcode might get displayed as-is on the frontend like this:

When you see something like this, please do not panic.
This will only happen when the plugin/theme related to the shortcode is no longer active or not functioning properly.
For example, imagine that you have moved away from WPForms to Gravity Forms.
After uninstalling the WPForms plugin, if you forget to remove or replace the shortcode from the Contact page, you’ll see the shortcode as is.
This applies to themes as well.
So when you come across this problem, check whether the responsible theme or plugin is active first.
If it is active but shortcode is still not working, contact the developer for the support.
If it’s a premium theme or plugin, you’ll receive great support immediately.
But if it is a free version, you’ll have to wait a bit longer because the developer of the free plugin has to earn money by doing another day job.
Bear that in mind.
Either way, WordPress has a strong community to support you in bad times.
So, don’t you ever worry.
Having said that, there is a lot more to learn about the WordPress Shortcodes and WPForms plugin.
To learn more about shortcodes, read this excellent article from Kinsta.
And, to learn more about WPForms, there is no better place than Docs from the WPForms site itself.
Step 8 How to manage a plugin in WordPress
When you create a WordPress website, you will be installing and managing a lot plugins at once.
Plugins are just like turning off the light switch when you don’t need it and then turning it back on when you want it.
For some reason, if you are not happy with a plugin, you can go ahead and de-activate it and try out another plugin.
If you want to activate it back, you still can :)
To manage a plugin, go to:
Admin Dashboard -> Plugins

If you want to deactivate a plugin, just click on the deactivate button and that plugin functionality will be off from the site.
If you want to activate it back, just click on the activate button.
And finally, if you want to delete the plugin, just click the delete button.
Remember, you can see the “delete” button and “activate” button only once you have deactivated the plugin.

Got it?
However, deactivating a plugin is different from deleting it
When you deactivate the plugin, the plugin files and data that you have created using the plugin are not deleted.
It’s just that you can not access them until you activate the plugin back.
For example, let’s just say you have created a couple of forms using the WPForms plugin.
When you deactivate the plugin, although the forms are not accessible, they are still in the database and you can restore in the same state when the plugin is activated back.
But when you delete a plugin, all the data related to the plugin is deleted completely including the files.
And, if you want the plugin back once it is deleted, you have to install it again and create the data like Forms, Galleries, etc. all over again.
So, just understand this difference and be careful.
Step 9 How to create a WordPress Blog
Let me tell you something really interesting.
You don’t really have to create a blog because you already created a blog when you installed WordPress.
WordPress is known as a blogging platform first and only then it evolved as a Content Management System.
So, you don’t really need a separate plugin to create a blog for your WordPress site.
Simply put, to display a blog for your website visitors, you have to perform the following actions from your side:
- Create some blog posts
- Then, create a page and name it “Blog” or whatever you want.
- Assign the newly created page to the “Posts Page” option located under the “Reading Settings” page.
- Add the “Blog” page to the header navigation menu.
Sounds really simple, right?
So, it is more like “Setting up your WordPress blog” instead of “Creating a WordPress blog”.
Anyway, Let’s perform the above steps one by one.
1. Create Blog Posts
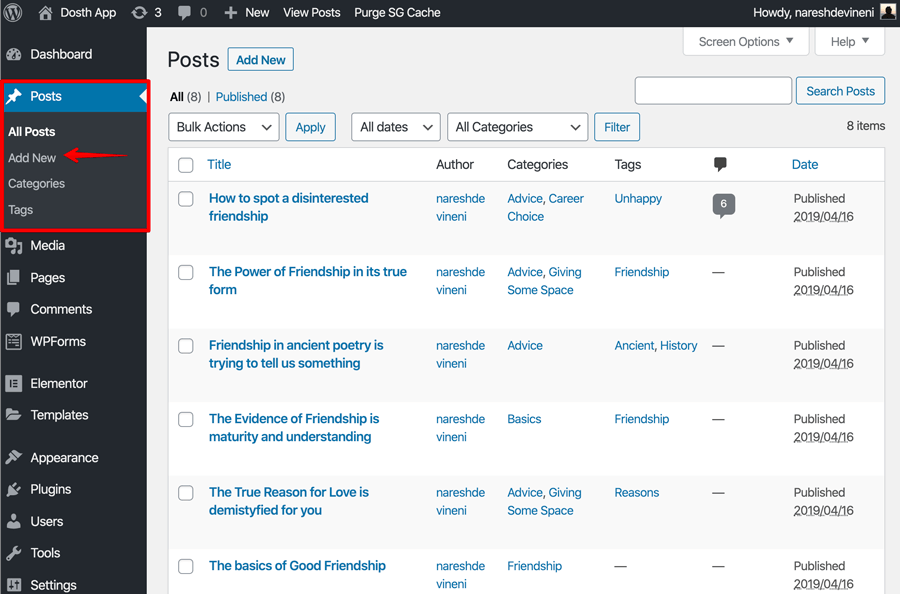
To add a new blog post, go to:
Admin Dashboard -> Posts -> Add New
If you need content or images for dummy posts, you can copy them from:
http://dosth.usablewp.com/blog/
From here on, I am gonna assume that you have created your Blog posts.
Anyway, now that we have created our blog posts, it’s time to create a page to display those blog posts.
2. Create a page and name it “Blog” or “Articles”

You do know how to create a page right?
Come on, go ahead and create a page named “Blog”.
You don’t really have to add any kind of content to this page. The content of this page is supposed to be empty.
Even if you add the content, WordPress is not going to display it on the frontend because it is going to use this page for outputting blog posts only.
You’ll understand it after the next step.
3. Assign the newly created page to the “Posts Page” option
Remember the “Your Homepage Displays” option?
We have used it to configure the Homepage of our site in a previous step.
See the “Posts Page” option right underneath it?

To make all the blog posts accessible to our website visitors, we need to tell WordPress that it should use the “Blog” page as the “Posts page”.
Only then WordPress will display blog posts when we someone visits the “Blog” page on the frontend.
So, to do this, Go to:
Admin Dashboard -> Settings -> Reading
Next, assign the newly created “Blog” page to the “Posts Page” option and save the changes.

If you now visit the “Blog” page on the frontend, you’ll see a list of blog posts and if you click one of them, you can read the entire blog post.
It’s as easy as that.
Also, you can control how many blog posts can be displayed in a single go using the “Blog pages show at most” option which is located right underneath the “Posts Page” option.
For example, I have created 8 blog posts, and since “Blog pages show at most” option is set to 10, all the 8 blog posts are being displayed on the “Blog” page in a single go without any pagination.
But if you set the “Blog pages show at most” option to 4, only the first four blog posts will be displayed on the first page of the blog and the rest of them will be displayed on the second page.

If this is the case, Visitors will use the pagination to access the remaining blog posts.
The same logic applies to RSS feeds as well.
If you care about your website’s RSS feed, you can configure the “Syndication Feeds show the most recent” option to control the number of feed posts in a single go.
Clear?
To finish setting up our blog, we have to perform one last step.
4. Add the “Blog” page to the header navigation menu
We have to do this.
Otherwise, how would the visitors know how to access the blog portion of our site?
Anyway, You already know how to do this, right?

So, just go ahead add the “Blog” page to the “Header Menu” inside the “Menus” screen and save the menu.
If you now visit the frontend, you can see the finalized navigation of our site.
That’s all.
That’s exactly how you set up the blog of your WordPress site.
Not at all complicated, right?
Also, if you notice, WordPress automatically generated other blog based pages like archives.
For example, one of the categories that I have created for my articles is “Advice” and you can visit the archive page of category “Advice” by going to:
https://dosthapp.in/category/advice/
Similarly, you can access the author archive by going to:
https://dosthapp.in/author/nareshdevineni/
This applies to Yearly and Monthly archives as well.
So, you don’t have to worry about them.
That’s just how the WordPress works.
Come on, now go ahead and test the site by clicking on blog category links, tag links, individual blog posts, etc.
From my side, everything is working a like a charm.
And I am sure it is same on your side too because WordPress is a consistent and well tested software.
Important Note: It’s the active WordPress Theme that controls the styling of the blog page, individual blog post, and the archive pages.
So, if you don’t like the looks of the blog related pages, you either have to edit the active theme or switch to a different theme that fits your design needs.
Thoughts and Recommendations
You have made it! Your site is now ready to launch.
This is exactly how we create a WordPress website.
You have learned how to create:
- Homepage
- Internal pages
- Contact Form
- Blog
And you have also learned about how to pick and use:
- Web hosting service
- Domain Name
- Plugins
- Themes
What more does any website will have?
You have definitely made a good start. However, this is just a beginning.
In this step by step guide, although we have learned how to create a WordPress website that suits most of the scenarios, we did not cover how to maintain a WordPress website once it is created.
You can not dust off your hands at this point in journey.
Since you have already learned how to create a WordPress website, let’s go a bit more further to make yourself even more powerful and knowledgeable.
So, your next ideal step would be setting up Google Analytics to track your website visitors.
After setting up Google Analytics, the next thing you have to do is optimize your website for performance.
You can do this by setting up caching plugins like WP Rocket and Image Optimization plugins like Imagify.
And finally, we have to take care of the website by regularly updating WordPress, it’s themes and plugins for maintaining good health of the website and to stop most of the common hack attacks on the site.
This is a continuous process which we can’t skip as a website owner.
So, see you in my next guide <3

Previous Article

 © 2026 UsableWP. A project by Naresh Devineni.