How to install WordPress locally
Table of Contents (Steps for installing WordPress locally)
To install WordPress locally on our computer, we need to install the following things on our computer.
- A Local Web server like Apache, Nginx, etc.
- Database server to let WordPress talk to database and store content in it.
- PHP (WordPress is a PHP based CMS)
“Wait! What is a local web server mate?”
To understand that, you first need to understand what is a Web server.
If you already know about servers, feel free to skip to the suitable installation sections using the table of contents above.
So, What is a web server?
A WordPress website is nothing but a collection of interlinked web pages and files stored in a single folder. And, that folder is stored on a publicly accessible computer called a “Web Server” or just a “Server”.
Every time you enter a URL into the web browser, the web browser finds out the web server based on URL and sends a request to it asking for a web page.
As soon as a web server receives that request, it processes the request and sends back a web page as a response to the browser.
Typically, A Web Server is a special computer box with no mouse, no keyboard, and some special software that processes tons of simultaneous requests at the same time.
“So, a Web server is just a computer. Just like mine?”
Theoretically Correct! You could turn your computer into a server.
But you can not maintain a web server from your home. There will be power cuts to your home, your internet connection could be interrupted due to heavy rains, which disconnect your computer from the internet.
You generally use your computer to connect to the World Wide Web and access information.
Once you are done with collecting the information or having a video call with your friend, you turn off your computer and disconnects from the internet.
On the other hand, People access your website from all over the world at any point in time. So, to make that 24/7 access possible, a Web Server that stores your website folder must always be connected to the internet.
“One more question! I maintain my own computer. Who maintains a web server? In fact, where can I purchase my web server to serve my website? ”
A Web Hosting company will sell you a web server to host your website and they will make sure that your web server is always connected to the internet so that your website can be accessed from any part of the world, all the time.
“I also heard the statement client – Server model? What is a client anyway?”
Usually, your web browser that requests the information is called Client ( On Our Personal Computer ), and the computer that serves the requested information is called a server. Hence the name Client-Server Model.
Let’s talk about Local Web Server
Now, don’t panic by hearing the word “Local Web Server”.
A Local Web Server is just like any remote web server that companies like GoDaddy or Host Gator provide with one important difference.
If you place your WordPress website on a Local web server, it is not accessible beyond your computer.
You are the only person who accesses it and that too when you are developing/building your website or your client’s.
That’s the reason why we use the word “local”.
It lets you build your website at a rapid pace.
You don’t have to worry about errors getting displayed on the site because the only person who can see them is you.
And you need to see those errors because you need to fix them before going live.
You can play around your website ideas without worring about the visitor loss to your actual website.
Local Web Server also lets you test your website rigorously before you push it to the publicly accessible remote server for the world to see it.
What goes inside a Local Web Server?
WordPress is nothing but a Big PHP project, right?
So, it requires a server environment with Apache or Ngnix installed so that they can process WordPress’s PHP code and a MySQL database server to store and manage our WordPress content.
We are living in the Modern Era of Web Development or Website Building.
So, there are many “ready to install” local web server tools at your fingertips and they take care of installing Apache, Nginx, and MySQL servers for us and the best thing is almost all of them are free.
Here is the list of the local web server tools that we will use throughout this guide.
- WampServer
- MAMP
- Local by Flyweel
Setting up a WordPress local development environment did not change much over the past 5 years except for one new awesome addition.
We still use WampServer to install WordPress for Windows.
We still use MAMP to install WordPress on MacOS ( MAMP also runs on Windows ).
Linux users used to get the shorthand because they had to install a WordPress local environment manually using LAMP. Neither WAMP nor WAMP works for Linux distributions.
But there is good news for Linux users now. You can now run WordPress locally using Local by Flywheel. I know you love going through a lot of commands but people at Flywheel decided to save your time.
Just get the best out of the tool. It also comes with bundled with Xdebug. That means you can now debug and test the performance of your WordPress site for free and it’s one of most sophisticated tools that I have used in recent times.
Also, Just like MAMP runs on both Windows and macOS, Local by Flywheel runs perfectly on Windows, macOS, and Linux operating systems.
As you can see, we now have multiple ways to local WordPress setup which is quite awesome in my opinion.
And, we will cover all the tools mentioned above for different operating systems.
So, based on your operating system, feel free to jump to any section using the table of contents above. You don’t really have to read the entire article.
How to install WordPress locally on macOS and Windows using MAMP
In MAMP, M stands for macOS; A for Apache, the web server; M for MySQL, the database management system, and P for PHP, the dynamic programming language.
MAMP is a software that gives us an easy to use interface to start and stop our Apache and MySQL servers with one click. Now, let’s go ahead and install it.
Installing MAMP
Open up your browser to fire up https://www.mamp.info/ and go to the downloads page to download the latest MAMP version that is compatible with your operating system.
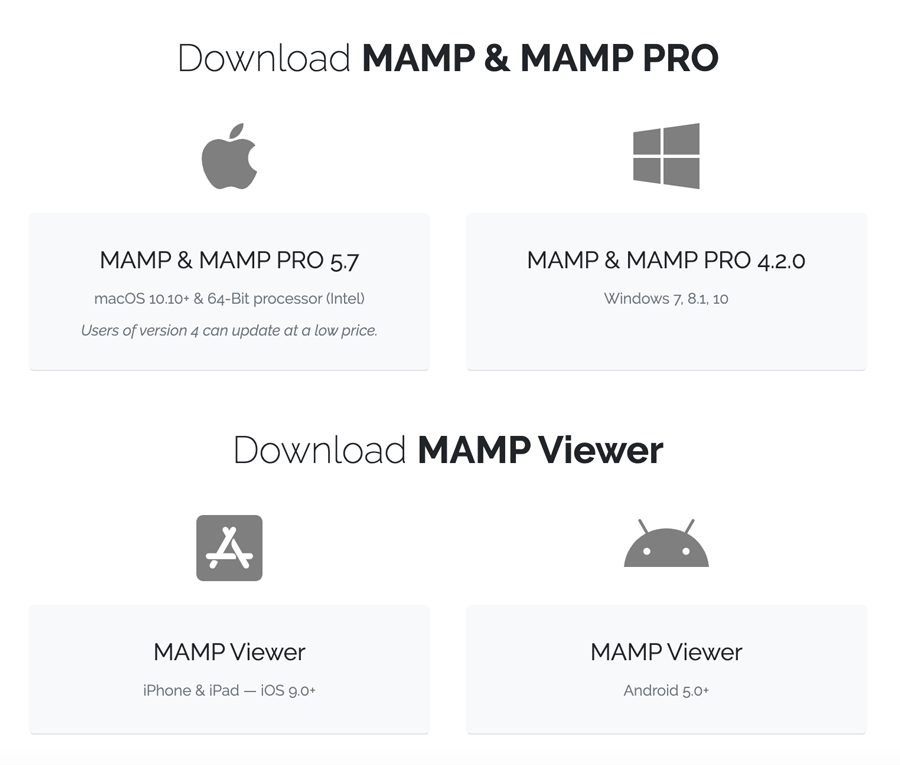
As you can see, MAMP works on Windows too. You can follow the same steps to install it on Windows.
“Wait! I can see MAMP & MAMP PRO. What is MAMP Pro?”
As the name suggests, It is a premium version of MAMP. You’ll get a lot of time-saving features along with the features of MAMP Free version.
For example, if you notice the above screenshot, there is another tool called MAMP Viewer and when it combined with the features of MAMP Pro, it will let us test our websites on Mobiles without much effort.
Anyway, I never tried MAMP pro and this lesson is all about MAMP free version.
If you notice the file size, it is huge, It is around 418 MB. Like it or not, the MAMP website forces us to install both Free and Pro versions under a single download.
So, when you hit install, You’ll also install MAMP Pro along with MAMP Free version. There is no opt-out option. Anyway, it does not get in our way. So don’t worry about it.
Once you have the download, click on the downloaded pkg file to bring up the MAMP installation start screen.
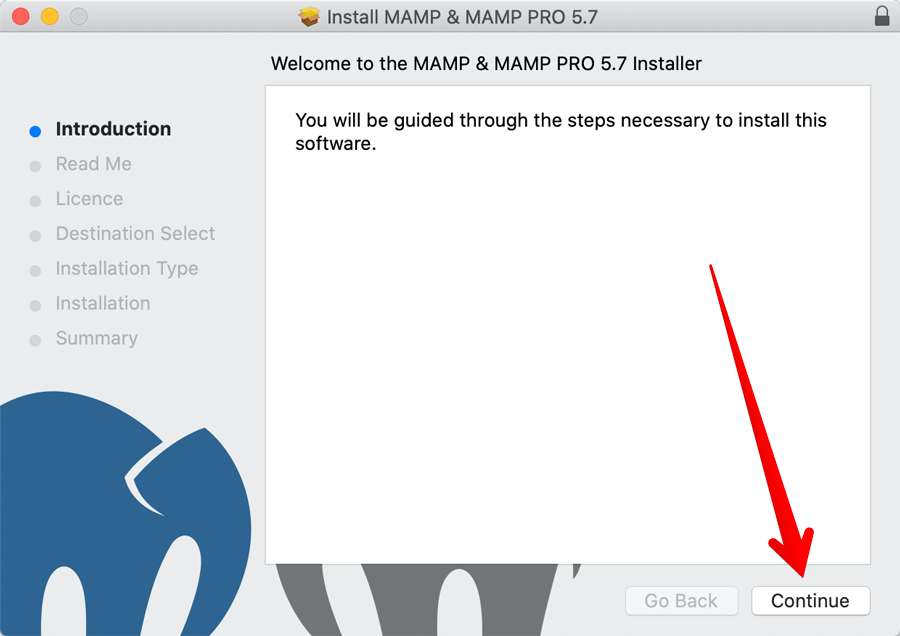
Click the continue button to proceed forward to the Read Me section. Once you have read the important information, click the continue button again to proceed forward to the Licence section.
Once you have landed on License section, read the license and hit Continue button.
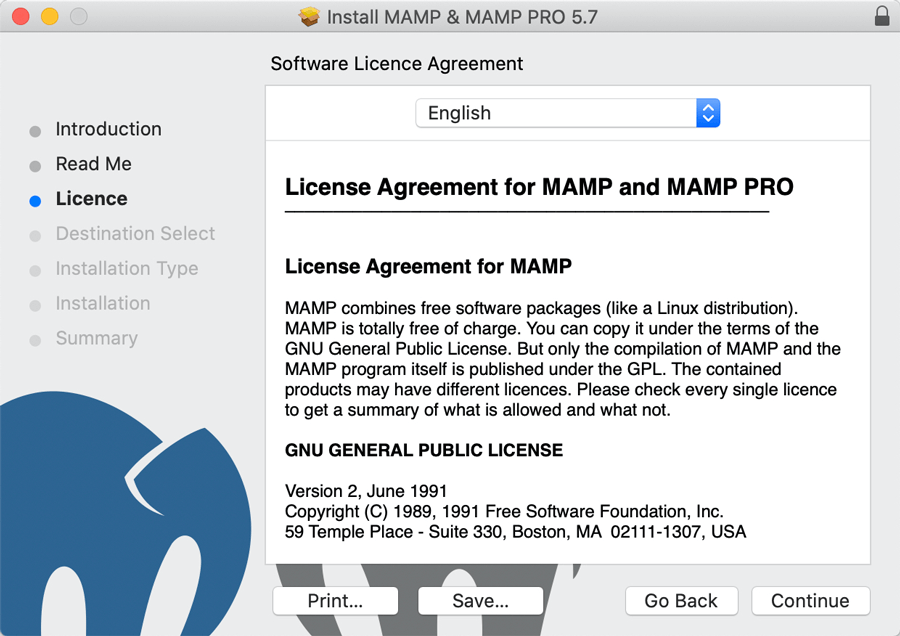
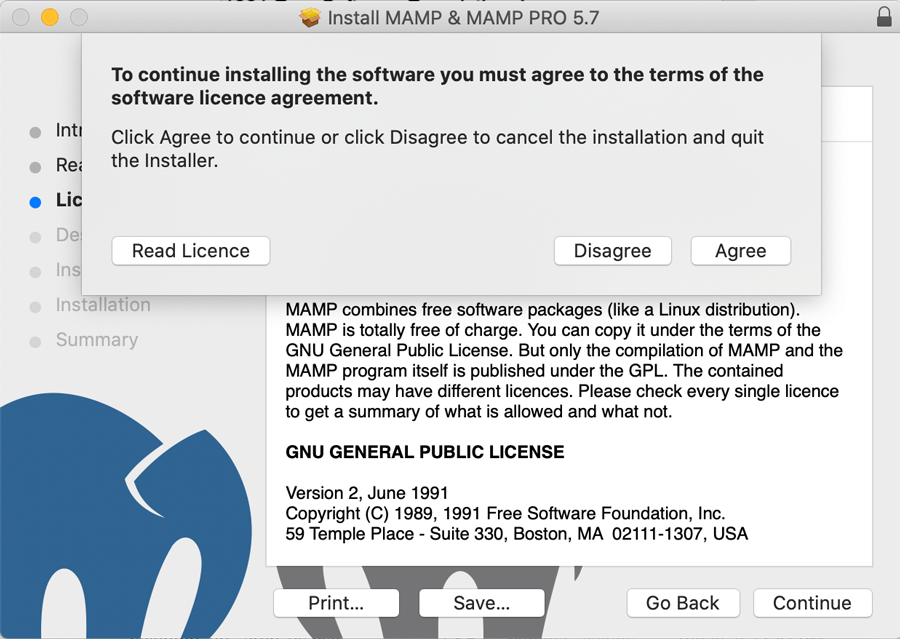
MAMP will open up a “license agreement” dialogue box. If you are ok with the terms, hit agree, and continue to the Destination Select section.
Unlike a Windows Machine, Mac does not come with multiple partitions on a single hard drive.
So, when it comes to macOS, most of the time, the MAMP installation will skip the destination selection and jumps to the “Installation Type” section.
On Windows, the default installation drive is C:/
So, you can keep the default destination as is. You can also pick a different drive. You are not limited to default destination.
Anyway, Hit continue for one last time to get into the Installation Type section.
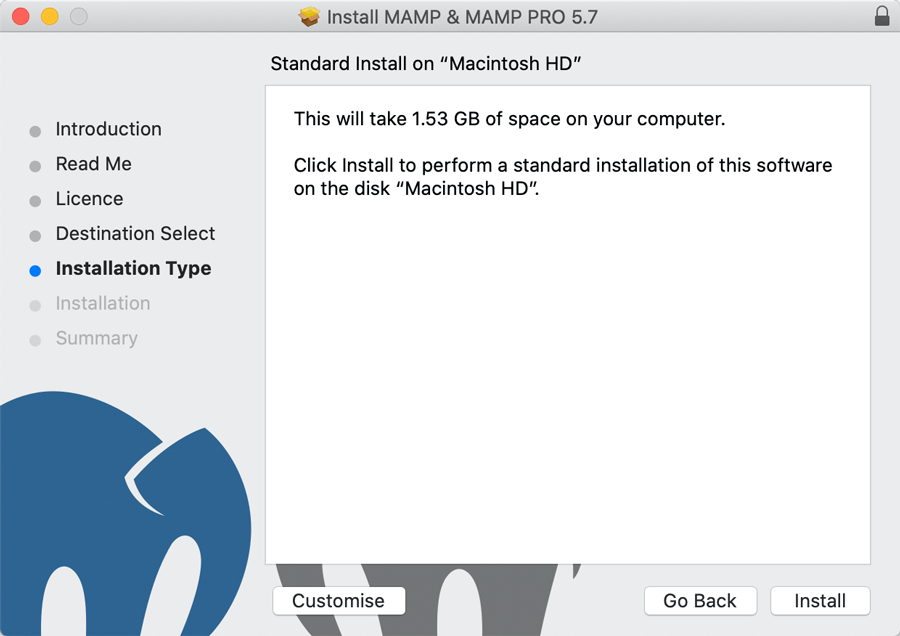
In the Installation Type section, either you can go with the standard installation, or you can customize the installation to your liking.
Trust me, I noticed the customize button only when I started creating this course. So, you can blindly hit the install button.
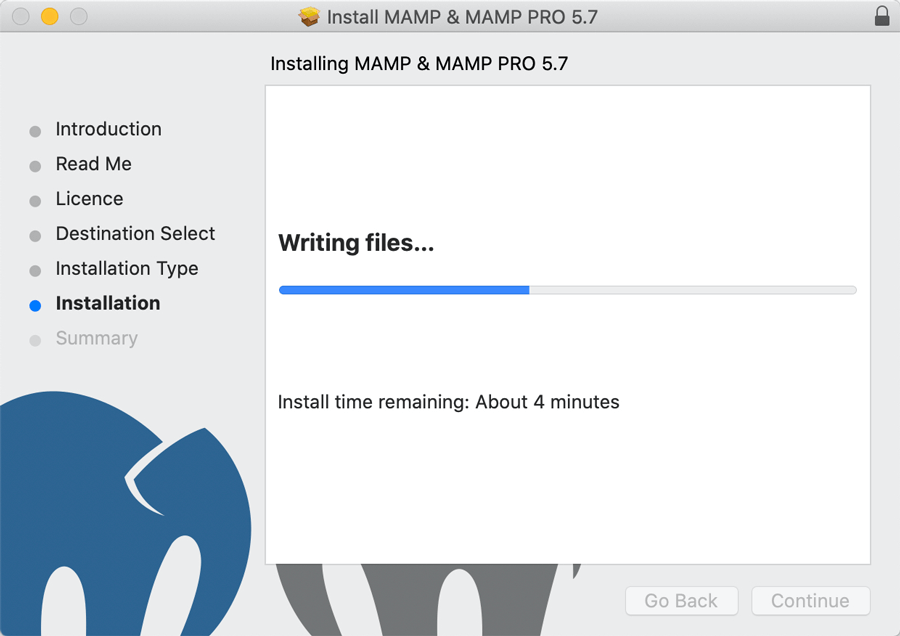
If your Mac or Windows is password protected, It will ask you to approve the install.
Approve it to start the installation process.
Once the installation is successful, hit the Close button to close the installer.
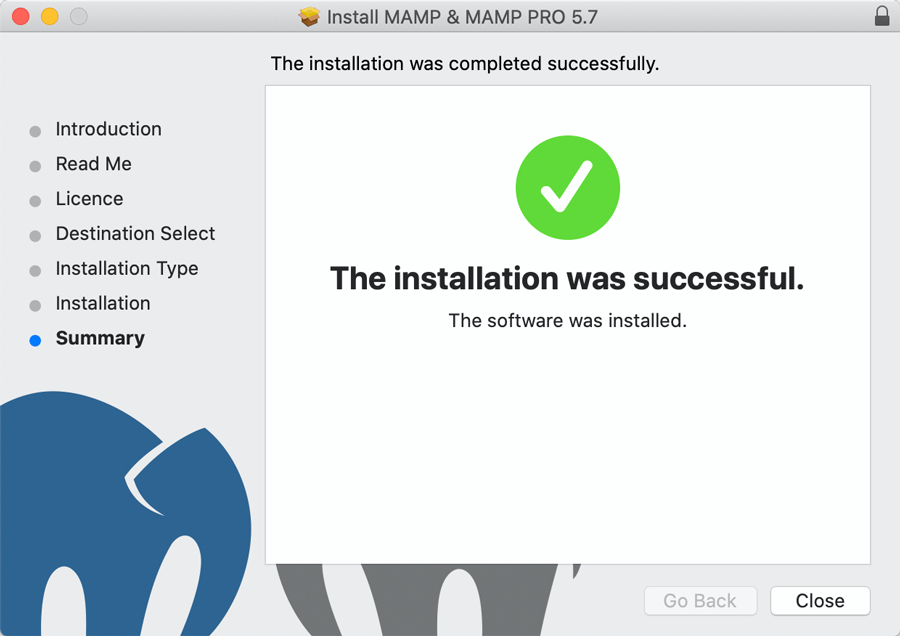
If your Mac is running on the latest macOS High Sierra or higher, it will ask whether you want to move the “MAMP & MAMP PRO” installer to the trash.
Because your installation was successful, you can safely hit the “Move to Trash button” as you no longer need it.
On Windows, you can find the MAMP shortcut icon on the Desktop. If not, Go to the installation destination and double click on the MAMP Icon.
When it comes to Mac, you can open up MAMP in two easy ways.
1) On your keyboard, hold Command and press spacebar. This keyboard shortcut opens up Spotlight search. Now start typing “MAMP” and hit enter.
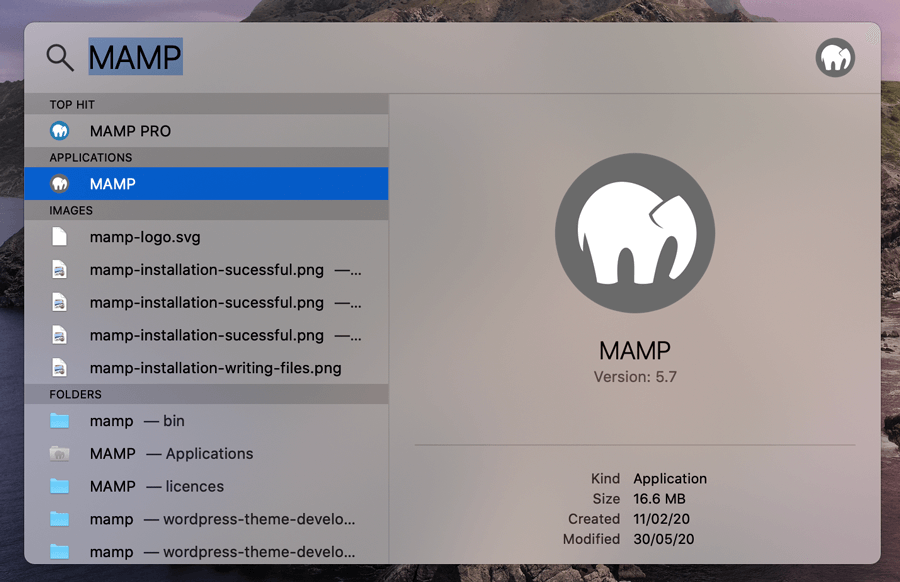
2) Fire up Finder by hitting on the Finder Icon on the dock. Go to the Applications -> MAMP folder and double click on the MAMP icon to open it.

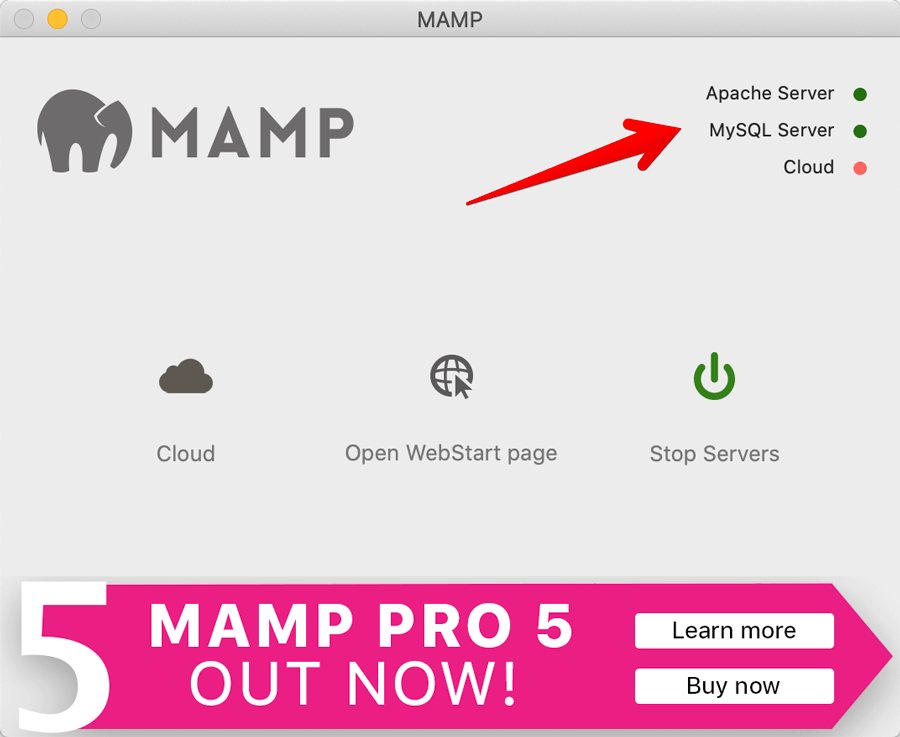
Finally, to start rolling our server we have to hit the Start Servers button.
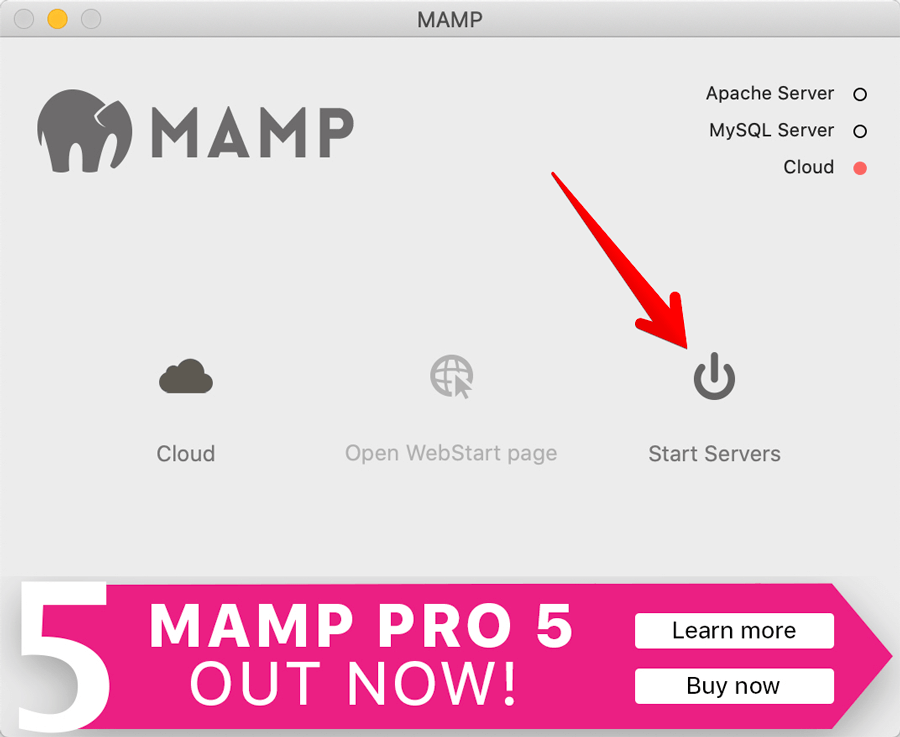
Now, keep an eye on Apache Server and MySQL Server indicators.
If everything went well, they would turn to green, and you are good to go with WordPress installation.
If somehow, even one of them failed to turn in to green, that is a problem.
Don’t panic; It is easy to solve the problem without banging our heads against the wall :P.
So, let’s take a look at some common MAMP Problems.
Common MAMP Problems and how to solve them
Problem: Apache Server is not starting
If Apache Server is not starting, chances are it is already running somehow.
Solution: For the MAMP to start the Apache server, you should stop what is already running. To do that, open up the Terminal, type the following command and hit enter on macOS terminal.
sudo apachectl stop
I have never faced this problem on Windows. If you do, I am really sorry to say that I don’t have enough experience with this issue when it comes to Windows.
So, please google the solution.
MySQL Server is not starting
If MySQL Server is not starting, chances are it is already running because we did not shut down the MAMP properly previously.
Solution: For the MAMP to start the MySQL server, you should stop what is already running. To do that, open up the Terminal, type the following command and hit enter.
killall -9 mysqld
For more alternatives on how to stop already running MySQL server, please refer to this answer on StackOverflow and this blog post.
Anyway, now that we have installed MAMP and it is running successfully, it’s time to create a MySQL database WordPress.
Remember, WordPress needs a database to store your website content. That’s why need to create a database now and provide its details during the WordPress installation phase.
How to create a MySQL Database using phpMyAdmin
This steps outlined below applies to both WampServer and MAMP Server.
You can create a Database in two ways. Using an easy to use interfaces like phpMyAdmin and using Command Line Interface( CLI ) like command prompt or macOS terminal.
If you are good with CLI and MySQL, there are tons of tutorials out there on the internet to guide you through the process. For the purposes of this guide, I will stick with phpMyAdmin.
phpMyAdmin gives us an to easy to use interface to create, read, update and delete our databases.
In short, it is a database management tool. It also lets you export databases with a single click.
And the best thing is, phpMyAdmin is totally free.
It is written in PHP, So, It can run anywhere a PHP code can run, and this is the reason why most of the Web Hosting Providers will provide you phpMyAdmin as part of their service.
I have been using phpMyAdmin for over a decade now.
I use phpMyAdmin to back up a database, I use it to export my WordPress database when I am moving the website to a new server, and there are tons of other problems that phpMyAdmin solves for us.
phpMyAdmin is also an excellent tool for people who are just getting started with databases.
When I started developing WordPress websites, I am a novice PHP developer with very little database knowledge. phpMyAdmin turned me into a pro-MySQL developer with its exceptional features.
Alright, now let’s create a database using phpMyAdmin.
To Access the phpMyAdmin, If you are on macOS, start your MAMP server, open up your browser and type http://localhost:8888/phpmyadmin/
If you are on Windows, start your MAMP server and type http://localhost/phpmyadmin
Simply put, you can remove the :8888 if you are Windows.
Anyway, as soon as you hit the enter in your browser, you’ll be greeted with the phpMyAdmin login screen.
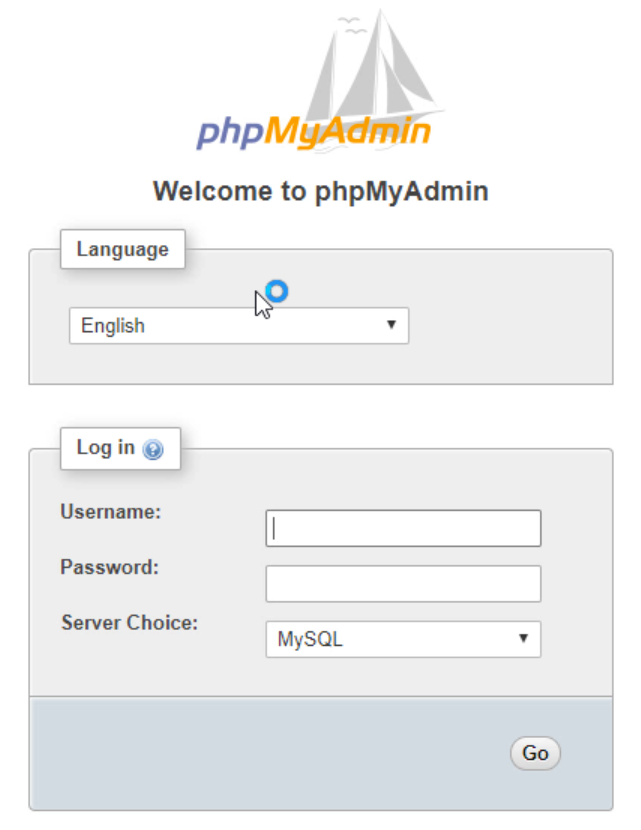
“Hey! I do not have any username or password. What do I do now ?”
By default, MySQL Server uses “grant privileges to the user to access a database” approach to protect access to its databases. This way, it can restrict access to a specific database only to the user with specific privileges.
Be it remote or local; every MySQL server comes with a pre-registered user called “root”.
The “root” user has all the privileges to manage every database and user on the MySQL server.
MySQL server lets you create new users once you log in as the root user.
A newly created user cannot access the already existing databases. For an individual user to access a particular database, the database administrator aka the root user must grant the permission on a database by database basis.
We will see this in action once we move our finished WordPress site to the remote server like Godaddy. Don’t worry about it now.
Coming back to MAMP, it comes with a “root” user too, and We will use the credentials of the root user to go inside phpMyAdmin and create and manage databases.
phpMyAdmin Credentials for MAMP user, be it Windows or macOS
Username: root
Password: root
Enter the Dragon (phpMyAdmin)
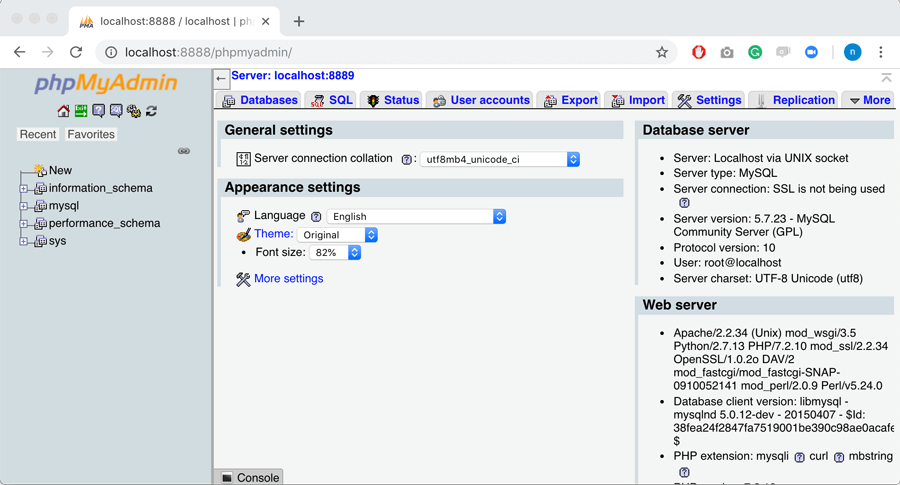
Now, on the left-hand side of the screen, we have the list of all the databases available to the root user.
At the top portion of the screen, we have an important menu with buttons like SQL, User Accounts, Export, Import, etc.
I will walk you through them when the need comes, for now, we are only interested in Databases button in the menu. Go ahead and click on that to create your first database.
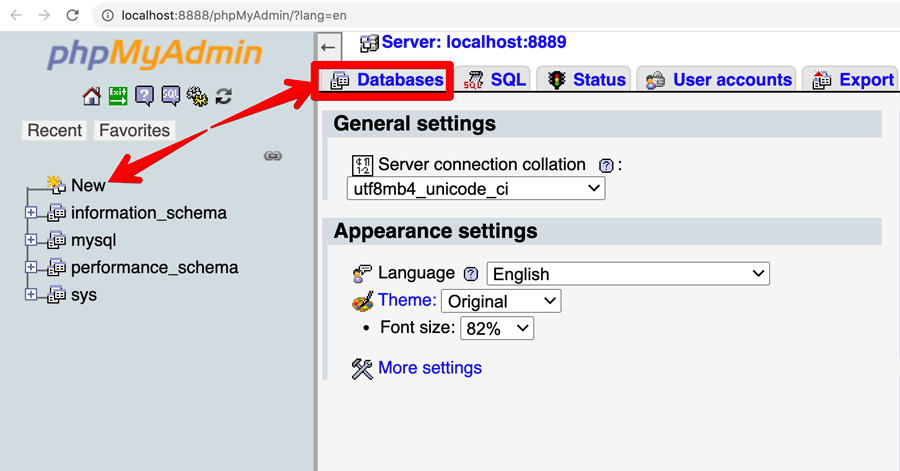
You can also create the database using the “New” link on the left-hand side of the screen. Both “Databases and New” links will take us to the same page.

Once the page is loaded, you’ll see a “Create Database” form.
You can enter the database name of your liking but for the purposes of this guide, please name it dosth.
I am habituated to name my database after the domain name of the project. This way, I don’t have to remember the database name.
Some say it is not a good practice because of security reasons. I agree with them.
But since this is local to you and nobody else except you can access this database, you can name it whatever you want.
When I create databases on remote servers, I postfix some creepy letters to the database name so that no hacker can guess it :P
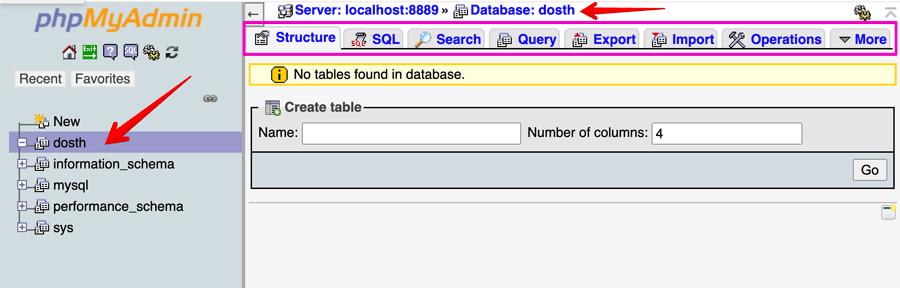
As soon as you hit the create button, phpMyAdmin does two things for us.
First, it creates the database.
Second, it selects the newly created database by redirecting you to the newly created database page.
If you notice, the breadcrumb and the menu in the top-middle part of the screen has changed. All the options residing under these menu items act on the selected database only.
For example, if you click on the Search button in the menu, you can only search the contents of the selected database. If you click on the Export button, you can only export the selected database.
This tells us one important thing.
When you are inside phpMyAdmin, you have to select a particular database to manage it.
It is true for both phpMyAdmin and CLI tools like terminal or the command prompt.
So, Be careful. I accidentally picked another project’s database once and paid a big price.
Anyway, now that the database is created, we now have everything to install WordPress. we’ll do just that next.
How to install WordPress
Fire up your browser and go to https://wordpress.org/download to download the latest version of WordPress.
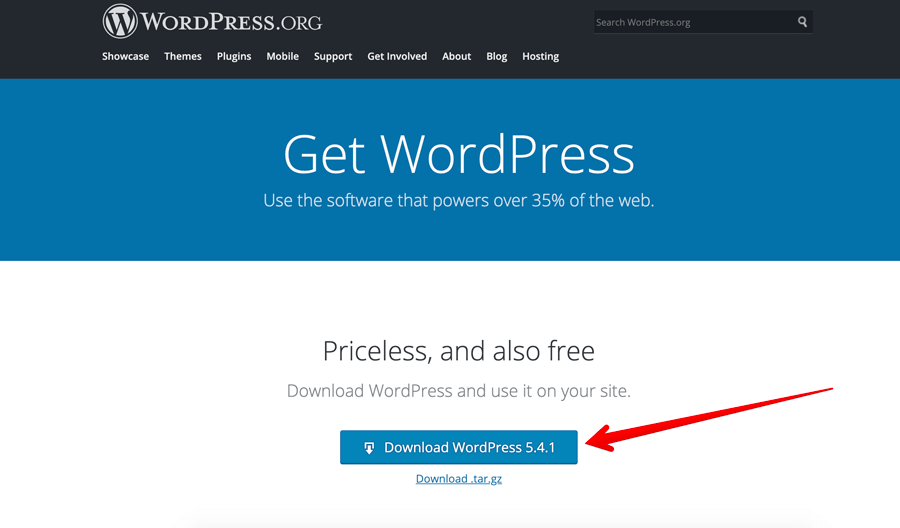
A “.zip” file will be downloaded with a naming convention like “wordpress-version.zip.” Double click on the zip file to extract a folder named wordpress.
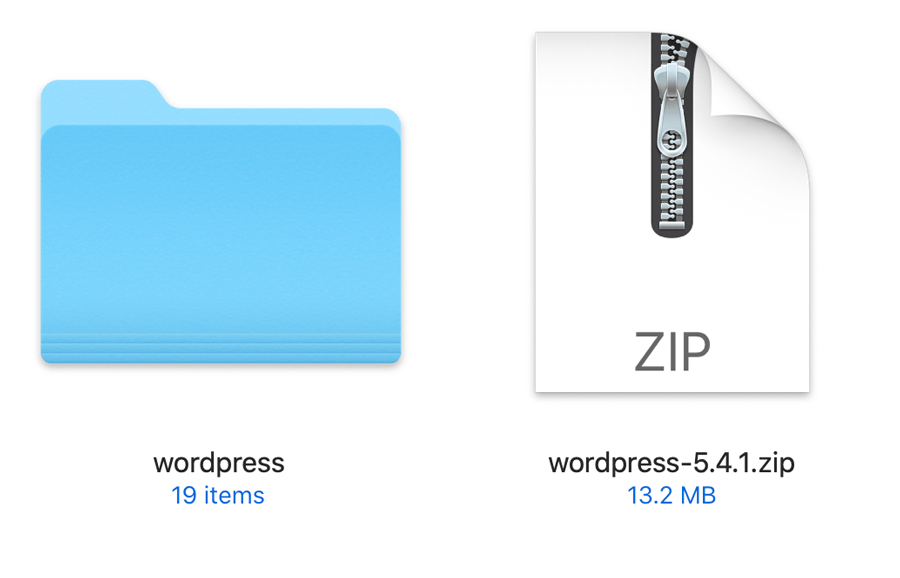
Here is a glimpse of folders and files inside “wordpress” folder.
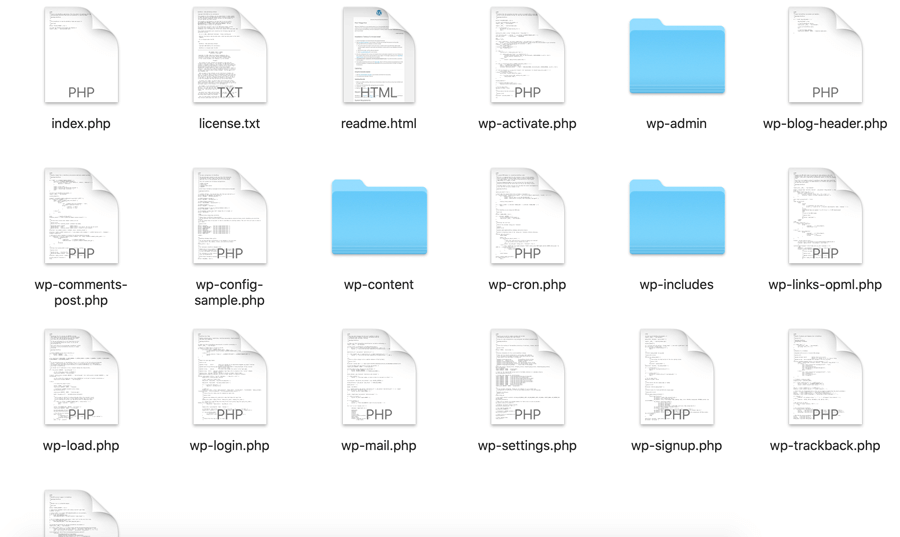
Now, you need to copy this “wordpress” folder inside the web server.
This folder contains WordPress code files. So, copy the entire folder. If even a small file is missing WordPress installation would fail.
Depending on where you installed your server,
MAMP Windows users, go to C drive -> mamp -> htdocs and paste the wordpress folder.
MAMP macOS users, go to Applications -> MAMP -> htdocs, and paste the wordpress folder.
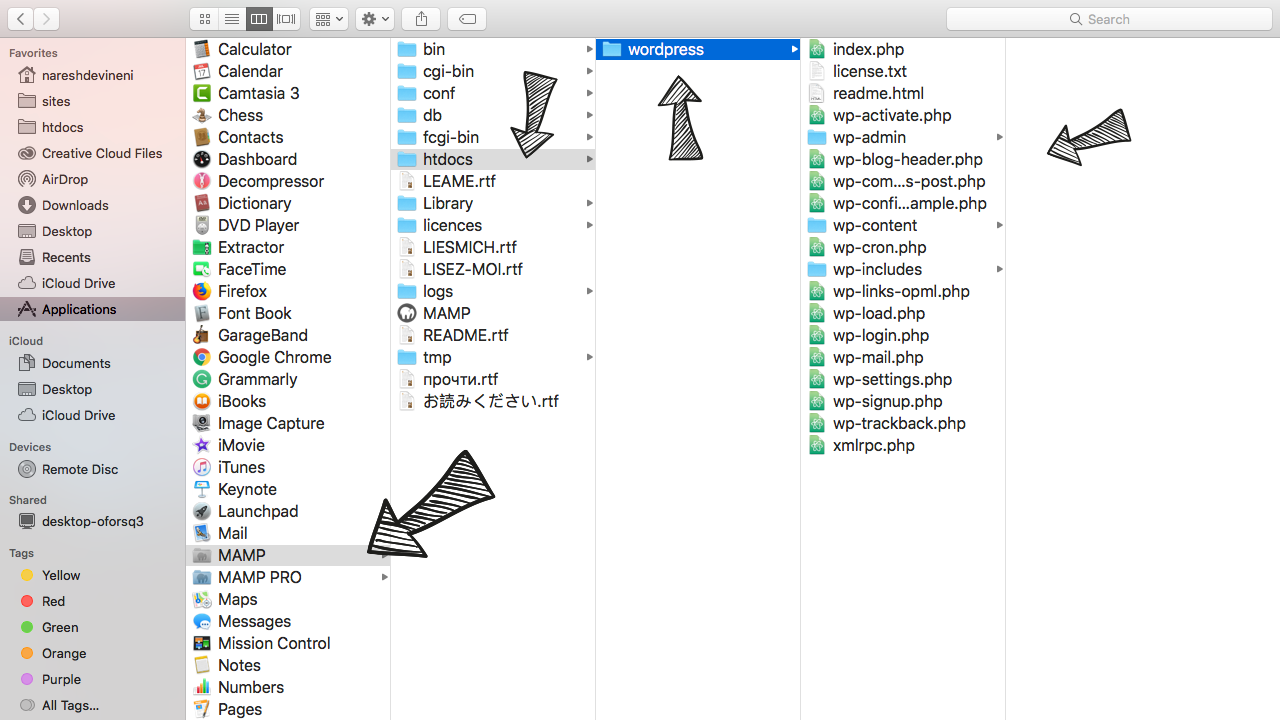
Now, we have to rename the folder to something meaningful, something that represents to our project.
I tend to rename the wordpress folder based on the client’s brand name. For example, our imaginary client’s brand name is Dosth, So, we will rename the folder to dosth.
Also, please remember that, once your WordPress installation is done, you can not rename the folder, if you do so, you can not access the website by entering the below URLs.
To install WordPress, you need to access the dosth folder from the browser, and our local server lets us access this folder using a URL.
Open up the browser and go to http://localhost:8888/dosth
The famous 2-minutes WordPress Installation

If you see this error after entering the URL, that means either you forgot to start the server or your server is facing a problem.
Once the server is turned on, refresh the URL. Aha! Now you’ll be greeted with WordPress installation step 1.
Step 1: Selecting a Language
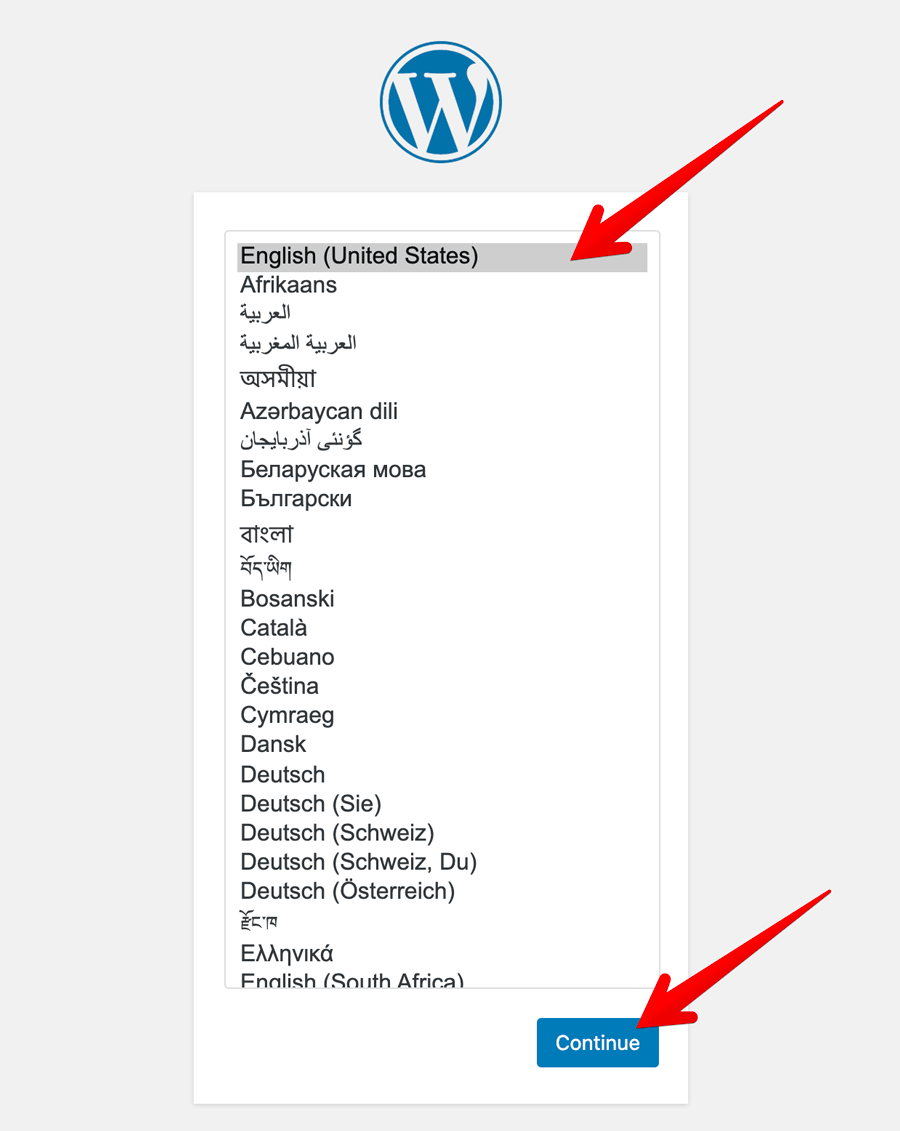
Dosth App project client is an English man, and he wants his website to be in English, so, let’s select English ( United States ), and hit continue.
Step 2: Keeping Database information ready

Now, WordPress asks you to keep the information about the database ready because it asks for the information in Step 3.
WordPress also says that It will create a wp-config.php based on the database information you’ll be providing during Step 3. We will discuss wp-config.phpfile in-depth in the upcoming lessons.
If you did not skip any previous lessons from this course, you have every information that WordPress set up need.
If you did jump, please go ahead and read previous lessons and come back here.
Step 3: Giving Database details to WordPress
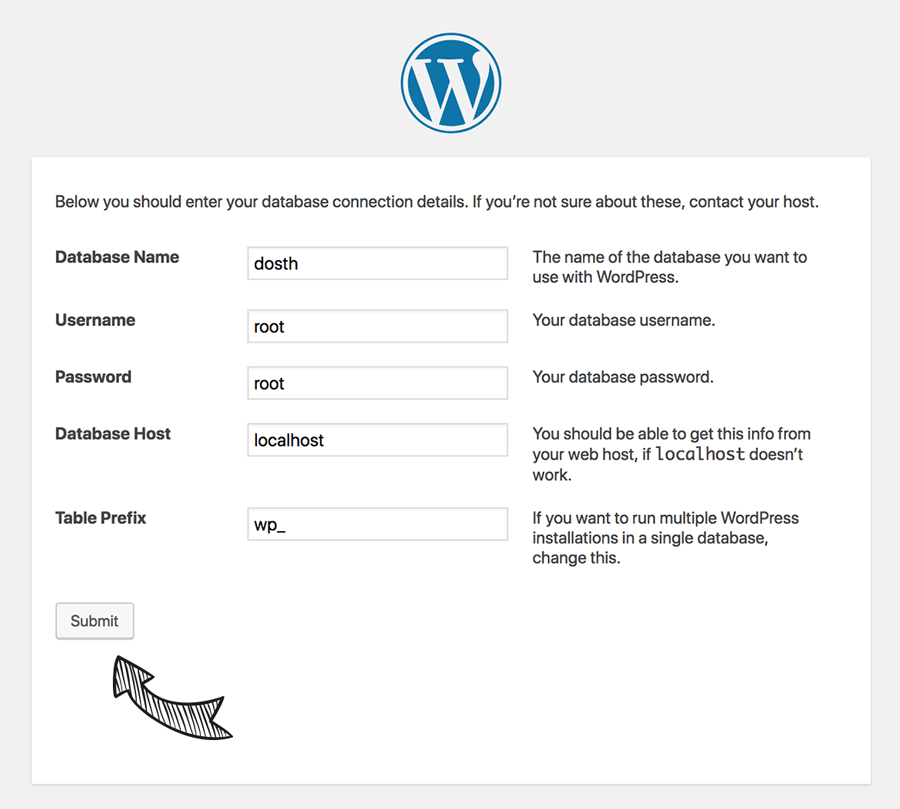
Database Details Form:
Database Name field: dosth
In the Previous lesson, we have created a database and called it dosth.
Username field: root
Remember the previous lesson? I mentioned that every MySQL server comes with the Default “root” user. So, for both MAMP and WAMP, root is the username.
Password field: root or empty
empty for WAMP’s root user, root for MAMP’s root user.
Database Host field: localhost
Not only for WAMP and MAMP, but localhost is also the default value for most of the remote servers provided by GoDaddy, Host Gator, Site Ground, etc.
So, in the near future, if you are tasked with moving a WordPress website from one web hosting service to another and when the new asks for Database Host, give localhost a try.
If that doesn’t work out, then go ahead and read their documentation for the Database Hostname.
Database Table Prefix: sometext_
The _ (underscore) is mandatory at the end of a table prefix. Replace “sometext” with something unguessable for security reasons.
For example, “wp_”, “dosth5539_”. I usually go with a combination of letters and numbers to make it unguessable. Since this is the local installation, I am going with wp_.
Enter everything correctly and the Submit button to proceed forward to step 4. If not, WordPress will redirect you to an error page.
If you see this error page, maybe you have entered your database name incorrectly, or you might have forgotten to enter the Database User Password.
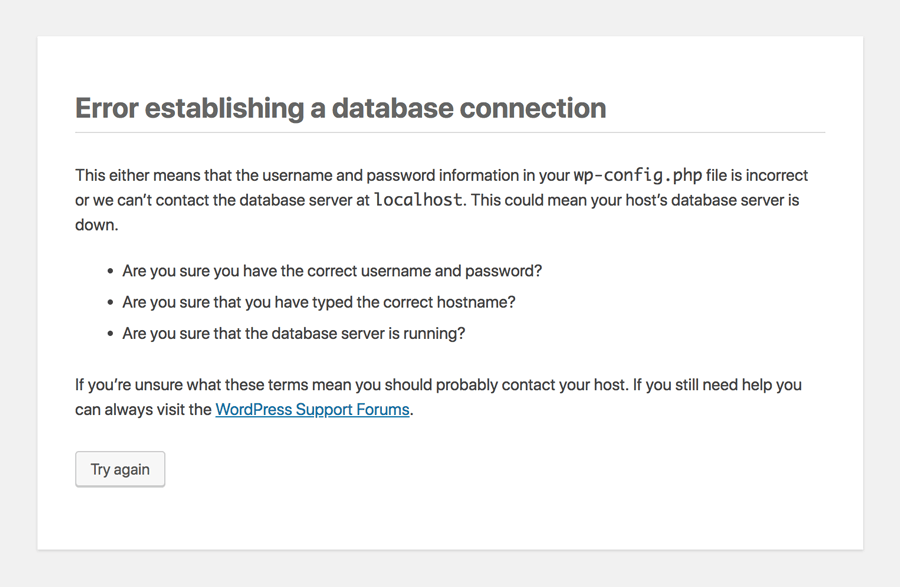
So, if you messed up something, hit try again and this time, enter the details correctly.
Step 4: Run the Installation
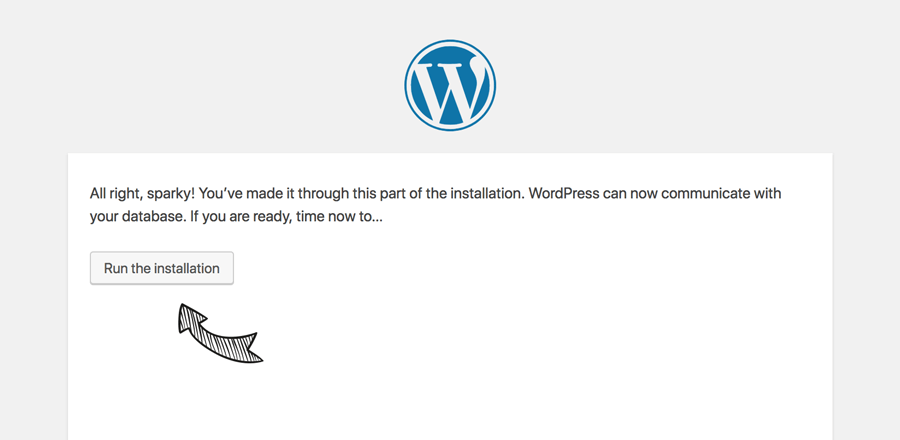
If everything goes well, you will reach this screen. Hit “Run the installation” button to continue installation.
Step 5: Enter the Site Information
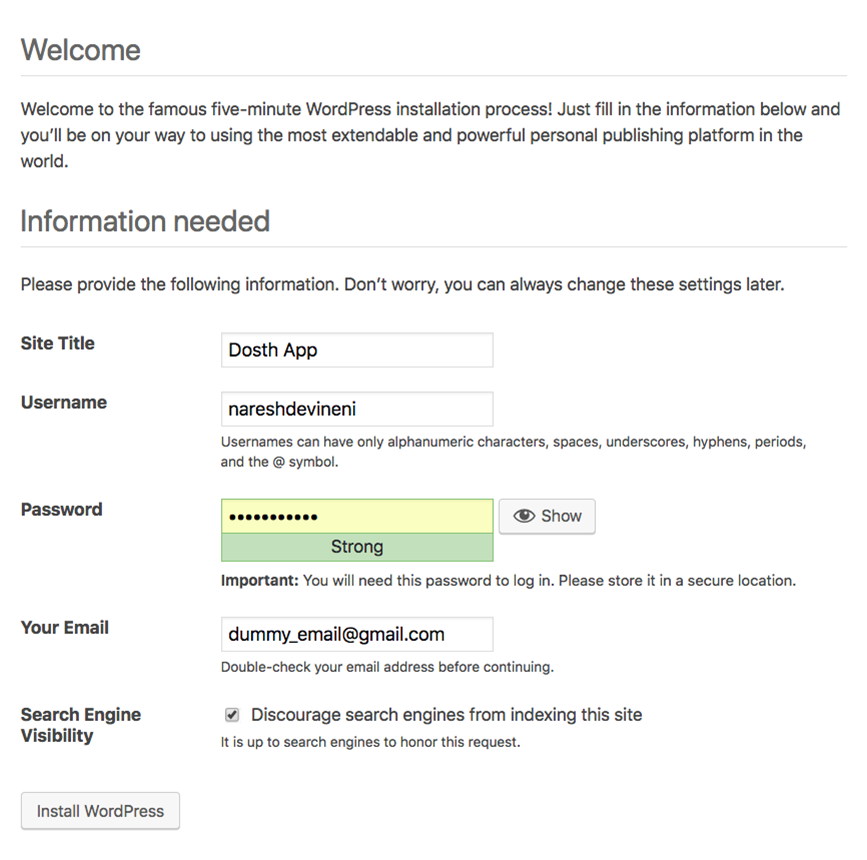
Except for Username, The information you enter here can be changed once we enter our WordPress Admin Dashboard. So choose the username carefully. ( That’s not entirely true, you can change your username using plugins, but that is painful, trust me! ).
Site Title field: Dosth App
Enter the website name, for the purposes of this course, its Dosth App. Later during theme development, you will pull this value from database to display it places like Header and Footer. Copyright statement in the footer is the best example.
Username field: nareshdevineni
The username you enter here is for WordPress Admin Dashboard. It is a common tendency to use something like “admin” or the site name itself.
But don’t do that.
“admin” is the first username guess of every hacker.
Password field: nareshdevineni
WordPress automatically generates a not-so-easy-to-hack password. If you don’t like it, you can type your own.
But again, don’t give something like “admin” or your phone number. Enemies always hide in plain sight.
Email field: your email or your client’s.
The email given here will be used for a lot of purposes.
For example, for password resetting, for notifying you when someone comments on the blog, these are just a few examples. So give the official one.
Search Engine Visibility field: Turn On the checkbox
Turn on the checkbox to discourage search engines. And I suggest you do it until the website goes into the production stage.
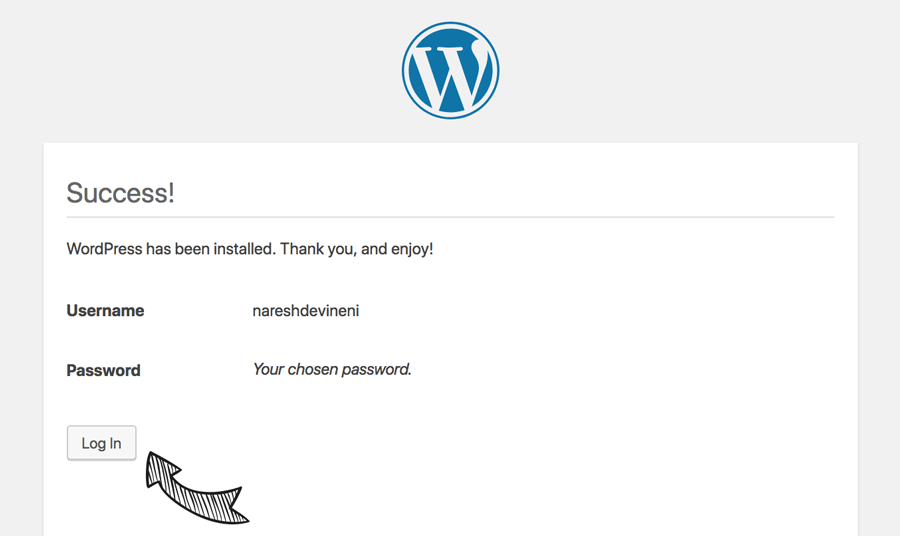
Finally, click on the Install WordPress button to finish the installation and you’ll be redirected to “Success!” screen with a login button.
Technically, this is not a login screen.
There is no way you can enter your password here! So, click on the Login button to get redirected to the actual WordPress admin login screen.
You can access the same Login screen using http://localhost:8888/dosth/wp-admin. Remove “:8888” from the URL if you are using WAMP.
Login to WordPress Admin Dashboard
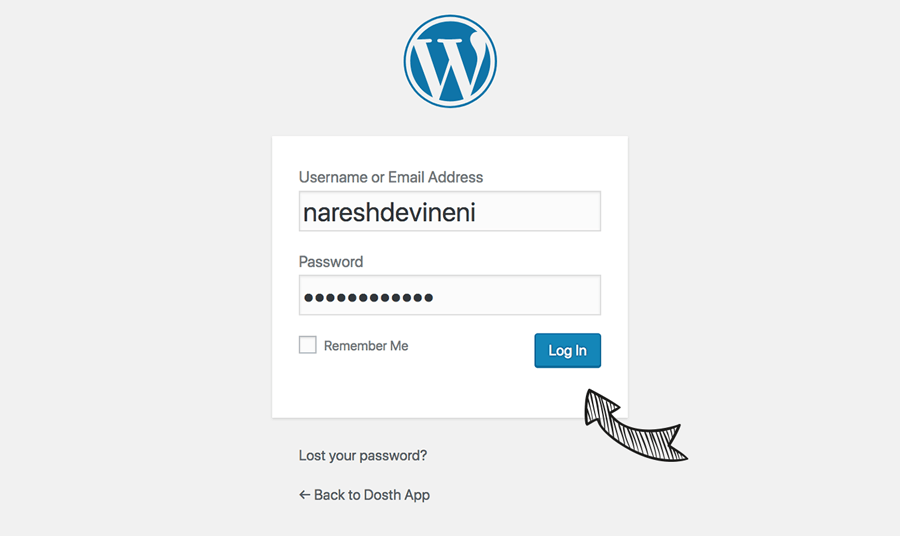
Enter the username and password that you have given during Step 5 and Hit login. WordPress will redirect you to the Admin Dashboard.
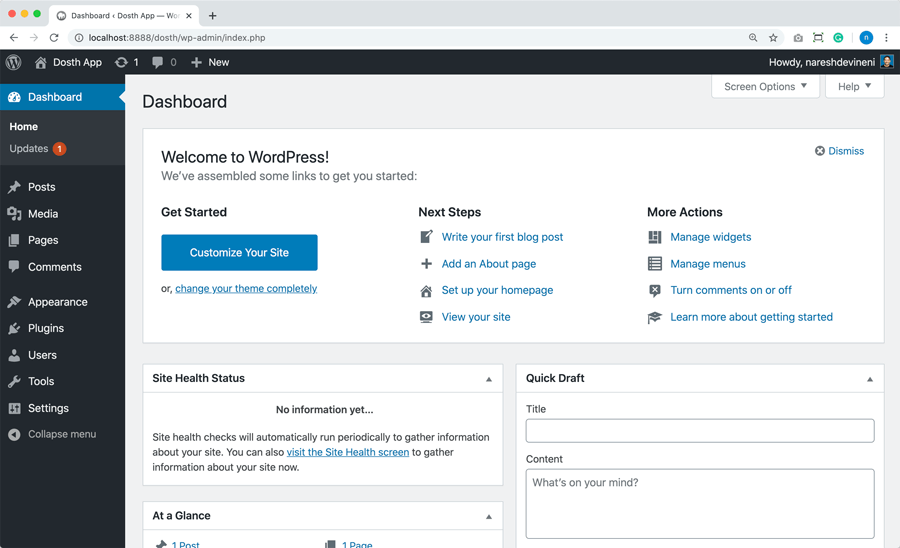
That’s it. That’s pretty how you install WordPress.
No matter what tool you use, this is end the result you would be looking forward to.
Next, lets see how to install WordPress using “Local” by flywheel.
How to install WordPress on major operating systems using “Local” by Flywheel (The easiest way to install WordPress)
“Local” is my favourite tool install WordPress locally these days.
I have saved the best and the easiest for the last.
“Why did you do that?”
“Local” follows a different approach for creating a local WordPress setup.
It abstracts the creation of a database. It also doesn’t install allow us to install WordPress in a traditional way. It takes care of everything, literally.
So, many of you might get confused about the underlying details and might not be able to solve problems related to local WordPress set up.
That’s the reason why I made you go through a very detailed and comprehensive approach first.
Having said that, “Local” by flywheel also comes action packed with some most needed features that other tools charge you for.
One of them is support for SSL certificate locally.
When creating e-commerce websites locally, this free local SSL certificates saves you a lot of time and hassle.
Anyway, the installation steps that I am about to show you is the same for every operating system that “Local” supports. That is Windows, Mac, and Linux operating systems as of now.
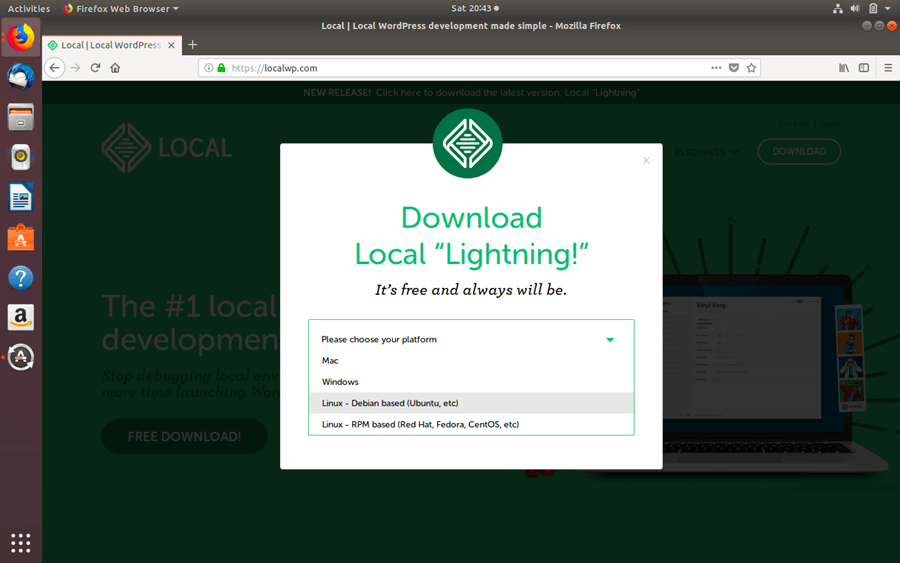
Hey Linux Mastermind, you have to trust me with this tool. Here is the proof that “Local” works correctly on any Debian based operating system.
The following screenshots are taken on Ubuntu.
And the best thing is, the interface is exactly same of all the operating systems.
So, I am gonna conveniently use my Macbook to demonstrate the installation process of the WordPress using the “Local”.
Open up your browser to fire up https://localwp.com/ and find the big “Free Download” button.
As soon as you click on, a popup will open up asking you to choose your operating system.
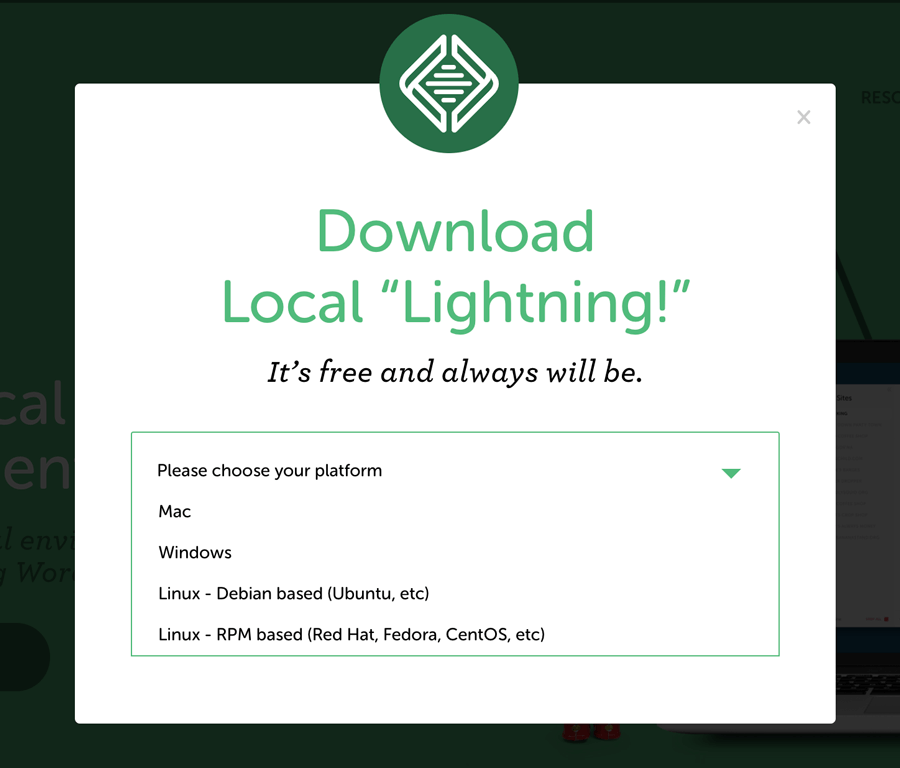
Go ahead and pick your operating system and enter your details to start downloading.
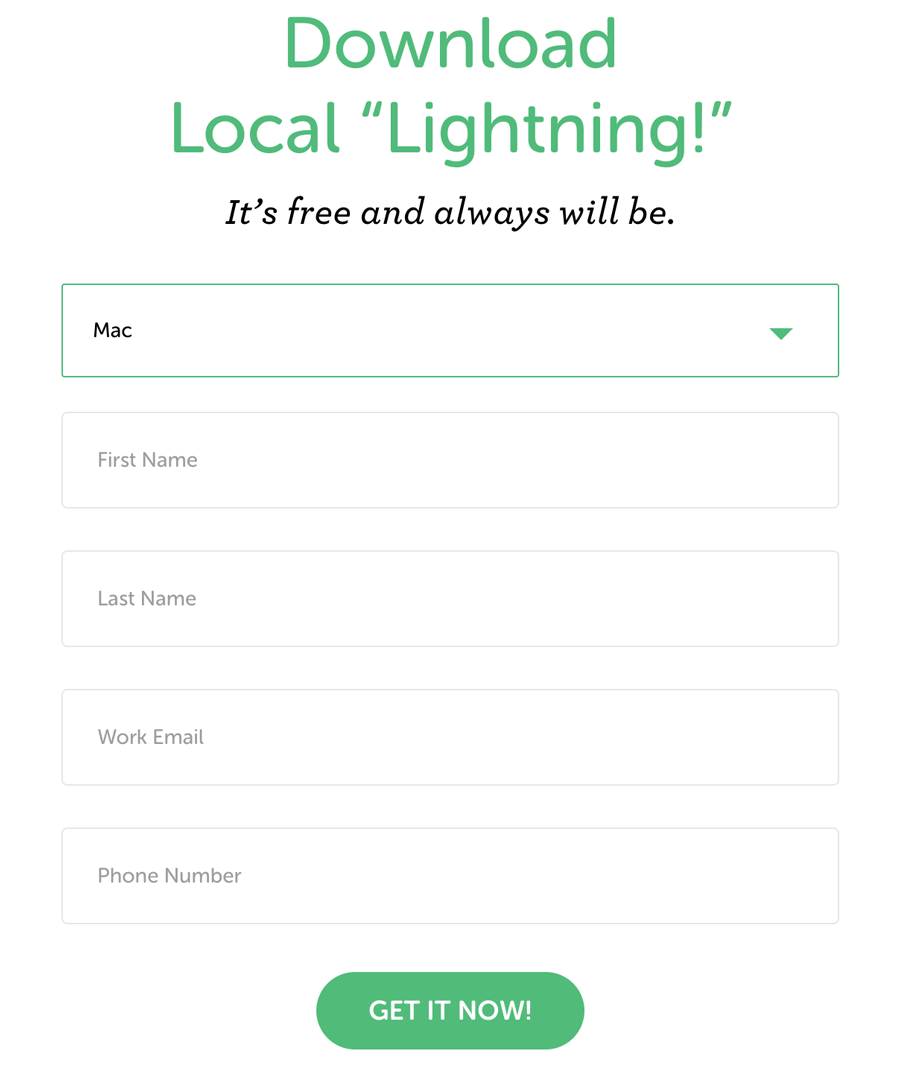
You can skip the phone number. That is not mandatory.
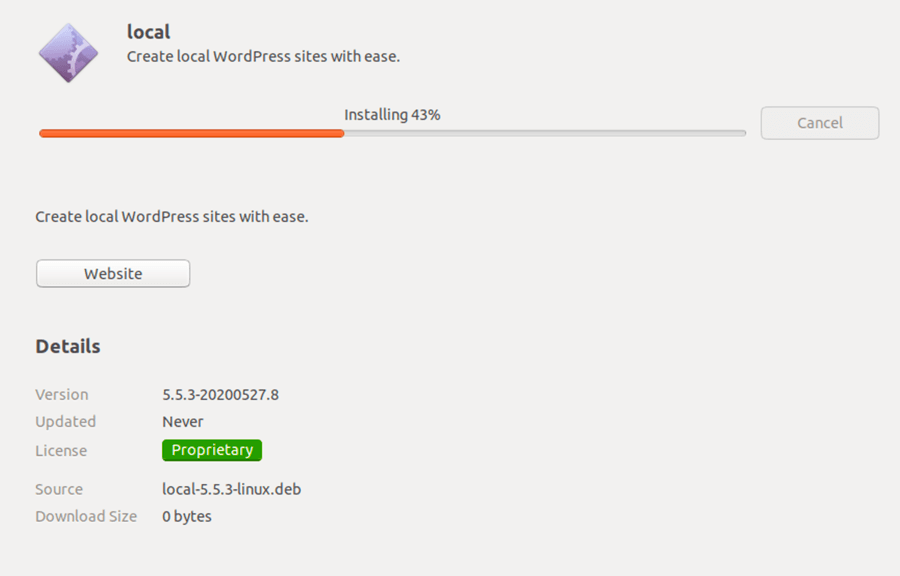
Once the download is complete, install it.
I have already installed “Local” on my computer and currently using it for the development of three websites.
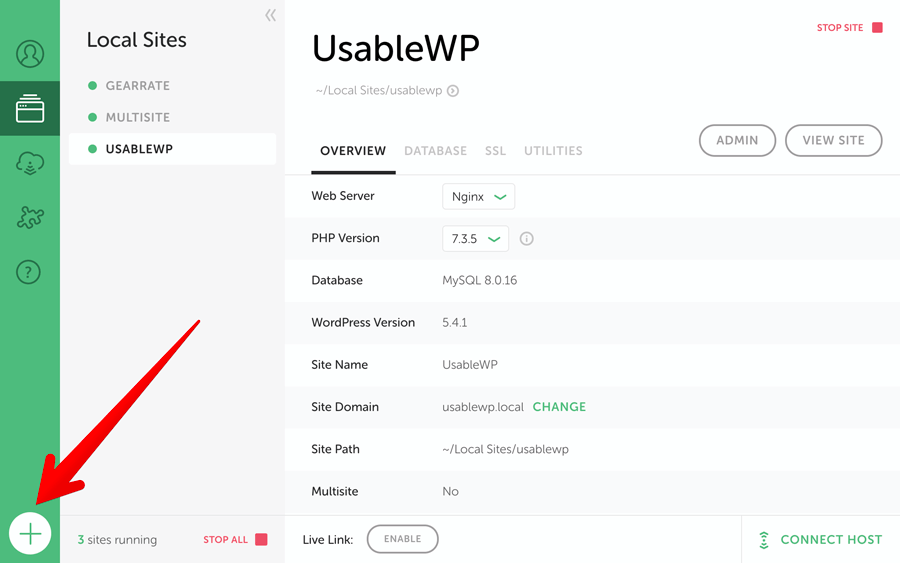
Next, click on the “+” (add site) button to start creating a new WordPress website.
Once you click on it, the first step is to setup the site.
1. Set up Site
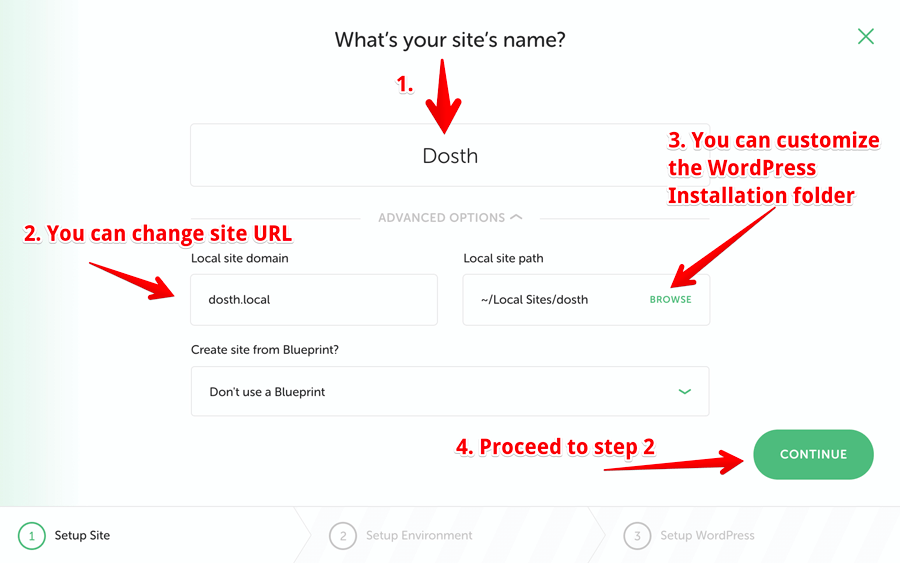
First, enter the name of the website.
Next, if you want to change the automatically generated URL of the site, use the “Local Site Domain” option.
Similarly, if you want to change the WordPress installation directory, use the “Local Site Path” option.
Once you are done these options, just click on “Continue” button to proceed forward to the next step.
2. Choose the best server environment
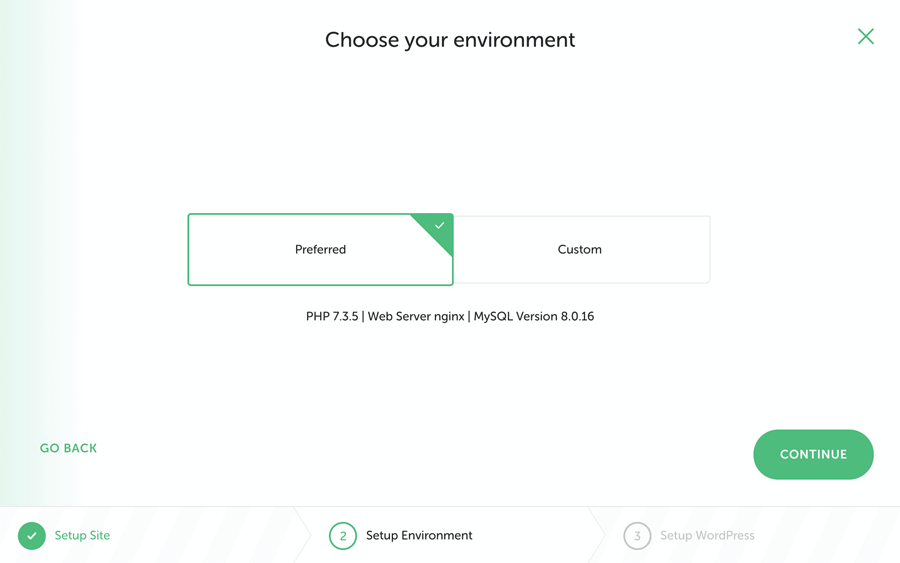
This is the single most important step while installing “Local”.
In this step, you can pick your favourite or reliable version of PHP, web server and MySQL.
By default, “Preferred” is an idea choice because “Local” gives us the best with latest versions of all the tools we need for our WordPress website.
But sometimes, you might need to work in a different environment.
For example, you project has limitations on a Nginx server. So, if you want to use Apache instead, the “Custom” tab will let you choose it.
Another example, if you are working on a WordPress project which contains a theme that only runs on an older version of PHP, or if you want to test a feature in the newest PHP release, choose “Custom”.
As soon as you click on it, you are allowed to choose whatever version of the tool you like or need.
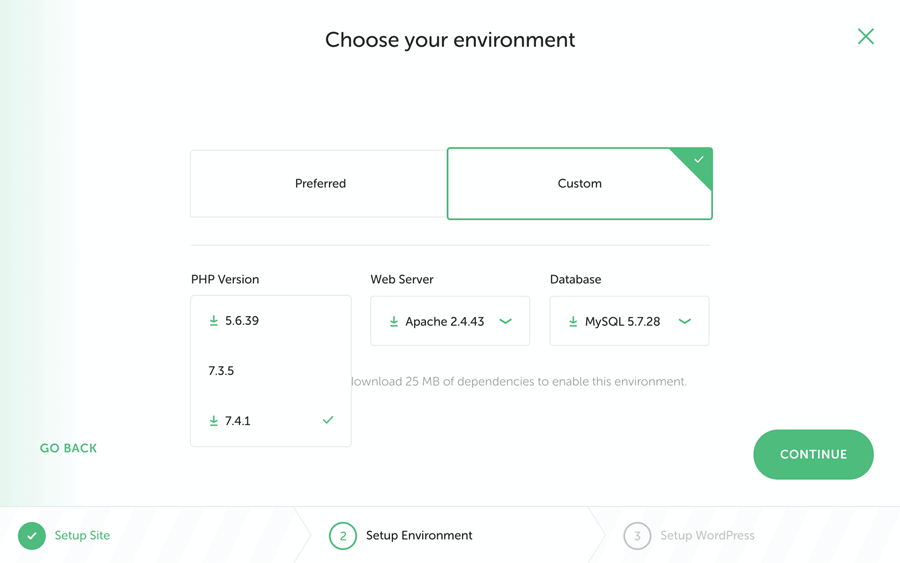
As you can see, you have a very deep control over your local WordPress development environment.
And, you can change these even after the WordPress site is installed. So, if you did a mistake in this step, “Local” has got you covered.
Anyway, I like the tool versions inside the “Preferred” tab. So, I am gonna switch the “Preferred” tab and continue to the next step.
3. Set up WordPress

Finally, choose a username, password and email for your WordPress site.
You can also build a WordPress multisite network, by saying yes to “Is this a WordPress multisite” option.
In our case, we are building a single site. So, I have left the option as is.
Alright, that’s pretty much it.
Now, click on “Add Site” button to install WordPress.
And as soon as you click on the “Add Site” button, “Local” will go ahead and provisions the local web server, MySql database, installs WordPress and starts the site.
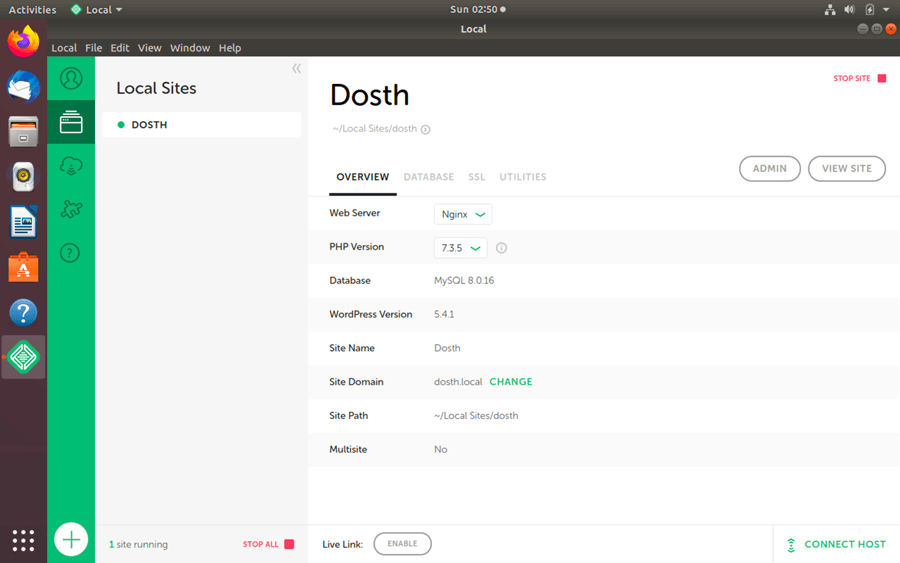
You can now visit your local WordPress site by clicking on the “View Site” button or entering the following URL in the browser:
http://dosth.local
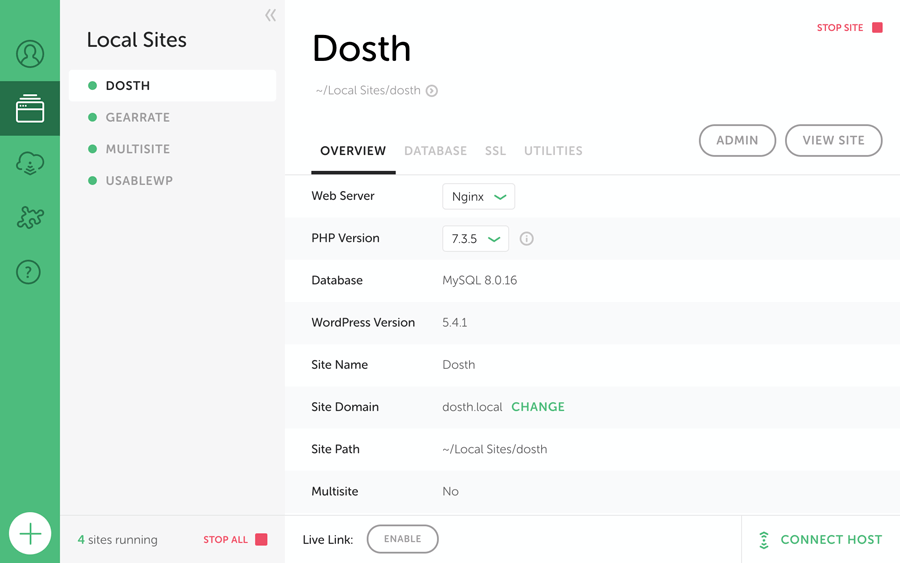
Now that the site is installed and running successfully, please remember the following things:
You have to pay attention to the “Stop Site” button located on the top-right-hand corner of the screen.
Before you access your local WordPress website in the browser, check whether the site is running or not.
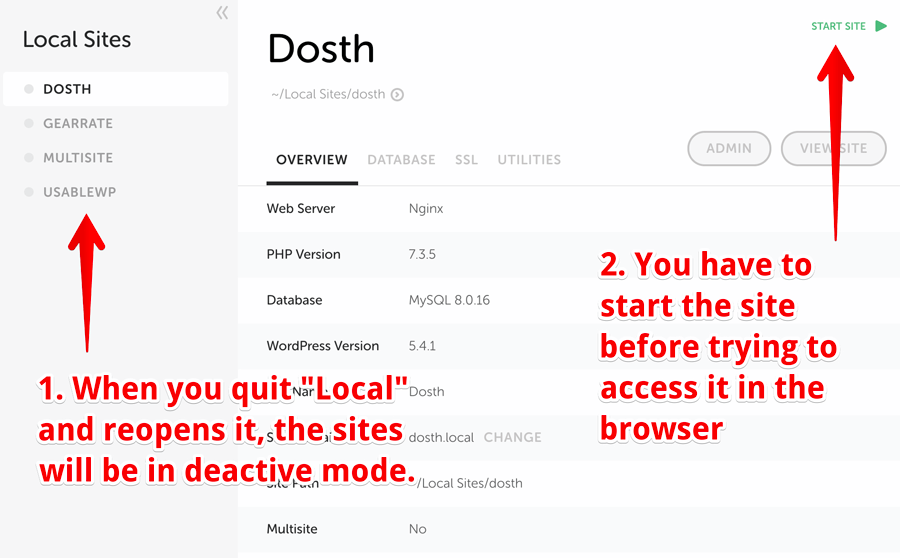
For example, when you quit the “Local” by Flywheel software, all the running sites will be stoped and are not gonna resume back.
This is a really helpful feature where the other alternatives of “Local” completely lack.
You can keep things tidy.
Having said that, let’s take a look some of the most important and totally cool features that just come with “Local”.
When you open the software next time, you have to start the individual sites by clicking on the “Start Site” button.
Anyway, now, let’s focus on cool luxary features that are unique to “Local” and are completely free.
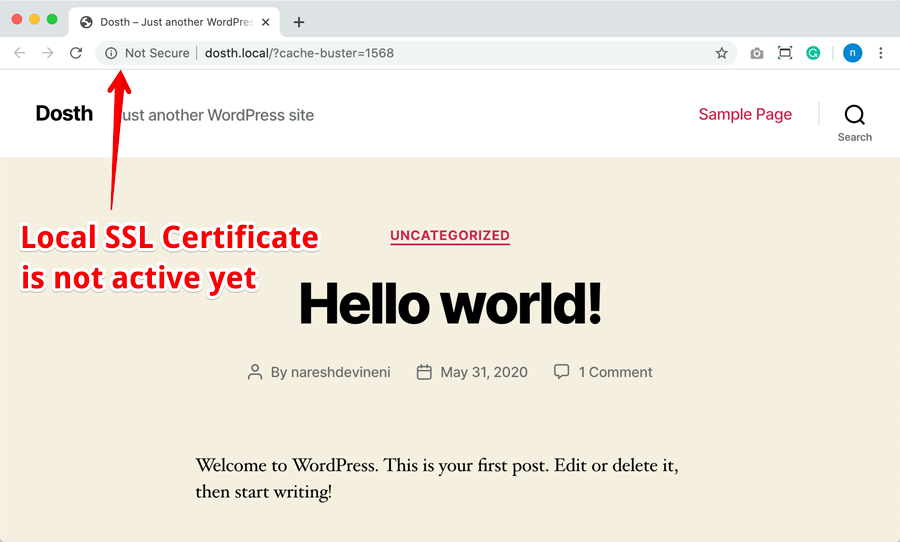
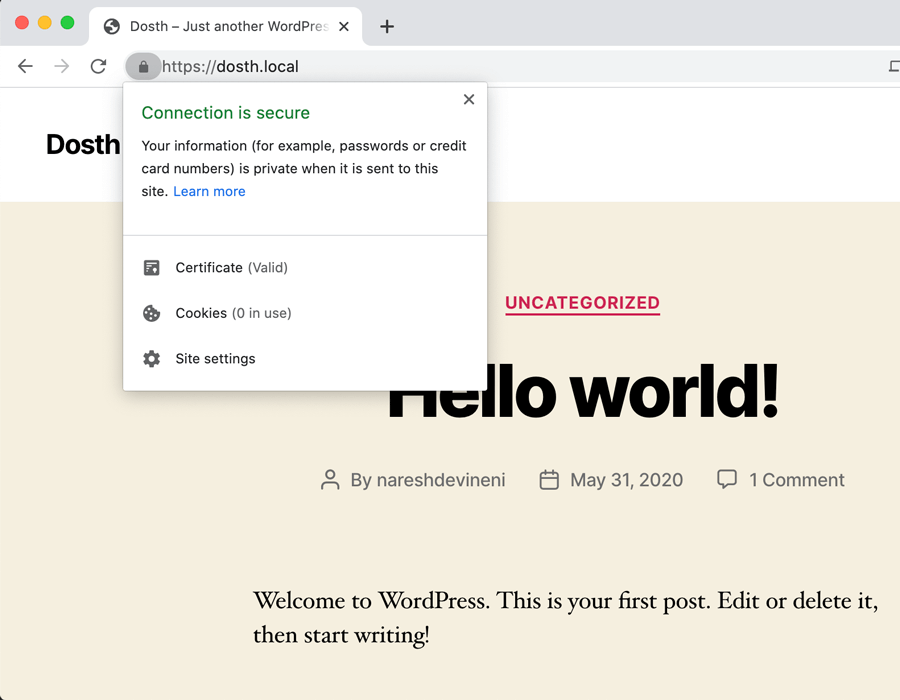
If you now visit the site in the browser, you’ll see that the site is currently using HTTP Protocol.
How to install an SSL certificate on your local WordPress website
To achieve this, just go to the “SSL” tab of the site we have just created and click on the “Trust” link.
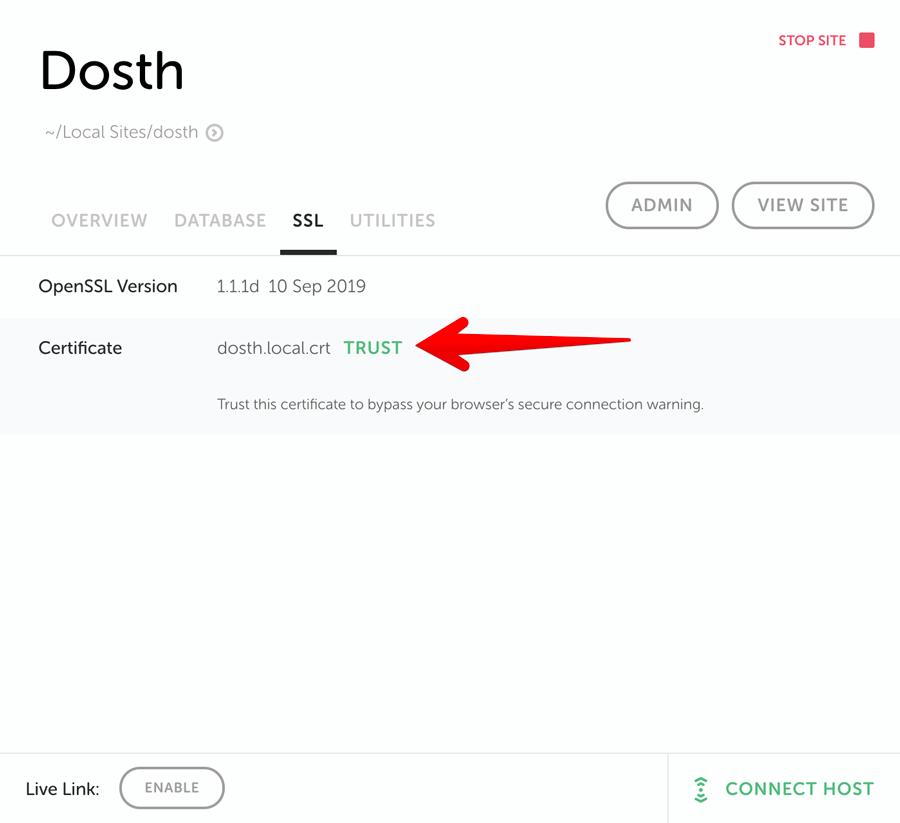
That’s all. That’s all you have to do to install an SSL certificate on your Local WordPress website using “Local”.
See how powerful and time saving it is?
The best thing is, it just works flawlessly.
You can now access your site by using the HTTPS protocol as well, like this:
https://dosth.local
This is a helpful feature when working with e-commerce plugins like woocommerce, Easy Digital Downloads.
How to test your local WordPress site on Mobiles and Tablets
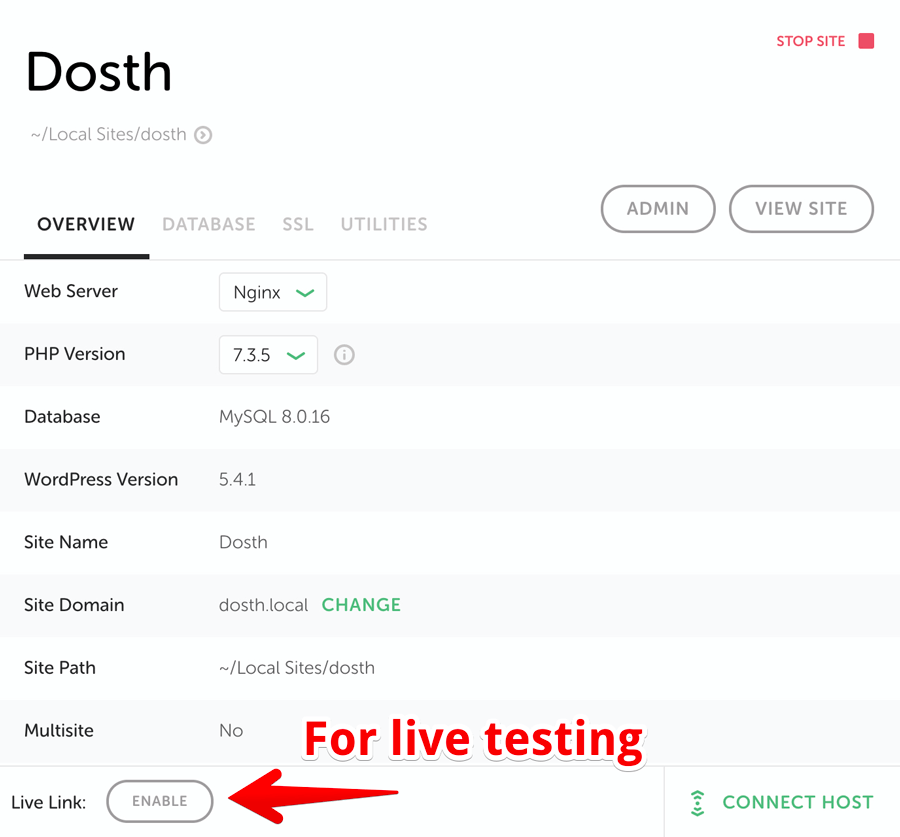
Next, let’s enable the “Live Link” for our local website. This features allows you to access your local WordPress website on any device in the world.
Simply put, this makes the website live for the world to see it.
Come on, go ahead and click on it.
As soon as you click on it, “Local” will provide you a link which looks like this:
http://f55491114ac.ngrok.io/

You can now access your site on any device you want:
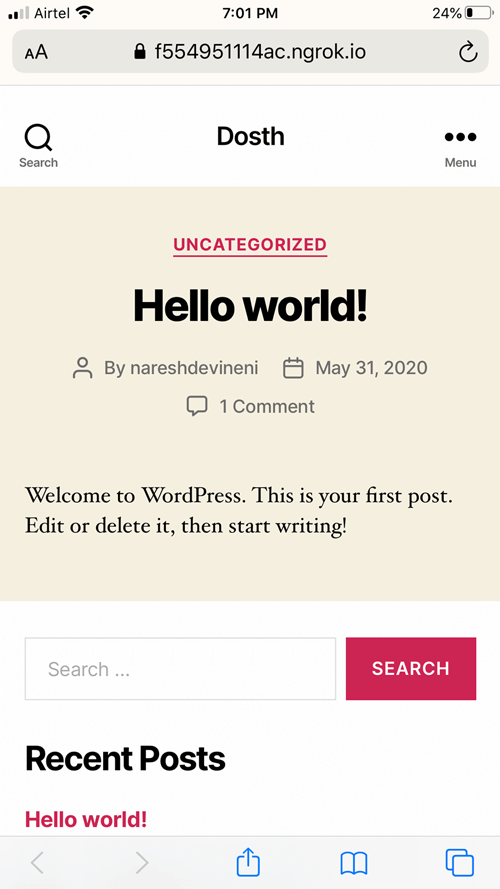
When I started using “Local”, I was really shocked to use the feature in less than 5 seconds because you have no idea how hard I tried to implement this feature using WampServer, Xampp, and MAMP.
It’s like a developer’s dream come true.
This is especially helpful when testing your website for responsiveness on mobile devices. Before “Local”, I used to test for responsiveness only after pushing the local site to a publicly accessible server.
You can also share the live link with your clients so that they can watch the progress and provide feedback.
I am sold! Take my money “Flywheel” <3
Having said that, there is one caveat to the live link feature. The live link will change everytime you stop the site or quit the “Local”.
There will be a new everytime you start your site.
But that’s ok. We are not really launching the website with that live link, are we?
Anyway, We are not done yet with cool features of “Local”. There is one last feature I want to talk about and it’s really cool.
How to test mails on your Local WordPress Website
“Local” uses “Mailhog” to help you test the emails on your local website.
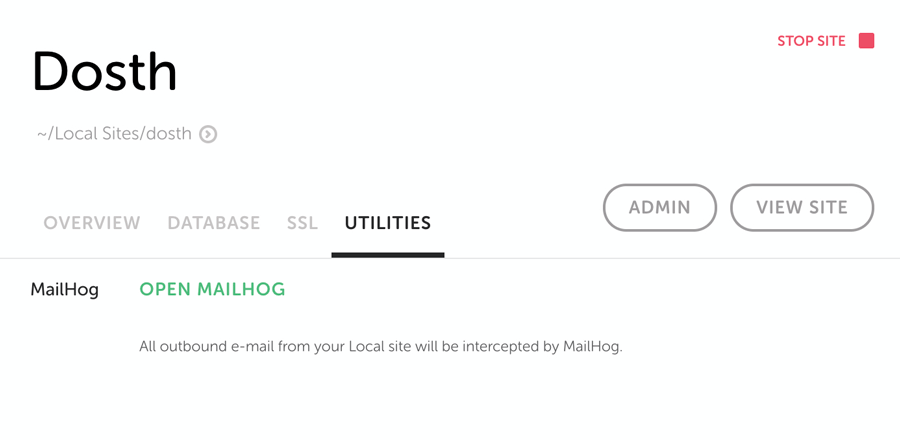
You can access “Mailhog” dashboard by going to the “Utilities” tab and then clicking on “Open Mailhog”.
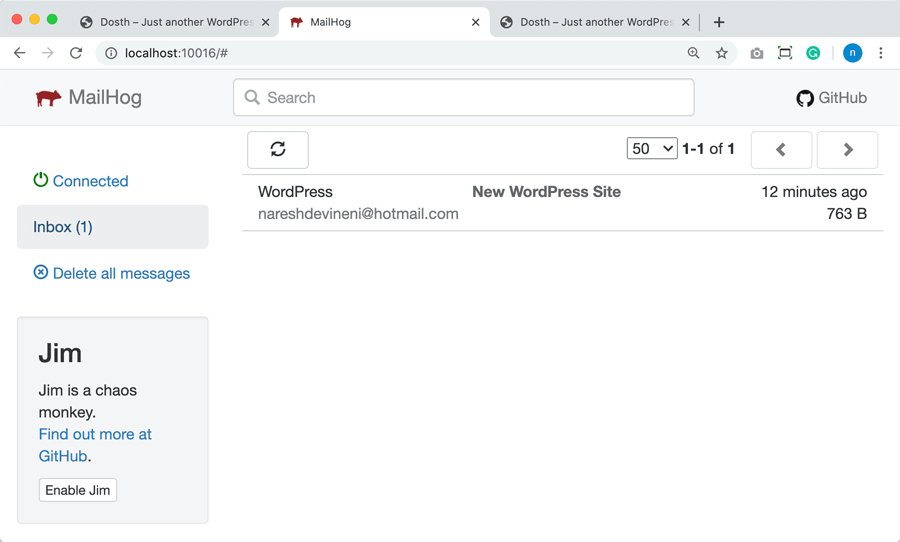
The “Mailhog” will let you see the emails that the WordPress has sent.
For example, WordPress sends an email to the administrator saying:
“Hey! you WordPress site is now ready and here is the username and password that have set”
This feature is especially helpful to debug and fix WordPress email system.
For example, many of my clients ask me to turn off email notifications for “Reset Password” feature of WordPress.
If we have written a solution for the above problem, it’s easy to test it using Mailhog, right?
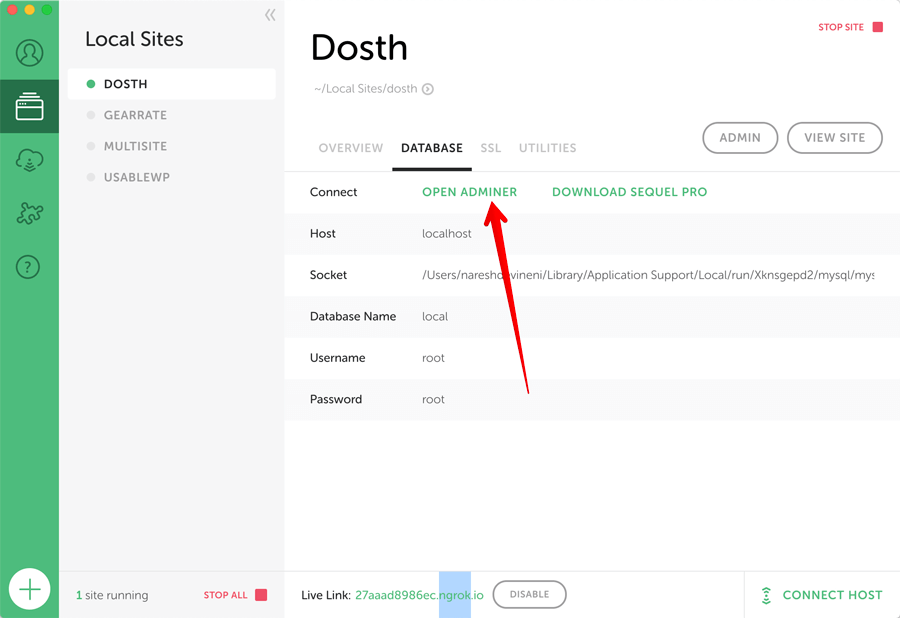
“Hey! All good, but I have a burning question. For MAMP, there is phpMyAdmin to manage databases visually. What about Local, does it come with phpMyAdmin too? If yes, how do I access it?”
Oh sorry, I totally forgot about that. Thanks for reminding me.
Well, Local doesn’t come with phpMyAdmin. Instead it comes with “Adminer”.
Adminer is alternative to phpMyAdmin. It has almost all the features of phpMyAdmin and performs better too.
You can access the Adminer by going to the “Database” tab of individual local sites.
Final Thoughts and Conclusion
And that’s pretty much you set up your Local Development Environment for WordPress.
Now go ahead and play around with WordPress.
Break the existing sites. Fire up the new WordPress sites with in minutes.
Do whatever you want. Try out different plugins.
You’ll get something out of every mistake you make when it comes to WordPress.
If you want to learn more about creating WordPress websites, read the following article:
How to create a WordPress website
I will see you in my next guide.

Previous Article

 © 2026 UsableWP. A project by Naresh Devineni.
So helpful, this article talked me through the steps on setting up wordpress on my mac. As musician violinist i’m really chuffed of how easy it was to make it work. Thanks a million!
I am glad, Merry Christmas :)
This is an absolutely perfect tutorial! I used MAMP on my Mac and everything went flawlessly. Thanks so much, I’m a new fan of your website.
I am glad and thanks for being my new fan :P
I read many articles from your site and just one word with a lot of “e”: awesomeeeeeeeeeee. thank you so much for this helpful articles about wordpress.
you cool, thanks