WordPress Theme Development: The Loop, the main content, Google Fonts, and the Custom Fields
This is Part 5 of the 9 part Course about developing a WordPress theme from scratch.
Here is the access to the other parts of the Course in the sequential order:
- Developing a WordPress Theme From Scratch
- WordPress Theme Development: The best way to enqueue scripts and styles
- WordPress Theme Development: Creating the header and making our theme translation ready
- WordPress Theme Development: Site footer with social navigation, dynamic copyright statement
- WordPress Theme Development: The Loop, the main content, Google Fonts, and the Custom Fields (Current Part)
- Building a WordPress Theme From Scratch: Internal Pages
- WordPress Theme Development: Building the Blog
- WordPress Theme Development: Search page, 404 error template, Custom Queries, and custom post types
- WordPress Theme Development: WordPress Customizer and it’s API
The Loop is the most important that you should get a good grasp of when you are learning about WordPress Theme Development.
Using the WordPress Loop, you can output the main content of a WordPress page, post and custom post type.
Anyway, before we see the Loop in action, let’s learn about the strategies for building the main content of the Homepage.
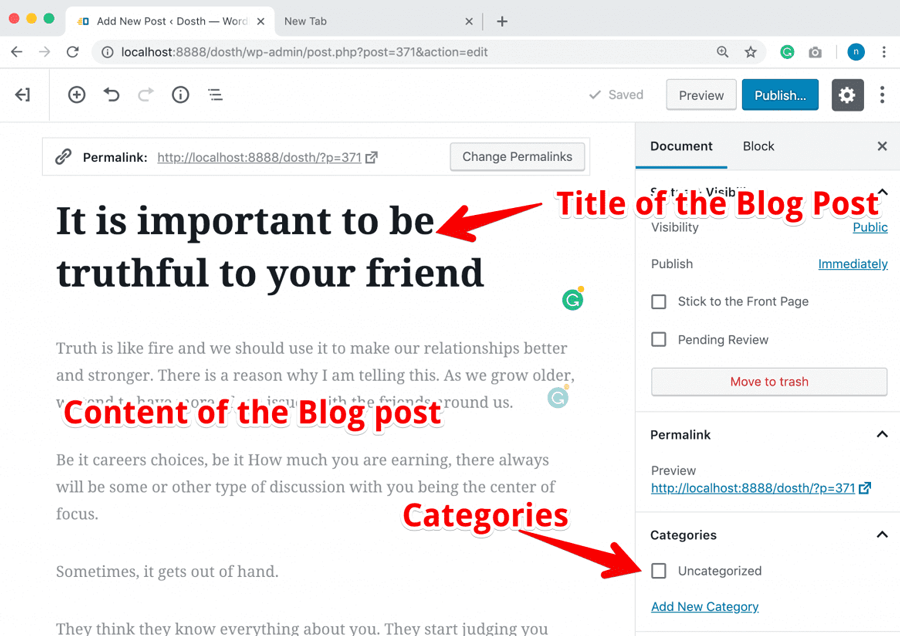
The main content of the internal pages or blog articles is often dull and can be easily created using the default Gutenberg editor (WordPress Block Editor). The following image is what we can achieve easily using Gutenberg Editor.
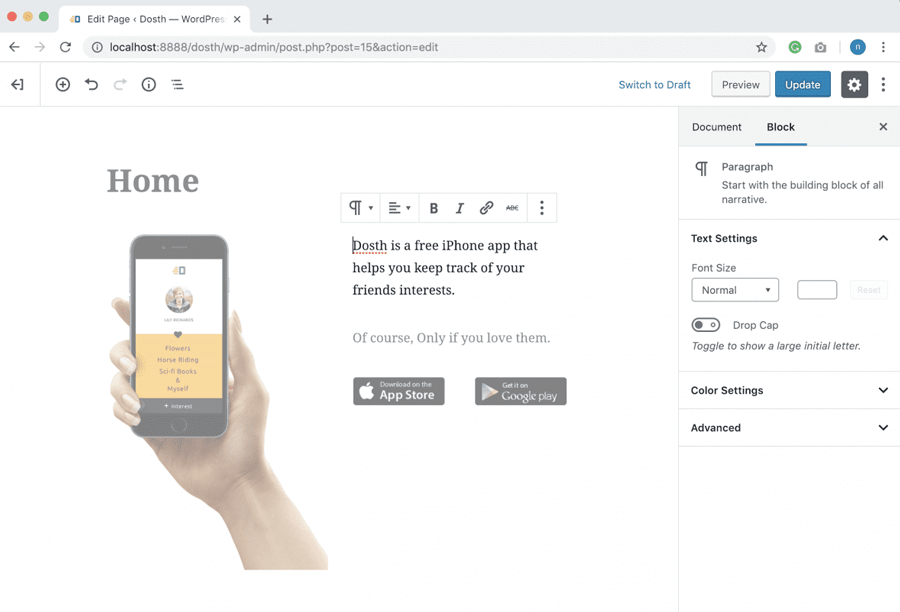
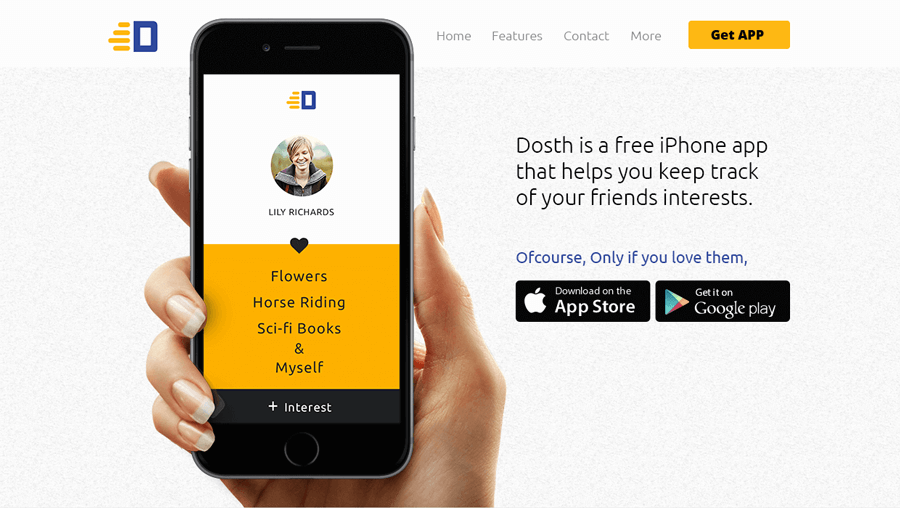
But this is not the case with the Homepage. In fact, not just the Homepage. Every page on your site with complex layout and heavy content. For Example, Our Dosth site’s Homepage.
We have two goals when building page’s main content:
- Every piece of main content must be easily editable by the client. Trust me, you don’t want to attend those content change phone calls when you were on a holiday.
- Often we only get 25 hours to build the Homepage. Most of the clients budget is limited. So, we have to choose the fastest yet least bad way to build the Homepage.
“Least bad way? What does that even mean?”
Here is the reality my friend. There is no standard way to build a page with complex layout and content.
I had this same question and took it to WordPress-StackExchange for an answer and Rarst gave a fitting answer that made sense. Here is it:
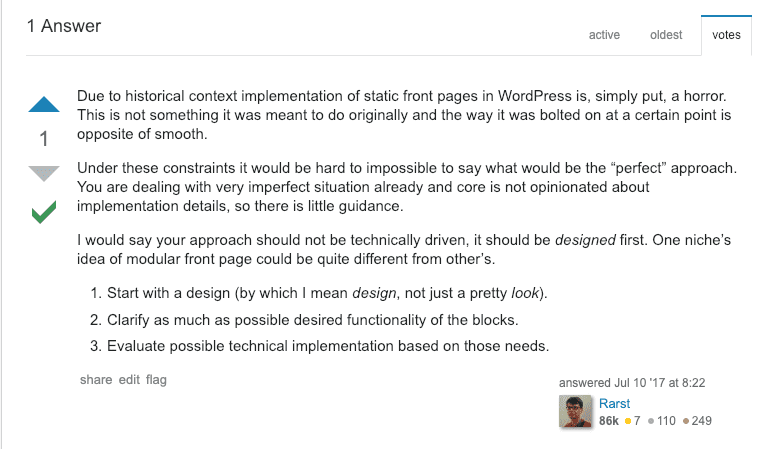
Although the question is about Theme Development for mass distribution, Rarst’s answer applies to “Theme development for a client” too.
Get it?
Anyway, let’s take a look at all the available approaches and let’s pick one of them to build our Homepage.
There are six approaches to build the content of a Complex Page ( From a Theme Developer’s perspective )
- Using Widgets
- Using page Builders like Divi, BeaverBuilder, WP-Bakery, Elementor, Site Origin
- Using multiple WordPress pages and their content to build the final page
- Using custom fields with the help of plugins like ACF, RMB2
- Using the Gutenberg Editor ( Default content editor since WordPress 5.0 )
- Combination of 5 and 6, that is building the page’s content with the help of Custom Fields and Gutenberg Editor
Every one of the above-mentioned methods has pros and cons.
But it’s the cons that bother me a lot.
- Using Widgets – The only problem I have with widgets is If someone accidentally deletes a widget with an image or content, puff, the content is gone. Plus, If they want to use the same widget with the same content in some other sidebar, they have to copy all the content again, Which is kinda tedious and also redundant content.
- Using Page Builders:
- They spit little too much HTML markup and we have no control over it whatsoever.
- Page Builders are just plugins that get updates every now and then. Not most of the time, but sometimes these updates break the page’s content and design. And this can be fatal sometimes. If you want to sleep peacefully at night, better do not go for this option. Page builders are for the clients who are designers themselves.
- Using multiple WordPress pages –This is the best standards-friendly way. This technique doesn’t involve any third-party plugin or data loss. But the only con is its time taking. It always takes time to build the content of the page in a standards-friendly way.
- Using Custom Fields with third-party plugins like ACF: Although this approach gives all the control over the Markup, it has the same problem as Page Builders. Sometimes Plugin updates break the site and force us to update our code.
- Using the default Gutenberg Editor – As of now, we can only build not-so-complex layouts but that too with a lot of CSS overrides. Anyway, Gutenberg is the future. It takes time for this beauty to evolve. So, let’s keep an eye on it.
In my opinion:
It totally depends on the budget of the client.
If the client strives to build their website by maintaining all the best possible standards and if the budget is not all a constraint, I will go with the third approach, that is, building the content of a complex page using Multiple WordPress pages.
But, most of the time, this is not the reality. Most of the clients just want their website done within a very short span of time like 45 hours, 60 hours etc. and if this is the case, I will go with the sixth approach, that is building the page’s content with the help of Custom Fields and Gutenberg Editor.
Now, WordPress allows us to create custom fields, but it takes a lot of time to build robust custom fields and we shouldn’t build these custom fields inside our theme, if we do so, when the client switches from our theme, the custom fields that came with our theme are gone too.
So, I will rely on a plugin like ACF to create custom fields within minutes. ACF ( Advanced Custom Fields ) is a very reliable plugin for developers and it’s worth the risk.
“Why this combination? Why can’t you just go with the Custom Fields approach totally?”
Simple. Every page has some content that is really important. And most often, this is the content that the page will get started with. So, I always try to build this content using the features that ship by default with WordPress. I Just want this content to be accessible to the visitors even if the ACF or RMB2 plugins fail.
Again, these are my personal preferences. But follow them unless you have a better approach.
For the purposes of this guide:
I am gonna go with the combination of custom fields with the ACF plugin and the WordPress Block editor to build the Homepage because this is the reality. Not only that, but I also want to walk you through how a Plugin like ACF gets integrated with your theme.
Now, this approach only works if you are developing the theme for a client. But if you are creating a theme for mass distribution, you have to go with “Using Multiples Pages” approach or some better new approach than that.
Anyway, we will be using “Multiples Pages and their content” approach when building the About Us page of our Dosth site.
By the time you are done with this guide, you’ll be mastering both the techniques.
If you are not familiar with how to build the page content with the Gutenberg Editor (WordPress Block Editor), please read the following guide:
WordPress Block Editor – An Actionable Guide
If you are already familiar with it, Go ahead and build the following design with it:
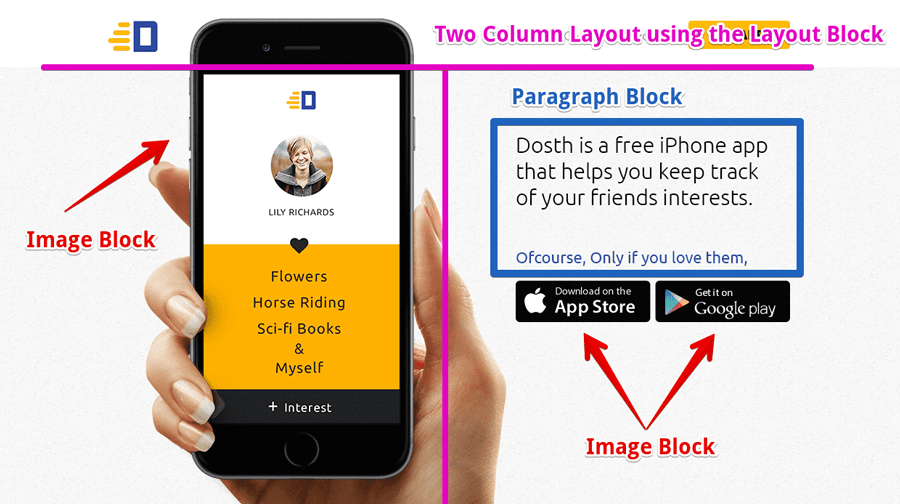
Make sure to come back here only when you have built a good above the fold content using the WordPress Block Editor or any other page builder.
I am forcing you to do this because we will be outputting this above the fold content using the Loop.
But before that, let’s understand the purpose of the Loop.
The Purpose of the Loop
There are three types of Posts in WordPress:
- A Page – For example, About us, Static Front page, Contact us
- A Blog Post like – “10 best places you must visit before you get married :P”
- A Custom Post – For example, an e-commerce product, a book, a movie, a team member etc.
And, the only responsibility of The Loop is to display a single post or a group of posts to the frontend. It doesn’t matter what type of post it is. That’s all. Nothing else.
To be precise, The Loop allows us to display the following elements of a particular post to the Frontend:
- Title of the Post
- Actual Content of the Post
- Some Meta Information like a book’s ISBN number
- Comments
- Author of the Post
- Categories, Tags
- Published Date
Simply put, the Loop is capable of displaying any piece of information that belongs to a particular post.
Using the Loop inside your theme
Now, that you understand the purpose of the Loop, let’s use it to output the Homepage content we created in the last lesson:
Open up the front-page.php file inside your theme and replace this boring “This is Homepage” Heading we had since decades:
<h1>This is Homepage</h1>with the Loop:
<?php while( have_posts() ): ?>
    <?php the_post(); ?>
<?php endwhile; ?>
“Is this The Loop? It’s an ordinary PHP WHILE Loop with a couple of function calls, right?“
Yep! It looks like a simple WHILE Loop, but it is extremely powerful and gives you access to any piece of information that belongs to a particular post.
Here is the complete code of front-page.php file after replacing the heading with the loop.
<?php
/**
 * The front page template file.
 *
 * If the user has selected a static page for their homepage, this is what will
 * appear.
 * Learn more: http://codex.wordpress.org/Template_Hierarchy
 *
 * @package Dosth App
 */

 get_header();
 ?>
<?php while( have_posts() ): ?>
    <?php the_post(); ?>
<?php endwhile; ?>
 <?php get_footer(); ?>
Now, if you go to the browser and check out the Homepage’s output, except for the header and footer, there is no content at all.
We can display the content of the Homepage by placing the following Template Tags inside the Loop.
How to display the Title
1) the_title() – As the function name suggests, this function outputs the Title of a particular page to the frontend.
2) get_the_title() – This “get” variation of the the_title() returns the title instead of outputting it instantly. We use this function when we want to use the title for later use.
How to display the Content
1) the_content() – This function outputs the Title of a particular page to the frontend.
2) get_the_title() – This “get” variation of the the_content() returns the content instead of outputting it instantly. We use this function if we want to manipulate the content before outputting it.
There are more.
There are tons of other template tags to easily display whatever information we want about a particular post, but we will see them when the time comes.
Let’s output the content of the Homepage
Usually, we don’t output the Title of the Homepage to the Frontend. Visitors got habituated to it.
So, We’ll just output the content.
Go ahead and place the the_content() template tag inside the loop, like this:
<?php while( have_posts() ): ?>
    <?php the_post(); ?>
    <div class="actual-content">
        <?php the_content(); ?>
    </div>
<?php endwhile; ?>
Always remember, Inside the Loop, We should always place a template tag like the_content() after the the_post() function call.
If we place a template tag before the the_post() function call, the template tag doesn’t return/output anything. WordPress also throws the a warning. We will understand the reason behind this in the lesson.
Now, let’s check out the Homepage in the browser.
And Bang! There is our content.
Agreed. It doesn’t look good yet! But the Loop and the_content() template tag are indeed working their charm.
“Great! Awesome! But I have a couple of questions!”
Shoot!
“We did not provide any parameters to any of the functions in the Loop, But still, how does the Loop output the Homepage content? “
“or, is it because we put the Loop inside the front-page.php file?”
“Also, why we need to use a WHILE Loop to display the content of a single page like Homepage? We generally use a WHILE Loop when we are displaying a bunch of pages, right?”
I understand your confusion, I have been there. But, you have to wait until the end of the next lesson to get answers.
Next, we will see what makes the Simple WHILE Loop soo powerful. So, in the next 15 minutes, you’ll have answers to all your questions.
How the Loop Works
The Word “Loop” throws many beginner developers of WordPress into the confusion. Even I was one of them when I was getting started.
So, it is important that you understand how “The Loop” works. But to understand how “the Loop” works, one must understand how WordPress decides what posts or post to display on a page.
I learned this from the following page of the WordPress Codex. It is an eye-opener for me.
https://codex.wordpress.org/Query_Overview
What follows now is a highly simplified version of the process mentioned in the above article.
Note: If you failed to understand the below flow, it is totally Ok. Just remember that, with the help of the Loop, WordPress displays correct content on a page based on the URL of the Page.
Anyway, We have already look at the flow of WordPress a couple of times. But, let’s take a look at it one last time. This time, we look at it by keeping the Loop in mind.
It all starts with a visitor typing a website URL into the web browser and hitting enter.
1) As soon as the visitor hits enter, the browser sends the request to the Web Server for the web page.
2) The Web Server receives the request and checks if there is a file name or directory name in the URL. If there is a file name and if that file exists, the Web Server processes that particular file and sends it as a response to the browser.
If it is a directory and if that directory exists, the Web Server sends the content of the directory to the browser.
4) If the URL is not about a particular file or directory, Server starts executing the WordPress core starting with the index.php file. From here onwards, WordPress takes the control.
5) WordPress loads and executes the plugins that are currently active.
6) WordPress then loads the functions.php file of the active theme.
7) WordPress runs the wp() function and this is where it all begins. This function calls $wp->main() function internally and this tells WordPress to Parse the URL and figure out what content should be displayed on a page.
The URL parsing is done by $wp->parse_request() function call. And the end goal of URL parsing is to determine query variables from the URL.
“What is a query variable and why do we need to determine it?”
Simply put, a query variable is fed to the MYSQL query to retrieve a particular piece of content from the Database.
If Ugly Permalinks are enabled on our WordPress site, the query variable can be directly seen in the URL, like this:
https://www.usablewp.com/?page_id=3028 (If the visitor is requesting a page)
In the above URL, page_id is a query variable set to a value of 3028. So, WordPress puts this query variable inside the MYSQL query, retrieves the information of the page with ID 3028 from the database.
https://www.usablewp.com/?cat=13 (If the visitor is requesting a category of blog posts)
In the above URL, the cat is a query variable set to a value of 13. This time, WordPress retrieves all the blog posts that are assigned to the category with ID of 13.
Here is the list of Query Variables that WordPress ships with:
https://codex.wordpress.org/WordPress_Query_Vars
But, WordPress by default enables Pretty Permalinks for our site. So, URLs don’t include query variables, for example:
https://www.usablewp.com/category/tips
This is same as https://www.usablewp.com/?cat=85
For this reason, WordPress has to determine the query variables by parsing the URL and it does so by using the Rewrite API.
The WordPress Rewrite API makes the pretty permalinks features possible because It is the workhorse that transforms the URL into query variables, for example:
a) If the user visits https://www.usablewp.com/category/tips, Rewrite API determines the following query variable
cat=13
b) If the user visits https://www.usablewp.com/get-help-now, Rewrite API determines the following query variable:
page_id=85
8) Once the Query Variables are determined, these are put inside an array called “Query Specification”.
9) This Query Specification is then converted into an MYSQL query and this MYSQL query is executed to get a list of posts using the WP_Query->get_posts() function, for example:
a) If the user visits https://www.usablewp.com/get-help-now, the WP_Query->get_posts() function only retrieves a single page from the database.
b) But, If the user visits https://www.usablewp.com/category/tips, the WP_Query->get_posts() function retrieves a bunch of posts from the database.
We also refer to this MySQL query as the “Main Query”. From now, I could be referring to this Main Query quite a bit.
10) Next, All these retrieved posts are saved to the $posts variable of the global $wp_query object. To be precise, $wp_query->posts. The $wp_query object is just an instance of the WP_Query class. If future lessons, We will be using this class to craft our Custom Queries.
(Spoiler Alert ) The Loop uses this global $wp_query object behind the scenes.
At this point, because WordPress has already figured out what content should be displayed on the page, So, It sets all the is_ variables that are used by conditional tags such as is_page(), is_single(), is_category etc. Trust me, these conditional tags are really helpful and saves us a lot of time. So, We will be using these Conditional Tags quite extensively throughout our WordPress Theme Development career.
Important Realization: WordPress has pulled the posts from the Database long before the Loop is executed inside our template files.
11) Next, based on the type of content retrieved from the Database, WordPress picks an appropriate template from our theme using the Template Hierarchy logic and starts processing it, for example:
a) If the user visits https://www.usablewp.com/, at this point of the flow, WordPress already knew that the user is trying to access the Homepage, and picks the front-page.php template file from the active theme.
b) If the user visits https://www.usablewp.com/get-help-now, WordPress already knew that the user is trying to access a page and picks looks for the page.php inside the active theme if it is not present, it looks for another file. Refer to Template Hierarchy Image.
c) If the user visits https://www.usablewp.com/category/tips, WordPress looks for a template file in the active theme’s directory that matches the category’s slug. In the above URL, the category slug is “Tips”, So WordPress looks for a template file named category-tips.php. If it is not present, it looks for another file. Refer to Template Hierarchy Image.
No matter what Template file WordPress picks, it comes across the Loop inside that template file.
Important Realization: We must put/include the Loop inside every template file we use to display a single post or bunch of posts.
Imagine that the user has visited https://www.usablewp.com/category/tips, and there are five posts that are assigned to “tips” category.
Now, all these five posts are store inside the $wp_query->posts array.
WordPress picked the category.php template file to display these posts and this file contains the following:
<?php while( have_posts() ): ?>
    <?php the_post(); ?>
    <div class="actual-content">
        <?php the_title(); ?>
        <?php the_date(); ?>
        <?php the_content(); ?>
    </div>
<?php endwhile; ?>
The First line of the Loop is:
<?php while( have_posts() ): ?>The WHILE statement is used to loop through all posts that are inside the $wp_query->posts array and display them neatly to the frontend.
Let me elaborate it.
The have_posts() function inside this WHILE Statement checks to see if there any posts inside $wp_query->posts that needs to be processed, that is, if the current query( Main/Custom Query ) has any results to loop over. Based on this it returns either TRUE or FALSE.
This function starts the Loop, steps through it, and finally ends the Loop when all the posts inside $wp_query->posts array are exhausted.
In our case, the Main Query returned five posts and we are still at the first iteration, so the have_post() function returns true and we step into the Loop for the first time.
During the First Iteration of the Loop
Once the WordPress is inside the Loop, it comes across the the_post() function. This function internally calls the setup_postdata() function to fill the global $post variable with the data of the first post inside $wp_query->posts array.
Technically, now the global $post variable contains all the information that belongs to the first post.
Every template tag that we use inside the Loop relies on the global $post variable to output specific piece of information about a particular post.
So, the_title() function ouputs the title of the first post by accessing global $post variable internally.
Then, the_content() function outputs the content of the first post by accessing the same $post variable.
Finally, the_date() function outputs the date of the first post by accessing the same $post variable.
That’s all.
By the end of the First iteration of the Loop, WordPress echoes the content of the first post.
Next, We are back again to the top of Loop for the Second Iteration because there are still four more posts that we need to output.
During the Second Iteration of the Loop
Once the WordPress is inside the Loop for the second time, it comes across the the_post() function again.
This time, WordPress replaces the old data( first post data ) inside the global $post variable with the data of the second post inside $wp_query->posts array by using the setup_postdata() function call.
Important Realization: The data inside the global $post variable is set freshly for every post in the Loop. For example, if the Main query returns five posts from the database, the global $post would be filled with the data of the current post of the Loop. So, when the loop ends, the global $post variable still possesses the data of the last post inside the $wp_query->posts array. This is very important for you to remember.
Next, the_title(), the_content and the_date() functions outputs the data of the second post using the global $post variable.
Now, all the remaining posts inside the $wp_query->posts array is displayed in the same way.
Once we looped through all the posts (After the Fifth Iteration)
Great! So, the have_posts() function will finally return false indicating “Hey! We needed to display 5 items and currently, we displayed all of them. so, don’t go inside the Loop.”
Hence, We are finally out of the Loop.
And, This is exactly how the Loop Works.
How this Applies to a Single Page like Homepage
If we apply this same flow to the Homepage, the $wp_query->posts would only contain a single post with the data of the Homepage. So the Loop will run only once.
And, the global $post variable will contain the data of the Homepage even after we exit out of the Loop.
Now, it’s time to answer the three question were raised in the last lesson.
Q and A
1) We did not provide any parameters to any of the functions in the Loop, But still, how does the Loop output the Homepage content?
It is because the $wp_query object is the backbone of the Loop.
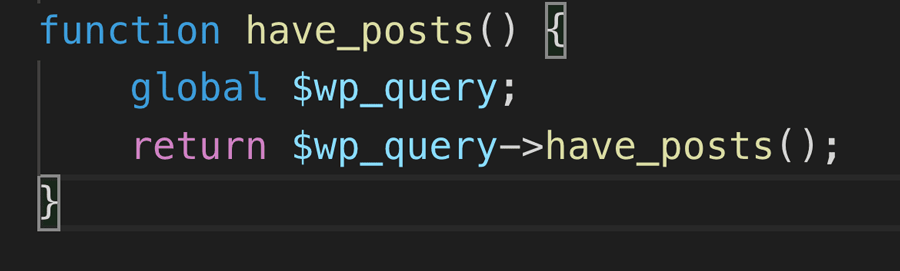
For example, the have_posts() function inside the WHILE Loop is just a wrapper function for the $wp_query->have_posts()
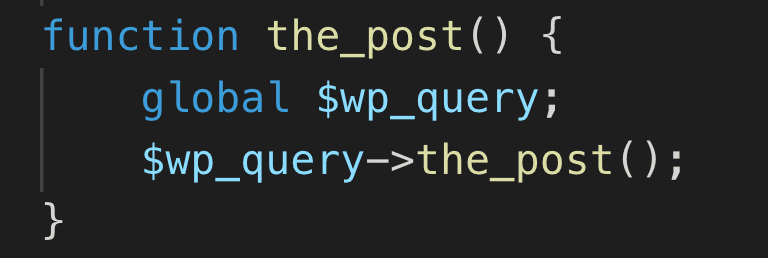
This applies to the the_post() function inside the Loop too. It is just wrapper function for the $wp_query->the_post() method.
Technically, everything that is related to the Loop uses the $wp_query object behind the scenes.
2) is it because we put the Loop inside the front-page.php file?
The answer to the above question answers this question too.
WordPress is picking the template file based on the query variables. When it comes to Homepage, it looks from the front-page.php file inside the active theme. If the file is found, but there is no Loop inside it, the content will still not get displayed.
3) why we need to use a WHILE Loop to display the content of a single page like Homepage? We generally use a WHILE Loop when we are displaying a bunch of pages, right?
As you have seen the above flow, WordPress uses the same approach( same code ) to display any kind of page on the site. Be it a single post or a bunch of blog posts. It takes the term “Code Reusability” to the next level.
Get it?
Next, We will style our Homepage’s above the fold content. Right now, it doesn’t look good.
Styling the Above the Fold content of the Homepage and fixing other layout problems
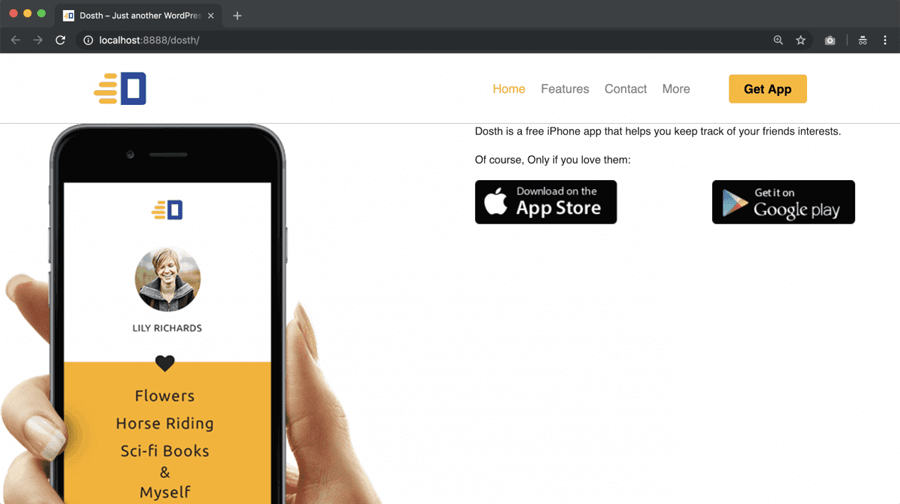
Here is how the above the fold content looks like now:
If you observe the mockup design, there is a neat pattern as the background image. And, We are already using the same background pattern for the Footer Section One. So, let’s re-use it for this section as well.
“Can’t we apply this background image using the Gutenberg Editor?”
No. We can not. As of now, we can not apply a background image to any of the Blocks.
So, open up the front-page.php file and add the “above-the-fold” class to the <div class="actual-content"> element. And wrap the_content() function inside the Bootstrap Container elements.
Here is the updated While Loop for this lesson:
<?php while( have_posts() ): ?>
    <?php the_post(); ?>
    <div class="actual-content above-the-fold">
        <div class="container">
            <div class="row">
                <div class="col-sm-12">
                    <?php the_content(); ?>
                </div>
            </div>
        </div>
    </div>
<?php endwhile; ?>
Next, add the following CSS at the end of the style.css file:
/*-------------------------------------------------------------------------------
  9.Homepage Above the Fold Styles
-------------------------------------------------------------------------------*/
.home .above-the-fold{
    background-image:url(assets/images/background-pattern.png);
}
.home .above-the-fold .introduction-text{
    margin-top:30px;
    font-size:25px;
    margin-bottom:20px;
    line-height: 1.3;
}
.app-store-image-links > div:first-child{
    margin-right:5px;
}
.app-store-image-links > div:last-child{
    margin-left:5px;
}
.app-store-image-links img{
    width:100%;
}
.secondary-color{
    color: #2e489d;
}
.home .above-the-fold .secondary-color{
    font-size:22px;
    font-weight:400;
}
@media only screen and (min-width:992px){
    .pull-me-up img{
        position:relative;
        margin-top: -80px;
        display:block;
        left: 15%;
        z-index: 1;
        max-width:500px;
    }
    .above-the-fold > div:last-child{
        position: relative;
        z-index:2;
    }
    .home .above-the-fold .introduction-text{
        font-size:30px;
        margin-top:60px;
    }
    .home .above-the-fold .introduction-text,
    .home .above-the-fold .secondary-color,
    .home .above-the-fold .app-store-image-links{
        margin-left:15%;
    }
}
@media only screen and (max-width:991px){
    .pull-me-up img{
        margin-top:40px;
    }
    .app-store-image-links img{
        width:180px;
    }
}
@media only screen and (min-width:768px) and (max-width:991px){
    .above-the-fold .has-2-columns:not(.app-store-image-links){
        -ms-flex-wrap: nowrap;
            flex-wrap: nowrap;
    }
}
@media only screen and (max-width:991px){
    .app-store-image-links{
        -ms-flex-wrap: nowrap;
            flex-wrap: nowrap;
    }
}
The problem with the Gutenberg editor is, the Column Blocks are not fully responsive. Although WordPress took care of styles for the Desktop and the Mobile, it does not handle the styles for the tablets. So, we have added the responsive styles ourselves for the tablets.
After adding the above styles, here is how the Homepage looks on Desktop:

I can see two problems right now. Observe the below mockup.
First of all, the designer used Ubuntu Light and Ubuntu Regular fonts, but we are still using some other font stack.
Next, there is a very small amount of gap between the Navigation and the iPhone image. But if you observe the header in the browser, there is a huge gap between them.
The problem is, in mockup the content is restricted to 960px but in our case, since we are using Bootstrap, the content width is 1140px wide.
So, let’s fix it right away by adding the following code at the end of the General Styles section of the style.css file:
.container{
    max-width:960px;
}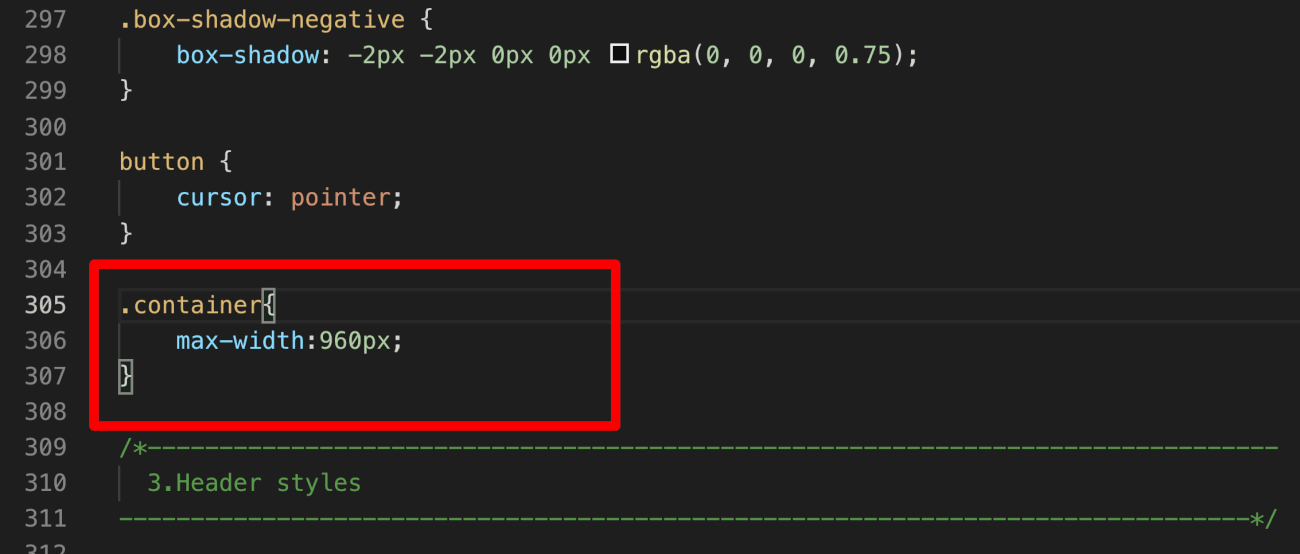
Now if we refresh the Homepage in the browser, the output looks closer to the mockup. Fantastic.
Unfortunately, there is a negative side-effect because of this change! If you scroll down to the Footer, the footer menu is no longer neatly fitting inside a single line.
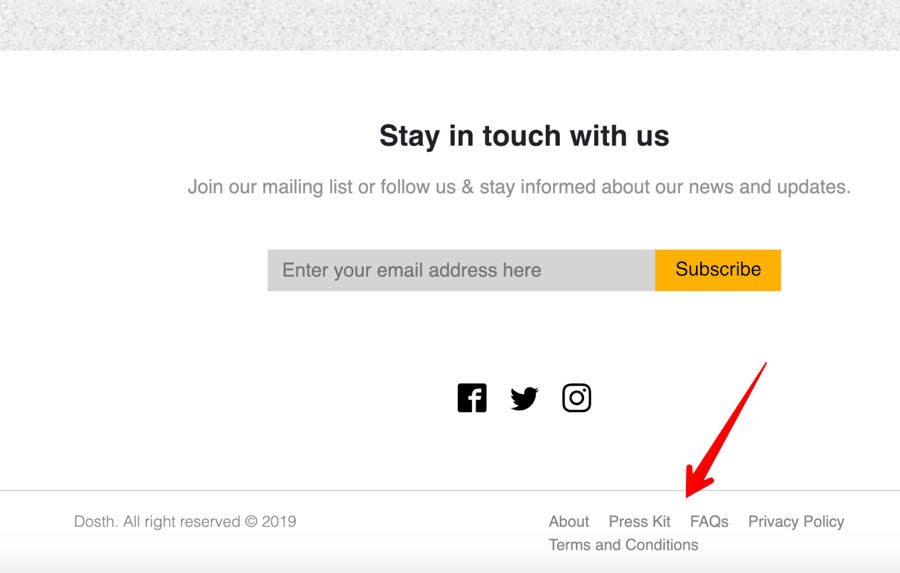
There are three ways to fix this:
- Reduce the font size of the Links so that they fit in single Line (Not always possible)
- Remove a link
- Re-word the name of a link
Again, there is no one right method. It all depends on the situation. I usually remove a Link to fix this issue by telling the client that:
“Hi! there is not enough room for five links inside the footer, so, please pick a link that is ok to remove from the footer, or else please adjust the design of the footer so that it accommodates five links”.
Most of the time, Client agrees to remove the Link, Some time they want us to just adjust the Wording of the links in the footer.
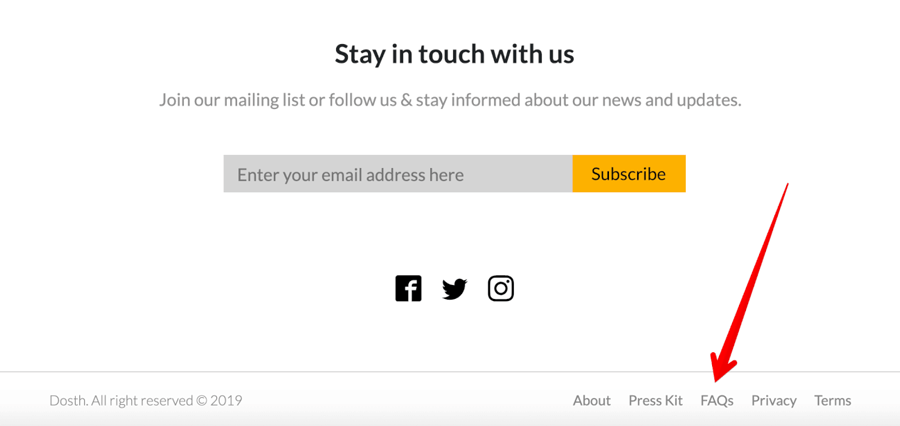
In our case, I am gonna adjust the wording of:
- Privacy Policy -> Privacy
- Term and Conditions -> Terms
Remember, we don’t have to the change the Title of the Pages to changing the Wording for menus, instead, we just have to temporarily modify navigation labels of the above-mentioned links inside “Footer Menu” using the Menus Panel.
So, go to Admin Dashboard -> Appearance -> Menus -> Footer menu and adjust the Wording, like this:
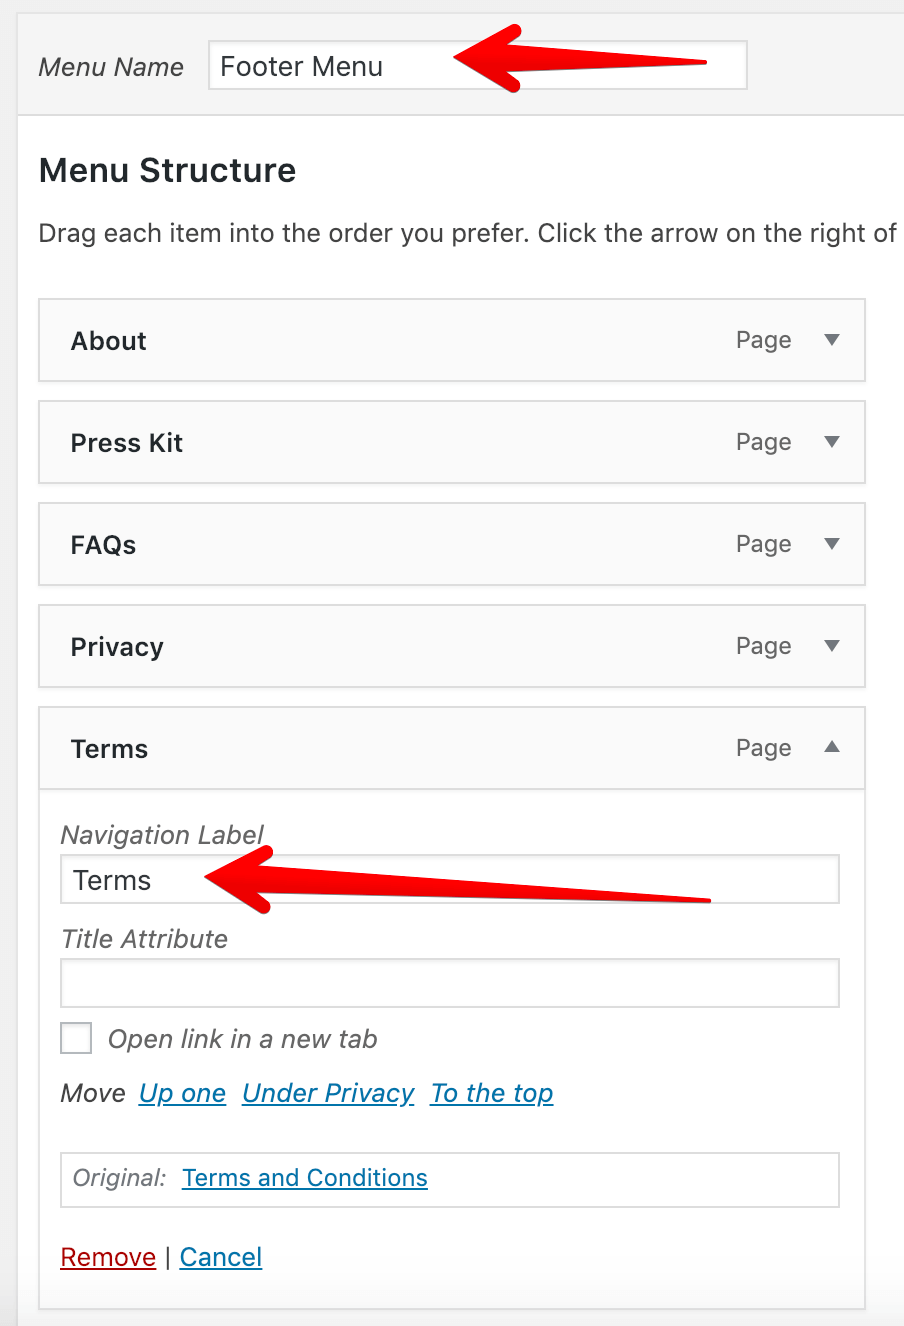
Now everything is fitting nicely inside a single line.
Anyway, we are not quite there yet! Because of the font, the site is looking totally different from the mockup.
So, next, we will fix this problem by learning how to add Google Fonts to our site.
How to add Google Fonts to the WordPress site
Up and until now, your Homepage and my Homepage inside this Course’s screenshots could have looked different unless you have the Lato font installed on your computer. This is because I accidentally instructed the browser to display the text of the Dosth site using the Lato font.
Since the Lato font was installed on my computer, The Browser obliged my instruction and displayed the Site’s text using the Lato font.
I did not do this mistake on purpose. As you start developing more and more WordPress sites, you will start to reuse the code from the previous projects. And Sometimes, you forget to change the Font Family of the webpage. So, the site ends up looking totally different from the Mockup until you realize it by yourself or someone points it to you.
Either way, It is time to fix it. Let’s replace the Lato font with Ubuntu.
Go ahead to the https://fonts.google.com/ and selected the following styles of Ubuntu Font:
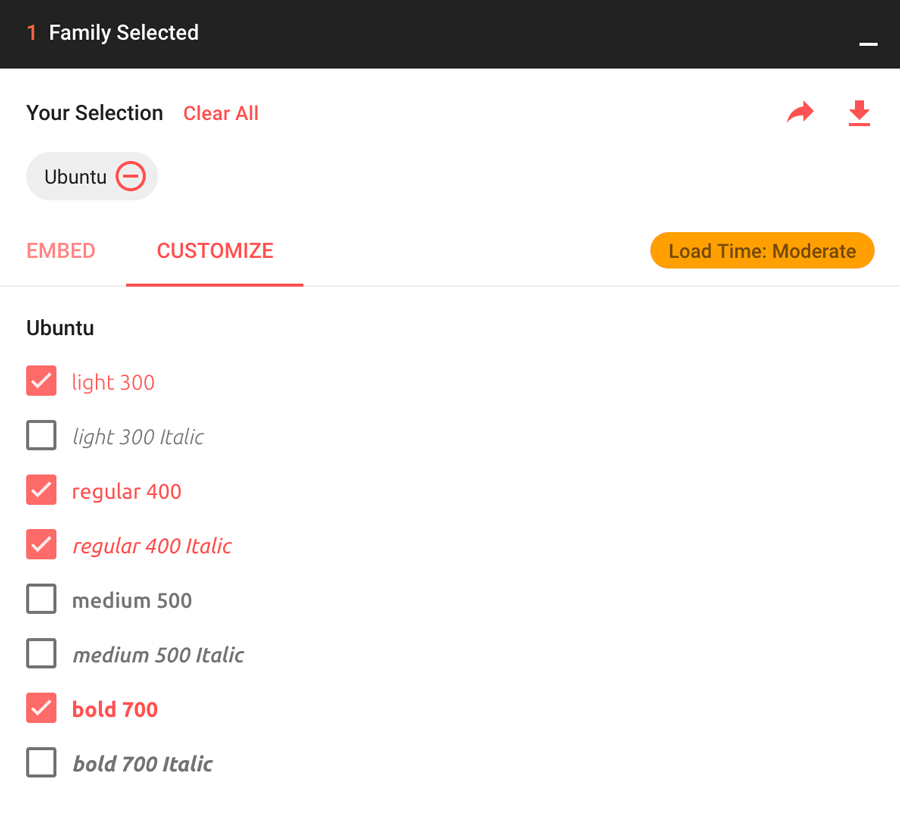
And Here is their embed code :
<link href="https://fonts.googleapis.com/css?family=Ubuntu:300,400,400i,700" rel="stylesheet">
Whenever there is a chance, instead of downloading the fonts and loading them manually, it is better to embed them because Google serves them using a Content Delivery Network. Although Google’s CDN doesn’t improve the Page Load speed by a great margin, it at least doesn’t slow our website down.
But, I am not going to hard-code this Link tag inside the header.php file directly because it is just a stylesheet. Instead, I will enqueue them just like any other stylesheet.
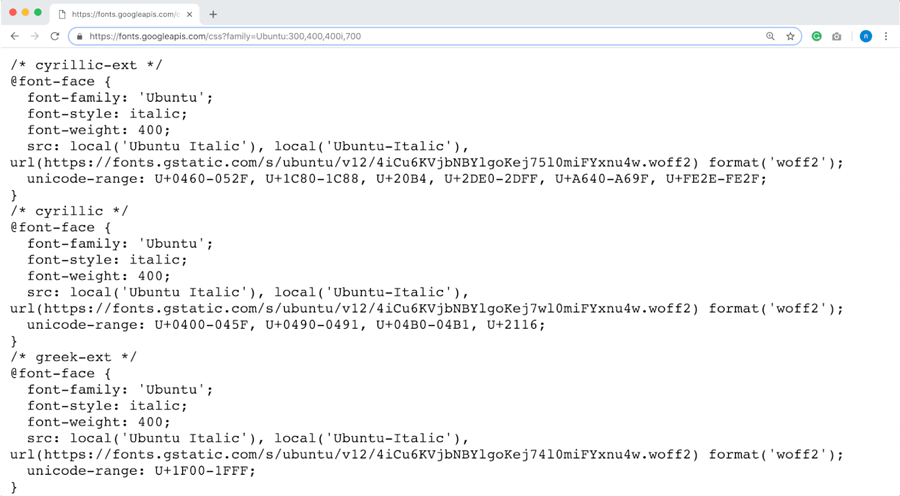
To enqueue a Google Font, all we need is the URL that is present in the href attribute of the above embed code.
https://fonts.googleapis.com/css?family=Ubuntu:300,400,400i,700
Note: Google Might Change the URL format and by the time you are reading this blog, the above URL and the URL inside the below screenshots could be invalid.
Just to confirm, If you open up this URL in the browser, you’ll indeed see plain CSS @font-face style rules.
Next, Open up the functions.phpfile and put the following enqueue code inside the nd_dosth_enqueue_stylesaction. To be precise, place it directly above the ‘main-stylesheet’ enqueue function.
wp_enqueue_style(
    'ubuntu-font',
    'https://fonts.googleapis.com/css?family=Ubuntu:300,400,400i,700',
    array(),
    false,
);
That’s all you have to do to use a particular Google Font inside our theme.
Here is the updated nd_dosth_enqueue_stylesaction from the functions.phpfile.
function nd_dosth_enqueue_styles() {
    wp_enqueue_style(
        'normalize',
        get_stylesheet_directory_uri() . '/assets/css/normalize.css',
        array(),
        false,
        'all'
    );
    wp_enqueue_style(
        'bootstrap',
        get_stylesheet_directory_uri() . '/assets/css/bootstrap.min.css',
        array(),
        false,
        'all'
    );
    wp_enqueue_style(
        'superfish',
        get_stylesheet_directory_uri() . '/assets/css/superfish.css',
        array(),
        false,
        'all'
    );
    wp_enqueue_style(
        'ubuntu-font',
        'https://fonts.googleapis.com/css?family=Ubuntu:300,400,400i,700',
        array(),
        false
    );
    wp_enqueue_style(
        'main-stylesheet',
        get_stylesheet_uri(),
        array('normalize', 'bootstrap'),
        "7.0",
        'all'
    );
}
add_action( 'wp_enqueue_scripts', 'nd_dosth_enqueue_styles' );
If we now switch back to the Homepage in the browser and inspect it, we can see that the Ubuntu Google Font is successfully enqueued.
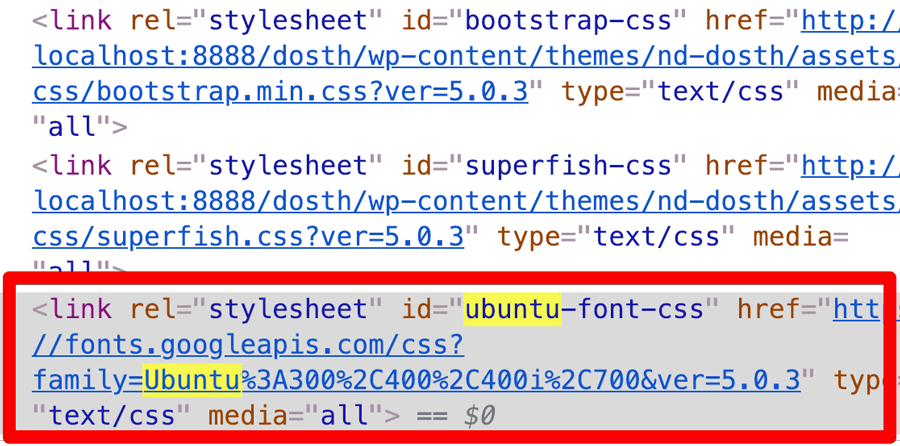
You are seeing all those weird symbols between font weights because the Browser replaces comma (,) with %2C inside a URL.
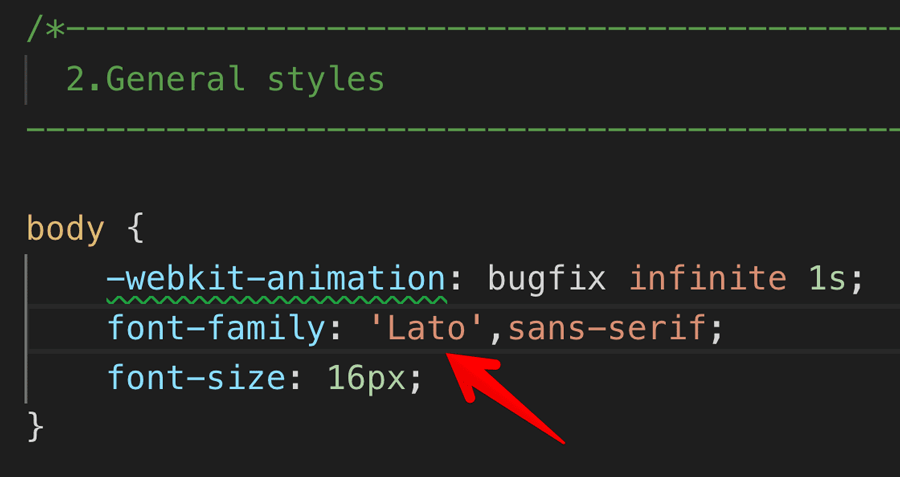
But, embedding the font is not enough. We have to change the style rules inside the style.cssfile to use the Ubuntu font.
So, go to the General Styles section of the style.cssfile and replace the font family declaration inside the Body style rule with the following CSS:
font-family: 'Ubuntu',sans-serif;
font-weight:300;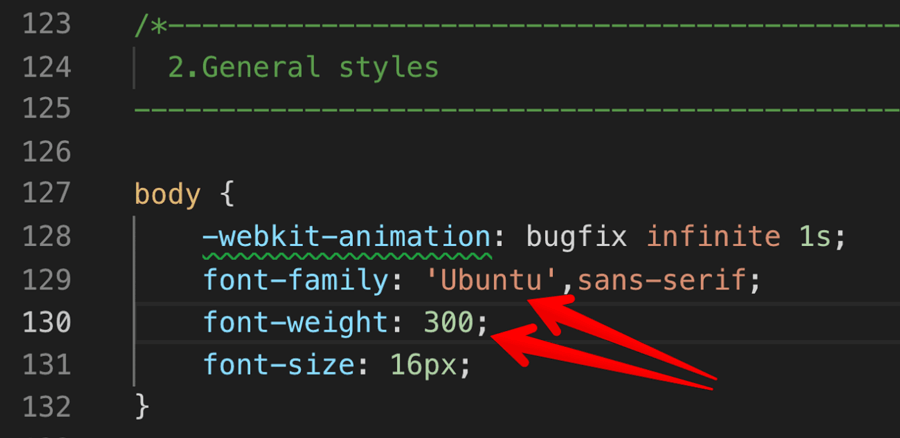
Also, if you scroll down a bit, under the same General Styles section, you will find this style rule where all the Headings are styled to look Bold.
Change the font weight to 300.
h1,
h2,
h3,
h4,
h5,
h6 {
    font-weight: 300;
}
If we now refresh the Homepage in the Browser, It looks much closer to the mockup. Close enough in such a way that the Client will less likely notice any difference from the mock.

Because of a couple of mistakes, we had to fix a lot of things since the last lesson. This could be extremely time taking if we did not realize our mistakes during the earlier stages of the project. So be careful with Fonts and CSS Container sizes.
Anyway, the fixing ends here!
Next, we will continue to build the rest of the sections of our Homepage using the WordPress Custom Fields and ACF plugin.
WordPress Custom Fields and How to Use Them
When you are writing a post in WordPress, sometimes you might want to provide some additional information to the visitor.
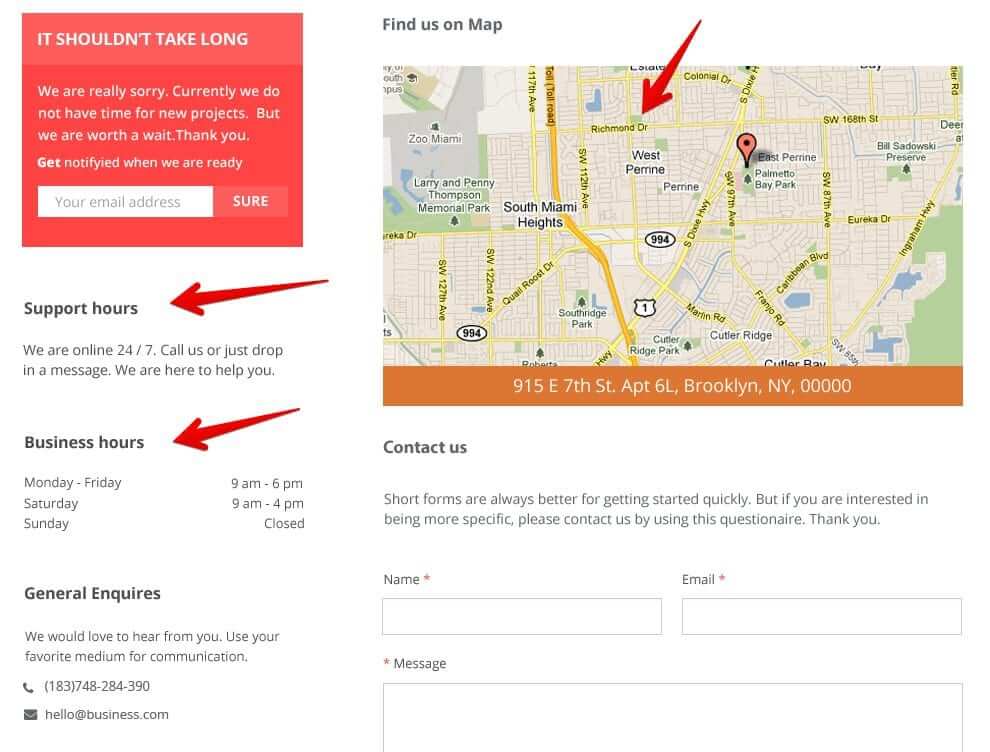
For Example, If you want your future clients to be visiting your physical office, you provide more helpful information about your availability such as:
- Office Business Hours
- Current Availability
- A Map
Similarly, An event host might want to showcase additional information about the event such as:
- Start Date
- End Date
- Organizer Phone Number
- Location of the Event
All these pieces of information require special attention and you don’t want them to get lost with the rest of the content.
WordPress calls this information as Meta Data or Post Meta. And, as a theme developer, we use Custom Fields to display this metadata because we need more control over their location on the page along with their styling.
Now don’t let the word “Meta” fool you. By using a bunch of Custom Fields, we can build pretty complex content.
WordPress is not opinionated. And this is why the developers in the WordPress community use Custom Fields.
“So, Where can I find these Custom Fields?”
We can attach some simple text-based metadata to a particular page/post by going to its edit screen.
For example, if you want to add some metadata to the Homepage, you have to go to:
Admin Dashboard -> Pages -> Home -> Edit
And, scroll down to the end of the Edit Post Screen to find the custom fields section.
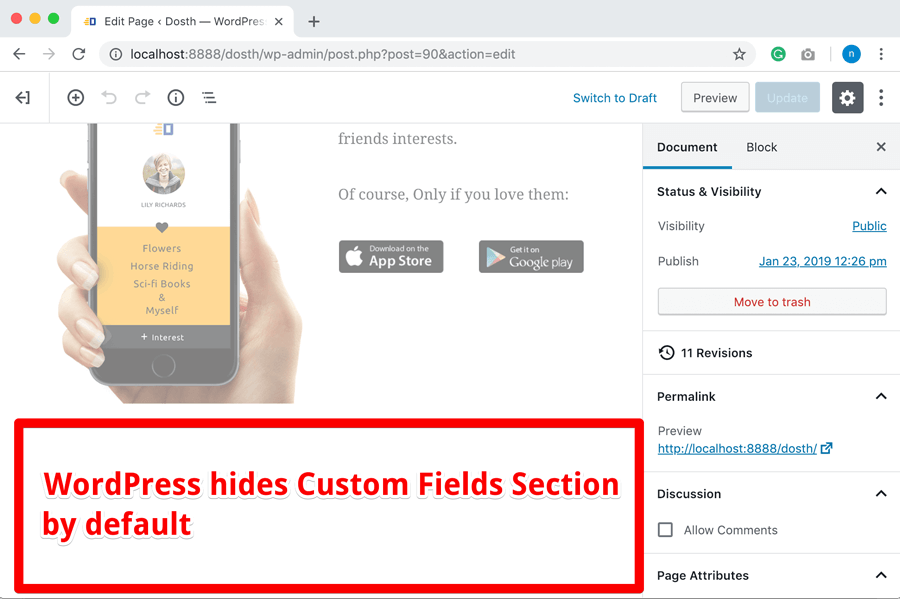
Don’t panic if you can’t find Custom Fields Section, WordPress hides it by default.
Here is how you can bring it back:
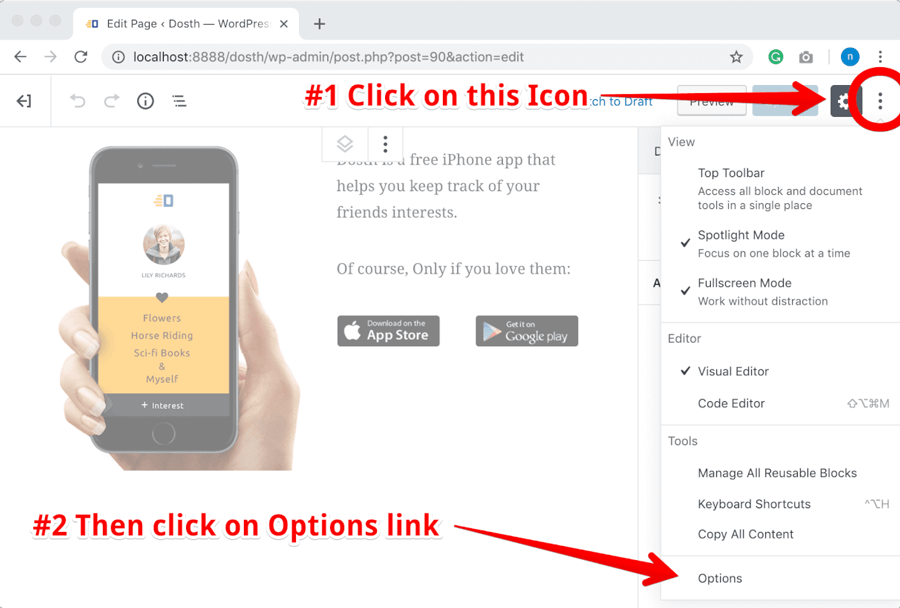
1) Click on the “Three Vertical Dots” icon located at the top right corner of the screen to access Page Action Links dropdown and then click on “Options” link located at the end of the dropdown.
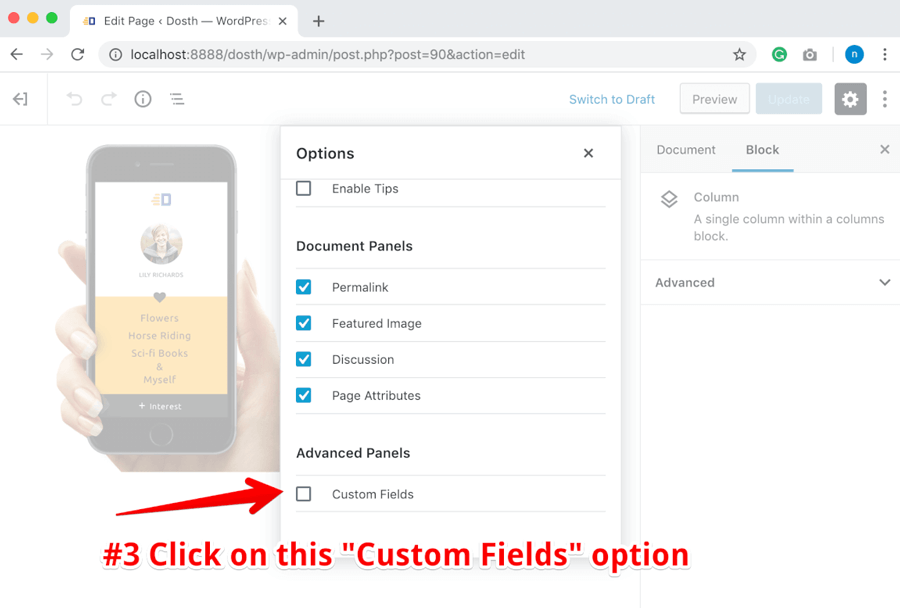
2) Next, you will get an Options Popup and inside this Popup, you’ll find a section dedicated to Advanced Panels. And, because we did not install any plugins yet, the only option you’ll find in this section is “Custom Fields”.
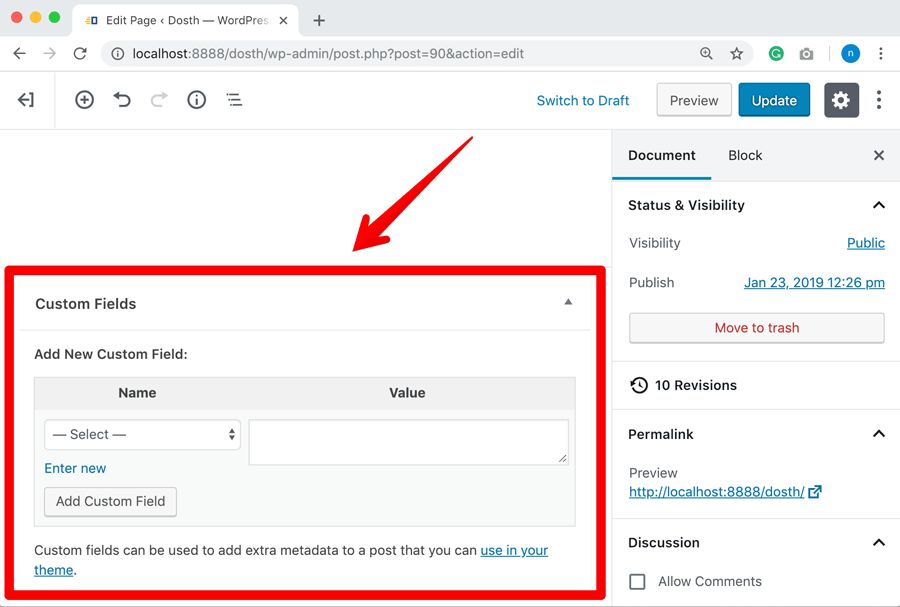
3) Finally, go ahead click on the “Custom Fields” option and as soon as you click on it, WordPress will get rid of the Options Popup and reloads the page.
4) If you now scroll down, you’ll find the Custom Fields section at the bottom of the Page.
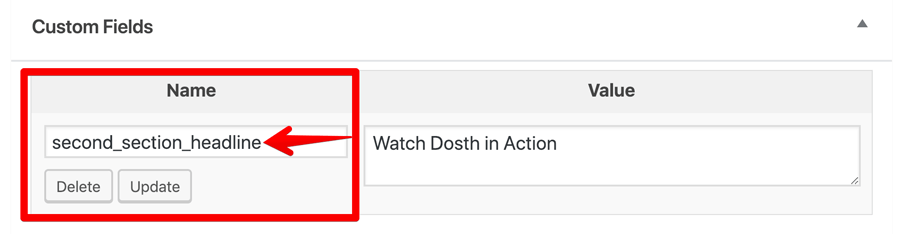
Now, let’s use Custom Fields to output “Watch Dosth In Action” section to our Homepage.
Inside Custom Fields Section, Go ahead and click on “Enter New” link located above the “Add Custom Field” button:
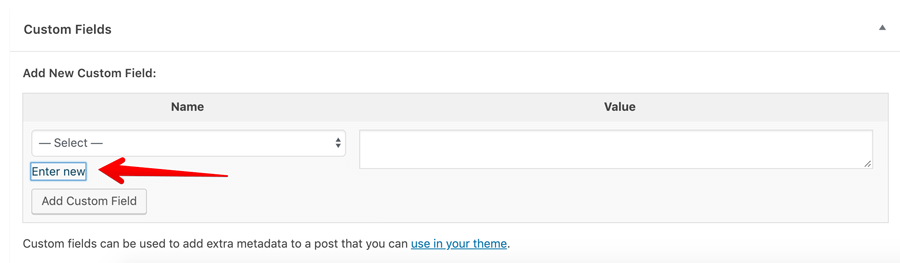
First, we have to enter a Name for our custom field. The Name field acts as a “key” to a particular custom field. WordPress calls this Meta Key.
Also, It should a proper PHP ID type of data.
For example:
“second_important_headline”
Although WordPress is liberal, It’s a big No No to capital letters and spaces characters between the words of the Name. This is because we will use this name to extract metadata ( post meta ) added to this Custom Field.
Again, this is a personal preference too. Also, most developers in the WordPress community suggest the same.
Anyway, now put the following ID inside the Name field:
“second_section_headline”
And enter the following text for the Value field:
“Watch Dosth in Action”
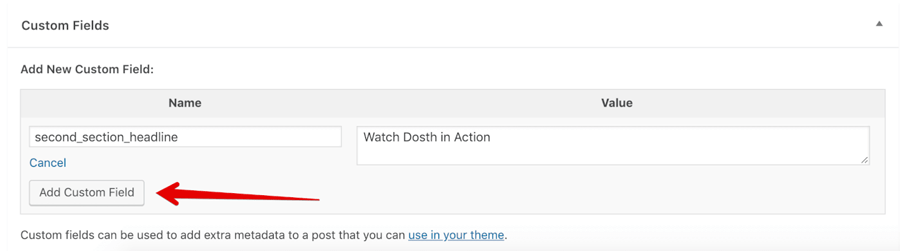
Finally, click on the “Add Custom Field” button.
As soon as you click on this button, WordPress reloads the page and add this Custom Field to the Custom Fields section.
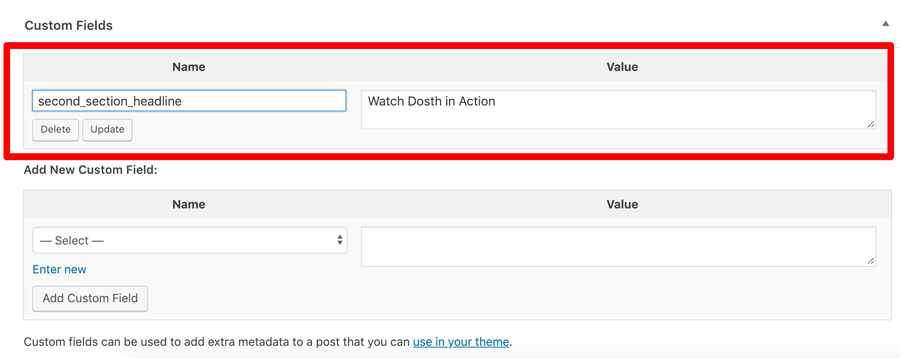
If you want to update the name or the value of this custom field, you can edit them any time you want and then click on the “Update” button to save the changes you made to the custom field.
“Wait! there are two update buttons, one inside the custom field and the other on the top right corner of the page which updates the entire page. Which update button should I click?”
You can click any one of them. Click the “Update” button at the top right corner of the page updates the entire page including the values you entered inside a Custom field.
Clicking the “Update” Button that is specific to a particular Custom Field will update just that Custom Field.
So, it is totally up to you!
Next, let’s display this custom field on the Homepage.
Introducing get_post_meta()
We can retrieve any Meta Data ( Post Meta ) of a particular post on the frontend using the get_post_meta() WordPress function.
Remember, this function just retrieves the Post Meta but it doesn’t output it. So, we have to output it ourselves, for example:
echo get_post_meta( $post_id, $key, $return_single_value );
As you can see in the above line of code, this function accepts three parameters:
1) $post_id: ID of a particular post/page.
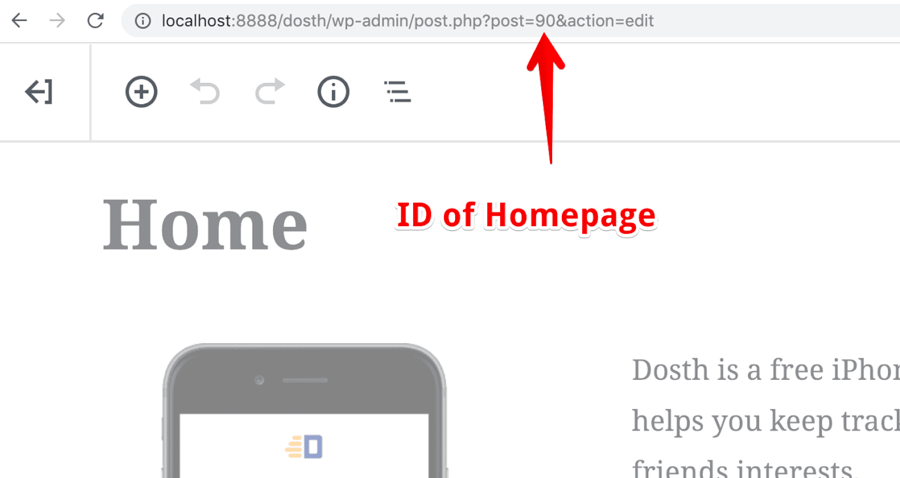
Usually, we will be retrieving the post meta inside the Loop. And inside the Loop, we can get the ID of the current Post in two ways:
a) Using the ID attribute of the global $post variable: $post->ID
b) Using the get_the_ID() template tag.
It is totally ok whichever method you want to go with. I personally prefer to use get_the_ID() inside the Loop.
2) $key: The Meta Key (Name) we entered while creating the custom field.
3) $return_single_value: We have to provide either True or False. False is the default value.
This parameter tells WordPress whether to return just the value of the custom field in plain string format or to return the value by putting it inside an array, like this:
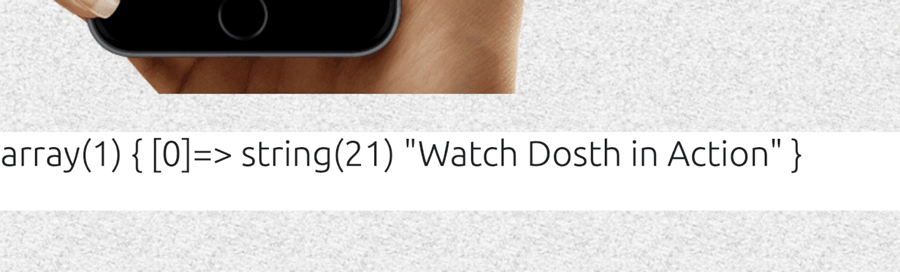
Most of the time, we will just the value of the custom field in plain string format, so we almost always end up specifying True for this parameter.
Alright, it’s time to put this function to use.
Open up the front-page.php file and place the following code after the <div class="actual-content above-the-fold"> element and within the Loop.
<section id="watch-dosth-in-action">
    <h2><?php echo get_post_meta(get_the_ID(), 'second_section_headline', true ); ?></h2>
</section>
Nothing new in the above code. You already know what is happening with all the parameters and why we are using PHP echo statement.
Here is the updated code of the Loop:
<?php while( have_posts() ): ?>
    <?php the_post(); ?>
    <div class="actual-content above-the-fold">
        <div class="container">
            <div class="row">
                <div class="col-sm-12">
                    <?php the_content(); ?>
                </div>
            </div>
        </div>
    </div>
    <section id="watch-dosth-in-action">
        <h2><?php echo get_post_meta(get_the_ID(), 'second_section_headline', true ); ?></h2>
    </section>
<?php endwhile; ?>
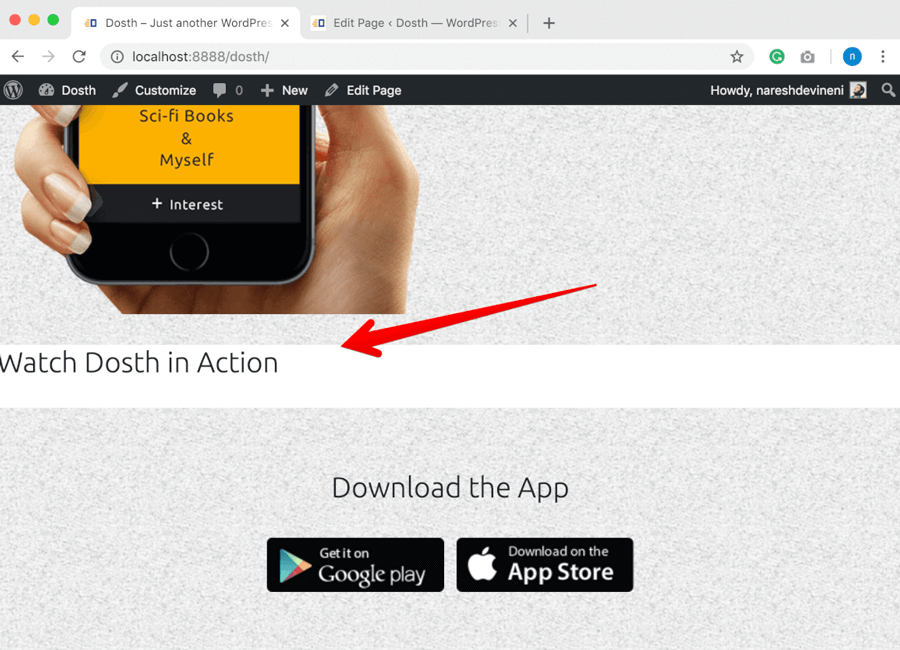
Now, let’s check out the output of the Homepage in the browser.
Next, let’s also output a youtube embed using a new Custom Field.
So, Go back to the Homepage Edit screen and create a new Custom Field with the following metadata and update the newly created Custom Field.
“section_two_content” as the Meta Key ( Name ) field and the following Youtube embed for the Meta Value:
<iframe width="560" height="315" src="https://www.youtube.com/embed/dGiQaabX3_o" frameborder="0" allow="accelerometer; autoplay; encrypted-media; gyroscope; picture-in-picture" allowfullscreen=""></iframe>
I really love the videos of Kurzgesagt. Of course, you can embed any video you want.
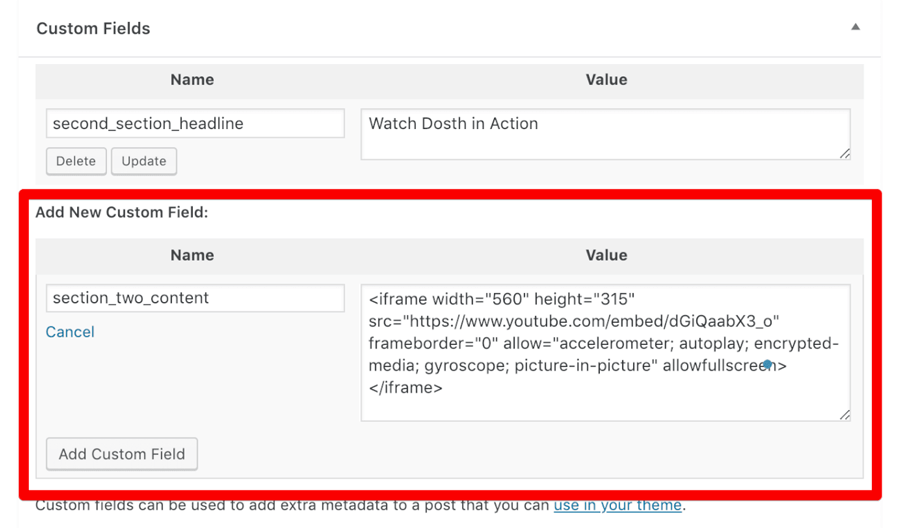
After adding the second custom field. Here is how the Custom Fields section looks like.
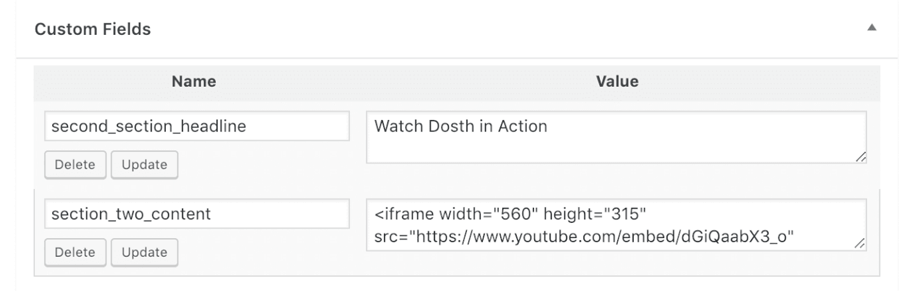
As you can see, the Meta Value field can handle HTML just fine.
Next, go back to the front-page.php file and place the following code inside the <div id="watch-dosth-in-action"> element and after the <h2> element.
<div class="section-content">
    <?php echo get_post_meta(get_the_ID(), 'section_two_content', true ); ?>
</div>
Here is the updated code of the Loop:
<?php while( have_posts() ): ?>
    <?php the_post(); ?>
    <div class="actual-content above-the-fold">
        <div class="container">
            <div class="row">
                <div class="col-sm-12">
                    <?php the_content(); ?>
                </div>
            </div>
        </div>
    </div>
    <section id="watch-dosth-in-action">
        <h2><?php echo get_post_meta(get_the_ID(), 'second_section_headline', true ); ?></h2>
        <div class="section-content">
            <?php echo get_post_meta(get_the_ID(), 'section_two_content', true ); ?>
        </div>
    </section>
<?php endwhile; ?>
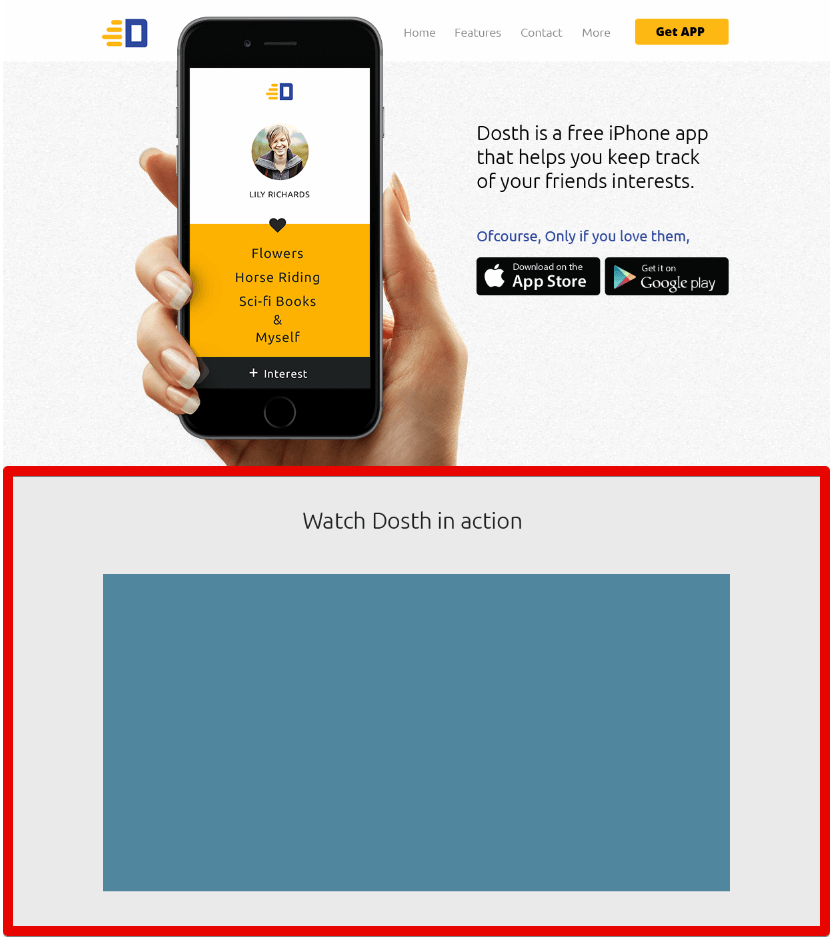
Next, Let’s go back to the Homepage in the browser and refresh it:
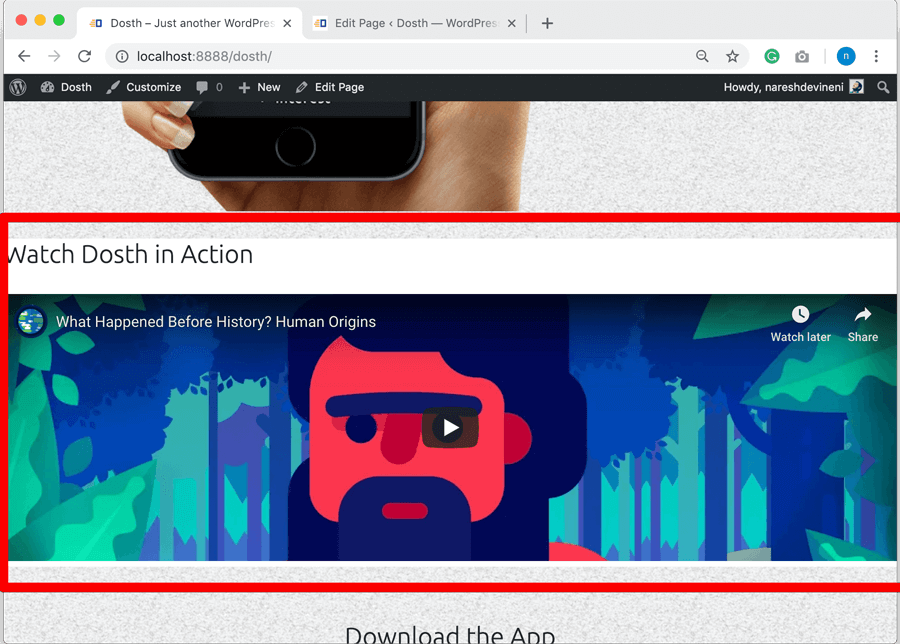
Fantastic! Right?
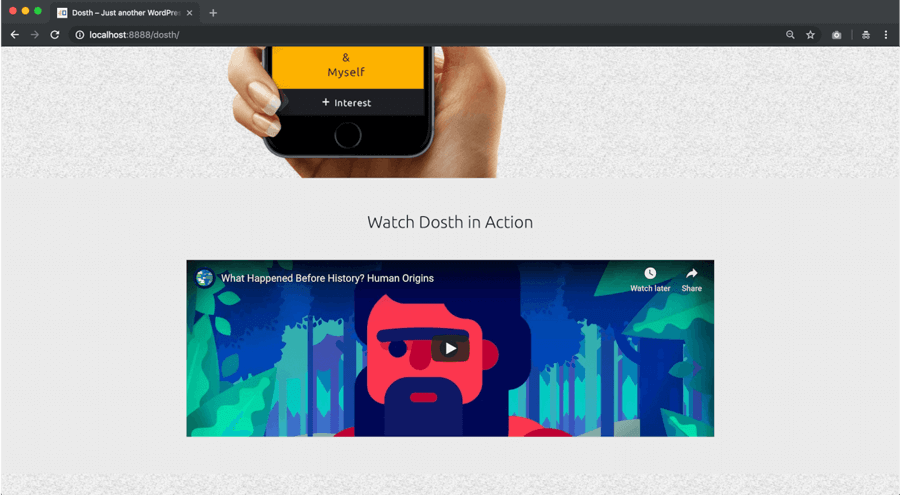
Now let’s style it.Add the following CSS to the style.css file to style this section:
.home .above-the-fold .wp-block-column:first-child,
.home .above-the-fold .pull-me-up{
    margin-bottom:0;
}

/*-------------------------------------------------------------------------------
  9.Homepage Section Two Styles
-------------------------------------------------------------------------------*/
#watch-dosth-in-action{
    padding:60px;
    background-color:#eaeaea;
    text-align: center;
}
#watch-dosth-in-action h2{
    margin-bottom:50px;
}
#watch-dosth-in-action .section-content{
    max-width:940px;
    margin:0 auto;
}
@media only screen and (max-width:767px){
    #watch-dosth-in-action{
        padding:40px 15px;
    }
}
I also removed the bottom gap of iPhone Image and here is the output in the browser:
If you notice, the Video Embed’s aspect ratio is slightly off. Let’s fix this by using FitVids Javascript plugin.
The easy way to add Fitvids to our site is using the Fitvids WordPress plugin.
https://wordpress.org/plugins/fitvids-for-wordpress/
But, every plugin that we install slows down our site’s page load speed at least by some extent.
So, whenever there is a chance, we have to choose the manual method.
So go ahead and visit https://github.com/davatron5000/FitVids.js and download the latest jquery.fitvids.js file and copy the file to the assets/js directory.
Here is the updated version of the assets/js directory inside visual code editor.
Now that we have everything set up, let’s go ahead and enqueue this file.
You already know how to enqueue a script. So, here is the updated nd_dosth_enqueue_scriptsaction from the functions.phpfile.
function nd_dosth_enqueue_scripts() {
    wp_enqueue_script(
        'modernizr',
        get_stylesheet_directory_uri() . '/assets/js/modernizr.min.js',
        array(),
        '1.0.0',
        true
    );
    wp_enqueue_script(
        'superfish',
        get_stylesheet_directory_uri() . '/assets/js/superfish.min.js',
        array('jquery'),
        '1.0.0',
        true
    );
    wp_enqueue_script(
        'fitvids',
        get_stylesheet_directory_uri() . '/assets/js/jquery.fitvids.js',
        array('jquery'),
        '1.0.0',
        true
    );
    wp_enqueue_script(
        'main-js',
        get_stylesheet_directory_uri() . '/assets/js/main.js',
        array('jquery'),
        '1.0.0',
        true
    );
    $translation_array = array(
        "email_placeholder" => esc_attr__( 'Enter your email address here', 'nd_dosth' ),
        'ajax_url' => admin_url('admin-ajax.php'),
    );
    wp_localize_script( 'main-js', 'translated_text_object', $translation_array );
}
Next, let’s initialize it inside our main.jsfile.
Open up the main.jsfile and put the following code after the Placeholder fix for Email input field :
/* ------------------------------------------------------*/
/* Adding fitvid
/* ------------------------------------------------------*/
$('body').fitVids();
Fitvids plugin must be initialized on the Container element of the Video/ Video Embed. And, we never know where we might end up placing any video on our site. So we are initializing the plugin on the <body> element.
Here is the updated main.jsfile:
(function($){
    /* If this line runs, it means Javascript is enabled in the browser
     * so replace no-js class with js for the body tag
     */
    document.body.className = document.body.className.replace("no-js","js");

    /* -----------------------------------------------------------------*/
    /* Activate accessible superfish
    /* -----------------------------------------------------------------*/
    $('.primary-navigation').find('.menu').superfish({
        smoothHeight    : true,
        delay           : 600,
        animation       : {
            opacity :'show',
            height  :'show'
        },
        speed           : 'fast',
        autoArrows      : false
    });
    /* -----------------------------------------------------------------*/
    /* Add Placeholder to the Email input field of "Email Subscribers" widget
    /* -----------------------------------------------------------------*/
    if( $( '.elp-widget input[type="email"]' ).length ){
        $( '.elp-widget input[type="email"]' ).attr('placeholder', translated_text_object.email_placeholder );
    }
    /* ------------------------------------------------------*/
    /* Adding fitvid
    /* ------------------------------------------------------*/
    $('.page-wrapper').fitVids();

})(jQuery);
Alright, if we now refresh our Homepage in the browser, this is how it looks like:
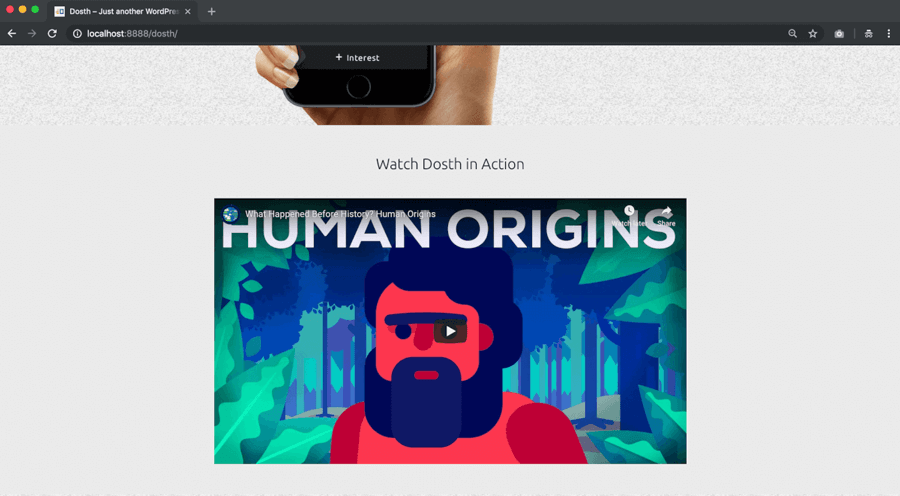
Perfect! Fitvids is working its charm <3
And this is how the Custom Fields work in WordPress. First, you create them, then you add data to them and WordPress stores this data in Database. Finally, we display them using the get_post_meta() WordPress function.
However, the interface of the default Textarea based Custom Field that ships with WordPress is not that client friendly and is not really useful for creating complex content.
Also, Clients/Content Editors are habituated to WYSIWYG editors. So, we have to make them feel comfortable at the end of the day.
We can’t ask them to type an Image tag to add a new image, right?
Of course, WordPress allows to code Advanced Custom Fields ourselves. It provides us with all the programming API to do so.
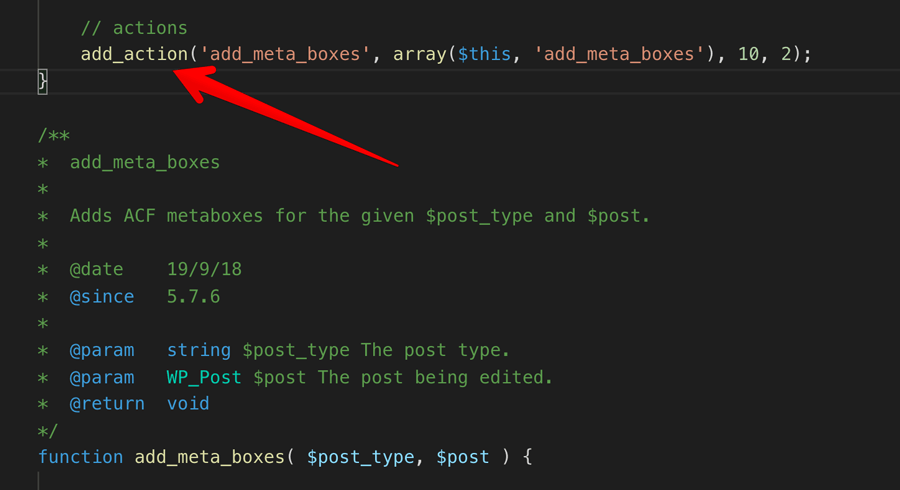
All we need to do is use add_meta_box() function and add_meta_boxes action hook with a bit of custom coding.
But, we can not create those using our theme. If we do that, all those fields will be lost if the client shifts to a different theme. So, the client ends up losing access to this data.
Even if we put them inside our plugin, it is extremely timing consuming and becomes a maintenance overhead for us.
But hey! Why re-invent the wheel?
This is where Advanced Custom Fields plugin comes in handy.
It allows us to create content-rich Custom Fields that are not only user-friendly but easy to create.
Simply put, with the ACF’s beautiful UI, we can create advanced fields like Image Upload, File Upload, WYSIWYG based Textarea, and much more within just minutes.
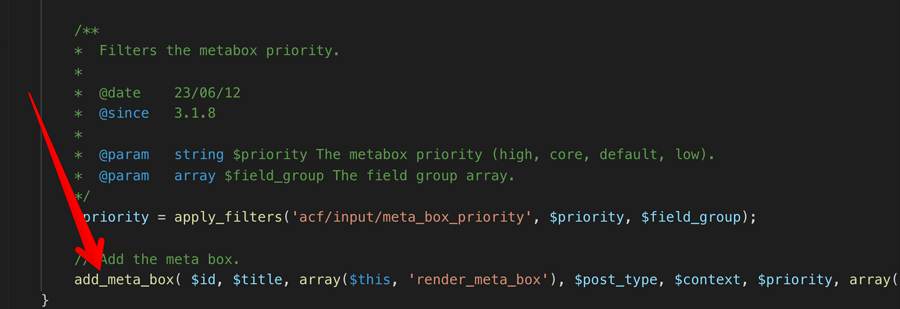
And we can still access these fields using the same get_post_meta() WordPress function. Because, ACF Plugin uses the same add_meta_box() function and add_meta_boxes action hook behind the scenes to let us create Custom Fields.
I am not saying it is completely Safe to use ACF plugin, but you are in good hands!
So, build the rest of the content of the Homepage using the following guide if you are interested in building the content of any page or post using the Advanced Custom Fields.
https://www.usablewp.com/advanced-custom-fields/
And here is the Frontend Output if you read and implemented the above guide:
Hammayyaaa! Our Homepage has finally taken its original shape from the Mockup!
Exercise Time

If you observe the Mockup design in Photoshop or image viewer, there is one more App Feature section.
That’s an exercise for you. But instead of going the easy way with ACF’s the_field()function for the Image field, try the Hard Way and display image using the help of wp_get_attachment_image_src()and get_post_meta()function.
The content and the Image is provided inside the same “dosth-site-content” Word Document.
For now, we are done with the Homepage
We need to address two more sections on the Homepage. The Testimonials and Featured On sections.

The best way to implement both these sections is by using WordPress Custom Post Types and Custom Queries. But, to understand how they work, you need to understand a lot of other stuff which you’ll be learning in the upcoming parts.
So, we will come back to these sections a later point in the course. For now, let’s continue to build other pages of our site.
In the next part, we will learn how to create an About Us page by creating and utilizing the default page template.


 © 2026 UsableWP. A project by Naresh Devineni.