How to use the WordPress Block Editor: Gutenberg Tutorial
WordPress is an easy-to-use Content Management System.
Why?
Because it makes it easy to create pages of a website, add content to them, and then easily edit or delete them.
It’s all about how WordPress lets us deal with the content, in my opinion.
Also, I don’t have to say how important it is for a non-techie person to be able to add content to his/her website without having to reach out to the developer now and then.
And this is where WordPress Block Editor comes in.
What is a Block Editor in WordPress?
The “Block Editor” helps us write content for blog posts and pages. And we call it a Block Editor because it helps us write content using something called “Blocks”.
For example, if you want to write a headline, you have to add the “Heading” block to the Block Editor and then add content to it.
Similarly, if you want to add an image, you have to add the “Image” block and then upload an image using it.
You get the idea, right?
Is WordPress Block Editor the same as Gutenberg?
Yes, it is the same as Gutenberg. During the development phase of the Block Editor, the core contributors of WordPress called it Gutenberg Editor. But as time passed by, because Gutenberg used blocks for building content, the Block Editor name made more sense and hence became the official name.
Also, all fastest-loading WordPress themes have one thing in common.
They all use Block Editor as their page builder.
That’s the power and adaptation of the Block Editor.
“This is all good. But I am scared of WordPress Editor. This interface is totally confusing for me”.
I get it. Been there.
Not just you; a lot of people are scared of using Block Editor because its interface is not as intuitive as the Classic Editor or Page Builders.
But once you start using the Block Editor regularly, you’ll master it in no time.
If you follow this article from beginning to end, you’ll be no longer scared about the “Block Editor”.
I promise.
Why use Block Editor in WordPress?
When compared to the Classic Editor and page builders, Block Editor helps you design and write content in an easy yet performant way.
And some of you think that using the Block Editor is a choice. But it shouldn’t be that way.
Let me elaborate.
The Rise and Fall of the Old Classic Editor and Page Builders
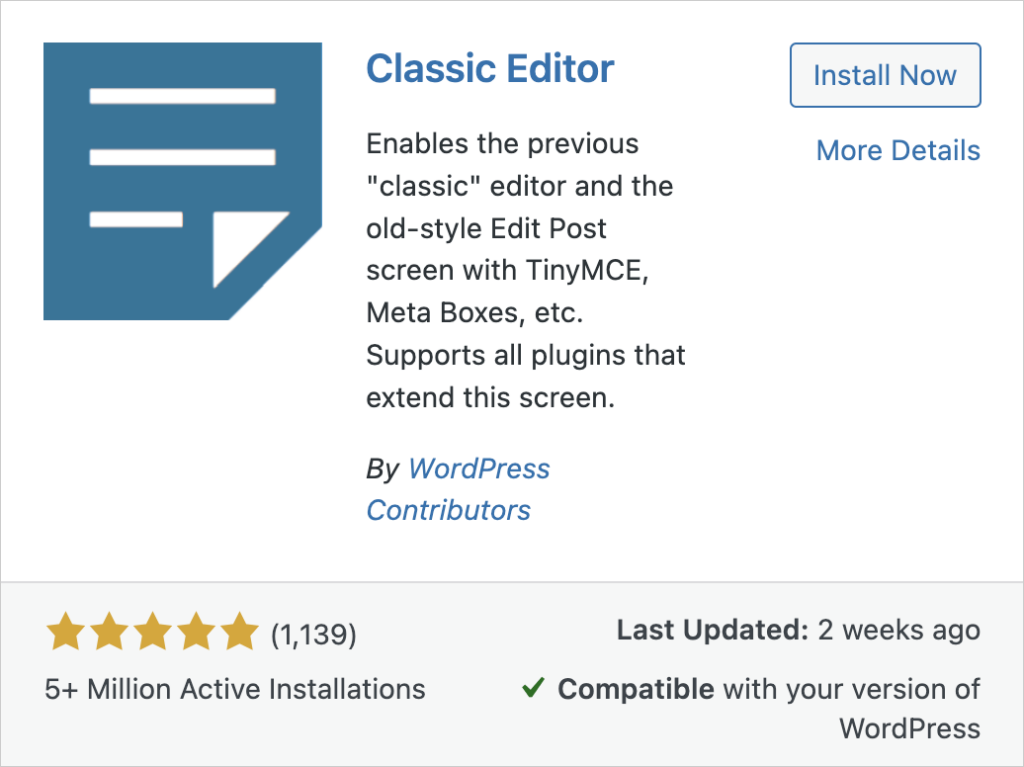
Just to be on the same page, before WordPress introduced the Block Editor, it provided us with a “Classic Editor” to help us create content for our website.
Many people are still using the classic editor for its simplicity and ease of use.
In fact, they installed a plugin called “Classic Editor” to disable the Block Editor.
This is a good read behind this, though.
This old WordPress editor is a basic TinyMCE editor that everybody can understand.
You can use a TinyMCE editor to write high-quality and informational blog posts.
But if you want to get fancy with it to create a beautiful layout, you have to write some HTML and CSS code to achieve it.
Yikes!
This is why people stopped using this default Classic editor people and started using page builders such as Elementor, Divi, etc.
A Page Builder allows us to create beautiful page designs for our WordPress website without even letting us touch a single code.
But this led to new problems.
Using page builders like Elementor for Landing pages is okay, but they can not be used with blog posts.
Because of the design flexibility that comes with Page builders, they usually make blog posts load slowly.
And Google hates slow-loading blog posts :P
Long story short, using page builders for blog post content led to search engine traffic drops and made website owners panic.
But a good thing was brought out of this sluggish page builders trend, though!
Developers of the WordPress core software realized the need for an in-built and performant page builder and finally launched the Block Editor for public use.
What are the benefits of the Block Editor?
Although the brand new Block Editor is less powerful than Page Builders like Elementor, it helps you build decent complex layouts in its own way.
Because of this, people who care about building fast-loading websites started adopting it, and now many people follow the same path.
In fact, many website owners are now ditching the Page builders for this new editor in WordPress.
Anyway, enough theory.
Come on, let’s see how to use the Block Editor.
I want you to follow along with me by opening up the Block Editor using this playground provided by the WordPress community or using one of your own websites.
Feel free to use the following content:
https://docs.google.com/document/d/117nI2kzcaSD-8788qufSIcyx8E1Ct1xLuQ7oXlckr4E/edit
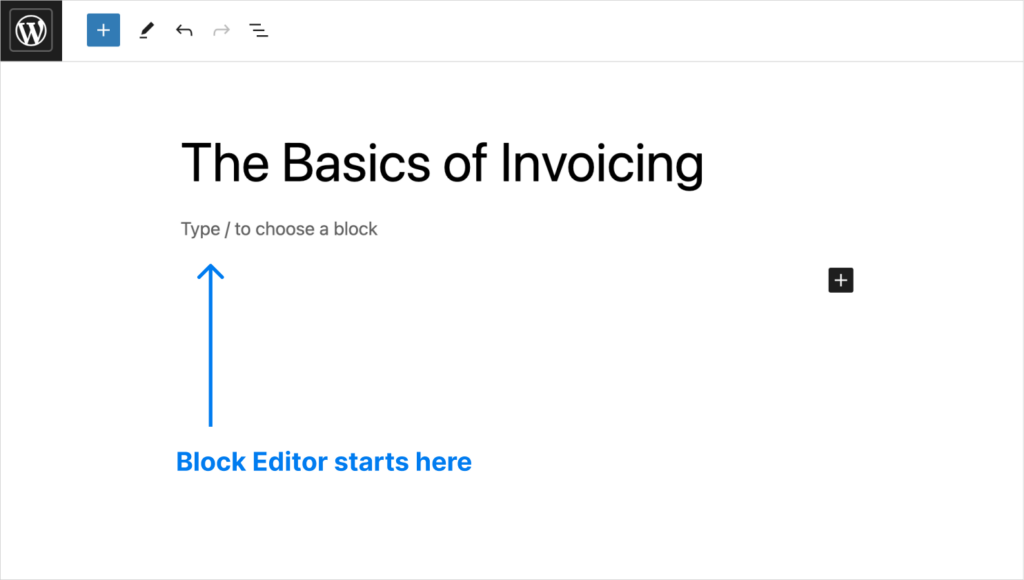
How do I open Block Editor?

Block Editor is the new editor that replaced the old Classic Editor. So, to access it, you need to go to the editing screen of a post or a page. Inside the editing screen, it is located right underneath the title of the blog post or page.
WordPress block editor not showing up for me
You could have installed the “Classic Editor” plugin. It is a plugin that replaces Block Editor with the old editor. So, deactivating the plugin will make the Block Editor show up.
All set now?
Writing your first paragraph
Most often, My blog posts begin with a paragraph.
So, let’s start with that.
We don’t have to add a “Paragraph” block to the editor for writing a paragraph.
The Block editor always contains the “Paragraph” block as the default block.
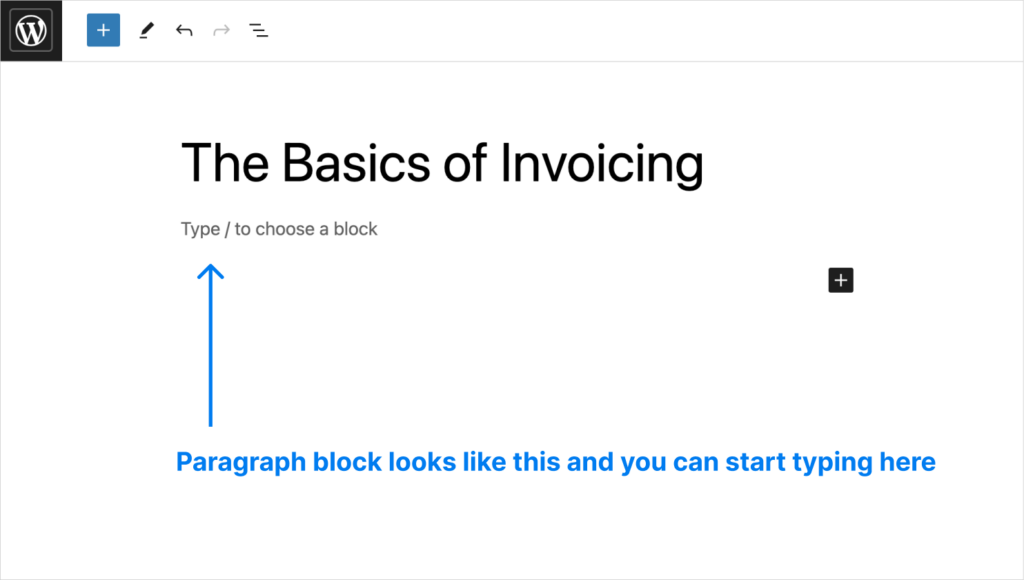
So, we can just start typing:
And once you have typed a paragraph, just hit enter to start the next paragraph.
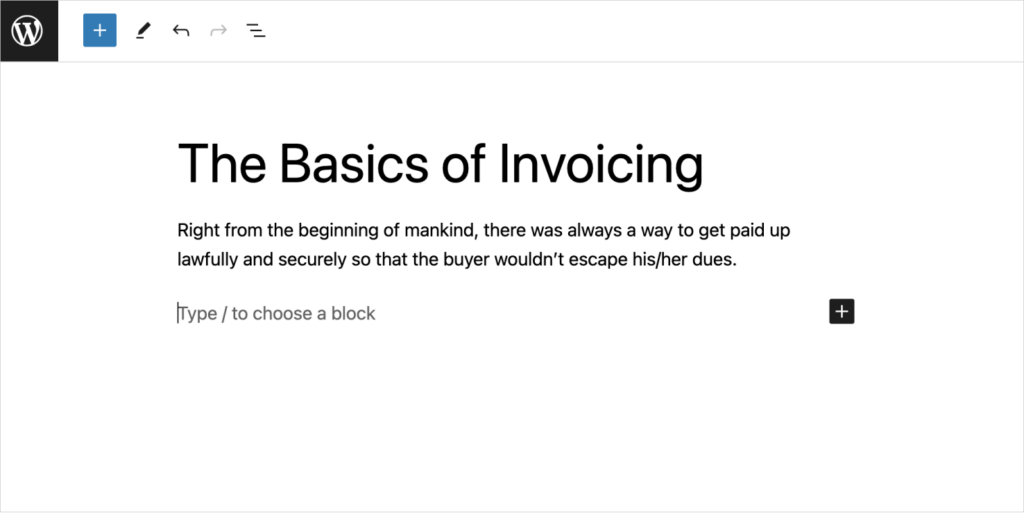
When you hit enter, the Block editor will place another paragraph block automatically so that you can continue typing seamlessly.
Block settings: The Toolbar and Sidebar settings
Once you have added a block to the editor with some content, sometimes you want to change that content.
To achieve that, we must first select the block by clicking on it.
And then, you should be able to edit the content or change the block’s settings.
The contextual settings of a block will help you customize it.
Every time you select a block, the settings related to that particular block will appear in two places:
- The Toolbar with basic formatting options
- The Sidebar with advanced options
I can’t stress this enough. These settings are not universal. When you select a block, you’ll see only settings related to that block.
Most people get confused because all the settings look the same. So, they apply some changes in one place and expect them to get applied everywhere.
The Toolbar
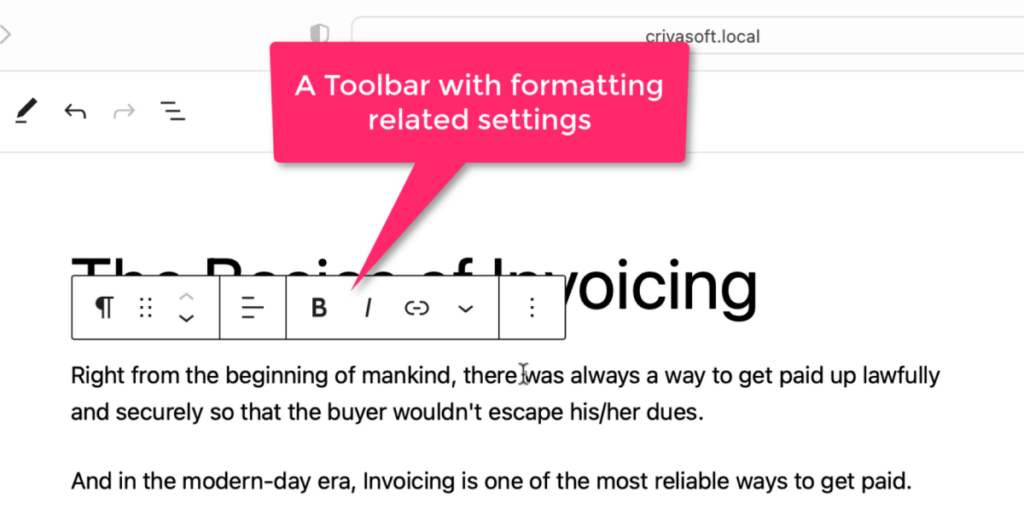
The Toolbar usually contains settings related to:
- Alignment and formatting
- Re-ordering the blocks
And these settings will change based on the kind of block selected.
For example, If it is a text-based block such as a Paragraph, Headline, etc., you’ll see options such as:
- Text justification options
- Text formatting options such as “Bold”, “Italic”, “Strikethrough”, etc.
- Text linking option

But if an “Image” is selected, it will show layout and cropping-related settings.
You get the idea, right?
Next, let’s talk about the Sidebar with advanced options.
The Block Settings sidebar
The sidebar contains advanced settings related to a particular block.
Again, these settings changed based on the type of block selected.
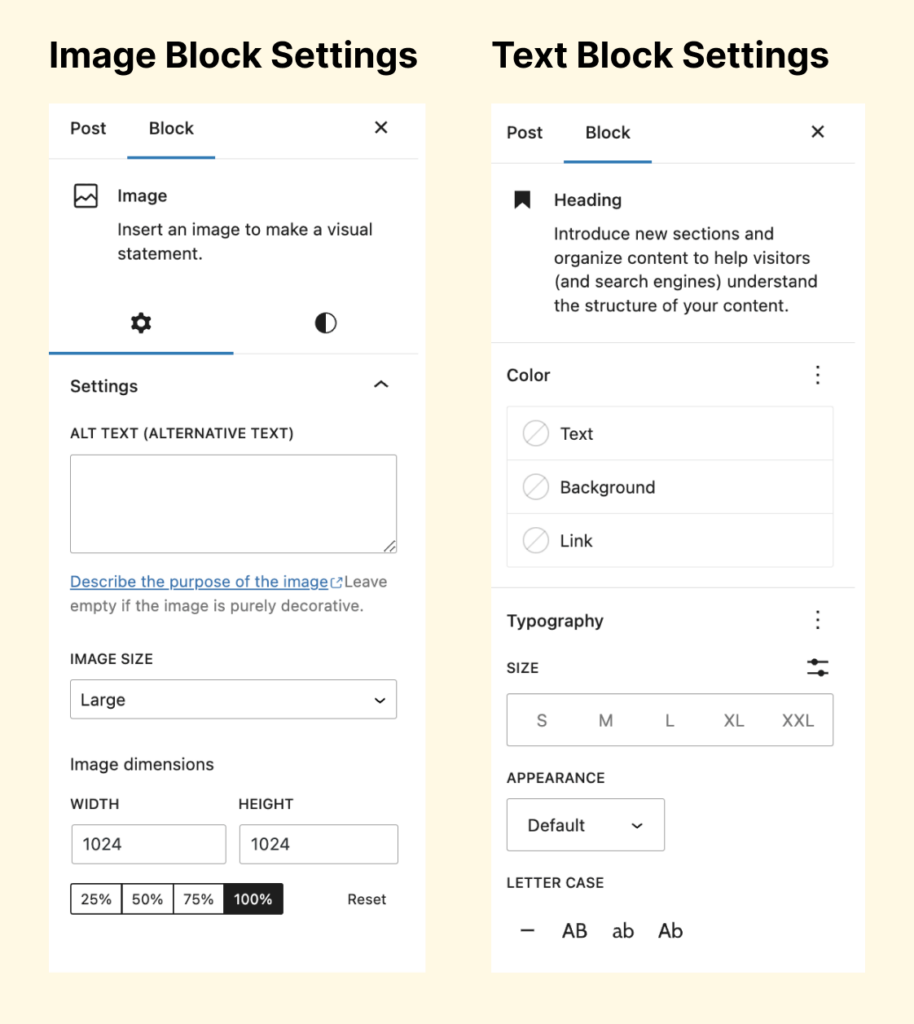
For example, if it is a text-based block, it contains settings for changing:
- Text color and background color of the text
- The font size of the text
- And similar options
But it is an “Image” block, and it contains settings for changing:
- Image width and height
- Alternative text for screenreaders
- And similar options

Got it. I understand. But I used to see Post settings somewhere in this sidebar. But I can no longer find them.
Good question!
The multi-tabbed Settings sidebar
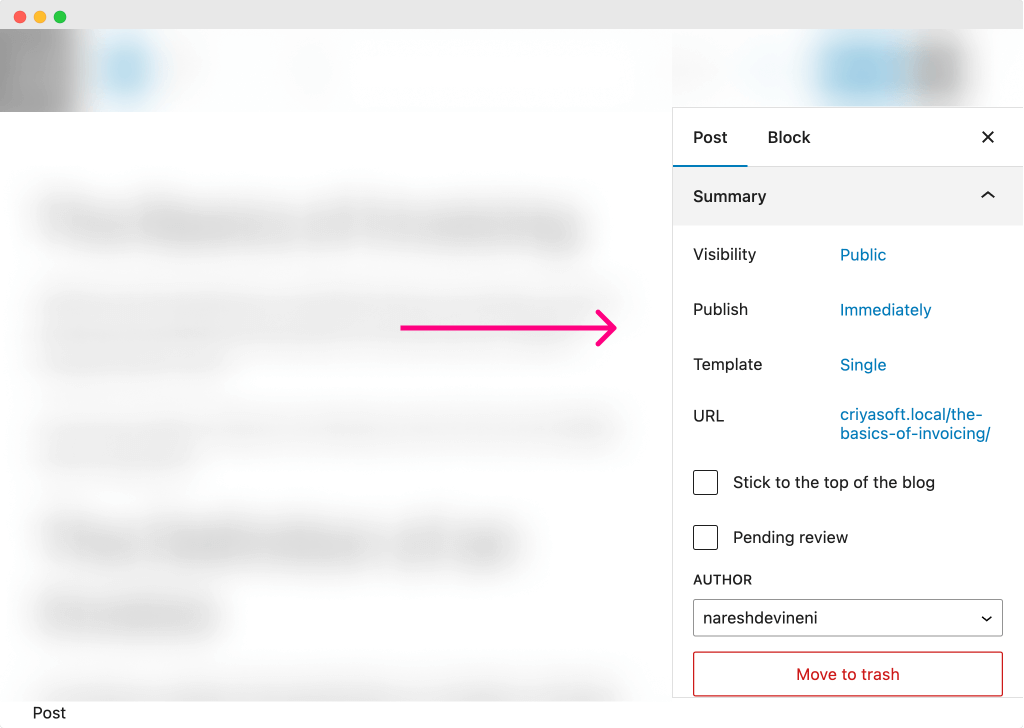
If you notice, the Settings sidebar contains two tabs:
- Post
- Block
The “Post” tab contains the settings for the entire blog post or page.
The “Block” tab contains the settings that are specific to a particular block.
The default tab is always the “Post” tab.
But the “Block” tab will activate whenever we select a block inside the post editor.
So, if you want to see the overall post settings, switch to the “Post” tab by clicking on it.
Also, we will be switched back to the “Post” tab automatically when we un-select a particular block.
Did you see how the setting tabs are getting switched when we select a block and un-select it?
That’s how the settings sidebar works.
Nice! Also, sometimes, I don’t see the sidebar at all. How do I fix that?
That is happening because the sidebar might have got closed accidentally.
We can easily fix that.
Hiding and revealing the Sidebar settings
Sometimes, if you don’t see the sidebar, click on the “Settings” button on the top bar.

If the Settings sidebar is already open, clicking the “Settings” button will hide it.
If it is hidden, clicking on the button will reveal it back.
Anyway, next…
Let’s add a headline
We must use the “Heading” block to add a headline to the Block editor.
Unlike the Paragraph block, we must manually add the heading block or any other block.
And currently, there are three main ways to add a block manually.
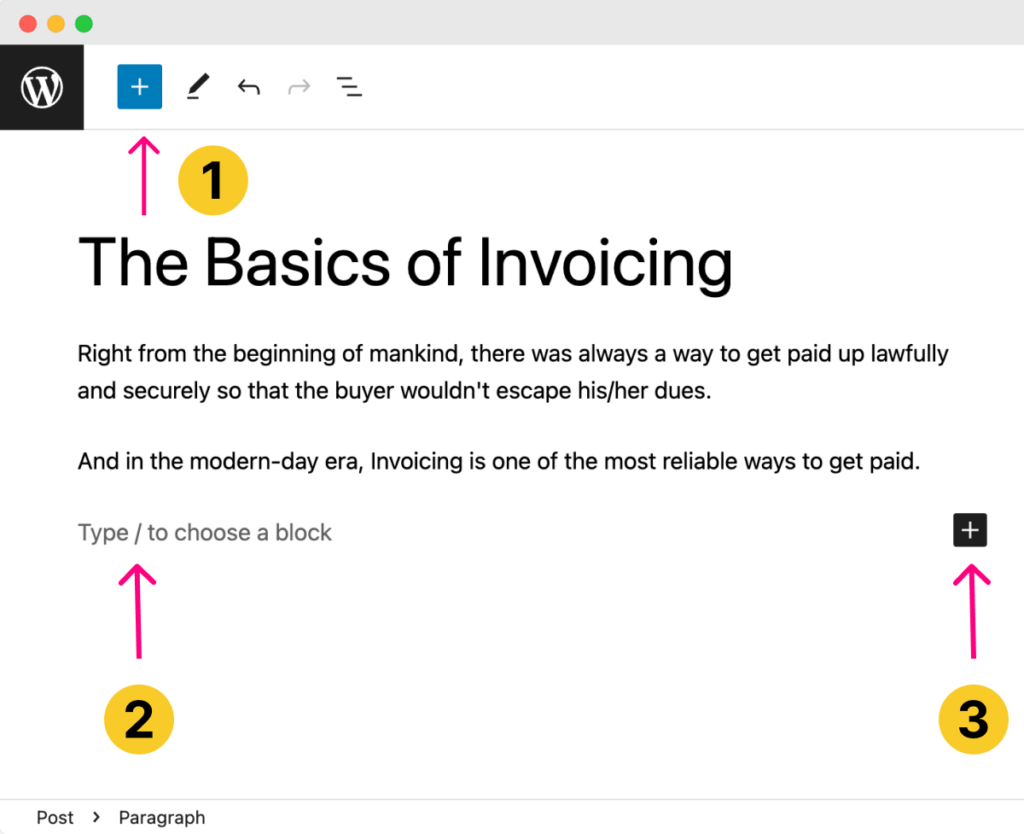
- By clicking the blue “Plus” button located at the top-left corner of the post-editor interface.
- By typing a slash
/inside the editor - By clicking the black “Plus” button on the editor’s right-hand side.
Their interface is different, but they all do the same thing of helping you add a block to the editor.
But the quickest way to add a block is by typing the “/” slash key on your keyboard.
If you notice the placeholder on the block editor, it says: “Type / to choose a block”.
So, type “/” and you’ll see a popup with the most frequently used blocks.
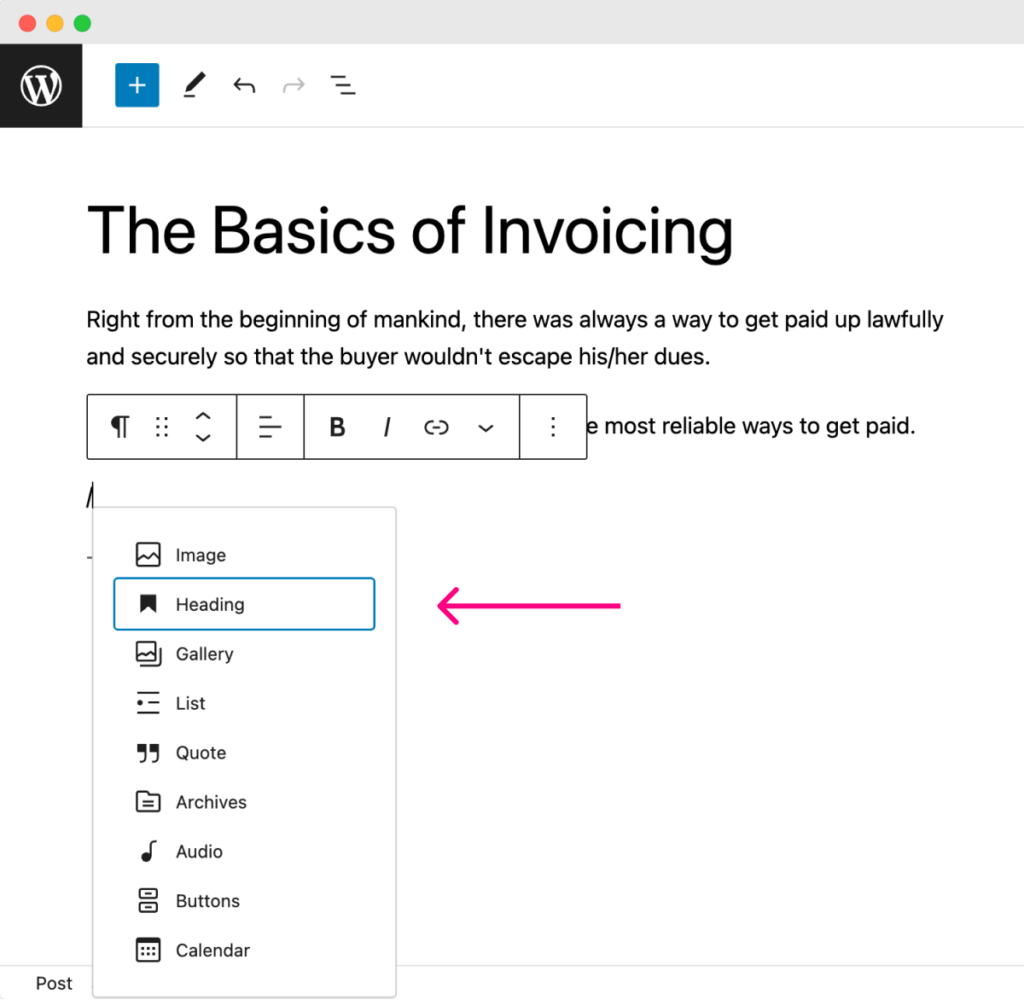
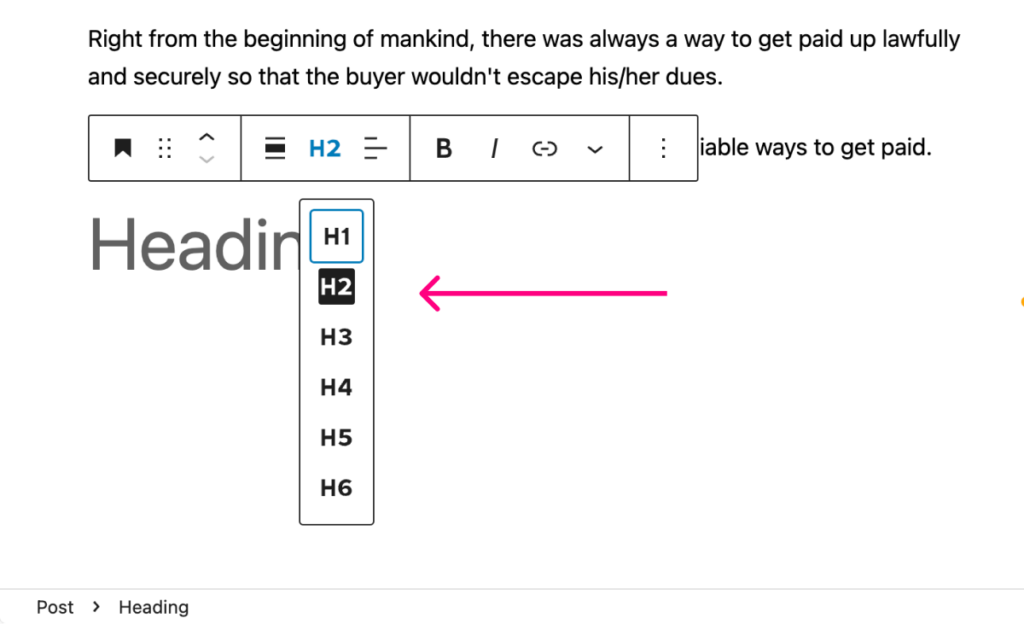
Next, click on the “Heading” block to add it to the Block editor.

If you notice, as soon as you add the heading block, the “Block Toolbar” specific to that heading block will appear.

And inside that toolbar, you’ll see an option called “H2”.
If you click on it, it will help you change the headline level from “H2” to a different headline level.
Guidelines for using headline levels
There are six headline levels: H1, H2, H3, H4, H5, and H6.
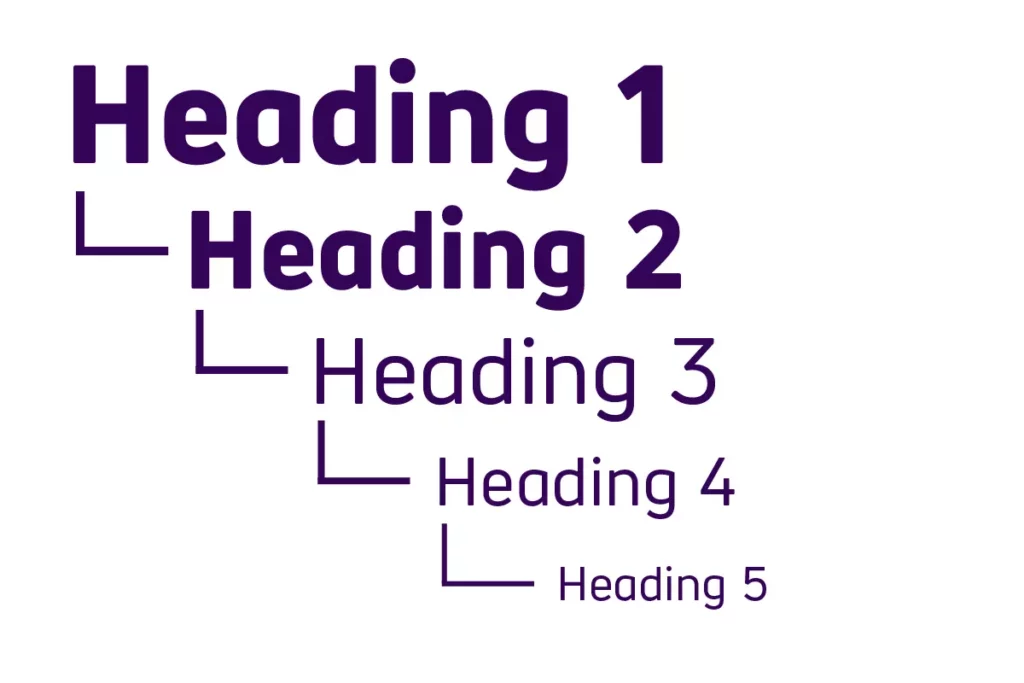
H1 represents the most important headline on a blog post or a page and is usually used for the page’s main headline. When it comes to styling, it looks the biggest of all, with a large font size.
H2 headline must be used for the second most important headline on a blog post or a page. So, we usually use it for the section headlines. When it comes to styling, it looks big but smaller than the H1-level headline.
Similarly, H3 is used for the sub-section headlines. H3 looks medium-sized and smaller than the H2-level headline.
H4, H5, and H6 headlines represent the least important headlines on the page. So, we don’t usually use them unless we have sub-sub-sections inside the main section.
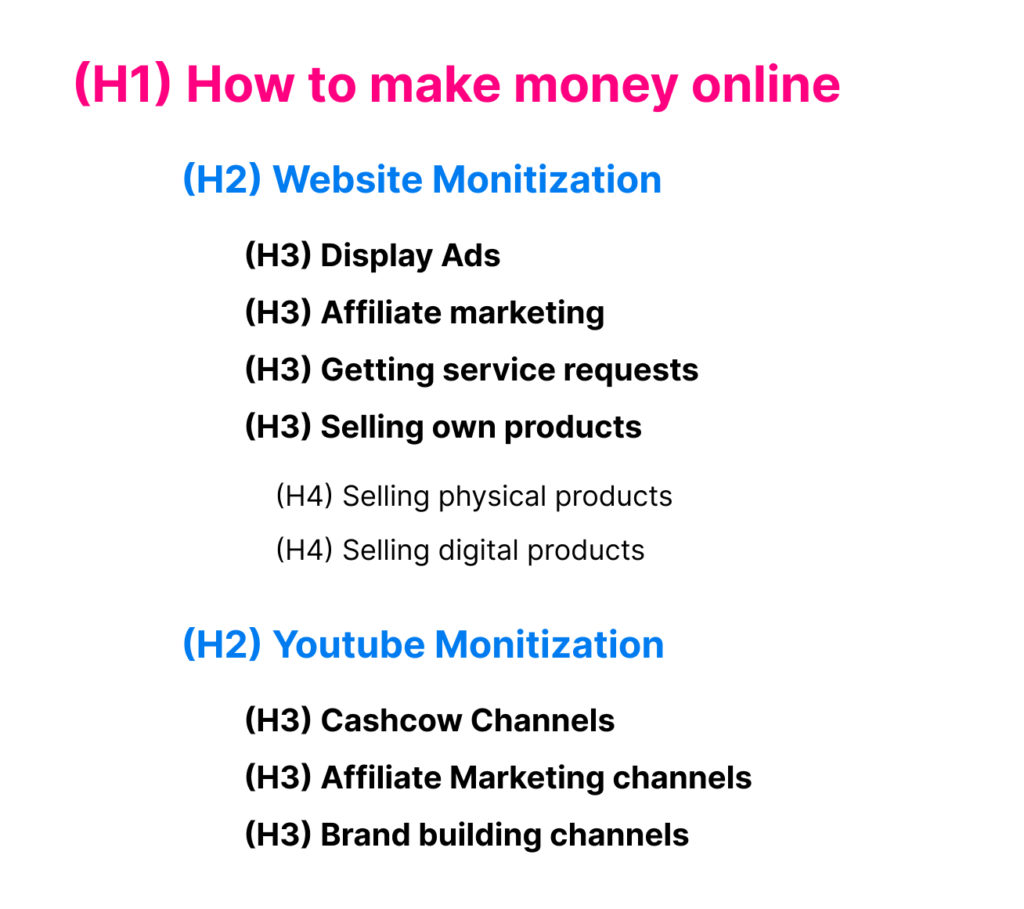
As you can see, each Headline level has a specific semantical meaning to it.
So, when writing the content inside the block editor, don’t use the H1 for the section-level headlines just because you can easily use it.
Or, don’t use the H3 level headline for the main sections of the article just because it has a smaller font size.
Just follow their order of importance, or it could negatively impact your SEO.
Here is a real-world content outline with section and sub-section headline levels:
You get the idea, right?
Anyway, let’s get back to the task at hand.
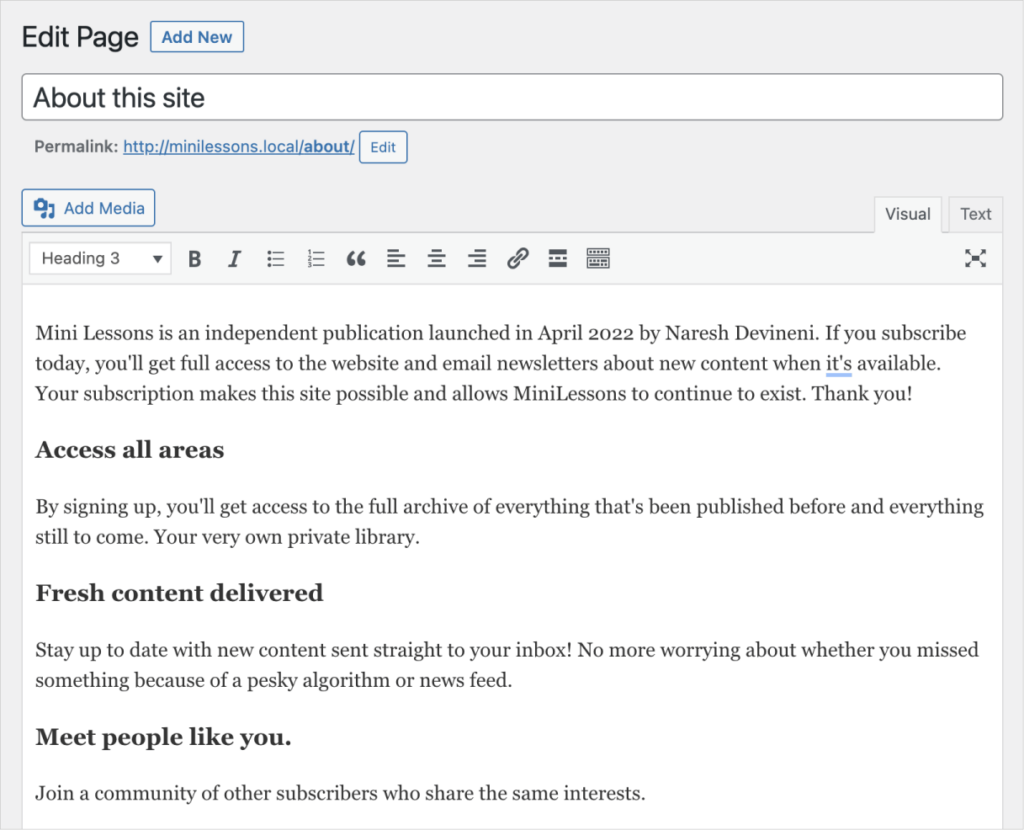
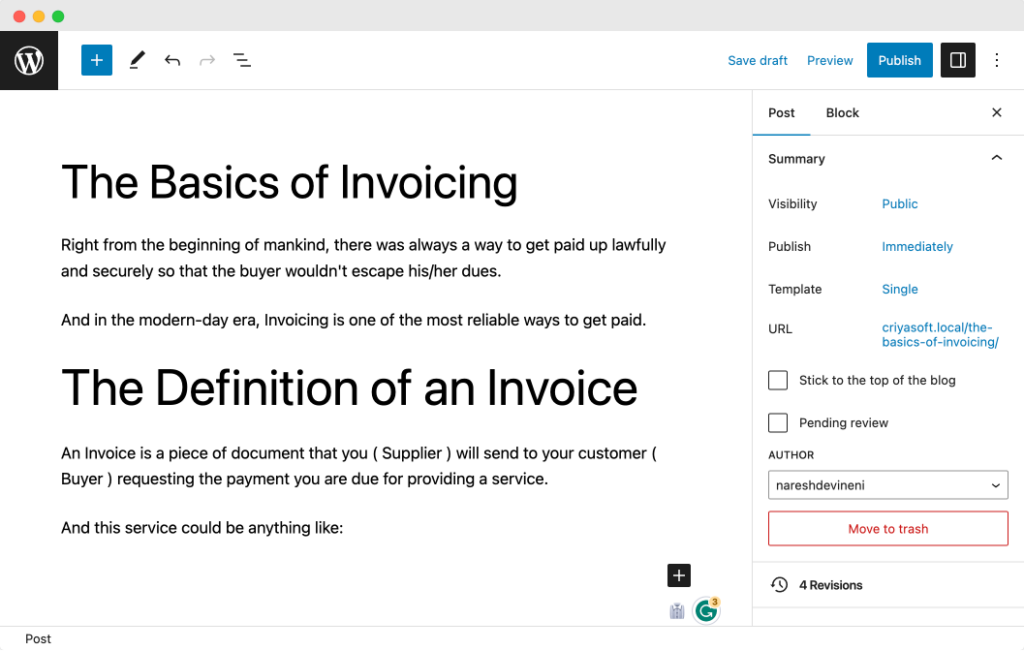
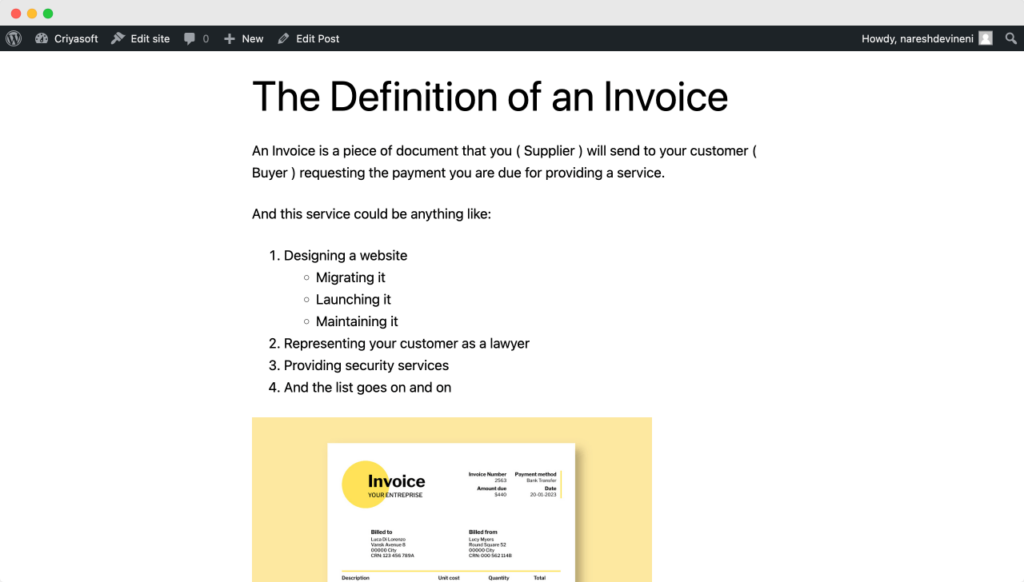
I want to add a headline called “The Definition of an Invoice”.
If you notice the table of contents of the Word document I have provided, it is a section-level headline.
So, we must use the H2 level headline for it.
H2 is the default headline level when you add a “Headline” block.
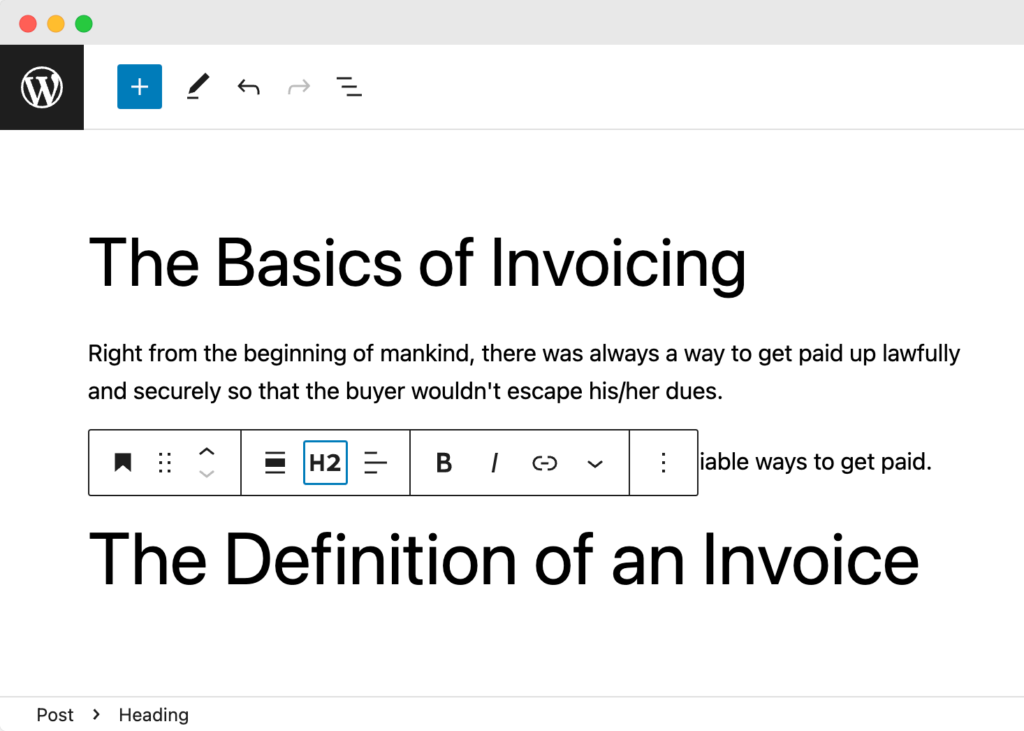
Anyway, I have now added the headline.
I also went ahead and added two more paragraphs:
Next, let’s see how to add and use the “List” block.
Introducing the List block and the parent blocks
The “List” block allows us to add bullet points to our content.
To add the “List” block, this time, let’s use the blue-colored “Plus” button located on the top-left corner of the editor screen.
Once you have added the “List” block, you can start typing an individual list item and then hit the enter key on your keyboard to add a new item.
How to exit the “List” block
Once you have added all the list items, you have to hit the enter key twice to exit out of the “List” block.
The “List” block is a parent block
Now, I want you to understand something.
Unlike the Paragraph block or the Headline block, the “List” block is not simple.
The “List” block is a parent block, and it can have multiple “List item” blocks as its children.
Let me show what I mean.
On the top bar of the post editor, there is a button called “Document Overview”.

If you click on it, it will open up the “Document Overview” section on the left-hand side of the post editor.
The “Document Overview” section contains the list of all the blocks that we have added to the Block editor so far.
It helps us select the blocks.
It also helps us add, delete, and change the order of the blocks.
Simply put, it helps us manage the entire block editor.
And if you notice, there is no dropdown arrow on the left for the “Paragraph” block and the “Heading” block.
This tells us that they are simple blocks with no child blocks.
But for the “List” block, there is a tiny arrow on the left.
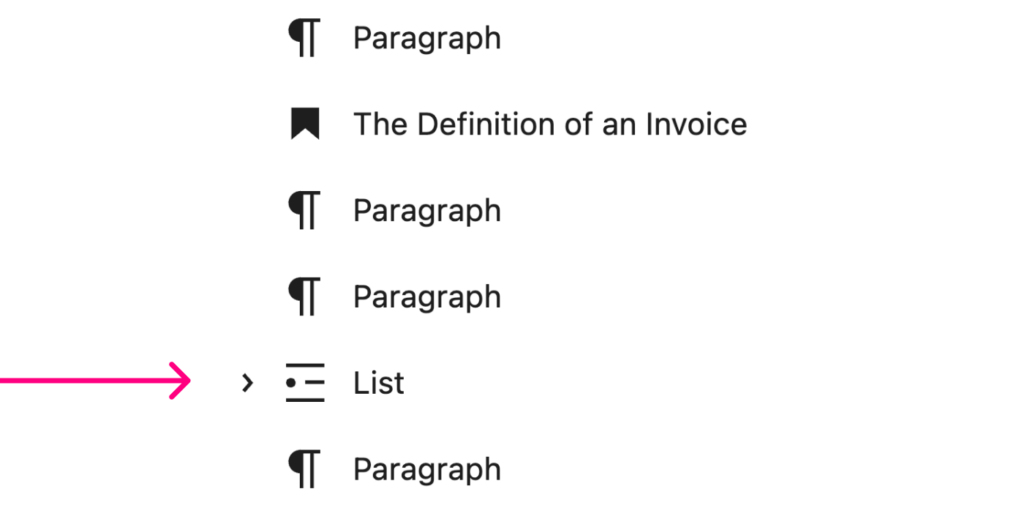
This arrow indicates that the “List” block is a parent block.
And if you click on that arrow, the child blocks of the “List” block will get revealed.
Each child block represents an individual bullet point.
Did you see that?
The parent “List” block contains four “List item” blocks as child blocks.
The “List” block acts as a container that holds the individual “List Item” blocks.
We can select the parent block and its child blocks independently.
For example, in the “Document Overview” section, when we click on the “List” block, only the “List” block is selected, and we can see the options toolbar that is specific to it.
If you notice, the children of the “List” block are not selected.
The thing is, WordPress Block Editor treats all the blocks individually.
Even if they are parent and child blocks.
This is important because some settings only make sense at the parent level and others at the child block level.
For example, when we select the parent “List” block, this “Ordered” list option transforms the entire bullet points into numbered points.
But we can’t find the same option for the child blocks because they are not “List” blocks. They are “List item” blocks.
This differentiation helps you look for the right options in the right place and don’t get confused.
Adding a nested list
So far, we have seen how to select the parent “List” block.
Now let’s select one of its child items and add a nested list inside it.
We can easily create a nested list using the “Indent” option that we get when we select one of the child items.
In the above video, we have created a nested list under the “Design a website” list item.
And if you have noticed, the “Indent” option is only available on the list item rather than the parent “List” block.

So, keep an eye on whether you are adding a parent block or a simple block.
If you are adding a parent block, remember that the parent block will have its own options that are different from its children.
And, if you can’t find a particular option on the parent block, look for it by selecting the child block if it makes sense for the child to have it.
That’s all.
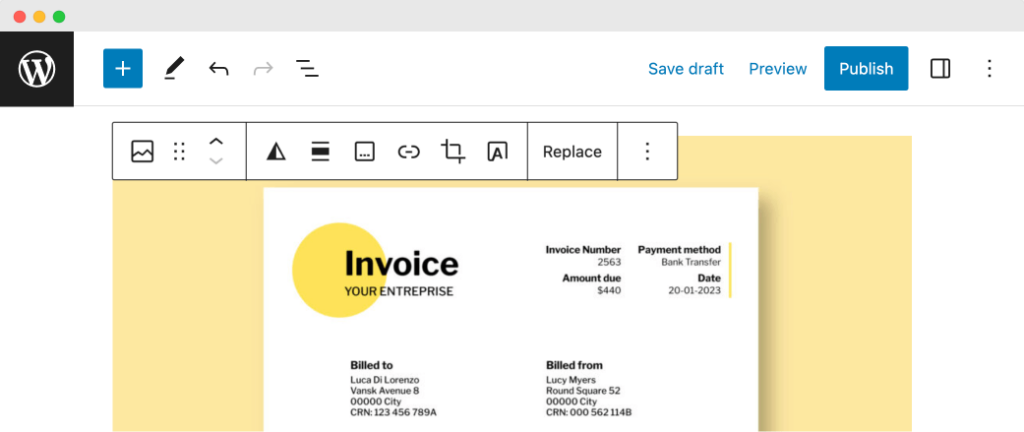
Next, let’s see how to upload and add images to your blog post.
WordPress makes it easy to upload images and use them inside posts and pages.
Adding the image block
To add an image to our blog post, first, we need to add the “Image” block.
Next, to upload the image, we have four options:
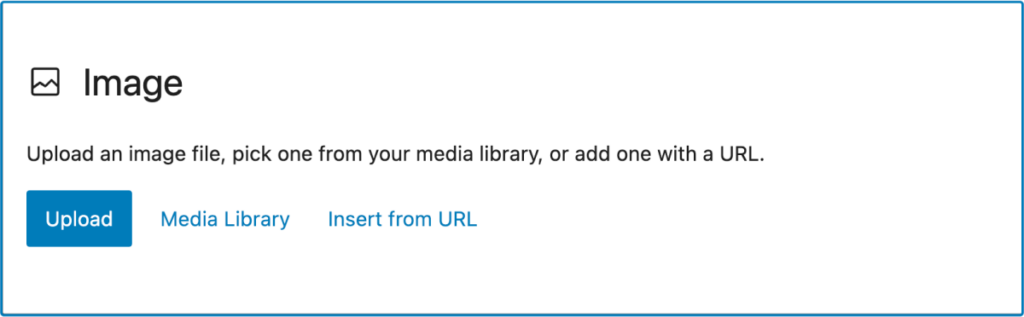
- “Upload” button – helps you upload new images.
- “Media Library” button – helps you choose from images that are already uploaded to the WordPress Media Library.
- “Insert from URL” button – helps you use an image from a website that you don’t own ( stranger’s website )
- Or you can just drop the files inside the image block (inside the blue border) directly.
We will use the “Upload” button.
Come on, download this invoice image:

Upload the image
Ah! Ah! Not so fast! Not so fast!

Resize and compress the image.
One common mistake most website owners make is downloading an image from the internet that is 3000×3000 large with a 2 MB file size.
And then they upload it directly without resizing and compressing it.
This is a bad practice because:
- It makes your blog post load slowly for your visitors. As a result, they will leave and never come back.
- It increases the disk space you need for your website. As a result, web hosting expenses will increase.
So, before uploading the image, please think of the long run of your website and only upload the images after optimizing them for speed and disk space.
Anyway, don’t worry; you can perform the resizing and compressing in two easy steps.
Step 1: Resize the image
There is a free tool called ImageResizer.com.
The image I have provided is 2000px wide and 266kb in file size.
But we don’t need an image larger than 1000px for our blog post.
So, go to ImageResizer.com, resize the invoice image to 1200px, and finally download it.
After the resize, the image file size is now around 122kb.
Previously the file size was 266kb. So, that’s a lot of savings.
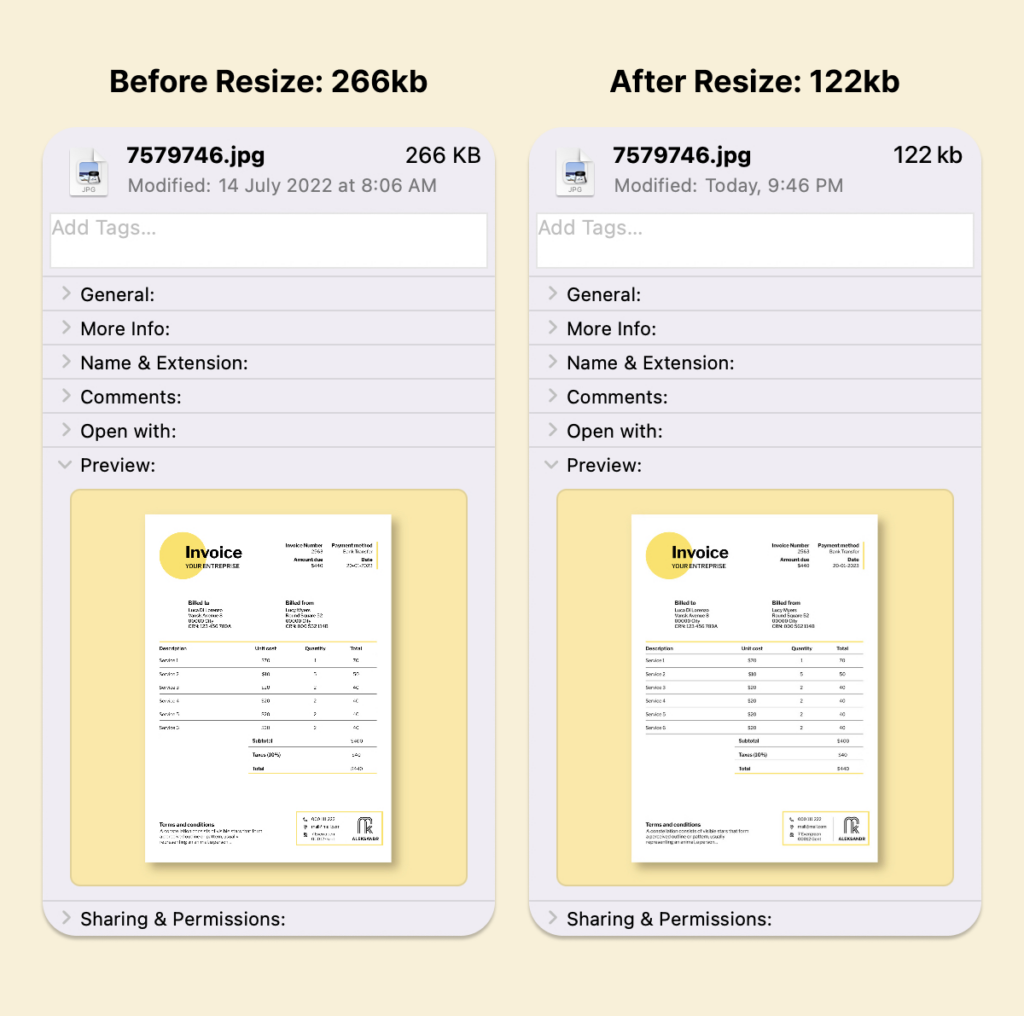
But we can reduce the file size even further by compressing it.
ImageResizer did an excellent job resizing the image, but the file size can be reduced a bit further without hurting the quality of the image.
Step 2: Compressing the image
To compress the image, we need to upload it to tinypng.com.
Tinypng does its best to reduce the file size further without reducing the quality.
So, upload the resized image to tinypng.com and see what happens.

Did you see that?
The image size is now 58kb, and the quality is still tip-top.
Now you have my permission to upload it to your WordPress site :P
I understand that I am being strict here.
But it is necessary to save you costs in the long run :)
Upload the image
Finally, upload the compressed image to your blog post from your computer’s file browser.
And that’s how easy it is to upload the images.
Anyway, be it dropping files or using the “Upload” button, we can upload multiple images at the same time.
Also, whenever we upload an image for displaying inside a blog post or a page, the image will get uploaded to the WordPress Media Library.
So, if you want to reuse the image somewhere else on the website, you don’t have to re-upload it again.
You can use the image by picking it from the Media Library.
And when using an image from the Media Library, click on the “Media Library” link or tab. This will give you access to all the images inside the media library.
Adding alternative text is important.
When you upload an image and select it inside the post editor, on the sidebar settings area, one of the settings you’ll see is “Alternative Text”.
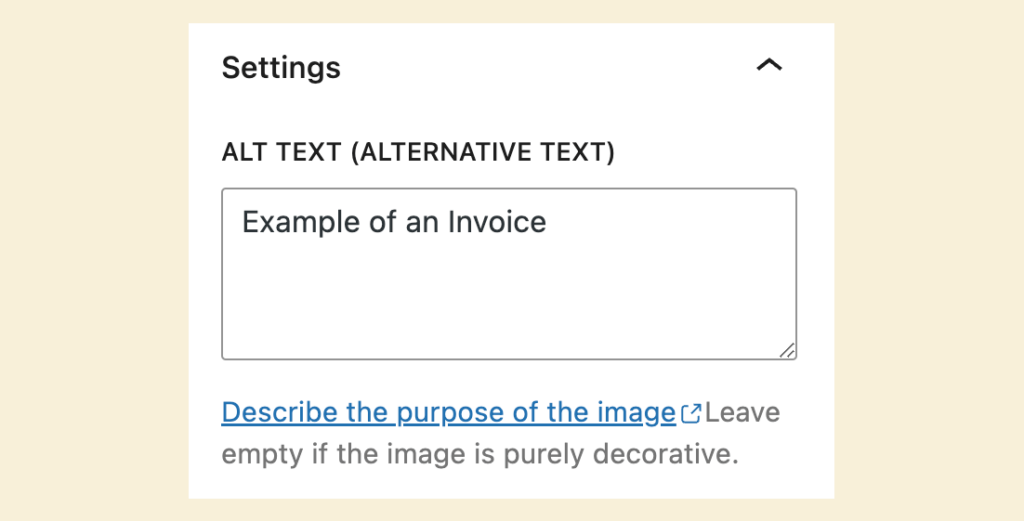
You must add an alternative text to the image uploaded because:
- It helps people who use screen readers to read your articles.
- It could improve the Search engine results of your website as well.
Having said that, if that image is only for decoration purposes and doesn’t add any value to your article, you can leave the “ALT Text” empty.
Next, let’s see how to turn the image into a link.
Turning an image into a link
We often want to link an image to a third-party website for giving credits or other purposes.
And it is really easy to achieve that with the Block editor.
All you have to do is click on the image to open its Toolbar and click on the “Link” icon.
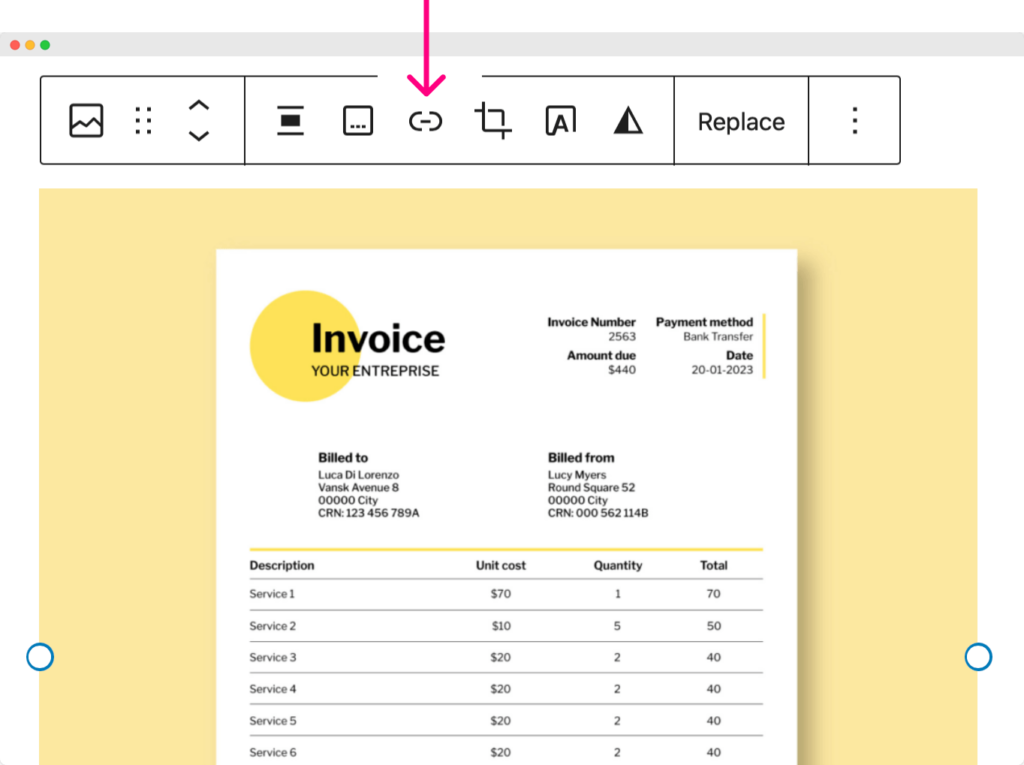
Doing this will bring up the link options.
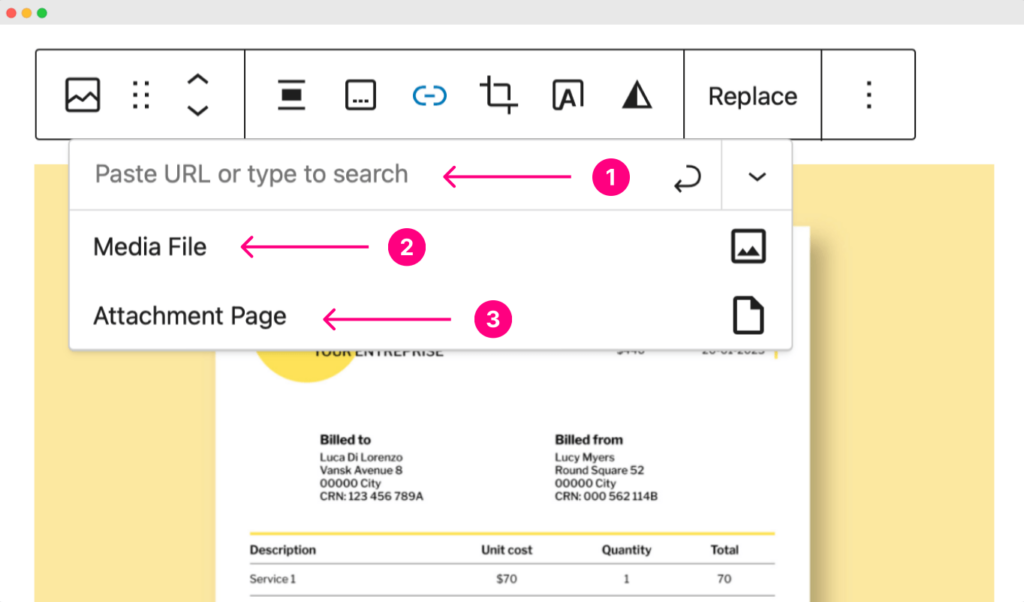
If you notice, there are three types of linking.
- Linking to a page on a third-party website or the same website
- Linking to the full version of the same image
- Linking to the attachment page of the same image.
I never used the “Attachment Page”, So I will explain the usage of the first two options in a detailed way.
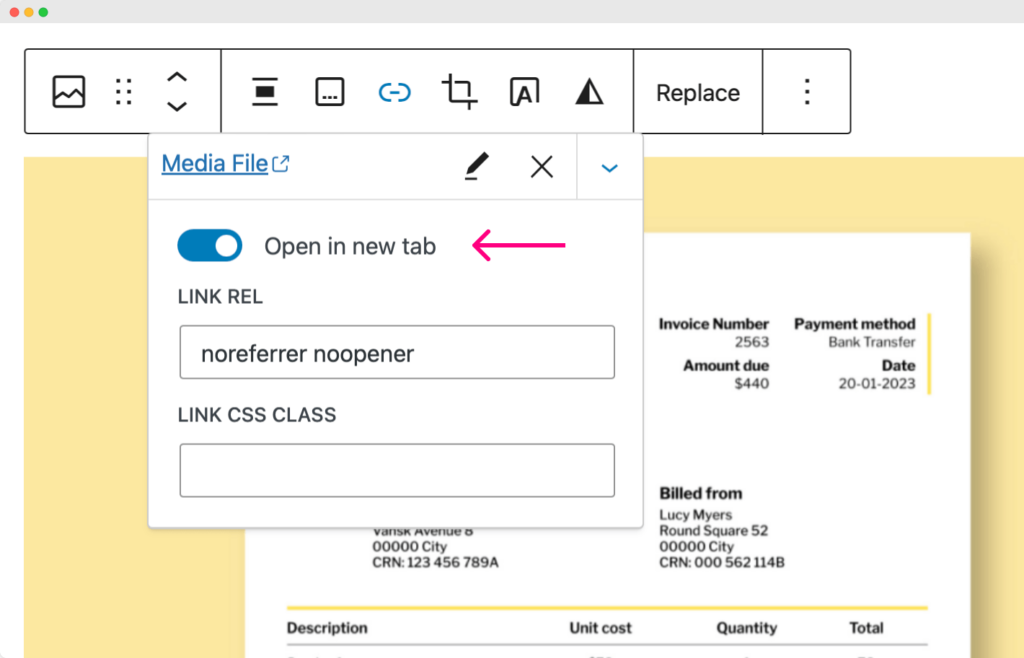
Linking to a page on a third-party website or the same website
If you want to link to a third-party website, paste the link inside the field that says “Paste URL or type to search”.
For example, I want to credit Freepik for the image, so I pasted Freepik’s Homepage URL.
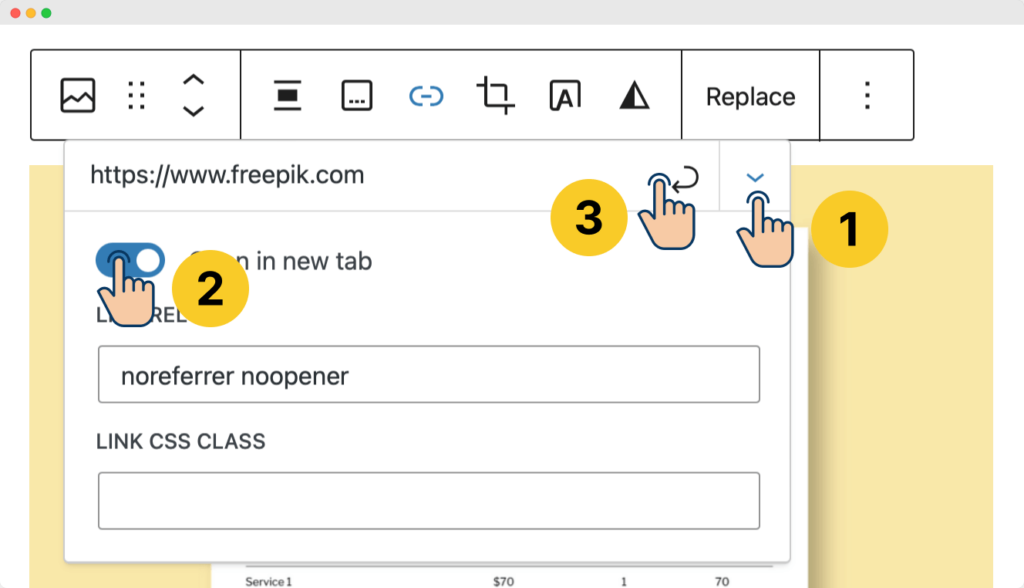
After pasting the link, make sure it opens in a new tab when someone clicks on it.
To achieve this, click the “Link settings” button and enable the “Open in new tab” option.
Finally, click on the “Apply” button to save these changes.
Because Freepik is a third-party website, it is recommended to open it in a new tab so visitors don’t totally move away from your website.
Linking to an internal page of your own website
Also, sometimes, you want to link to an internal page of the same website (your website).
In that case, instead of pasting a URL, you can type the page name inside the URL box, and if that page exists, WordPress will show the page name.
Just click on the page name, and WordPress adds its URL automatically.
And because this is your own website, setting the link to open on a new tab is not mandatory.
For example, in the above video (although not practical :D ), I have linked the image to the “Sample Page”.
This sample page was automatically created when we installed WordPress.
Anyway, next…
Linking to the full version of the same image
Sometimes, you want to link to the full size of the same image.
You might want people to view the image in its high resolution or want them to download it.
In either case, You don’t need to enter any URL.
link to the original image uploaded.
Also, if you want to open the full image in a new tab, make sure the “Open in new tab” option is enabled:
That’s all you need to know about linking the images.
Changing the size of the image uploaded
Sometimes, after uploading the image, we might want to reduce the size of it.
If that is the case, WordPress provides us with many easy-to-use settings to achieve our goal.
Come on, let’s quickly go through it with several scenarios.
Scenario 1: Automatic image sizes
Let’s say we have uploaded a large image.
But we want to display it in a medium size.
If that is the case, we can easily achieve it using the “Image Size” setting.
When an image is uploaded to WordPress, the platform automatically creates three different sizes of the original image:
- Thumbnail size – 150px (Only if the image uploaded is larger than 150px)
- Medium size – 300px (Only if the image uploaded is larger than 300px)
- Large size – 1024px (Only if the image uploaded is larger than 1024px)
It creates these sizes so that it can use them in appropriate places on your website ( more on this later ).
Not just that, it also gives us the control to use these extra images inside the post editor.
Come on, let’s see how it works.
First, if it is not already, click on the image to select it.
This will open up the Settings sidebar for that specific image.
Next, inside the sidebar, there is a setting called “Image Size” with four options: Thumbnail, Medium, Large, and Full Size.
By default, WordPress uses the large size of the image for displaying it on the blog post.
But if we choose the “Thumbnail” option, WordPress will replace the large image with a thumbnail-sized image.
If we choose the “Full Size” option, it will use the original uploaded image.
For our scenario, we only want to use the medium-sized version of the image.
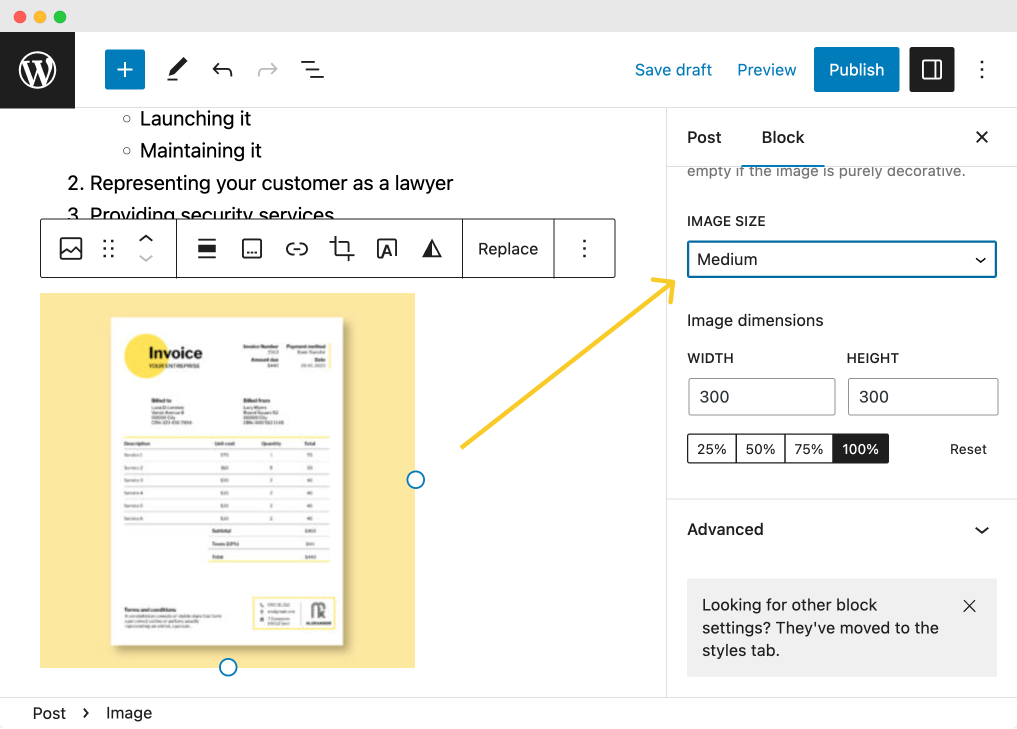
So, choose “Medium” for the “Image Size” settings.
That’s all. A medium-sized version of the image is now getting displayed.
Scenario 2: Taking control of the image dimensions
Sometimes, we want to display the image at a particular width.
For example, when we choose the “Medium” option, the image is displayed at 300px wide.
But we want the image to be displayed at 500px wide.
How do we achieve that?
Currently, The “Image Size” setting doesn’t have an image size for displaying an image at 500px.
How do we fix this problem?
This is where the “Image Dimension” setting comes in and helps us manually enter the image dimensions we want.
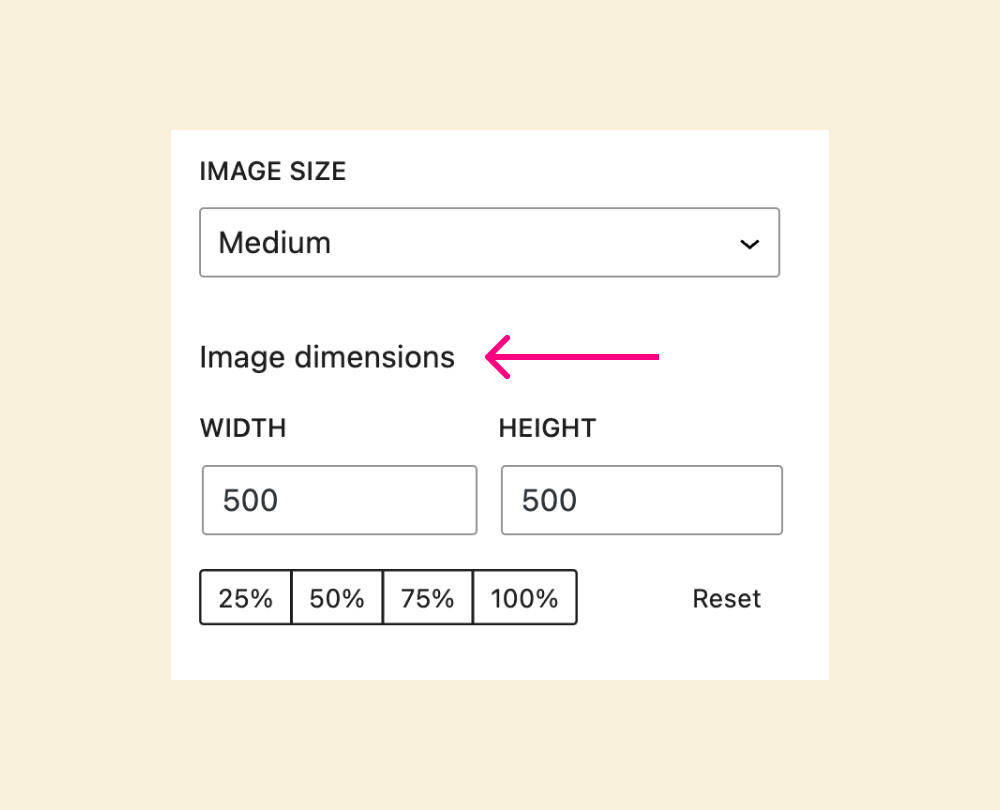
Come on, let’s use it and increase our image display size.
And bang!
Why did the image get pixelated and blurry?
The reason behind this is pretty simple.
We have chosen the image size as “Medium”. So, WordPress is displaying an image that is 300px wide.
But when we changed the image dimensions to 500px wide, WordPress is now trying to display the same 300px wide image at 500px wide.
When you try to display a low-resolution image (300px) at a higher resolution (500px), the image will appear low-quality and blurry.
This is the natural behavior of the browser.
The thing is, the “Image Dimensions” setting doesn’t automatically generate an image that is 500px wide.
It works in association with the “Image Size” setting.
If the image size is Medium (300px) and if you change its dimensions to 500px using the “Image Dimensions” setting, it will only try to enlarge an existing image.
So, to make the image look high-quality at 500px wide, we have to use an image size larger than 500px wide.
If we take a higher-resolution image (1000px) and shrink it down to 500px, the image won’t lose its quality.
To cut to the chase, to display the image at 500px, we either have to use the large size (1024px) or the full size (2000px) and then shrink down the image to 500px using the “Image Dimensions” setting.
Come on, let’s go with the Large size and see what happens:
Did you see that?
That’s exactly how you take control of the image display size inside the Post editor.
Anyway, I understand that the last couple of sections of this article are a bit exhaustive for you.
So, take a little gap, come back, and we will learn how to:
- Save the draft written so far
- Preview the blog post we have written so far
Save the draft and preview it
Why should you save the draft?
So far, we have written a fair amount of the content for our blog post.
But our blog post is nowhere near the publishing state.
So, it is a good time to save the draft.

If you save your blog post as a draft, WordPress will save your post content without publishing it.
Because of this, if you want to, you can exit the post edit screen and come back later to continue writing the blog post.
You don’t have to worry about losing your content accidentally.
But, if you don’t save the draft and accidentally close the post editor window, you might lose all the content you have written.
So, click on the “Save draft” button on the top bar of your post editor screen.
You can also use the keyboard shortcut CTRL + S to save the draft. It’s CTRL + S on Windows and CMD + S on MacOS.
Now that you have saved the draft, it’s time to preview what we have written so far.
Preview your blog post.
Previewing will let us see how the blog post looks for our website visitors without publishing the post.
And I think it’s the right time to preview it because we have recently changed the image size, and I want to see how that change looks on the front end of the website.
So, let’s go ahead and click on the “Preview” button that is located right next to the “Save draft” button:

As you click on the preview button, WordPress will give you a choice of a device you want to preview the blog post on.
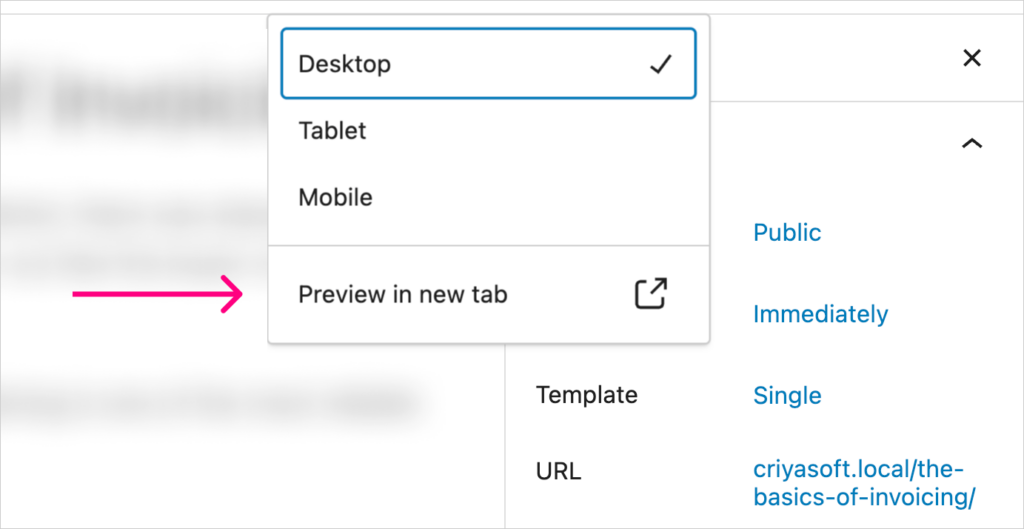
By default, “Desktop” is selected, and I am okay with it.
Finally, click the “Preview in new tab” to check the preview.
Everything looks nice, but we should change the image’s alignment to the center.
And that’s your first challenge for this article.
You now have good experience with the Block editor.
So, I will be now pushing you down the rabbit hole of challenges :P
You ready? :D
Challenge: Change the image alignment to the center
I want to see how the image looks if it is center-aligned.
So, here is your task.
Make the image center aligned.
🙈 Hint: The alignment setting will appear when you click on the image.
The Solution
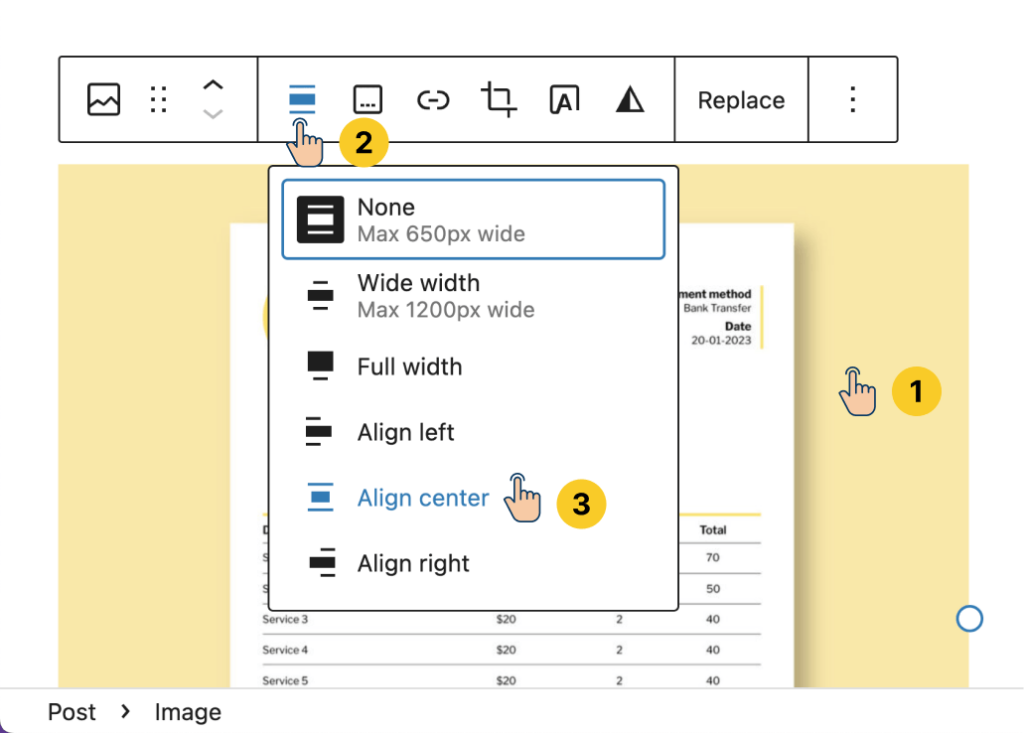
We can easily change the alignment of the image in three easy steps:
- Click on the image that you want to change the alignment for
- Inside the Toolbar settings, you’ll find the “Align” setting. Click on it to bring the alignment options.
- Choose “Align Center”
That’s all it takes to center-align the image.
Challenge: Add a link to a piece of text using Block Editor
One of the most common things we do while writing the content is to add links to our text.
And there are two types of links:
- External links
- Internal links
Both these links will help improve something called On-Page SEO and could improve your search engine rankings.
So, here are the challenges.
Challenge: External Link
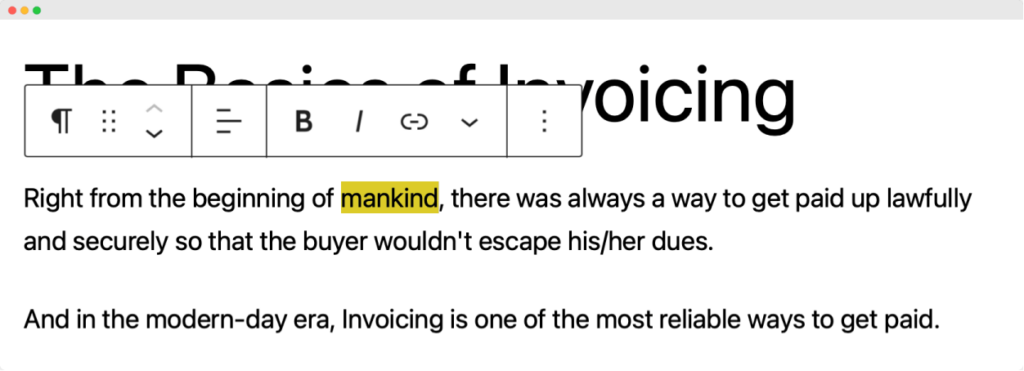
Inside the first paragraph, there is a word called “mankind”.
- Link it to https://www.dictionary.com/browse/mankind
- Make sure the link opens in a new tab
🙈 Hint: Use the link icon from the Toolbar
The Solution
Adding a text link is pretty straightforward.
Select the word to bring up the Toolbar options.
Click on the “Link” icon and paste the URL.
Finally, enable the “Open in new tab” option and save the settings by hitting “Enter” on your keyboard.
That’s all you need to do.
Anyway, I changed my mind. I want to make this an internal link.
Challenge: Internal Link
Remove the external link and link the word “mankind” to the “Sample Page”.
The “Sample Page” is an internal page that is automatically created by WordPress when it is installed.
The Solution
First, we must unlink the text from the external link we have previously added.
To achieve this, we need to click on the link first and then click on the “Unlink” button.
After that, we need to select the word again, and this time, instead of pasting a link:
- We are making sure that the link opens in a new tab
- And then we search for the “Sample page” to select it
That’s all.
Challenge: Change the font size using Block Styles
This challenge has two variations.
- Set the font size of the first paragraph to “Large”
- Set a custom font size of 36px of the first paragraph to 40px.
🙈 Hint: The font size setting will appear on the Settings sidebar.
Solution for: Set the font size of the first paragraph to large
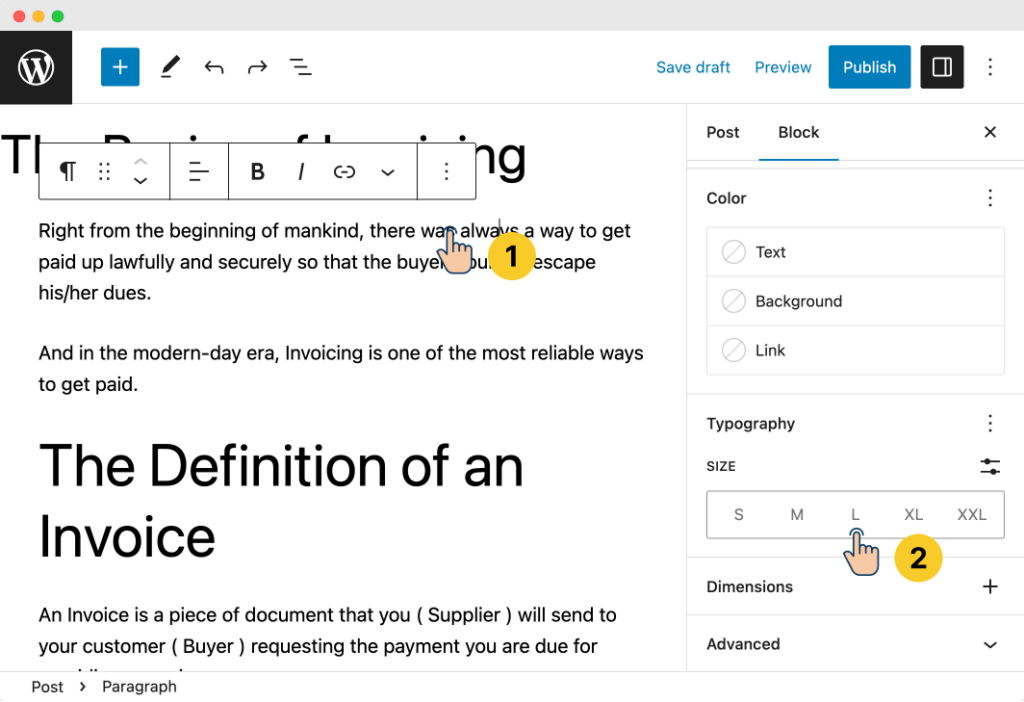
We can change the font size in two easy steps:
- Click on the first paragraph
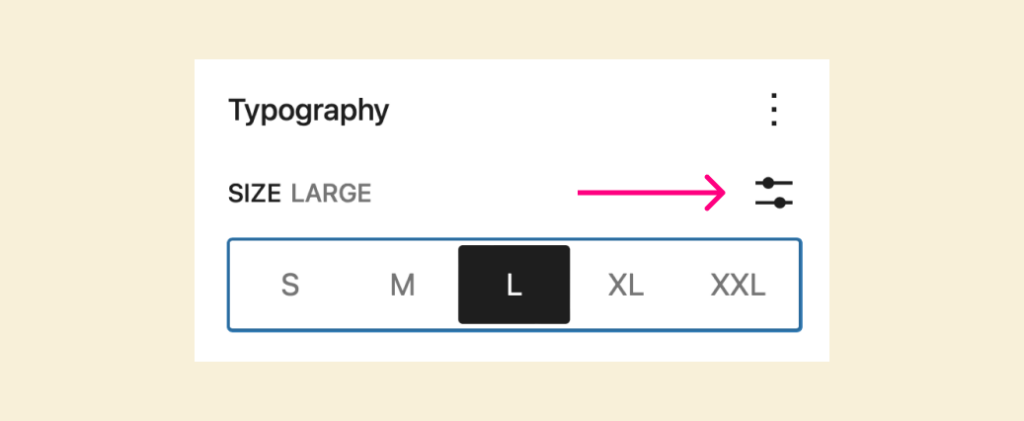
- Inside the Sidebar settings, there is a section called “Typography”.
- Inside “Typography”, there is a setting called “Size”. From here, choose the “L” option. “L” means large.
That’s all it takes to increase the font size of any text-based block in the Block editor.
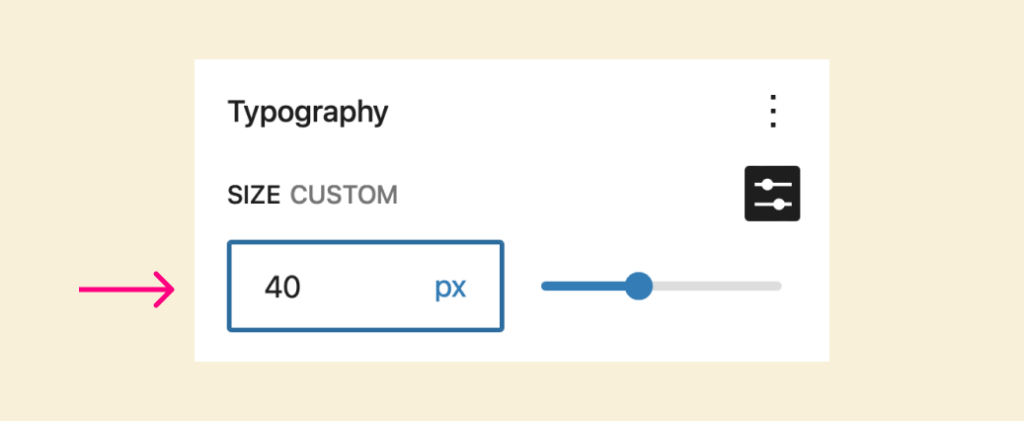
Solution for: Set a custom font size of 36px of the first paragraph to 40px.
This one is straightforward too.
We can set a custom font size in four easy steps:
1) Make sure the first paragraph is selected
2) Inside the “Typography” section, click on the “Set Custom Size” icon
3) Next, change the font-size metric to “PX” (Pixels)
4) Finally, enter the font size manually:
That’s all it takes to change the font size manually inside the WordPress Block editor.
Let’s undo or reset the changes
As part of the last few challenges, we made a lot of changes to our blog post.
The fastest way to undo the changes is to use the “Undo buttons” in the post editor’s top bar.

Or you can just use the keyboard shortcut CTRL + Z on Windows or CMD + Z on MacOS.
Take more control of the resets.
The “Undo” button is nice, but sometimes, we might need more control in skipping certain changes.
For example, let’s say I have changed the text color of the first paragraph to purple this time.
And I have embedded a Youtube video.
You can embed the YouTube or Vimeo videos by pasting their URLs from the respective platforms. More on this later!
Now let’s say I want to change the first paragraph color to black again.
But I want to keep the YouTube video.
But if we use the undo button in this scenario, the YouTube embed will be removed first, and then the color will be reverted to black.
This happens because that’s how the “Undo” button works.
It will undo the steps you have performed in reverse order without skipping a particular step.
So, there is no way you can keep the Youtube video from getting removed before reverting the color to black.
How do we solve this problem?
This is where the “Reset” functionality comes in.
The Reset
WordPress gives us the ability to reset any design and spacing changes we make to a particular block.
By design changes, I mean:
- Color settings
- Typography settings
- Spacing settings
In our case, we want to reset the color back to black, right?
To achieve it:
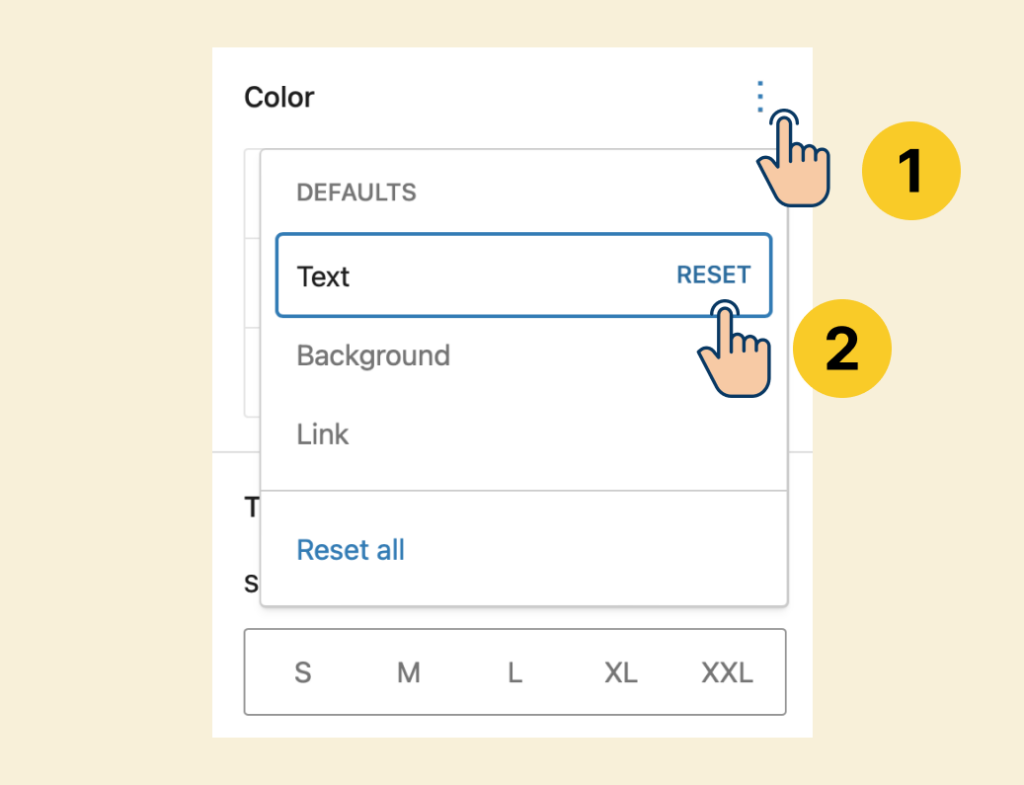
- Click on the paragraph.
- Under the Sidebar settings -> Color settings, click the three dots icon on the far right.
- Finally, Click the “Reset” button in the “Text” option.
Note: The Reset button will be present for each option inside each design-related section on the Settings sidebar.
That’s all.
Adding quotes to our blog post
Quotes make your blog post:
- More credible
- More interesting
And WordPress makes it easy to add quotes to your post.
All you have to do is use the “Pull Quote” or the “Quote” block.
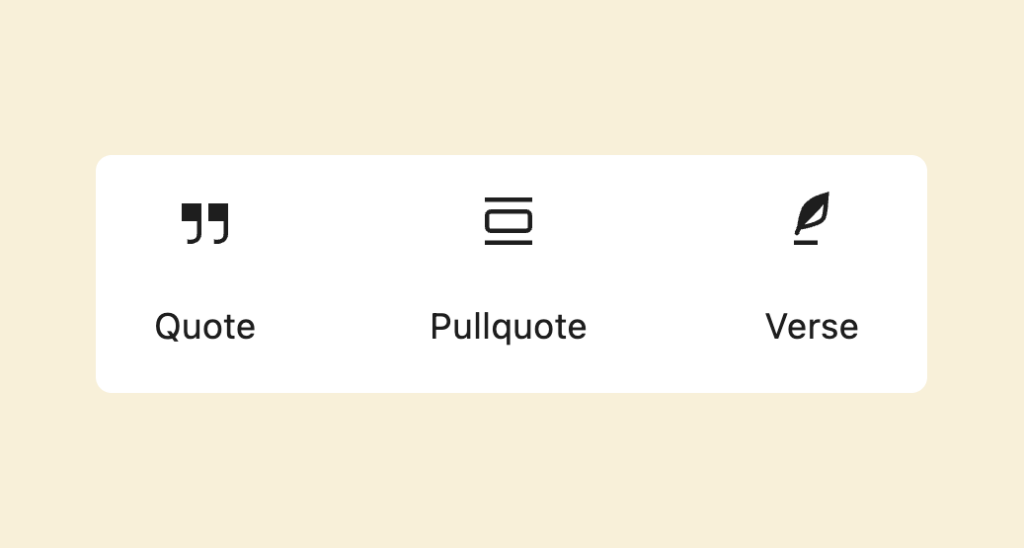
“Pull Quote” and “Quote” blocks do the same thing.
They let you add a quote.
The only difference is how the quote looks for the website visitors.
The “Quote” block
The “Quote” block allows us to present the quote with a very basic design, and this basic design changes from theme to theme.
Honestly, I don’t really like the “Quote” block because it looks basic and confusing to use.
The “Pullquote” block
I prefer the “Pullquote” block because it has a better design.
But for some reason, I still don’t like the design of the quote :D
The design of the quote totally depends on the active theme.
What shall we do now?
Shall we build a custom design for presenting the quote?
We can mix and match multiple blocks with the quote block.
But it is time-consuming, and I am currently feeling lazy.
So, is there a shortcut for displaying a good-looking quote at the click of a button?
Indeed!
Introducing Block Patterns
WordPress Block Editor has an exciting feature called “Block Patterns”.
So, what is a block pattern?
A WordPress block pattern is a predefined arrangement of blocks that can be used to create consistent and reusable layouts within the WordPress block editor.
A block pattern comprises multiple blocks grouped to form a specific design or content structure.
This is better shown than explained.
Previously, we got stuck with an average-looking quote design, right?
Let’s see if there is a block pattern for a quote.
How to add a block pattern to the Block editor?
Finding and adding block patterns is extremely easy.
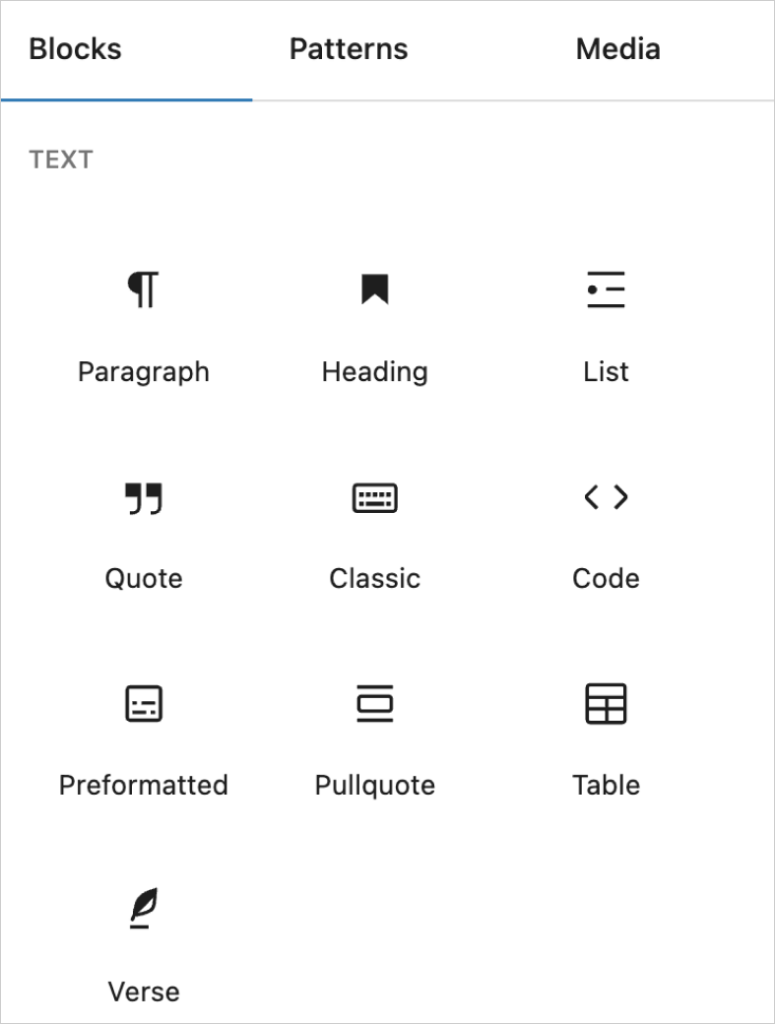
Step 1: Access the “Blocks” Sidebar

Click on the blue-colored “Plus” button in the top-left-hand corner of the post editor screen.
We usually use this button for adding a block.
Anyway, as soon as we click on it, it will show us a sidebar full of blocks.
And if you notice, the Sidebar’s content is divided into three tabs:
- Blocks – The default tab
- Patterns
- Media
Step 2: Click on the “Patterns” tab
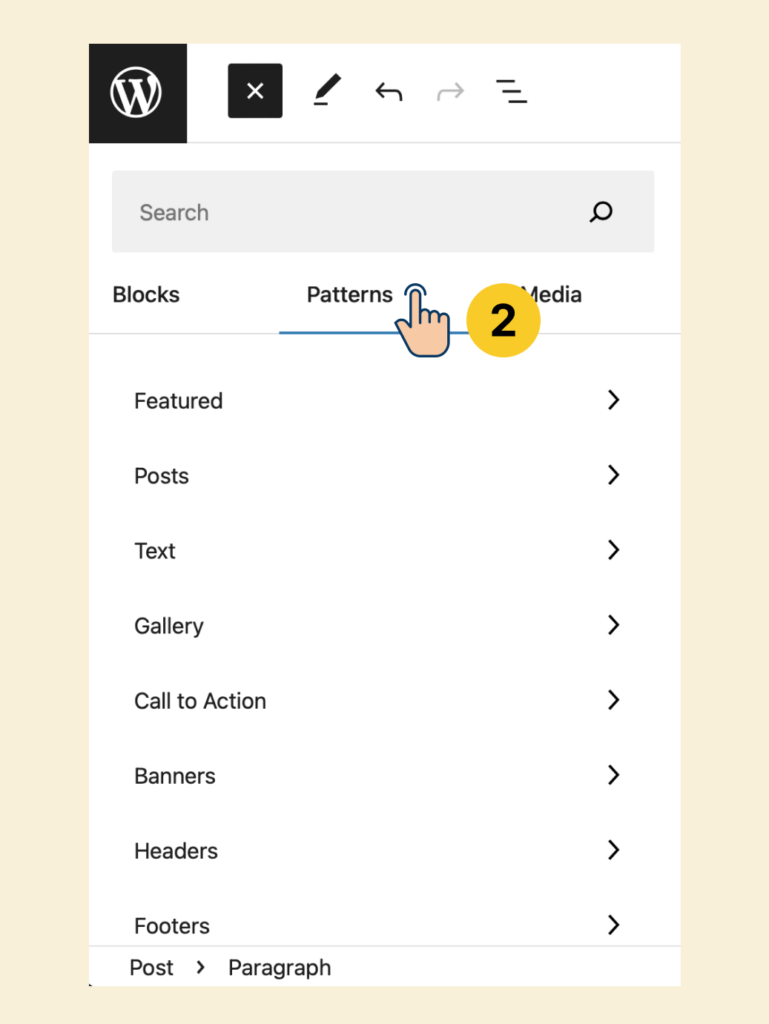
As you can see, the patterns are divided into categories.
We want to look for a “Quote” pattern, right?
So, we are interested in the “Testimonials” category, and you’ll find it at the bottom of the categories list.
Step 3: Click on the “Testimonials” category
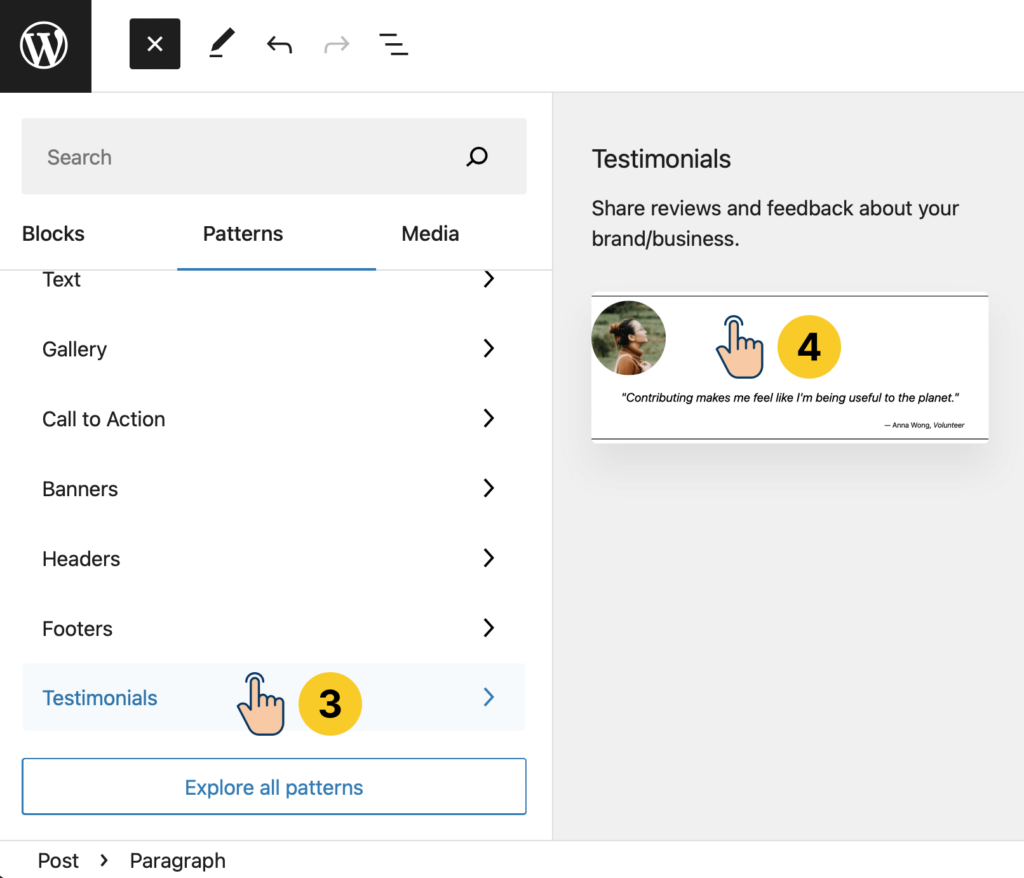
Step 4: Click on the “Testimonial” block pattern to add it to the post editor
When writing this lesson, only one pattern is available inside the “Testimonials” category.
But it looks nice. Let’s take a chance.
Click on the “Testimonial” pattern, and it is now added to the post editor.
Isn’t it looking nice?
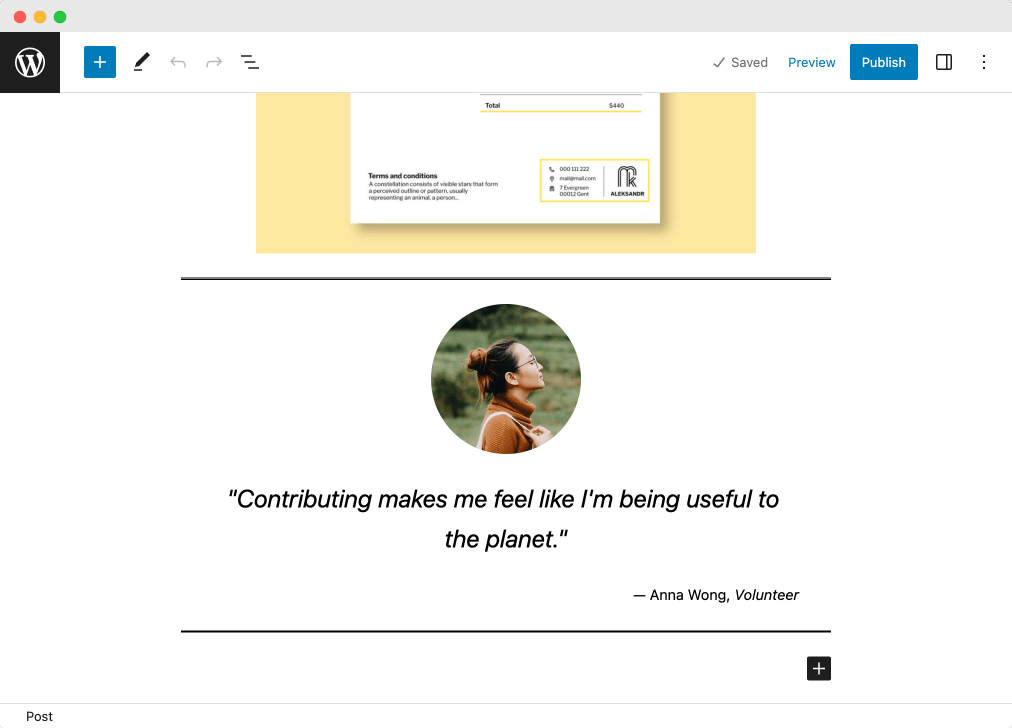
Next, we need to customize the information inside the “Testimonial” pattern.
Currently, it has some default data.
We can edit the pattern however we want
As I said, a pattern is a collection of blocks used together to form a specific design.
And to customize a pattern, you must select and edit the individual blocks inside that pattern.
The concept of block patterns will become more clear if you can see the document structure.
So, click on the “Document Overview” button:
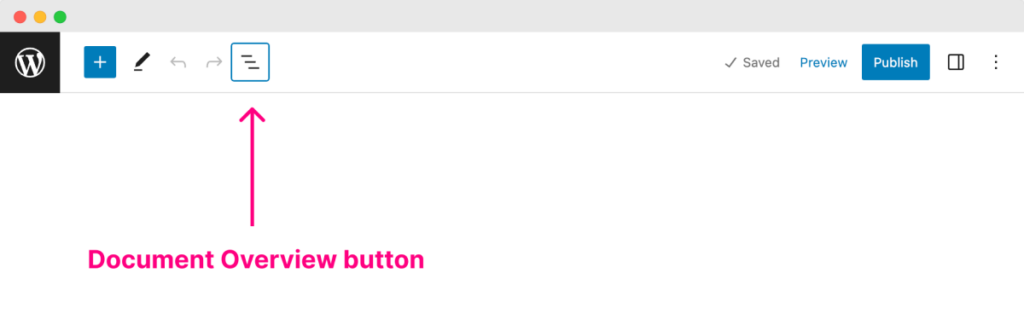
This will bring up the Sidebar that contains the list of existing blocks inside the post editor.
And if you observe the last four blocks inside the Sidebar, they were added as individual blocks to the block editor when we clicked on the “Testimonial” pattern.
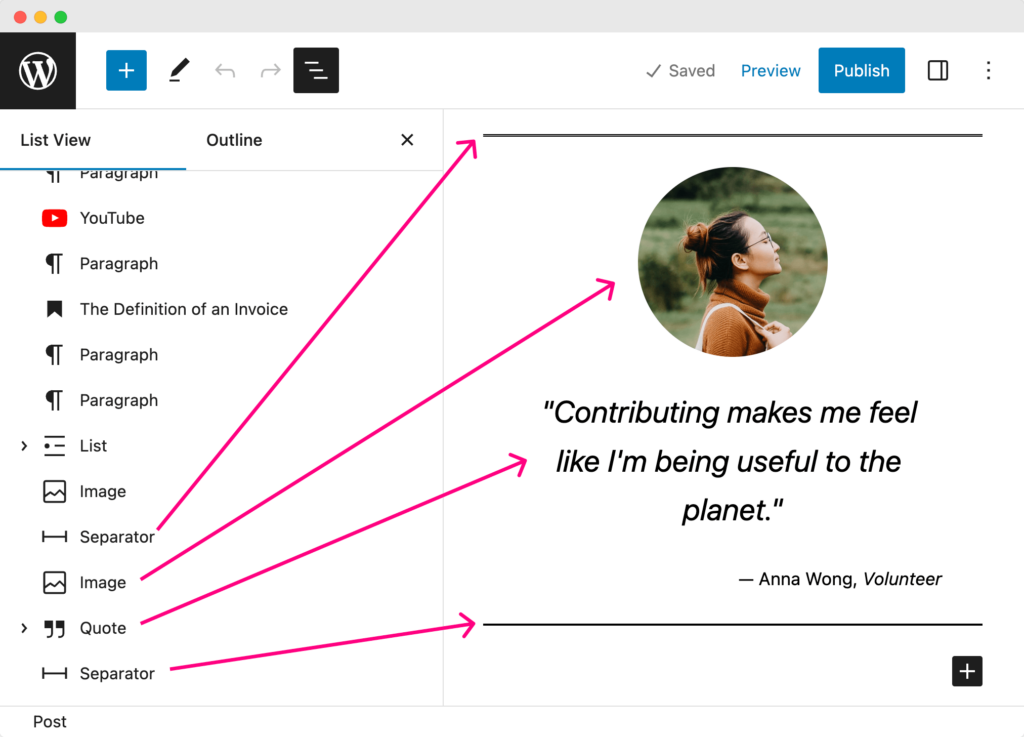
And they are just normal blocks that you can edit as usual. Nothing special.
We could have added and configured those blocks manually, but WordPress “Patterns” feature did it for us at the click of a button.
That’s all. Nothing special.
Now that you know what’s happening behind the scenes, let’s customize those blocks to fit our needs.
First, let’s change the author’s image to Benjamin Franklin.
Use this image that I downloaded from Wikipedia.
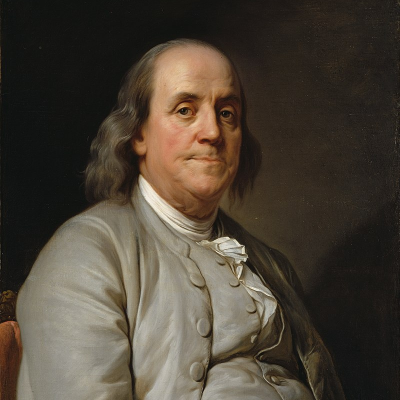
Next, click on the women’s image and replace it with Benjamin’s image using the “Replace” setting available in the Toolbar.
Next, let’s change the quote itself.
As we have seen, it is just a “Quote” block. So, click on the quote and change the text to:
“Beware of little expenses, a small leak will sink a great ship”
Finally, change the citation to:
— Benjamin Franklin, Scientist
Come on, let’s take a preview of the changes we just did.
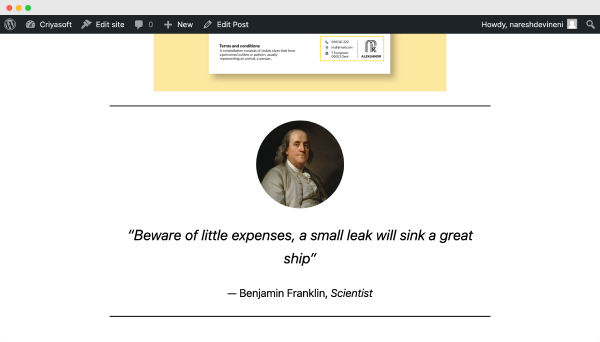
And bang!
If you notice, the citation is centered.
But in the block editor, it appears right-aligned, correct?
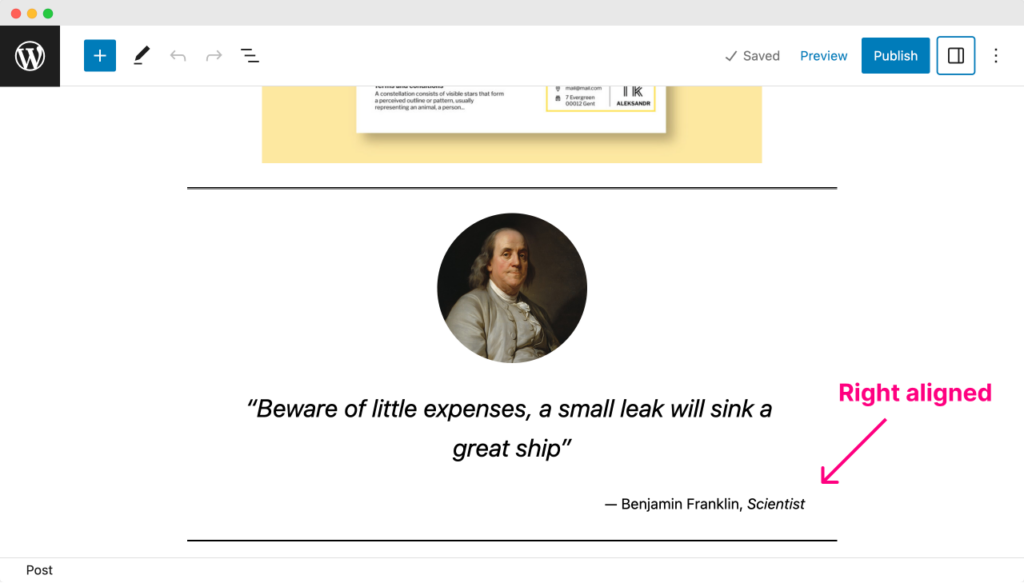
When I noticed this first, I tried fixing it on the block editor, but the “Quote” block is downright confusing to use and doesn’t give much control to right-align the citation.
This is one of the few inconsistencies of the block editor that we still have to face.
Hopefully, this issue could be fixed by the you are reading this lesson, but I am not 100% certain.
Anyway, long theory short, I don’t like the quote design we just added, and I want to delete the entire quote now.
Deleting blocks
When we are writing content, it is common for us to add content and delete some of that content because we don’t like it.
So, the Block editor makes deleting a particular block or a group of blocks easy and fast.
Come on, let’s learn how to delete blocks by removing the “Testimonial” pattern that we added previously.
How to delete an individual block?
There are many ways to delete a block, but the easiest way is:
- Just click on the block
- And then, hit the “Delete” button on the keyboard. Use the “Backspace”
But sometimes, as the block editor layout gets more complicated, selecting a block and hitting the delete button will not be easy.
This complexity usually comes with the parent blocks like Group, List, Row, etc.
If parent blocks are in place, we need precision to delete a block so that other blocks or the parent block won’t get deleted accidentally.
And we will get this precision from the “Document Overview” sidebar.
Deleting a block using the “Document Overview”
First, go ahead and click on the “Document Overview” button.
Then, find the last separator block in the editor.
Click on it and then delete it using your keyboard’s “delete” button.
That’s how you can be more sure you’re deleting the correct block.
Deleting a group of blocks at the same time using the “Document Overview”
Sometimes, to save time, you might want to delete multiple blocks at the same time.
And the only way to select multiple blocks is to use the “Document Overview” sidebar.
This sidebar is turning out to be much helpful, isn’t it?
Anyway, let me quickly demonstrate how it works.
I brought back all the previously deleted pattern blocks using the undo buttons.
Next, let’s delete all four blocks related to the quote at the same time.
To achieve that, first, open up the “Document Overview” sidebar.
Next, find the four blocks we want to delete.
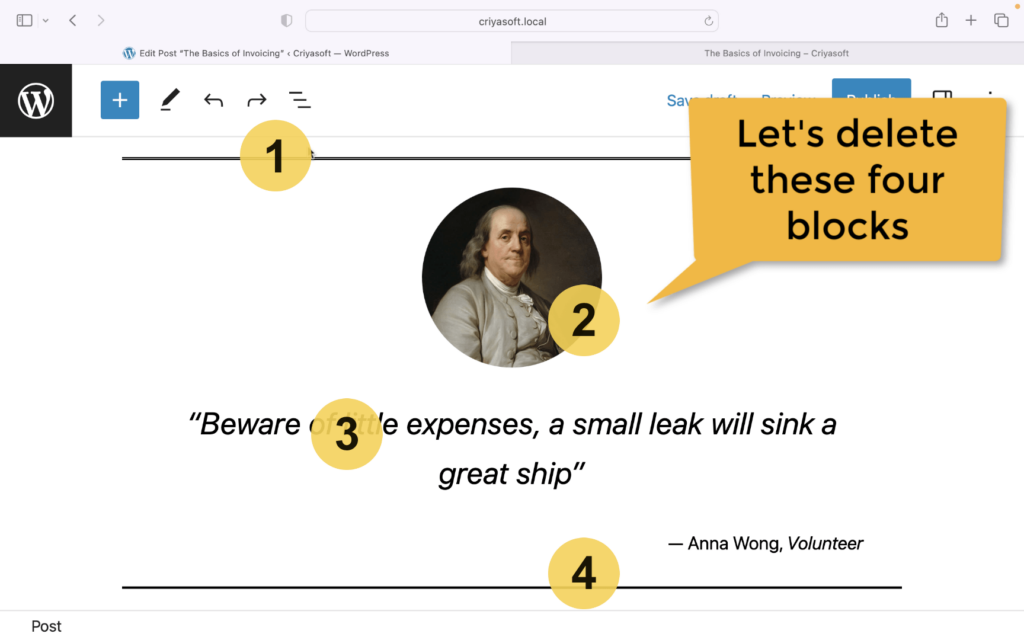
Then, while holding the “Shift” key on your keyboard, click on the first separator block and then click on the last separator block.
This will help you select all the blocks between the two separator blocks (image and the quote blocks ).
Now, if you try hitting the delete button on your keyboard, it doesn’t work :D
Instead, click the “three dots” icon next to any of the selected blocks.
It will bring up the settings popup, and if you scroll all the way down inside that popup, you’ll find the “Remove Blocks” button.

Just click on the “Remove blocks” button to delete all the buttons at once.
That’s all.
That’s how simple it is to delete an individual or multiple blocks inside the Block editor.
Next, let’s see how to embed YouTube and other third-party embed videos inside the block editor.
How to embed a YouTube video using the Block Editor
There are two ways to achieve this.
1) Directly paste the YouTube video URL inside the Block editor
For example, copy this YouTube URL about Invoicing:
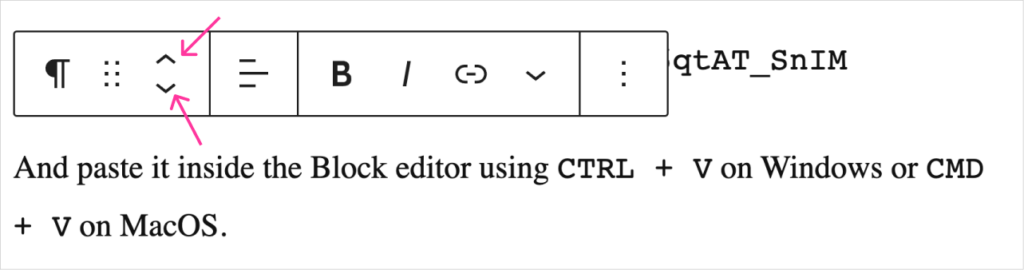
https://www.youtube.com/watch?v=O6qtAT_SnIMAnd paste it inside the Block editor using CTRL + V on Windows or CMD + V on MacOS.
This will make the Block Editor embed the YouTube video automatically.
2) Using the “Youtube” block
WordPress comes with a dedicated “Youtube” block.
And here is how you can use it.
Step 1: Add the “YouTube” block to the editor
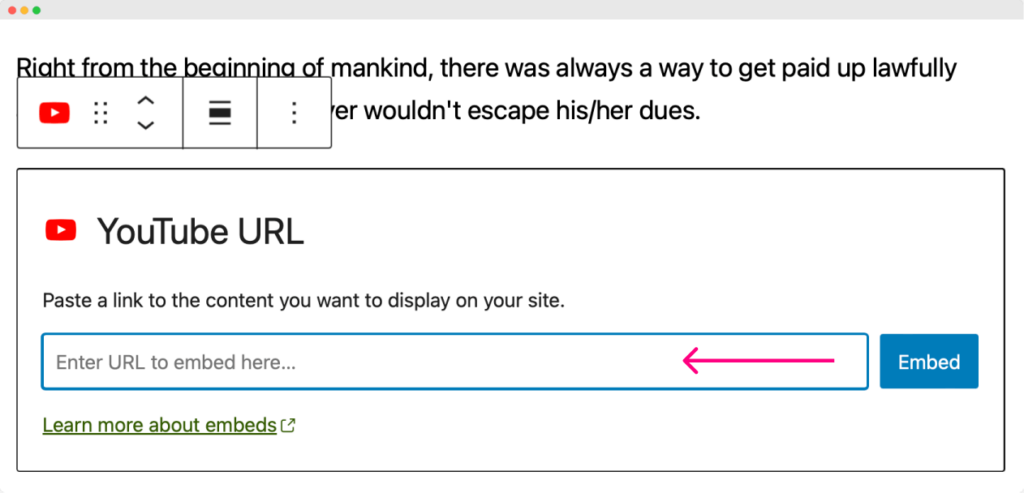
If you notice, there is a text field called “Enter URL to embed here…”
It would be best to paste the YouTube URL here and then click the “Embed” button.
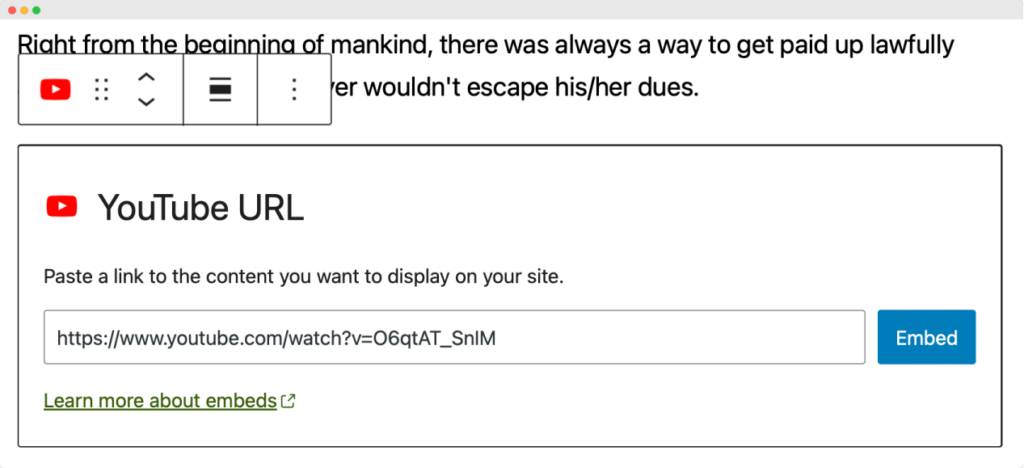
That’s all it takes to embed a YouTube video.
The same tactics we used for embedding YouTube videos also apply to Vimeo. But with Vimeo, sometimes, the direct copy-and-paste strategy doesn’t work. It is advised to use the “Vimeo” block for a reliable embed.
How to change the order of the blocks
We will conclude this article by understanding how to change the order of the blocks.
We have added a lot of content to our blog post, right?
So, sometimes, we end up re-arranging the content.
To achieve this, we need to use “Move up” or “Move down” options.
You can only find these options when you select a particular element.
So, click on the block that you want to re-order and:
- Use the “Move up” option to re-order it one step in the upward direction
- Use the “Move up” option to re-order it one step in the downward direction
How to add a Shortcode to the Block Editor
Adding a shortcode is just like adding any piece of content to the block editor.
You could directly paste the shortcode inside the block editor, and it will work as expected.
But I would recommend using the “Shortcode” block.
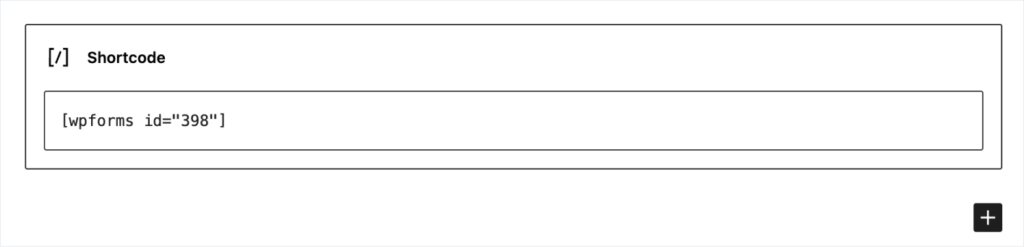
Remember, you still have to add the square brackets before and after the shortcode. Otherwise, the shortcode doesn’t work.
How do you exit the block editor?
Once the article is written, make sure to publish the article by adding :
- Featured image
- Categories and Tags
After that, to exit the block editor, you need to exit the entire page or post-editing screen.
To achieve this, click on the “View Posts” button that is located on the top-left-hand corner of the editing screen:

If you have uploaded a favicon for your site, you’ll see the favicon instead of the WordPress icon.
That’s all you need to know about WordPress Block Editor for now.
I hope you’re now feeling confident about how to use the Block Editor.
“Yep, I am! But I have a few unanswered questions!”
Ask away!
Frequently asked questions
Why is WordPress Block Editor so slow?
Plugins are the culprit here. Activating bad plugins on your site will make your WordPress website slow. Not just Block Editor. WordPress Block Editor is part of Core WordPress software, and it is always fast on its own. So, to speed up the Block Editor, deactivate the problematic plugins, and you’re good to go.
Which is faster, Elementor or Gutenberg?
Gutenberg, a.k.a Block Editor, is faster and more performant when compared to any Elementor or any other page builder, for that matter. This is because Block Editor is part of Core WordPress software. So it is quick and reliable.
 © 2026 UsableWP. A project by Naresh Devineni.