Building a WordPress Theme From Scratch: Internal Pages
This is Part 6 of the 9 part Course about developing a WordPress theme from scratch.
Here is the access to the other parts of the Course in the sequential order:
- Developing a WordPress Theme From Scratch
- WordPress Theme Development: The best way to enqueue scripts and styles
- WordPress Theme Development: Creating the header and making our theme translation ready
- WordPress Theme Development: Site footer with social navigation, dynamic copyright statement
- WordPress Theme Development: The Loop, the main content, Google Fonts, and the Custom Fields
- Building a WordPress Theme From Scratch: Internal Pages (Current Part)
- WordPress Theme Development: Building the Blog
- WordPress Theme Development: Search page, 404 error template, Custom Queries, and custom post types
- WordPress Theme Development: WordPress Customizer and it’s API
When building a WordPress theme, you’ll be creating a lot of template files.
In this part, we will learn how to build template files for the static internal pages.
A Static page is nothing but an internal page of a WordPress site. Pages like About, Contact Us, Terms & Conditions etc. are the best examples of a static page. We are calling them static pages because we don’t change the content of these pages that often.
Now, don’t get confused with the word Static Front Page for Static Page. They both are different in the world of WordPress.
A Static Front Page is a Homepage of our WordPress site and as I said above, a Static page is an Internal Page of the same site.
Anyway, If you know how to build the Homepage in WordPress, you can use the same technique to build every other page on the site. The thing is, We still have to use the same main query Loop. We still have to use the same Header and Footer files.
The only thing that changes here is the theme’s template file that WordPress choose to render the page. You have to get habituated to this fact.
So, technically, all we have to do now is create an appropriate template file inside our theme and put the Loop and include Header Footer files in it. That’s all. WordPress will take care of the rest.
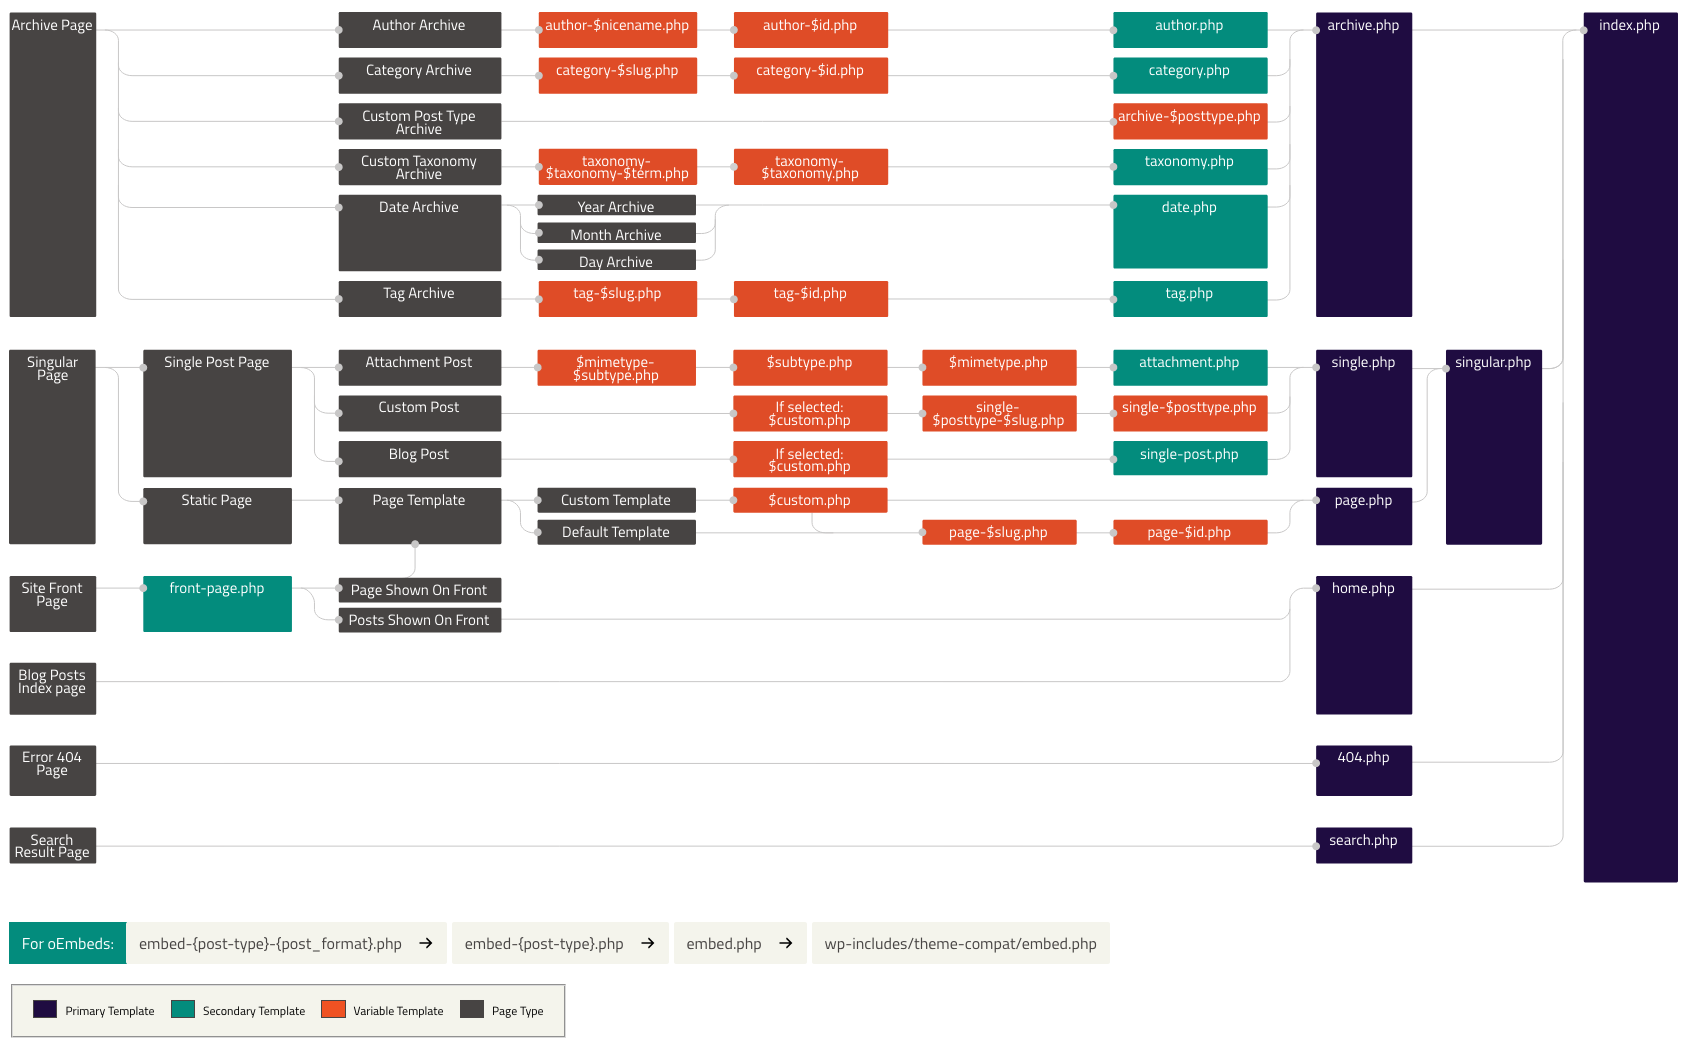
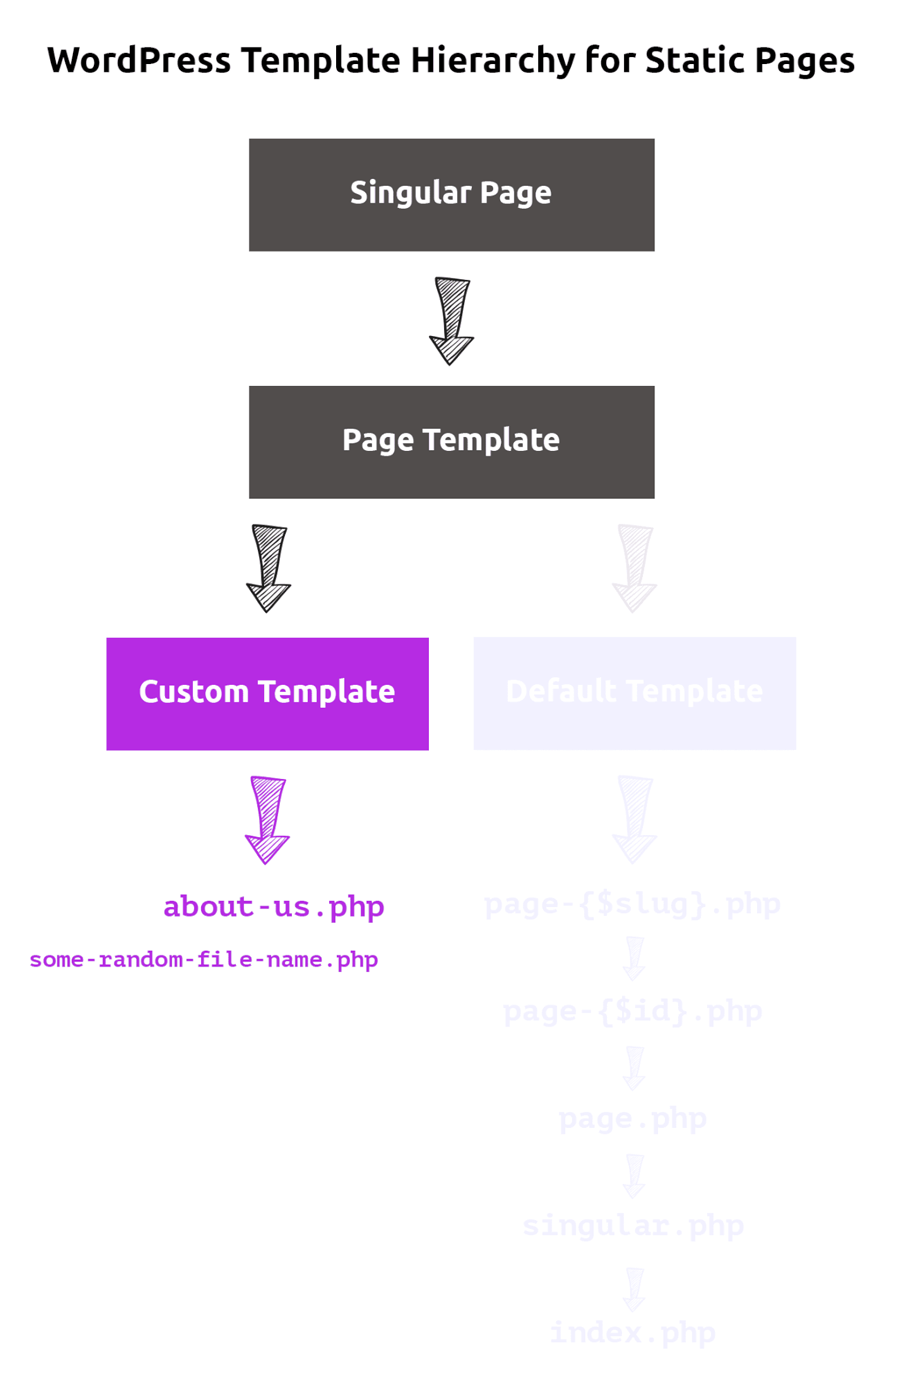
Common, let’s take a look at the WordPress Template Hierarchy for rendering Static Pages.
For the Static Front Page, we used the front-page.php file.
For a Static Internal Page, we usually use page.php file.

If you observe the above image, you can tell that WordPress looks for two types of template files inside our theme for rendering the static pages:
- Custom Template Files
- Default Template Files
- Dynamic Templates
- Generic Templates
When to use the WordPress Default Template files
The reality is, almost 80% of static pages on every website looks exactly the same from a design perspective. This applies to a large percentage of sites on the web.
Also, the site owner will keep adding more and more static pages as the time progresses. And whenever site owner publishes a new page, he/she expects that the page design to be consistent with rest of the independent pages.
This is exactly where the Default Template files come in.
We can use a Default template file like page.php or index.php to render all most all the pages on the site. Even the future pages. The client doesn’t have to change any setting.
We can also use Default Template Files to render a particular page
If you notice the Default Template section in the above image, you can see two template files with dynamic names.
1) page-{slug}.php file
2) page-{id}.php file
The template files with the above naming convention are used by WordPress to render a particular page only.
The {slug} and {id} portions refer to the URL slug and ID of a particular page.
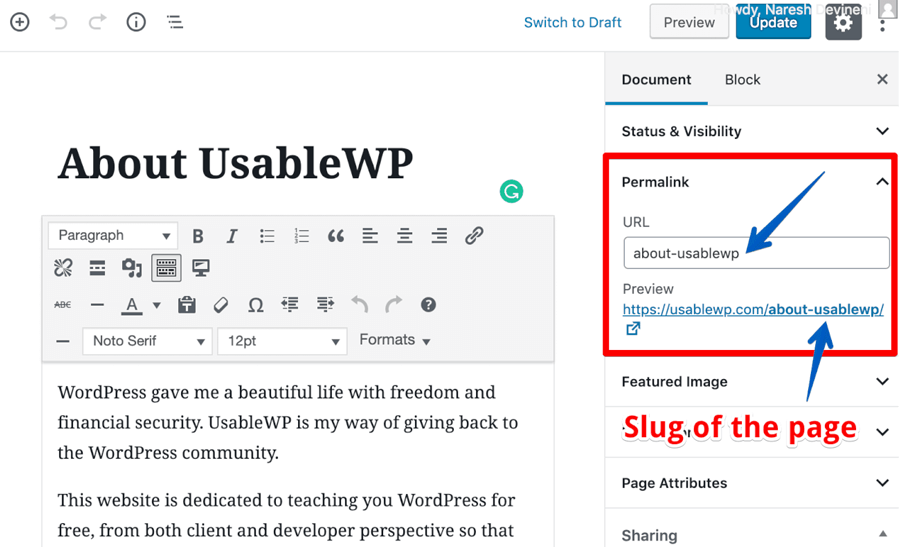
For example, if the user visits the About page of Dosth site and if the URL of about page is:
https://www.usablewp.com/about-usablewp
Assuming a custom template file is not assigned to render this page, WordPress will start looking for a template file with name page-about-usablewp.php. If WordPress finds this file, it will use it to render the page.
Although this technique is helpful to code the About page uniquely, we can not rely on this type of Template file. What if the SEO guy asks to change the slug of the page? If the slug of the page changes, we have to change our template file name too.
The same thing applies for Page Template with page-{id}.php format. What if the Client / Administrator decides to delete and re-create the page? WordPress will assign a new ID for the page making the page-{id}.php file useless.
So, it is a bad Idea to use these Default Template files for designing a Page uniquely. And this is where Custom Templates shine.
When to use a Custom Template File
We can use the custom template file for rendering a particular page with a unique design. I do this all the time. I create a custom page template for every unique looking page on the site. This helps me write appropriate HTML markup based on the design.
This doesn’t mean you can not use custom templates to render multiple pages. You can absolutely do that.
For example, We can use a Custom Template file to render a ditto-looking group of static pages of our site. Imagine the site has 26 Static pages. Out of these 26 pages, four of them look exactly the same from the design perspective because they might belong to a particular service that the site owner promotes. For this scenario, we have to use the same template file for rendering all those ditto-looking four pages. And a Custom Template file helps us achieve this.
Get it?
Also, There is a problem
Before we start creating more specific template files for our static pages, It is important that we fix an important problem.
Currently, If you try to visit other pages on our Dosth Site, for example, About page, WordPress is greeting you with an empty page.
http://localhost:8888/dosth/about
“I tried previously! But couldn’t figure why is this happening! Is this because the content of the About page is empty?”
Oh! It’s good to know that you are curious.
Anyway, You already knew the answer. All you have to do is utilize the knowledge that you gained from the previous lessons.
Common, take a dig at it one more time!
Did you?
Anyway, the reason behind this is, since there is no Static page specific template file inside our theme, WordPress is using the index.php file render the page. And because this file is empty with no Loop and Header-Footer files, the browser is rendering the empty page to the user.
And this is not a good practice.
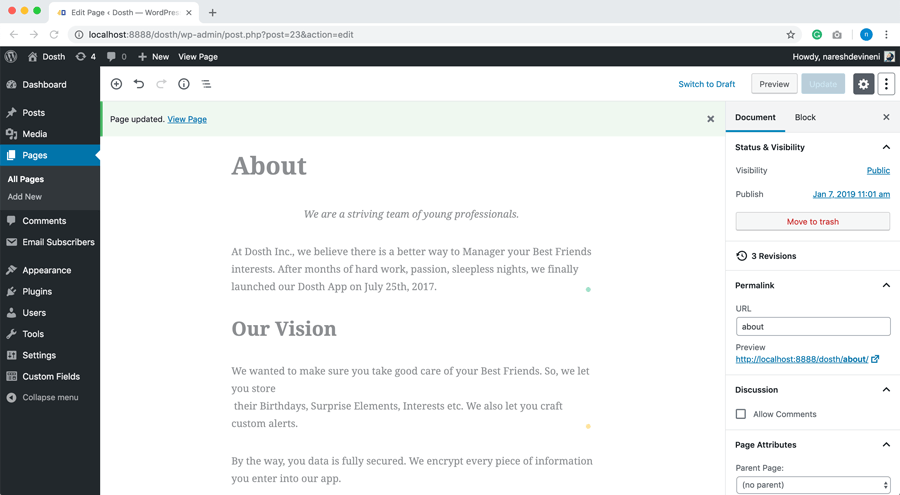
But before we fix the index.php file, let’s put some content into the About page.
You can find the content of the About page inside the dosth-site-content.docx word document.
I added the content and it looks by going to:
Admin Dashboard -> Pages -> About -> Edit Screen
Let’s fix the empty page problem
It is pretty common for us the theme developers to forget creating some template files and this mix up could lead us to show empty page to the visitors.
So, temporarily, if we can code the index.php file with some generic design, we can at least make content accessible to our visitors.
Later, we use index.php file to render the blog posts archive without ever having to create separate template files for them.
Common, go ahead and open up index.php file and put the following code inside it.
<?php
/**
 * The main template file
 *
 * This is the most generic template file in a WordPress theme
 * and one of the two required files for a theme (the other being style.css).
 * It is used to display a page when nothing more specific matches a query.
 * E.g., it puts together the home page when no home.php file exists.
 *
 * @link https://developer.wordpress.org/themes/basics/template-hierarchy/
 *
 * @package Dosth
 */
get_header();
?>
<?php while( have_posts() ): ?>
    <?php the_post(); ?>
    <div class="content-container">
        <div class="container">
            <div class="row">
                <div class="col-sm-12 actual-content">
                    <h1 class="page-title"><?php the_title(); ?></h1>
                    <?php the_content(); ?>
                </div>
            </div>
        </div>
    </div>
<?php endwhile; ?>
<?php get_footer(); ?>
Nothing much going on in the above code. I copied the introduction comment from the TwentyNineteen default theme that comes with WordPress and pasted inside our theme’s index.php file.
Next, I included Header and Footer files.
Finally, I copied the Loop from the front-page.php file and made a small adjustment to it so that it outputs the title of the page.
This is common sense, right? For Homepage, We don’t need to output the title saying “Home”. But we need to output it for the Internal Pages.
That’s all it takes to avoid empty pages in WordPress. All you have to do is put the Loop inside the index.php file. Also, you’ll face this problem only if you are creating your first WordPress theme. For your second WordPress site, you’ll be reusing the same code without ever having to re-create them.
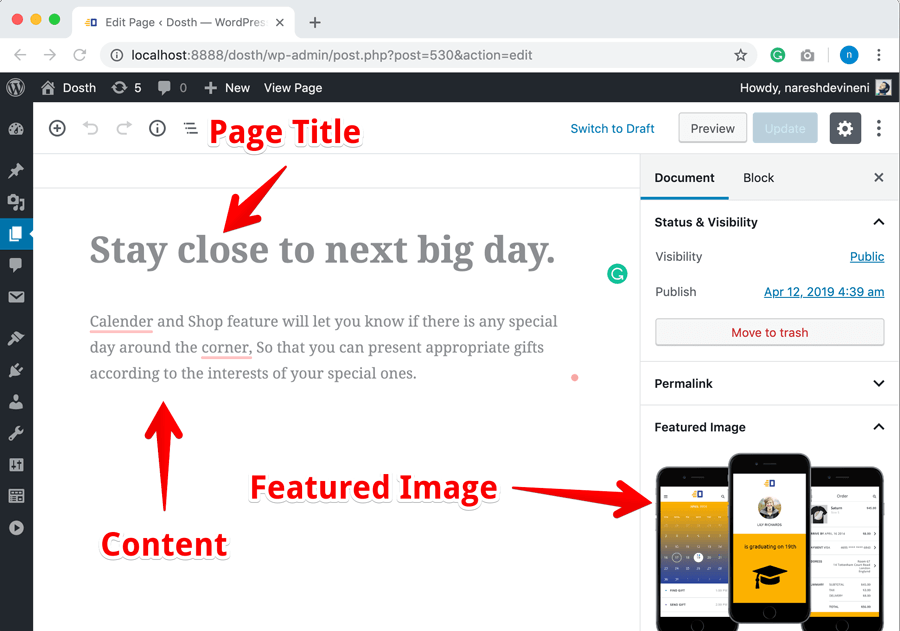
Now, if you go back to the browser and refresh the About page, you’ll see the content of the About page along with the Header and footer elements.
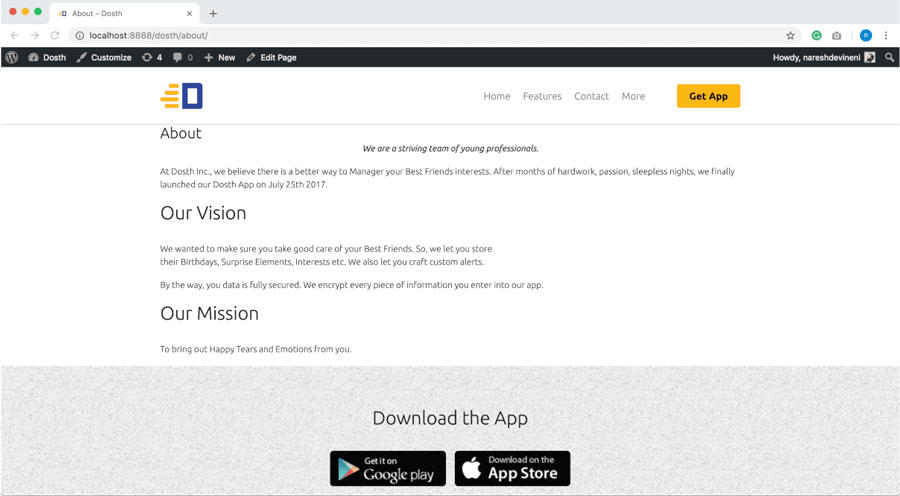
I agree this is not the best-looking page design. But that’s ok for now.
Now that the problem is solved, we will create a more specific template file to render our static pages.
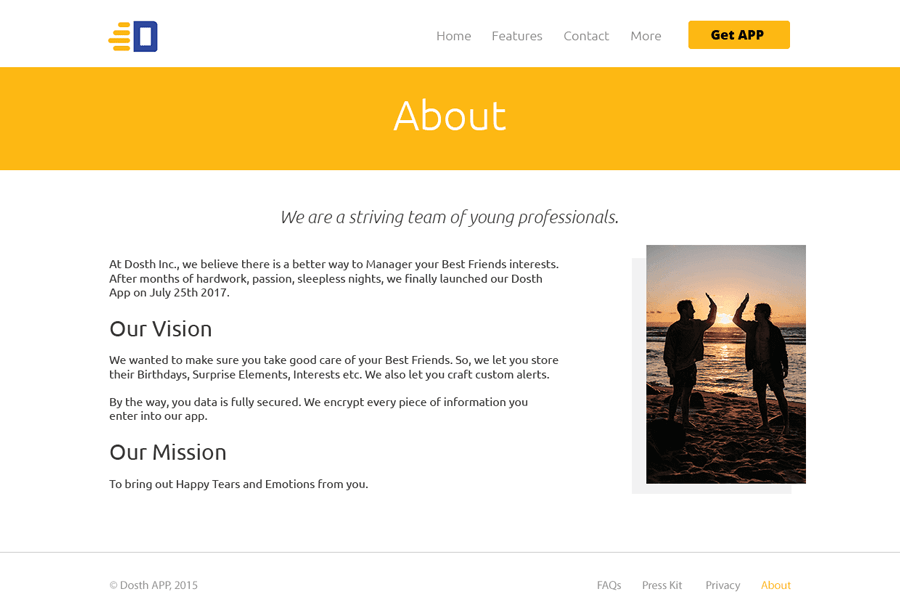
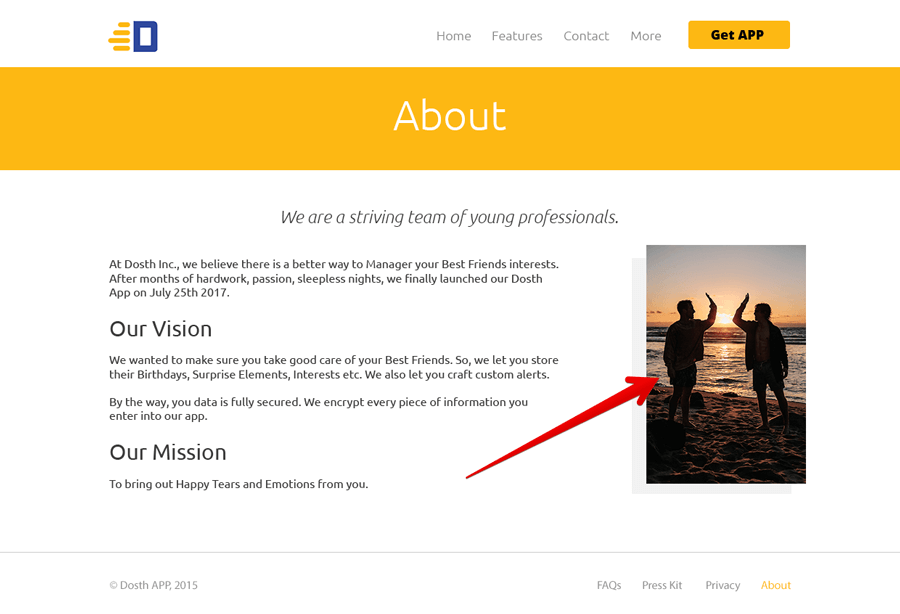
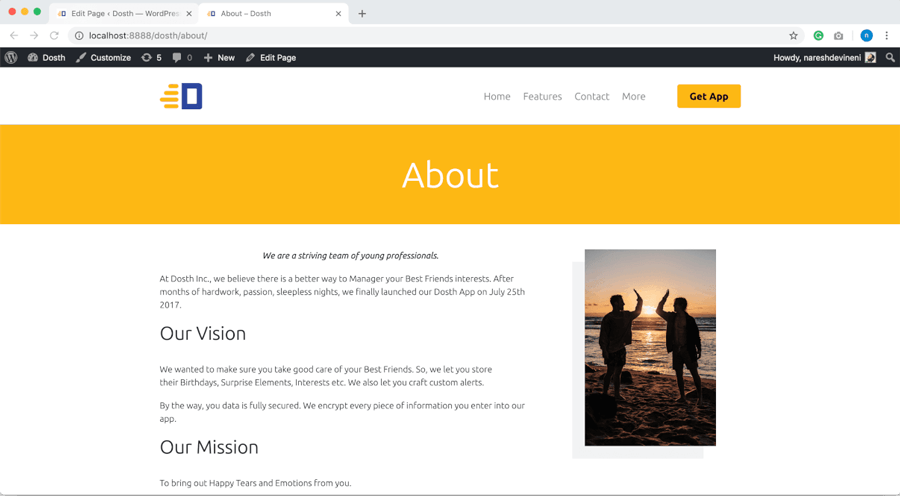
Rendering the About page using the page.php when building a WordPress Theme
Here is the design of Dosth’s About page.
In the last section, we entered the content for the About page and WordPress rendered it using the index.php file.
But the problem with this file is, WordPress uses it to render all kinds of post types. Not just pages. So, we can not limit the output of the index.php file to resemble the above design.
You’ll understand what I am trying to say by the end of this course.
Also, I want all other internal static pages of the site to look exactly as the above design.
So, to achieve this, we have to create page.php default template file and put the markup that is specific to the above design.
Open up the code editor and create the page.php file inside our nd-dosth theme folder and put the following code in it.
<?php
/**
 * The template for displaying all static pages
 *
 * @link https://developer.wordpress.org/themes/basics/template-hierarchy/#single-post
 *
 * @package Dosth
 */
get_header();
?>
<?php while( have_posts() ): ?>
    <?php the_post(); ?>
    <div class="content-container">
        <h1 class="page-title"><?php the_title(); ?></h1>
        <div class="container">
            <div class="row">
                <div class="col-sm-8 actual-content">
                    <?php the_content(); ?>
                </div>
                <div class="col-sm-4">
                    <div class="featured-image">

                    </div>
                </div>
            </div>
        </div>
    </div>
<?php endwhile; ?>
<?php get_footer(); ?>
Again, nothing much going on. Inside the loop, I created a two column layout.
In the left side column, I am outputting the content of the page. And on the right side, I want to output the Featured image of the page which I will do in the next lesson.
If you check out the About page in the browser, this is the output you’ll see.
WordPress is now using the page.php file to render the About page instead of index.php file.
We can confirm this by inspecting the HTML of the About Page.
Next, we will learn about Featured Images.
How to output Featured Image aka Post Thumbnail when building a WordPress theme
A Featured image ( Post Thumbnail ) is nothing but an image which acts as the main image of a particular page or a blog post. That’s all.
Sometimes a featured image conveys the type of information that is present on the page. But, sometimes it is just there for aesthetic purposes.
If you remember, in the first section of this module, although we have added the text content for the About page, we did not add the featured image.
Let’s do that now.
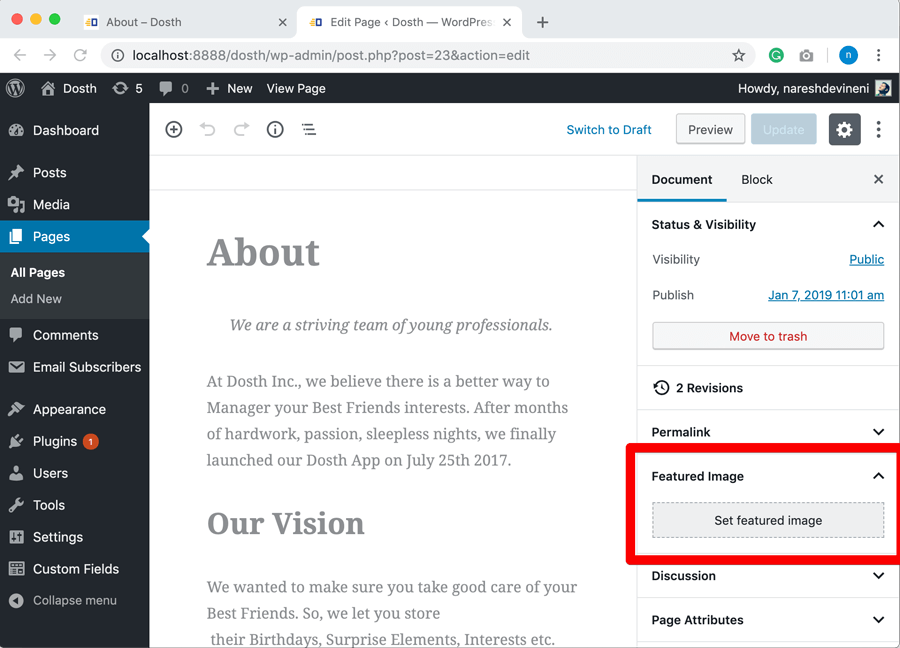
Go to Admin Dashboard -> Pages -> About -> Edit Screen
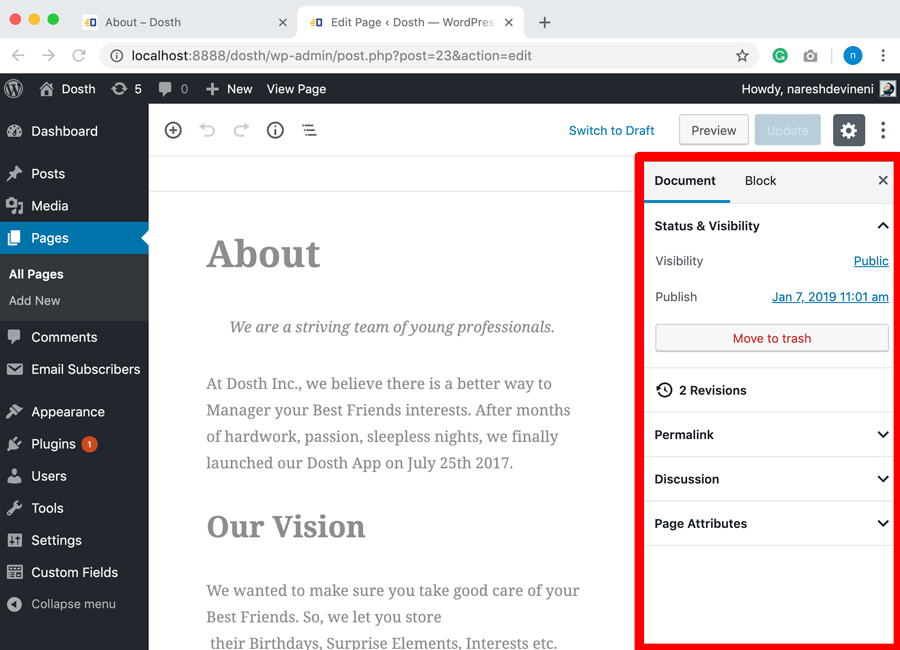
Ah! Bummer. If you notice the Document Options on the right-hand side of the screen, there is no Featured Image section at all.
This is because “Featured Image aka Post Thumbnail” is also a theme specific feature and we need to enable support for it.
“Hey! I understand that a Featured Image is same as Post Thumbnail. You don’t have to repeat it all the time.”
Oh, Thanks :)
Anyway, open up the functions.php file and put the following code inside the nd_dosth_theme_setup action:
// Add Featured Image support
add_theme_support( 'post-thumbnails' );
Now, let’s go back to the Admin Dashboard -> Pages -> About -> Edit Screen
And Voila! Now you can set a Featured Image for both pages and blog posts of our site.
Nothing Surprising. WordPress just works as expected.
Now, let’s upload the featured image for the About page. You can find the image inside the dosth-site-content.docx file -> About Page Content.
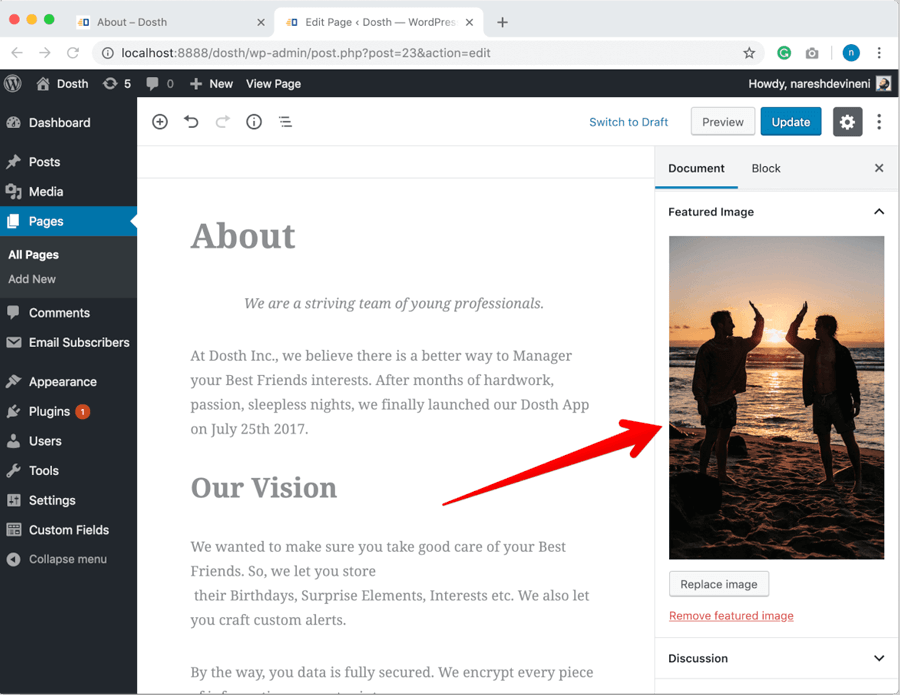
Don’t forget to click on the “update” button to save the changes.
Finally, let’s output the Featured Image on the frontend.
Now let’s output the “Featured Image”
You already know how to output the featured image.
Remember outputting the logo in the Header? We used wp_get_attachment_image_src function to output the logo.
And now, we will be using the same technique and function to output featured image as well.
So, open up the page.php file and put the following code inside the <div class="featured-image"> container.
<?php if ( has_post_thumbnail() ) :
    $featured_image = wp_get_attachment_image_src( get_post_thumbnail_id( $post->ID ), 'large' ); ?>
    <img src="<?php echo $featured_image[0]; ?>" alt='' />
<?php endif; ?>
First, we are checking to see if the page has a featured image with the help of has_post_thumbnail() function. This function will return true only if we have set a featured image for a particular page.
In our case, the has_post_thumbnail() function returns true. So, we go inside the IF condition.
And inside the IF condition, we are first getting the details of the Featured Image like its URL, dimentions etc. using the wp_get_attachment_image_src function call.
It accepts three parameters. We are only interested in the first two of them.
The $post_thumbnail_id parameter
wp_get_attachment_image_src( get_post_thumbnail_id( $post->ID ), 'large' );
We are getting the Post Thumbnail ID by using the get_post_thumbnail_id() function. This function needs the Post ID / Page ID as the parameter. And, because we are inside the loop, we can access the Post ID / Page ID by using the global $post->ID variable or the get_the_id() function.
I went with the $post->ID variable because it is easy to type :P. Convenience matters you know?
Don’t Remember $post variable? When we learned about the Loop, we also learned that the_post() function inside the loop sets up the global $post variable.
The $image_size parameter
wp_get_attachment_image_src( get_post_thumbnail_id( $post->ID ), 'large' );
As I have said before, WordPress automatically generates various thumbnails sizes for every uploaded image. Featured image is not an exception. So, We need to specify the image size that we are interested in. If we don’t specify the image size, by default, WordPress gives us the image data for the thumbnail version of the actual uploaded image.
And here is the full list of the default image sizes that WordPress generates.
- small – smaller thumbnail with 100x100px
- thumbnail – 150x150px ( Square )
- medium – 300x300px (maximum width or height is 300px)
- large – larger thumbnail (maximum width or height is 1024px)
- full – the original image with the actual dimensions
When it comes to the featured Image, depending on the page design, some times we need to display the thumbnail version of the image and sometimes full version.
We usually display the thumbnail version of the image inside archive pages. You’ll learn about archive pages when we build the blog.
In our case, we are going with the full version of the image by keeping the responsive layout in mind for smaller devices.
Now, there are some better ways and advanced techniques to deal with responsive images. At the end of the day, it all depends on how much budget the client has.
Irrespective of the budget, always compress images and try to keep the image dimensions below 1000px width and height.
Once the wp_get_attachment_image_src function call returns an array with all the featured image details like its dimensions, URL etc. We are storing the array inside the $featured_image variable.
$featured_image = wp_get_attachment_image_src( get_post_thumbnail_id( $post->ID ), 'large' );
The first item inside the $featured_image array is the image URL that we need.
So, we are finally outputting the Featured Image URL inside the source attribute of the Image Tag:
<img src="<?php echo $featured_image[0]; ?>" alt='' />
That’s all. This is the technique you’ll be using to output a featured image that belongs to any post type in WordPress. Most probably for the rest of your WordPress career.
Here is the final code for page.php file’s Loop:
<?php while( have_posts() ): ?>
    <?php the_post(); ?>
    <div class="content-container">
        <h1 class="page-title"><?php the_title(); ?></h1>
        <div class="container">
            <div class="row">
                <div class="col-sm-8 actual-content">
                    <?php the_content(); ?>
                </div>
                <div class="col-sm-4">
                    <div class="featured-image">
                        <?php if ( has_post_thumbnail() ) :
                            $featured_image = wp_get_attachment_image_src( get_post_thumbnail_id( get_the_ID() ), 'large' ); ?>
                            <img src="<?php echo $featured_image[0]; ?>" alt='' />
                        <?php endif; ?>
                    </div>
                </div>
            </div>
        </div>
    </div>
<?php endwhile; ?>
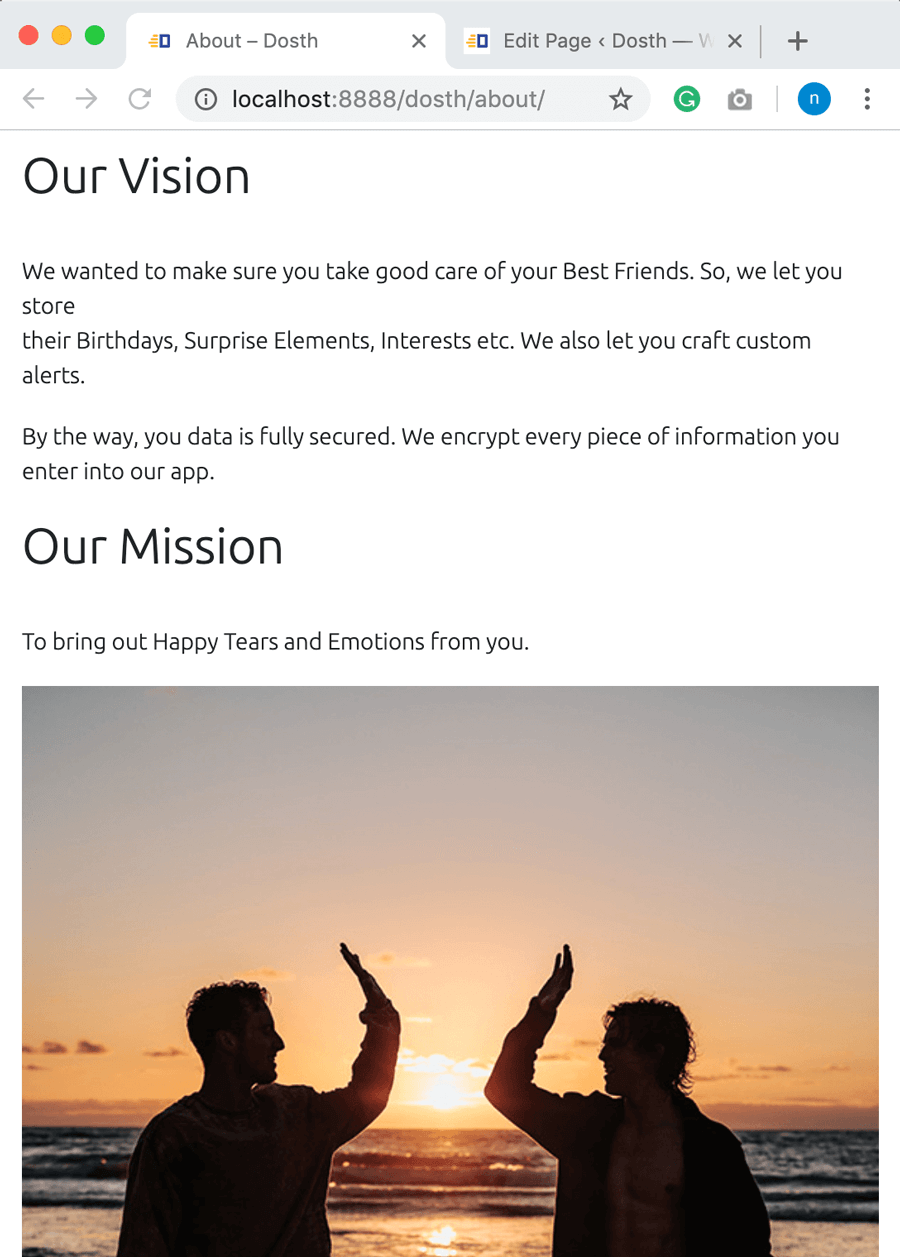
Here is the output in the browser:
I know, currently, it doesn’t look anything like the Mockup.
To fix this problem, add the following CSS to the end of the style.css file:
/*-------------------------------------------------------------------------------
  11.Internal Page Styling
-------------------------------------------------------------------------------*/
.content-container .page-title{
    background-color: #fdb813;
    padding:46px 15px;
    text-align:center;
    font-size:56px;
    text-align: center;
    color:white;
}
.content-container .featured-image{
    margin:40px;
    position:relative;
}
.content-container .featured-image:before{
    position: absolute;
    background-color:#f2f2f2;
    width:100%;
    height:100%;
    content:"";
    left:-20px;
    top:20px;
    z-index: -1;
}
.page-template-default .actual-content{
    padding-top:40px;
    padding-bottom:40px;
}
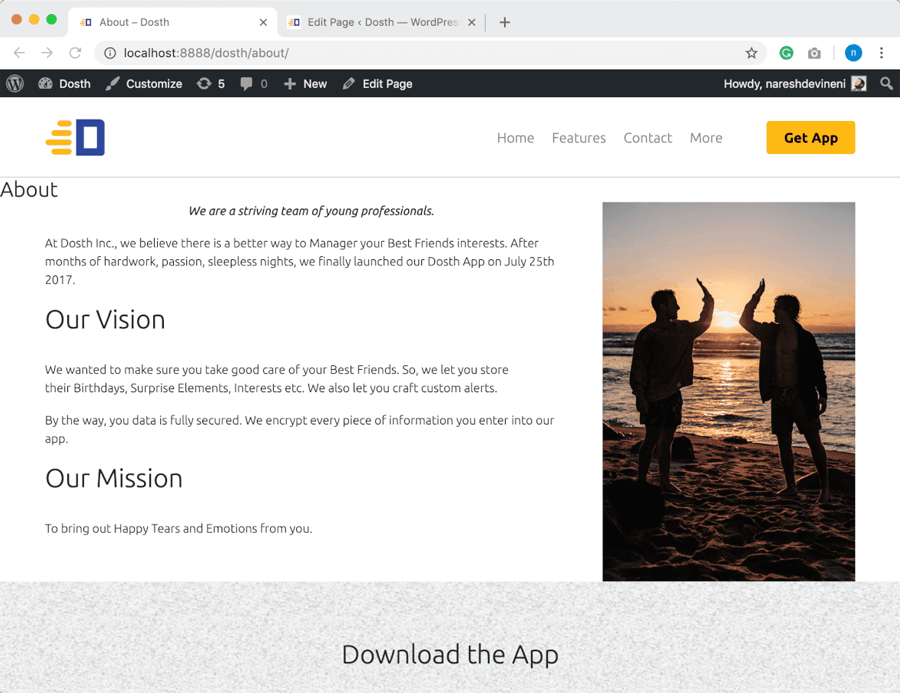
Here is the final output of the About Page:
“Hey, it is a bit different from the mockup! The top line in the italic must be bigger in font-size and at the center of the page, right?”
Yep! Correct. That’s your exercise.
A Simple Exercise
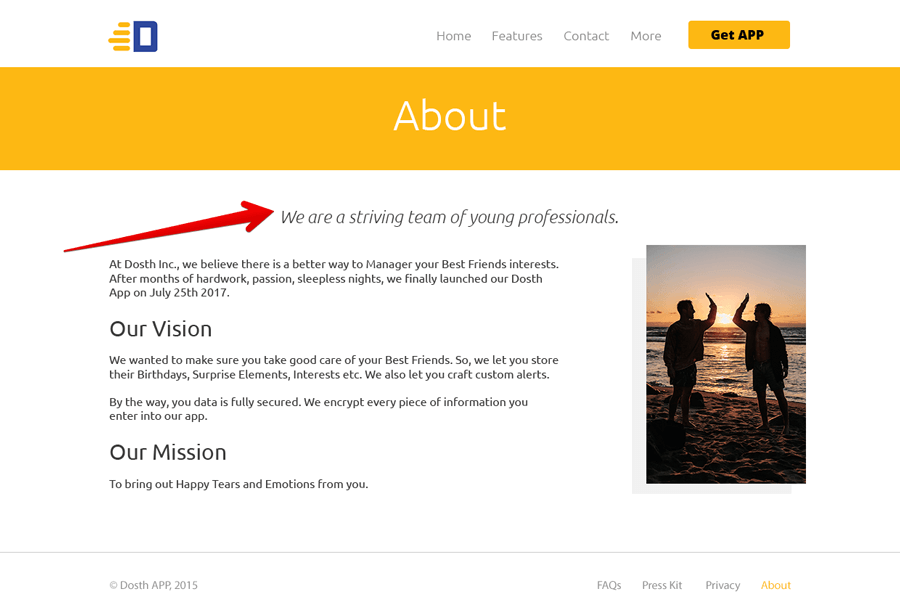
You can fix the problem by using the ACF based custom field, for example:

You already know how to use ACF. You have to use the same technique that you have used for the Hompage.
Anyway, if you now go ahead and look at the other internal pages of the site, all of them would look the same as the About page.
This is the power of default templates files in WordPress. From now onwards, if we do not set up a custom template for a page, WordPress will use the page.php file to render the static page.
Next, we will learn how to create and make use of Custom Page Templates in WordPress.
Introducing WordPress Custom Page Templates
The above design looks totally different from the About page design, right? The markup for the above design would look totally different too!
So, it is not a good idea to modify the page.php file to render the above design. I am not seeing it is not possible but you have to deal with a lot of IF conditions if you do so.
This is where custom template files come in handy. As I said before, we use a custom template file for rendering a particular page with a unique design.
WordPress allows you to create any number of custom template files you want. So, if it is a unique looking page design, go with a custom template blindly.
Also, creating a custom template file to render a page is extremely easy. All you have to do is create a new template file with any name you want and put a special comment at the top of the file.
So, inside our nd-dosth theme, create a new directory called page-templates.
Creating this directory is not mandatory. WordPress will scan the entire theme directory to find custom page templates. I created this directory just for the sake neatness and it helps other developers find the page based templates easily.
Next, inside page-templates directory, create a new file called template-announcement.php file.
I am repeating it again! You can name the file whatever you. But just make sure it is relevant to the purpose of the template file.
For example, if I am creating a custom template file to render a Contact page, I will name it template-contact.php.
In our case, I named it template-announcement.php because I am creating this template file to render all the announcement based static pages of the site.
Open up the newly created file and put the following code init:
<?php
/**
 * Template Name: Announcement
 */
?>
It is just a normal PHP comment. As soon as WordPress loads the theme, it will scan the active theme directory for any custom page templates. Any file with the “Template Name” comment at the top will be treated as a custom template by WordPress.
“Wait! That’s all it takes to create and use a custom template?”
Yep! WordPress is awesome, is it not?
What follows next is as usual.
Include header and footer files.
Include the Loop.
Finally, when we create a new page in WordPress, we have to assign a custom template to render it.
WordPress will take care of the rest.
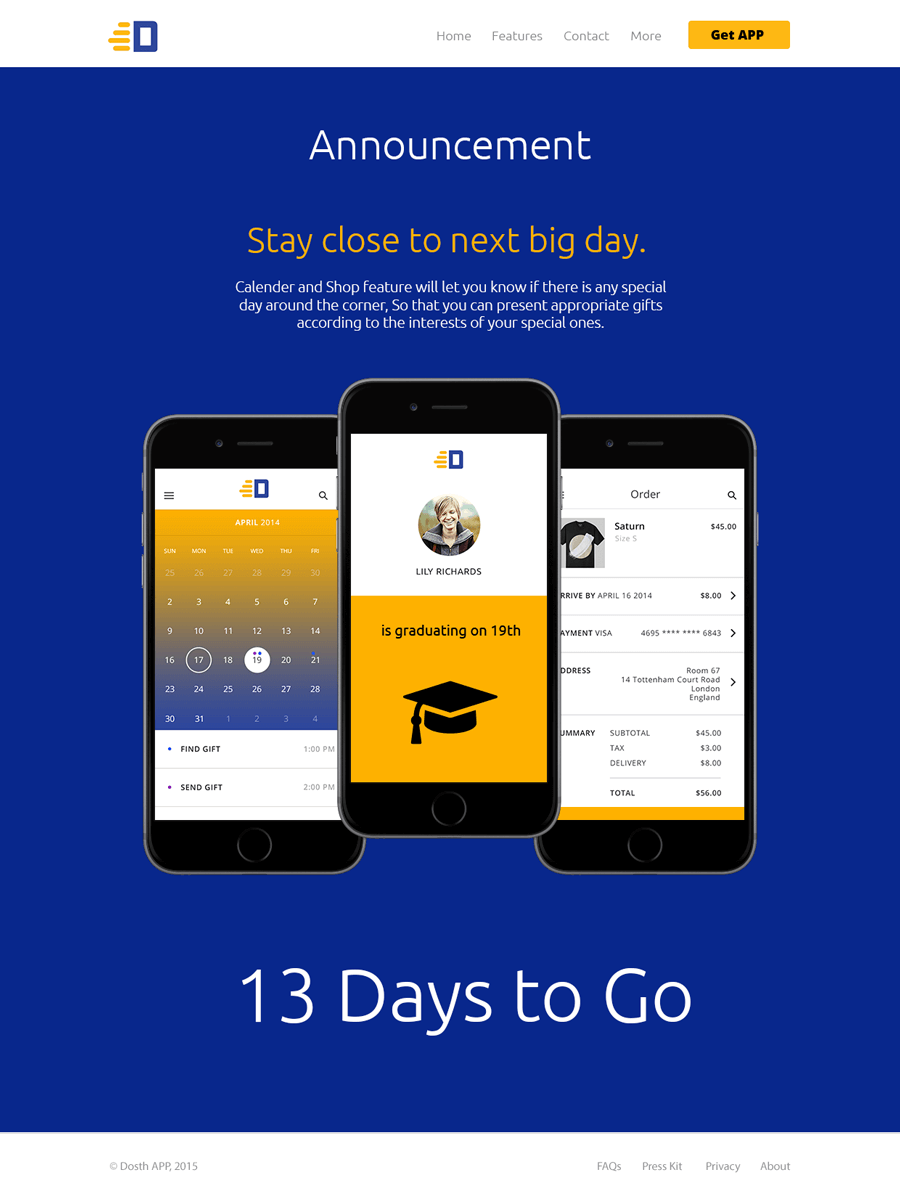
Let’s build the announcement page
You can find the content of the Announcement page inside the dosth-site-content.docx -> Announcement Page Content.
Now let’s create a new page by going to:
Admin Dashboard -> Pages -> Add New
I went ahead and added the content and this is how it looks like now:
How to select a custom template for a page
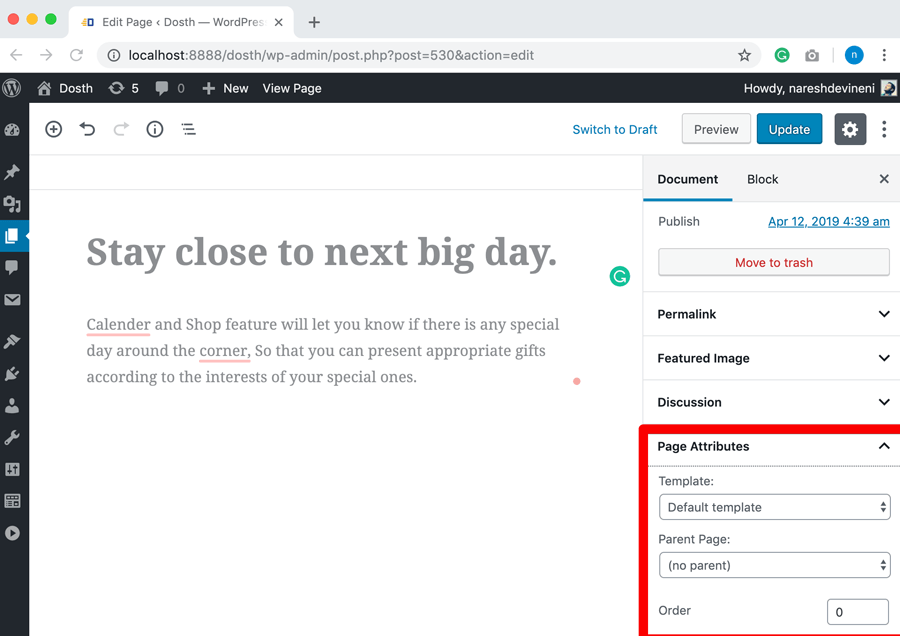
You can assign a custom template to any page by using the “Page Attributes” section inside Document Block.
If you notice, currently, Template Option is set to “Default template”. Template Option will only appear if there are any custom templates inside the theme.
For the purposes of this lesson, click on it and choose the “Announcement” template we have created earlier.
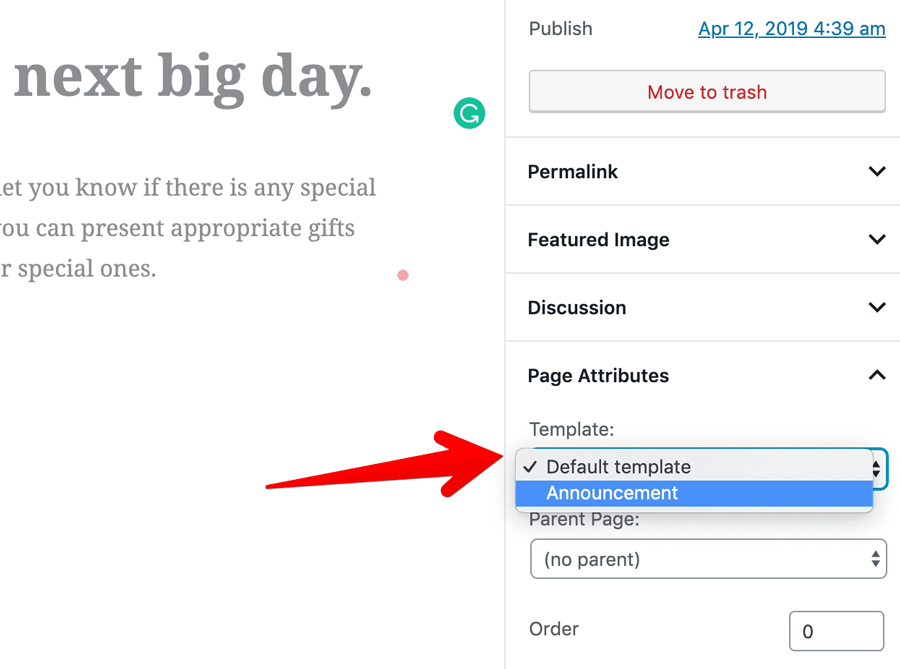
That’s all it takes to choose a custom template to render a particular page. From now on, WordPress will use the template-announcement.php file to render this particular page.
Now let’s put some code in it
You already know everything.
Go back to the template-announcement.php file and put the necessary code inside it. Just write some good markup.
Consider it as an exercise.
Here is the final code for this file:
<?php
/**
* Template Name: Announcement
*/
?>
<?php get_header(); ?>
<?php while( have_posts() ): ?>
    <?php the_post(); ?>
    <div id="announcement">
        <h1 class="page-title"><?php _e( 'Announcement', 'dosth' ); ?></h1>
        <div class="container">
            <div class="row">
                <div class="col-sm-12 actual-content">
                    <h2 class="announcement-title"><?php the_title(); ?></h2>
                    <?php the_content(); ?>
                </div>
                <div class="col-sm-12 featured-image">
                    <?php if ( has_post_thumbnail() ) :
                        $featured_image = wp_get_attachment_image_src( get_post_thumbnail_id( get_the_ID() ), 'large' ); ?>
                        <img src="<?php echo $featured_image[0]; ?>" alt='' />
                    <?php endif; ?>
                </div>
            </div>
        </div>
    </div>
<?php endwhile; ?>
<?php get_footer(); ?>
“I have a simple question!”
Shoot!
“Why did you hardcode the headline ‘Announcement’? “
The client said that every announcement based pages should start with the headline “Announcement” and all announcement based pages must be consistent with this headline. So, I hard-coded it by wrapping it inside a translation function. It is totally ok to do this.
But here is the bottom line. Whenever the client says something like this, ask him/her whether they want control over editing the Headline. If they want control over it, we have to make it client-editable somehow. There are multiple options.
- Use ACF field with a default value of “Announcement”
- Use Theme Options
We will make this headline client-editable by using the WordPress Customizer API in a future lesson. For now, let’s style the page.
Add the following CSS to the end of the style.css file:
/*-------------------------------------------------------------------------------
  12.Announcement Page Styling
-------------------------------------------------------------------------------*/
#announcement{
    background-color:#08278c;
    padding:50px 0;
}
#announcement .page-title{
    text-align:center;
    font-size:56px;
    color:white;
}
#announcement .announcement-title{
    margin-top:50px;
    color:#fdb100;
    font-size:48px;
    text-align: center;
}
#announcement .actual-content p{
    max-width:600px;
    font-size:20px;
    margin:0 auto;
    color:white;
    text-align:center;
}
#announcement .featured-image{
    max-width:750px;
    margin:50px auto;
}
And here is how it looks like in the browser:

“I have one more question! Where is the text ’13 days to go’ from the mockup?”
I talked with the client/client-service-manager and he said that the count down is not necessary.
The thing is, sometimes the designer gets creative and adds some unnecessary elements to the mockup.
Of course, some executive from the client side could have given that count down brief to the designer and forgot to inform the designer that the idea is scrapped.
These things are pretty common in any project.
So, as soon as you receive a design, enquire about any feature that takes a lot of time to implement. Start coding the feature only once you confirm it. This saves you a lot of time.
Anyway, next, we will see how to use a different/alternative header and footer design for a particular page.
WordPress Theme Development: Creating and using an alternative header file
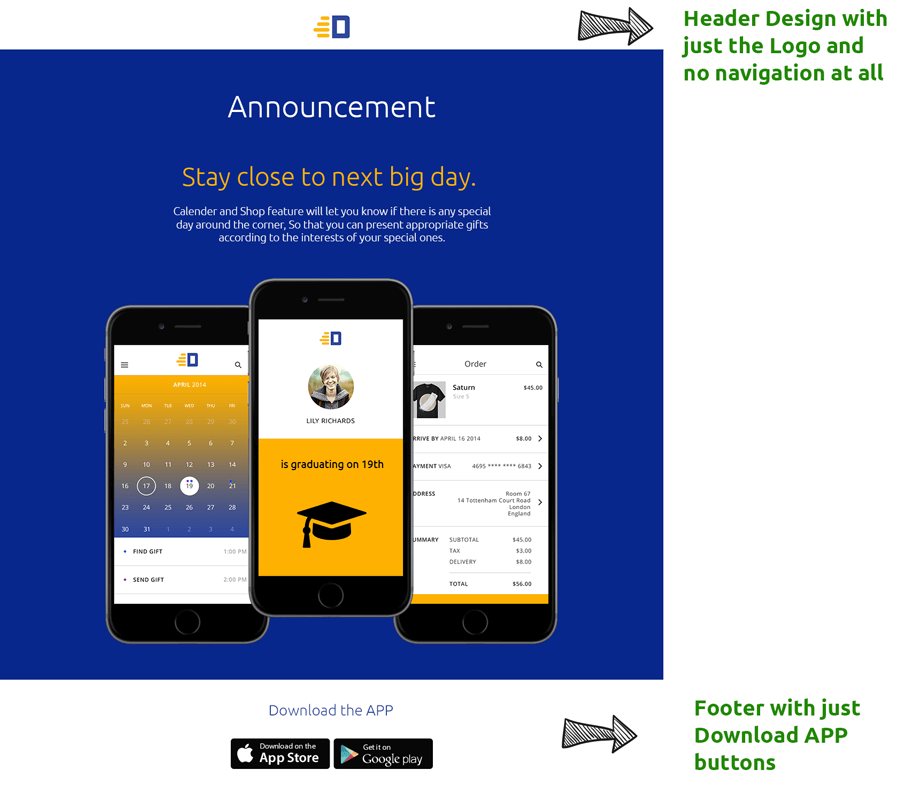
When it comes to a business based website which runs so many digital campaigns, it is common to experiment with a different header and footer designs.
Most of the clients which depend on digital campaigns ask me to code at least three different header and footer designs for their landing pages.
- A page with literally no header or footer at all
- A page with the header containing just the logo without any navigation
- Header and footer designs with logo and multiple Call To Action buttons
In fact, our client asked to remove the navigation entirely from the header of the Announcement based pages which we created in the last lesson.
Also, the client clearly mentioned that footer should only contain App download buttons.
Now, comes the actual question!
“Is there a way to use a different header or footer design just for a particular page?”
Yesssssssssssssss :)
How to use get_header() function to load a different header
The only way we can load a header file in WordPress is by using the get_header() function.
By default, the get_header() function looks for the header.php file inside the active theme. You already know this.
We can also instruct the get_header() function to look for a different file by passing the file name as a parameter, for example:
get_header( 'with-no-nav' );
Now because we have provided a file name as the parameter, get_header() function will look for the file that is named as header-with-no-nav.php inside the active theme.
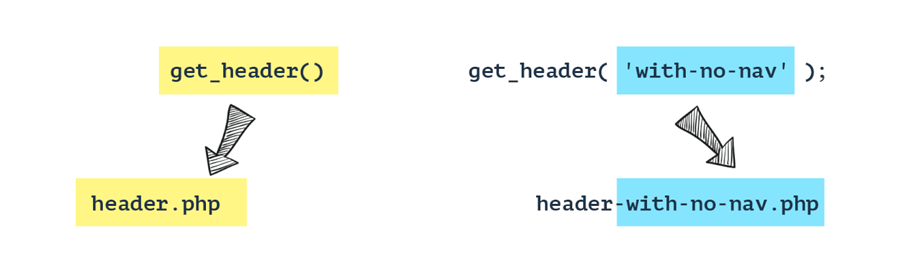
The point here is, you shouldn’t pass the full file name. Header files in the WordPress theme should always start with header- prefix. So we have to pass the file name by excluding the header- prefix and the .php file extension.
Simple, right?
Now let’s create a new header file that just contains the Logo and use it inside the Announcement template to satisfy the client requirement I mentioned above.
Go ahead and create the header-with-no-nav.php file at the root level of the active theme.
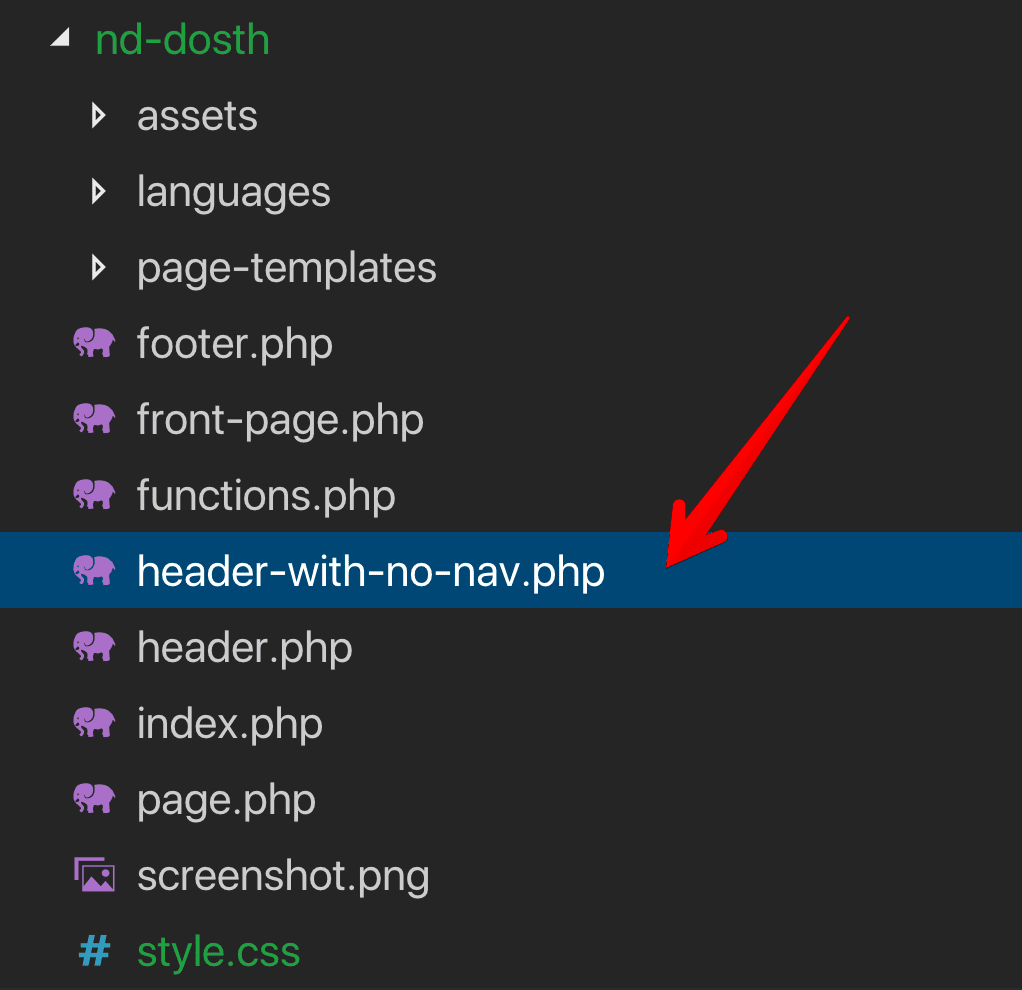
Unlike Page templates, we can not put header files inside a sub-directory. They must be present at the root level of the active theme.
If WordPress fails to find the header-with-no-nav.php file at the root level, it will revert back to the header.php file without throwing any error.
Anyway, add the following to code the header-with-no-nav.php file:
<?php
/**
 * The alternative header for our theme.
 *
 * Displays all of the <head> section and the logo. No navigation.
 *
 * @package Dosth
 */
?>
<!DOCTYPE html>
<html <?php language_attributes(); ?>>
    <head>
        <meta charset="<?php bloginfo( 'charset' ); ?>">
        <meta name="viewport" content="width=device-width, initial-scale=1">
        <link rel="profile" href="http://gmpg.org/xfn/11">
        <link rel="pingback" href="<?php bloginfo( 'pingback_url' ); ?>">

        <?php wp_head(); ?>
    </head>
    <body <?php body_class('no-js'); ?> id="site-container">
        <header role="banner">
            <div class="logo centered">
                <?php if( has_custom_logo() ):  ?>
                    <?php
                        // Get Custom Logo URL
                        $custom_logo_id = get_theme_mod( 'custom_logo' );
                        $custom_logo_data = wp_get_attachment_image_src( $custom_logo_id , 'full' );
                        $custom_logo_url = $custom_logo_data[0];
                    ?>
                    <a href="<?php echo esc_url( home_url( '/', 'https' ) ); ?>"
                    title="<?php echo esc_attr( get_bloginfo( 'name' ) ); ?>"
                    rel="home">
                        <img src="<?php echo esc_url( $custom_logo_url ); ?>"
                            alt="<?php echo esc_attr( get_bloginfo( 'name' ) ); ?>"/>
                    </a>
                <?php else: ?>
                    <div class="site-name"><?php bloginfo( 'name' ); ?></div>
                <?php endif; ?>
            </div>
        </header>
All I did is removed the Navigation code and adjusted the markup around the Logo because we no longer need those bootstrap classes.
To be more precise, I copied all the code from the header.php file and pasted it inside the header-with-no-nav.php file. And then I removed the code that is marked as with red color in the below image. That’s all.
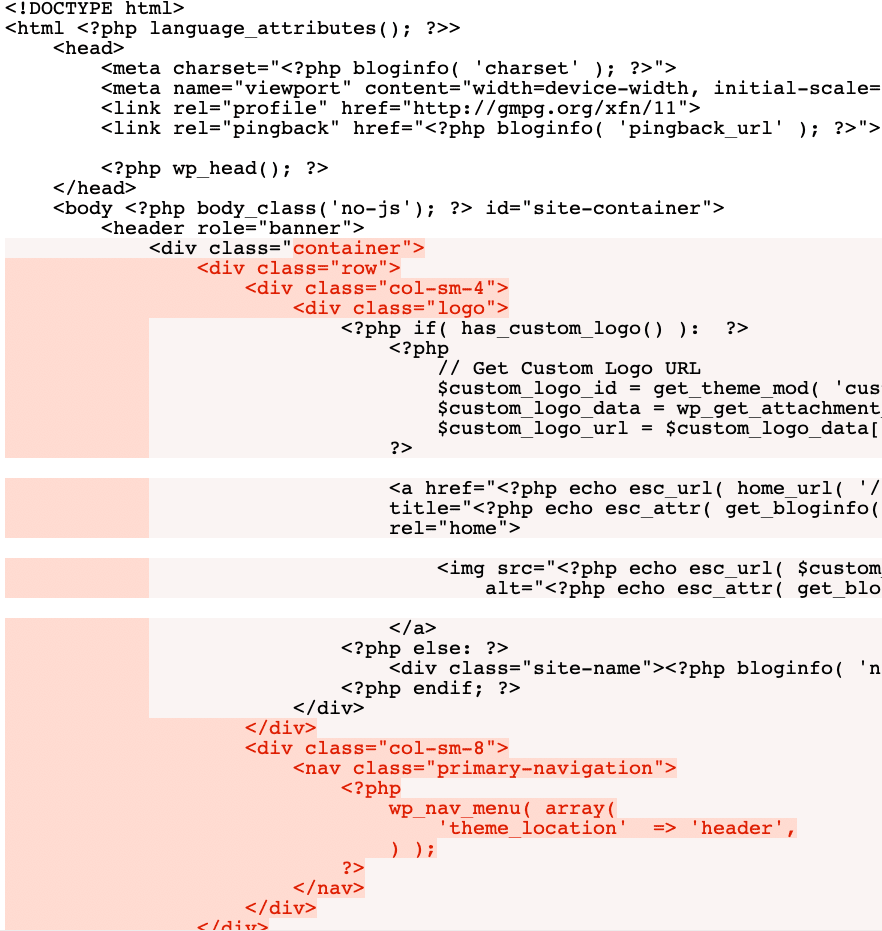
Remember, the header-with-no-nav.php file is a different header file. So, this file should contain everything that makes up a proper header portion of the site.
Usually, we would just add/modify/remove the elements which our site visitors see visually. For example, navigation.
Now, open up the page-templates/template-announcement.php file and replace:
<?php get_header(); ?>
With the:
<?php get_header('with-no-nav'); ?>
Like this:
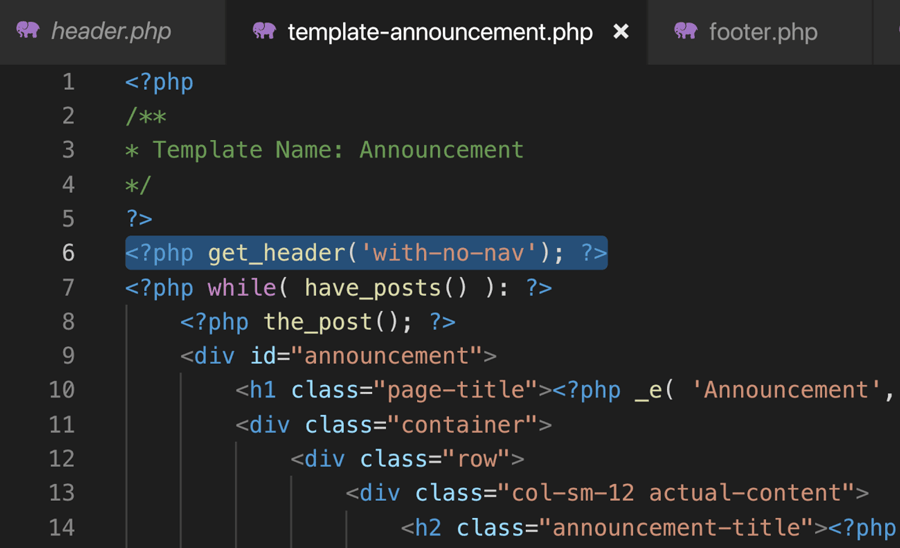
Finally, Save the file.
From now onwards, WordPress will use the header-with-no-nav.php file to render the header portion of the pages that uses the Announcement template.
Here is how the Announcement Page looks in the browser:
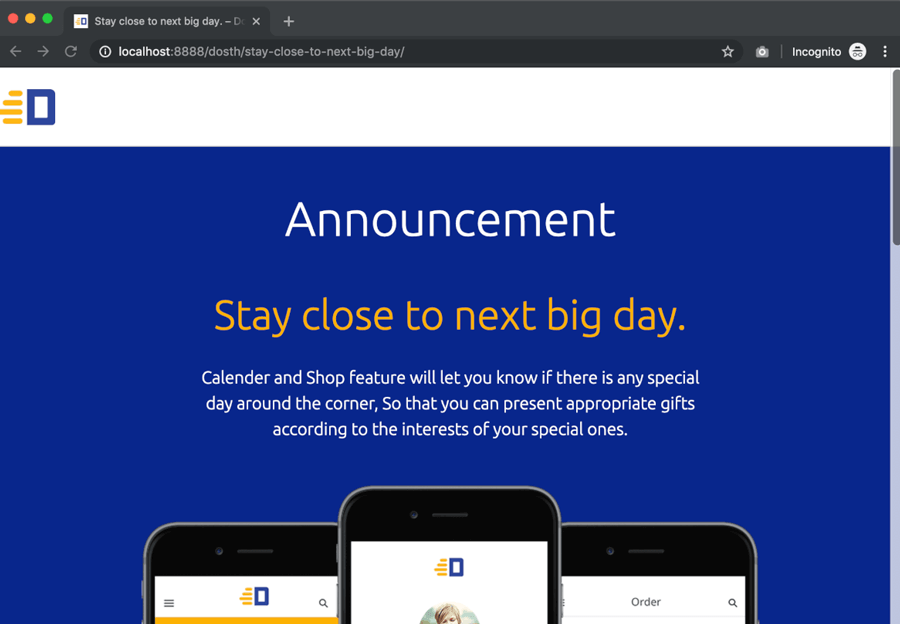
“Oh Yeah! A header with no navigation.”
Now, all we have to do is center the logo on the header by adding the following CSS to the end of the style.css file:
.logo.centered{
    max-width:68px;
    margin:0 auto;
}
And this is the final output of our alternative header with the logo centered.
Next, we will use a similar technique to render an alternative footer design for the Announcement page.’
Exercise: Creating and using alternative footer file for your Custom WordPress Theme
Everything that applies to get_header() function also applies to the get_footer() function.
Just like get_header() function, we can also instruct the get_footer() function to look for a different footer file by passing the file name as a parameter, for example:
get_footer( 'with-cta-only' );
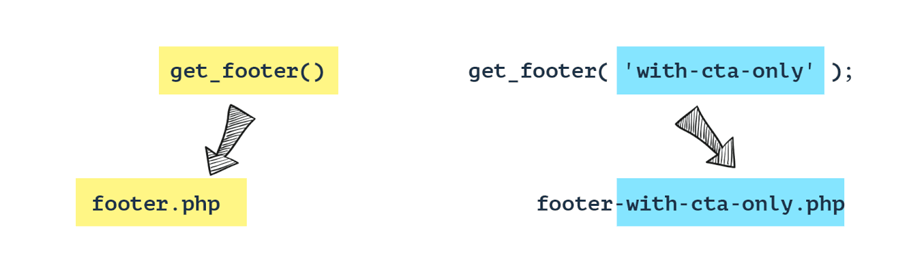
And, here is an exercise for you. Create an alternative footer and use it inside the Announcement template.
Here is the design. Photoshop file is included inside the exercise files.
Tip: Create a separate dynamic sidebar just for this alternative footer design.
Anyway, that’s all it takes to implement a different header or footer design for a particular page.
Exercise: Creating a page with contact form for your Custom WordPress Theme
No matter what kind of website you pick, it will definitely have a contact us page with a contact form.
And when it comes to WordPress, the most sensible way to build out a contact form or any other kind of form is with the help of a plugin like a Contact Form 7 or Gravity Forms.
You can still craft your own custom contact form with your PHP skills. But, according to my experience, you don’t really get that much of time to build something from scratch. Also, it is not at all a good idea to re-invent the wheel unless your version is better.
Plus, it is WordPress. The Client expects a screen in the admin panel to edit the form or create a new form for a different need. If you are creating a form by yourself, it is a lot of work, right?
So, no matter in which direction you think, it is always sensible to go with existing WordPress Form plugins.
Anyway, here is the exercise:
- Install Contact Form 7 or Ninja Forms plugin
- Create a contact form with some fields like Name, Email, and message
- Create a page and put the shortcode of the newly created form in it. Every form based WordPress plugin will provide shortcodes for individual forms.
- Create a custom template to render this newly created page. The custom template shouldn’t output the featured image even if it is set.
That’s all for this part.
In the next part, You’ll learn how to code template files for WordPress blog.

Previous Article

 © 2026 UsableWP. A project by Naresh Devineni.