WordPress Theme Development: WordPress Customizer and it’s API
This is Part 9 and the final part of 9 part course about developing a WordPress theme from scratch.
Here is the access to the other parts of the Course in the sequential order:
- Developing a WordPress Theme From Scratch
- WordPress Theme Development: The best way to enqueue scripts and styles
- WordPress Theme Development: Creating the header and making our theme translation ready
- WordPress Theme Development: Site footer with social navigation, dynamic copyright statement
- WordPress Theme Development: The Loop, the main content, Google Fonts, and the Custom Fields
- Building a WordPress Theme From Scratch: Internal Pages
- WordPress Theme Development: Building the Blog
- WordPress Theme Development: Search page, 404 error template, Custom Queries, and custom post types
- WordPress Theme Development: WordPress Customizer and it’s API (Current Part)
In this part we will learn about WordPress Customizer.
It’s been an amazing journey so far.
If you have made it this far, then congratulations again. You are a good theme developer now.
Anyway, back to the topic now.
Theme options give us an ability to create some custom options in such a way that clients can easily:
- Change the color scheme of the site
- Edit miscellaneous text by eliminating the hard-coded text inside the theme files
- Change Font Families being used on the site
- Other Hide/Show specific frontend features of the site like a read more link inside archives.
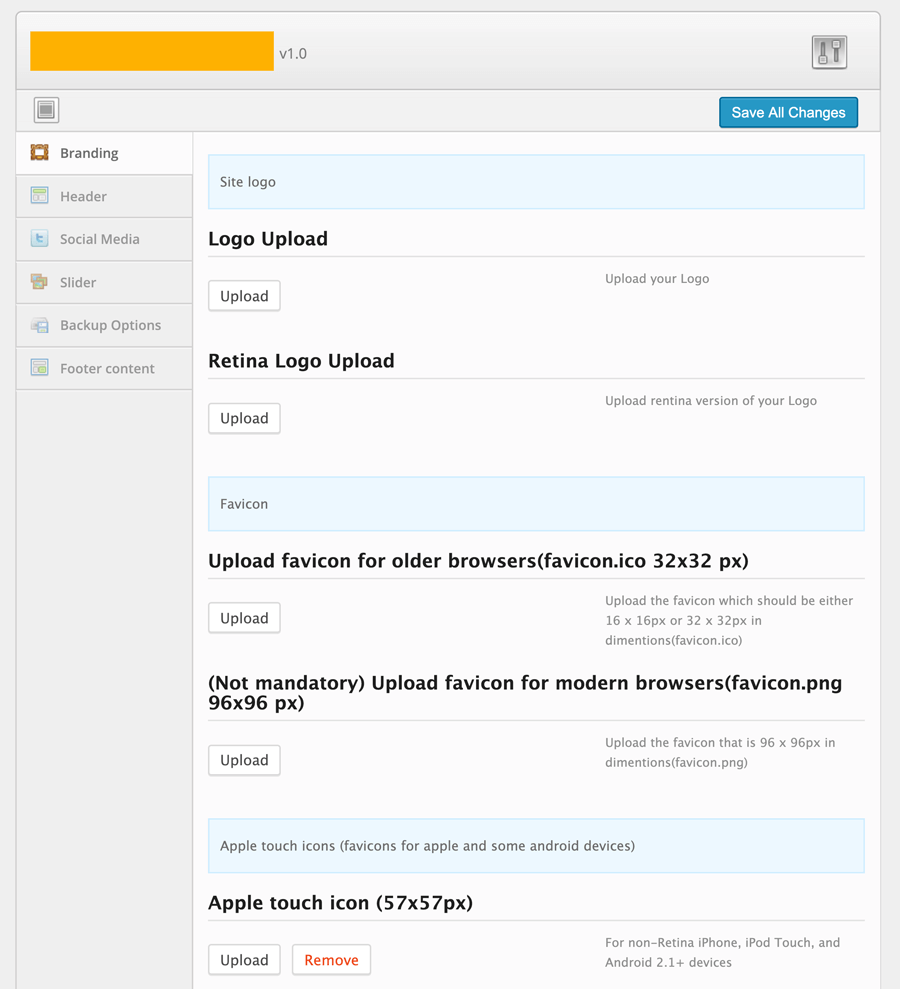
The following image is a screenshot of the theme options from an Old website that I developed for my client.
In the olden days of WordPress theme development, to create theme options, we used to depend on third-party theme options framework.
But you are learning WordPress in the Modern era. You no longer have to depend on third-party frameworks to create theme options. WordPress ships with an elegant Customize panel and Theme Customization API. And using this API, we can create a wide variety of theme options and attach them to the Customize Panel.
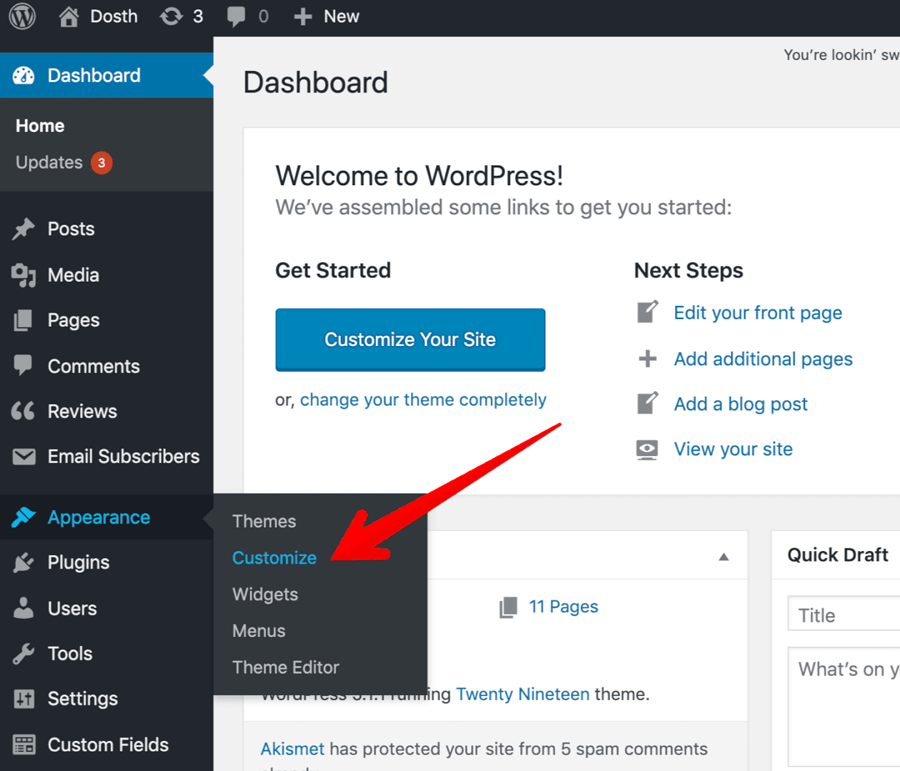
You can access the Customize panel by going to:
Admin Dashboard -> Appearance -> Customize Panel
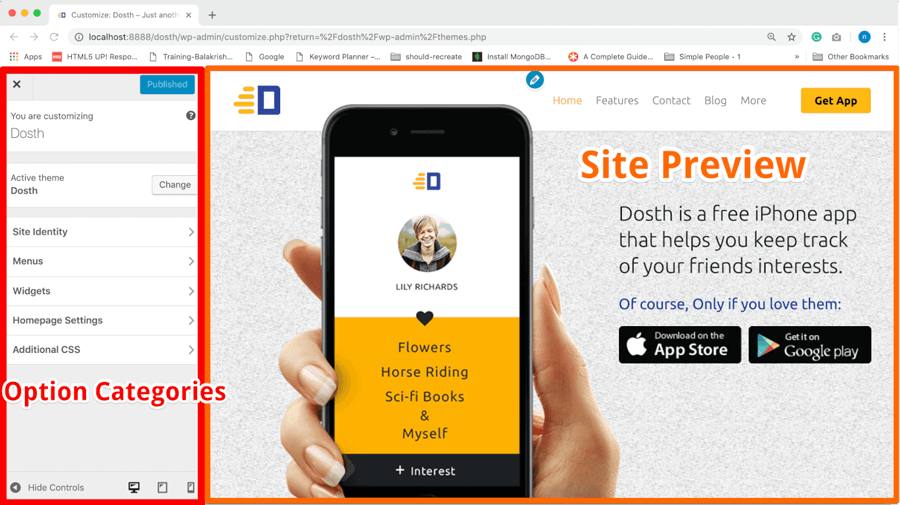
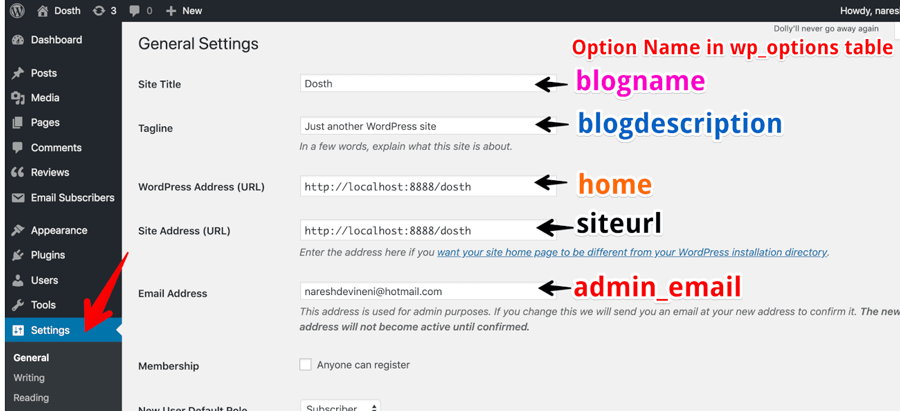
The components of the WordPress Customizer Panel
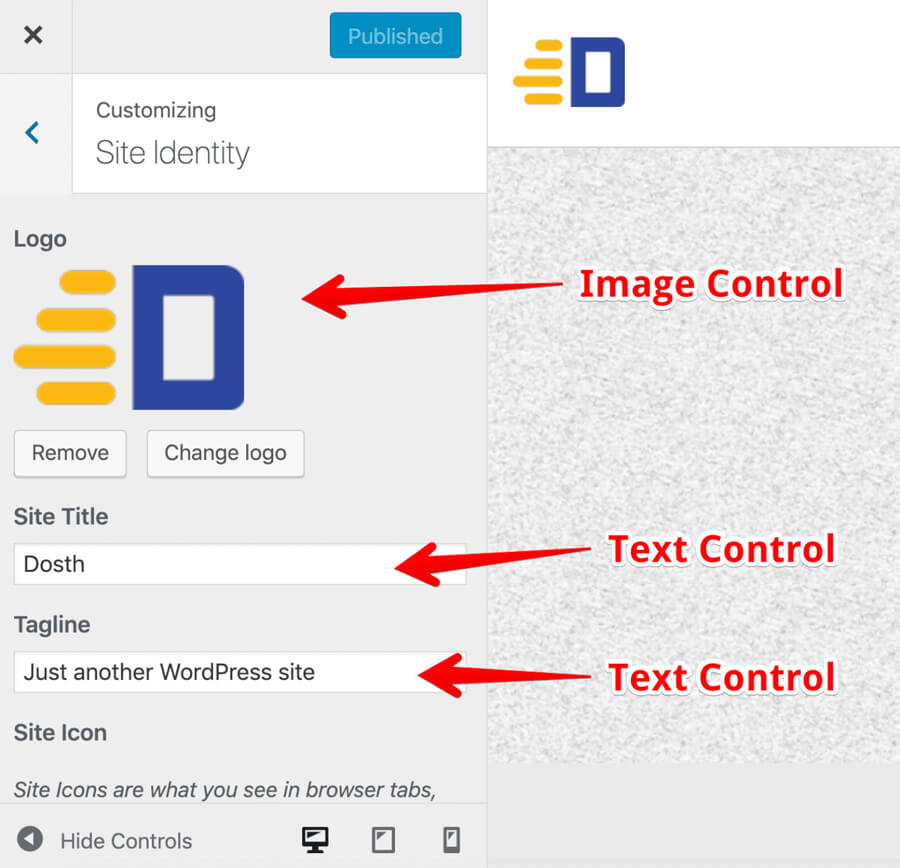
We have already worked with the Customize Panel when we worked with the Logo of the site. But, let’s look into it in more depth.
From here onwards, I am going to call settings as options and vice versa. Please don’t get confused. They mean the same.
The Customize Panel is divided into two columns. Customization Settings are located on the left-hand side and when you change those settings, you can live preview the changes on the right-hand side of the screen.
For example, if you change the Site Logo setting by going into the “Site Identity” section, WordPress will immediately refresh the Site Preview portion of the Customize Panel with the new logo.
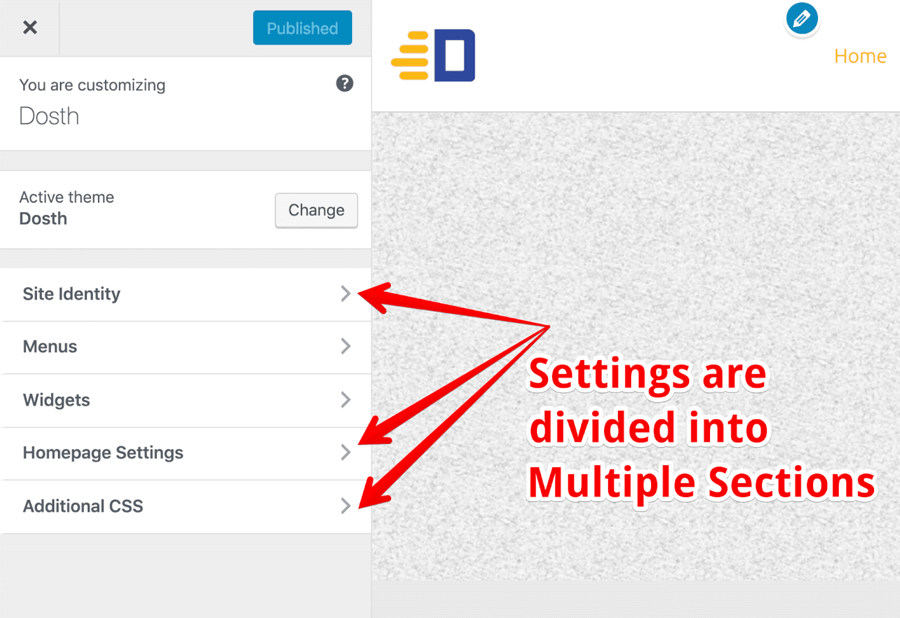
WordPress Customizer: Introducing Setting Sections
As you can see, the Settings on the left-hand side are categorized into multiple sections.
WordPress Customizer: Introducing Panels
We can also combine multiple sections under one Panel.
The best example of a Panel with multiple sections is the Widgets Panel.
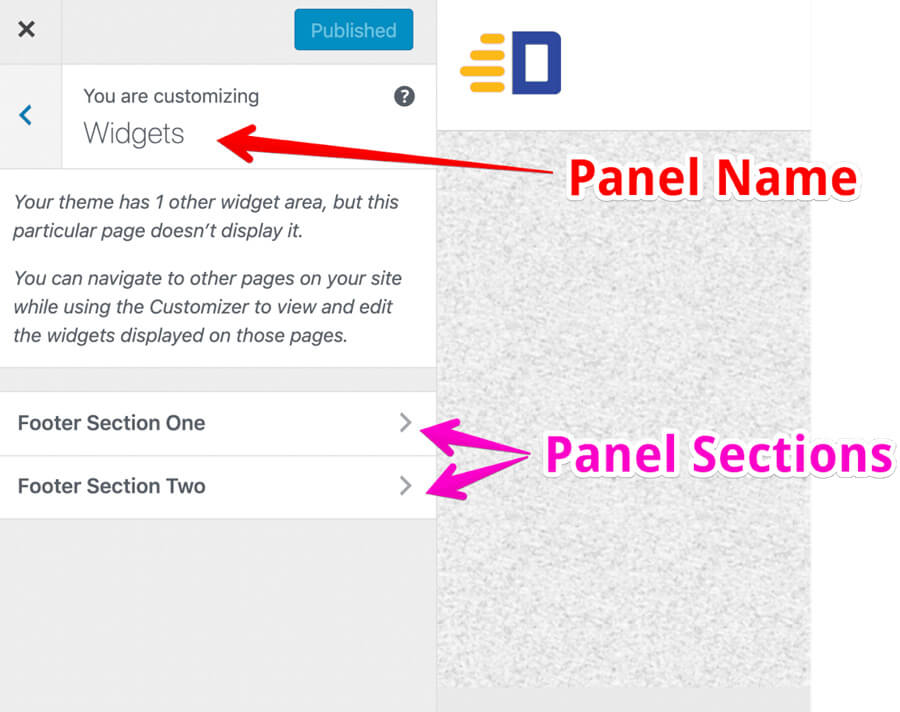
WordPress Customizer: Introducing Settings & Controls
Each Section will have one or more settings. And each Setting is associated with a Control ( Form Field ) which helps us manage the Setting.
Simply put, we are using a Control ( Form Field ) to generate the value of the Setting. And we will be outputting this value inside our theme’s template files. In fact, we already did it. We outputted the Logo using the same process, right?
For example, You upload a logo using the Image Control for the “Logo” setting inside the “Site Identity” section. Once you upload the logo, WordPress will save the “Logo” setting with the URL of the uploaded logo image as its value.
The value of a particular setting is stored inside the wp_options table inside the WordPress database.
This will make more sense once we start creating settings their associated controls.
If we make any changes to the settings, don’t forget to click on the “Publish” button at the top-left side of the Customize panel to save those changes to the database.
And, that’s everything you need to know about the WordPress Customizer Panel for now.
Next, we will set up the foundation to interact with the WordPress Customizer Panel.
Introducing WordPress Theme Customization API
The Theme Customization API is the only way to interact with the Customize Panel.
The Theme Customization API allows us to:
- Modify existing default Customize Panel Sections by allowing us to modify the section properties like Title, description, etc.
- Create new sections
- Create new panels and put sections inside them
- Create a new set of setting and their controls using default HTML5 form fields
- Create custom and advanced controls that are a mash-up of default HTML5 form fields
Let’s set up the Foundation
The only way we can make use of the Theme Customization API is with the help of customize_register Action Hook.
First of all, go ahead and create a new directory called “customize” at the root level of our theme and then create a new file inside it called customize.php
nd-dosth/customize/customize.php
You can name the directory and the file whatever you want. Naming them “customize” is just a naming convention followed by some popular developers of the WordPress community.
Next, open up the newly created customize.php file and put the following code in it:
<?php
/**
 * Registers options with the Theme Customizer
 *
 * @param      object    $wp_customize    The WordPress Theme Customizer
 * @package    Dosth
 */

add_action( 'customize_register', 'nd_dosth_customize_register' );
function nd_dosth_customize_register( $wp_customize ) {
  // All the Customize Options you create goes here
}
We just hooked an action called nd_dosth_customize_register to the customize_register Action Hook and the nd_dosth_customize_register action is receiving the $wp_customize object.
Theme Customization API is built using Object Oriented PHP. So, the $wp_customize variable is an object with all the methods and properties we need to make use of the Theme Customization API.
Simply put, we will be using the $wp_customize object to create or edit the sections, panels, settings, and controls of the Customize Panel.
Next, put the following code at the top of the functions.php file to include the customize.php file. You don’t really have to put it at the top, you can include the customize.php file anywhere inside the file. I usually put it at the top for no reason.
/**
 * --------------------------------------------------------------------------------
 * Theme Customization Options
 * --------------------------------------------------------------------------------
 */
require_once ( get_template_directory() . '/customize/customize.php' );
We are including the customize.php file with the help of get_template_directory() function. This function returns the full OS level directory path of our theme like this:
/Applications/MAMP/htdocs/dosth/wp-content/themes/nd-dosth
Then we are just concatenating the rest of the path manually to the customize.php file.
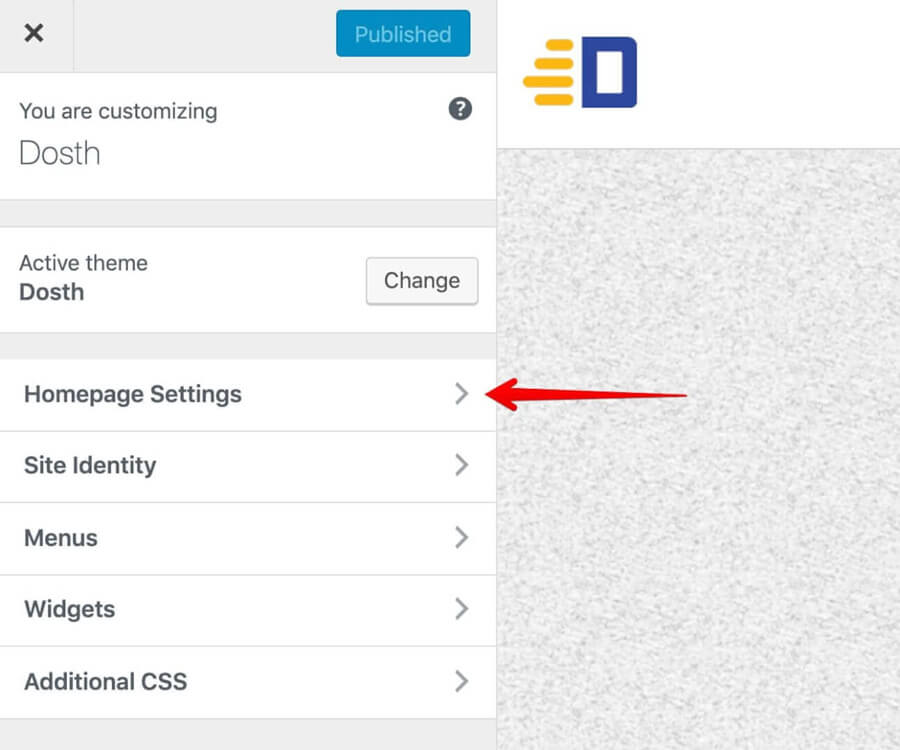
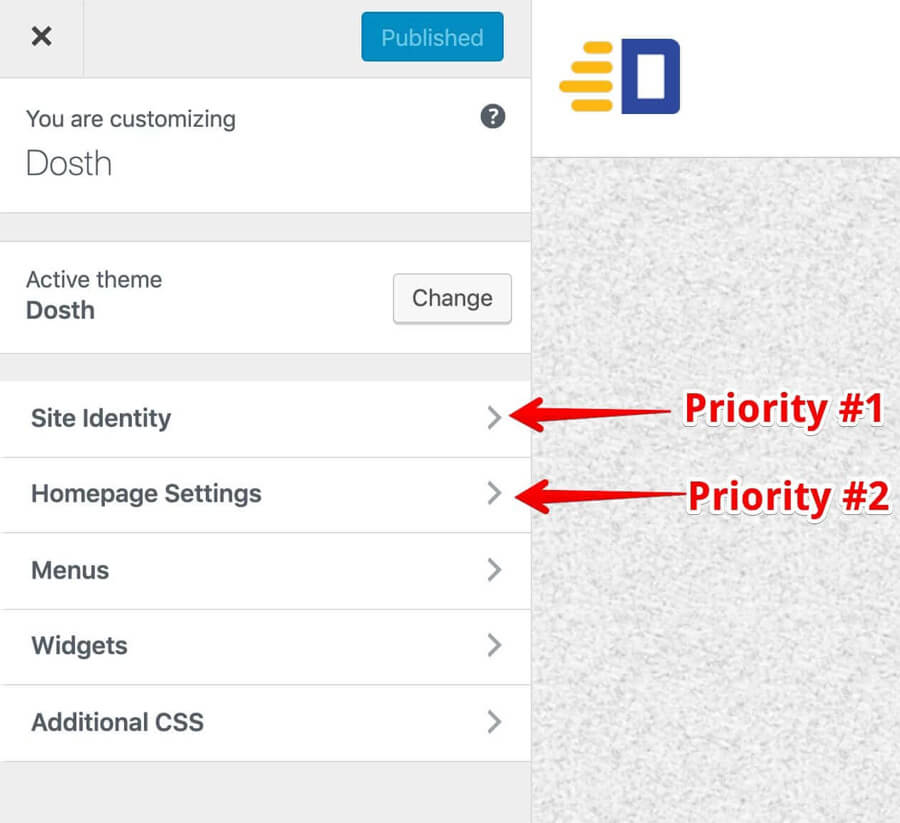
Now that we have everything set up, The first thing I want to do is move the “Homepage Settings” section underneath the “Site Identity” section. To achieve this, put the following code inside the nd_dosth_customize_register action:
// Move Homepage Settings section underneath the "Site Identity" section
$wp_customize->get_section('static_front_page')->priority = 2;
Here is the updated nd_dosth_customize_register action code:
function nd_dosth_customize_register( $wp_customize ) {
    // All the Customize Options you create goes here

    // Move Homepage Settings section underneath the "Site Identity" section
    $wp_customize->get_section('static_front_page')->priority = 2;
}
In the above code, using the $wp_customize object and its get_section() method, we are getting access to the “Homepage Settings” section like this:
$wp_customize->get_section('static_front_page')
The above line actually returns the “Homepage Settings” Section in the form a PHP Object and this Section Object contains some important properties which allow modifying the Section Title, Section Priority( Order ) and so on.
The get_section() method accepts the ID of the section. In the case of “Homepage Settings”, the ID is static_front_page.
Once we got hold of the “Homepage Settings” Section Object, we are setting up its priority to 2 in the hope of placing this section underneath the “Site Identity” section. To change the order of the Section, we must use the “priority” property. “Priority” doesn’t mean anything else here in the context of Customize Panel.
$wp_customize->get_section('static_front_page')->priority = 2;
“How did you figure out the ID of a particular Section?”
There are two ways to figure out the ID.
- WordPress Documentation
- Inspecting section markup using Browser Developer tools
I went with the second approach because it also works for custom options added by plugins.
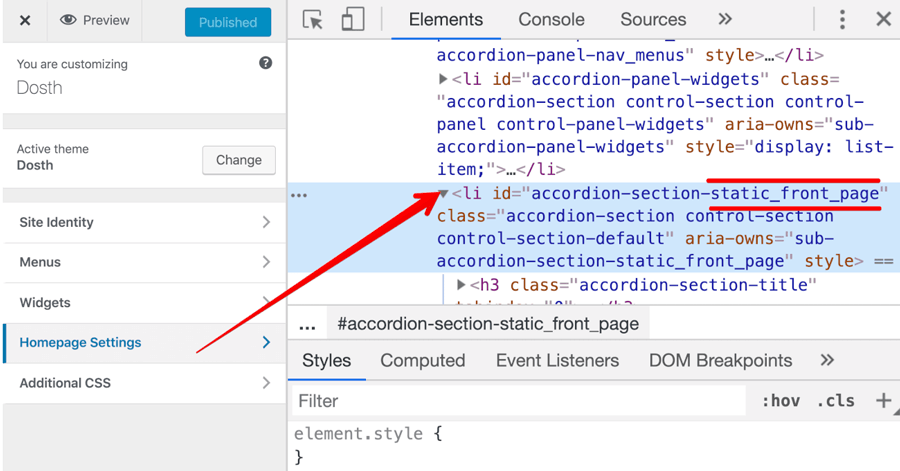
As you can see in the above image, WordPress is rendering each Section navigation using the <li> tag and each <li> tag has a unique ID attached to it.
accordion-section-static_front_page
The first half of the ID is common for every section “accordion-section-” and the second half of the ID is the Section ID. You can cross verify this technique by visiting the document of the Theme Customization API:
https://codex.wordpress.org/Theme_Customization_API
Anyway, let’s test our code. Let’s go to the Customize Panel.
Oops! Something went wrong! Setting up a priority of 2 for the “Homepage Settings” section took it to the top position. That means, the location priority of “Site Identity” is not 1.
“So, How do we achieve the section order that we want?”
Simple, since there is a default priority set for other Sections, if we set the priority of “Site Identity” to 1, that should do the trick. Let’s do just that. The ID of the “Site Identity” is title_tagline.
Here is the updated nd_dosth_customize_register action code:
function nd_dosth_customize_register( $wp_customize ) {
    // All the Customize Options you create goes here

    // Move Homepage Settings section underneath the "Site Identity" section
    $wp_customize->get_section('title_tagline')->priority = 1;
    $wp_customize->get_section('static_front_page')->priority = 2;
}
If you now go back to the Customize Panel, this time our technique indeed works!
Next, let’s rename the title of “Homepage Settings” to “Home Page Preferences”.
If you want to modify the Section Title, you can do so using the title property on the object returned by the get_section() method.
$wp_customize->get_section('static_front_page')->title = __( 'Home page preferences', 'nd_dosth' );
In the above code, we are getting the “Homepage Settings” Section and changing its title to “Home Page Preference”
I am not wasting your time. A client asked me to do this a few years ago.
Put the above line of code at the end of the nd_dosth_customize_register action. Here is the updated nd_dosth_customize_register action.
add_action( 'customize_register', 'nd_dosth_customize_register' );
function nd_dosth_customize_register( $wp_customize ) {
    // All the Customize Options you create goes here

    // Move Homepage Settings section underneath the "Site Identity" section
    $wp_customize->get_section('title_tagline')->priority = 1;
    $wp_customize->get_section('static_front_page')->priority = 2;
    $wp_customize->get_section('static_front_page')->title = __( 'Home page preferences', 'nd_dosth' );
}
And here is the output of the Customize Panel:
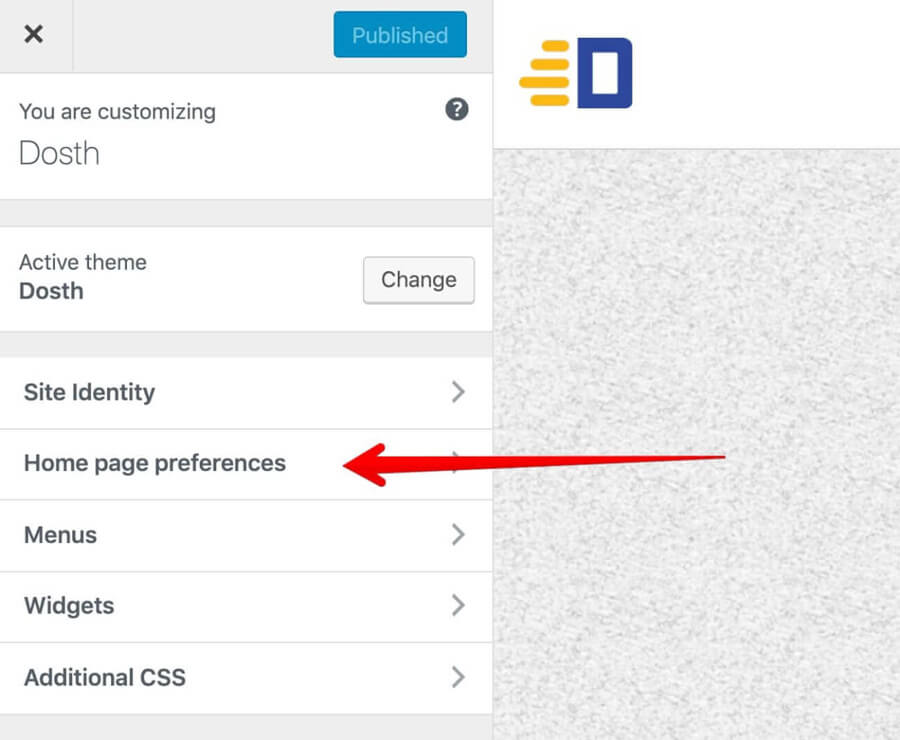
Our code is working as expected with no surprises.
Anyway, this is pretty much how you edit the properties of default Sections. You can dig more depending on the situation!
Next, We will create our first setting and its control along with a new section.
How to add a Panel, Section, and Controls to the WordPress Customizer Panel
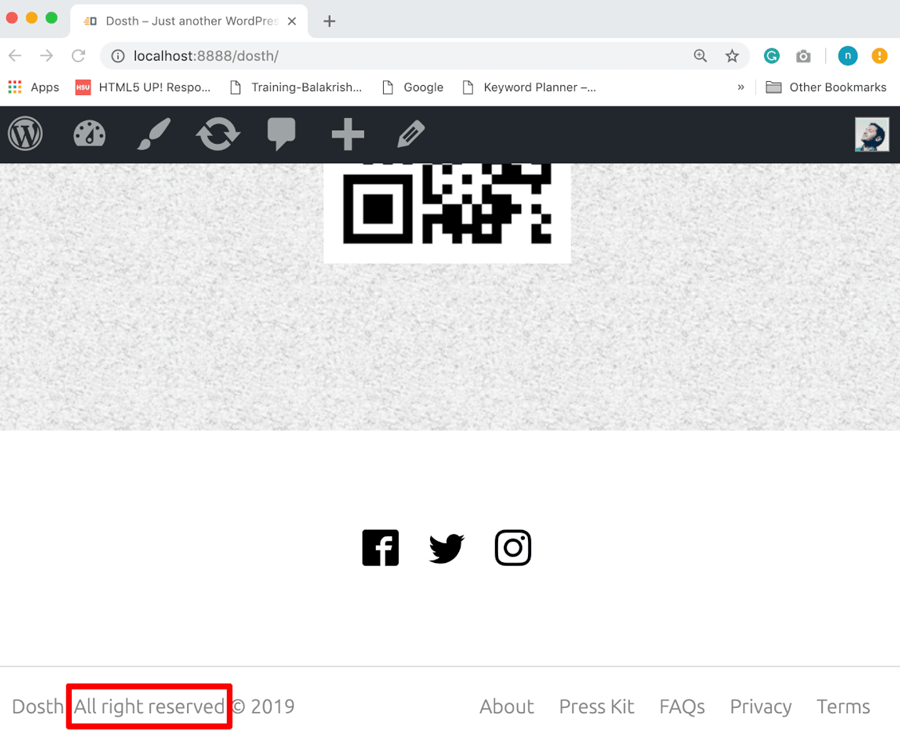
“Can we edit the copyright text in the footer? There is a typo!”
This is the most common request I get from the clients. It is not because of the typo I made, you get it, right?
Common, Let’s make the “All Rights Reserved” text in the Footer editable.
How to add a new Panel to the WordPress Customizer panel
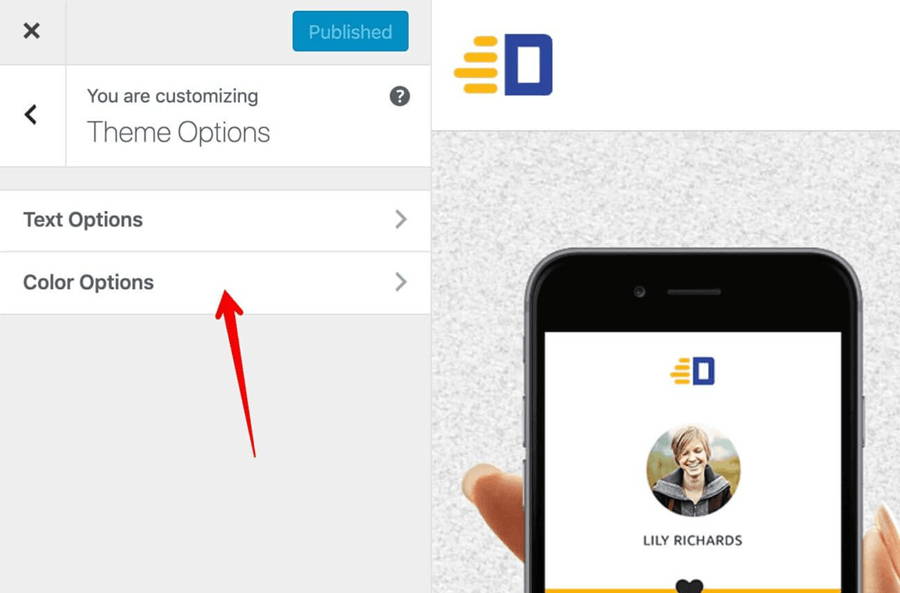
First of all, Let’s create a New Panel inside the Customize Panel and let’s name it “Theme Options”.
Go ahead and put the following code at the end of the nd_dosth_customize_register action:
// Theme Options Panel
$wp_customize->add_panel( 'nd_dosth_theme_options',
    array(
        //'priority'       => 100,
        'title'            => __( 'Theme Options', 'nd_dosth' ),
        'description'      => __( 'Theme Modifications like color scheme, theme texts and layout preferences can be done here', 'nd_dosth' ),
    )
);
We are adding a New Panel called “Theme Options” to the Customize Panel with the help of add_panel() method on the $wp_customize object.
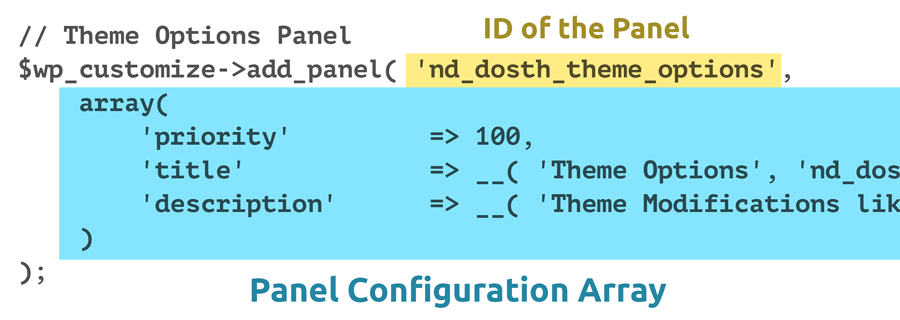
The add_panel() method adds a new panel to the Customize Panel.
The add_panel() method accepts two parameters.
- Unique ID for the Panel: We will use this ID to add a new section to this panel
- Configuration Array: to give the Panel:
- A Priority: Just like we changed the priority (order) of an existing Section/Panel, we can also decide where our custom Section/Panel gets placed. I thought that giving a priority of 100 would put this new Panel at the of the existing Sections/Panels, but it is that not that way. So ended up commenting out the priority argument altogether.
- A Title
- Some Description
Now that we have created the “Theme Options” Panel, if you now refresh the “Customize” screen, You’ll not see the new Panel yet!
Always remember, Be it a Panel with multiple sections or Be it just a Section, you’ll only find it if there are any Settings inside it. Currently, we have only added Panel, It neither contains Sections nor Settings to play with. So, WordPress is hiding the Panel for the time being.
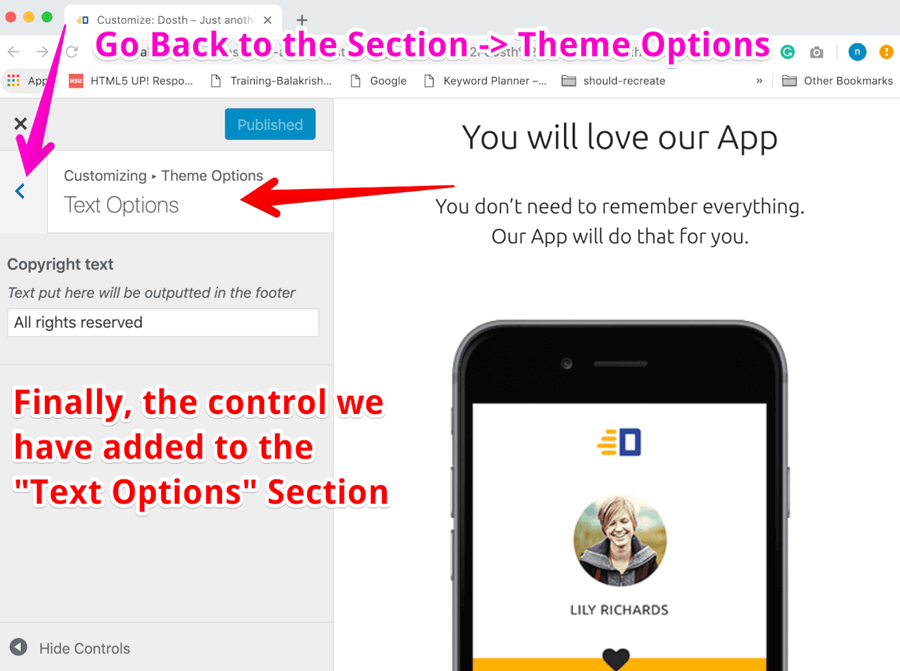
Next, a Panel cannot host Settings directly. A Setting can only be placed inside a Section. So, let’s create a new Section called “Text Options” and add it to the Panel we have created above.
How to add a new Section to the WordPress Customizer panel
Put the following code at the end of the nd_dosth_customize_register action:
// Text Options Section Inside Theme
$wp_customize->add_section( 'nd_dosth_text_options',
    array(
        'title'         => __( 'Text Options', 'nd_dosth' ),
        'priority'      => 1,
        'panel'         => 'nd_dosth_theme_options'
    )
);
We are adding a New Section called “Text Options” with the help of add_section() method on the $wp_customize object.
And we are adding this Section to the “Theme Options” Panel.
Just like add_panel() method, the add_section() method accepts two parameters.
- Unique ID for the Section: We will use this ID to add a new setting to this section
- Configuration Array: to give the Section a title, some description, priority, etc.
Also, Configuration array accepts “panel” ID argument. Using this argument, we can put this Section inside a particular Panel.
If you don’t want to put this Section inside a Panel, you can omit the “panel” argument and WordPress will add this Section along with the other Sections in the Customize Panel.
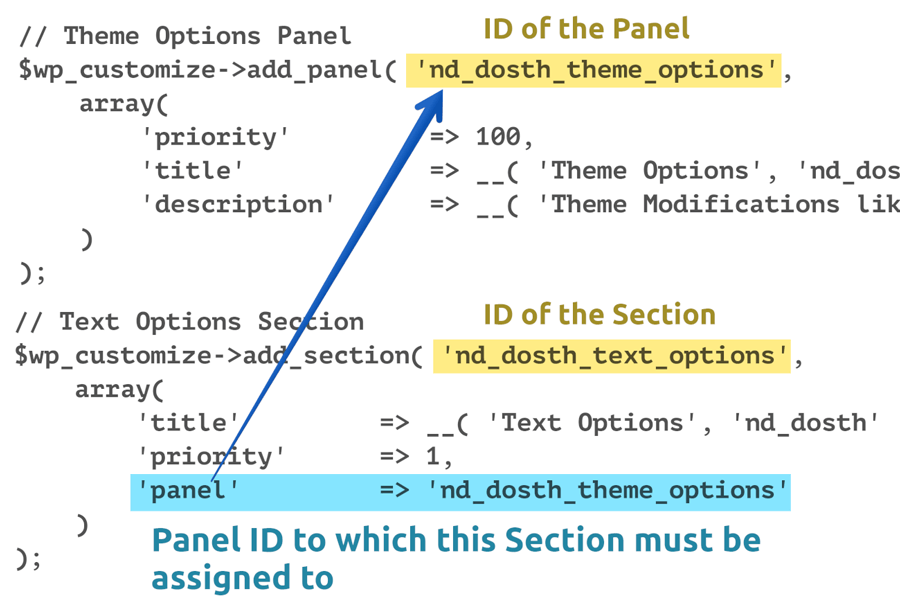
In our case, I want to add the “Text Options” Section to the “Theme Options” panel, So, I have provided the ID of the Panel “nd_dosth_theme_options” to the Section’s “panel” argument.
As I said before, you still can not see the newly created Panel nor the Section inside the Customize Panel yet!
Now let’s add a Setting called “Copyright Text”.
How to add a Setting to the Database
Go ahead put the following code at the end of the nd_dosth_customize_register action:
// Setting for Copyright text.
$wp_customize->add_setting( 'nd_dosth_copyright_text',
    array(
        'default'           => __( 'All rights reserved ', 'nd_dosth' ),
        'sanitize_callback' => 'sanitize_text_field',
        'transport'         => 'refresh',
    )
);
We are adding a new Setting called “nd_dosth_copyright_text” to the WP_OPTIONS table of our WordPress database with the help of add_setting() method on the $wp_customize object.
Just like add_panel()and the add_section() methods, the add_setting() method accepts two parameters.
- Unique ID for the Setting: We will use this ID to link this new setting to a Control like HTML text field.
- Configuration Array: to give the Setting
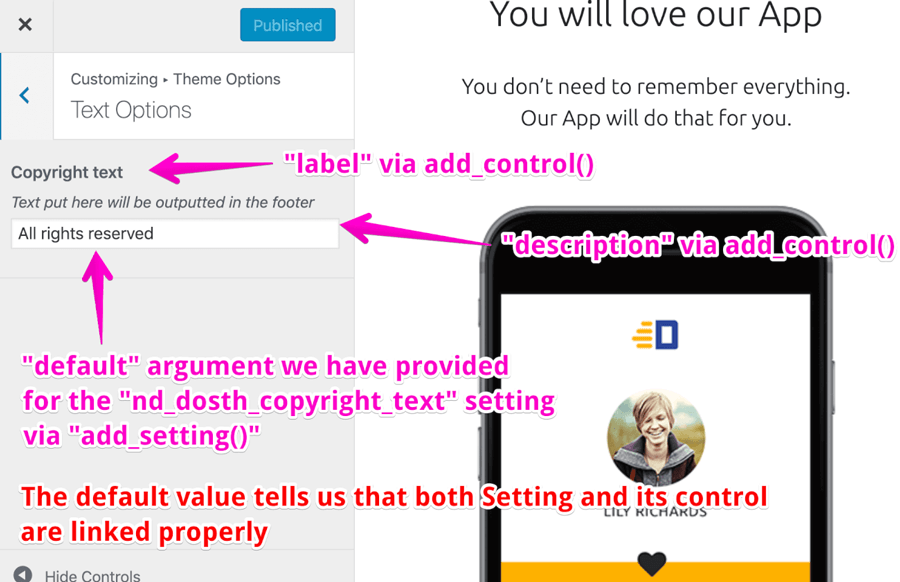
- A default value: You can provide a default value for the Setting so that if the Client likes the default value, he/she doesn’t have to update the Setting at all.
A default value also helps in eliminating empty text areas when the theme is activated for the first time. Developers who distribute their themes for mass usage uses this default value to provide some dummy text.
In our case, we are providing “All rights reserved” as the default value. - A sanitization callback function: You can provide a PHP callback function to sanitize the Data entered by the user for this setting.
As I have said before, you can not trust the user data, even if it is you. By default, WordPress provides Sanitization callback functions for some HTML fields only. For the others, we have to define a Sanitization Function ourselves and provide it to this argument.
In our case, we have provided “sanitize_text_field” as the callback function. This function ships with WordPress. You can just use it directly as we did above!
We will see this in action in an upcoming lesson. - A Transport Type: You can provide “refresh” or “postMessage” as a value for this argument. If you provide “refresh”, WordPress refresh the entire Customize Panel to show you the changes affected by the Setting. It is just like a normal web page refresh and slows you down.
If you provide “postMessage”, WordPress will only refresh a part of Customize Panel where the change took place. It is like AJAX and improves user experience. You’ll understand this once we see “postMessage” in action in the next lesson. - Capability: The default value for capability is “edit_theme_options”. That means, only a user with “edit_theme_options” capability should be able to edit theme options.
And this is what we need, so I omitted this argument altogether.
- A default value: You can provide a default value for the Setting so that if the Client likes the default value, he/she doesn’t have to update the Setting at all.
Technically, we can not add a Setting to a Panel nor Section. This is why we did not provide a Section ID in the Setting’s configuration array.
A Setting just holds a piece of Data in the Database. And we manage this piece of Data with the Help of a Control (Form Field) and we can add this Form Field to any Section inside the Customize Panel.
How to add a Control and link it to the Setting and a particular Section
Go ahead put the following code at the end of the nd_dosth_customize_register action, to be precise, anywhere after the “nd_dosth_copyright” Setting we have added previously.
// Control for Copyright text
$wp_customize->add_control( 'nd_dosth_copyright_text',
    array(
        'type'        => 'text',
        'priority'    => 10,
        'section'     => 'nd_dosth_text_options',
        'label'       => 'Copyright text',
        'description' => 'Text put here will be outputted in the footer',
    )
);
The add_control() method adds a Form field of a certain type to a particular Section and links this Form field to the specified Setting.
Again, The add_control() method accepts two parameters.
- Unique ID of the Setting: We have to provide the ID of the Setting which this “Control” (Form Field) manages
- Configuration Array: We can provide the following arguments to this array:
- type: We have to specify the type of the Form Field. For example, If we specify the type as “text”, an HTML “text” input field will be outputted by WordPress.
If we specify “radio”, an HTML “radio” input field will be outputted.
Currently, WordPress supports the following types:text,checkbox,radio,select,textarea,dropdown-pages,email,url,number,hidden, anddate
In our case, I want a “text” form field to enter the copyright text. If it is a paragraph, I would have chosen “textarea”. - priority: Just like Sections, Controls can have priority too! You can control the order of the “Control” using this argument.
In our case, I am going with a priority of 1 for no reason. I Just wanted to tell you that this option exists. - section: As I said before, you have to put this Control inside a particular Section.
In our case, I want to put this Control inside the “nd_dosth_text_options” Section that we have recently created. - label: Label for the HTML Form field that this Control outputs. The label must be descriptive and should be easily understandable by the client.
In our case, I want the client to enter the Copyright text here, So I have provided “Copyright Text” - description: Sometimes, we need to give more idea about a particular option, for example, what it does and the location where the value of this “Setting” is outputted.
In our case, we are outputting the copyright text in the footer, So I have provided “Text put here will be outputted in the footer”
- type: We have to specify the type of the Form Field. For example, If we specify the type as “text”, an HTML “text” input field will be outputted by WordPress.
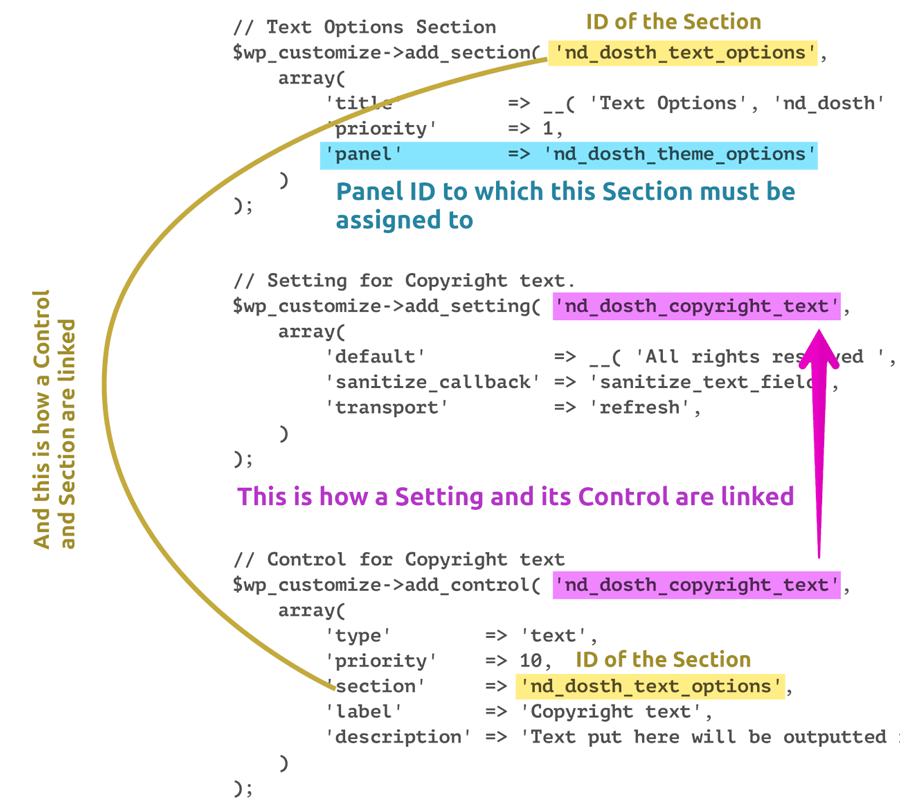
And this how a Setting is linked with a Control and how a Control is linked with a Section.
If you now go the Customize panel and refresh it, you will indeed find a Panel called “Theme Options”:
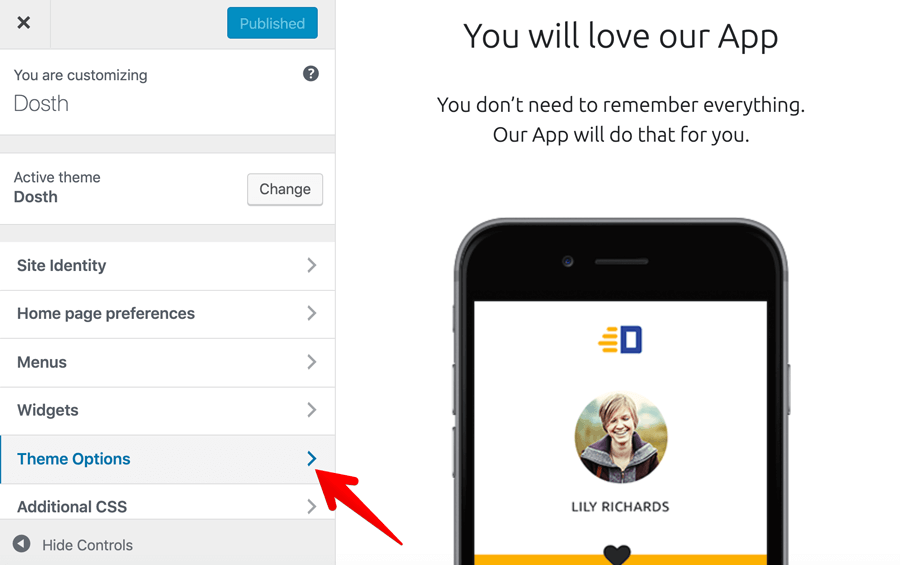
And if you go inside it, you will find a Section called “Text Options”
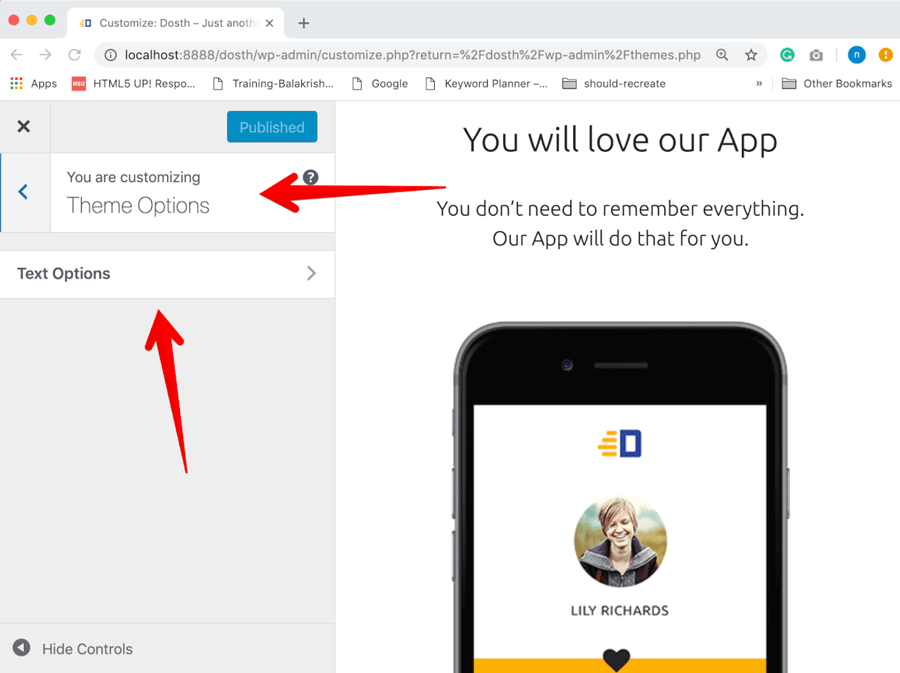
And if you go inside it, you will finally find a control called “Copyright Text”.
As you can see, the arguments we have provided for the Control is showing up in their respective locations.
Uff! That’s all it takes to create a Panel -> Section -> Setting and its Control.
Next, we will learn how to grab the “Copyright Text” Setting value and output it to the frontend.
How to output a Theme Setting value created
One way to output a theme setting’s value is by using the:
get_theme_mod( 'setting_id', 'default_value' );As you can see, the get_theme_mod() function accepts two parameters. Setting ID and a default value. Providing a default value is optional but it is necessary as you’ll see in a moment.
Common, let’s output the “Copyright Text” Setting’s value in the Footer.
Open up the footer.php file and replace the following code:
<div class="copyright">
<p><?php printf( __( '%s. All right reserved © %s', 'nd_dosth' ), get_bloginfo('name'), date_i18n( 'Y' ) ); ?></p>
</div>
With:
<div class="copyright">
<p>
<?php
printf(
'%s. %s © %s',
get_bloginfo('name'),
get_theme_mod('nd_dosth_copyright_text'),
date_i18n( 'Y' )
);
?>
</p>
</div>
We just removed the __() translation function inside the printf() altogether and added a new dynamic placeholder in the second position. That’s all. In a way, we just simplified it.
We no longer need the __() translation function because we previously used it to make the text “All Right Reserved” translation ready.
But since we are outputting this hard-coded text via Theme Settings now, we no longer need a translation function.
“Why? can’t we put another %s inside the translation function?”
Do you mean this?
<div class="copyright">
<p>
<?php
printf(
__('%s. %s © %s', 'nd_dosth'),
get_bloginfo('name'),
get_theme_mod('nd_dosth_copyright_text'), date_i18n( 'Y' )
);
?>
</p>
</div>
“Yep!”
The thing is, we use translation functions to make the hard-coded text accessible for translation.
And the problem is, the above translation function contains only dynamic placeholders, and it will show up to translators like this:
The text “%s. %s © %s” doesn’t make any sense to the translators, right?
So, it is better not to use the translation function everything inside it is a dynamic variable.
“Then how do we translate the text we put inside a Theme Setting?”
Currently, there is no easy way.
If you want to do it manually, there is a lengthy and complicated process.
The best to do it is using the WPML plugin. And, If you can’t afford it, there are some free plugins which do this.
Anyway, now that we have replaced the “All right reserved” hard-coded text with the get_theme_mod() function, let’s check out the output in the frontend.
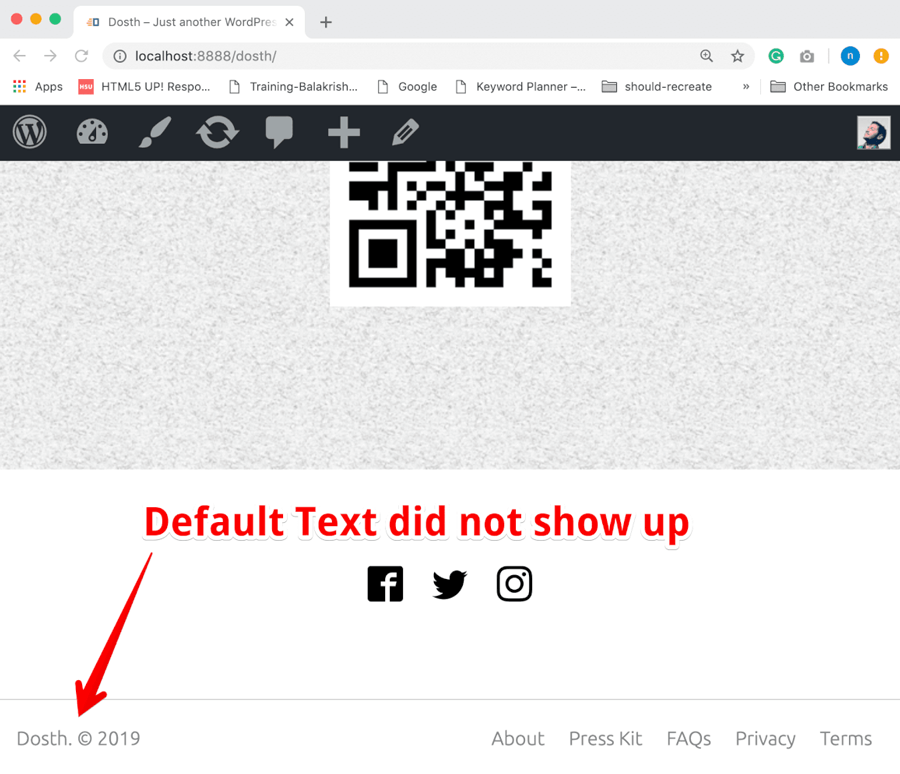
OOPS! The default copyright text is not getting outputted.
// Setting for Copyright text.
$wp_customize->add_setting( 'nd_dosth_copyright_text',
    array(
        'default'           => __( 'All rights reserved ', 'nd_dosth' ),
        'sanitize_callback' => 'sanitize_text_field',
        'transport'         => 'refresh',
    )
);
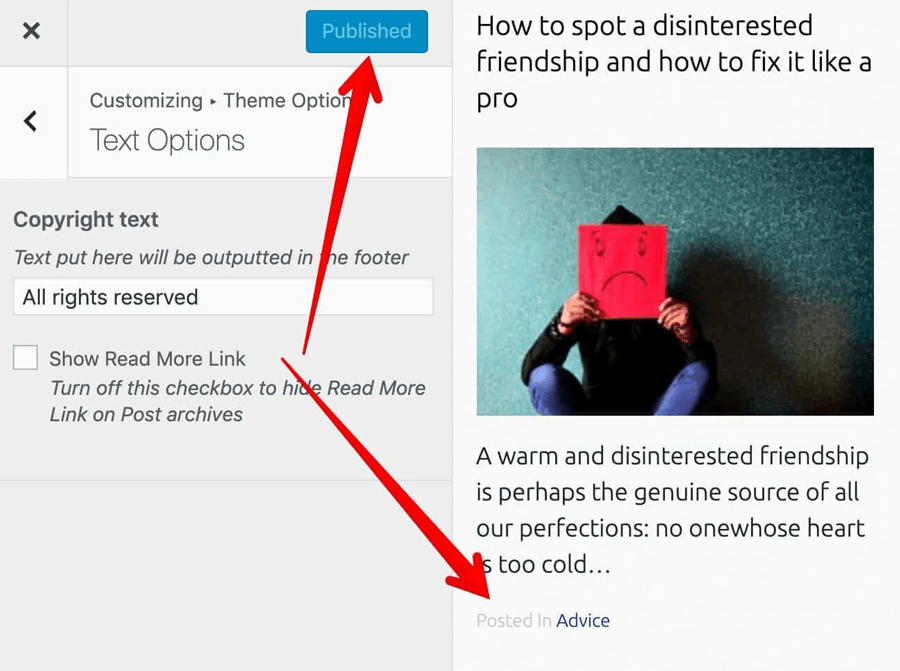
The problem is, although we have added the default text for the “Copyright Text” Setting, WordPress doesn’t save the default text to the Database automatically.
There are two ways to fix, both solve the different problems.
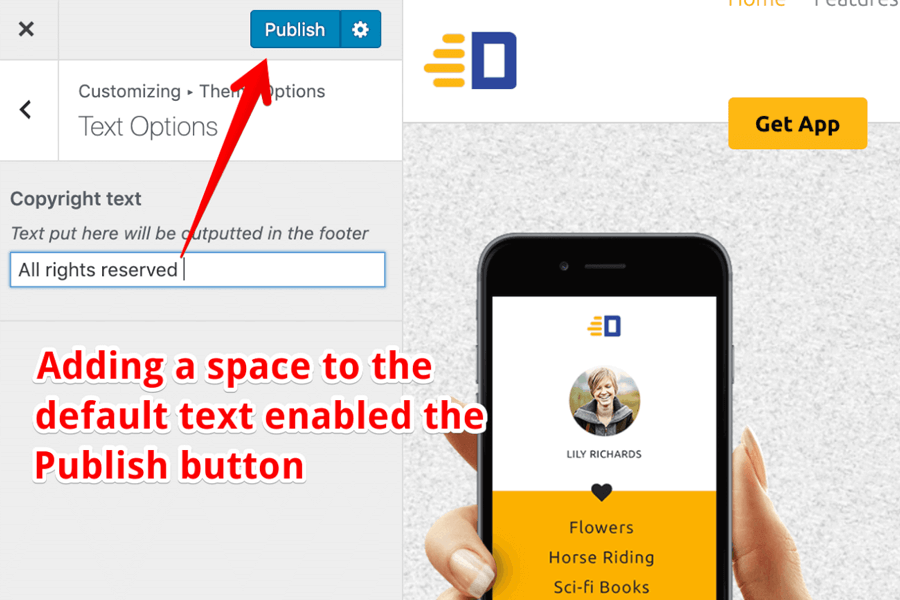
Solution 1: Hitting the Publish Button
We have to manually hit the “Publish” button at the top of the Customize Panel to save it.
So, always remember, if you are providing a default value via the Theme Setting code above, you always have to click the “Publish” button. Otherwise, the default text wouldn’t show up.
“But the Publish button is currently disabled.”
Don’t panic. To enable the button, try adding a space to the default text and remove it.
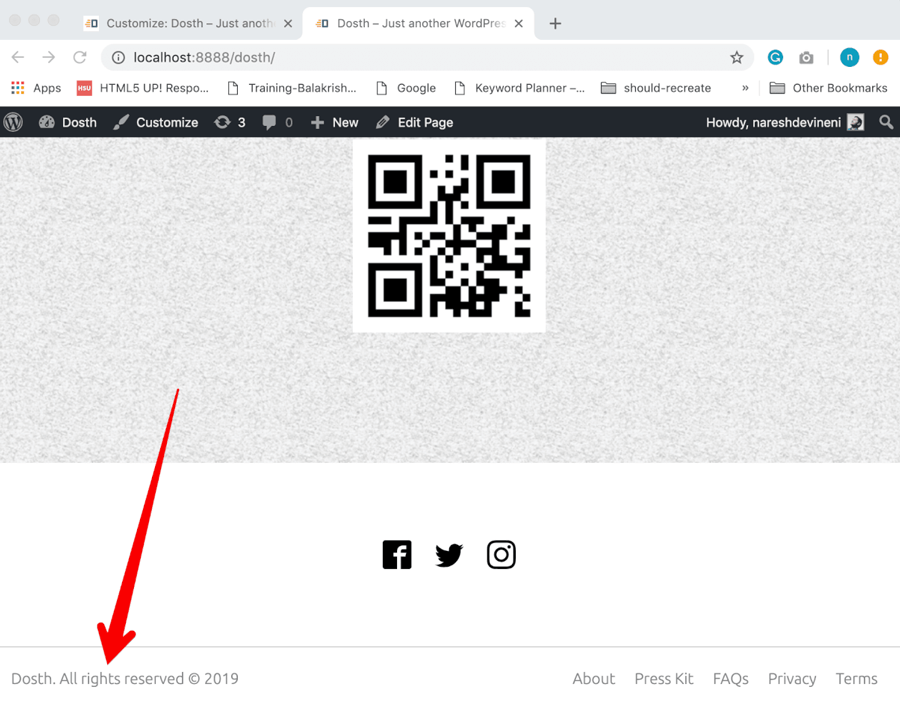
Now if we go back to the footer area in the Frontend, everything is working as expected.
Solution 2 (The Better One): Providing a default value via the get_theme_mod()
The above solution works fine if you are developing the theme for a client. Once the site is ready, you would hit the “Publish” once and the problem is solved.
But, what if you were distributing your Theme on the WordPress Theme Repository?
You can’t really ask the users of your theme to go to Customize Panel and hit the Publish button to avoid missing texts in the frontend, right?
To solve this problem, we have to provide a default value as the second parameter to the get_theme_mod() function like this:
get_theme_mod('nd_dosth_copyright_text', __( 'All Rights Reserved', 'nd_dosth' ) );
This will 100% avoid the missing text problem that we saw above.
Of course, you still have to provide the default text while creating a setting via add_setting() function. This solution is not an alternative to Solution 1. Instead, it helps us overcome the limitation of Solution 1. So, we just have to provide the default value in both the places.
So after combining both the solutions, here is the final footer.php file:
<footer id="site-footer">
<?php if ( is_active_sidebar( 'footer-section-one' ) ) : ?>
<div class="footer-section-one">
<?php dynamic_sidebar( 'footer-section-one' ); ?>
</div>
<?php endif; ?>
<?php if ( is_active_sidebar( 'footer-section-two' ) ) : ?>
<div class="footer-section-two">
<div class="container">
<div class="row">
<div class="col-sm-12">
<?php dynamic_sidebar( 'footer-section-two' ); ?>
</div>
</div>
</div>
</div>
<?php endif; ?>
<div class="copyright-and-menu">
<div class="container">
<div class="row">
<div class="col-sm-6">
<div class="copyright">
<p>
<?php
printf(
'%s. %s © %s',
get_bloginfo('name'),
get_theme_mod('nd_dosth_copyright_text', __( 'All Rights Reserved', 'nd_dosth' ) ),
date_i18n( 'Y' )
);
?>
</p>
</div>
</div>
<div class="col-sm-6">
<div class="footer-links">
<?php
wp_nav_menu( array(
'theme_location' => 'footer',
) );
?>
</div>
</div>
</div>
</div>
</div>
</footer>
<?php wp_footer(); ?>
</body>
</html>
And, here is the final customize.php file for this lesson:
<?php
/**
 * Registers options with the Theme Customizer
 *
 * @param      object    $wp_customize    The WordPress Theme Customizer
 * @package    Dosth
 */
add_action( 'customize_register', 'nd_dosth_customize_register' );
function nd_dosth_customize_register( $wp_customize ) {
    // All the Customize Options you create goes here
    // Move Homepage Settings section underneath the "Site Identity" section
    $wp_customize->get_section('title_tagline')->priority = 1;
    $wp_customize->get_section('static_front_page')->priority = 2;
    $wp_customize->get_section('static_front_page')->title = __( 'Home page preferences', 'nd_dosth' );
    // Theme Options Panel
    $wp_customize->add_panel( 'nd_dosth_theme_options',
        array(
            //'priority'         => 100,
            'title'            => __( 'Theme Options', 'nd_dosth' ),
            'description'      => __( 'Theme Modifications like color scheme, theme texts and layout preferences can be done here', 'nd_dosth' ),
        )
    );
    // Text Options Section
    $wp_customize->add_section( 'nd_dosth_text_options',
        array(
            'title'         => __( 'Text Options', 'nd_dosth' ),
            'priority'      => 1,
            'panel'         => 'nd_dosth_theme_options'
        )
    );
    // Setting for Copyright text.
    $wp_customize->add_setting( 'nd_dosth_copyright_text',
        array(
            'default'           => __( 'All rights reserved ', 'nd_dosth' ),
            'sanitize_callback' => 'sanitize_text_field',
            'transport'         => 'refresh',
        )
    );
    // Control for Copyright text
    $wp_customize->add_control( 'nd_dosth_copyright_text',
        array(
            'type'        => 'text',
            'priority'    => 10,
            'section'     => 'nd_dosth_text_options',
            'label'       => 'Copyright text',
            'description' => 'Text put here will be outputted in the footer',
        )
    );
}
Next, we will learn an alternative way of defining a Theme Setting.
WordPress Theme Mods vs Theme Options
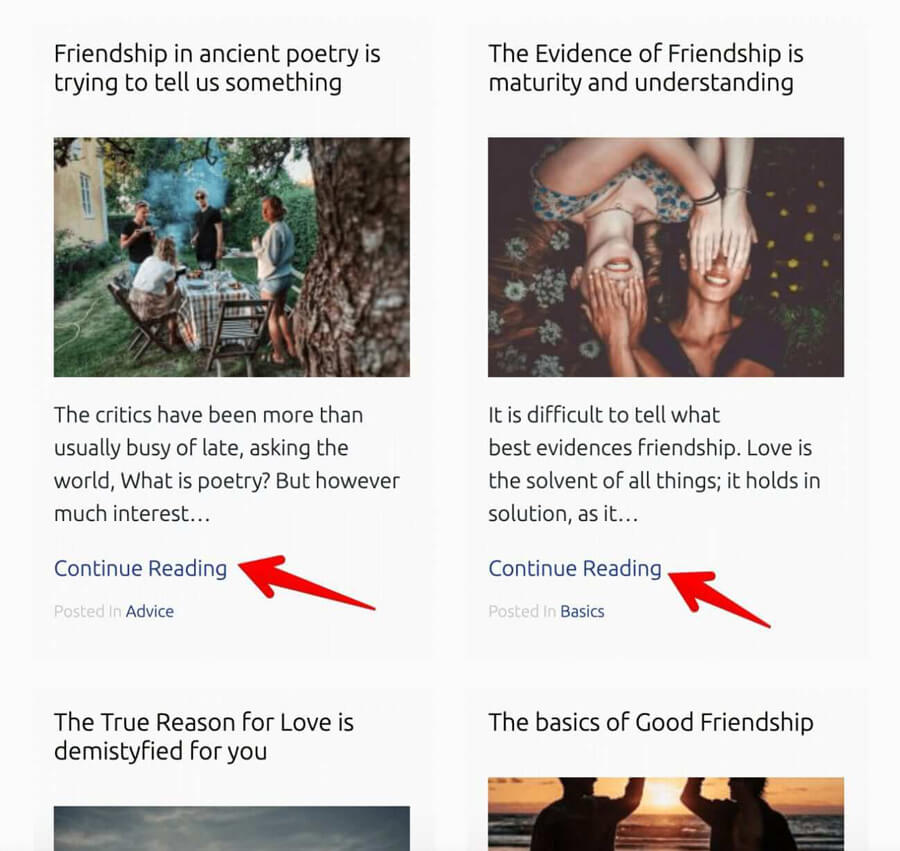
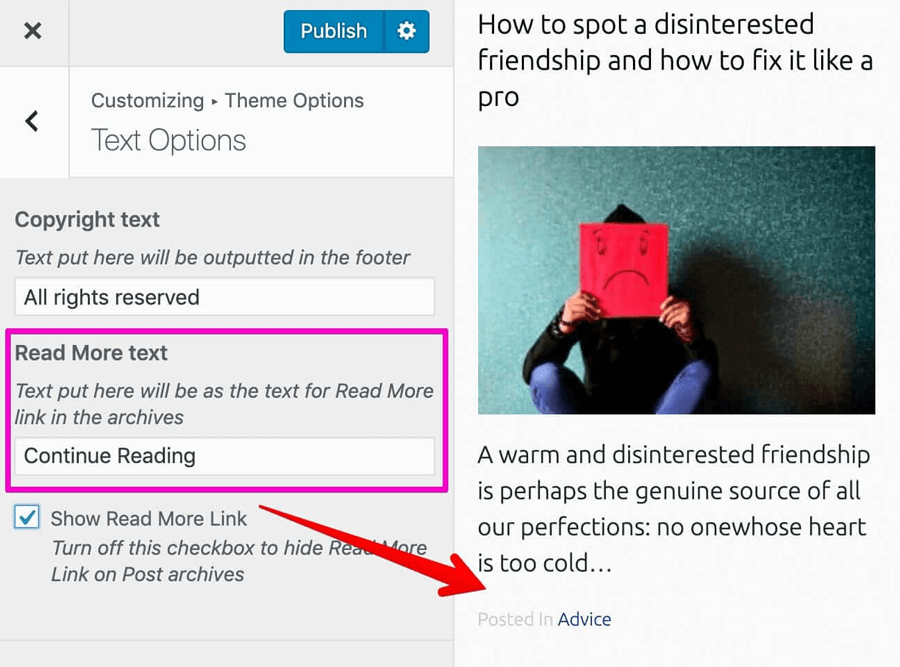
One more common request is to make the “Read More” text in the archive pages editable. Let’s just do that in this lesson.
Go ahead and put the following code at the end of the nd_dosth_customize_register action:
// Setting for Read More text.
$wp_customize->add_setting( 'nd_dosth_readmore_text',
    array(
        'type'              => 'option',
        'default'           => __( 'Read More ', 'nd_dosth' ),
        'sanitize_callback' => 'sanitize_text_field',
        'transport'         => 'refresh',
    )
);
// Control for Read More text
$wp_customize->add_control( 'nd_dosth_readmore_text',
    array(
        'type'        => 'text',
        'priority'    => 10,
        'section'     => 'nd_dosth_text_options',
        'label'       => 'Read More text',
        'description' => 'Text put here will be as the text for Read More link in the archives',
    )
);
You already know what’s happening in the above code. It just adds a new Control and Setting for “Read More” text inside:
Customize Panel -> Theme Options -> Text Options
Nothing new, right?
But if you notice the add_setting() function in the above code, I added an extra argument called “type” to its configuration array and I have provided “option” as its value.
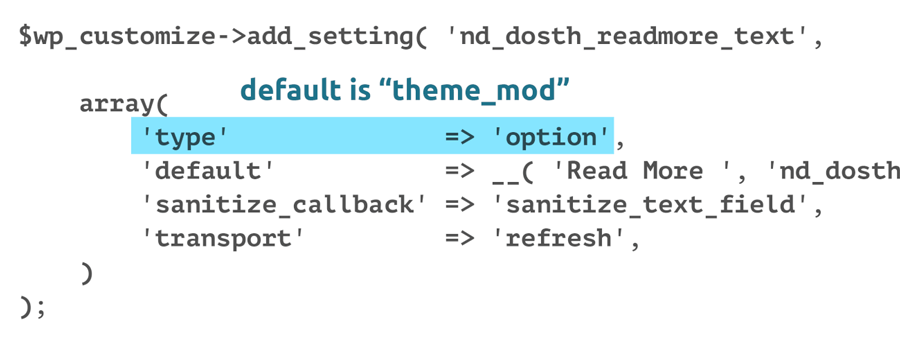
The “type” argument accepts two values.
- theme_mod (default)
- option
The default value for the “type” argument is “theme_mod”. This is why we did not provide this argument for the “Copyright Text” Setting and we used the get_theme_mod() function to retrieve the Setting value.
But I want the “Read More” Setting to be the type of “option”, so I have specified the “type” without omitting it.
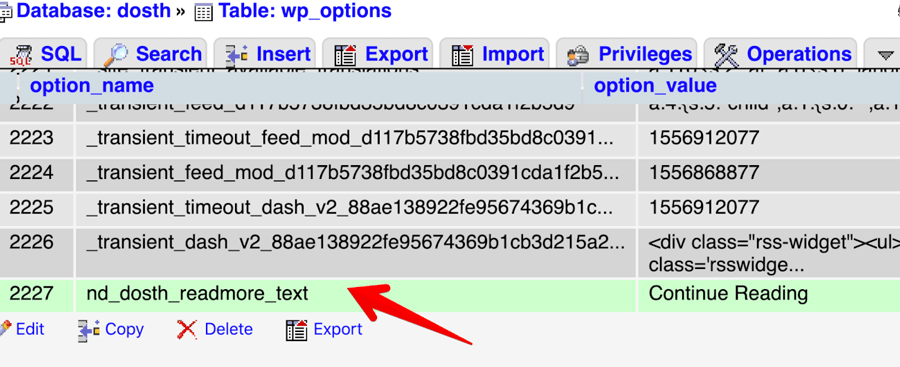
The importance of the “type” argument is that it tells WordPress how to store a particular Setting’s value inside the WP_OPTIONS table. That’s all.
This will make more sense if you take a look at how the “Copyright Text” Setting is store inside the WP_OPTIONS table.
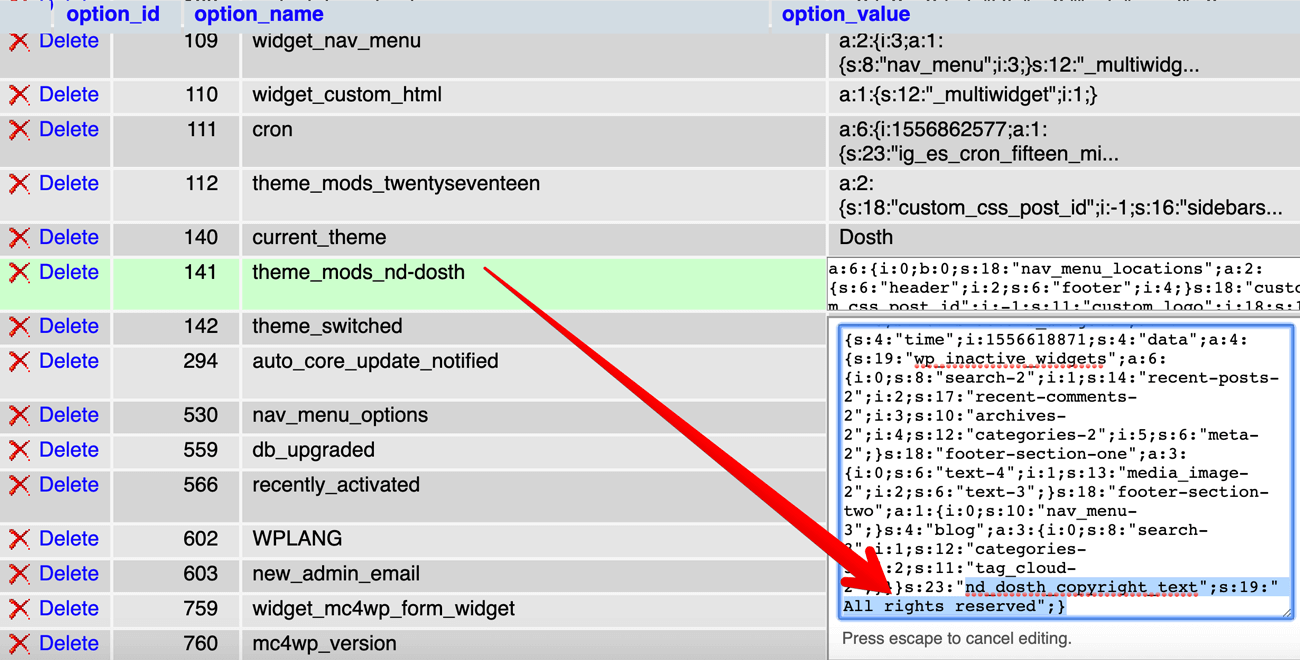
See? Not just “Copyright Text” Setting, All the Settings inside Customize Panel whose type is “theme_mod” are getting store inside a single row of the table called “theme_mods_nd-dosth”.
If you have some good amount of knowledge about Database Performance, you know this is not good for performance.
This is where the Setting type of “option” comes in.
You know the Settings Screen inside the Admin Dashboard, right?
Along with some internal WordPress settings, The values of all the above Settings are stored the WP_OPTIONS as well, but each Setting gets its own row!
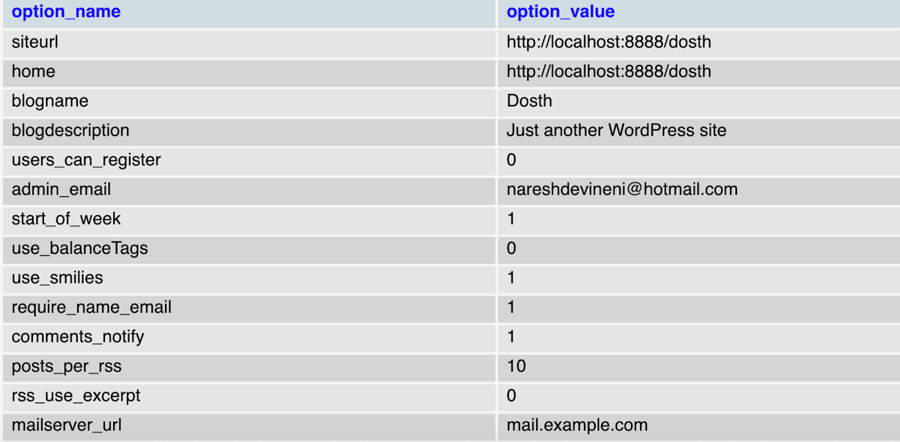
So, if we set the “type” of a particular Customization Setting to “option”, this Setting’s value will get its own inside the WP_OPTIONS table and there will be a performance boost when we access this Setting’s value for outputting in the frontend.
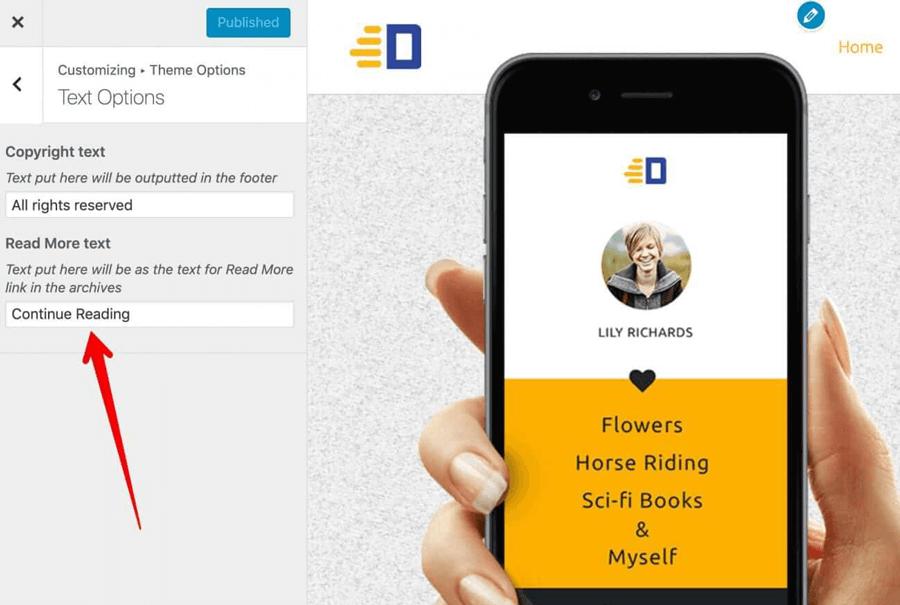
Common, let’s test this out! Go back to the Text Options:
Admin Dashboard -> Appearance -> Customize -> Theme Options -> Text Options
And change the text of “Read More Text” Setting to “Continue Reading” and hit the Publish button to save changes to the Database.
If we now check out the WP_OPTIONS table, we can indeed see that “Read More Text” Setting got its own row.
Trust me, This is a really good thing.
Anyway, now let’s retrieve and output “Read More Text” Setting inside our Blog posts Index and archive pages.
If you remember, we are outputting the “Read More” link from the parts/blog-index.php template file. We are using this template part to render the blog posts on the Blog post index page, Homepage, and archive pages.
Seeing the advantage of writing modular template parts yet?
Go ahead and open up the blog-index.php template file and replace the following code:
<a class="read-more-link" href="<?php the_permalink(); ?>"><?php _e( 'Read More', 'nd_dosth' ); ?></a>
With:
<a class="read-more-link" href="<?php the_permalink(); ?>">
    <?php echo get_option( 'nd_dosth_readmore_text', __( 'Read More', 'nd_dosth' ) ); ?>
</a>
Because we have the Setting type to be “option”, we can no longer use the get_theme_mod() function to retrieve the value of the Setting. Instead, we have to use get_option() function.
The get_option() function accepts the same two parameters that the get_theme_mod() function accepts. Setting ID and a Default Value.
That’s all.
If you now go to the Blog posts Index, Homepage or any of the archive pages, on individual articles, you should see the text “Continue Reading” instead of “Read More”.
Slick, Isn’t it?
Here is one more secret, the get_theme_mod() function internally uses the get_option() function. So you can still retrieve and output a Setting with “theme_mod” type using the get_option() function as well. It saves one internal function call for WordPress.
Common, go ahead and replace the get_theme_mod() function inside the footer.php file with the get_option() function.
<?php
printf(
'%s. %s © %s',
get_bloginfo('name'),
get_option('nd_dosth_copyright_text', __( 'All Rights Reserved', 'nd_dosth' ) ),
date_i18n( 'Y' )
);
?>
Everything still works the same. From here onwards, for the rest of the module, We will use get_option() function instead of get_theme_mod() function.
Next, we will learn how to create a “Checkbox” Control and how to sanitize it.
Using Custom Sanitization Callbacks for Settings
Sometimes clients prefer to hide the “Read More/Continue” Reading link altogether. So, let’s give them the option to hide it and reveal it back if they want to.
Go ahead and put the following code at the end of the nd_dosth_customize_register action:
// Setting to Show/Hide Read More Link.
$wp_customize->add_setting( 'nd_dosth_show_readmore',
array(
'type' => 'option',
'default' => true,
'sanitize_callback' => 'nd_dosth_sanitize_checkbox',
'transport' => 'refresh',
)
);
// Control to Show/Hide Read More Link.
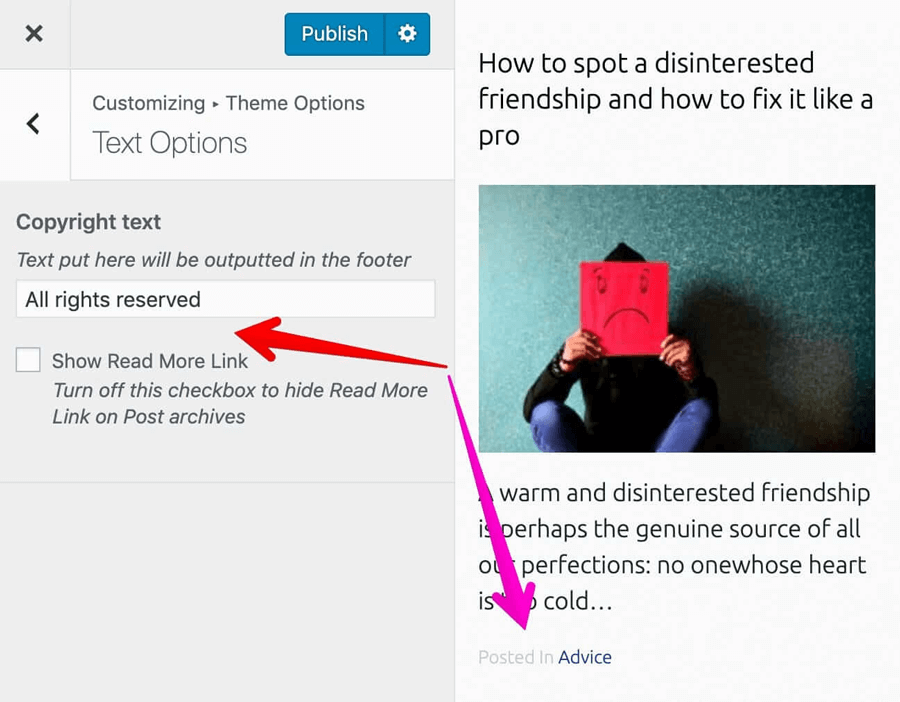
$wp_customize->add_control( 'nd_dosth_readmore_text',
array(
'type' => 'checkbox',
'section' => 'nd_dosth_text_options',
'label' => 'Show Read More Link',
'description' => 'Turn off this checkbox to hide Read More Link on Post archives',
)
);
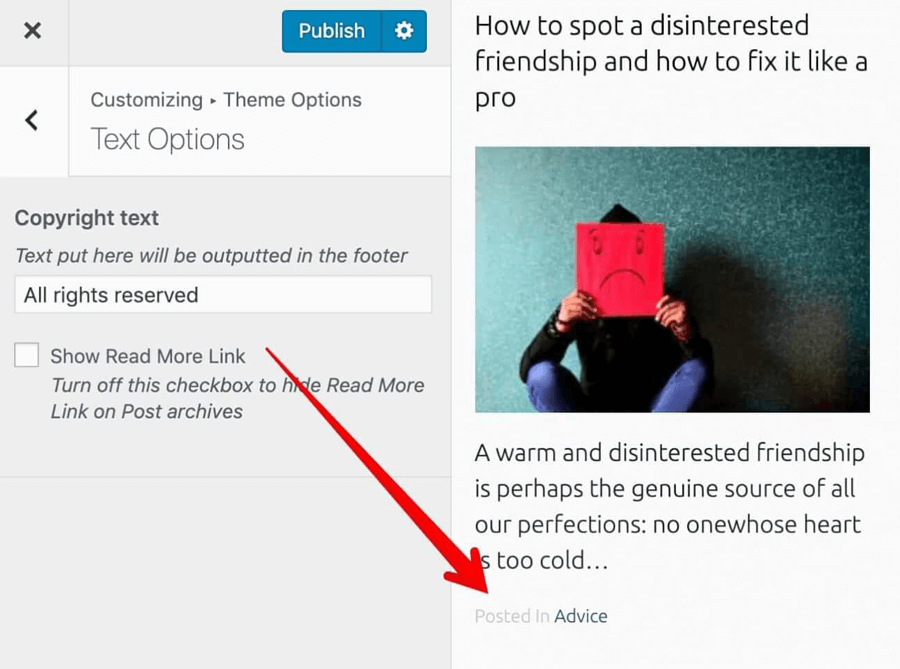
With the help of the above code, we are adding a “Show Read More Link” checkbox to the “Text Options” Section:
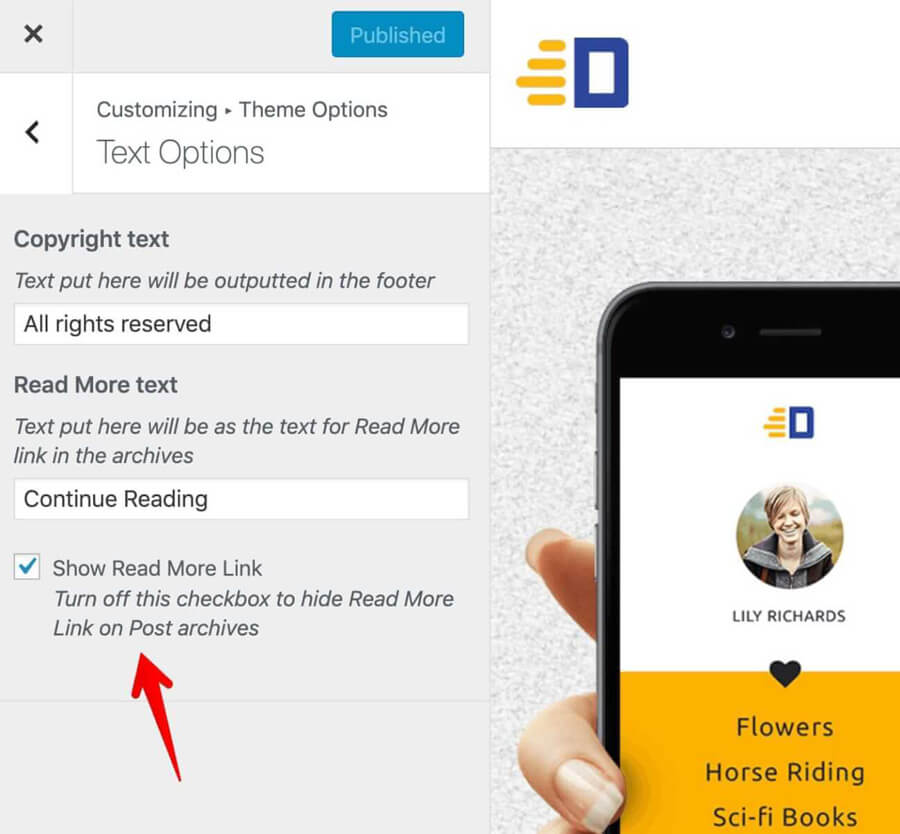
I have set the default value to “true” to make checkbox turned on by default.
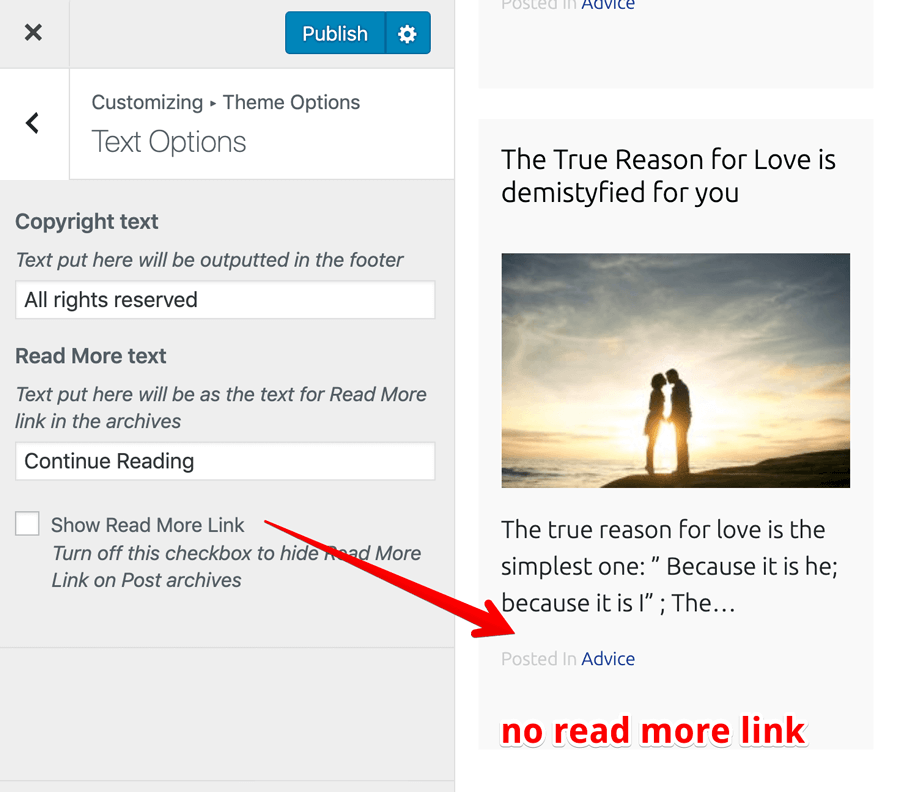
Although the checkbox control and the Setting are working just fine if you test it out, there is one problem.
We have provided a custom sanitization callback and we didn’t define it!
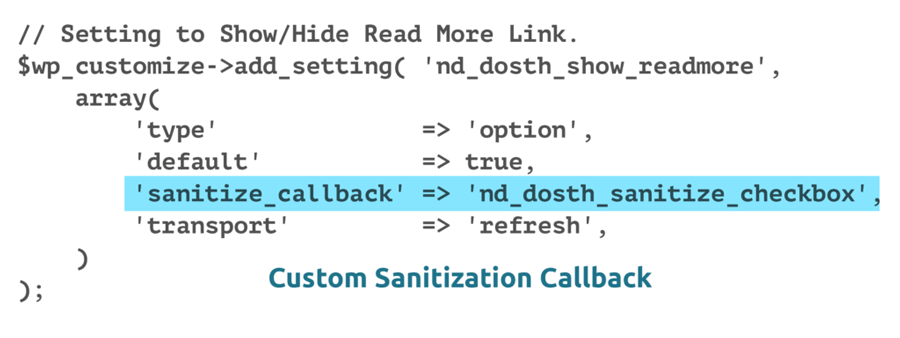
Yet! WordPress is failing silently by skipping sanitization altogether even if it can not find the function definition for the nd_dosth_sanitize_checkbox function. I just want to tell you this.
Anyway, WordPress doesn’t ship with a callback function that sanitizes a checkbox and we definitely need to sanitize all our custom settings for security reasons and to avoid weird bugs.
So, we have to define our own sanitization callback and it’s not that difficult at all.
In fact, we don’t have to break a sweat.
Ahmad Awais, one of the core developers of WordPress provided us with a neat collection of sanitization callbacks:
https://github.com/ahmadawais/WPCustomize/blob/master/customizer/customizer-sanitization.php
And for the purposes of this lesson, We just need the “checkbox” sanitization callback from the above collection.
So go ahead and paste the following code at the end of the nd_dosth_customize_register action:
/**
 * Checkbox sanitization callback example.
 *
 * Sanitization callback for 'checkbox' type controls. This callback sanitizes `$checked`
 * as a boolean value, either true or false.
 *
 * @param bool $checked Whether the checkbox is checked.
 * @return bool Whether the checkbox is checked.
 */
function nd_dosth_sanitize_checkbox( $checked ) {
    // Boolean check.
    return ( ( isset( $checked ) && true == $checked ) ? true : false );
}
The above sanitization callback just ensures that the checkbox value is either true or false and nothing else. That means, except for true or false, no other value will be stored in the database for this Setting.
This is what sanitization is all about, right? No monkeying around with the data that gets stored in the database.
And the placement of this callback doesn’t really matter. You can put a sanitization callback inside functions.php or any other file that functions.php file includes.
I placed it inside nd_dosth_customize_register action to keep everything that is related in one place. I usually move all the sanitization callbacks to another file and then include this file inside the nd_dosth_customize_register action.
At the end of the day, it all boils down to your personal preferences.
Now, let’s go back to the blog-index.php template file and replace the following code:
<a class="read-more-link" href="<?php the_permalink(); ?>">
    <?php echo get_option( 'nd_dosth_readmore_text', __( 'Read More', 'nd_dosth' ) ); ?>
</a>
With:
<?php if( get_option('nd_dosth_show_readmore', true ) ): ?>
    <a class="read-more-link" href="<?php the_permalink(); ?>">
        <?php echo get_option( 'nd_dosth_readmore_text', __( 'Read More', 'nd_dosth' ) ); ?>
    </a>
<?php endif; ?>
We want to display the “Read More” link only if the “Show Read More Link” Setting is true, so we wrapped the “Read More” link inside an IF CONDITION which checks whether the “Show Read More Link” is true or false.
Our custom checkbox sanitization callback ensures that the get_option('nd_dosth_show_readmore', true ) will return false if the “Show Read More Link” checkbox is turned off.
Pleasant, right?
Important Note: You can use a particular sanitization callback on any number of settings.
And that’s pretty much how to use our own sanitization callback and make our Customize Panel a better place.
Here is the updated blog-index.php template file:
<div class="blog-post">
    <?php if( is_front_page() || is_single() ): ?>
        <h3><a href="<?php the_permalink(); ?>"><?php the_title(); ?></a></h3>
    <?php else: ?>
        <h2><a href="<?php the_permalink(); ?>"><?php the_title(); ?></a></h2>
    <?php endif; ?>
    <?php if ( has_post_thumbnail() ) :
        $featured_image = wp_get_attachment_image_src( get_post_thumbnail_id( get_the_ID() ), 'dosth-blog-thumbnail' ); ?>
        <div class="blog-post-thumb">
            <a href="<?php the_permalink(); ?>"><img src="<?php echo $featured_image[0]; ?>" alt='' /></a>
        </div>
    <?php endif; ?>
    <?php the_excerpt(); ?>
    <?php if( get_option('nd_dosth_show_readmore', true ) ): ?>
        <a class="read-more-link" href="<?php the_permalink(); ?>">
            <?php echo get_option( 'nd_dosth_readmore_text', __( 'Read More', 'nd_dosth' ) ); ?>
        </a>
    <?php endif; ?>
    <?php $categories = get_the_category(); ?>
    <?php if ( ! empty( $categories ) ) : ?>
        <div class="posted-in">
            <span><?php _e( 'Posted In', 'nd_dosth' ); ?></span>
            <a href="<?php echo get_category_link( $categories[0]->term_id ); ?>">
                <?php echo $categories[0]->name; ?>
            </a>
        </div>
    <?php endif; ?>
</div>
Next, we will talk about Active Callbacks!
Using Active Callback on a Control inside WordPress Customizer
An Active Callback allows us to show or hide a particular Control based on a Condition.
For example, It is a good Idea to hide a Control when viewing a particular page where it is not relevant. When I said “page”, I am talking about a particular page that is being viewed on the Site Preview part of the Customize Panel.
The Site Preview section allows you to navigate around all the pages on the site when playing around with the Customize Panel settings. The navigation links inside the site preview work just fine like they do on the actual frontend.
Alright! This is better shown than explained.
Go back to the customize.php file and add the following active_callback argument to the “nd_dosth_readmore_text” Control’s configuration array.
'active_callback' => 'is_archive'
Here is the updated “nd_dosth_readmore_text” Control
// Control for Read More text
$wp_customize->add_control( 'nd_dosth_readmore_text',
    array(
        'type'        => 'text',
        'priority'    => 10,
        'section'     => 'nd_dosth_text_options',
        'label'       => 'Read More text',
        'description' => 'Text put here will be as the text for Read More link in the archives',
        'active_callback' => 'is_archive'
    )
);
We have to use active_callback argument on a Control which we want to contextually show or hide and the active_callback argument accepts a function as a callback. When WordPress tries to render a Control, it will execute this callback function to determine whether to show the Control or not!
So, the callback function we have provided for the active_callback argument must return a boolean True or False. Nothing else. The idea is If the callback function returns True, WordPress will show the Control. Otherwise, it will hide it.
We can provide any function that returns a boolean. Usually, we provide a WordPress conditional tag to determine whether we are viewing a particular WordPress page and then show the Control if it is relevant to that particular page.
Remember the following conditional tags?
- is_page()
- is_archive()
- is_front_page()
All the Conditional Tags works just fine with the active_callback argument.
But we shouldn’t put function call brackets “()” at the end. We are not executing these functions right away. We are providing these conditional tags as a callback function.
So, coming back to the above code, When WordPress renders the “nd_dosth_readmore_text” Control in the “Text Options” Section, WordPress will execute the is_archive() function and the is_archive() function returns True only if we are viewing an archive page.
That means if we are viewing the “Text Options” Section with the Homepage in the Site Preview, the “Read More Text” Control will be hidden.
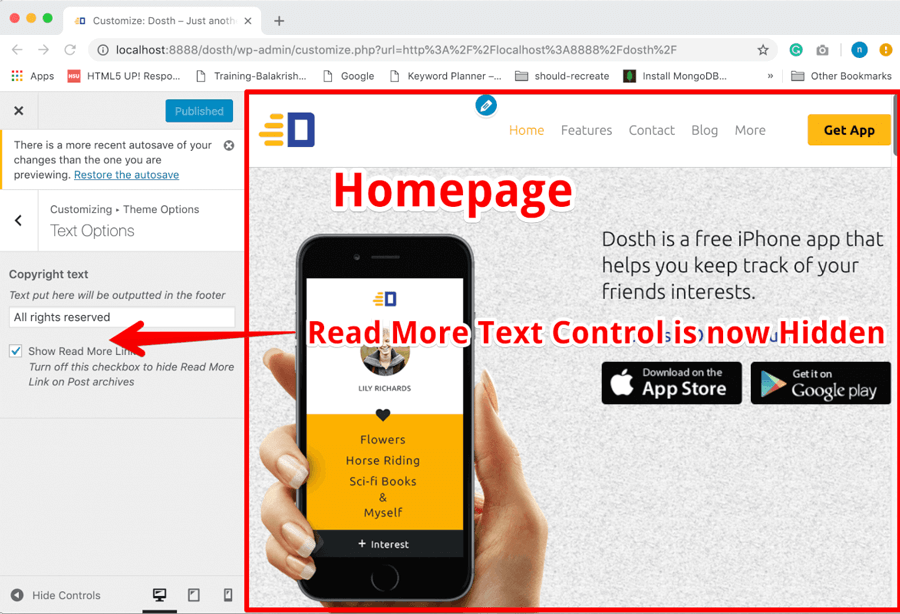
But, if we are viewing the “Text Options” Section with an Archive page, the “Read More Text” Control will indeed show up.
However, the existing WordPress Conditional tags are not enough sometimes.
We are showing Blog posts on the Homepage and Blog posts Index page as well, right? What if you want to show “Read More Text” Control while previewing these pages and hide it for the rest of the pages?
This is where Custom Active Callbacks come in.
Introducing Custom Active Callbacks
Go back to the customize.php file and replace the current active_callback argument of “nd_dosth_readmore_text” Control with:
'active_callback' => 'nd_dosth_hide_readmore_on_condition'
Here is the updated “nd_dosth_readmore_text” Control
// Control for Read More text
$wp_customize->add_control( 'nd_dosth_readmore_text',
    array(
        'type'        => 'text',
        'priority'    => 10,
        'section'     => 'nd_dosth_text_options',
        'label'       => 'Read More text',
        'description' => 'Text put here will be as the text for Read More link in the archives',
        'active_callback' => 'nd_dosth_hide_readmore_on_condition'
    )
);
And put the following Custom Active Callback definition at the end of the nd_dosth_customize_register action:
/**
* Show "Read More Text" Control only if a condition is met.
*
* @param WP_Customize_Manager object
* @return bool
*/
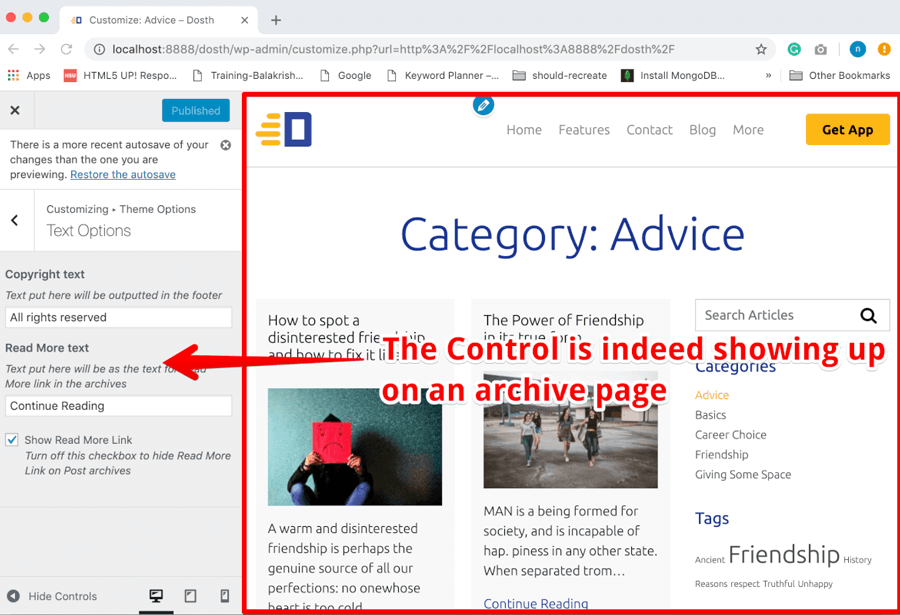
function nd_dosth_hide_readmore_on_condition( $control ) {
if( is_archive() || is_front_page() || is_home() ){
return true;
} else{
return false;
}
}
In the above Custom Active Callback definition, we are just checking whether the current page on the site preview is one of these pages:
- Archive page
- Static Homepage
- Blog posts Index
If so, we are returning True and the “nd_dosth_readmore_text” Control will be shown. If not, we are returning false and the Control will be hidden.
That’s all!
If you now go ahead and test out our Custom Active Callback, it indeed works like a charm.
Just like Sanitization Callbacks, the place of Custom Active Callbacks doesn’t matter as longs as they are within the scope of the functions.php file.
Taking it a step further
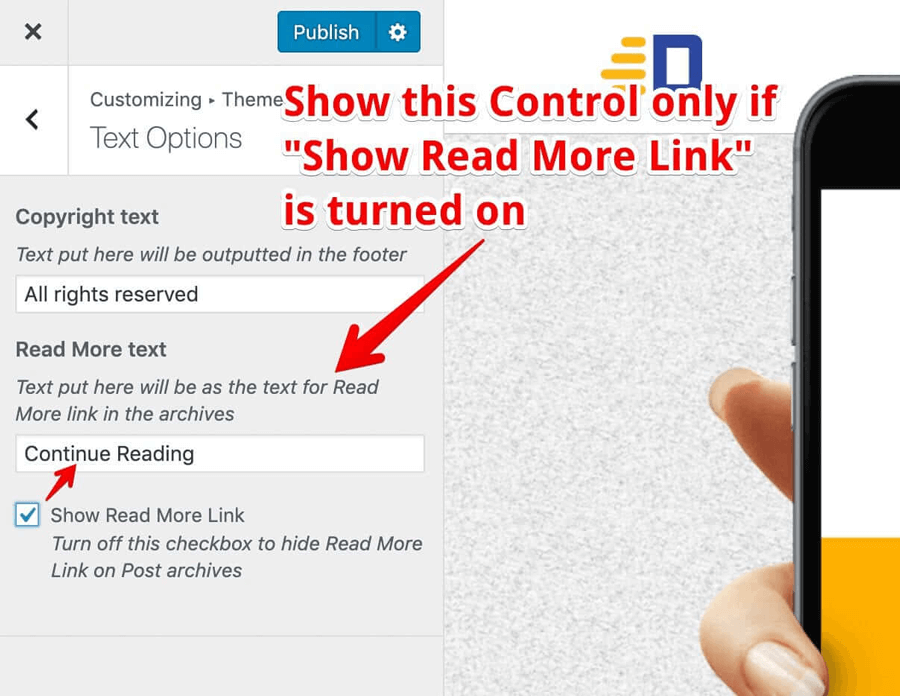
An Active Callback also allows us to show or hide the Control based on the value of another Control.
For example, we can hide the “Read More Text” setting if the “Show Read More Link” setting is set to false.
It makes sense, right?
If “Show Read More Link” setting is set to false, it means the client is not interested in modifying the “Read More text” setting at all.
So, hiding it makes total sense.
Common, let’s do this!
Go back to the customize.php file and update the nd_dosth_hide_readmore_on_condition function definition like this:
function nd_dosth_hide_readmore_on_condition( $control ) {
    $setting = $control->manager->get_setting( 'nd_dosth_show_readmore' );
    if( false == $setting->value() ){
        return false;
    }
    if( is_archive() || is_front_page() || is_home() ){
        return true;
    } else{
        return false;
    }
}
Active Callbacks receive WP_Customize_Manager object. And using this object, we can retrieve the value of a particular Setting.
$control->manager->get_setting( 'nd_dosth_show_readmore' );
So, first, we are getting the value of the “nd_dosth_show_readmore” Setting. If it is false, we are hiding the “Read More Text” Control right away by returning False. We are not interested in any further checks.
But if the “nd_dosth_show_readmore” Setting is True, then we are checking if it is a certain page.
Makes sense?
You can also combine the above IF CONDITIONS in the following way:
function nd_dosth_hide_readmore_on_condition( $control ) {
    $setting = $control->manager->get_setting( 'nd_dosth_show_readmore' );
    if( ( true == $setting->value() ) and ( is_archive() || is_front_page() || is_home() ) ){
        return true;
    } else{
        return false;
    }
}
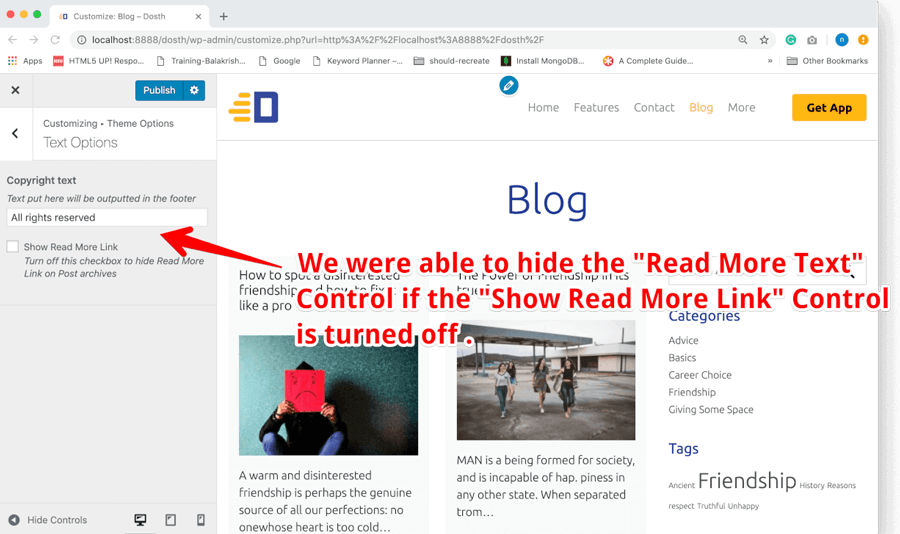
Also, remember, there are two things happening at the same time when you turn off the “Show Read More Link” setting.
- Because of our custom active callback, The “Read More Text” Control is getting hidden.
- And because of the IF CONDITION inside the
blog-index.phptemplate file, the “Continue Reading” link is also getting hidden.
These both are two separate things. The active callback is only responsible for hiding the Control. It has nothing to do with the “Continue Reading” link on the Site Preview side.
Everything is working fine but currently, the User Experience is a bit clunky, isn’t it?
We will fix that next.
Using Javascript to improve the User Experience of the WordPress Customizer Panel
The problem is, Once we un-check the “Show Read More Link” option, Sometimes the “Read More Text” Control is hiding right away and Sometimes it is only getting hidden after refreshing the Customize Panel.
Wouldn’t be great if “Read More Text” Control is shown/hidden right away as soon as we click on “Show Read More Link” Control?
It is definitely doable!
We can achieve this with the help of some Javascript. And it is not at all scary. Some developers think of it that way. But actually, it is not.
Anyway, like it or not, Javascript is the only way to enhance User Experience when it comes to web pages! So let’s fix our problem using Javascript.
Customize Panel provides us with a neat little Javascript Customization API and it is extremely easy to use it.
The first thing we need to do is, we need to change the “transport” argument of the “nd_dosth_show_readmore” Setting to “postMessage”.
$wp_customize->add_setting( 'nd_dosth_show_readmore',
    array(
        'type'              => 'option',
        'default'           => true,
        'sanitize_callback' => 'nd_dosth_sanitize_checkbox',
        'transport'         => 'postMessage',
    )
);
Note: Remember, the “transport” argument is only set on a particular Setting. Not its Control.
Go ahead and Do it! You must follow along with me to understand upcoming problems and their solutions.
As I have said before, If you provide “refresh” for the “transport” argument, WordPress refresh the entire Customize Panel to show you the changes affected by the Setting. It is just like a normal web page refresh and slows you down.
This is the default behavior of the Customize Panel. But, If you provide “postMessage”, WordPress will only refresh a part of Customize Panel where the change took place. It is like AJAX and improves user experience.
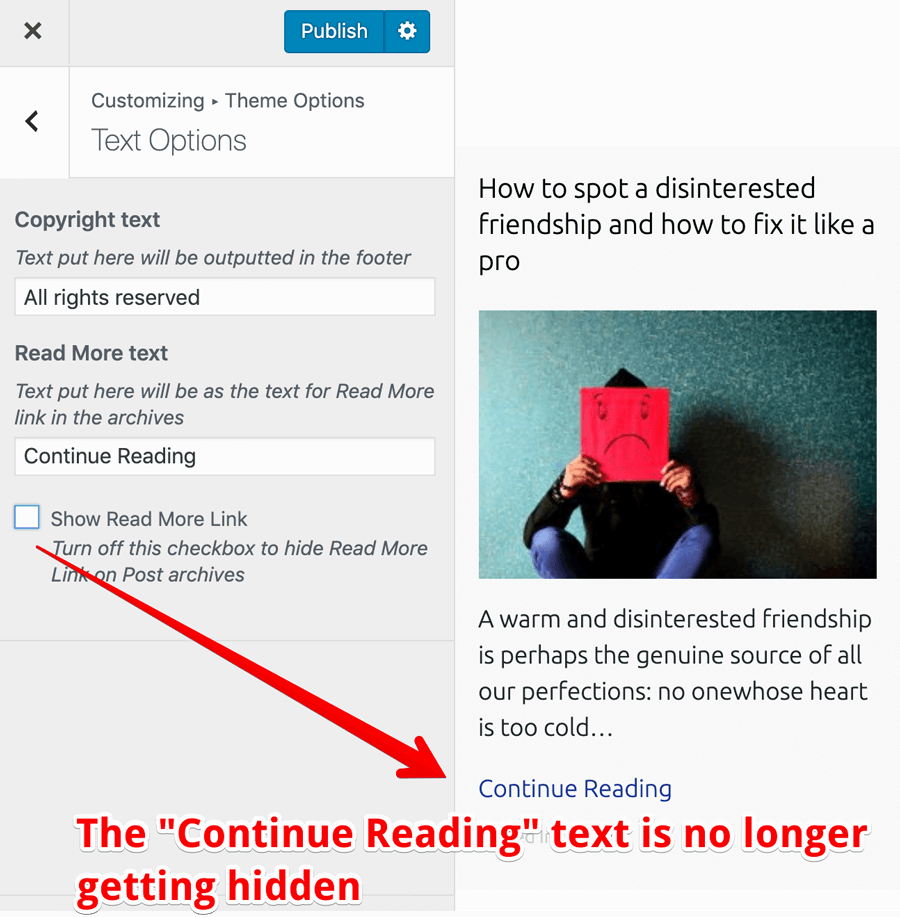
Now that we have changed the “transport” method to “postMessage” if you now test out the “Show Read More Link” Control, you’ll notice that it is no longer working as expected.
The Customize Panel is not getting refreshed like it used to be.
Turning off the “Show Read More Link” will no longer hide the “Read More Text” Control and “Continue Reading” Link inside the Site Preview. This is not malfunctioning. This is the correct behavior of a Setting with “postMessage” transport method.
The ultimate goal is to hide both of them using the Javascript and we can’t hide them in a single go and two different action hooks are involved here.
First, let’s hide the “Read More Text” Control using the customize_controls_enqueue_scripts action hook. This action hook is just like wp_enqueue_scripts action hook.
The customize_controls_enqueue_scripts action hook allows us to enqueue scripts to the Customize Panel and allows us to deal with the Settings and Controls of the Customize Panel. Not anything else.
Remember, It doesn’t care about the Site Preview side of the Customize Panel. If you try to hide an element from the Site Preview, it is not going to work. There is another hook for that purpose and we will see that shortly.
For now, let’s focus on hiding the “Read More Text” Control and we should hide it only when “Show Read More Link” Control is turned off. That’s our goal.
So, go back to the customize.php file and put the following code at the end of the file:
/**
 * Register customize panel controls scripts.
 */
function nd_dosth_customize_controls_register_scripts() {
    wp_enqueue_script(
        'nd-dosth-customize-active-callbacks',
        get_stylesheet_directory_uri() . '/assets/js/customize-active-callback.js',
        array(),
        '',
        true
    );
}
add_action( 'customize_controls_enqueue_scripts', 'nd_dosth_customize_controls_register_scripts', 0 );
In the above code, we are just enqueuing a Javascript file to the Customize Panel and the code inside this Javascript file will be executed only when we are interacting with the Customize Panel.
We did not create this file yet!
So, go ahead and create a new file called customize-active-callback.js inside the assets/js directory. Here is the full path to the file:
/wp-content/themes/nd-dosth/assets/js/customize-active-callback.jsNext, open up the customize-active-callback.js file and put the following Code inside it:
(function($){
    // Show "Read More Text" Control only if "Show Read More Link" is set to true
    wp.customize.control( 'nd_dosth_readmore_text', function( readmore_text_control ) {
        var show_readmore_setting = wp.customize( 'nd_dosth_show_readmore' );
        readmore_text_control.active.set( true == show_readmore_setting.get() );

        show_readmore_setting.bind( function( updated_value_of_show_readmore_setting ) {
            readmore_text_control.active.set( true == updated_value_of_show_readmore_setting );
        } );
    } );
})(jQuery);
Let’s break it down piece by piece.
wp.customize.control( 'nd_dosth_readmore_text', function( readmore_text_control ) {
 // Logic for hiding/showing a control goes here
} );
First, we are getting the “Read More Text” Control with the help of wp.customize.control method.
The wp.customize.control method accepts a callback as the second parameter. This callback function will be executed as soon as we enter the Customize Panel.
We have to access the “Read More Text” Control inside this callback to show it or hide it. So we are passing the “Read More Text” Control as a parameter to this callback function.
wp.customize( 'nd_dosth_show_readmore' );
Next, we are getting the “Show Read More Link” Setting with the help of wp.customize method. I’d suggest you to console log the wp javascript object to explorefurther. Things get really interesting down there.
readmore_text_control.active.set( true == show_readmore_setting.get() );
Then, we are showing the “Read More Text” Control only if the “Show Read More Link” Setting returns true.
The active.set method is responsible for keeping a Control active( visible ) or inactive (hidded) based on a condition.
readmore_text_control.active.set(true == show_readmore_setting.get());
Simply put, we are keeping the “Read More Text” Control active inside the “Text Options” Section only if “Show Read More Link” Setting returns true.
We are getting the value of the “Show Read More Link” Setting with the help of get() method attached to the Setting.
show_readmore_setting.bind( function( updated_value_of_show_readmore_setting ) {
    readmore_text_control.active.set( true == updated_value_of_show_readmore_setting );
} );
The value of “Show Read More Link” Setting changes every time we click on the “Show Read More Link” control.
So, we are repeating the same process of hiding the Control whenever the value of “Show Read More Link” Setting changes with the help of Javascript’s bind() function.
That’s all! Essentially, this is the JS version of “nd_dosth_hide_readmore_on_condition” Active Callback. We are doing the same thing.
Easy, right?
“Hey, you did not use any jQuery inside the code, is the above jQuery dependent?”
Na! It is not! We used vanilla Javascript.
“Then why did you pass jQuery to the outer function?”
It is just a habit of mine. You can remove it if you want to!
Anyway, if you now go back to the Customize Panel and if you turn off the “Show Read More Link” Control, the “Read More Text” Control gets hidden right away. And vice-versa happens when you turn it back on!
Now that’s what I call improved user experience.
“Yayyyyyyyy! I really love it!”
Do not celebrate! We still did not fix the Site Preview yet!
Fixing the Site Preview
The “Continue Reading” link is still showing up even when the “Show Read More Link” is turned off. To fix this problem, we have to write a similar piece of Javascript we have coded above.
And we have to enqueue this Javascript using the customize_preview_init action hook because we are dealing with the “Site Preview” portion of the Customize Panel.
So, go back to the customize.php file and put the following code at the end of the file:
/**
 * Registers the Theme Customizer Preview with WordPress.
 */
function nd_dosth_customize_live_preview() {
    wp_enqueue_script(
        'nd-dosth-customize-js',
        get_stylesheet_directory_uri() . '/assets/js/customize.js',
        array( 'jquery', 'customize-preview' ),
        '',
        true
    );
}
add_action( 'customize_preview_init', 'nd_dosth_customize_live_preview' );
This new script depends on the jQuery and Customize Preview script that WordPress ships with. So we are telling WordPress to enqueue them right before our custom script.
Again, we did not create this file yet!
Common, go ahead and create a new file called customize.js inside the assets/js directory. Here is the full path to the file:
/wp-content/themes/nd-dosth/assets/js/customize.jsNext, open up the customize.js file and put the following Code inside it:
(function($){
    /* Show/Hide Read More link inside Site Preview */
    wp.customize( 'nd_dosth_show_readmore', function( value_of_show_readmore_setting ) {

        value_of_show_readmore_setting.bind( function( updated_value_of_show_readmore_setting ) {
            if( true == updated_value_of_show_readmore_setting ){
                $('.read-more-link').show();
            } else{
                $('.read-more-link').hide();
            }
        } );

    } );
})(jQuery);
Again, nothing much going on in the above code. Whenever we turn on/off the “Show Read More Link” Control in the Customize Panel, the callback function in the above code will get executed.
And this callback function receives the value of the “Show Read More Link” setting in the form of value_of_show_read_more_setting parameter.
Next, as usual, we are getting the updated value of the value_of_show_read_more_setting parameter using the Javascript’s bind function and based the updated value, we are showing/hiding the “Read More” Link inside the Site Preview portion.
See? It is working as expected. This is a huge user experience boost for users interacting with the Customize Panel.
Sorry but, all this is a big mess up
“What?”
Yep! we messed it up and we brought in a bigger user experience problem in the name of enhancing it.
To reproduce the problem, implement the following steps:
Step 1) Turn off the “Show Read More Link” Control and publish the changes.
Everything will work as expected up and until this point.
Step 2) Refresh the Customize Panel and find your back to the “Text Options” Panel.
Again, you’ll see the same interface as the above screenshot.
But if now turn on the “Show Read More Link” Control, the “Read More Text” Control will slide down as expected. But, the “Continue Reading” Link in the Site Preview doesn’t show up.
No matter how many times you turn on/off the “Show Read more Link” Control, the “Continue Reading” Link is not going to show up.
This is happening because, in step 1, we turned off the “Continue Reading” Link and published the changes and WordPress is rendering the Site Preview section using our theme’s template files, right?
The thing is, inside our blog-index.php template file, we are totally omitting the markup of “Continue Reading” Link if the “Show Read More Link” setting is turned off.
<?php if( get_option('nd_dosth_show_readmore', true ) ): ?>
    <a class="read-more-link" href="<?php the_permalink(); ?>">
        <?php echo get_option( 'nd_dosth_readmore_text', __( 'Read More', 'nd_dosth' ) ); ?>
    </a>
<?php endif; ?>
So, if you inspect the blog post markup in the Site Preview Section, there is no “Continue Reading” markup at all.
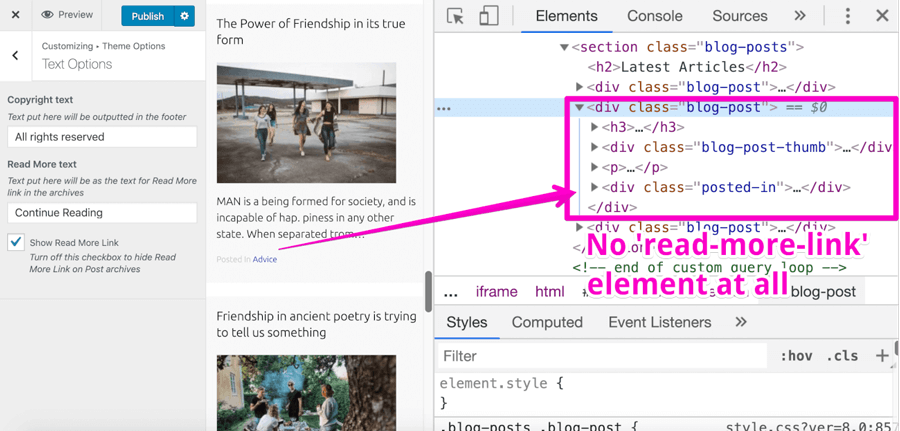
So, our Javascript code inside the customize.js file is trying to show/hide an HTML element that doesn’t even exist.
(function($){
    /* Show/Hide Read More link inside Site Preview */
    wp.customize( 'nd_dosth_show_readmore', function( value_of_show_readmore_setting ) {

        value_of_show_readmore_setting.bind( function( updated_value_of_show_readmore_setting ) {
            if( true == updated_value_of_show_readmore_setting ){
                $('.read-more-link').show();
            } else{
                $('.read-more-link').hide();
            }
        } );} );
})(jQuery);
Get it?
Don’t get confused. The problem is only with the Site Preview. If you hit the Publish button and refresh it, you’ll notice that turn on/off the “Show Read more Link” Control is still working as expected.
Here is a fun fact!
We can not actually bring in the “read-more-link” HTML markup magically by appending some code to the above script.
Technically, inside the customize.js file, we can only work with HTML markup that is already present inside the Site Preview. For example, we can hide/show elements that are present in the Markup. Not just hide and show, we can edit an HTML element’s background color, text color, etc.
Whatever changes we make using in the above Javascript files are not permanent. They are just temporary. We are writing this Javascript code only to mimic the permanent changes.
So, we can not work on the markup that is not generated. We are using Javascript for enhancing the User Experience but not to magically print markup from the template files.
“I get it! What is the solution now?”
No More Twists!
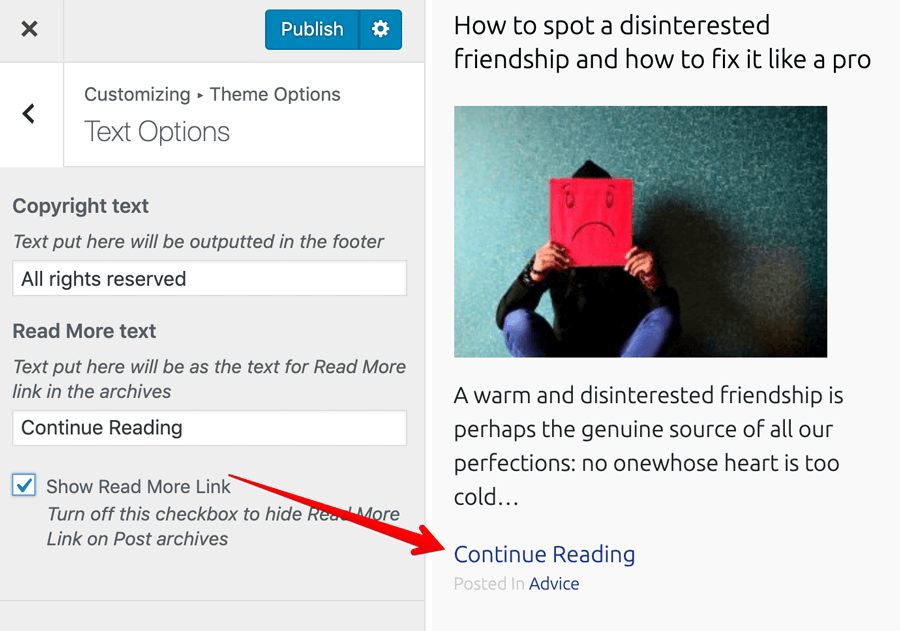
We can solve this problem if we change the way we are outputting the “read-more-link” element inside our blog-index.php template file.
Currently, we are outputting the “read-more-link” element only if the “Show Read More Link” setting is True.
The solution is, we have to use CSS to hide or Show “read-more-link” element instead of not generating the markup completely if the “Show Read More Link” setting is False.
You’ll understand what I am saying once we implement the solution.
Open up the blog-index.php template file and remove the IF CONDITION around the “read-more-link” HTML element.
<?php if( get_option('nd_dosth_show_readmore', true ) ): ?>
    <a class="read-more-link" href="<?php the_permalink(); ?>">
        <?php echo get_option( 'nd_dosth_readmore_text', __( 'Read More', 'nd_dosth' ) ); ?>
    </a>
<?php endif; ?>
Here is the updated blog-index.php template file:
<div class="blog-post">
    <?php if( is_front_page() || is_single() ): ?>
        <h3><a href="<?php the_permalink(); ?>"><?php the_title(); ?></a></h3>
    <?php else: ?>
        <h2><a href="<?php the_permalink(); ?>"><?php the_title(); ?></a></h2>
    <?php endif; ?>
    <?php if ( has_post_thumbnail() ) :
        $featured_image = wp_get_attachment_image_src( get_post_thumbnail_id( get_the_ID() ), 'dosth-blog-thumbnail' ); ?>
        <div class="blog-post-thumb">
            <a href="<?php the_permalink(); ?>"><img src="<?php echo $featured_image[0]; ?>" alt="" /></a>
        </div>
    <?php endif; ?>
    <?php the_excerpt(); ?>
    <a class="read-more-link" href="<?php the_permalink(); ?>">
        <?php echo get_option( 'nd_dosth_readmore_text', __( 'Read More', 'nd_dosth' ) ); ?>
    </a>
    <?php $categories = get_the_category(); ?>
    <?php if ( ! empty( $categories ) ) : ?>
        <div class="posted-in">
            <span><?php _e( 'Posted In', 'nd_dosth' ); ?></span>
            <a href="<?php echo get_category_link( $categories[0]->term_id ); ?>">
                <?php echo $categories[0]->name; ?>
            </a>
        </div>
    <?php endif; ?>
</div>
Now that we have removed the IF Condition around the “read-more-link” HTML element, the link markup will be generated by WordPress even if the nd_dosth_show_readmore Setting is set to false.
Next, add the following Code at the end of the customize.php file:
/**
* Generate Internal CSS from the values Customize Panel Settings
*/
function nd_dosth_customization_css(){
$style = '';
//Get Options from the Customize Panel
$show_read_more_link = get_option( 'nd_dosth_show_readmore' );
// Hide ".read-more-link" element if the "Show Read More Link" Control is turned Off
if( false == $show_read_more_link ){
    $style .= ".read-more-link{display:none}";
}
// Remove unnecessary spacing from the styles
$style = str_replace( array( "\r", "\n", "\t" ), '', $style );
// Put the final style output together.
$style = "\n" . '' . "\n";
// Echo it
echo $style;
}
add_action( 'wp_head', 'nd_dosth_customization_css' );
Basically, in the above code, we are injecting some dynamic CSS into the header portion of our site using the wp_head() action hook. That’s all.
Let’s break it down.
$style = '';
First of all, we are creating an empty variable. The idea is to append all the dynamic CSS to this variable.
$show_read_more_link = get_option( 'nd_dosth_show_readmore' );
Next, we are getting the value of the nd_dosth_show_readmore Setting.
if( false == $show_read_more_link ){
$style .= ".read-more-link{display:none}";
}
If the value of nd_dosth_show_readmore Setting is false, we are hiding the “read-more-link” HTML element via CSS.
$style = str_replace( array( "\r", "\n", "\t" ), '', $style );
Usually, on a production site, we will be appending quite a bit of dynamic CSS to the $style variable.

And Removing unnecessary spacing from the $style variable is a good idea. So, we are using str_replace function to remove newlines, carriage returns from the $style variable.
Simply put, we are compressing the internal CSS we are outputting to the header portion of our site.
$style = "\n" . '' . "\n";
echo $style;
Finally, we are wrapping our styles inside the <style> tag and echoing the final set of styles to the frontend.
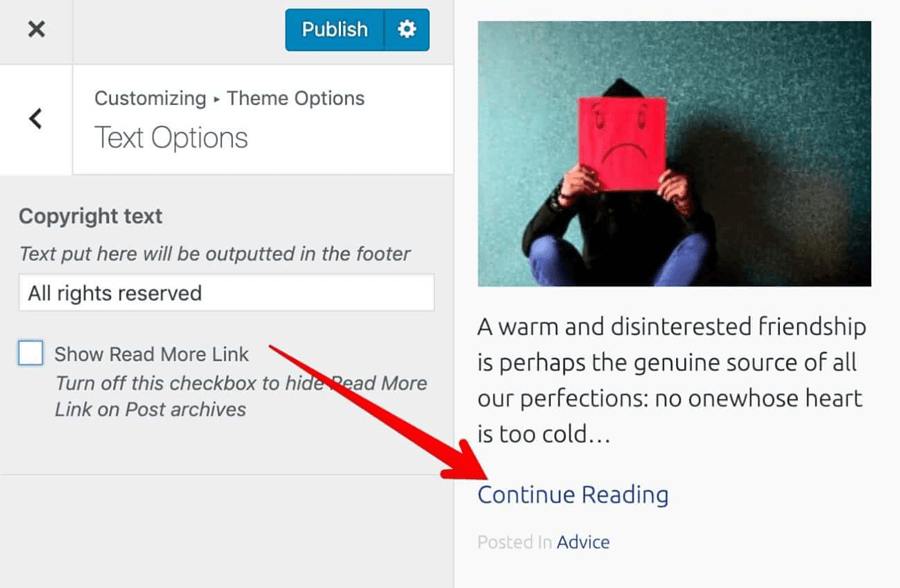
If we test out the “Show Read More Link” Control inside the Customize Panel, everything is finally working as expected.
And that’s pretty much how we improve the user experience of the Customize Panel Options using the “postMessage” transport method.
Now that we know what is right and what is wrong. Next, we will put this knowledge to good use one last time by allowing the client to edit the color scheme of our site.
How to Change the Color Scheme of the site using the WordPress Customizer Panel
With the knowledge we have gained over the span of the last couple of lessons, We can easily allow the client to edit the Color Scheme of the site using the Customize Panel.
All we have to do is create a couple of Color Controls and output some Dynamic CSS to the header portion of the site.
If you have any doubts from the previous lesson, they will be smashed by the end of this lesson.
First, let’s create a new “Colors Options” Section inside the “Theme Options” Panel by put the following code at the end of the nd_dosth_customize_register action:
// Color Options Section
$wp_customize->add_section( 'nd_dosth_color_options',
    array(
        'title'         => __( 'Color Options', 'nd_dosth' ),
        'panel'         => 'nd_dosth_theme_options'
    )
);
Every site’s Color Scheme consists of at least two Colors. We usually call them Primary and Secondary colors.
Our Dosth Site’s Color Scheme is Yellow and Blue.
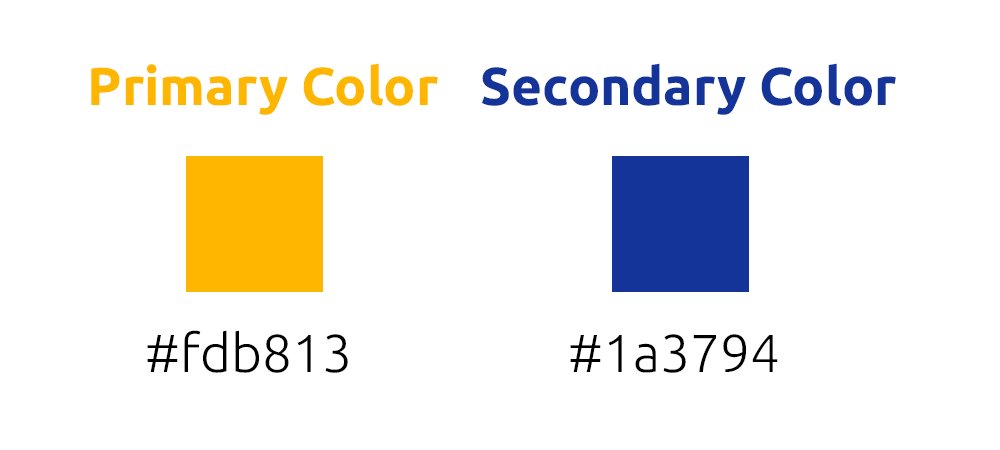
So, to allow the client to change the Color Scheme of Dosth Site, we have to create two Color Controls. One for Primary Color and one for Secondary Color.
We will start with by adding a “Primary Color” Control to the “Color Options” Section by putting the following code at the end of the nd_dosth_customize_register action:
// Add a new setting for primary color.
$wp_customize->add_setting( 'nd_dosth_color_primary',
    array(
        'default'              => 'fdb813',
        'sanitize_callback'    => 'sanitize_hex_color_no_hash',
        'sanitize_js_callback' => 'maybe_hash_hex_color',
        'transport'            => 'postMessage',
    )
);
// Add a control for primary color.
$wp_customize->add_control( new WP_Customize_Color_Control(
        $wp_customize,
        'nd_dosth_color_primary',
        array(
            'label'         => esc_html__( 'Primary Color', 'nd_dosth' ),
            'section'       => 'nd_dosth_color_options',
            'settings'      => 'nd_dosth_color_primary',
        )
    )
);
First, we are creating the Setting with ID nd_dosth_color_primary.
If you notice the default value for this Setting, we are providing a hexadecimal color code with no hash (#). This is a good sanitization practice.
Even if you put the hash (#) in front of the Color Code, the sanitize_hex_color_no_hash sanitization callback removes the hash (#) before storing it to the Database.
However, this is one of the sides.
On the other side, The Color Control needs a (#) in front of the color code, like this:
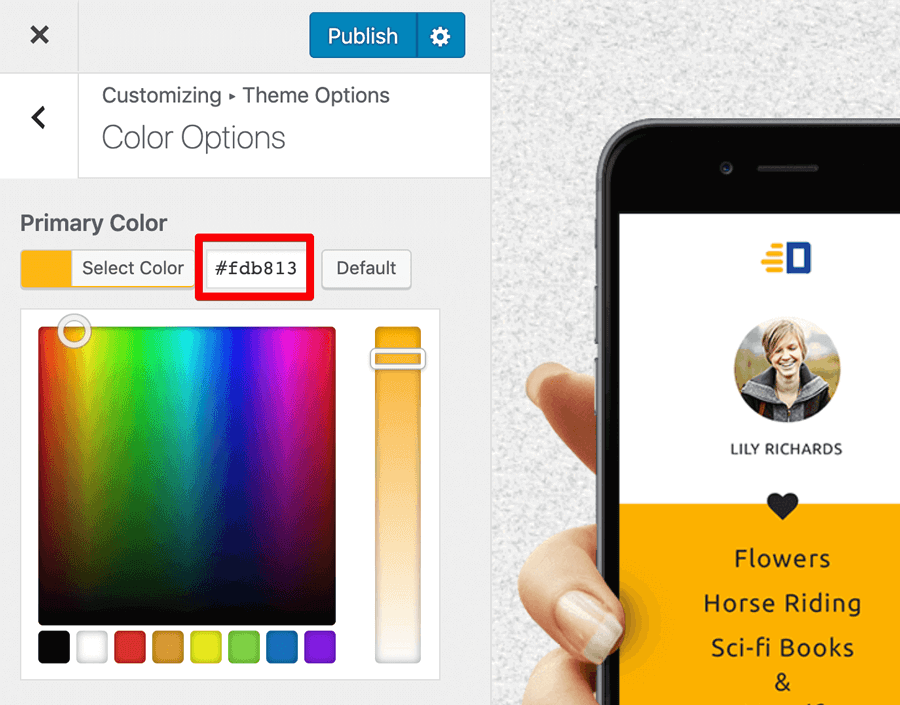
So, We are using maybe_hash_hex_color Javascript Sanitization Callback to output the color code with the hash (#) to the Color Control. The only responsibility of the maybe_hash_hex_color is to prepend the hash (#) before a hexadecimal color code.
Both sanitize_hex_color_no_hash and maybe_hash_hex_color callbacks ships by default with WordPress.
Clear?
Next, We are creating Color Control itself by instantiating the WP_Customize_Color_Control class.
The Constructor of this class accepts three parameters.
- The
$wp_customizeobject itself - Associated Setting ID
- Finally, the configuration
Color Control that ships WordPress is a complex Control. So does the Image Control.
So, every complex Control like Color Control will have its own class and accepts the parameters in the same way.
For example, this is how we create an Image Control for the Customize Panel:
$wp_customize->add_control( new WP_Customize_Image_Control(
        $wp_customize,
        'nd_dosth_retina_logo',
        array(
            'label'         => __('Retina Logo','nd_dosth'),
            'section'       => 'some_section_id',
            'settings'      => 'nd_dosth_retina_logo',
        )
    )
);
Arguments are pretty much the same except for the WP_Customize_Image_Control Class name, right?
Also, If you notice the code for any Complex Control, we are providing the Setting ID two times instead of once. Don’t ask me why :P
Anyway, this is pretty much you add a Color Control to a particular Section inside the Customize Panel.
Now let’s go ahead and create another Color Control for the Secondary Color by putting the following code at the end of the nd_dosth_customize_register action:
// Add a new setting for Secondary color.
$wp_customize->add_setting( 'nd_dosth_color_secondary',
    array(
        'default'              => '1a3794',
        'type'                 => 'option',
        'sanitize_callback'    => 'sanitize_hex_color_no_hash',
        'sanitize_js_callback' => 'maybe_hash_hex_color',
        'transport'            => 'postMessage',
    )
);
// Add a control for Secondary color.
$wp_customize->add_control( new WP_Customize_Color_Control(
        $wp_customize,
        'nd_dosth_color_secondary',
        array(
            'label'         => esc_html__( 'Secondary Color', 'nd_dosth' ),
            'section'       => 'nd_dosth_color_options',
            'settings'      => 'nd_dosth_color_secondary',
        )
    )
);
Same deal!
We have used “postMessage” transport method for both the Settings. So, When you are interacting with them, the Site Preview will not refresh and we have to mimic the Color Scheme Changes using the Javascript.
Mimicking the Color Scheme changes in the Customize Panel involves two steps:
Step 1 ) Gather all the CSS styles that are related to the Color Scheme and put them in one place like this:
//Primary Color as Background Color
#site-footer .es_button input,
.slick-dots li.slick-active,
.menu-button a,
.content-container .page-title,
.pagination .nav-links a, .pagination .nav-links .current,
#commentform input[type="submit"]
{
    background-color:#fdb100;
}

//Primary Color as Text Color
#announcement .announcement-title,
.nd-dosth-reviews blockquote p,
.search-results .page-title,
.menu li:hover > a, .menu li a:focus,
.current-menu-item a,
#blog-sidebar .widget .current-cat a,
.previous-article{
    color:#fdb100;
}

//Secondary Color as Background Color
#announcement{
  background-color:#1a3794;
}

//Secondary Color as Text Color
.blog .page-title, .archive .page-title,
.blog-posts .blog-post h2 a:hover,
.blog-posts .blog-post h3 a:hover,
.read-more-link, .posted-in a,
.widget-title,
.single .article-info a,
.comment-reply-link,
.next-article,
.single .related-articles h2,
.search-results .search-query{
   color:#1a3794;
}
Most of the time, we apply colors for the text and the background, So I separated them.
I did not put the above-separated styles anywhere. I just gathered them for my reference.
Step 2 ) Put the following code inside the customize.js file:
/* Shows a live preview of changing the Primary Color of the theme. */
wp.customize( 'nd_dosth_color_primary', function( color_code ) {
    color_code.bind( function( updated_color_code ) {

        // Primary color as background color
        $( '#site-footer .es_button input, .slick-dots li.slick-active, .menu-button a, .content-container .page-title, .pagination .nav-links a, .pagination .nav-links .current, #commentform input[type="submit"]' )
        .not( '.archive .page-title, .blog .page-title, .search .page-title' )
        .css( 'background-color', updated_color_code );

        // Primary color as text color
        $( '#announcement .announcement-title, .nd-dosth-reviews blockquote p, .search-results .page-title, .current-menu-item a, #blog-sidebar .widget .current-cat a, .previous-article' )
        .css( 'color', updated_color_code );

    } );
} );
You already know what’s happening in the above code. We are getting the “Primary Color” Setting and passing the color code to the callback function. Then, inside the callback function, we are applying this color code to all the necessary CSS selectors we have gathered in Step 1. It is a very basic jQuery Code.
Common, let’s do the same for the Secondary Color.
Here is the final code for the customize.js file:
(function($){
    /* Show/Hide Read More link inside Site Preview */
    wp.customize( 'nd_dosth_show_readmore', function( value_of_show_readmore_setting ) {

        value_of_show_readmore_setting.bind( function( updated_value_of_show_readmore_setting ) {
            if( true == updated_value_of_show_readmore_setting ){
                $('.read-more-link').show();
            } else{
                $('.read-more-link').hide();
            }
        } );

    } );

    /* Shows a live preview of changing the Primary Color of the theme. */
    wp.customize( 'nd_dosth_color_primary', function( color_code ) {
        color_code.bind( function( updated_color_code ) {

            // Primary color as background color
            $( '#site-footer .es_button input, .slick-dots li.slick-active, .menu-button a, .content-container .page-title, .pagination .nav-links a, .pagination .nav-links .current, #commentform input[type="submit"]' )
            .not( '.archive .page-title, .blog .page-title, .search .page-title' )
            .css( 'background-color', updated_color_code );

            // Primary color as text color
            $( '#announcement .announcement-title, .nd-dosth-reviews blockquote p, .search-results .page-title, .current-menu-item a, #blog-sidebar .widget .current-cat a, .previous-article' )
            .css( 'color', updated_color_code );

        } );
    } );
    /* Shows a live preview of changing the Secondary Color of the theme. */
    wp.customize( 'nd_dosth_color_secondary', function( color_code ) {
        color_code.bind( function( updated_color_code ) {

            // Secondary color as background color
            $( '#announcement' )
            .css( 'background-color', updated_color_code );

            // Secondary color as text color
            $( '.blog .page-title, .archive .page-title, .read-more-link, .posted-in a, .widget-title, .single .article-info a, .comment-reply-link, .next-article, .single .related-articles h2, .search-results .search-query' )
            .css( 'color', updated_color_code );

        } );
    } );

})(jQuery);
Thanks to “postMessage” transport type and above code, we can preview the color changes right off the bat If we now interact with the Color Controls inside the Customize Panel.
Picking different colors indeed change the Color Scheme of the site.
Common, Publish the changes and refresh the Customize Panel.
Oops! The Color Scheme of the Site is reverted back to Yellow and Blue.
But if you notice the Color Controls, our new scheme is indeed saved to the Database.
I can’t repeat it enough! The “postMessage” transport type only mimics the updated Color Scheme inside the Site Preview temporarily, it doesn’t affect the template files or the style.css file.
To make the color scheme permanent, we have to generate dynamic CSS with the new color Scheme and enqueue it to our frontend.
You already know how to do this, right?
Go back to the customize.php file and update the nd_dosth_customization_css action like this:
/**
* Generate Internal CSS from the values Customize Panel Settings
*/
function nd_dosth_customization_css(){
$style = '';
//Get Options from the Customize Panel
$show_read_more_link = get_option( 'nd_dosth_show_readmore' );
$primary_color_code     = get_option( 'nd_dosth_color_primary', 'fdb100' );
$secondary_color_code   = get_option( 'nd_dosth_color_secondary', '1a3794' );
// Hide ".read-more-link" element if the "Show Read More Link" Control is turned Off
if( false == $show_read_more_link ){
$style .= ".read-more-link{display:none}";
}
// Primary Color as Background Color
$style .= '#site-footer .es_button input,
.slick-dots li.slick-active,
.menu-button a,
.page-template-default .content-container .page-title,
.pagination .nav-links a, .pagination .nav-links .current,
#commentform input[type="submit"]
{ background-color: #'. $primary_color_code .'; }';
// Primary Color as Text Color
$style .= '#announcement .announcement-title,
.nd-dosth-reviews blockquote p,
.search-results .page-title,
.menu li:hover > a, .menu li a:focus,
.current-menu-item a,
#blog-sidebar .widget .current-cat a,
.previous-article
{ color:#'. $primary_color_code .'; }';
// Secondary Color as Background Color
$style .= '#announcement{ background-color:#'. $secondary_color_code .'; }';
// Secondary Color as Text Color
$style .= '.blog .page-title, .archive .page-title,
.blog-posts .blog-post h2 a:hover,
.blog-posts .blog-post h3 a:hover,
.read-more-link, .posted-in a,
.widget-title,
.single .article-info a,
.comment-reply-link,
.next-article,
.single .related-articles h2,
.search-results .search-query
{ color:#'. $secondary_color_code .'; }';
// Remove unnecessary spacing from the styles
$style = str_replace( array( "\r", "\n", "\t" ), '', $style );
// Put the final style output together.
$style = "\n" . '' . "\n";
// Echo it
echo $style;
}
add_action( 'wp_head', 'nd_dosth_customization_css' );
As usual, nothing complicated going on the above code.
First, we are gathering the primary and secondary color code using:
$primary_color_code = get_option( 'nd_dosth_color_primary', 'fdb100' );
$secondary_color_code = get_option( 'nd_dosth_color_secondary', '1a3794' );
Then we are appending the Color Scheme based Dynamic CSS rules to the $style variable, like this:
// Primary Color as Background Color
$style .= '#site-footer .es_button input,
.slick-dots li.slick-active,
.menu-button a,
.content-container .page-title,
.pagination .nav-links a, .pagination .nav-links .current,
#commentform input[type="submit"]
            { background-color: #'. $primary_color_code .'; }';
If you notice, we are outputting the color codes without the hash (#).
If you now go back the Customize Panel and refresh it:
Aha! Finally, everything is working as expected and that’s it.
That’s pretty how we develop for the Customize Panel.
I know you are tired and exhausted. Sorry about that.
But you did it!
Next, I will give you some exercises.
Exercise for mastering the WordPress Customize Panel
Exercise 1: Enable Live Preview to the default Settings
We can enable “postMessage” transport method for default settings in the following way:
$wp_customize->get_setting( 'blogname' )->transport = 'postMessage';
In the above line of code, we are getting the blogname Setting and enabling Live Preview to it.
You know this is only half of the job. You have to write necessary javascript for the Live Preview to work properly.
So, here is the exercise.
Implement Live Preview for the Custom Logo Setting and other default Settings.
Exercise 2: Research about Custom Defined Controls
You can add a control to any of the existing Customize Panel Sections such as “Site Identity”.
Here is the exercise. Create an Image Control for retina logo and add it to the “Site Identity” Section like this:

The Image Control doesn’t have a predefined Sanitization Callback. So you have to define a custom sanitization callback as well.
Exercise 3: Research about Custom Defined Controls
Yep! We are not limited to the Controls that WordPress ships with.
With the kind of knowledge you have now, you should be able to skim through some of the finest articles on the Internet about Custom Customization Controls.
Here are a couple of them to get started with:
https://madebydenis.com/adding-custom-controls-to-your-customization-api/
Anthony Hortin from Github created a bunch of Custom Controls and open sourced them here:
https://github.com/maddisondesigns/customizer-custom-controls
You can learn a lot from this nice Anthony Hortin’s Code. Just dive into them I say.
Final Thoughts and the Conclusion
You have come a long way.
Really really long way.
Thank you for this. I am being emotional right now!
WordPress gave me a fantastic life with Freedom and Financial Control and it will do the same thing for you too!
Just respect the tool and it will take you to the desired destination.
Technically, I consider this Course as just an Introduction to WordPress Theme Development.
I voluntarily skipped a lot of topics and you’ll learn them while working on real-world WordPress projects. Simply put, you’ll learn them when the time comes.
Happy WordPress Coding and Be nice to Drupal Developers :P


 © 2026 UsableWP. A project by Naresh Devineni.