WordPress Theme Development: Site footer with social navigation, dynamic copyright statement.
This is Part 4 of the 9 part Course about developing a WordPress theme from scratch.
Here is the access to the other parts of the Course in the sequential order:
- Developing a WordPress Theme From Scratch
- WordPress Theme Development: The best way to enqueue scripts and styles
- WordPress Theme Development: Creating the header and making our theme translation ready
- WordPress Theme Development: Site footer with social navigation, dynamic copyright statement (Current Part)
- WordPress Theme Development: The Loop, the main content, Google Fonts, and the Custom Fields
- Building a WordPress Theme From Scratch: Internal Pages
- WordPress Theme Development: Building the Blog
- WordPress Theme Development: Search page, 404 error template, Custom Queries, and custom post types
- WordPress Theme Development: WordPress Customizer and it’s API
Footer a WordPress website plays a key role WordPress Theme Development because all the legal navigation and scripts goes inside the footer section of the website.
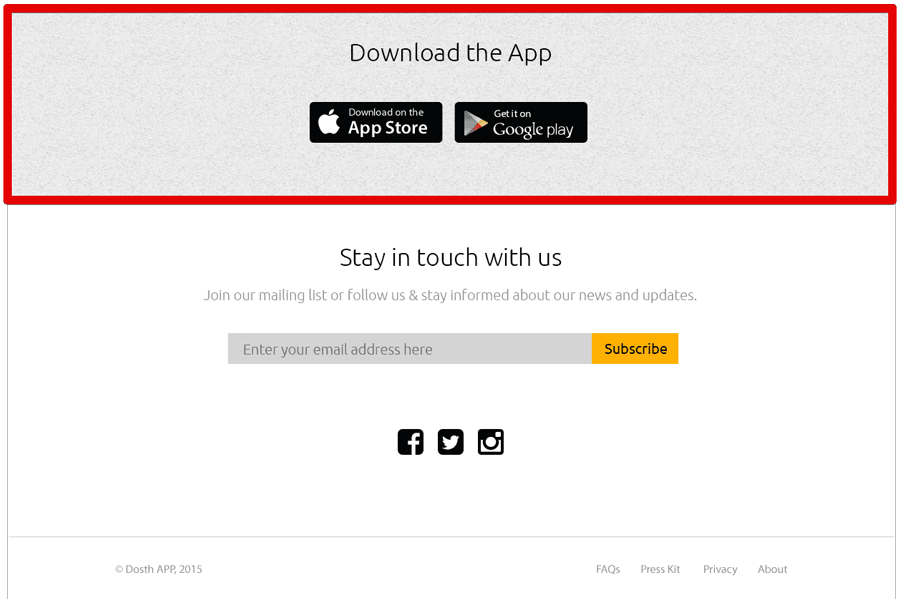
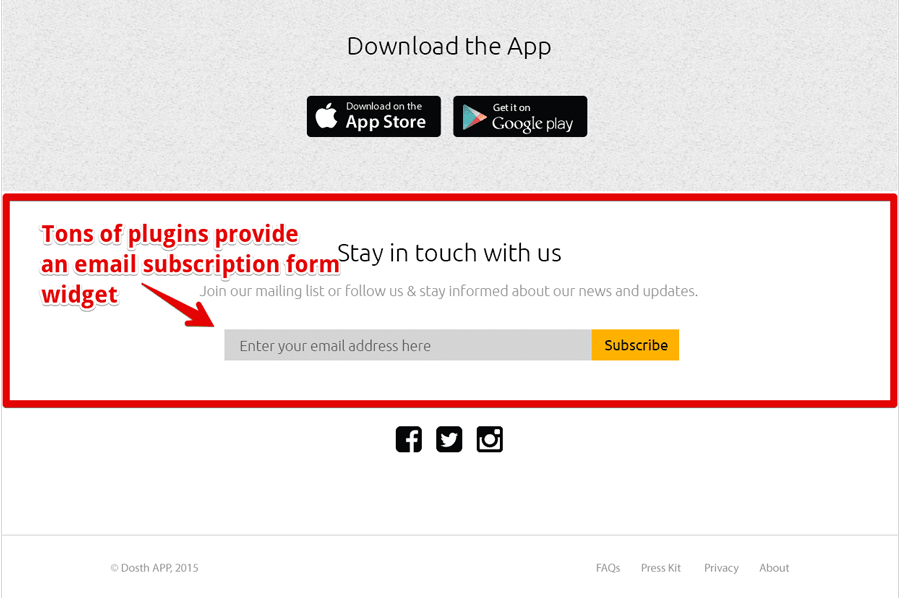
The below image is the mockup of the footer portion of our WordPress site. It is a pretty standard minimal design.
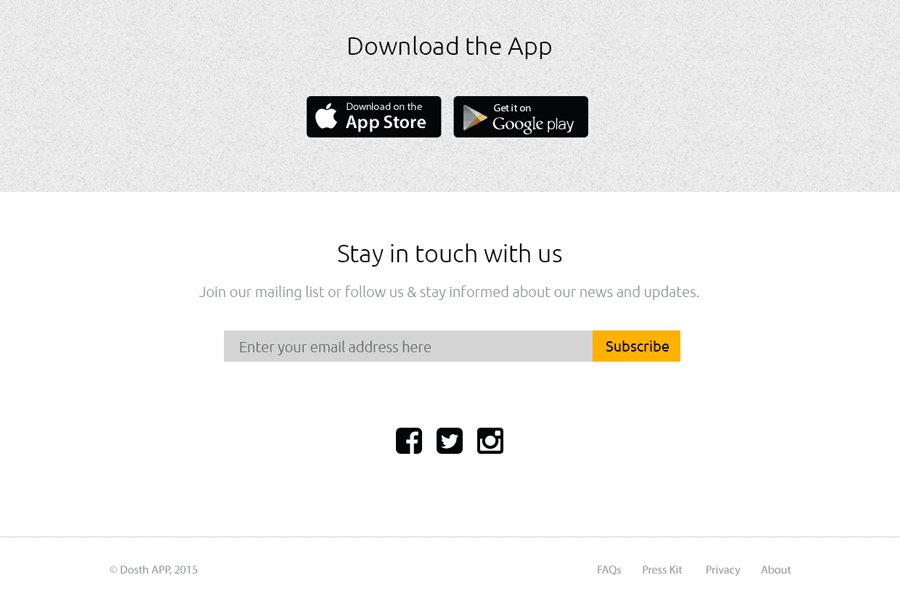
There is a “Download the App” section with the App download links followed by the email subscription collection form and the social links.
Lastly, There are a traditional copyright statement and a footer menu.
Now, we have to build this footer in such a way that the client or an administrator of the website should be easily able to add, modify and remove components from it.
Simply put, we have to give them ultimate control over the footer.
“How do we accomplish that? I know it is important for them to modify stuff in the footer, But it sounds like a daunting task for me!!!”
Ah! Don’t worry, It is easy as heaven.
We will be using multiple dynamic sidebars and a number of widgets to build the content of the footer.
That’s the only way to make footer editable without having to install third-party plugins.
“What?”
WordPress Theme Development: Introducing WordPress Sidebars and WordPress Widgets
What is a WordPress Sidebar?
A sidebar is nothing but a small area on a webpage where we find all kinds of miscellaneous information like secondary navigation, related articles, ads, and so on.
It is generally placed beside the main content. But we can put a sidebar anywhere that makes sense.
WordPress’s own news section is the perfect example of a sidebar.
What is a Dynamic WordPress Sidebar?
A Dynamic WordPress Sidebar is nothing but a WordPress Sidebar with some dynamic content in it. That’s all.
WordPress takes the concept of sidebars to the next level by allows us to create unlimited dynamics sidebars anywhere we want on a webpage.
For example, you can put a dynamic sidebar in the header portion, in the footer portion, in the off-canvas menu, etc. You are not limited to put sidebars only on a webpage that displays a blog article.
“Dynamic content? How do we place dynamic content inside sidebars? Do we have to write some complex PHP code to pull content from the database?”
No. We use widgets for placing dynamic content inside the sidebars.
If there are no widgets, Dynamic sidebars are pretty much useless in WordPress.
What is a WordPress widget?
When it comes to WordPress, a widget can output some piece of content to the frontend. That’s all. In WordPress, a widget is stateful, that means, their settings and the content are saved to the database.
Also, WordPress ships with a ton of useful widgets and each of them helps us output unique content to the frontend. For example:
Image Widget: Lets you output an image.
Gallery Widget: Lets you output gallery of images.
Custom HTML Widget: Lets you output custom HTML like ads.
Search Widget: Lets you output a site search form, in a snap.
Navigation Menu Widget: Lets you output a custom menu you have created.
This list goes on and on.
Also, we can place any number of Widgets inside a Dynamic Sidebar. There is no limit.
If you realize, Widgets is a really powerful feature of WordPress. If we can properly utilize widgets, we can let the client modify every corner of a webpage.
The good news is, we can now use widgets without putting them Dynamic Sidebars. Since version 5.0, WordPress allows you to put widgets directly inside the content editor.
Previously, page builders are the only way to utilize widgets outside Dynamic Sidebars.
Anyway, now that you vaguely understand the concept of Widgets and Dynamic Sidebars, Let’s start working.
There are three steps involved in building the client editable footer.
- Register a Dynamic Sidebar
- Put Widgets in it
- Display the Widgets placed inside the Dynamic Sidebar to the frontend using our theme.
Step 1) Registering a Dynamic Sidebar using the widget_init action hook
In order to utilize Dynamic Sidebars and Widgets inside our theme, we have to register them first using the widgets_init action hook and register_sidebar() WordPress function.
Also, if you go to the Admin Dashboard -> Appearance, widgets panel is totally missing. This is because of the fact that Widgets are a theme feature too.
Of course, You can add theme support for this feature by adding the following code to your functions.php file:
// Add widgets support
add_theme_support( 'widgets' );
But don’t do it. Just like register_nav_menus() function adds theme support for the menus internally, register_sidebar() WordPress function allows us to register a dynamic sidebar and enables the theme support for the Widgets at the same time.
Anyway, before register any number of Dynamic Sidebars for the footer section, let’s analyze the footer mockup properly.

By taking a look at the above footer design, I can see three sections of content in it. And, I want the Client/Administrator to have complete control over the first two sections of the footer design. That means we may need to register two Dynamic Sidebars, one for each section in the footer.
Being said that, Footer Section 1 and Footer Section 2 are stacked on top of each other. That means you achieve the same design with just one Dynamic sidebar. Remember, You can put any number of Widgets into a single Dynamic Sidebar and style them according to your needs. But, at the end of the day, it is just about personal preference.
In our case, I decided to go with two dynamic sidebars. The only reason behind this is, I just want to show you the flexibility of the Dynamic Sidebars. That’s all. No logical reason.
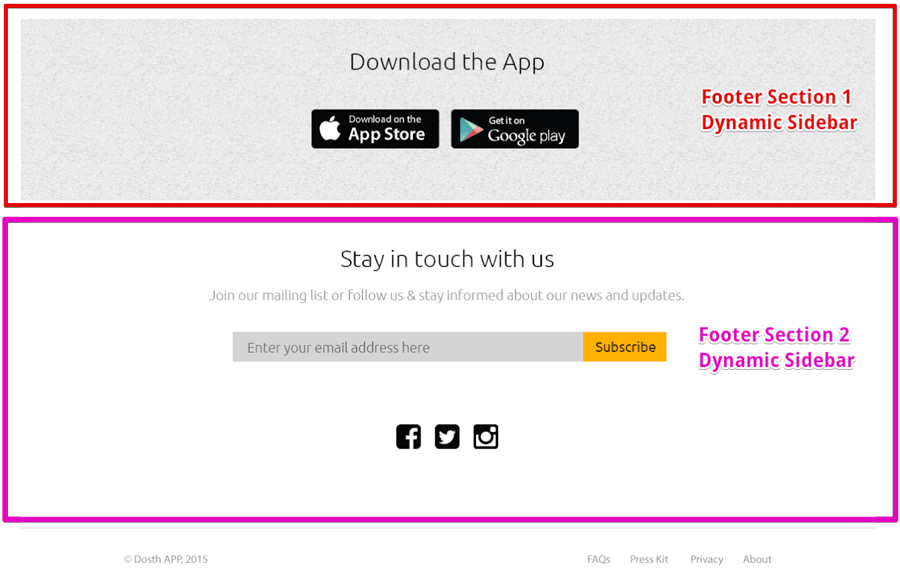
“Wait! What about the third section? What if the client wants to change the menu in the footer?”
We will create that menu using the theme menu Display Location technique that you have mastered in the last lesson. But, if you want to create a third Dynamic Sidebar for the copyright statement and the menu, who’s stopping you?
1) Anyway, open up the functions.php file and add the following code at the end of the file to register the Footer Section 1 and Section 2 dynamic sidebars:
/**
 * Register widget area.
 *
 * @link http://codex.wordpress.org/Function_Reference/register_sidebar
 */
function nd_dosth_register_sidebars() {

   register_sidebar( array(
		'name'          => esc_html__( 'Footer Section One', 'nd_dosth' ),
		'id'            => 'footer-section-one',
		'description'   => esc_html__( 'Widgets added here would appear inside the first section of the footer', 'nd_dosth' ),
		'before_widget' => '',
		'after_widget'  => '',
		'before_title'  => '',
		'after_title'   => '',
    ) );

    register_sidebar( array(
		'name'          => esc_html__( 'Footer Section Two', 'nd_dosth' ),
		'id'            => 'footer-section-two',
		'description'   => esc_html__( 'Widgets added here would appear inside the second section of the footer', 'nd_dosth' ),
		'before_widget' => '',
		'after_widget'  => '',
		'before_title'  => '',
		'after_title'   => '',
	) );
}
add_action( 'widgets_init', 'nd_dosth_register_sidebars' );
“Woah! what is that mate?”
For registering our dynamic footer sidebars, we hooked into widgets_init action hook using our nd_dosth_register_sidebars action and inside this action, we registered two dynamic sidebars.
Before we break them down, Let’s see what the above code is adding to the Widgets panel inside the Admin Dashboard.
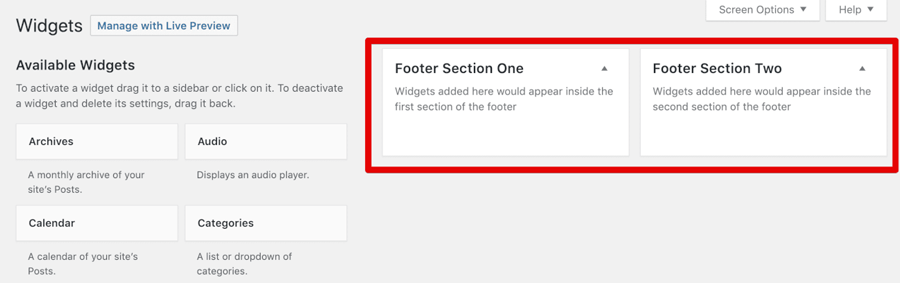
Great! WordPress has added two Dynamic Sidebars to the Widgets panel. Now let’s break down the first register_sidebar() function inside the nd_dosth_register_sidebars action.
register_sidebar( array(
    'name'          => esc_html__( 'Footer Section One', 'nd_dosth' ),
    'id'            => 'footer-section-one',
    'description'   => esc_html__( 'Widgets added here would appear inside the first section of the footer', 'nd_dosth' ),
    'before_widget' => '',
    'after_widget'  => '',
    'before_title'  => '',
    'after_title'   => '',
) );
The register_sidebar() function accepts an optional single associative array with a bunch of keys.
1) name: we must provide a name to this Dynamic Sidebar as a PHP string. Also, it must be a Client friendly name for the Dynamic Sidebar. We have to write it in such a way that the client should easily judge where this Sidebar is put to use in a webpage.
In our case, we will be outputting the widgets placed in this Sidebar to the First section of the footer. Hence, we provided “Footer Section One” as the name.
WordPress uses this name as heading to the Dynamic Sidebar, like this:
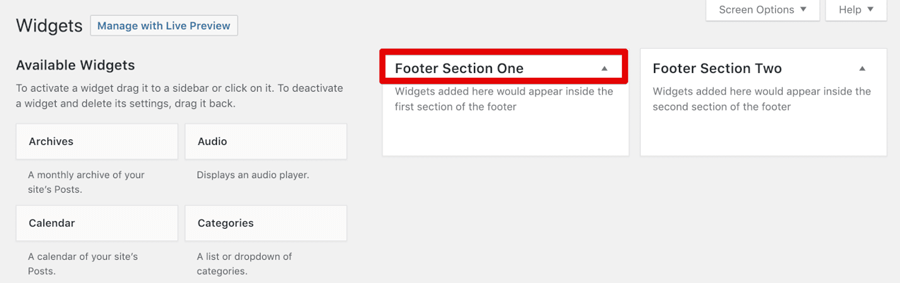
And because WordPress is outputting this name as a heading to the sidebar, this needs to translation ready. So, we are using the esc_html__() translation function.
2) id: we must provide a unique ID to this Dynamic sidebar as a PHP string. The ID must unique because, inside our theme, this is the ID we use if we want to output the widgets of this sidebar to the frontend.
Also, You can not use the IDs found in the following stack-overflow answer. The IDs found in the answer are proprietary to WordPress.
3) description: Just like the ‘name’ key, WordPress uses this description to provide more insights to the Client/Administrator.
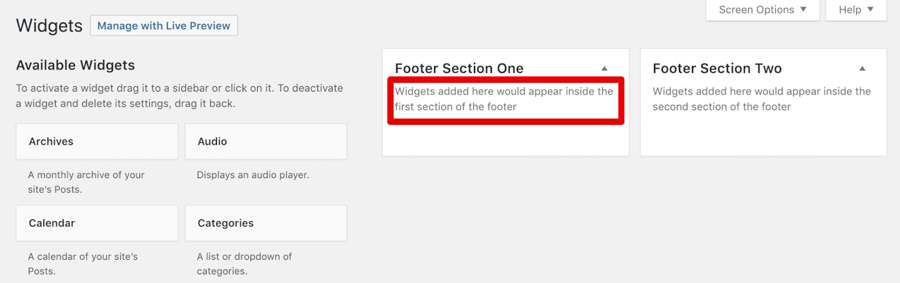
So, in our case, we are telling the Client/Administrator that “Widgets added here would appear inside the first section of the footer”.
Remaining array keys makes sense when you see the markup that a widget is generating. So, for now, let’s skip them.
The same explanation applies to the second register_sidebar() function inside the nd_dosth_register_sidebars action.
Next up, Step 2.
Step 2) Put Widgets into the respective sidebars
Let’s start with the content inside the Footer Section 1. Let’s take a good look at its design.
It is a pretty common “Download the App” section. There is a heading followed by two image links to the respective app stores.
It is extremely important that we choose the right Widget for the right job. And, there are two widgets which can help us build this section.
- The “Custom HTML” widget
- The “Text” widget.
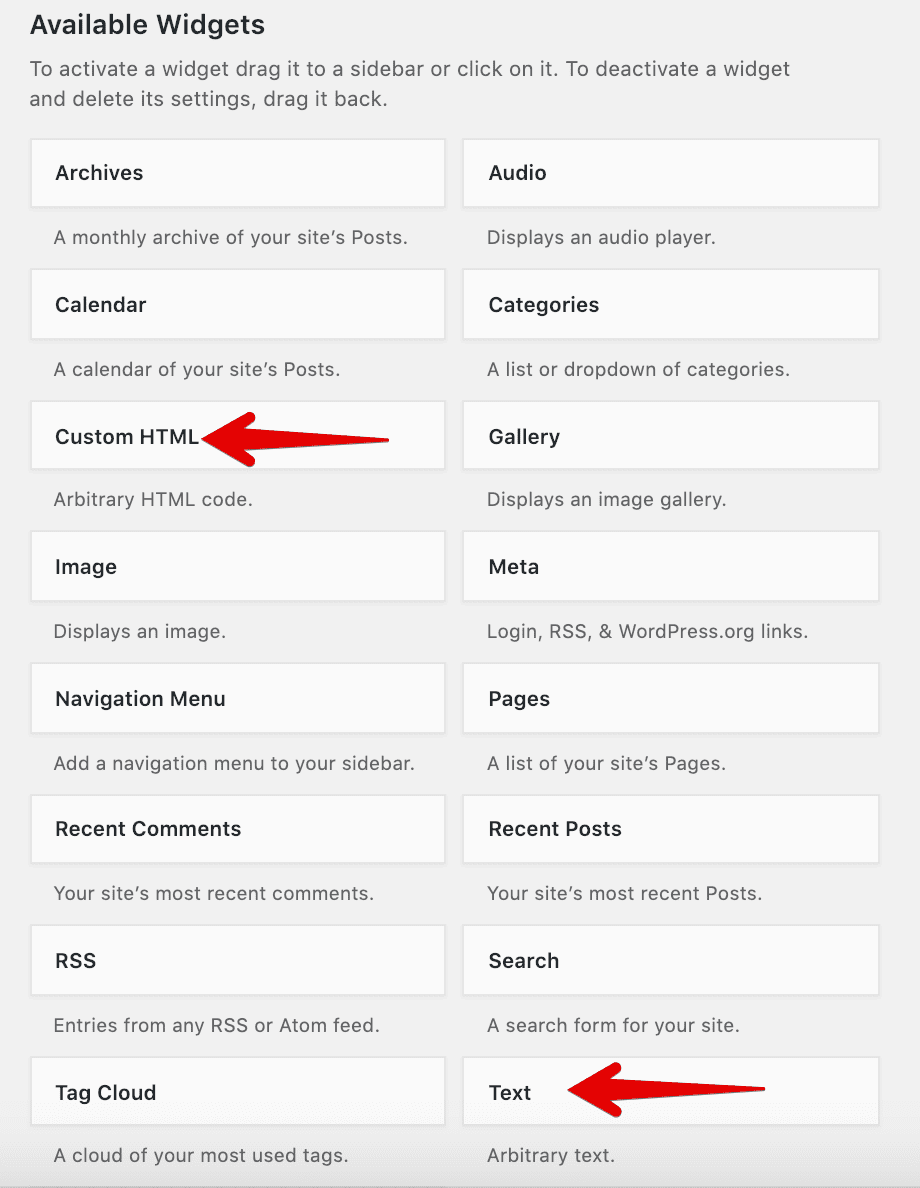
But, which widget is easy to use for the client? Most of the clients/administrators are not all good with HTML. So, the “Custom HTML” widget is not an option at all.
But, the “Text” widget is the both of Worlds. It comes with a WYSIWYG interface which houses most widely used text formatting options that we regularly use in Microsoft Word. At the same time, It also allows us to tweak the HTML. For this reason, in my opinion, there is no better Widget than the “Text” widget to build the design of the footer section 1.
So, let’s go ahead click on the “Text” widget.
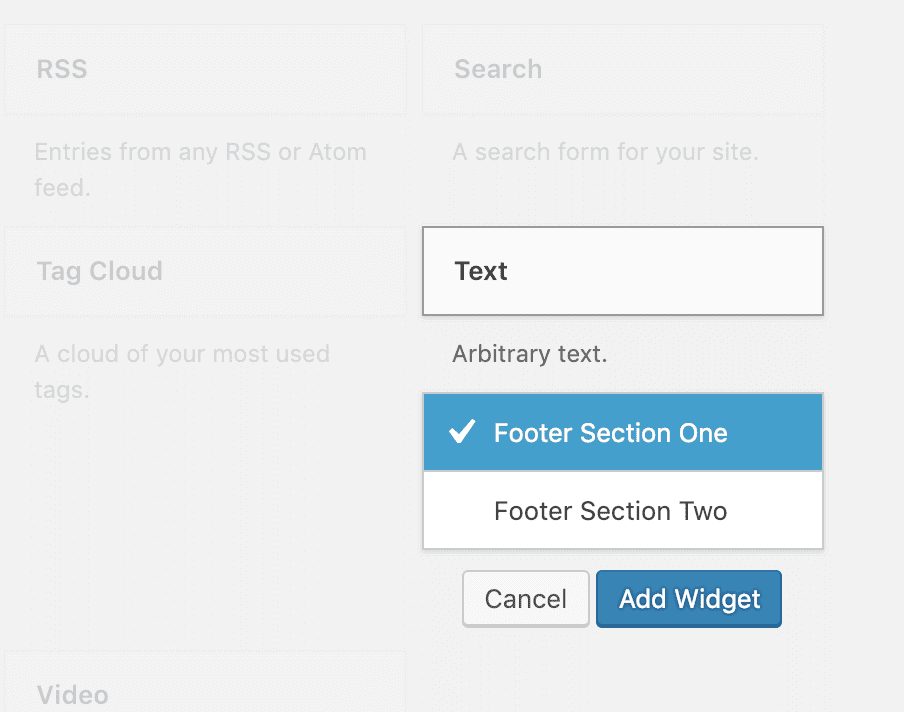
And as soon as we click on the “Text” widget, WordPress greys out the other widgets to prevent any accidental interactions.
WordPress also dropdowns the list of Dynamic Sidebars available and picks one automatically. In our case, We want to add the “Text” widget to the Footer Section One Sidebar and WordPress has already picked it by default. So, all we have to do now is to click on the “Add Widget” button to add the “Text” widget to the Footer Section One Sidebar.
And as soon as we click on the “Add Widget” button, WordPress puts the “Text” widget inside the Footer Section One Sidebar and opens up the “Text” widget Interface for us to set up the Widget for our needs.
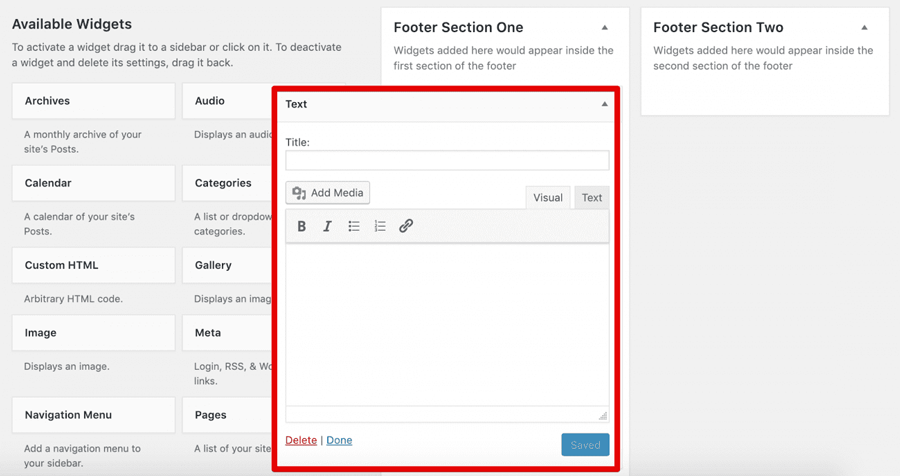
Every default WordPress Widget that has a Title field. WordPress displays this title on top of the Widget’s actual output.
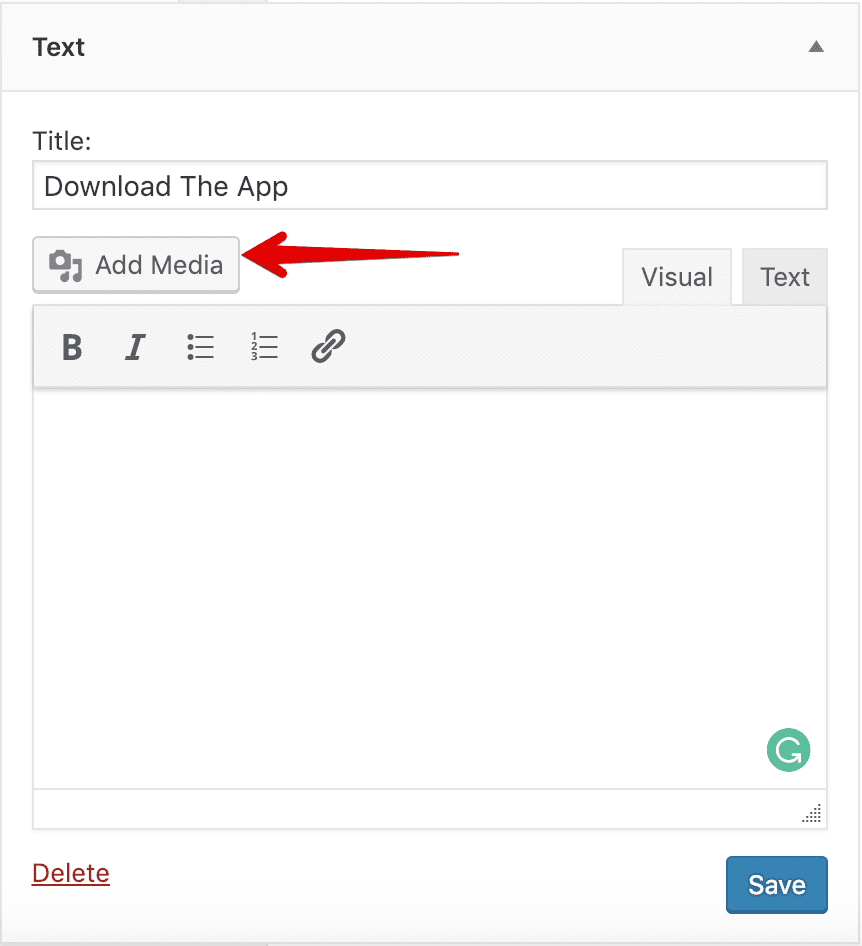
In our case, let’s put “Download the App” text inside the Title field.
And when it comes to the images, Let’s use the “Add Media” button to add the App Store buttons. This “Add Media” button helps us add the image buttons to the WYSIWYG editor.
First, download the following App Store images:


You can also find these files in the exercises folder provided for this lesson.
Next, click on the “Add Media” button. We will get an “Add Media” window. And inside this window, there are two tabs. “Media Library” tab is selected by default. If the image download buttons are already uploaded to the WordPress Media Library, they will show up inside this tab. But, in our case, we are uploading the above app store buttons for the first time. So, click on the “Upload Files” tab.
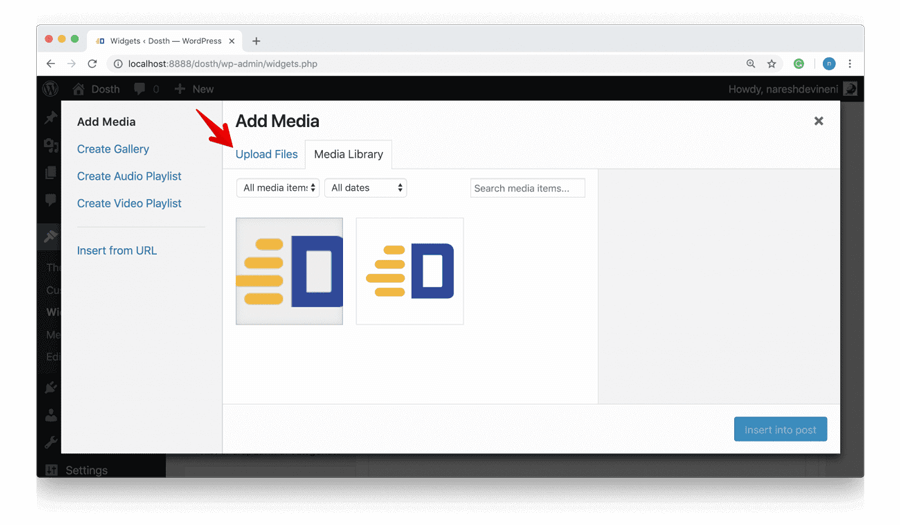
Then click on the “Select Files” button to image app store files from your computer.
Once you have uploaded both the files, WordPress automatically selects them. Now, all you have to do is click on the “Insert into post” button to add both images to the “Text” widget’s to the WYSIWYG editor.
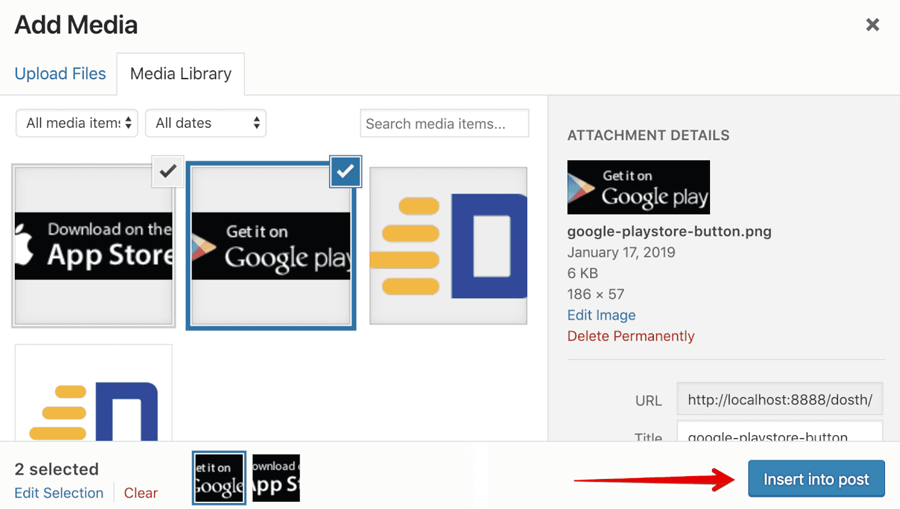
Once you click on the “Insert into post” button, the “Add Media” window goes away and WordPress adds those two images to the WYSIWYG editor, like this:
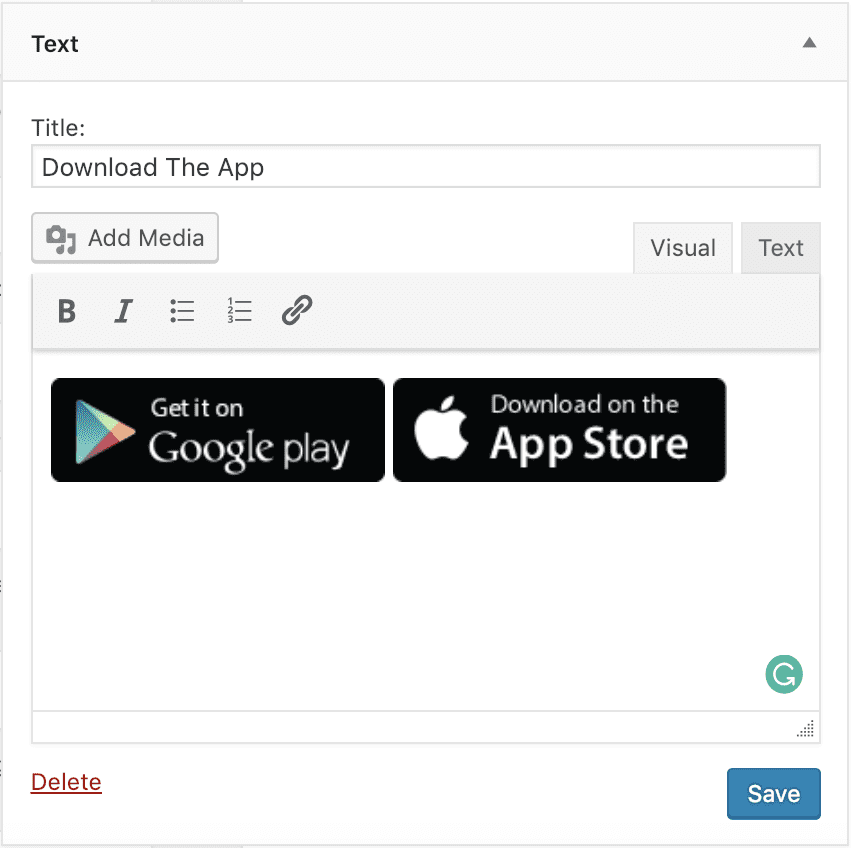
First of all, I want these images to be positioned next to each other. Images are inline elements and WordPress is aware of this, so, it already positioned them next to each other.
Next, I want to position these at the center of the viewport. To achieve this, click on the “Google Play” image inside the WYSIWYG editor to access the alignment options. Then click on the “Align Center” icon.
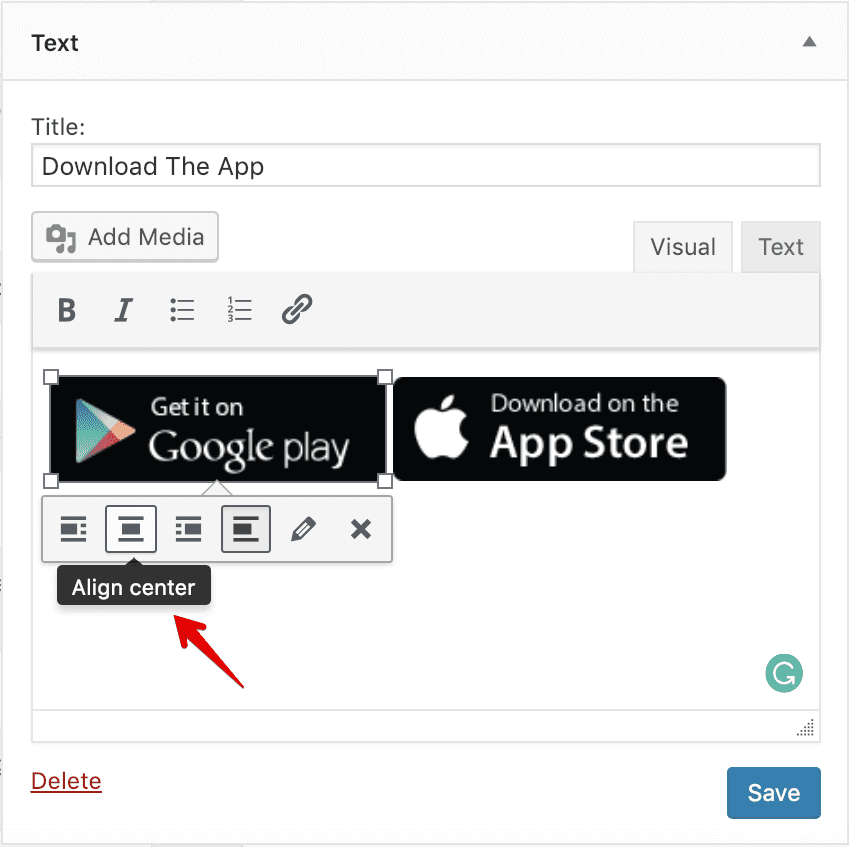
Do the same for the “App Store” button too.
Finally, they are the app download buttons, we have to link them to their respective app stores. So, click on the “Google Play” image once again. Once the image options popup, click on the pencil icon this time.
You’ll get an “Image Details” window. Inside this window, there is a section dedicated to “Display Settings”. Inside this section, the “Link To” option allows us to link this image to a custom URL. Right now, this option is set to none, change this to “Custom URL”. As soon as you choose “Custom URL”, WordPress drops down a URL field where we can enter a custom URL.
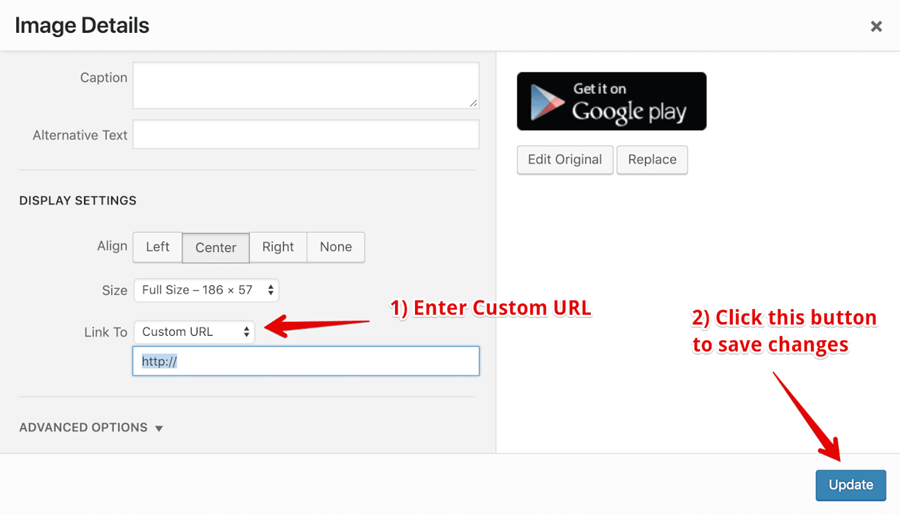
Anyway, since this is just a dummy project, enter what the custom URL you want to and click on the “Update” button which is located at the bottom right corner of the screen. I am putting #.
Next, do the same to the Apple App store button.
Up and until this point, We have done everything using the “Visual” Tab of the “Text” widget. Now, let’s switch to the “Text” tab of the widget to see and adjust the markup according to our needs.
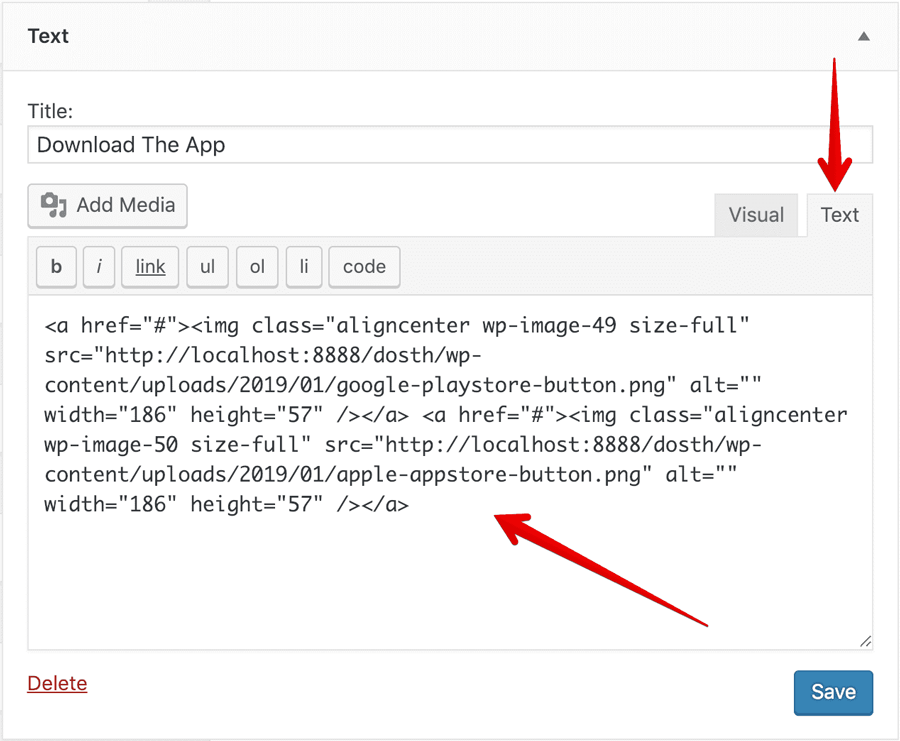
Well, WordPress is generating pretty standard HTML markup for the image links. WordPress is generating a lot of classes to give us handle over the styling of the images links. And, In my opinion, I don’t particularly see any problems with this markup. So, I will leave it as is.
Finally, click on the “Save” button to save the widget’s status.
That’s it. This is exactly how we use widgets. Not at all complicated, right?
Now comes the big question. How do we display the widgets that we placed inside the “Footer Section One” Dynamic sidebar?
Step 3) Output the Dynamic sidebar’s widgets to the frontend using dynamic_sidebar() WordPress function
The dynamic_sidebar() function allows us to display the widgets placed inside a particular sidebar to the frontend.
It accepts the ID of a registered Sidebar as a parameter. And if you remember the ID of the “Footer Section One” sidebar is “footer-section-one”.
So, where do you want to output the “Footer Section One” sidebar?
“Such a stupid Question! In the Footer!”
Haha, Correct! So, open up the footer.php file and add the following code at the beginning of the file. That means before the wp_footer() function call. As you already know, the wp_footer() function call outputs the scripts and styles to the footer. So, we shouldn’t place any content after this function call. Every time you add any custom content to the footer, it always must be placed above this function call.
	 <footer id="site-footer">
            <?php if ( is_active_sidebar( 'footer-section-one' ) ) : ?>
                <div class="footer-section-one">
                    <?php dynamic_sidebar( 'footer-section-one' ); ?>
                </div>
            <?php endif; ?>
        </footer><!-- End of Footer -->
        <?php wp_footer(); ?>
    </body>
</html>
Nothing much is happening in the above code.
First of all, we are wrapping the dynamic sidebar code inside the <footer> element with HTML ID of site-footer.
Next, we are checking if the sidebar has any widgets using the is_sidebar_active() function call. We only want to output the Sidebar markup if there are widgets in it.
In our case, we placed a “Text” widget inside “footer-section-one” sidebar. So, the IF condition returns True and WordPress executes whatever the code we placed inside this IF condition.
And inside the IF condition, we are wrapping the dynamic_sidebar() function call inside a <div> container. Although WordPress generates a wrapper HTML element for individual widgets, It doesn’t wrap all the Widgets belonging to a particular sidebar inside an HTML element. So, We are doing this ourselves as we want to style this Footer Section differently by adding a grey textured background to it.
Finally, we are displaying the widgets placed inside the “Footer Section One” sidebar by calling the dynamic_sidebar('footer-section-one') function.
Now, let’s see what is happening on the frontend after placing the above code.
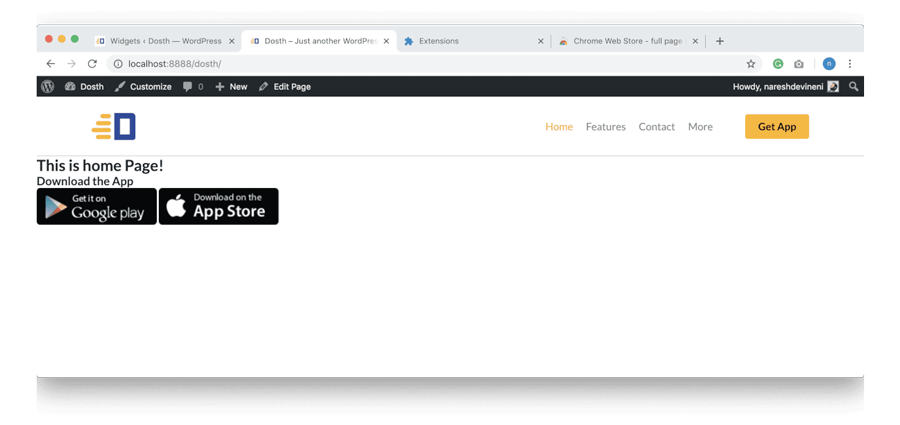
Pretty cool, right? The widget we added to the “Footer Section One” sidebar is getting outputted to the frontend. Fantastic.
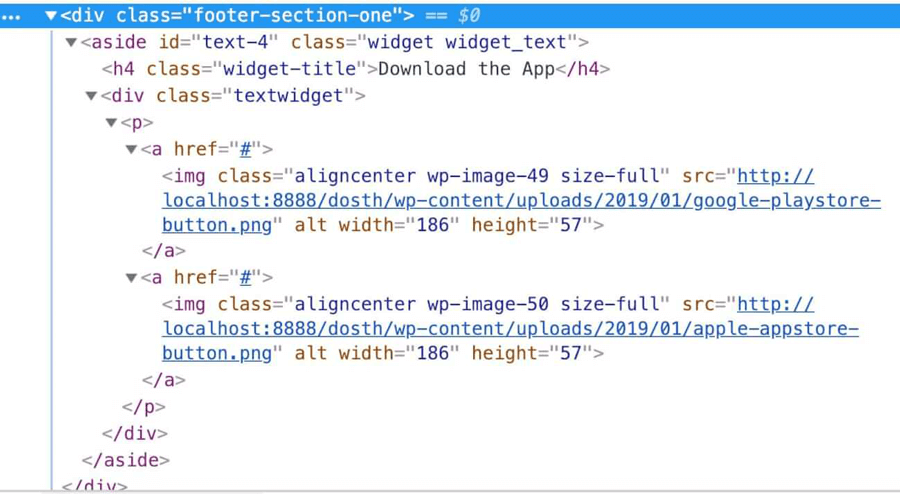
Now let’s see what markup is getting generated.
That’s a pretty standard markup, right?
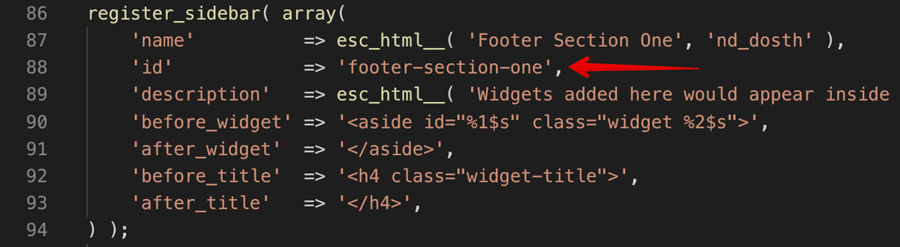
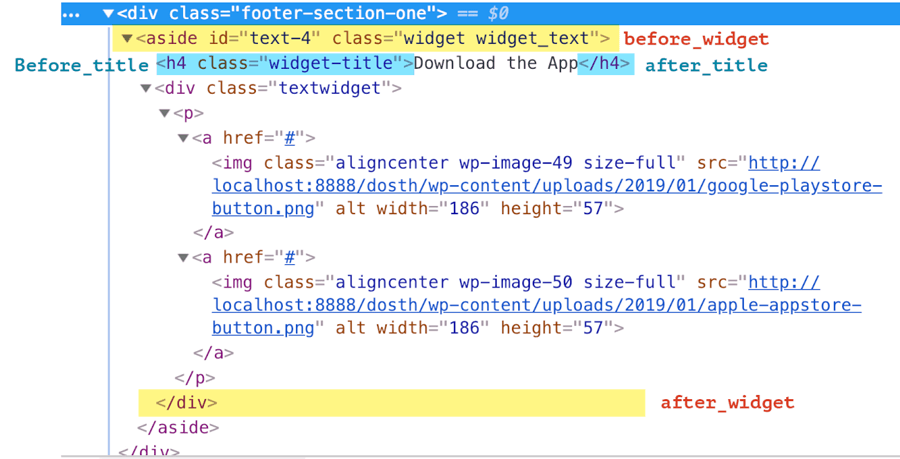
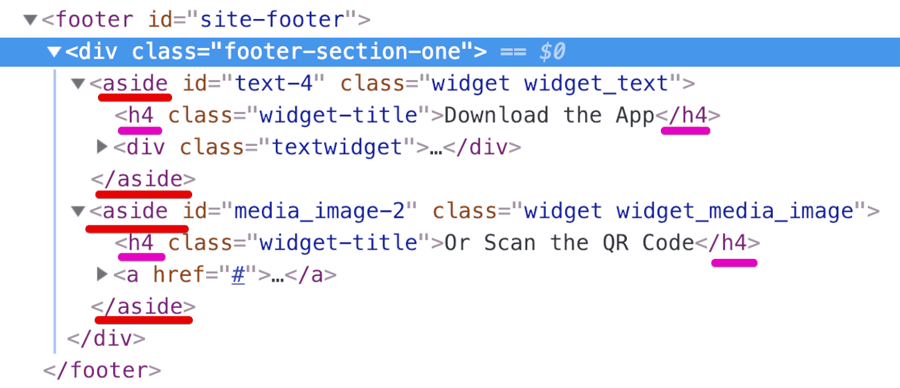
If you notice, WordPress wrapped the “Download the App” Title inside the <h4> HTML heading tag and the entire widget is wrapped inside the <aside> HTML element. WordPress did this because we told it when we registered the sidebar using register_sidebar().
register_sidebar( array(
    'name'          => esc_html__( 'Footer Section One', 'nd_dosth' ),
    'id'            => 'footer-section-one',
    'description'   => esc_html__( 'Widgets added here would appear inside the first section of the footer', 'nd_dosth' ),
    'before_widget' => '<aside id="%1$s" class="widget %2$s">',
    'after_widget'  => '</aside>',
    'before_title'  => '<h4 class="widget-title">',
    'after_title'   => '</h4>',
) );
The before_widget and after_widget keys allow us to tell WordPress that “Hey! Wrap each widget inside this sidebar with this HTML markup.”
In our case, we are telling WordPress to wrap each widget inside this sidebar with <aside> HTML element.
Similarly, the before_title and after_title keys allows us to tell WordPress that “Hey! Wrap every widget’s title inside this sidebar with this HTML markup.”
In our case, we are telling WordPress to wrap every widget’s title inside this sidebar with <h4> element.
Get it?
“Cool! Got it! But what are those %1$s and %2$s symbols inside the HTML string that we set for before_widget key?”
Ah! Don’t worry about them. Those are just dynamic placeholders that tell WordPress where to output widget specific HTML ID and classes.The %1$s is a place holder for the Widget ID and %2$s is a place holder for the Widget classes.
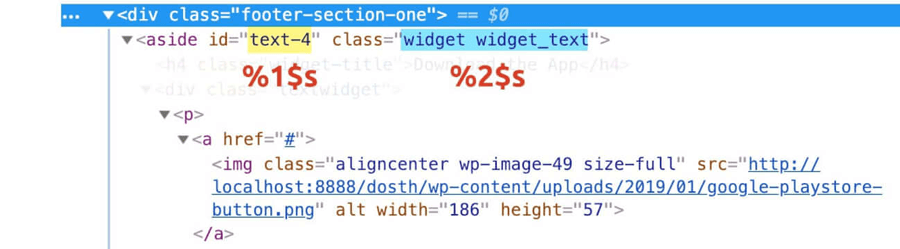
You can even remove them if you don’t like what WordPress is outputting. But I usually keep them to style a particular widget using CSS. They are really handy.
Important Realization: I can’t stress this enough! Irrespective of the Widget being outputted, WordPress generates the same Wrapper HTML markup for every widget placed inside a particular sidebar. That means, every widget inside “Footer Section One” sidebar will be wrapped inside the <aside> HTML element. And every widget’s title will be wrapped inside the <h4> HTML heading element.
Common, let’s try it out practically. It is important that you fully understand this.
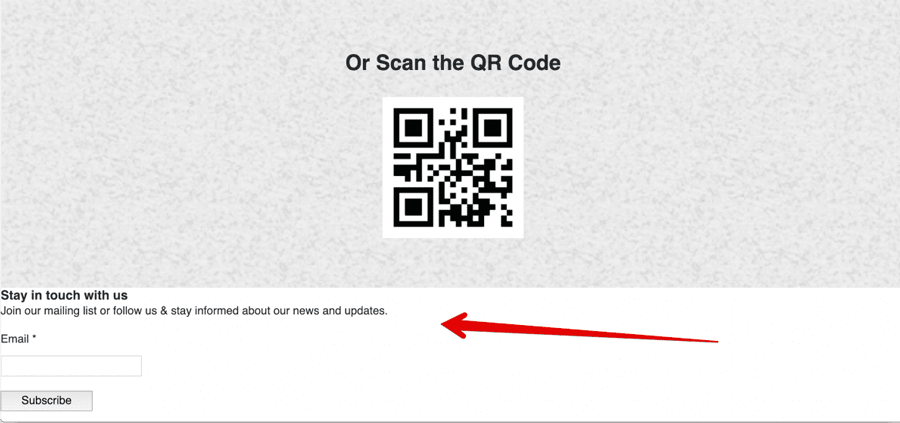
Let’s put “Image” widget inside the “Footer Section One” sidebar.
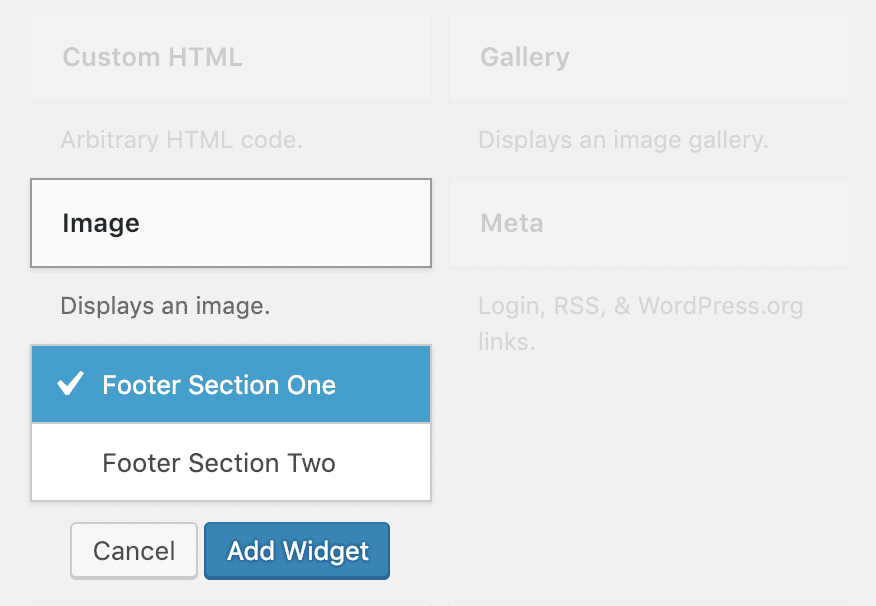
For the title of the Widget, put “Or Scan the QR Code”.
Next, download the following random QR code image:

Then, add this image to the widget by clicking on the “Add Image” button.

Also, For the “Link To” put a custom URL. In our case, it is just a dummy QR code, so I put #.
Finally, click the “Save” button. Now, head over to the Homepage of the Website and refresh it.
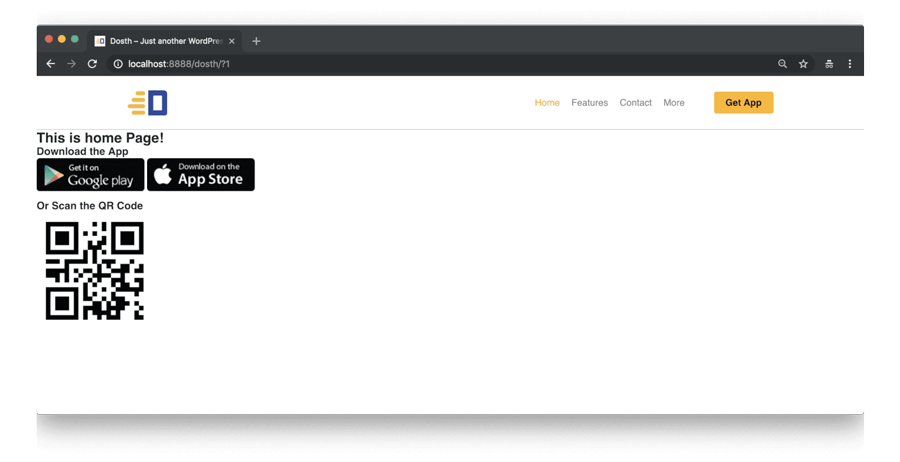
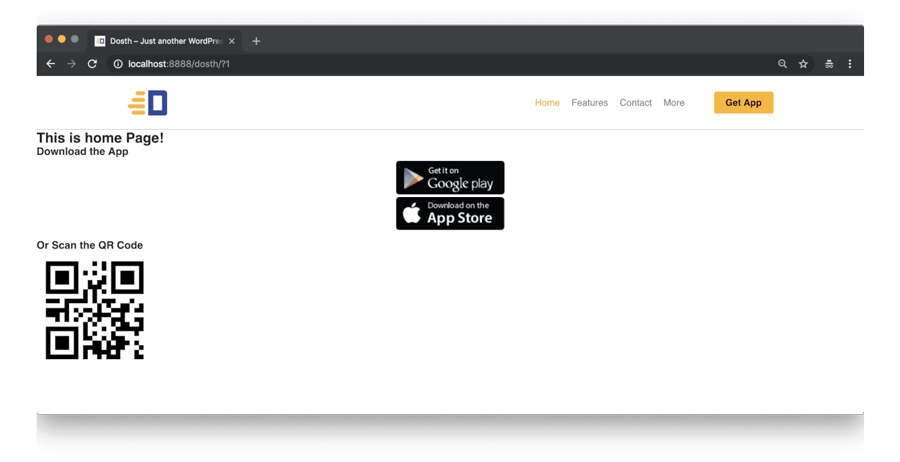
Cool, the QR code is getting outputted as expected. That was quick, isn’t it?
Anyway, now if we check out our footer markup again, you’ll see the same wrapper HTML element for both the Widgets.
But there is one problem!
And, If you remember, we center aligned the images inside the “Download the App” text widget, isn’t it?
But why it’s not working?
We need to support WordPress generated CSS classes inside our theme
The Problem
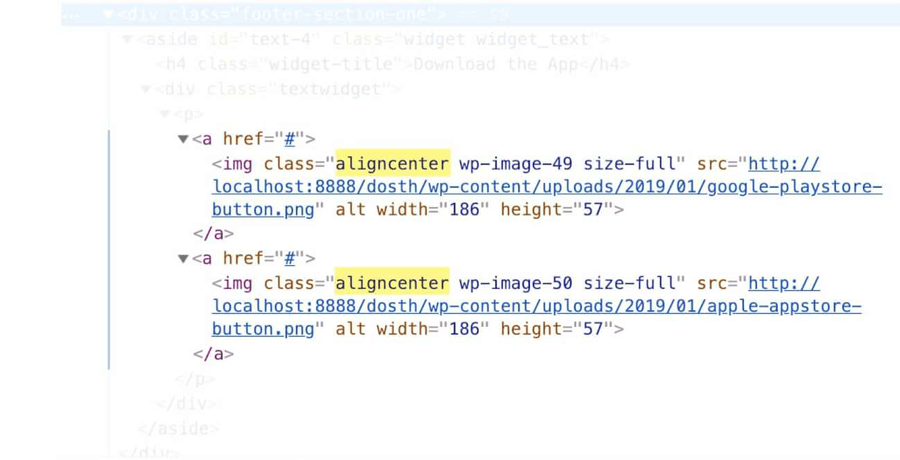
If you watch the above markup of the images inside the “Download the App” text widget closely, WordPress added a class called “aligncenter” for the images.
But, did we write CSS for this class?
“No, We did not!”
This is why the images are not getting centered. WordPress doesn’t magically center the media we add using the WYSIWYG editor. It just adds classes like “aligncenter”. It is up to us as theme developers to support those CSS classes inside our theme.
The “aligncenter” class is just one of many classes
We can fix this problem by writing some CSS to the “aligncenter” class. But the problem is not just about the “aligncenter” class. This class is just one of many classes that WordPress generates when we use a WYSIWYG editor inside WordPress.
These WordPress generated classes are called “Editor Classes”. And as a theme developer, it is our primary responsibility to write proper CSS for all the important WordPress generated classes. We have to do this because the Client/Administrator just uses the align options available inside the WYSIWYG editor and expect them to work properly.
Here is the list of HTML classes that we need to write CSS for:
- aligncenter
- alignleft
- alignright
- alignnone
- wp-caption
- wp-caption-text
- wp-smiley
- left
- right
The list is not final. There are more. But these are the most and important classes that we must support as a theme developer.
To save us a lot of precious time, Liam Gladdy provided a neat little Gist which contains styles for all the above-mentioned classes. You can find the Gist here:
https://gist.github.com/lgladdy/10597478
It is five years old, but it is still relevant. I still use this Gist inside every WordPress project I work on.
Also, the above Gist contains the SCSS version of the WordPress WYSIWYG styles. But for the purposes of this course, I converted it to plain CSS.
The Fix
Open up the style.css file and add the following CSS right below the comment with styles outline information. To be precise, at the beginning of our custom CSS rule-sets.
/*-------------------------------------------------------------------------------
  1.WordPress WYSIWYG styles
-------------------------------------------------------------------------------*/
.alignnone {
  margin: 5px 20px 20px 0;
}

.aligncenter, div.aligncenter {
  display: block;
  margin: 5px auto 5px auto;
}

.alignright {
  float: right;
  margin: 5px 0 20px 20px;
}

.alignleft {
  float: left;
  margin: 5px 20px 20px 0;
}

.aligncenter {
  display: block;
  margin: 5px auto 5px auto;
}

@media only screen and (max-width:480px){
 .single .alignright,.single .alignleft{
 float:none;
 }
}

a img.alignright {
  float: right;
  margin: 5px 0 20px 20px;
}

a img.alignnone {
  margin: 5px 20px 20px 0;
}

a img.alignleft {
  float: left;
  margin: 5px 20px 20px 0;
}

a img.aligncenter {
  display: block;
  margin-left: auto;
  margin-right: auto;
}

.wp-caption {
  background: #fff;
  border: 1px solid #f0f0f0;
  max-width: 96%;
  /* Image does not overflow the content area */
  padding: 5px 3px 10px;
  text-align: center;
}

.wp-caption.alignnone {
  margin: 5px 20px 20px 0;
}

.wp-caption.alignleft {
  margin: 5px 20px 20px 0;
}

.wp-caption.alignright {
  margin: 5px 0 20px 20px;
}

.wp-caption img {
  border: 0 none;
  height: auto;
  margin: 0;
  max-width: 98.5%;
  padding: 0;
  width: auto;
}

.wp-caption p.wp-caption-text {
  font-size: 11px;
  line-height: 17px;
  margin: 0;
  padding: 0 4px 5px;
}
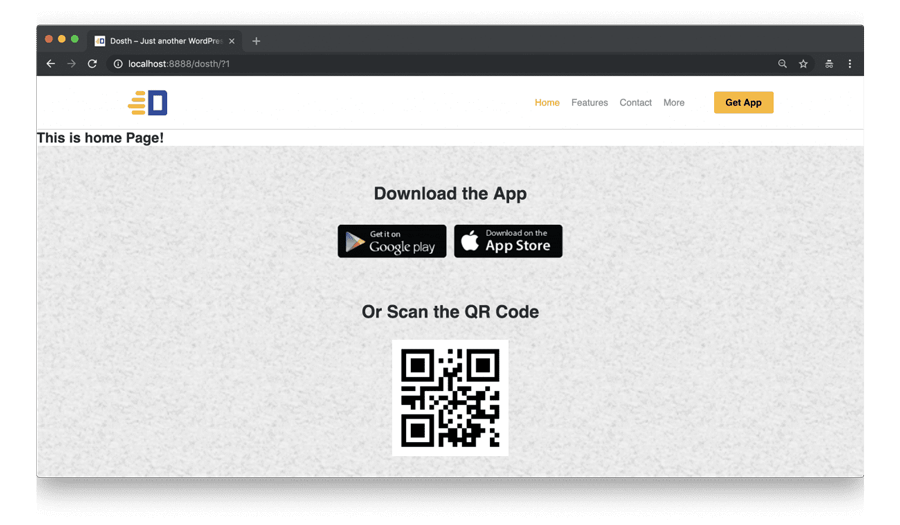
Anyway, now if you go back to the browser and refresh the Homepage, the images are indeed getting centered to the viewport.
Now that we fixed the problem successfully, you don’t ever midnight phone calls from a client saying:
“Hi, Sorry for the disturbance. I am trying to align an image to the right side of the screen, but for some reason, it is not working as expected!”
Alright, But this is not the way Footer section one was designed, right?
We just added styles to the classes generated by WordPress. But we did not start styling our widget yet!
So, next, we will finish the styling of our “Footer Section One” along with the styling of Widgets inside it.
Styling “Footer Section One” and Widgets inside it
To begin the styling, download the following grey background image and put it inside the assets/img directory.

We will apply the above image as a background to the Footer Section One <div> element using the CSS.
Now, add the following CSS at the end of the style.css file:
/*-------------------------------------------------------------------------------
  6.Footer Styles
-------------------------------------------------------------------------------*/
#site-footer .widget{
	margin-bottom:65px;
}
#site-footer .widget:last-child{
	margin-bottom:0;
}
#site-footer .widget h4{
	font-size:30px;
	text-align: center;
	margin-bottom:30px;
}
.footer-section-one{
	background-image:url(assets/images/grey-texture.png);
	padding:65px 15px 70px;
}
.footer-section-one #text-4 a{
	display: inline-block;
	margin:0 5px;
}
.footer-section-one #text-4 .textwidget{
	text-align:center;
}
.footer-section-one .widget_media_image img{
	max-width:300px;
	display: block;
	margin:0 auto;
}
Alright, Let’s go back to the Homepage in the browser and refresh it!
“Haha! Finally, I am seeing something fruitful to my eyes :P”
I am glad you liked it :P
Anyway, next, we will continue to build our site’s footer by dealing with the Email Subscription Form.
What should and shouldn’t go inside a WordPress theme
Alright, fellow theme developers here is the reality.
WordPress does not ship with an Email Subscription Functionality. And as theme developers, we shouldn’t implement a custom functionality like an Email Subscription management inside our theme. That is against the theme development standards and there is a very good reason behind this.
Some clients always try to change the look and feel of their websites. So, if they got bored with the current design, the first thing they do is purchase a new WordPress theme or hires freelance WordPress developers like us to get the job done.
This means we can not guarantee that the client will continue to use the theme we developed for a longer period of time. Also, it is pretty easy to install a new theme, right?
Let’s imagine that we implemented some custom functionality like e-commerce inside our theme and the client used this feature to add two hundred products.
And, after 6 months, for some reason, the client got bored with our theme’s frontend design and decided to ditch our theme for a new one with a better design.
What happens now?
Simple yet Deadly! What comes with a theme goes with a theme. Not only the client will lose the e-commerce functionality that comes with our theme, but the client also loses access to the hundreds of products that he/she added using our theme. That’s a huge data loss.
And most of the clients are not aware of this at all. Any client who reads a general “what is a WordPress theme” thinks that theme only takes care of the presentation of the website. And that’s is the exact purpose of a WordPress theme. A theme should only take care of the frontend presentation and not anything else.
Here is another most common problem with functionality inside themes. Most theme developers ships their themes with a lot of shortcodes that lets the clients achieve complex content layouts, just using the classic content editor. And the clients unknowingly use these shortcodes quite extensively to build their content layouts. But, as soon as they switch to a different theme, all hell will break loose. Their beautifully crafted layouts are messed up with shortcodes rendering everywhever on the frontend.
What I am trying to say is, there is a fine line between what goes and what does not go inside a theme and we have to respect that to reduce the headaches for the clients when they move away from us.
So, whenever you realize that some functionality is not shipping with WordPress by default, as a theme developer, you shouldn’t implement that inside the theme you are building. But if you are the one who should build this custom functionality, create a plugin yourself and put the functionality in it or look for a plugin and integrate it inside your theme. This way, the clients will never lose the functionality and the data even when they switch to a different theme.
Let’s deal with the Email Subscription form
Now, since Email Subscription Functionality is not part of WordPress, let’s look for a plugin which provides this functionality.
We know that there are tons of plugins out there which provides this functionality and most clients prefer to use a Services like MailChimp, Aweber, etc. So, we have to go with a plugin which supports easy integration with these services.
I personally prefer the “Gravity Forms” plugin. But that is a premium plugin. So, for the purposes of this course, I am going with the “Email Subscribers & Newsletters” plugin from Icegram. This is one awesome plugin I use whenever a client doesn’t want any integration with third-party email services.
Of course, at the end of the day, It all boils down to personal preference, so, feel free to go with any plugin you are comfortable with.
Anyway, let’s go ahead install “Email Subscribers & Newsletters”.
Warning: Do not install the most recent version of this plugin. Instead, download the 3.5.18 version to follow along with me.
Follow this article from Kinsta on how to download an older version of a particular plugin.
For the rest of the course, I am gonna assume that you have downloaded 3.5.18 version of the “Email Subscribers & Newsletters” plugin
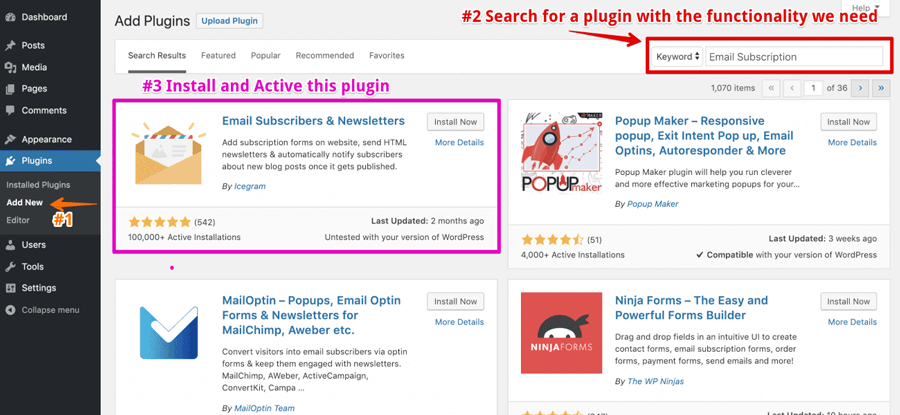
- Go to Admin Dashboard -> Plugins -> Add New panel.
- Then search for “Email Subscription”.
- WordPress will return a ton of search results.
- Install the “Email Subscribers & Newsletters” plugin and activate it.
- Activated Plugin redirects you to its main page.
- We are not going to configure settings because we are at the very early stages of our site development.
- That’s all.
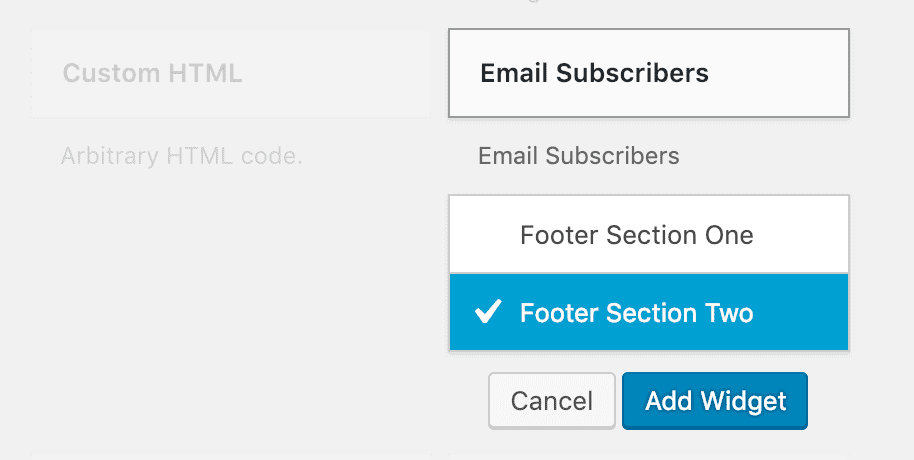
This plugin adds an Email Subscription Form widget to the Appearance -> Widgets panel.
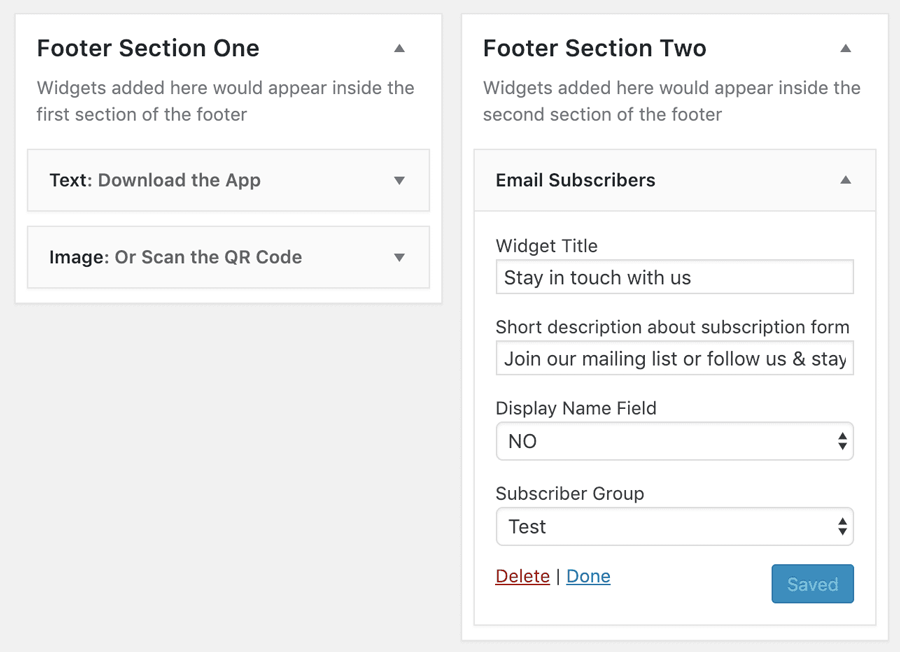
And I want to add this widget to the “Footer Section Two” sidebar.
So, let’s go to Widgets panel and add this widget to the “Footer Section Two” Dynamic Sidebar.
Now, go ahead and fill the Widget Title and Short description fields of this widget. You can fill whatever you want and save the Widget. I am going with:
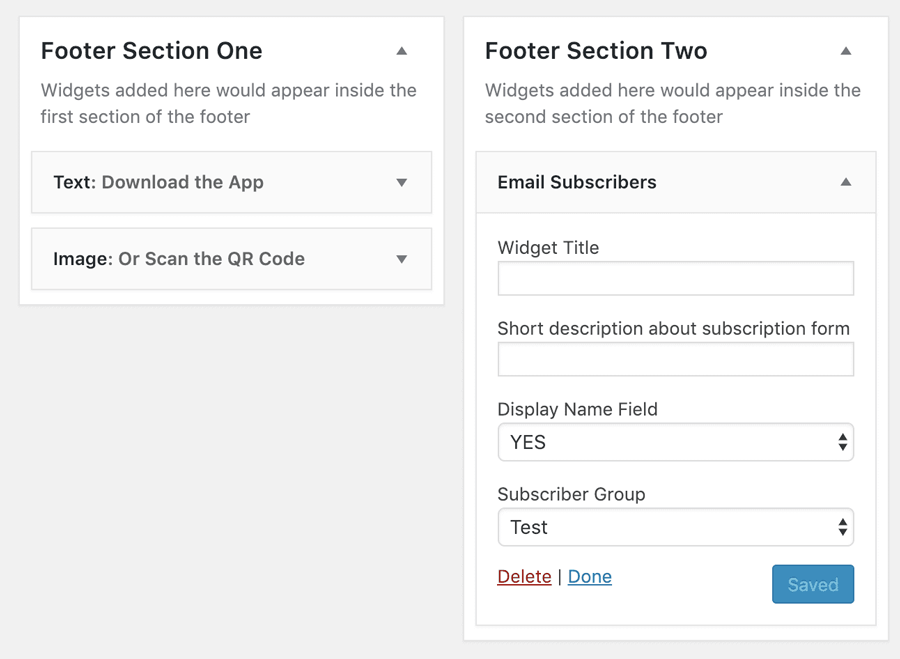
Widget Title: Stay in touch with us
Short Description: Join our mailing list or follow us & stay informed about our news and updates.
I don’t want to display the Name Input Field on the frontend, so I selected “No” for “Display Name Field” option.
Now that we have successfully configured this widget inside the “Footer Section Two” sidebar, Let’s output the “Footer Section Two” sidebar right below the “Footer Section One” sidebar.
So, go ahead and open up the footer.php file and add the following code right above the closing </footer> tag.
<?php if ( is_active_sidebar( 'footer-section-two' ) ) : ?>
    <div class="footer-section-two">
        <div class="container">
            <div class="row">
                <div class="col-sm-12">
                    <?php dynamic_sidebar( 'footer-section-two' ); ?>
                </div>
            </div>
        </div>
    </div>
<?php endif; ?>
Again, we are checking if the sidebar has any widgets using the is_sidebar_active() function call. We only want to output the Sidebar markup if there are widgets in it.
In our case, we placed an “Email Subscribers” widget inside “footer-section-two” sidebar. So, the IF condition returns True and WordPress executes whatever the code we placed inside this IF condition.
And inside the IF condition, I have written some Bootstrap specific markup to restrict the widget content of this sidebar from spanning the full width of the viewport.
Finally, we are displaying the widgets placed inside the “Footer Section Two” sidebar by calling the dynamic_sidebar('footer-section-two') function.
That’s all.
Here is the Final footer.php file for this lesson:
        <footer id="site-footer">
            <?php if ( is_active_sidebar( 'footer-section-one' ) ) : ?>
                <div class="footer-section-one">
                    <?php dynamic_sidebar( 'footer-section-one' ); ?>
                </div>
            <?php endif; ?>
            <?php if ( is_active_sidebar( 'footer-section-two' ) ) : ?>
                <div class="footer-section-two">
                    <div class="container">
                        <div class="row">
                            <div class="col-sm-12">
                                <?php dynamic_sidebar( 'footer-section-two' ); ?>
                            </div>
                        </div>
                    </div>
                </div>
            <?php endif; ?>
        </footer>
        <?php wp_footer(); ?>
    </body>
</html>
Alright, let’s check out the Homepage in the browser.
Great! The Email Subscription form widget is indeed getting outputted to the frontend as we expected. Pretty cool.
Next, let’s style this form so that it almost exactly looks like the subscription form from the Footer mockup.
And, We never know where a particular widget goes. So, whenever possible, It is important that we write modular CSS when it comes to the styling of Widgets. It saves us a lot of time in the long run.
The following CSS might not work by the time you are reading this article. This is because plugins sometimes keep changing the markup of their output. So, adapt it according to the latest markup generated by the plugin.
Open up the style.css file and put the following CSS code at the end of the file.
.footer-section-two{
    padding:70px 0;
}
#site-footer .elp-widget .es_caption{
    font-size:20px;
    color:#939393;
}
#site-footer .es_widget_form{
    text-align: center;
}
#site-footer .es_textbox input{
    width:400px;
    margin-right:-4px;
}
#site-footer .es_textbox, #site-footer .es_button{
    display:inline-block;
}
#site-footer .es_lablebox{
    position: absolute;
    left:-9999px;
}
#site-footer .es_textbox input, #site-footer .es_button input{
    height:43px;
    display: block;
    border:0;
    font-size:20px;
    -moz-appearance:none;
    -webkit-appearance:none;
    appearance:none;
}
#site-footer .es_textbox input{
    background-color:#d4d4d4;
    padding-left:15px;
    padding-right:15px;
}
#site-footer .es_button input{
    background-color:#fdb100;
    color:black;
    position: relative;
    top:-1px;
}
#site-footer .elp-widget h4{
    margin-bottom:20px;
}
#site-footer .elp-widget .es_caption{
    margin-bottom:20px;
}
Now, let’s go back to the Homepage in the browser and refresh it.
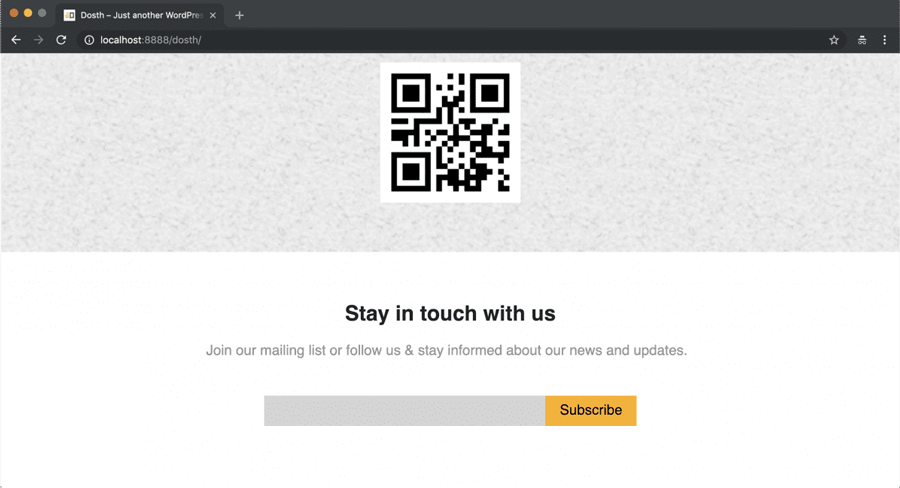
It looks neat, ain’t it?
But there is a small problem. If you notice the mockup, there is a placeholder for the email input field. But the “Email Subscribers & Newsletters” plugin’s widget is not outputting the placeholder at all. It outputted the label, but it’s not helpful.
There are three approaches to fix this:
- We have to look into the plugin’s documentation and source code in the hope of a solution. Most of the time we will find a solution but it totally depends on the project deadline and financial budget of the client for this website.
- We can write a neat little javascript code which adds the placeholder attribute to the email input field.
- Replace the plugin with some other plugin which helps us configure the placeholder attribute. This option exists because the clients will never back down when it comes to the design. Again it totally depends on the project deadline and financial budget of the client for this website.
And choosing one of these approaches totally varies from situation to situation.
In our case, adding a placeholder attribute to an HTML element using the Javascript doesn’t hurt much. It doesn’t hurt the accessibility of the form either. This is because we only moved the “Email” label out of the visible area by positioning it absolutely. But, we did not hide it using display:none.
So, open up the main.js file located inside the assets/js directory and put the following code at the end of it:
The following Javascript might not work by the time you are reading this article. This is because plugins sometimes keep changing the markup of their output. So, adapt it according to the latest markup generated by the plugin.
/* -----------------------------------------------------------------*/
/* Add Placeholder to the Email input field of "Email Subscribers" widget
/* -----------------------------------------------------------------*/
if( $( '.elp-widget input[type="email"]' ).length ){
    $( '.elp-widget input[type="email"]' ).attr('placeholder', 'Enter your email address here');
}
We are first checking whether an email input field exists inside a specific widget and if it does exist, we are adding the placeholder attribute to it.
Easy enough, right?
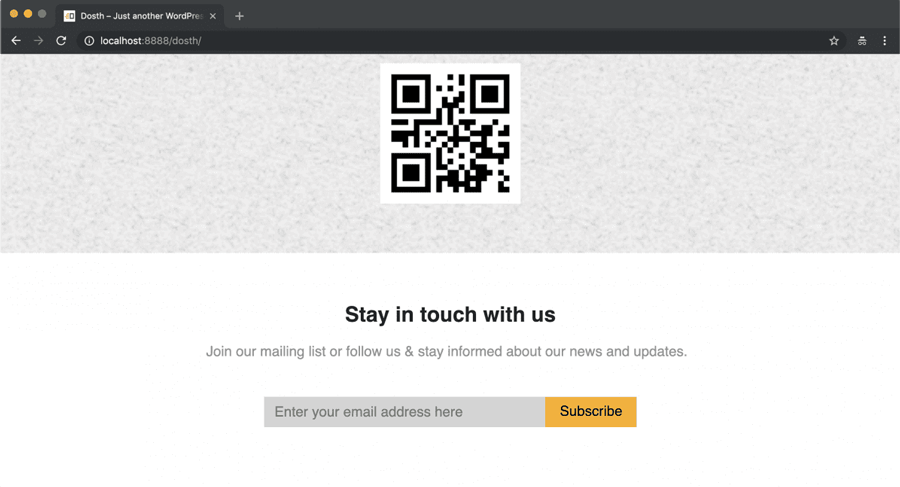
And, if you now check out the subscription form in the browser, the placeholder attribute is indeed showing its charm.
Anyway, if the client is planning to launch this website in multiple languages, the above technique causes problems because we are hard-coding the placeholder’s value inside a javascript file.
This is a terrible idea and we will fix this next.
Preparing the Javascript text inside our theme for localization
Previously, We added the following code to the main.js file:
/* -----------------------------------------------------------------*/
/* Add Placeholder to the Email input field of "Email Subscribers" widget
/* -----------------------------------------------------------------*/
if( $( '.elp-widget input[type="email"]' ).length ){
    $( '.elp-widget input[type="email"]' ).attr('placeholder', 'Enter your email address here');
}
Add, Here is our goal.
We want to output the translated version of the placeholder text if it exists, if not, we want to output the original text in the English language.
“But how do we do it? Can we use WordPress translation functions inside Javascript?”
No. we can’t use the WordPress translation functions inside the Javascript. WordPress provided the Localization API only in PHP.
“Oh! So, can we put mix this Javascript code inside our theme’s PHP files?”
No, It is a terrible idea. We shouldn’t try to put Javascript code inside our theme’s templates files or functions.php file.
“Then how?”
Follow my lead! There are three steps involved.
Step 1) Do what you normally do to make a piece of text ready for translation
As usual, first, we have to wrap the email field’s placeholder text inside a WordPress Translation function. We know how to do this, right?
Open up the functions.php file and place the following code at the end of the nd_dosth_enqueue_scripts action.
$translation_array = array(
   "email_placeholder" => esc_attr__( 'Enter your email address here', 'nd_dosth' );
);
Nothing much going on. We created an associative array and named it $translation_array. We placed only one item inside it and this item contains the placeholder text wrapped inside the esc_attr__() function attached to the “email_placeholder” key.
We went with the esc_attr__() function because we are dealing with the value of the HTML placeholder attribute.
Each Javascript text you want to translate must be provided as an individual item to this array.
Now, because we wrapped the placeholder text inside the esc_attr__() function, WordPress takes care of the translation process.
So, for example, if the placeholder text is translated into the Telugu language and if a user is viewing our website in Telugu language, WordPress will get the Telugu language version of the placeholder text and puts it inside the $translation_array .
Common let’s check it out by var dumping the $translation_array .
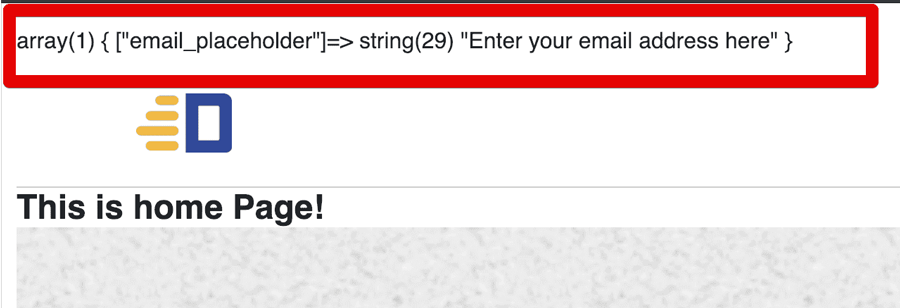
Woah! Did you see that?
Since our site is currently not translated into Telugu language, WordPress returned the original text immediately after executing the translation function.
So, this tells us that the placeholder text indeed went through the process of localization and the $translation_array contains translated or the original placeholder text. Simply put, the $translation_array now contains the localized placeholder text.
Next, we need to access this localized placeholder text inside our main.js file.
Step 2) Feed this $translation_array to wp_localize_script() function
If we feed this $translation_array to the wp_localize_script() WordPress function, this function converts the $translation_array into a proper Javascript object and outputs this object to the frontend by taking some basic instructions from us like where to output the Javascript object and what name it should give to this object.
Anyway, all this fuss makes sense when we see what’s going on practically. So, let’s try it out.
Go back to the functions.php file and place the following code right underneath the $translation_array that we created in the previous step.
wp_localize_script( 'main-js', 'translated_text_object', $translation_array );Here is the final code for nd_dosth_enqueue_scripts action for this lesson:
function nd_dosth_enqueue_scripts() {
    wp_enqueue_script(
        'superfish',
        get_stylesheet_directory_uri() . '/assets/js/superfish.min.js',
        array('jquery'),
        '1.0.0',
        true
    );
    wp_enqueue_script(
        'main-js',
        get_stylesheet_directory_uri() . '/assets/js/main.js',
        array('jquery'),
        '1.0.0',
        true
    );
    $translation_array = array(
        "email_placeholder" => esc_attr__( 'Enter your email address here', 'nd_dosth' )
    );
    wp_localize_script( 'main-js', 'translated_text_object', $translation_array );
}
add_action( 'wp_enqueue_scripts', 'nd_dosth_enqueue_scripts' );
Let’s break it down.
The $handle Parameter
If you notice, the first parameter this function accepts is a $handle of an enqueued Script file.
In our case, we are provided the main-js as the handle telling this function to output the Javascript object right before our main.js file so that we can access this object inside our main.js file.
The $object_name Parameter
Next, we told this function to name the object as “translated_text_object” so that we can query this javascript object for the localized placeholder text.
The $data Parameter
And for this parameter, we fed the $translation_array saying “Hey! convert this PHP array into a proper javascript object”.
Now, let’s see what this code is outputting to the frontend by inspecting the Homepage’s page source:
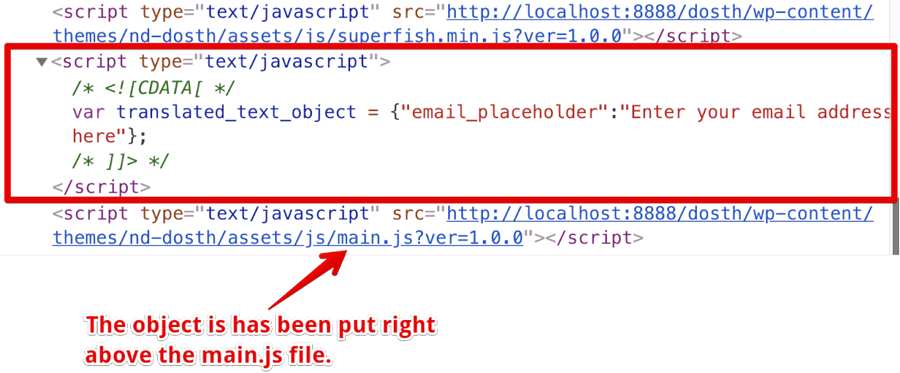
Fantastic! Just like we instructed it, the wp_localize_script() function converted the $translation_array into the Javascript object with the name translated_text_object and most importantly, outputted this javascript object just before our main.js file.
Now this javascript object contains the email field’s placeholder text, we can easily access it using the email_placeholder object key.
Step 3) Let’s output the placeholder text inside this Javascript object
Finally, we have to replace the hard-coded placeholder value inside our main.js file with the placeholder value inside the translated_text_object Javascript Object.
Open up the main.js file and replace the hard-coded placeholder value like this:
if( $( '.elp-widget input[type="email"]' ).length ){
    $( '.elp-widget input[type="email"]' ).attr('placeholder', translated_text_object.email_placeholder );
}
Alright, let’s check out the email subscription form on the Homepage:
And bang! It works like a charm!
This technique is not just for the localization of our script texts.
Technically, we created a standards-friendly data bridge between our site’s Javascript and the WordPress core.
And, we can use this data bridge to print out any value that WordPress stores in the database to a Javascript object.
For example, If we want to implement ajax inside our theme, we are going to need the ajax URL of the WordPress, right? But, we can’t hard code the WordPress’s Ajax URL because of its CMS nature.
So, what we can do instead is, we can add a new item to the array that we will feed to the wp_localize_script() function and we can access the Ajax URL with the help of it:
$translation_array = array(
    "email_placeholder" => esc_attr__( 'Enter your email address here', 'nd_dosth' ),
    'ajax_url' => admin_url('admin-ajax.php'),
);
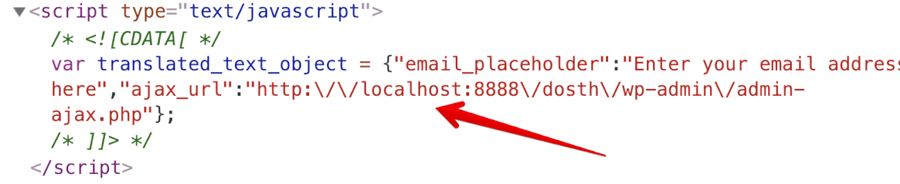
Pretty cool, isn’t it?
What we have just seen is just the basic usage of the wp_localize_script() function. It can get pretty complicated.
Anyway, Trust me, If you worked hard and understood this lesson, You are a better WordPress developer already.
Next, We will continue to build our footer by dealing the Social menu of our site.
How to properly create Social Navigation Menus in WordPress
A Social Navigation Menu is nothing but a custom menu with social networks links in it. That’s all.
Back in 2013, there used to be no standard way to create social media menus in WordPress. So, the theme developers used theme options frameworks to create theme options so that it’ easy for the client to enter/modify Social Media URLs at will.
The following image is a screenshot of the theme options from an old 2013 website that I developed for my client.
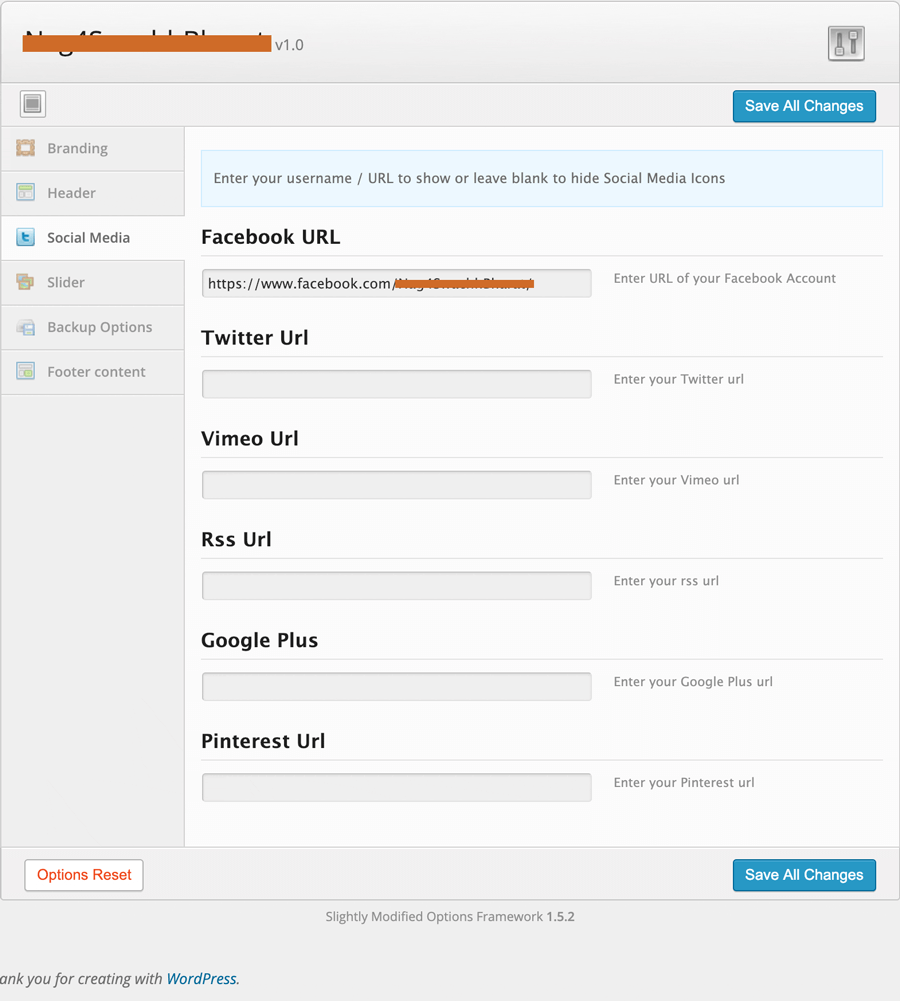
This Theme Options panel was built using Slightly Modified Options Framework plugin. This plugin used to be my life saver.
But there is a problem with this approach.
If you observe the above image, I added an option for every popular social network that was popular in 2013. But what if a new social network pops up? And what if the client wants to support that new social network on his/her website?
To support a new social network in our social menu, we have to do two things. First, we have to add a new theme option so that the client/administrator can enter the URL. Next, we have to update the Hard-Coded markup that we put inside our theme to output the new social network along with the others.
Tedious, isn’t it?
But things suddenly changed for me when I stumbled upon Justin Tadlock‘s article about how to properly create Social Menus in WordPress.
http://justintadlock.com/archives/2013/08/07/social-media-nav-menus
This article changed the way I create Social Menus forever. Also, made me realize how dumb I am.
In this article, Justin explains how to create client friendly social media menus using the WordPress Custom Menus. And this technique has the following advantages over the theme options technique.
- Most of the clients/Administrators are already familiar with the Menus panel and if they don’t, there are tons of articles on the internet to help them.
- We don’t have to create a theme option for every social media network available on the internet. The client/administrator can create any number of custom URLs inside a WordPress custom menu.
Anyway, now we are going to slightly modify Justin’s technique to create our SVG based modern social menu.
It takes four steps to create and output our modern social menu:
- Create a custom “Social Menu” by using the Menus Panel and the custom URL option inside it.
- Put the newly created social menu inside the “Footer Section Two” by using the “Navigation Menu” widget to output the menu to the frontend.
- Collect SVG based social media icons
- Use CSS attribute selectors to detect social networks and write appropriate CSS to target individual social network.
- That’s all.
Now, the above points may sound hard, but they are really easy to implement. So, let’s start by creating the custom “Social Menu”.
Step 1) Create a Custom Menu using the Menus panel
You already know how to do this, Don’t you?
Common, go ahead and create a custom menu like this:
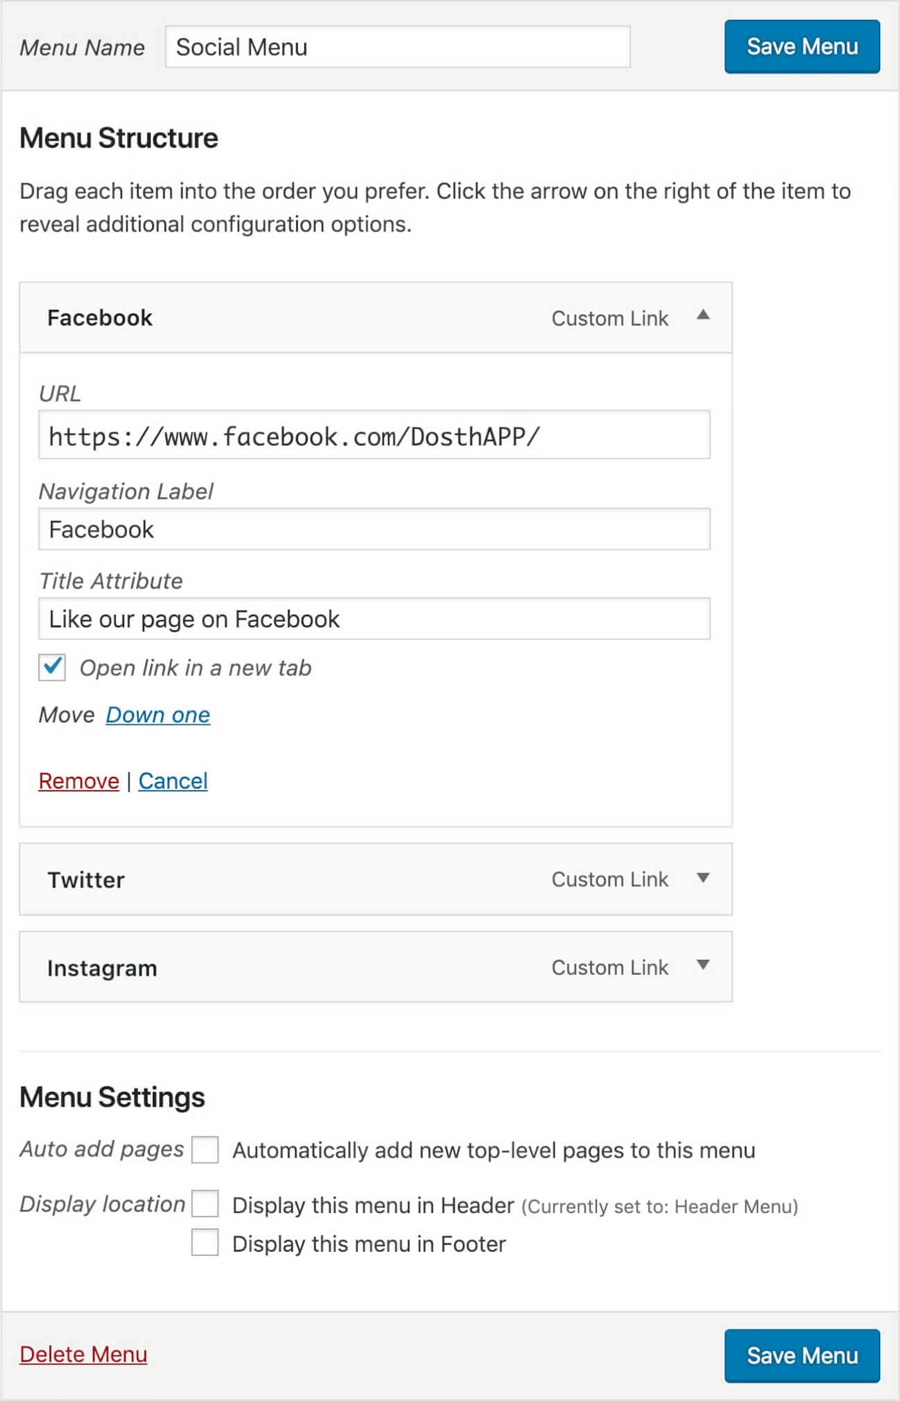
I created three custom links and put the Dosth App’s social media URLs in them. That’s all.
If you observe the Menu Settings for this menu, I did not assign this menu to any Display Location. Why? Because we will be displaying this menu using the “Navigation Menu” widget.
Also, just because we are displaying this menu using a widget, it doesn’t mean you can not assign it to a Display Location. You can still do it. Both solve two unique problems. Clear?
Step 2) Put this custom menu inside a Sidebar
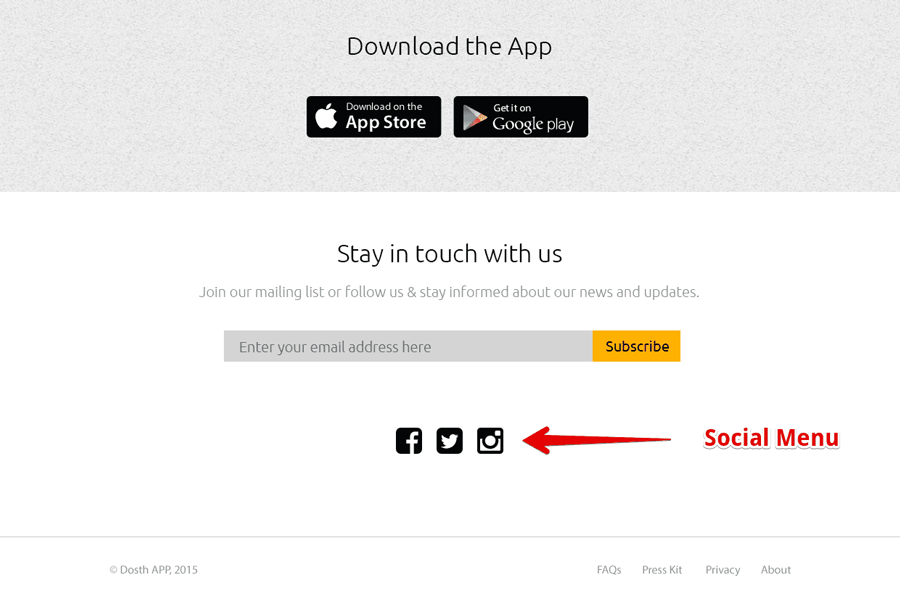
It’s time to output this menu to the frontend. I want to display this menu right below the email subscription from.
So, let’s go to the Widgets panel and put the “Navigation Menu” widget inside the “Footer Section Two” Sidebar.
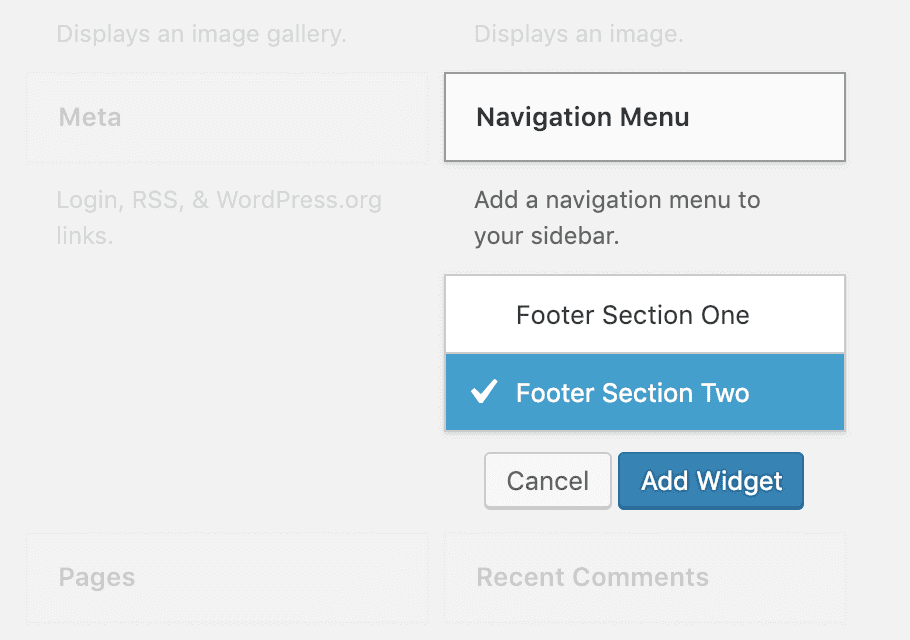
This widget outputs a navigation menu to the frontend. Period. You can select any you created using the Menus Panel.
So, click on the “Select Menu” option and choose “Social Menu” from the list and Save the widget.
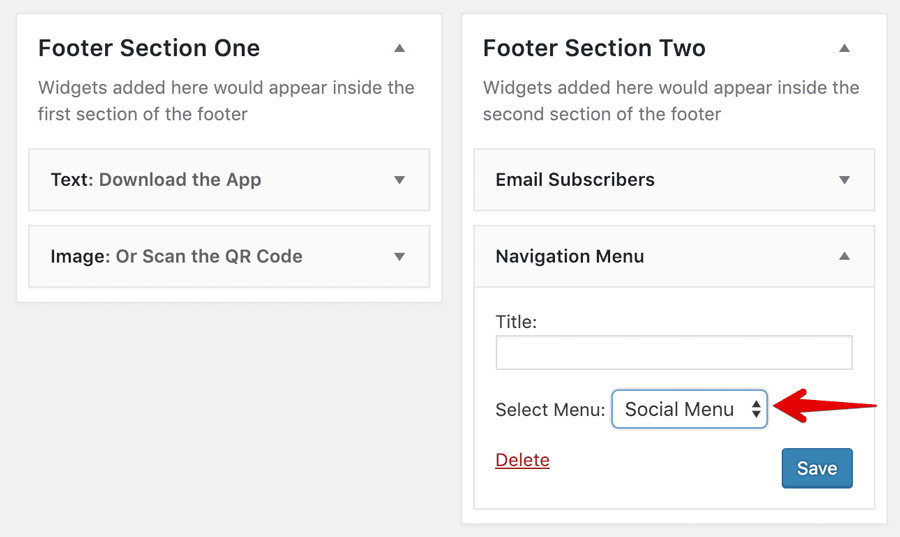
Also, I didn’t want to display a title for this widget, so I left it empty.
Anyway, let’s check out how the menu is getting displayed on the frontend.
That’s all you need to do from the backend side. What follows now is purely a front-end CSS technique.
Step 3) Collect the Social SVG Icons and enqueue the Modernizr Script
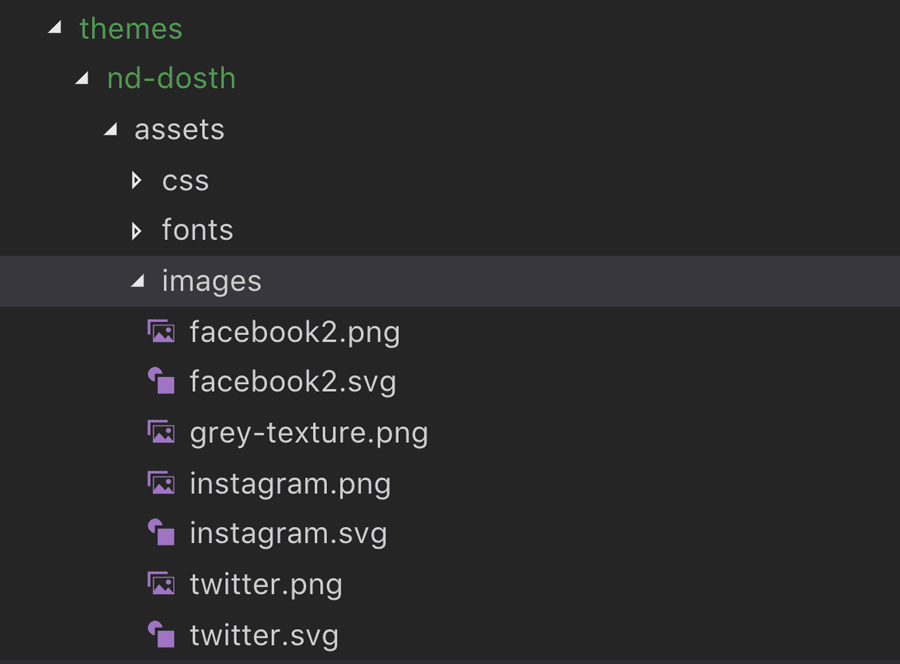
Go ahead and download the SVG and PNG icons for Facebook, Twitter, and Instagram and put them inside the assets/images directory.
I generated these icons using the infamous IcoMoon website.
If for some reason you can not use IcoMoon App for generating the icons, I provided these icons inside the exercise files. But I’d love it if you can try the IcoMoon app. It is really handy and powerful.
Here is my updated images directory for this lesson:
“Hey! Why do we need PNG versions of these icons, isn’t SVG is enough?”
It totally depends upon what browsers you want to support. SVG is not supported by older browsers like IE8. So, we will detect the support for SVG using the Modernizr Javascript plugin. If the browser supports SVG, we will use SVG Icons, if not we will use Png icons.
So, here is a small exercise for you. Download the Modernizr plugin and enqueue it with our theme.
If you are not interested in supporting older browsers, skip this Modernize exercise.
But, I am interested in providing fallback support for the old browsers. So, I went ahead and downloaded the Modernizr. You can download the same build by visiting the following URL:
https://modernizr.com/download?svg-svgasimg-setclasses&q=svg
I only want to check the browser support for the SVG, So I only included SVG in my custom build for Modernizr.
Anyway, after enqueuing the Modernizr script, here is my final nd_dosth_enqueue_scripts action for this lesson:
function nd_dosth_enqueue_scripts() {
    wp_enqueue_script(
        'modernizr',
        get_stylesheet_directory_uri() . '/assets/js/modernizr.min.js',
        array(),
        '1.0.0',
        false
    );
    wp_enqueue_script(
        'superfish',
        get_stylesheet_directory_uri() . '/assets/js/superfish.min.js',
        array('jquery'),
        '1.0.0',
        true
    );
    wp_enqueue_script(
        'main-js',
        get_stylesheet_directory_uri() . '/assets/js/main.js',
        array('jquery'),
        '1.0.0',
        true
    );
    $translation_array = array(
        "email_placeholder" => esc_attr__( 'Enter your email address here', 'nd_dosth' ),
        'ajax_url' => admin_url('admin-ajax.php'),
    );
    wp_localize_script( 'main-js', 'translated_text_object', $translation_array );
}
add_action( 'wp_enqueue_scripts', 'nd_dosth_enqueue_scripts' );
If you notice the enqueue code for Modernizr, I provided false to the $in_footer argument. This is because I want to output the Modernizr script inside the <head> element.
Now, if your browser supports SVG, you’ll see the “svg” class on the <html> tag. If not, you’ll see the “no-svg” class.
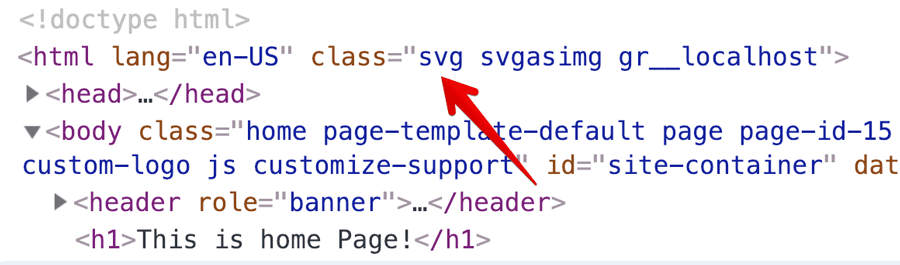
Neat! Right?
Alright, let’s deal with the CSS now.
Step 4) Use CSS attribute selectors to replace text with icons
First of all, let’s take a look at the markup that “Navigation Menu” is generating.
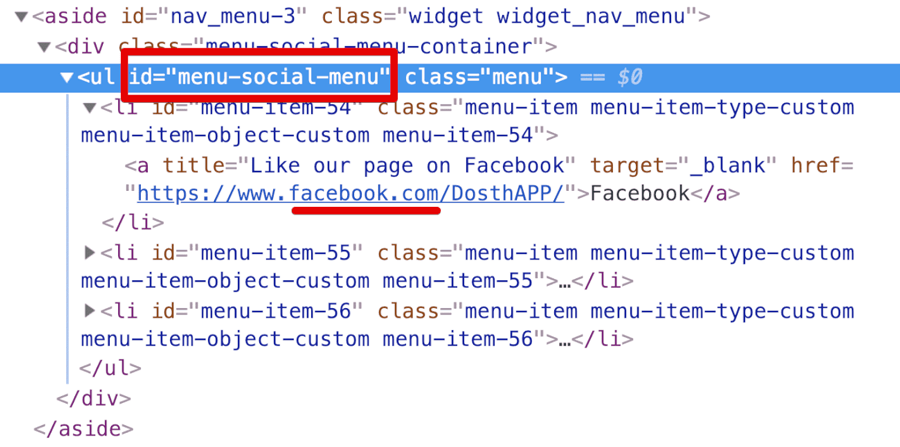
If you notice, the social menu links are wrapped inside a container with an ID of “menu-social-menu”. This ID is unique to the Navigation Menu widget that we placed inside the “Footer Section Two” sidebar. So, although I will use this ID to center the social Icons in the footer, I am not going to use to replace the text with Social Icons.
This is because we could end up displaying this social icons menu in multiple places on the same webpage. So, I would style this menu using the generic “menu” class which is right beside that ID.
To be frank, this is the drawback if we are trying to display a menu using the widget. We have no control over the classes and IDs that it will generate. This is not the case with wp_nav_menu() function because we have full control over the markup of the Menu.
At the end of the way, It all boils down to your personal preference.
Important Realization: You don’t have to style it the way I am styling it. You can use the ID to style the menu. It totally depends on how much you know about the design of the website and how much control you have over the styling of the theme.
So, open up the style.css file and put the following CSS code at the end of it:
/*-------------------------------------------------------------------------------
  7.Social Menu Styles
-------------------------------------------------------------------------------*/
#menu-social-menu{
    text-align: center;
}
#menu-social-menu li{
    display:inline-block;
    float:none;
}
.menu li a[href*="facebook.com"],
.menu li a[href*="instagram.com"],
.menu li a[href*="twitter.com"] {
    background-repeat: no-repeat;
    background-size:30px;
    width:30px;
    height: 30px;
    display: block;
    text-indent:-9999px;
    margin:10px;
}
.menu li a[href*="facebook.com"]{
    background-image:url(assets/images/facebook2.svg);
}
.menu li a[href*="twitter.com"]{
    background-image:url(assets/images/twitter.svg);
}
.menu li a[href*="instagram.com"]{
    background-image:url(assets/images/instagram.svg);
}
.no-svg .menu li a[href*="facebook.com"]{
	background-image:url(assets/images/facebook2.png);
}
.no-svg .menu li a[href*="twitter.com"]{
	background-image:url(assets/images/twitter.png);
}
.no-svg .menu li a[href*="instagram.com"]{
	background-image:url(assets/images/instagram.png);
}
Now, let’s go back Homepage in the browser and check out the new styling of the Social Menu.
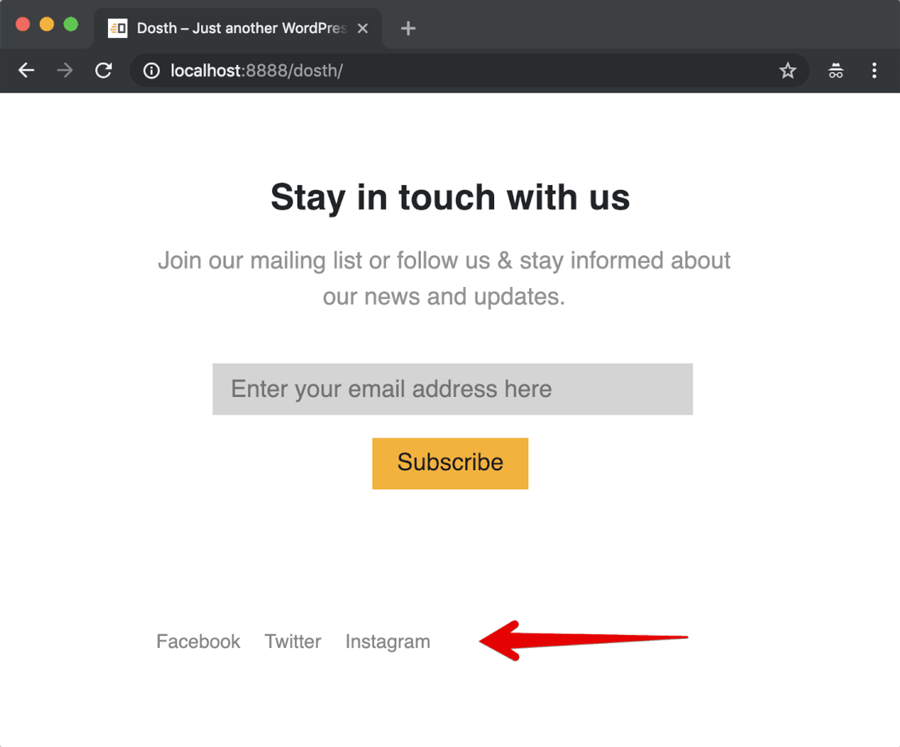
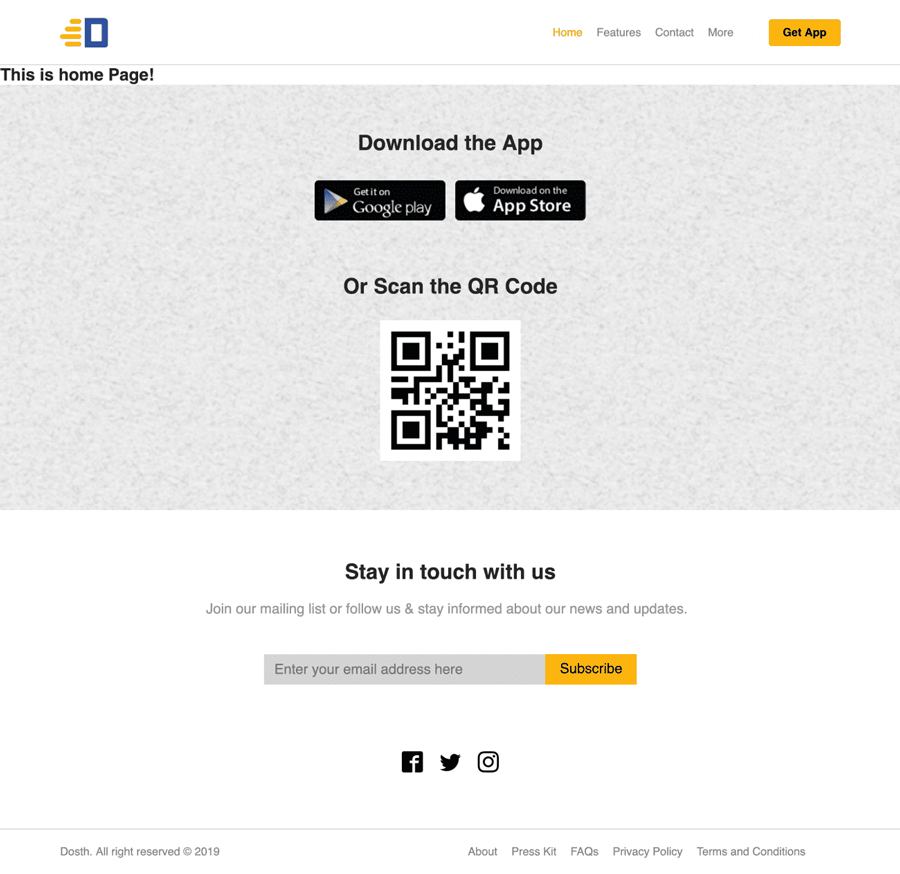
It is looking great, isn’t it? Our footer finally took its true shape from the mockup.
Next, we finish our site’s footer by dealing with the copyright statement and a footer menu.
Adding Dynamic and translation ready Copyright Statement to the footer
Be it WordPress, Be it Drupal, One of the best things about PHP based site is, We don’t have to change the year in the copyright statement every time we celebrate the new year! We can make it dynamic using the PHP’s date() function!
So, open up the footer.php file if it not already open and put the following code right above the closing </footer> tag:
<div class="copyright-and-menu">
<div class="container">
<div class="row">
<div class="col-sm-6">
<div class="copyright">
<p><?php printf( '%s.All right reserved © %s', get_bloginfo(name), date( 'Y' ) ); ?></p>
</div>
</div>
<div class="col-sm-6">
<div class="footer-links">
    <?php
        wp_nav_menu( array(
            'theme_location'    => 'footer',
        ) );
    ?>
</div>
</div>
</div>
</div>
</div>
And this is the frontend output for the above code:
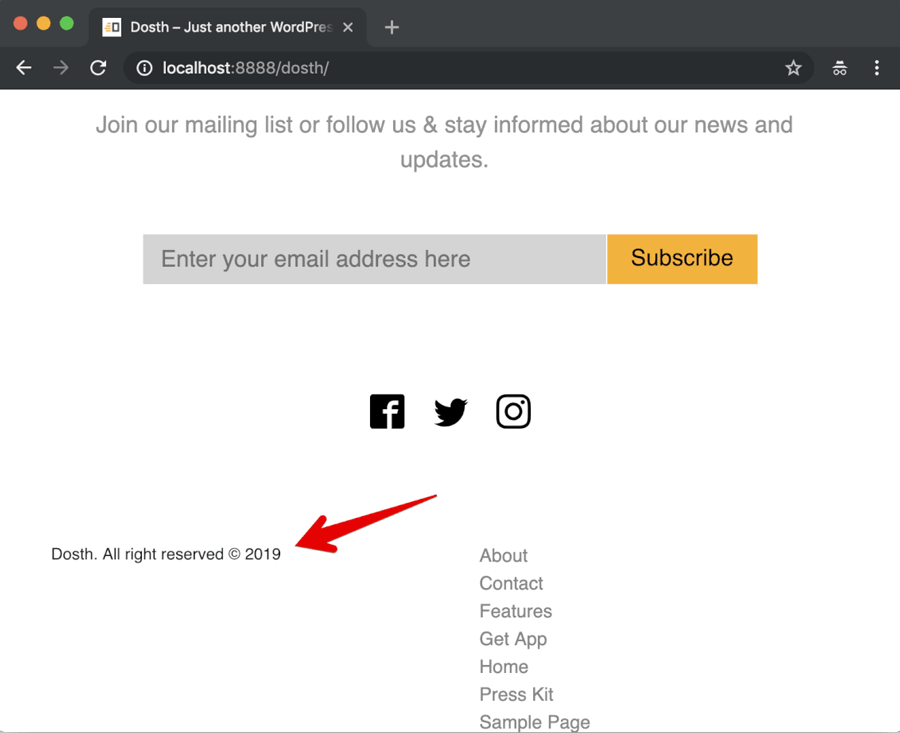
The Dynamic Copyright Statement
First of all, Let’s focus on printf() function inside div with copyright class. It is not a WordPress function. It belongs to the PHP language itself.
The printf() function is just like echo statement, but helps us build complicated dynamic strings in much cleaner and better way. And, This is the reason why we used this function to output the Copyright statement to the footer.
printf( '%s.All right reserved © %s', get_bloginfo(name), date( 'Y' ) );
This function accepts parameters in the following way:
printf( $format, $dynamic_value_1, $dynamic_value_2, $dynamic_value_n );
For the $format parameter, we must provide the text that should be outputted to the browser. And this text would contain some placeholders where we want to put dynamically computed values.
We provide these dynamically computed values one by one after the $format parameter, like this:
printf( $format, $dynamic_value_1, $dynamic_value_2, $dynamic_value_n );
The number of dynamically computed values we provide must be equal to the number of placeholders in the $format parameter. For example, if we put only one placeholder, we have to provide only dynamically computed value.

If you observe the above picture, the dynamically computed value could be the result of calling a function that returns some data from the database, or it could be a simple PHP variable which contains some data.
This function works incrementally. Simply put, step by step. It replaces the first placeholder it counters in the $format parameter with the first dynamic value we provided after the $format parameter. It replaces the second placeholder with the second dynamic value. And there is no limit. You can place any number of placeholders.
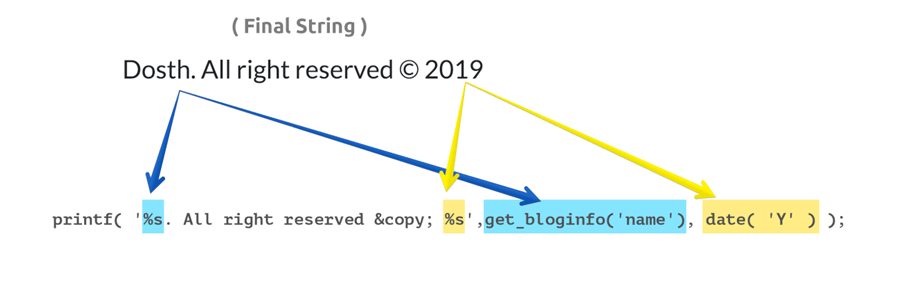
In our case, we are trying to output a copyright statement with the site name and the current year.
But if we manually hard-code the year into the copyright statement, we have to update the year everytime we celebrate a new year. And trust me, it is not funny!
This applies to the site name as well. It is quite often that the clients change their site names after some months. So, if we hardcode the site name, we would get calls from the client saying “Hi! How are you? Could you please change our site name in the footer? It got updated everywhere else except the footer. Thank you!”
So, We are using the two %s placeholders instead of manually typing the site name and the year.
Now, as soon as PHP Server encounters the first %s symbol, it replaces the first %s symbol with the value returned by the first dynamic function get_bloginfo('name')and second %s symbol with the value returned by the second dynamic function date('y').
There is one more thing you need to remember. You have to different placeholders for different data types.
In our case, we are using the %s placeholderbecause both date('y') and get_bloginfo('name') function returns the data in a string format. But if we are getting back a decimal value from a dynamic function, we have to use %d instead of %s.
You can see the full list of placeholders here:
https://www.w3schools.com/php/func_string_printf.asp
Anyway, now let’s make it translation ready. I didn’t do it earlier because it could be confusing for you.
So, update the above code like this:
printf( __( '%s. All right reserved © %s', 'nd_dosth' ), get_bloginfo('name'), date_i18n( 'Y' ) );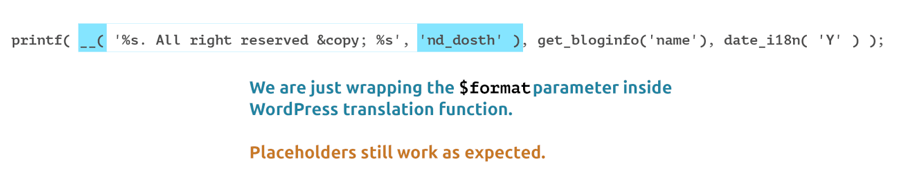
Don’t panic. We are just wrapping the text with placeholders inside the __() translation function. Nothing else. Placeholders still work as expected.
Also, we replaced the date('y') function with date_i18n('y')function.
This date_i18n('y') function retrieves the date in a localized format instead of the plain year in decimals.
That’s it. This is what it takes to output a translation ready copyright statement.
Here is the final Copyright statement code for this lesson:
<div class="copyright">
<p><?php printf( __( '%s. All right reserved © %s', 'nd_dosth' ), get_bloginfo('name'), date_i18n( 'Y' ) ); ?></p>
</div>
Next, let’s deal with the footer menu.
Outputting the footer menu
We have already put the following code alongside the copyright statement.
<div class="footer-links">
<?php
wp_nav_menu( array(
'theme_location' => 'footer',
) );
?>
</div>
Anyway, we did not create a “Footer Menu” and certainly we did not assign it to the “footer” Display Location, right?
But, if you observe the footer, we are already seeing a menu.

“Oh Yeah! What’s happening mate?”
Nothing much, It is just that WordPress is trying to be nice with you. If we are trying to output a Custom Menu that is not yet created or assigned to a Display Location, WordPress outputs the default menu automatically.
“Hey! What’s a default menu?”
A default menu is nothing but a navigation menu which contains all the pages of our site as menu items.
Remember? When we came back to the Menus panel after adding the theme support for menus, the error was gone and to our surprise, WordPress has already put all our site pages as menu items in the default menu.
“Yep! I do remember it!”
Cool. Now, let’s take the control away from the WordPress by creating the Custom Footer Menu and assign it to the “footer” Display Location.
But before we do that, we need to create three new pages for our site.
- FAQs
- Privacy Policy
- Terms & Conditions
Now, ever since GDPR took effect, Along with the Sample Page, WordPress also creates a “Policy Policy” page by default with some standard Privacy related content copy. It is not published yet because We have to modify this page’s content to our needs.
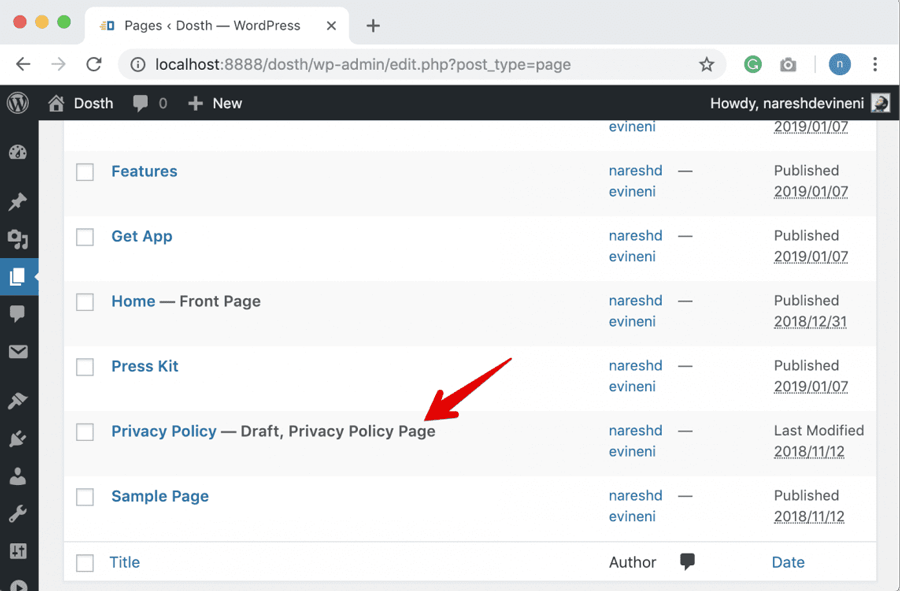
For the purposes of this Course, let’s just go ahead and publish this Privacy Policy page so that we can add it to the footer menu.
Also, if you notice the above screen, there is a Sample Page which we don’t need at all and I want to keep my Pages panel clean. So let’s just remove it.
Next, create the FAQs page along with the Terms and Conditions page.
Once you are done, go ahead and create the “Footer Menu” using the Menus panel and assign it to the Display Location with ID “footer”.
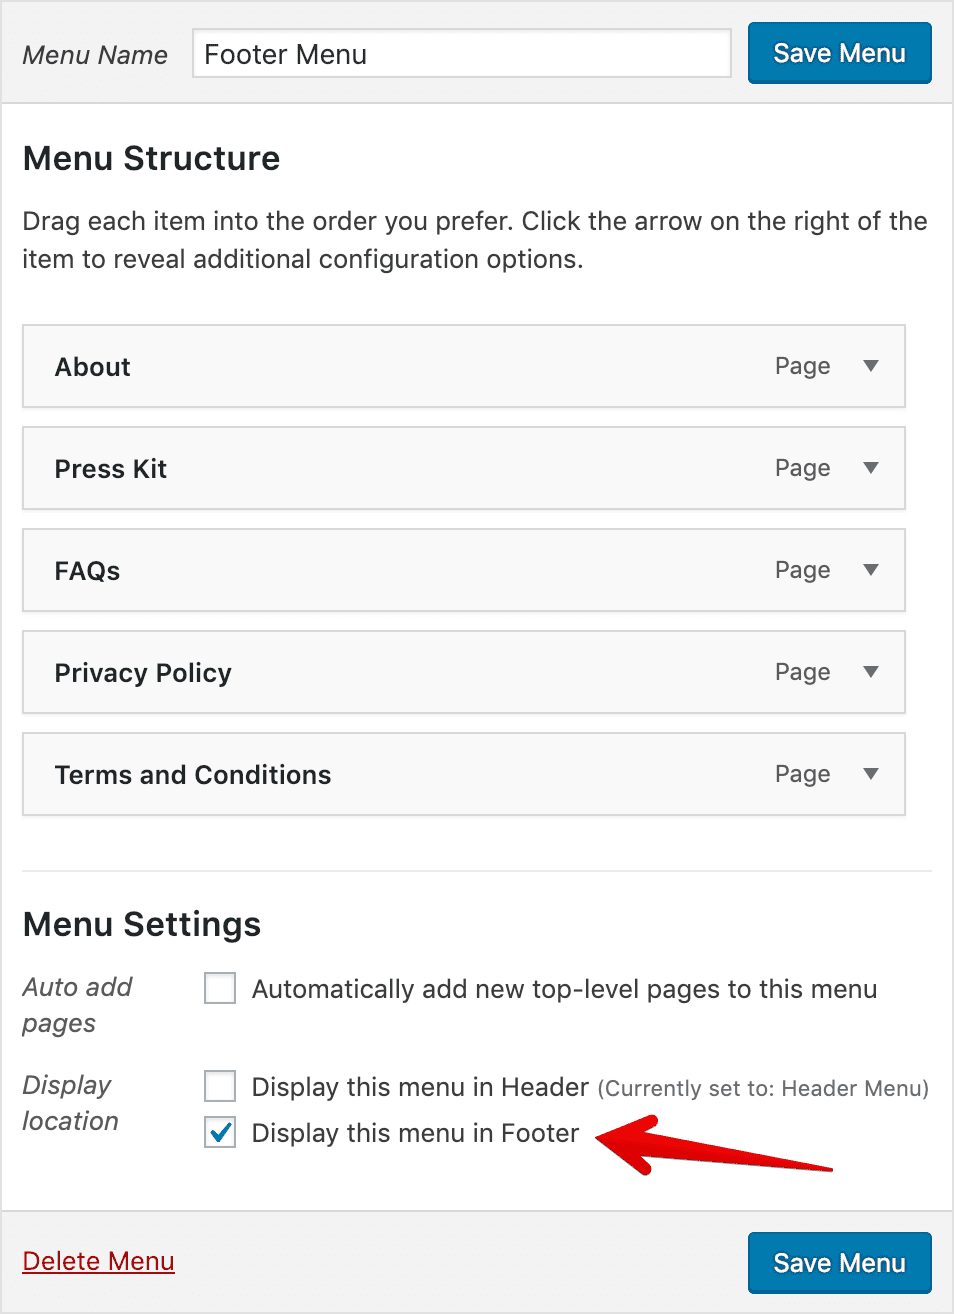
Now if we go back to the browser, We should see this above “Footer Menu” instead of the default menu.
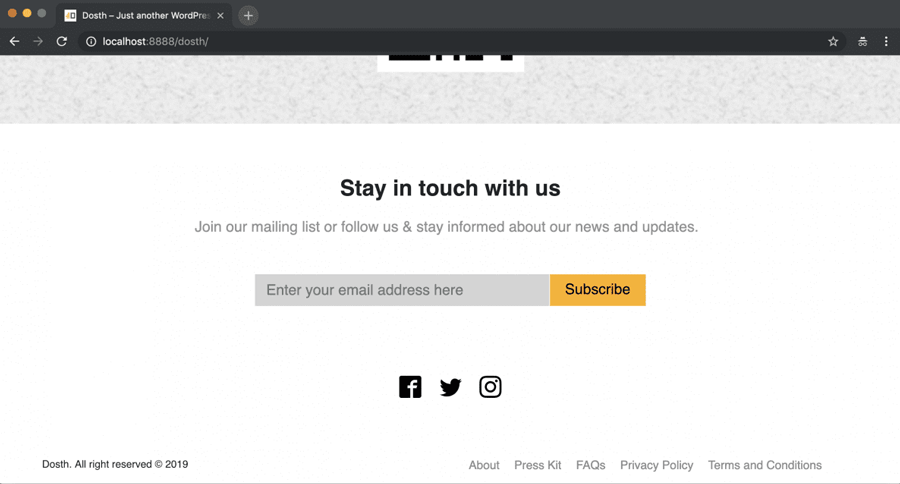
Indeed we can see the newly created “Footer Menu”. Also, if you notice, the navigation items are neatly floating next to each other.
This is happening because we have cleverly styled WordPress menus while we are styling our Header menu. WordPress by default puts the “menu” class on every menu we output using the Display Locations. And, remember? We targeted this class while we wrote common menu styles.
The bottom line is, if you can write your CSS in a generic and modular friendly way, we can save a lot of our theme development time.
Anyway, add the following CSS to the style.css file to make it a bit more sleek.
/*-------------------------------------------------------------------------------

  8.Footer Section Three Styles
-------------------------------------------------------------------------------*/
.copyright-and-menu{
    padding:20px 0;
    border-top:1px solid #ccc;
}
.copyright p{
    margin-bottom:0;
    font-size:16px;
    color:#878787;
}
#footer-links{
    float:right;
}
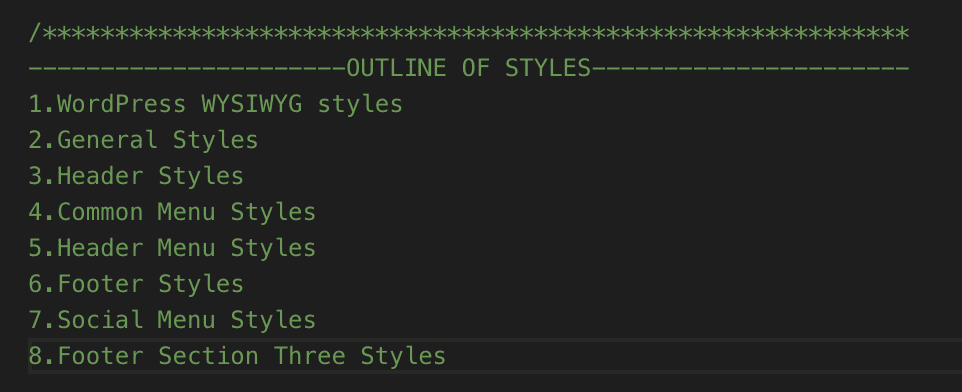
Here is the updated styles outline:
Here is the updated look of our Site’s footer in the browser:
We are now done with the footer. This is how you build a fully client editable footer in WordPress. I omitted quite a few things, but you’ll learn them on your own when the need comes.
Next, I will give you a couple of exercises which you can totally do by yourself.
Exercises for mastering Widgets and Menus
If you have reached this far in the course, you have already learned 80% of the important concepts in WordPress.
It’s time to get more practice.
I skipped two things completely while building the header and footer. First comes the mobile responsive menu.
So, here is your first exercise.
Exercise: Mobile Responsive Menu
I want you to build an off-canvas menu for the Dosth Site using the Sidebar and Widget concepts.
Dosth is an App promotion website. There will be so much to promote. It is important to make proper use of the mobile screen real-estate. So, I have decided to go with an off-canvas menu.
And here is what I want you to put inside the off-canvas menu:
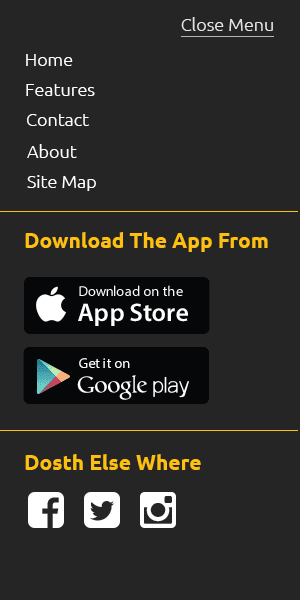
Photoshop mockup is available inside the exercise files.
Off-canvas menu doesn’t always have to contain just a navigation menu. You can put just about anything inside it as long as it makes sense. So, You have to use a dynamic sidebar and a number of widgets to build the content of the above mobile off-canvas element.
Exercise: Site’s responsive styles
I did not take care of Responsive Styles for the Dosth Site because this is a course about Theme Development.
You have to take care of them yourselves and after you are done with the course, I want you to submit the finished theme with responsive styles.
I saved the best for the last.
In the next part, we will take a look at various methods to build the content of the Homepage.


 © 2026 UsableWP. A project by Naresh Devineni.
Hey man, I just wanna say thanks for this tutorial. It the most helpful one I’ve found yet. Great job breaking down each individual task and giving thorough explanation of all the goings on inside the code!