How to add a plugin in WordPress: 3 Reliable Ways and best practises
If you’re in a hurry, read the table of contents below and directly go to the section that satisfies your needs. You don’t have to read the entire article.
There are two easy ways and two slightly hard ways to add a plugin in WordPress.
But no matter what approach you take, to install a WordPress plugin, you need to perform the following three steps:
- First, you need to find the plugin
- Next, you need to download and install the plugin
- Finally, you need to activate the plugin to start using its features.
The approach for performing the above steps will slightly change based on the type of the plugin.
Generally speaking, there are three main types of plugins in WordPress:
- Free plugins
- Premium plugins
- Custom plugins
The approach for installing the premium plugins and custom plugins is the same.
In this article, we will explore how to add any kind of plugin to your WordPress site.
But before that, just to be on the same page…
What is a WordPress Plugin?
A WordPress plugin allows you to extend the functionality of WordPress core software.
In other words, a WordPress plugin lets you have a functionality that WordPress core software doesn’t support by default.
For example, WordPress core software doesn’t support creating a contact form.
We can overcome this limitation by installing a plugin called WPForms.

The “WPForms” plugin extends the functionality of WordPress by helping you create a contact form for your site.
Another example.
By default, there is no way to sell products using WordPress core software.
However, we can overcome this limitation by installing the WooCommerce plugin.

And don’t worry. WordPress makes it really easy to add a plugin to your website.
Come on, let’s see how to do it.
Important: Use a staging site to test the plugin before adding it to the live website
Adding a new plugin to the live site could take the entire site down if the plugin is poorly coded or configured.
Many plugin developers do not follow best practices when coding their plugins.
So, it is not recommended to test the plugin on the live site directly.
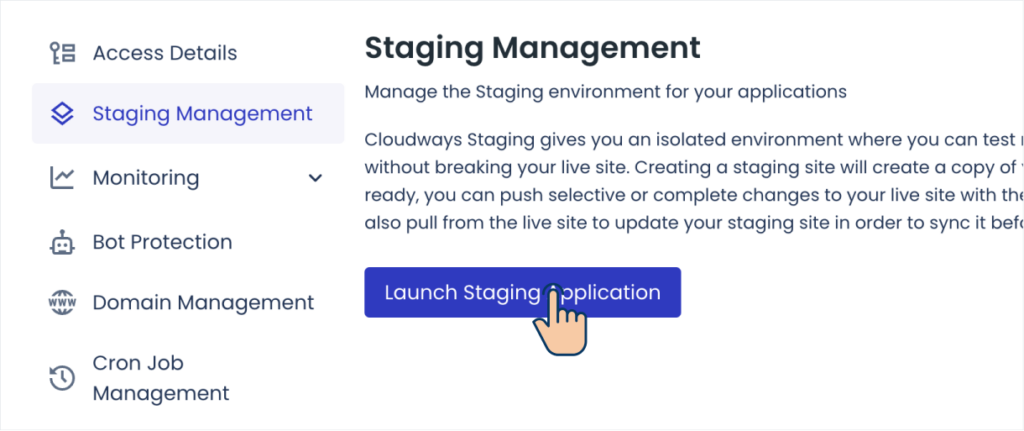
Instead, try out the plugin on a staging site first.
“Hey! What is a staging site?”
A staging site is an exact replica (clone) of your live website. It helps us perform updates, experiments, and optimizations without touching and damaging the live website.
If everything goes well on the staging site, only then I want you to install the plugin on the live site.
“Got it, How do I create this staging site?”
I have written an in-depth article about how to create a staging site.
Come back here after creating a staging site for your live website.
Next…
How to add a free plugin in WordPress
WordPress has an official plugin repository to help you find and download free plugins.
You can find any free plugin by going there.
All developers will upload their free plugins to the official repository because it is easy for the website owners to find and install them.
Having said that, WordPress provides access to this same official plugin repository from within the admin dashboard, too.
This way, you can install any free plugin without leaving the admin dashboard.
Come on, let’s try it out.
We can install any free plugin in four easy steps:
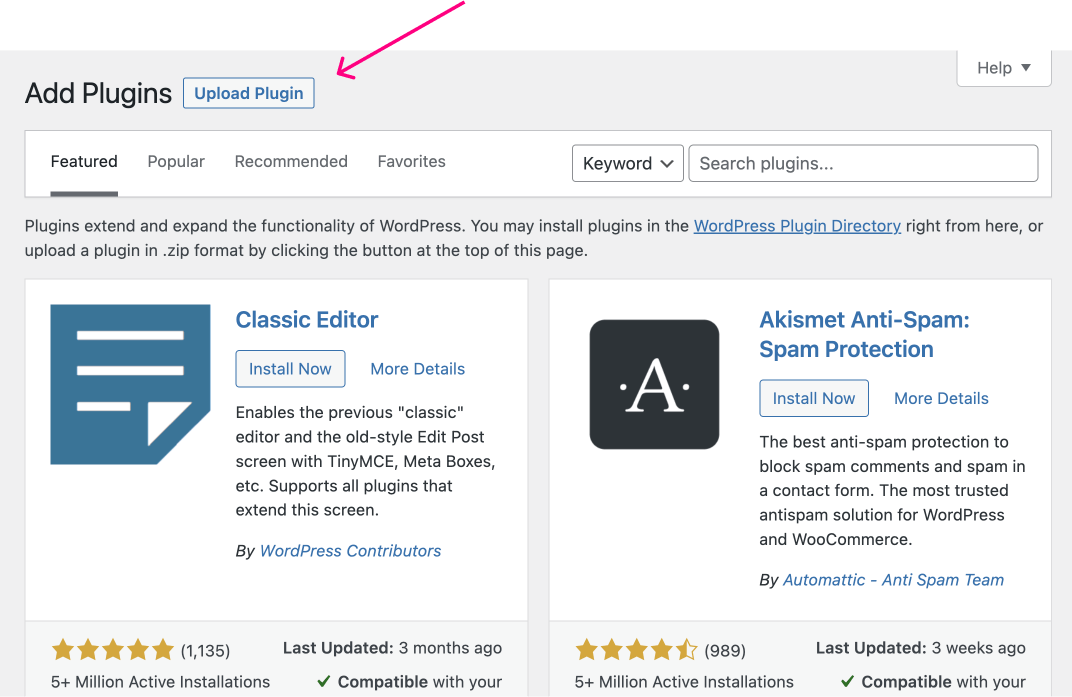
Step 1: Go to the “Plugins” item from the Admin menu and click “Add New Plugin”.
Admin Menu -> Plugins -> Add New Plugin
This will take us to the “Add New Plugin” screen.
Inside it, you can search for a particular plugin based on its functionality or name.

Step 2: Search for the plugin
If you notice, there is a “Search Plugins…” box on the top-right-hand corner of the screen.
You can put a search term in there to find the plugin you need.
The search term could be generic or specific plugin name such as “WPForms”.
For example, if you want to install a plugin to create a contact form, you can use “contact form” as the search term.
It is a generic search term that lists all the plugins that help you create a contact form.

Similarly, if you want to find a plugin that adds additional security measures to your website, you can use “Security” as the search term.
Using these generic search terms will help you find a lot of plugins that give you the functionality you are looking for.
This is a good thing.
But on the negative side, this also means decision fatigue 💡
So, it is recommended to install a plugin that is:
- Highly rated – Read the reviews and see what problems other users are facing
- Has all the features you want – Don’t try to install multiple plugins that do the same job
- Has been receiving regular updates – Just like Core WordPress software, plugins get regular software updates
Not every plugin will have all these qualities.
So, you can filter out a lot of bad plugins using this process.
Some plugin developers do not follow best practices when coding their plugins. So, when you install their plugins, they could break your site.
Read reviews for each plugin before installing them.
Also, you can go with a more specific search term such as a plugin name like “WPForms”.
Anyway, for this article, I want to install the “WP Forms” plugin.

If you notice the above screenshot, it has better ratings and reviews when compared to other contact form plugins.
Step 3: Install the plugin
If you notice, each plugin’s box has an “Install Now” button.
I want to install the “WPForms” plugin, right?
So, I will click the “Install Now” button in the “WPForms” box.

When you click the install button, the plugin will be downloaded from the WordPress.org plugin repository.
That’s why it could take some time to get installed.
You can also read the plugin reviews by clicking the “More Details” button underneath the “Install Now” button.
Finally, once the plugin is installed, the “Install Now” button transforms into the “Activate” button.
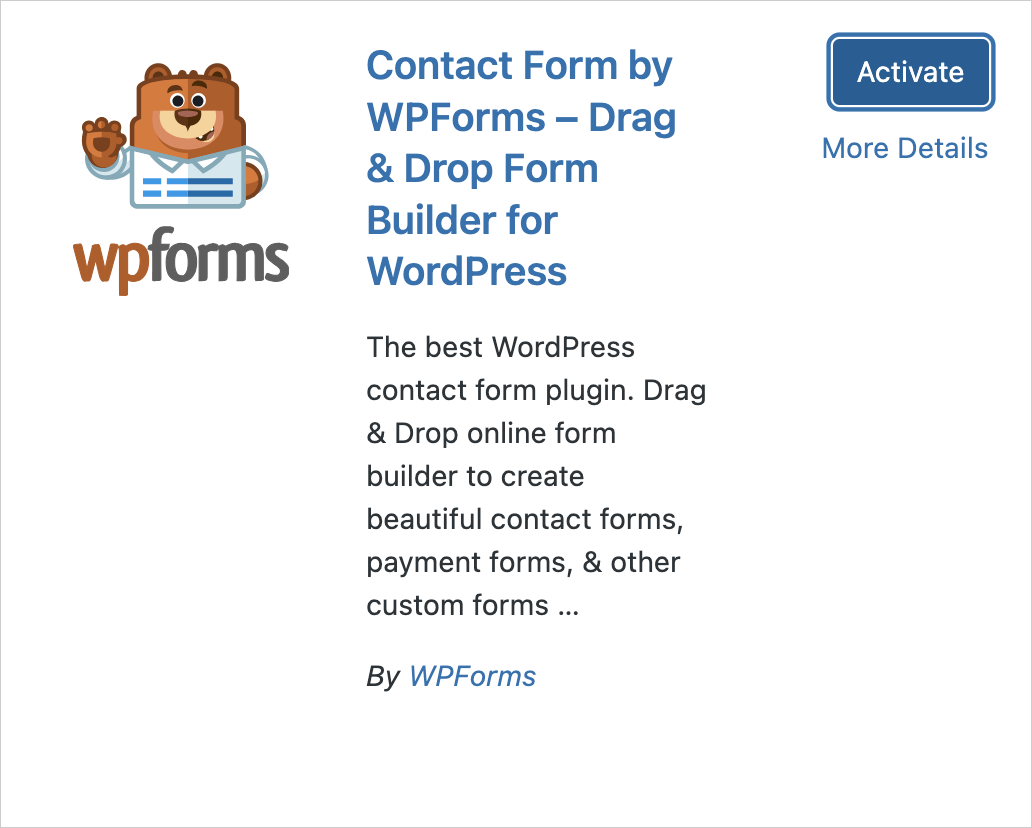
Step 4: Activate the plugin
Installing the plugin is not enough.
You need to activate it to add it to your site.
So, click on the “Activate” button to finish the installation.
That’s all.
How to add a plugin in WordPress manually
The following process applies to custom plugins, free plugins, and premium plugins.
Basically, this technique is all about uploading the plugin file manually to WordPress.
We can achieve this in four easy steps.
(Optional) Step 1: Purchase the premium plugin from its official website or a marketplace like CodeCanyon
If you are not trying to upload a premium plugin, skip this step and go to Step 2.
Premium plugins are not available for download from wordpress.org’s plugin repository.
So, we can not find them using the “Search Plugins” box inside the “Add New Plugins” screen.
This also means that we can’t purchase a premium plugin from within the admin dashboard.
We have to visit an external website where the plugin is being sold officially.
Some premium plugins can be found on CodeCanyon, but usually, developers sell plugins on their own websites.

For example, there is a premium and lightweight social sharing plugin called Novashare.
For me to add the Novashare plugin to my WordPress site:
- First, I need to visit novashare.io.
- Next, I must purchase the plugin by clicking the “Buy Now” button.
- Finally, after the purchase, I need to log into the Novashare site and download the plugin

Also, any WordPress plugin, be it free or premium, it will get downloaded in a compressed file format called .zip extension.
For example, the Novashare plugin was downloaded as novashare.1.4.3.zip file.
Step 2: Upload the WordPress plugin manually to the dashboard
To install and activate a premium plugin, we need to upload the plugin’s zip file to our website manually.
We must go to the “Add New Plugin” screen to do this.
Yep, the same “Add New Plugin” screen that we use to install free plugins.
Only this time, we will use it to upload the premium plugin.
So, go to:
Admin Dashboard -> Plugins -> Add NewAnd click on the “Upload Plugin” button. It is located in the top-left-hand corner.

This will bring up the form for choosing the plugin file from your computer’s file system.
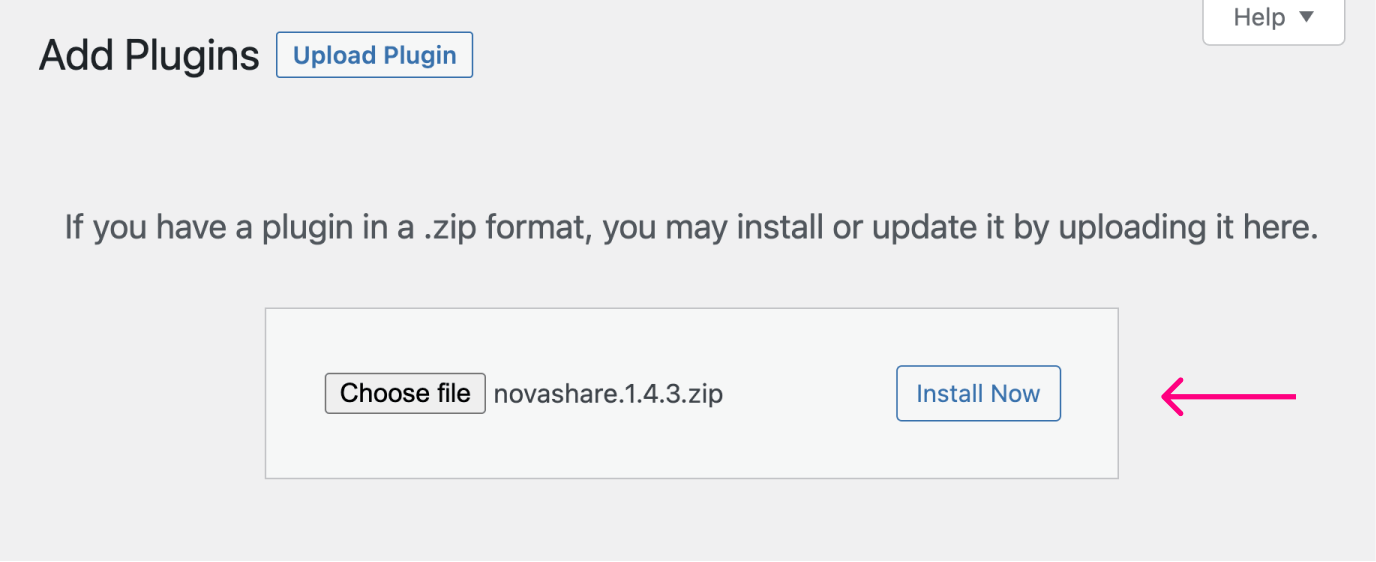
Next, click the “Choose File” button, select the plugin’s zip file, and click the “Install Now” button.
Step 3: Activate the premium plugin
Once the upload is finished, WordPress will install the plugin automatically.
Once the plugin is installed, you’ll be redirected to the screen where you can “Activate” the plugin.

If you see the “Activate Plugin” button, it means the installation is successful. So click on it to activate the plugin.
Step 4: Activate the plugin’s license to receive future updates
Unlike installing a free plugin, we need to perform one additional step to finish activating the premium plugin.
And that is, we need to activate the license for the premium plugin.
The thing is, be it a free plugin or a premium plugin, a plugin is like just any other software.
The plugin developer will release newer versions of the plugin every now and then by fixing bugs and adding new features.
For a free plugin installed, if there is a newer version, WordPress will notify us and let us download the more recent version of the plugin easily.
But if it is a premium plugin, unless we activate the license key, WordPress will not let us download the newer version of the premium plugin.
It will just say that the download failed:
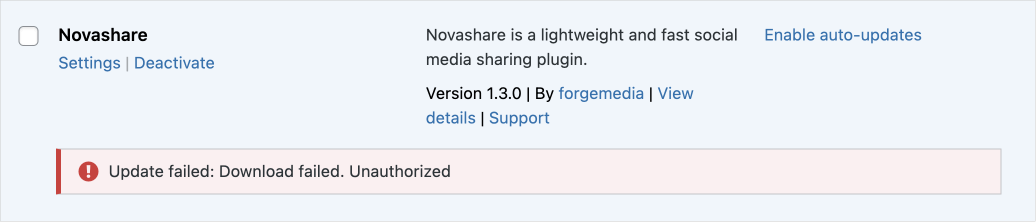
So, we must enter the license key.
Here is how you can do it in five easy steps:
Step 1: Find the “License key” by logging into the site where you have purchased the plugin and copy it
Step 2: Comeback to the admin dashboard of your WordPress website
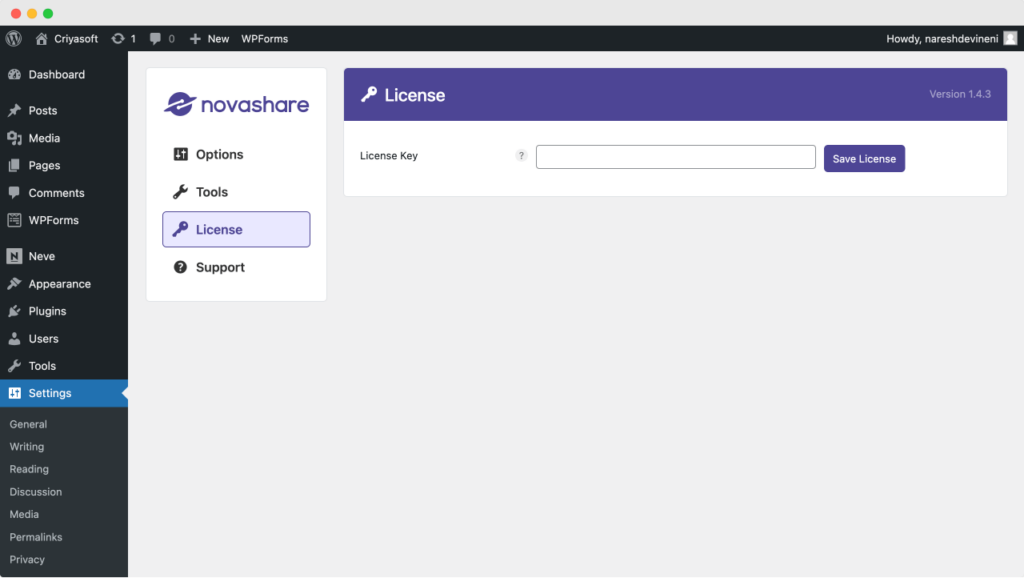
Step 3: Access the settings page of the premium plugin to which you’re trying to activate the license for
Step 4: Find the “License Key” setting and paste the license inside it.
Step 5: Finally, save the changes.
This process could slightly differ from plugin to plugin, but the overall process is similar.
What if we don’t update the plugins at all?
If we don’t update, chances are our site will get hacked.
There are many hackers on the internet waiting to exploit older and vulnerable plugins.
Knowing this, the plugin developers will keep releasing newer versions with security fixes.
So, performing these updates is important, and there is no what if 💡
Sorry to say that.
Add a plugin in WordPress using FTP.
Sometimes, because of the restrictions put by the web host, it becomes impossible to add and upload the plugins via the WordPress Dashboard.
This is especially true for a plugin with a large file size or some security concerns.
If you’re in such a complicated position, it is a good idea to reach out to the web host’s support team to install the plugin for you without going through the following mess :D
If that is not an option, here are a few more “slightly complex” approaches to adding your plugin:
- WP-CLI – Helps us manage the entire WordPress website via the command line. It has special commands to download, install, and manage the individual plugins. You can read more about it here.
- SSH access – Helps us manage the file system of our WordPress website via the command line. Unlike WP-CLI, SSH Access only provides file management.
- FTP/SFTP Access – Helps us manage the file system of our WordPress site using UI tools like FileZilla, Cyberduck, etc. Unlike WP-CLI, FTP Access only provides file management.
The easiest of the above approaches is using the FTP/SFTP Access because we will get an interface for file management. We don’t have to type in code/commands.
So, let’s see how to add a plugin in WordPress via FTP/SFTP.
If you have no clue about FTP/SFTP, I have written an in-depth article just for you: How to access your WordPress website using FTP.
Read the article now and come back here after learning how to access your website files via FTP.
…
…
…
Did you learn FTP and able to connect to your site’s file system?
“Yep! It was easy!”
Cool.
Once you know how to access your website files via FTP, the next step is to upload the plugin.
But before proceeding forward, I want you to understand the WordPress site’s File and Folder structure clearly.
It will help you understand where to upload the plugin.
You can read about it here: WordPress File and Folder Structure.
Come back here only after understanding it.
It will help you avoid unnecessary headaches and messing up things.
If you don’t understand it properly, you could take down the entire website by making petty mistakes such as:
- Uploading the plugin to the wrong directory and expecting it to work
- Deleting important files accidentally
- Editing important files accidentally
- The list is mess-ups is big
You get the idea, right?
…
Come on, take your time.
I am asking again. Did you understand WordPress file structure and how to use FTP?
“Double Yes!”
Nice :)
Next, make sure you have access to the plugin’s zip file and perform the following steps:
- Extract the plugin’s zip file on your personal computer
- Log into your website’s file system via an FTP client like FileZilla
- Access the
pluginsdirectory using FTP - Upload the extracted plugin folder to the
pluginsdirectory - Finally, go to the “Plugins” screen inside the WordPress Dashboard and activate the uploaded plugin
Step 1: Extract the plugin’s zip file on your local computer
For example, I have downloaded a premium plugin called LearnDash and extracted it so that I can access the installation folder of the plugin:

We now have to upload this extracted folder to the plugins directory of your site.
So…
Step 2: Log into your website’s file system via FTP
You should see something like this:

Step 3: Access the plugin directory
Once you have connected to your site via FTP, you’ll find a directory called public_html or www based on the kind of web server your website is hosted on.
Go inside it because all the files related to your WordPress site reside inside it.

Next, find and go inside the wp-content Directory:

The wp-content Directory contains separate directories for:
- Themes
- Plugins
- Uploads such as pdf files, image files, videos, etc.
We are trying to add a plugin to our site, right?
So, go inside the plugins directory:

Once you are inside the plugin directory, you’ll see the currently installed plugins of your WordPress site in the form of directories:

This is where we must upload the extracted plugin folder from Step 1.
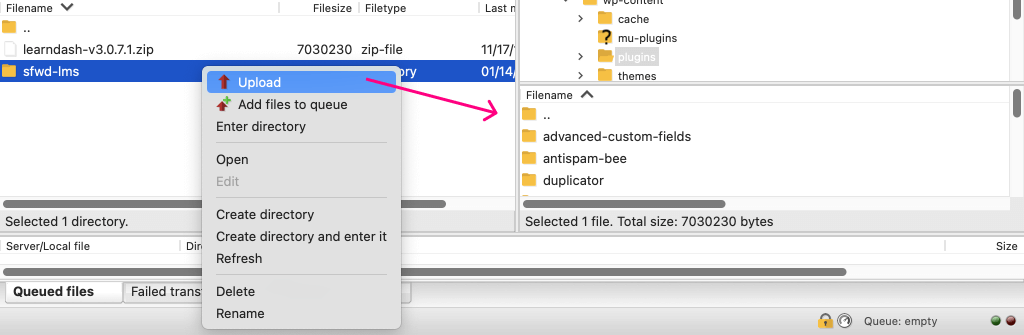
Step 4: Upload the extracted plugin folder to the plugins directory
If you remember, during Step 1, we extracted the plugin’s zip file and got access to the plugin’s installation folder.
We must now upload that folder to the plugins directory from the above step.
So, inside the FTP client, find the plugin folder that you have extracted on your personal computer and upload it to the plugins directory of the website’s file system.
When uploading files using an FTP client like FileZilla, sometimes, all the files are not transferred. Some go missing due to inconsistent internet connection or file permissions.
If that is the case, I don’t recommend uploading the plugin folder via FTP.
If the plugin folder is not uploaded properly, the site will go down by throwing a fatal error.
So, make sure that the entire plugin folder gets uploaded properly.
Only proceed to the next step if you’re 100% sure that all the plugin files got uploaded.
Alternatively, you can log into your site’s file system using SSH and extract the plugin’s zip file using SSH commands.
If you are going with the SSH approach:
- Skip “Step 1” of extracting the plugin’s zip file on your personal computer
- Read this article about how to extract the plugin’s zip file using SSH.
After that…
Step 5: Go to the “Plugins” screen inside the WordPress Dashboard and activate the extracted plugin
Once the plugin’s folder is uploaded to the plugins directory, it appears as a deactivated plugin inside the “Plugins” screen of your Admin Dashboard.
So, go to:
Admin Dashboard -> Plugins
And finally, click on the “Activate” button to finish adding the plugin to your WordPress site.
That’s all for now.
I hope this helped you learn how to add a plugin in WordPress.
I will see you in the next article.


 © 2026 UsableWP. A project by Naresh Devineni.