How to create a WordPress staging site: 2 reliable and easy ways
Published By Naresh Devineni
and last updated On August 27th, 2025
Before we understand how to create a WordPress staging site, let’s understand…
What is a WordPress staging website?
A staging website is a replica or clone of the live website.
We create a staging version of our live website to:
Test out new plugins and features.
Check if the website works as expected after performing updates related to the Core WordPress software, theme, and plugins.
For troubleshooting why something went wrong with your website and fixing it.
You can also call the live site as the “Production” site.
They both mean the same thing.
If you prefer an analogy, a staging website is more like a lab rat that goes through a lot of medical experiments for us.
Most medications are only released to humans if they show positive results on animals.
Similarly, if everything goes well on the staging site, only then you should perform those changes on the production website.
How does a WordPress staging site work?
A staging site is created by cloning the files and the database of the production website into a staging environment.
This way, your staging site looks and functions exactly like the production site.
Because of this, if an update or troubleshooting ended up in a positive result on a staging site, you can expect the same positive results by performing the same actions on the production site as well.
Also, to log into the WP Admin dashboard of the staging site, you can use the same Admin login credentials that you use for logging into the production site.
“Got it. But creating a staging site looks like a lot of work, Bro. Is it really important that I test updates on a staging site first?”
Haha, I understand.
YES, it is important that you need test updates on a staging site first.
But NO, it is not a lot of work.
There are tools out there to help you create staging sites in an easy and less time-consuming way.
Skip to the “How to” parts of this article if you already have strong reasons for creating a WordPress staging site.
The need for a WordPress staging site
Updates can break your website
A WordPress site has a busy ecosystem that receives regular updates for:
WordPress core software
Plugins
Themes
PHP programming language
Usually, there are a few good reasons behind every update released:
New features
Bug fixes
Security fixes
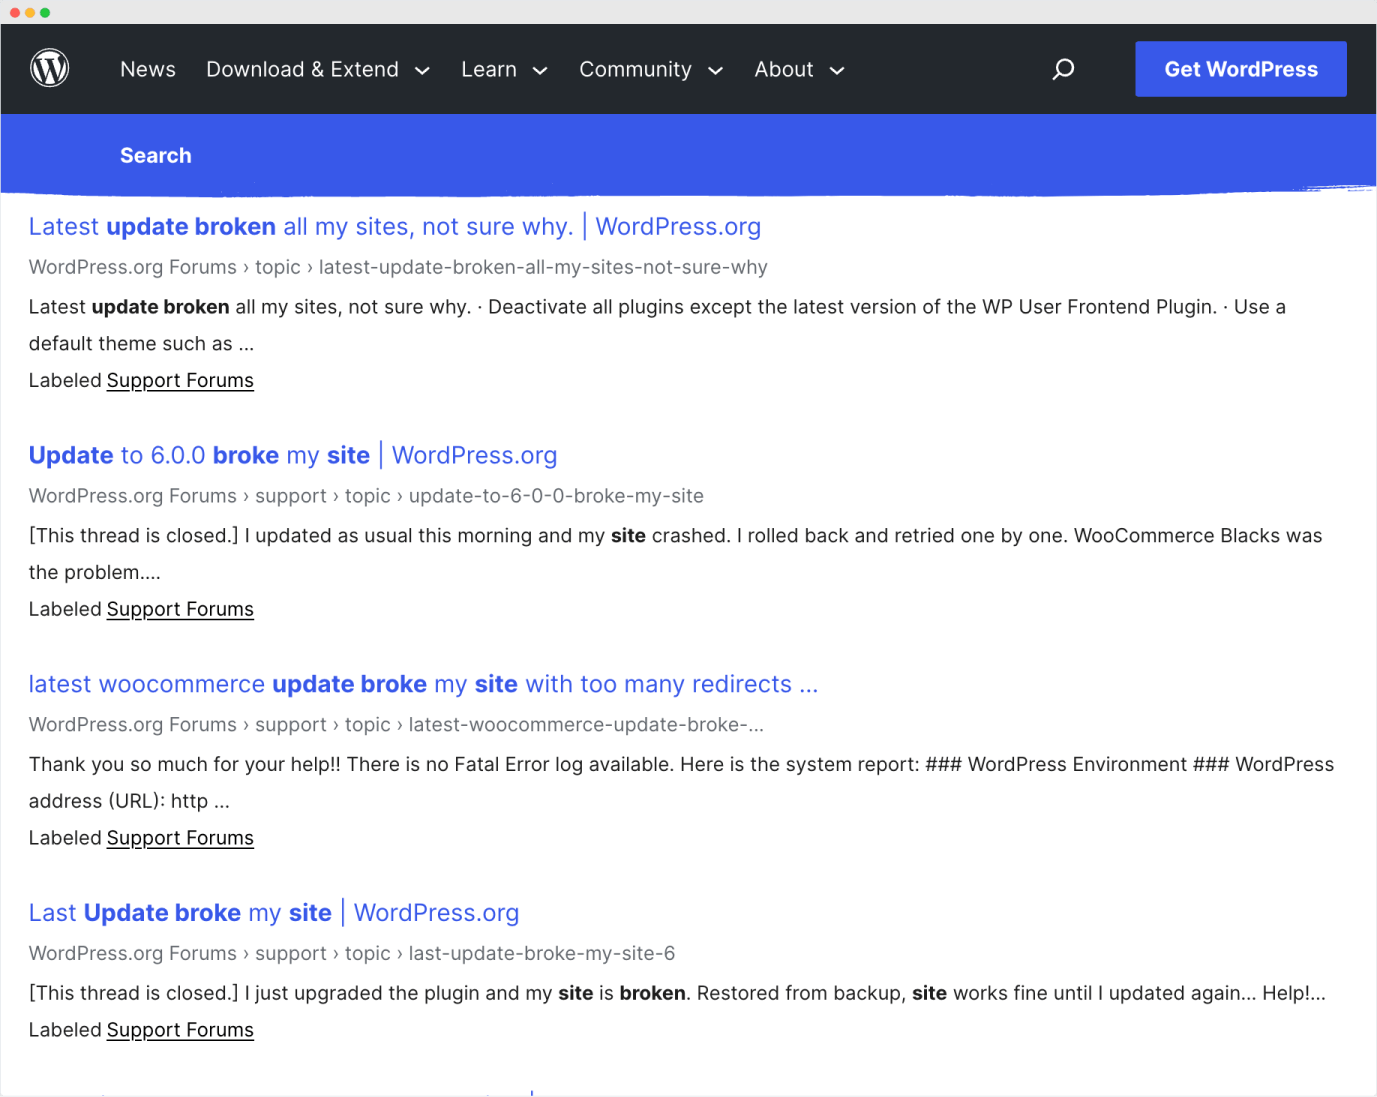
The thing is, each of these above updates could easily break your site and throw errors.
Or they could change the look and feel of your website in a negative way.
Compatibility issues between all parts of the ecosystem are the primary reason behind this.
For example, the “The Events Calendar” plugin’s 6.0 update was a major update, and most websites suffered from errors and design changes on the front end.
While the plugin caused the design changes on the frontend, the active child theme on the client’s site was coded poorly and was using a lot of deprecated code from the Event Calendar plugin.
So, this ended up costing the client a lot of frustration and money to get things back on track while restoring the previous design.
If the update was initially tested on a staging site, the client could have saved a lot of frustration.
So, use a staging site.
New plugin activations can break your site
As a website owner or developer, you might end up adding new plugins for new functionality.
These new plugins could easily break your website:
If they are poorly coded
If they are not compatible with the active theme, other plugins, or the PHP version
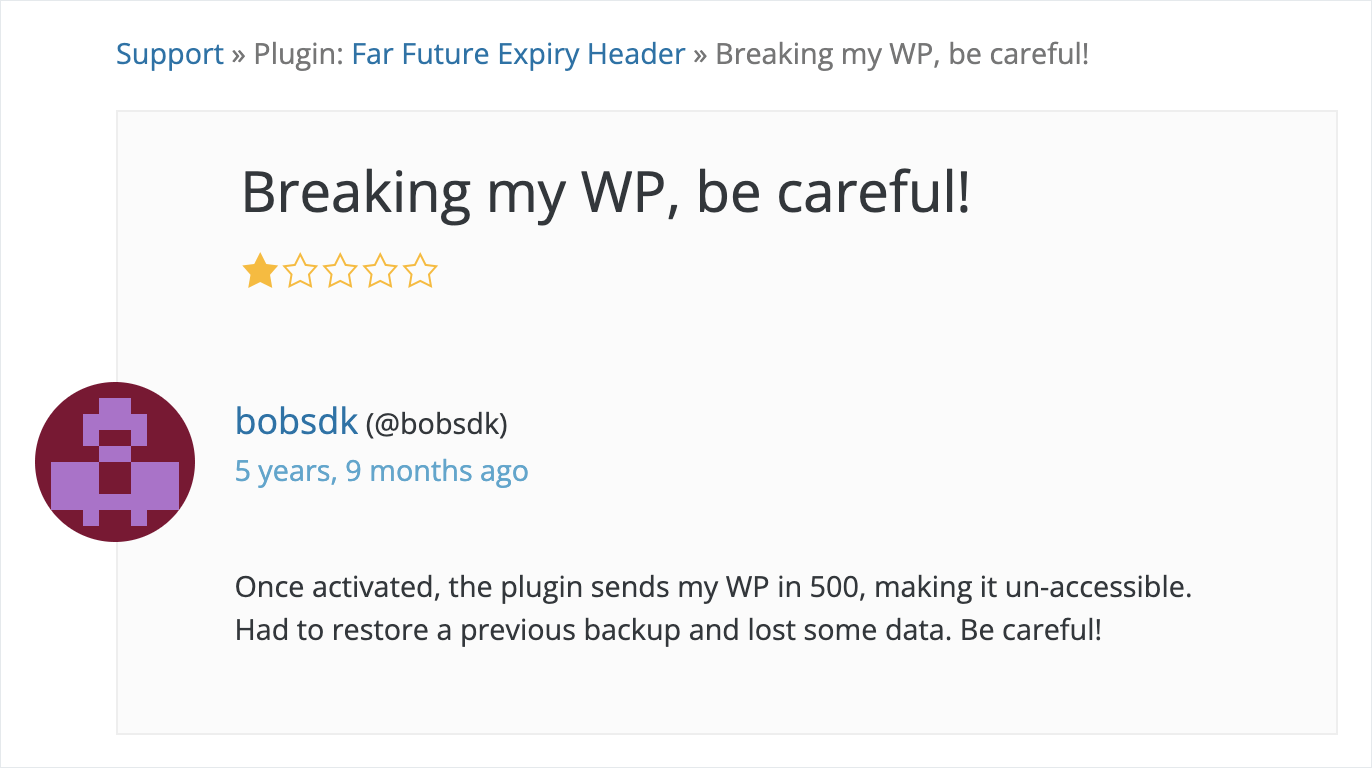
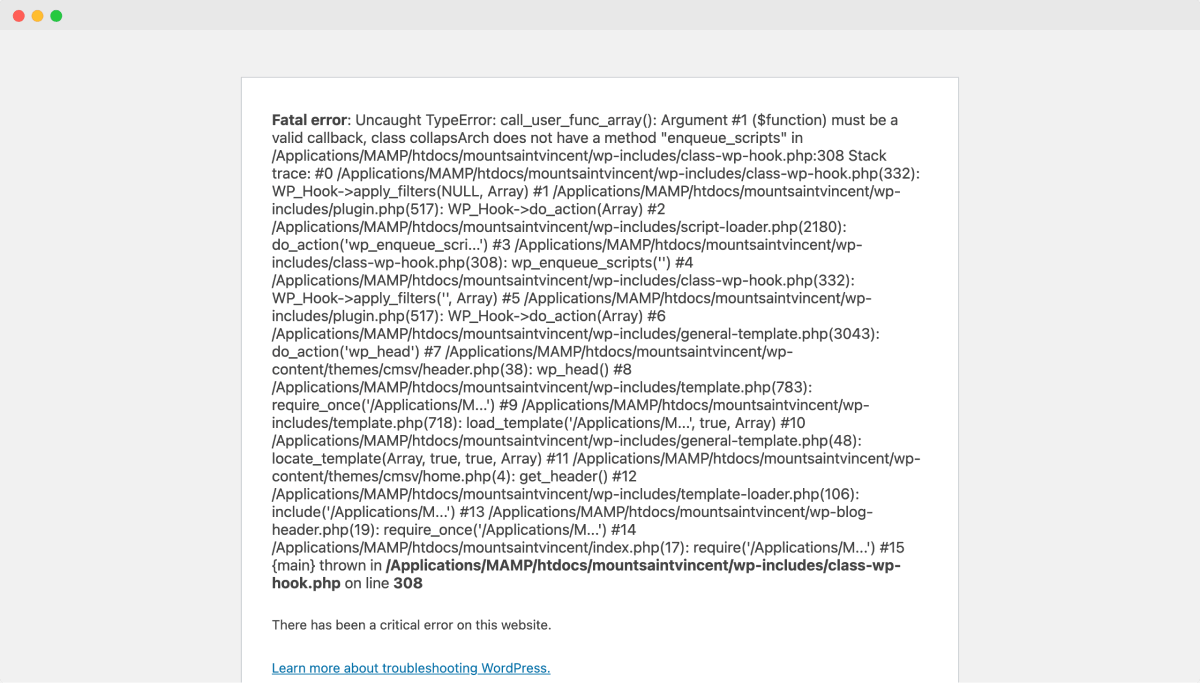
For example, one of my clients installed the “Far Future Expiry Header” plugin to optimize their website.
But, after enabling one of its settings, the website started throwing a “500 internal server” error.
Again, this cost the client a lot of frustration and money, and website visitors lost trust in the site.
If the client tested the plugin on a staging area first, she could have saved a lot of frustration and money.
So, set up a staging site.
Troubleshooting could result in loss of functionality and content
If there is an error on your website or something is not working as expected, if you perform troubleshooting on your production website, you could end up losing the critical functionality and data of your website.
This is because troubleshooting a WordPress site involves:
Deactivating the plugins
Switching to a default theme
Deleting plugins that you could have used for adding website content
All these activities are data and functionality destruction activities.
So, it is recommended to perform these activities on a staging site and fix the issue on it and only then apply the same fix on the production site.
I once recklessly performed a troubleshooting on the production site, and it caused the client a lot of headaches.
For example, I deactivated a plugin, and this resulted in bringing back the shop functionality for the visitors. So, the client ended up receiving orders that he couldn’t deliver. I ended up losing the client in a bitter way.
Using a staging environment could have avoided this mess-up in the first place.
So, use a staging site.
Switching themes could result in a loss of content on the website
It is a given fact that a website’s design will change when we switch to a different theme. This is totally fine because the whole purpose of changing the theme is to change the design of the website.
Having said that, a theme should never deal with the content of the website.
But, unfortunately, most third-party themes deal with the content by forcing:
Proprietary page builders
Site layout and content design are solely based on theme options and widgets.
If you’re dealing with one such theme, you must switch or update the theme on a staging site to see what kind of content are you losing.
This way, you could save that content somewhere and only then perform the update on the production site.
There are many other stories that I can share, but I hope you understand the importance of having a WordPress staging environment because it will save you a lot of time, money, and frustration.
Next, let’s see ways to make a WordPress staging site.
There are many methods, actually
Use the staging feature provided by your current web hosting company – Easiest, fastest, and free.
Use a third-party hosting service like InstaWP – Easy and reliable. Might not be free and takes time.
Based on your requirements, all of these methods are useful to create your WordPress staging site.
So, you be the judge of your requirements and follow the appropriate method. If one method doesn’t work out for you, try out another method.
Alright, enough theory!
Come on, let’s learn how to implement these methods in a detailed way.
Using your web hosting company to create a staging site
Hands down, this is the easiest, fastest, and totally free way to create a staging site with the help of your web hosting company.
Most web hosting companies make it really easy to create a staging version of your website.
It is the least time-consuming way because cloning your website files and database on the same web host takes less than 10 minutes.
“Bro! It looks like my web host doesn’t provide a staging site feature. What should I do?”
I am really sorry to hear that.
If your web host doesn’t provide a staging feature, I strongly recommend getting a web host with a reliable staging feature. It saves you a lot of time, stress, and money in the long run.
I have tried many web hosts, but these are the only hosting companies that have the most reliable staging site creation features:
I had a bad experience with every other hosting company. So, try to host your site on one of the above hosting companies.
“Got it. But I am not really in a position where I could change the hosting company. What should I do?”
Then skip this section and jump to the “Use a third-party hosting service for creating a staging site” section on this page. It is another least expensive, easy and reliable way.
“Sure, going there :)”
Nice!
For those of you who are still here, I will now show you how to create a WordPress staging site on the two most popular WordPress hosting services ( assuming your website is hosted on one of these ):
Bluehost
Siteground
WPEngine
Cloudways
If your hosting company is different, you can easily find your staging guide by typing “How to create a staging site on [put your hosting company name here]”.
How to create a WordPress staging site on Bluehost
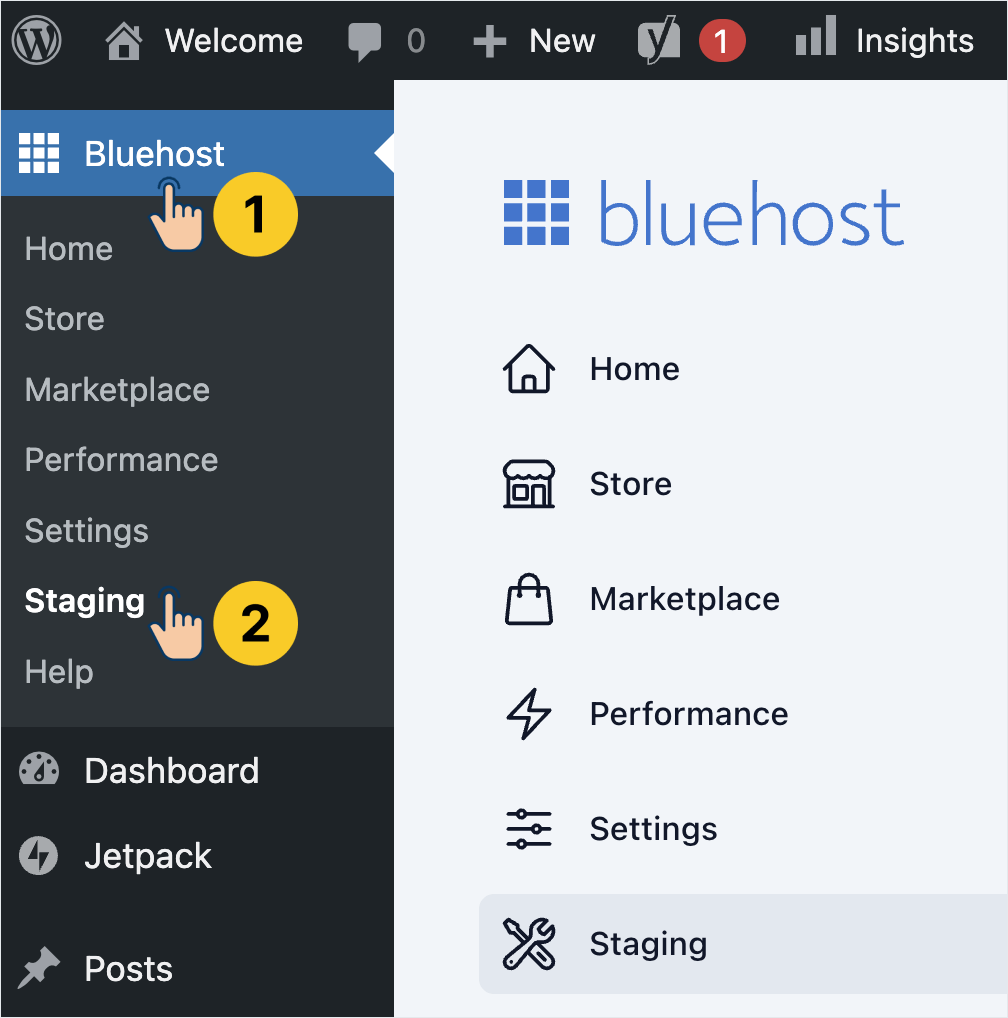
To create a staging site on Bluehost, make sure you’re logged inside your WordPress admin dashboard.
Once you are logged in, from the Admin menu on the left, go to “Bluehost” and then click on “Staging”:
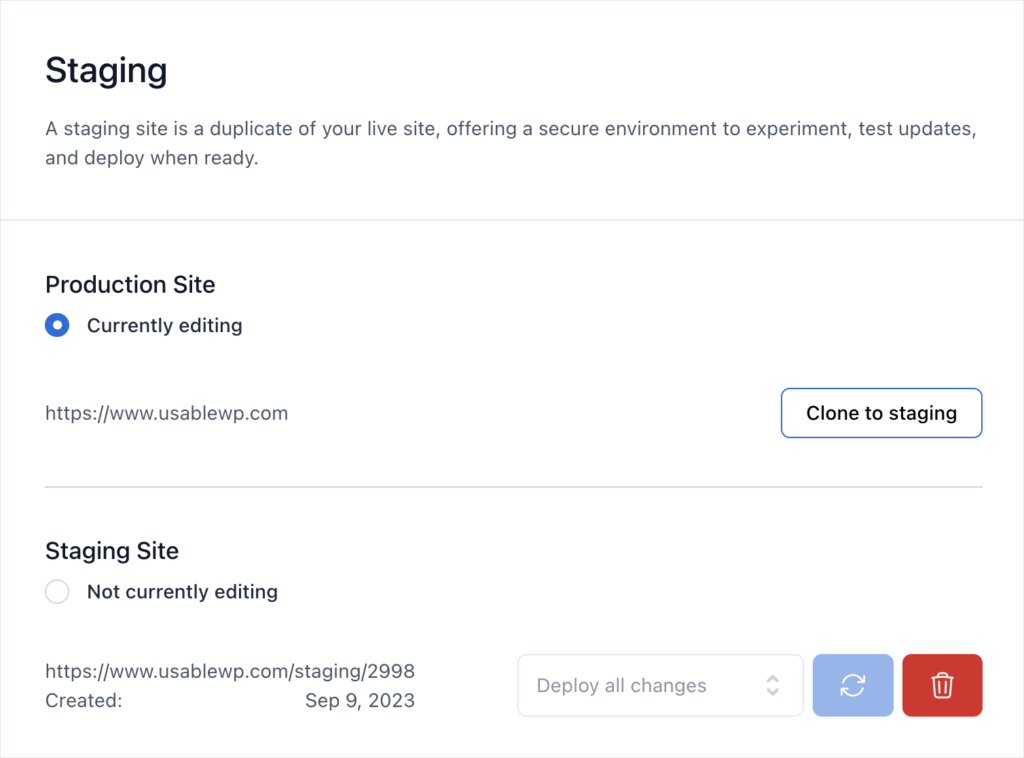
This will now take us to the “Staging” screen.
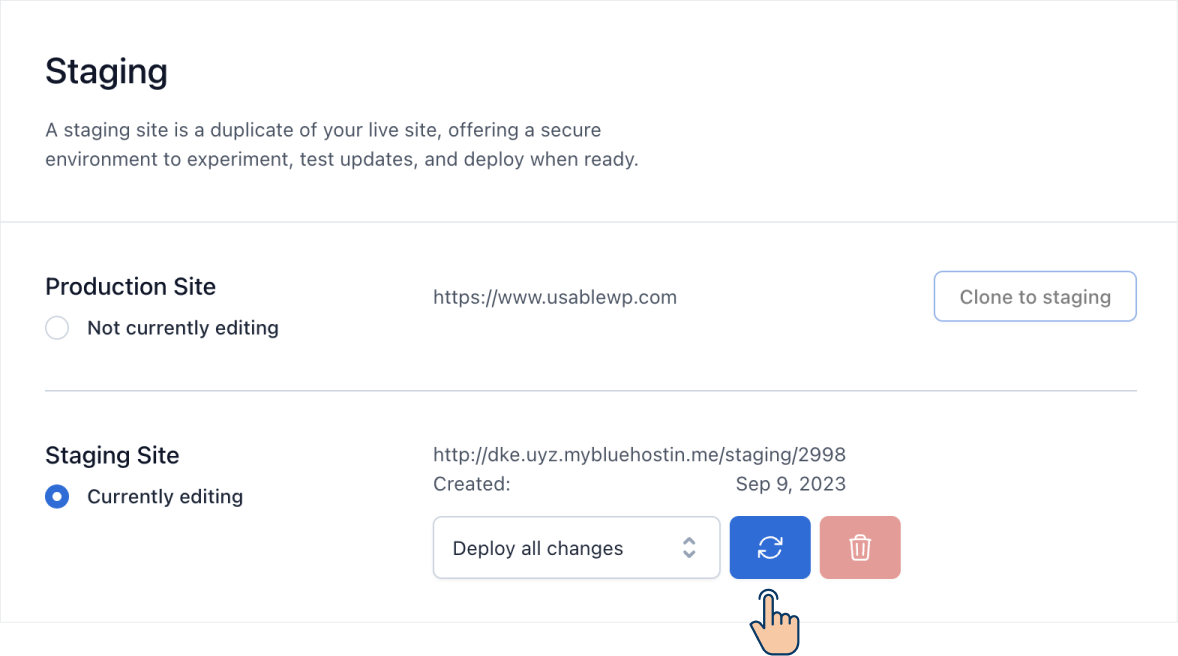
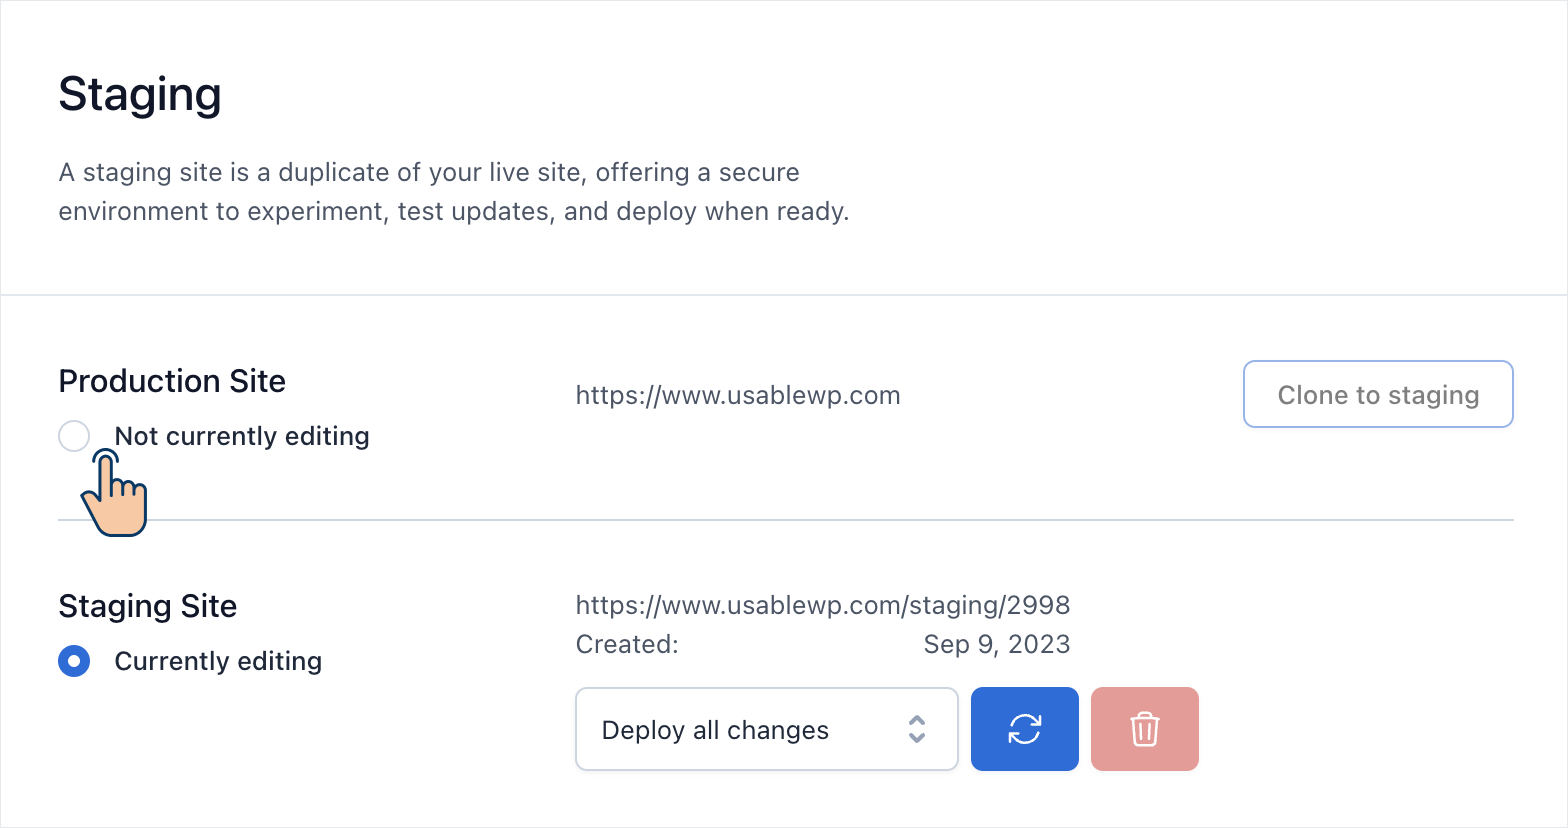
If you notice the “Staging” screen, it has two sections:
Production Site
Staging Site
Anyway, inside the “Staging Site” section, there is a button called “Creating staging site”.
Click on it to create a staging version of your “Production” website.
That’s all. You’re staging site is now created.
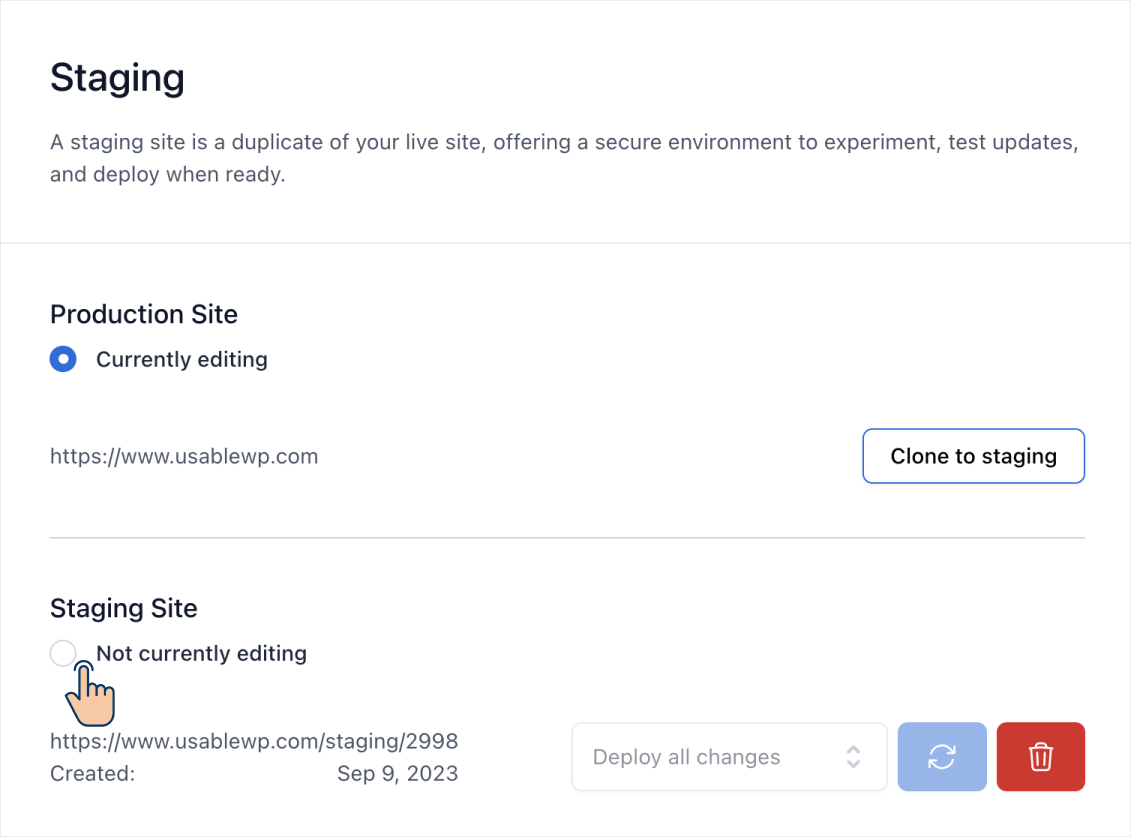
Finally, we need to switch to the staging site to start working on it.
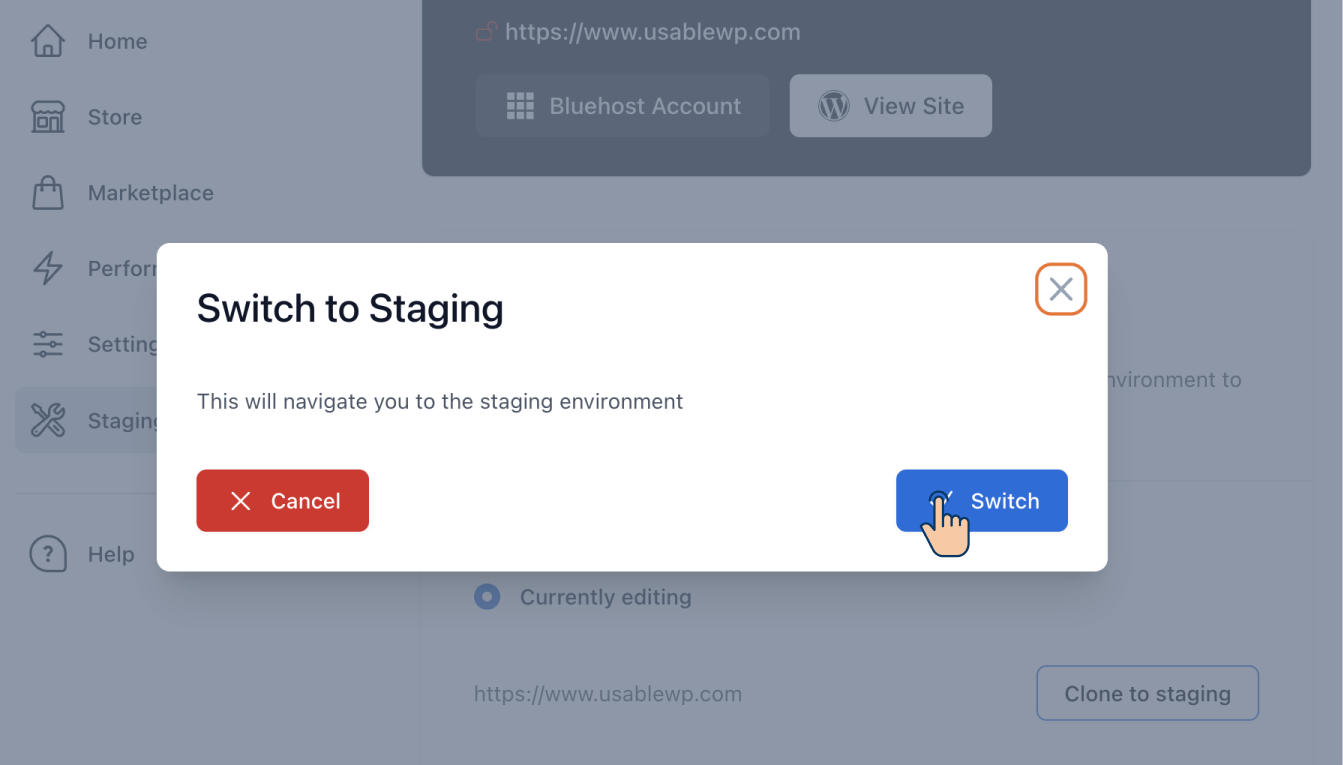
To achieve this, click on the “Not currently editing” option under the “Staging site” section:
This will now open up a popup asking to “Switch to Staging”:
Click on the “Switch” button to switch to the staging version of your production website.
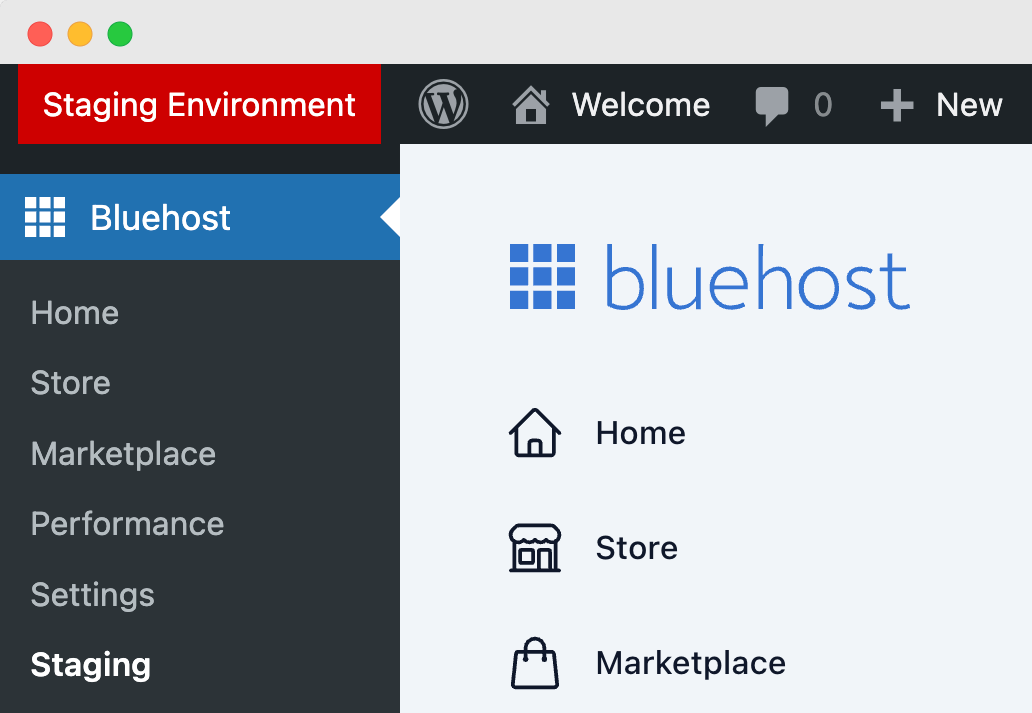
Once the switch is complete, you’ll see a bright red “Staging Environment” badge on the top-left-hand corner of your WordPress dashboard.
This means you have now successfully switched to a staging site, and you can now start playing with your WordPress website without worrying about disturbing the production version of the website.
Bluehost: How to push changes from the staging site to the production website
Once you’re done playing, if you want to apply the changes you made on the “Staging site” to the “Production website”, you can do so in four easy steps:
Step 1: Click on “Bluehost” from the Admin menu on the left and then click on “Staging”
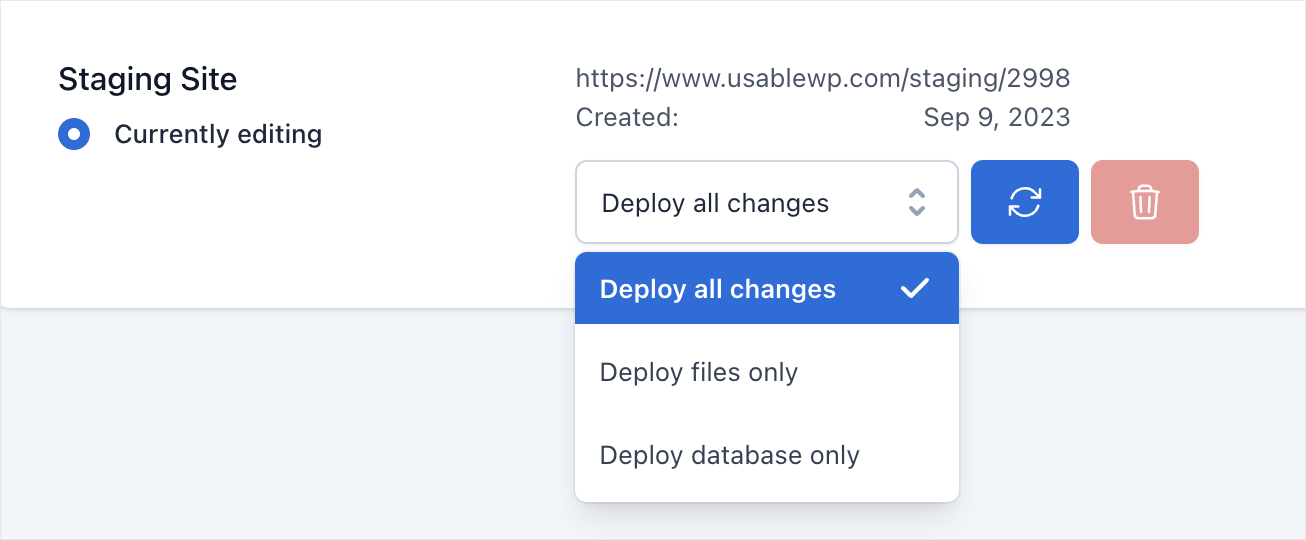
Step 2: Next, under the “Staging site” section on the right, choose the appropriate deployment option.
If you want to push all the changes to the production site, choose the “Deploy all changes” option.
But sometimes, you might not want to push all the changes to the production website.
Perhaps, you only made a few file changes on the staging site,and you want those file changes to reflect on the production site. If that is the case, choose the “Deploy files only” option.
Or you might have just performed some operations on the database. If that is the case, choose the “Deploy database only” option.
Finally, no matter what deploy option you choose, click on the “Deploy site” button to push the changes you made on the “Staging site” to the “Production website”.
Also, please remember not to use the “Deploy all changes” or “Deploy database only” option if you’re running an eCommerce store or any website that involves tracking user data.
The thing is, While you were working on the staging site, chances are you could have received a new order on the production website, and you could easily erase that order.
So, if you’re running any eCommerce store, I recommend updating the production site manually by remembering the changes you made on the staging site. More on this later.
Anyway, that’s how easy it is to operate a staging site on Bluehost.
Bluehost: How to switch back to editing the production site
Once you are done working with the staging site, don’t forget to switch back to the production site’s dashboard again.
If you don’t do it, you will keep working on the staging site by thinking you’re working on the production site, and you could lose your work.
So, you need to switch back to the production site.
You can switch back to editing the production site by clicking on the “Not currently editing” option inside the “Production site” section.
As soon as click on that option, a popup will rise up saying, “Switch to production”.
Click on the “Switch” button to switch to the production site.
Bluehost: Make sure the staging site is up-to-date with the production site when you start re-working on the staging site
Now let’s just say that one month has passed, and you made a lot of changes on the production website during this one month.
But suddenly, some issue occurred, and you want to troubleshoot it on the staging site.
As usual, you will come to the “Staging” screen:
Next, instead of switching to the “Staging Site” directly, first, click on the “Clone to staging” button to push the updated production site’s content to the staging site and then switch to the “Staging Site”.
This will make sure you’re working with the latest version of the production site on the staging environment.
If you’re working with the outdated version of the production site on the staging site, the updates or troubleshooting might not produce accurate results and diagnosis.
So, always make sure that the staging site is up-to-date with the production site.
For some reason, if the Bluehost staging feature didn’t clone your production website as is or not working as expected, don’t worry.
It is a common issue, and I would recommend creating a staging site using third-party server providers such as InstaWP or Cloudways. More on this later as well.
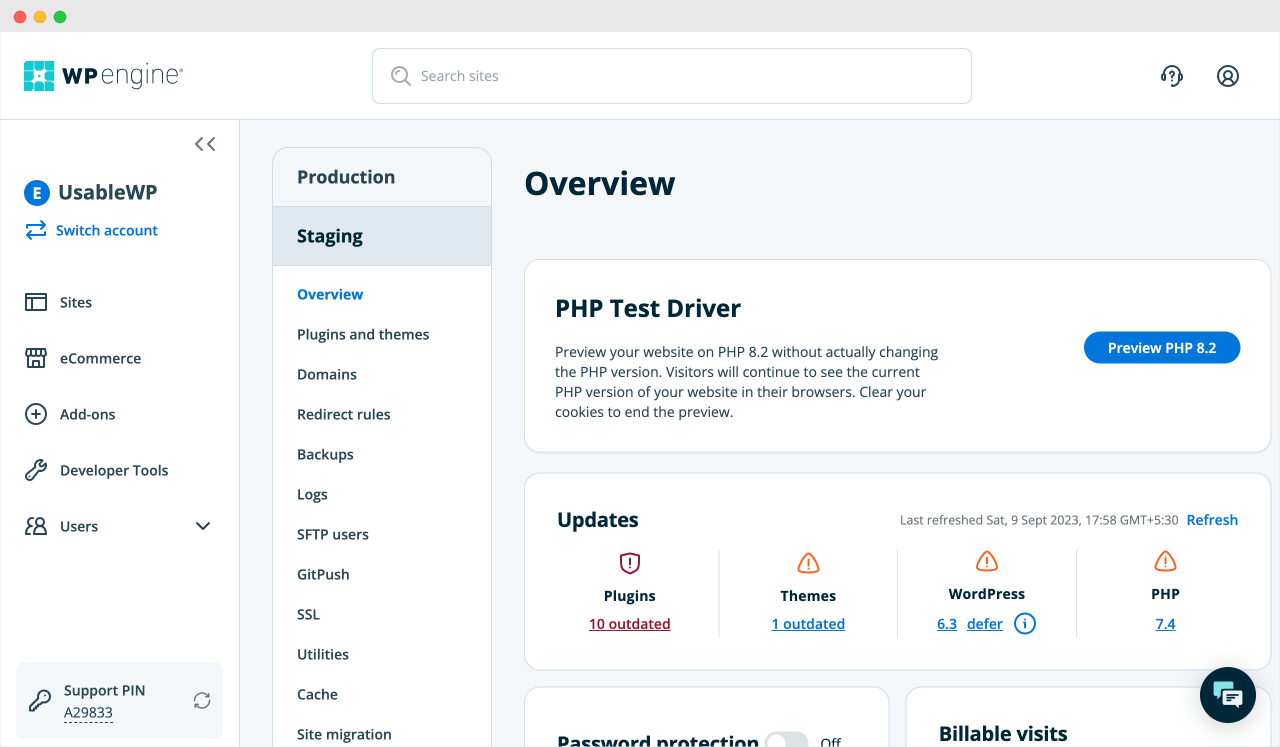
WPEngine: How to create a WordPress staging site
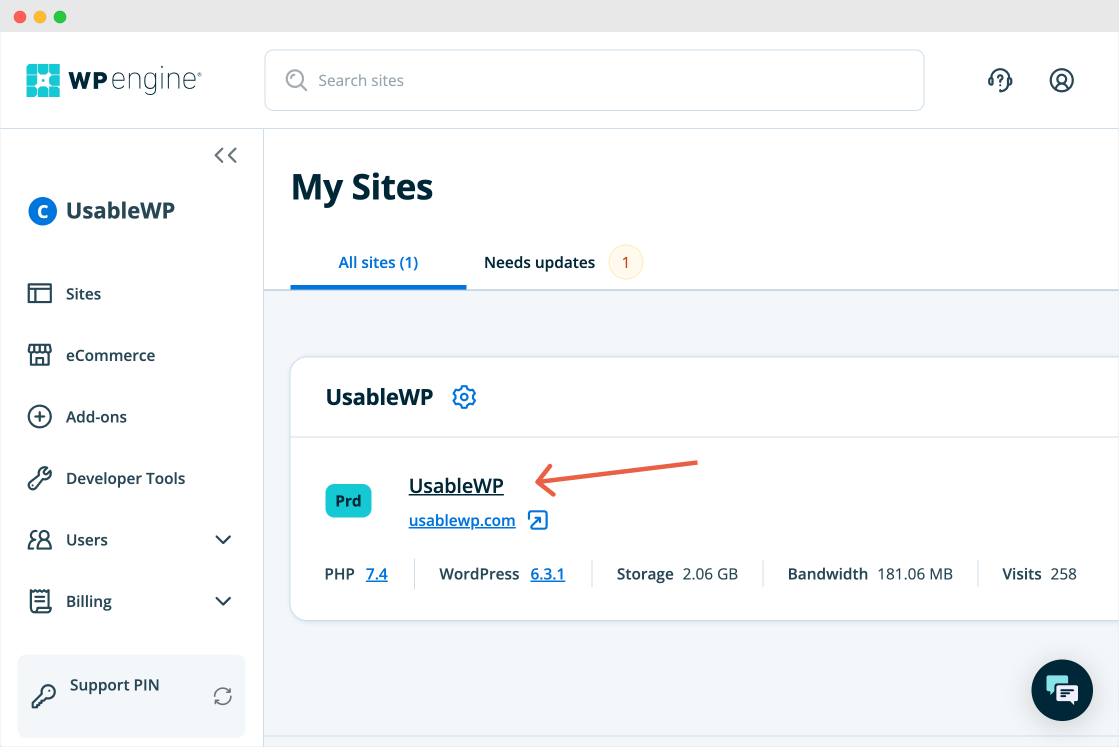
To create a staging site on WPEngine, make sure you’re logged inside your WPEngine’s dashboard:
Next, click on the “Site Label” that is located right above the domain name.
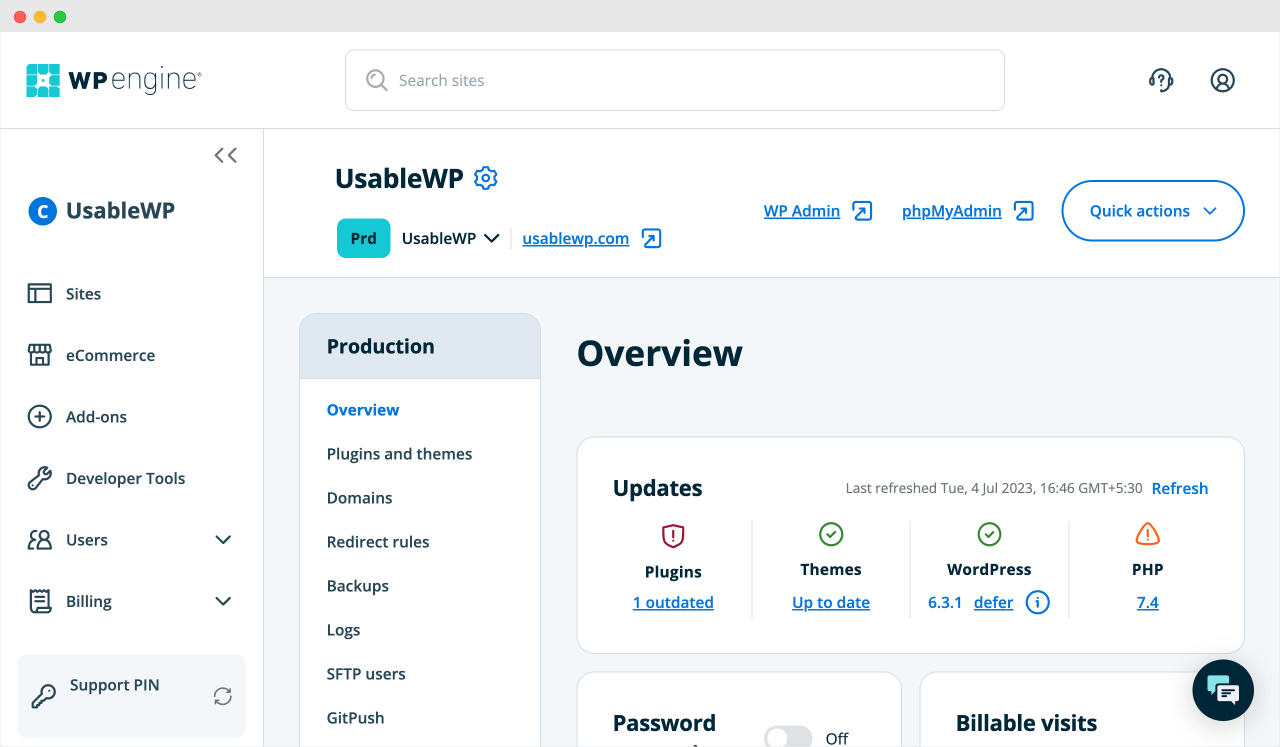
This will take us to the “Overview” page of the “Production” site.
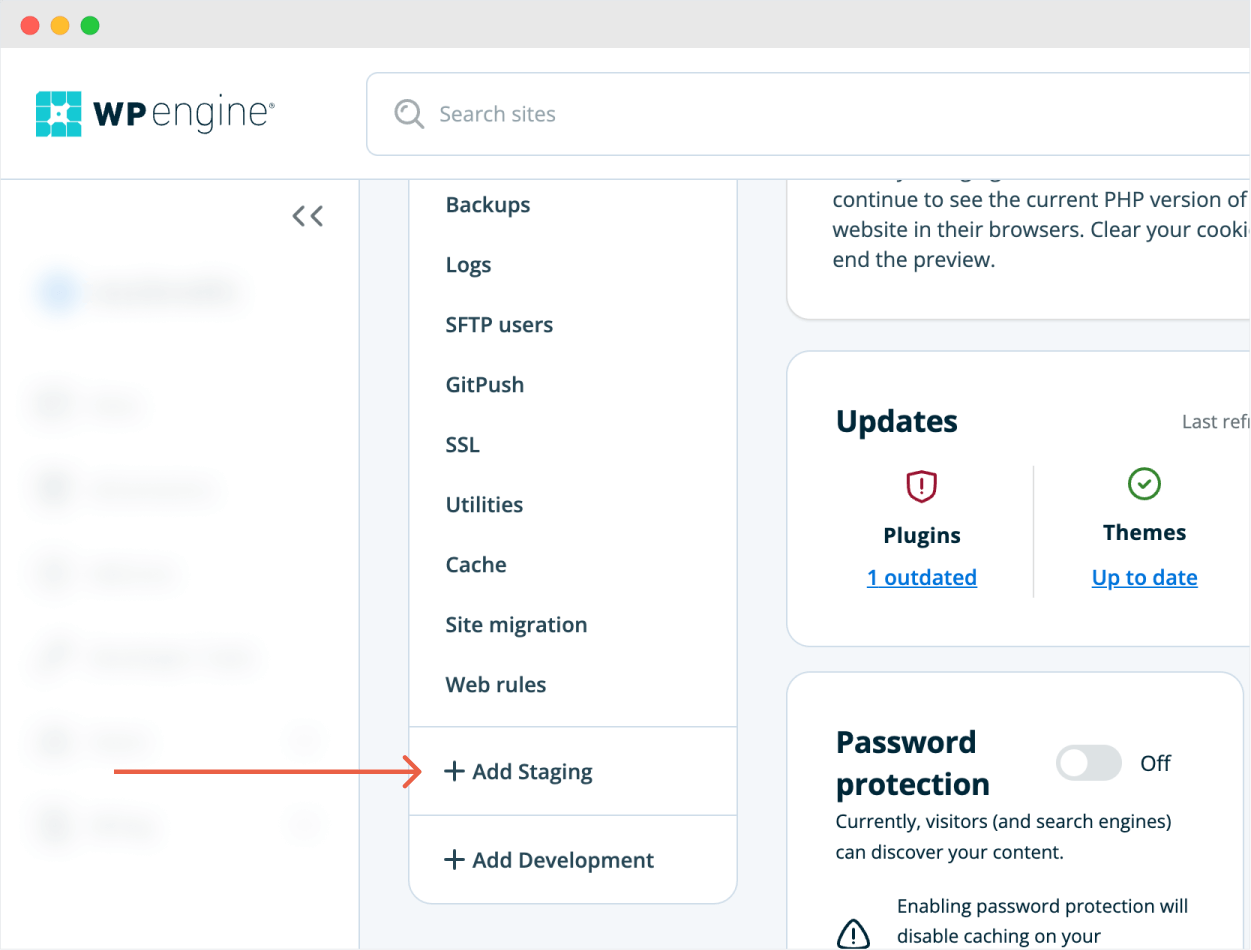
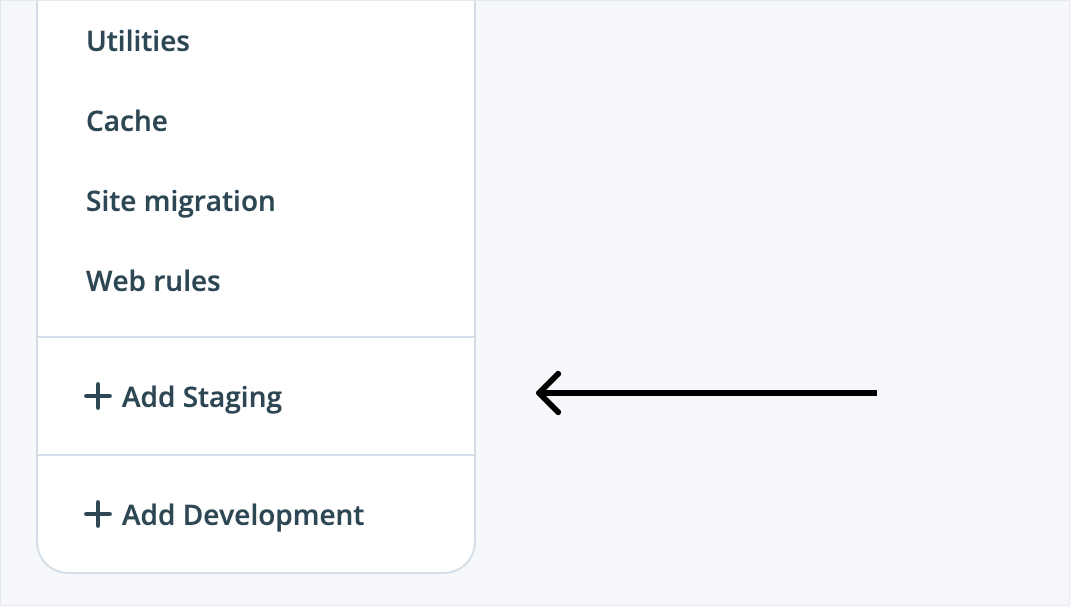
And if you notice, there is a navigation sidebar next to the “Overview” title.
If you scroll down just a bit on the overview page, on the navigation sidebar, you’ll notice a button that says “Add Staging”:
WPEngine allows us to create three website environments by default:
Production environment
Staging environment
Development environment
When you created your site with WPEngine, it automatically created the “Production” environment for us. Our production site is currently living inside the “Production” environment.
But creating the “Staging” or “Development” environment is totally up to us.
As of now, we need to create the “Staging” version of our production website, right?
We can achieve this in two easy steps:
First, we need to create the “Staging environment”.
And then copy the production site to it.
So, click on the “Add Staging” button to create the “Staging” environment.
This will now take us to the staging site configuration page:
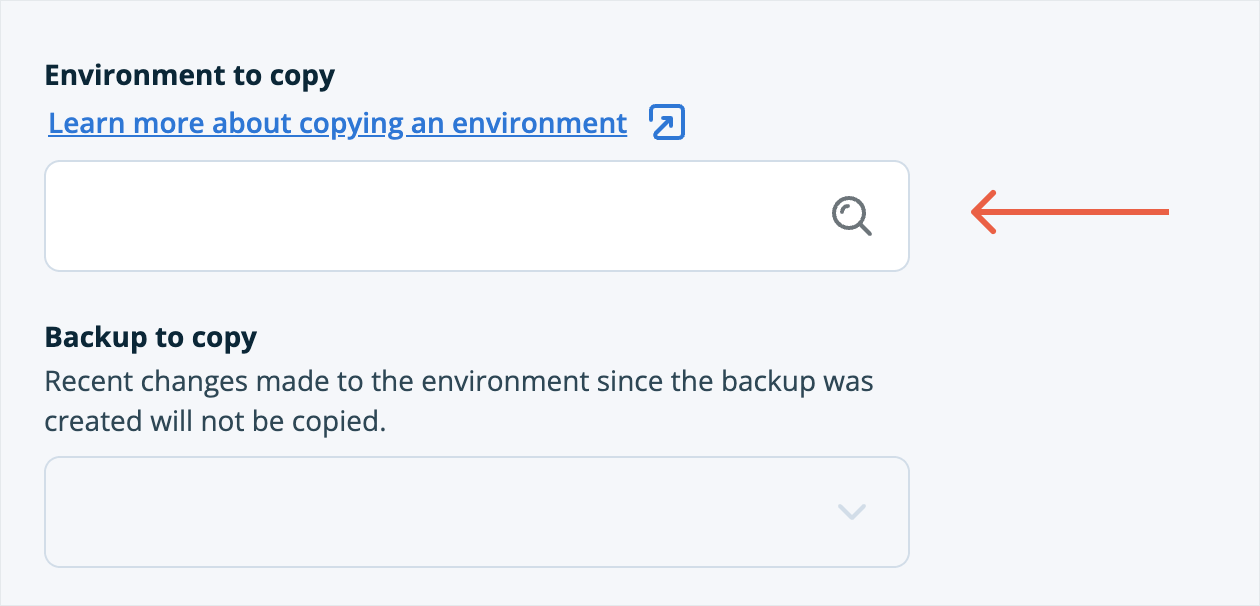
Next, click on the “Copy an existing environment to this site” box and scroll down to the “Environment to copy” option:
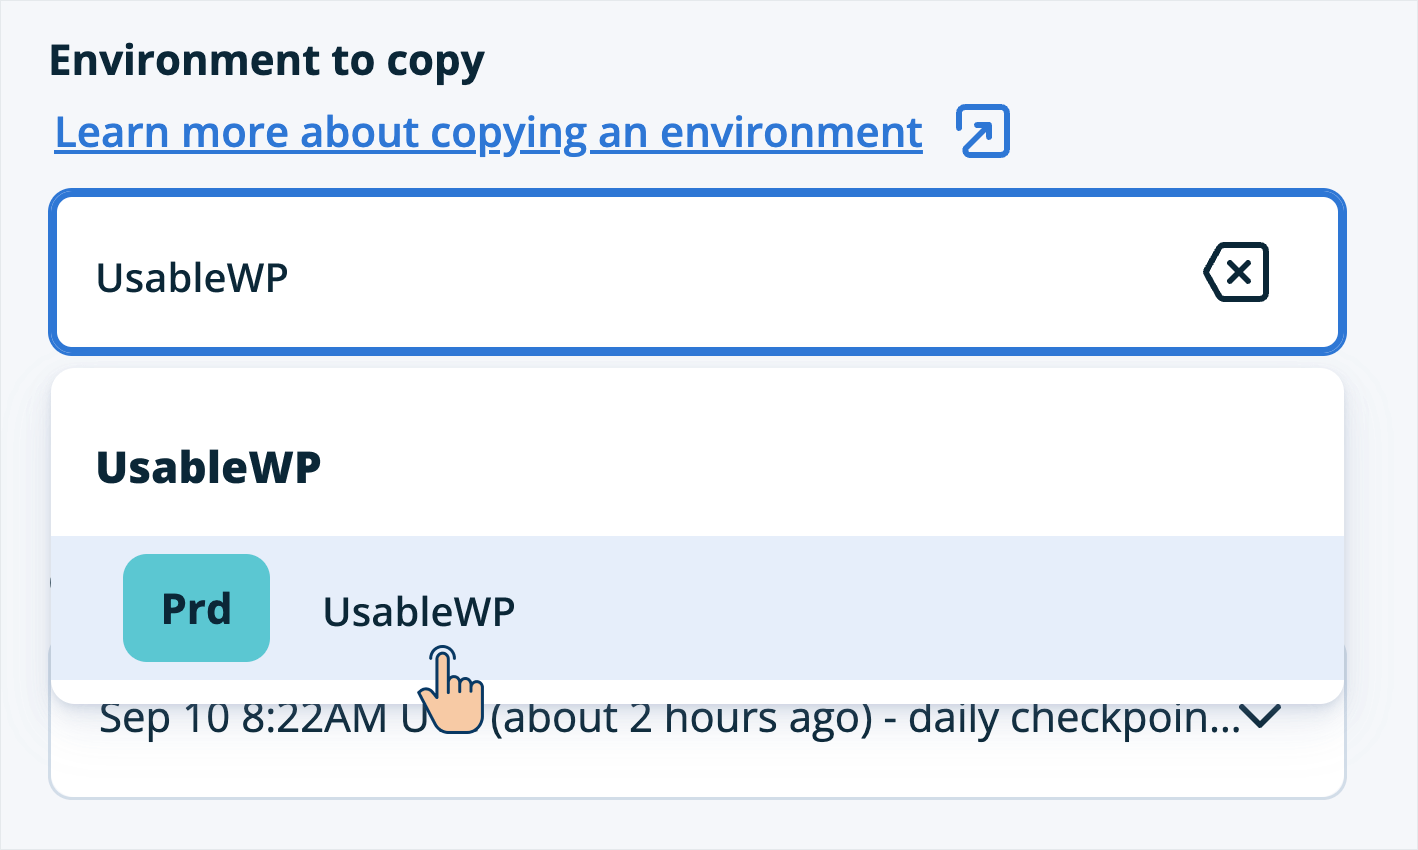
Now, to create a staging version of the production site, we need to copy the “Production Environment” to the “Staging Environment”.
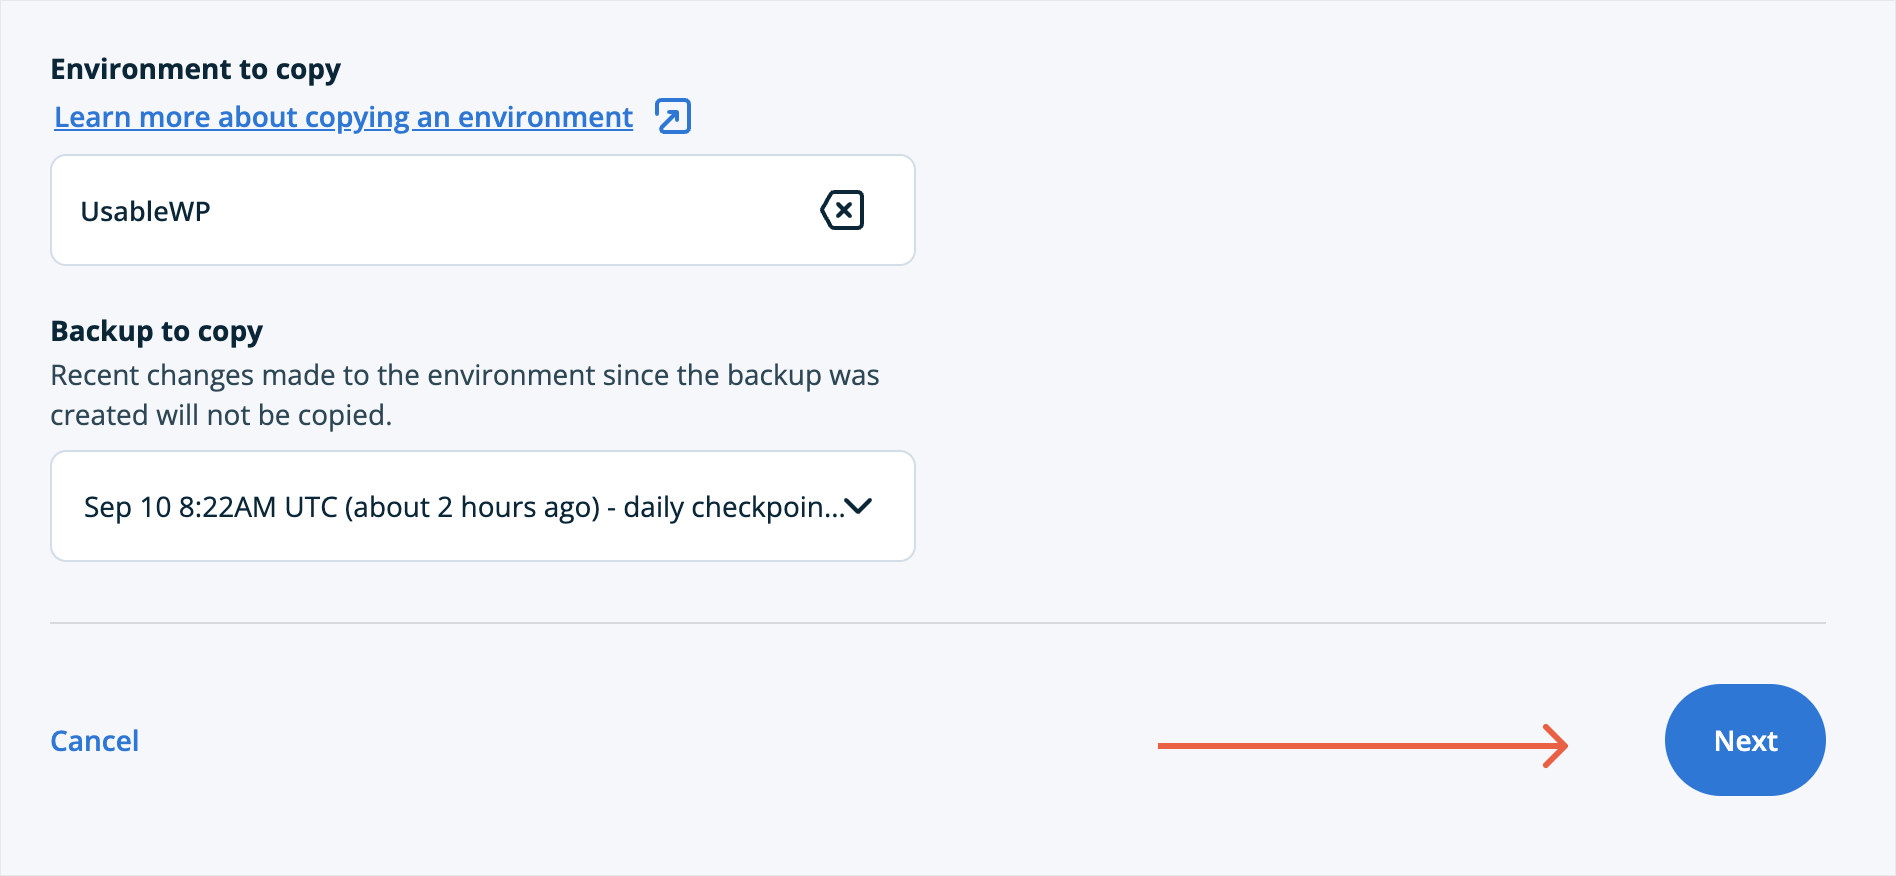
So, for the “Environment to copy” option, we need to select the option that says “Prd”. “Prd” stands for production environment.
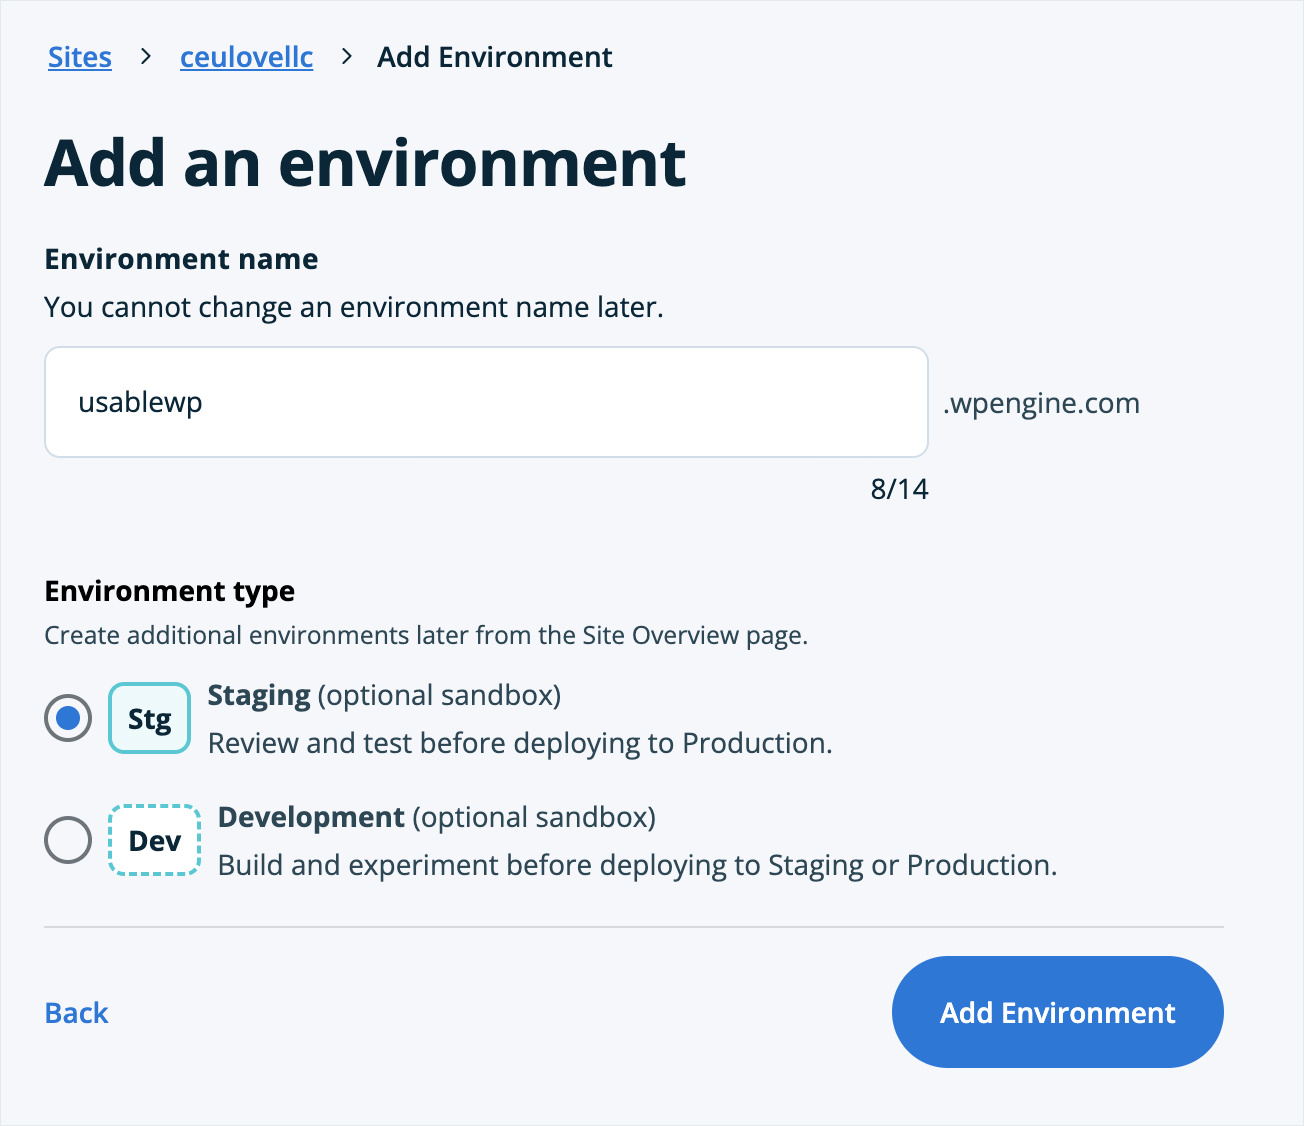
Once you have selected the production environment, click on the “Next” button to go to the “Add Environment” page.
Next, add a recognizable name to the staging environment using the “Environment Name” option.
Then, make sure that the “Staging” is selected for the “Environment type”.
Finally, click on the “Add Environment” button to create your staging website on WPEngine.
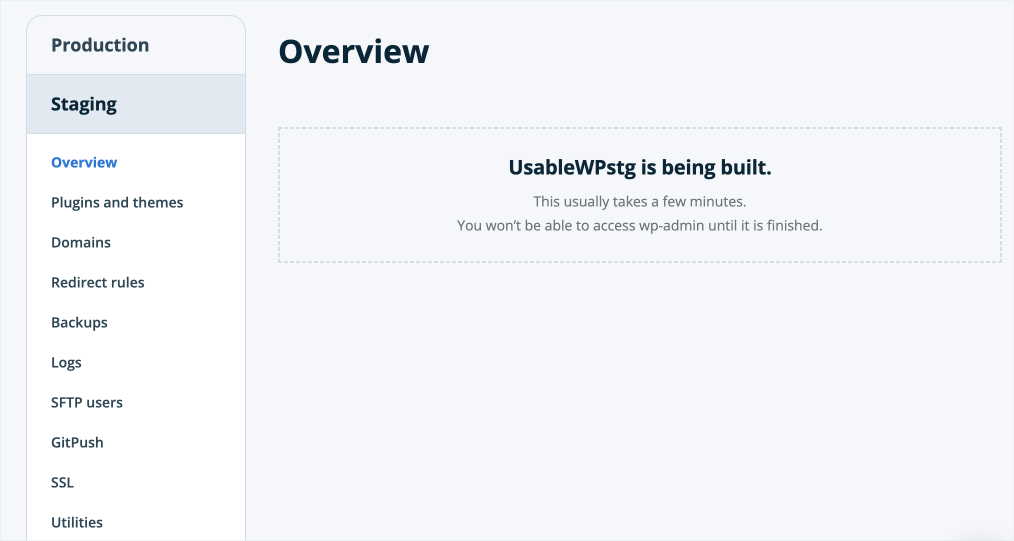
Now, WPEngine will take some time to build the staging site. Please wait for 15 minutes at least before trying to access the staging environment.
The amount of time it takes to build the staging site on WPEngine depends on the size of the website. If the website size is large, it takes a lot of time. Sometimes it even takes one hour to build the staging site.
So, make sure to keep a window of one hour whenever you’re creating a staging site for the first time.
Anyway, because my site size is around 2Gb, WPEngine took 20 minutes to create my staging site:
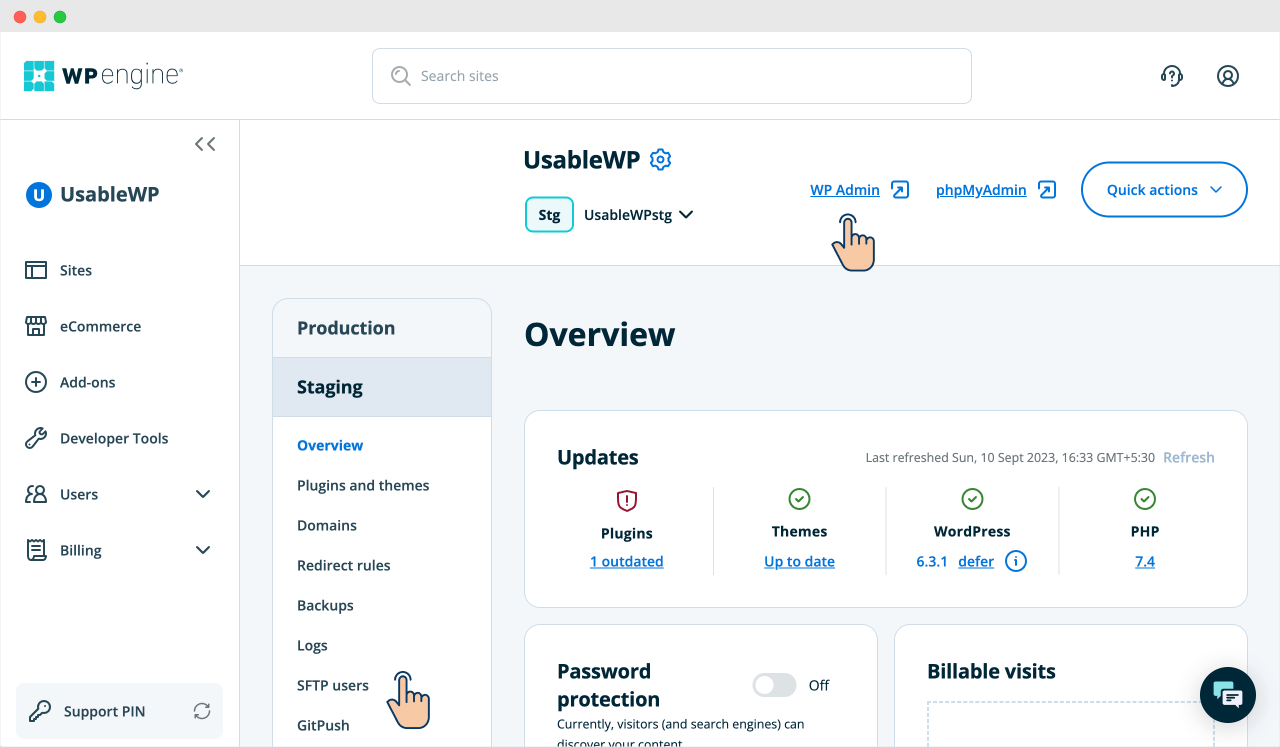
Finally, to start working on the staging site, you can either access the WordPress Admin of the staging site by clicking on the “WP Admin” link at the top of the “Staging” screen, or you can work with the files of the staging site by clicking on “SFTP users”.
WPEngine: How to push changes from staging site to the production site
Once you’re done playing, if you want to apply the changes you made on the “Staging site” to the “Production website”, you can do so in three easy steps:
Step 1: Take a fresh backup of the staging site
WPEngine maintains various versions of the Staging site.
And we need to push the latest version of the staging site to the production environment.
And, to create the latest version of the staging site, we need to take a fresh backup of the staging site.
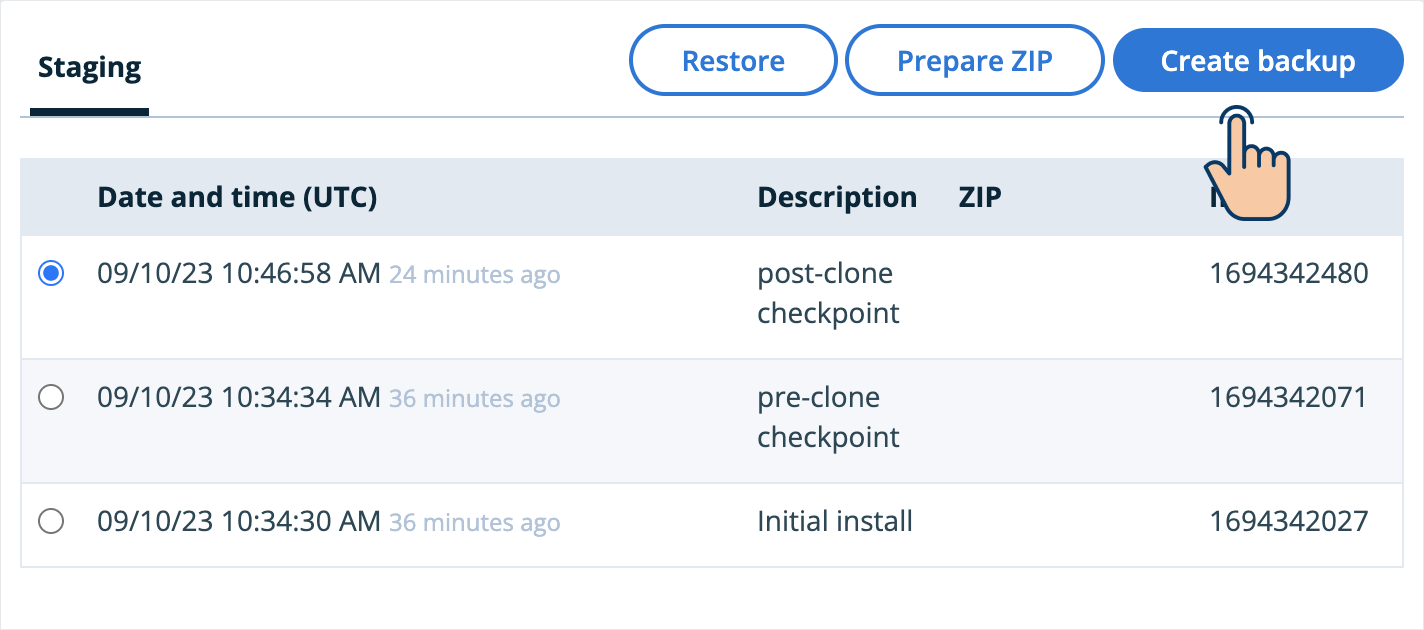
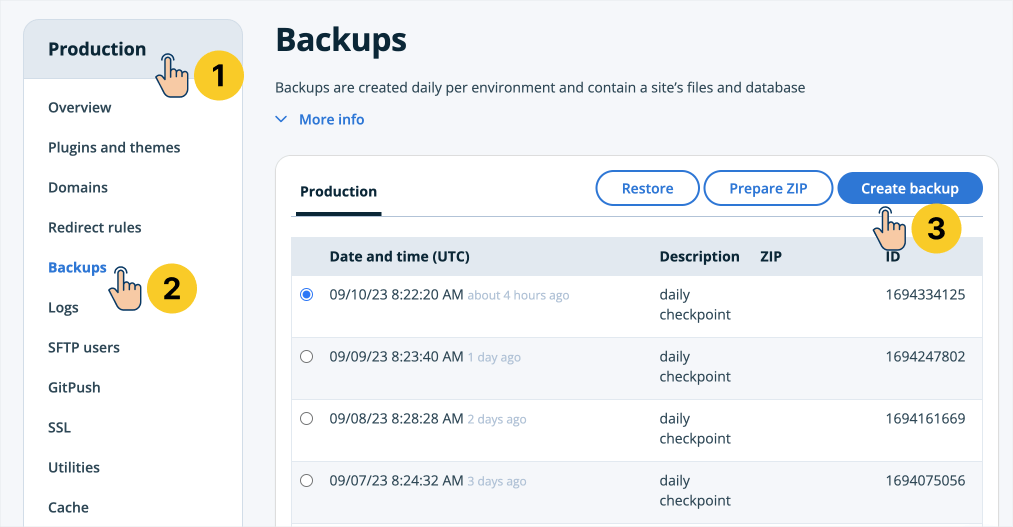
So, by staying inside the “Staging” screen, click on the “Backups” link from the Sidebar navigation menu:
Step 2: Next, click on the “Create Backup” button.
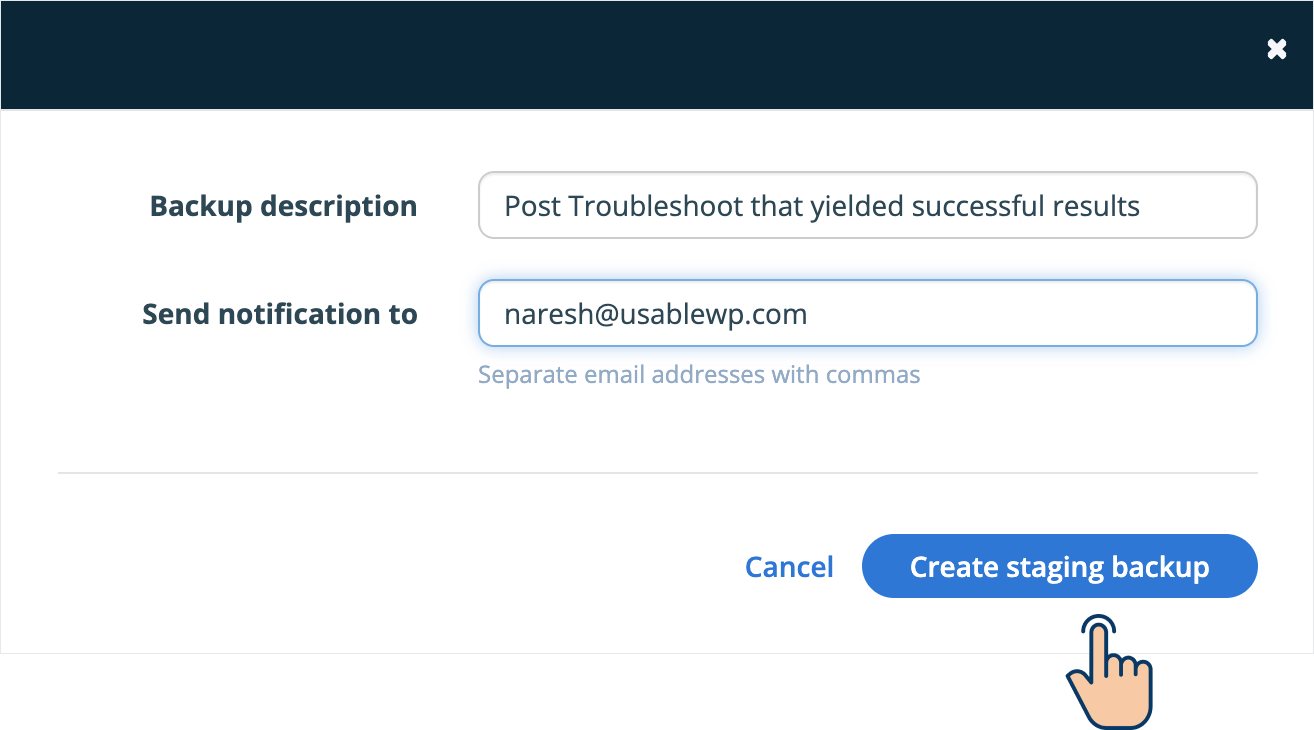
This will now raise a popup:
Provide a self-descriptive backup name and click on the “Create staging backup” button.
WPEngine takes at least ten minutes to take the backup, and once the backup is complete, you’ll receive a notification to the email you have provided for the “Send notification to” option.
After ten minutes…
The backup is now complete.
Close the popup and…
Step 3: Make sure the latest backup is selected
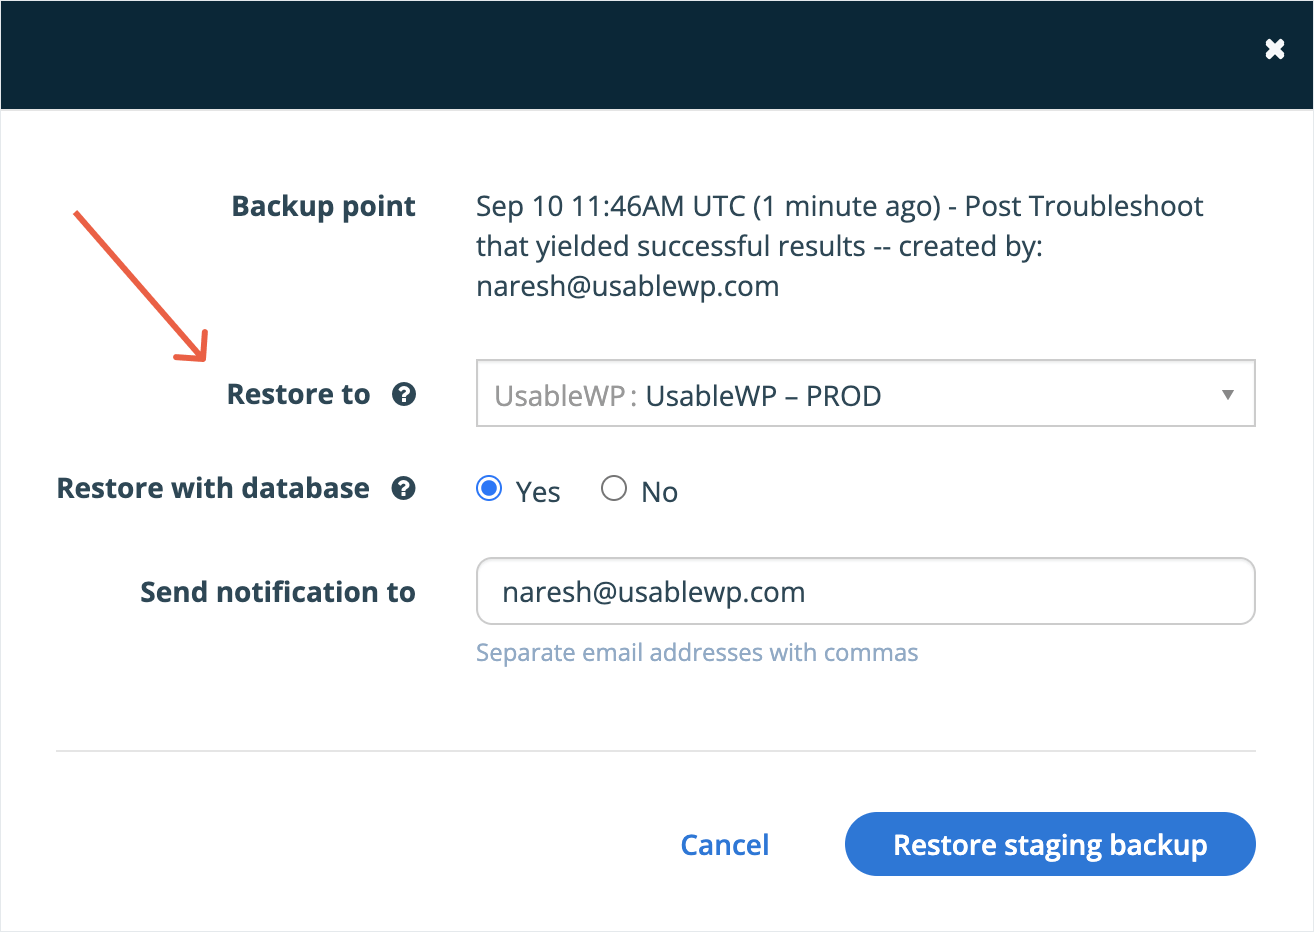
And then click on the “Restore” button to bring up the deployment popup:
The most important option of this popup is the “Restore to” option. Choose the “PROD” environment for this option.
“PROD” stands for “Production” environment.
Next, for the “Restore with database” option, choose “No” if you have only updated the site files. Choose “Yes” otherwise.
Finally, click on the “Restore staging backup” button to push the changes from the staging site to the production site.
Also, please remember not to automatically push staging changes to the production site if you are running an eCommerce store or any website that involves tracking user data.
The thing is, While you were working on the staging site, chances are you could have received a new order on the production website, and you could easily erase that order.
So, if you’re running any eCommerce store, I recommend updating the production site manually by remembering the changes you made on the staging site.
WPEngine: Make sure the staging environment is up-to-date with the production site whenever you start re-working on the staging site
Now let’s just say that one month has passed, and you made a lot of changes on the production website during this one month.
But suddenly, some issue occurred, and you want to troubleshoot it on the staging site.
If this is the case, before you start troubleshooting the staging site:
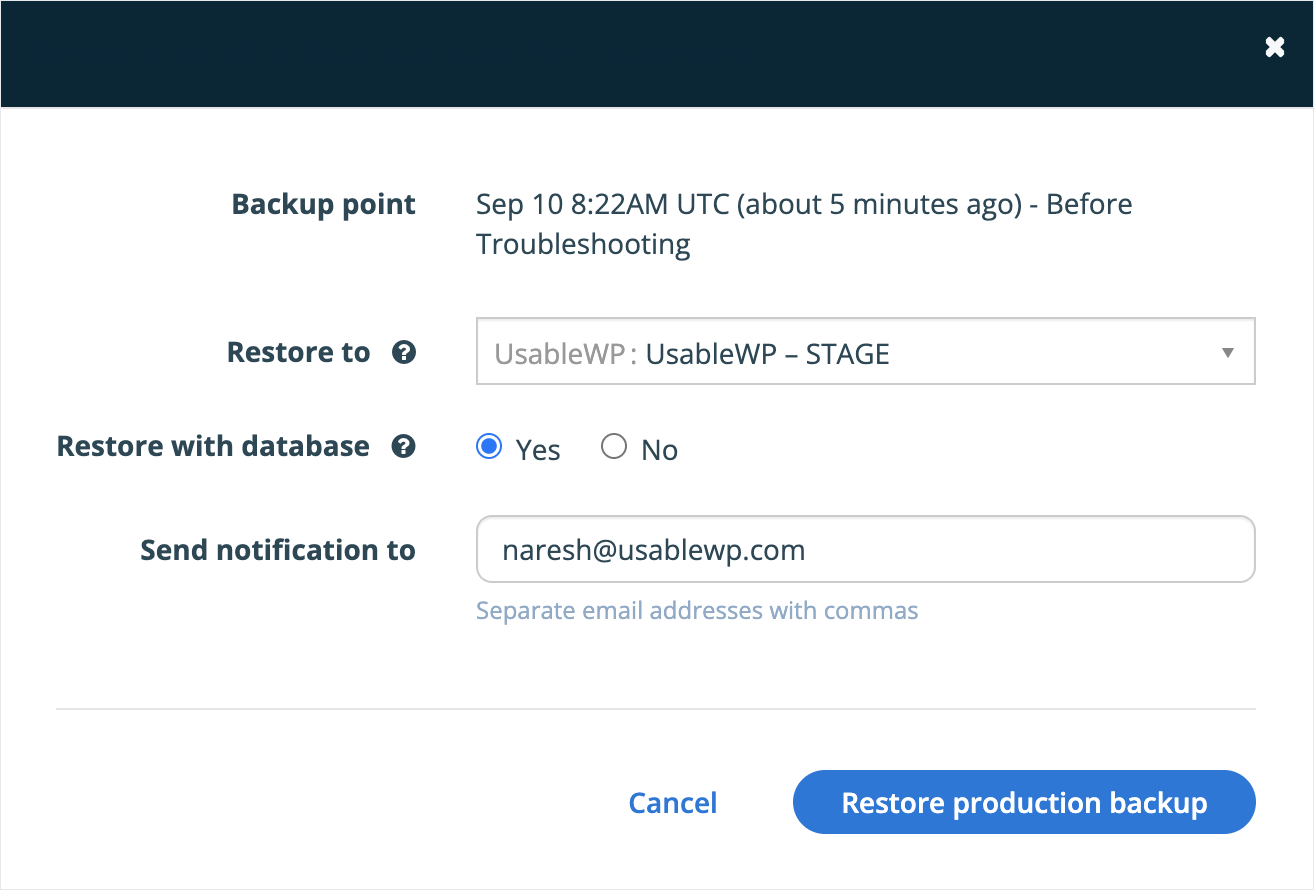
1) Create the latest backup of the production site.
2) Push it to the staging environment by selecting the “STAGE” environment for the “Restore to” option.
3) And only then start working on the staging site.
This will ensure that the staging site is up-to-date with the production site.
Unfortunately, WPEngine doesn’t automatically update the staging site every time the production site is changed. So, we have to do it manually by following the above-mentioned process.
If you don’t follow this process, the content and plugins on the staging site will be outdated compared to the production site, and the troubleshooting process might not yield accurate results.
Cloudways: How to create a WordPress staging site
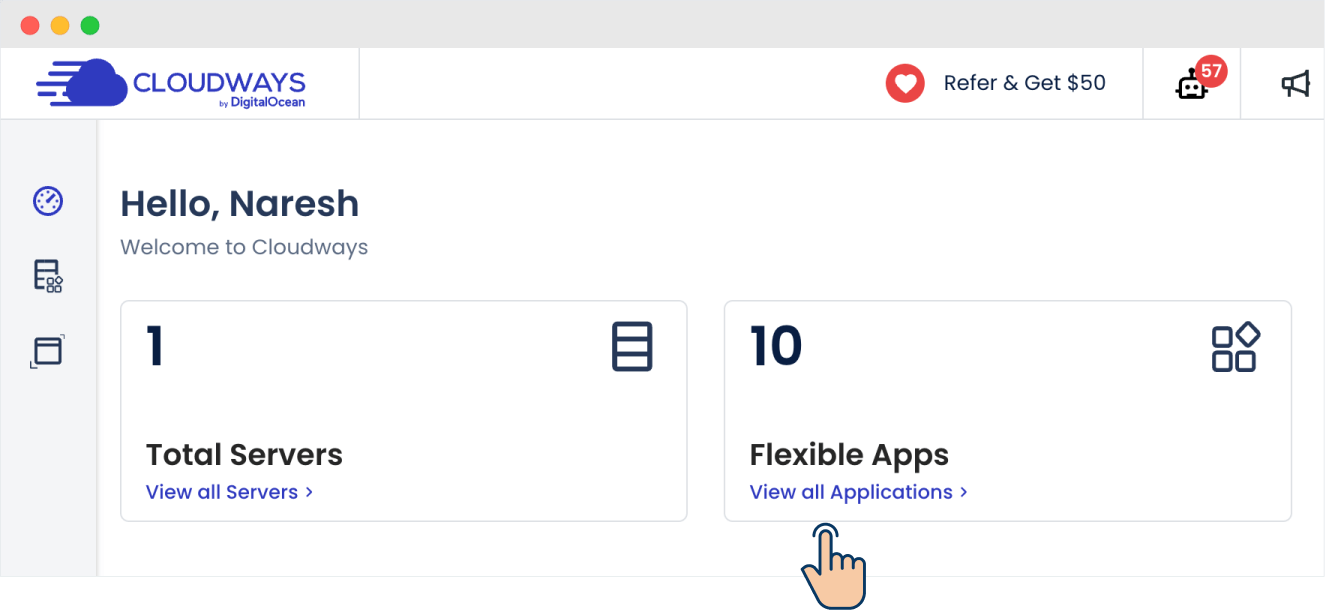
To create a staging site on Cloudways, make sure you’re logged inside your Cloudways dashboard:
Next, go to the “Applications” screen by clicking on the “View all Applications” link.
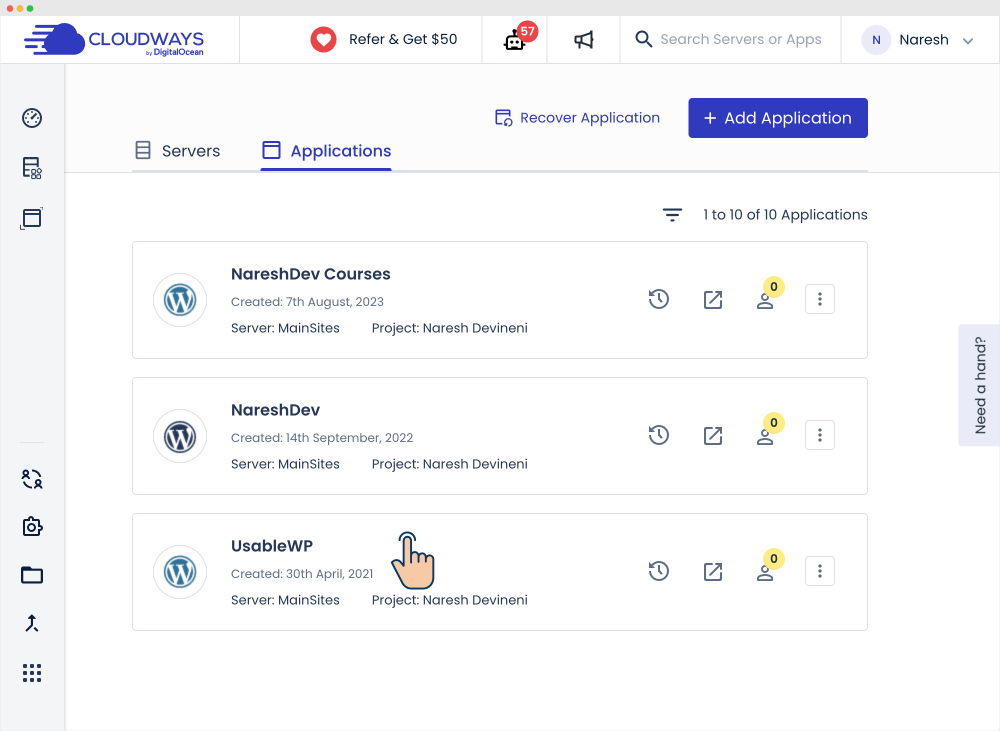
The “Applications” screen will list all the WordPress sites that you have installed so far on your Cloudways server.
Click on the website you want to create a staging site for, and it will take you to the management page that is specific to that website.
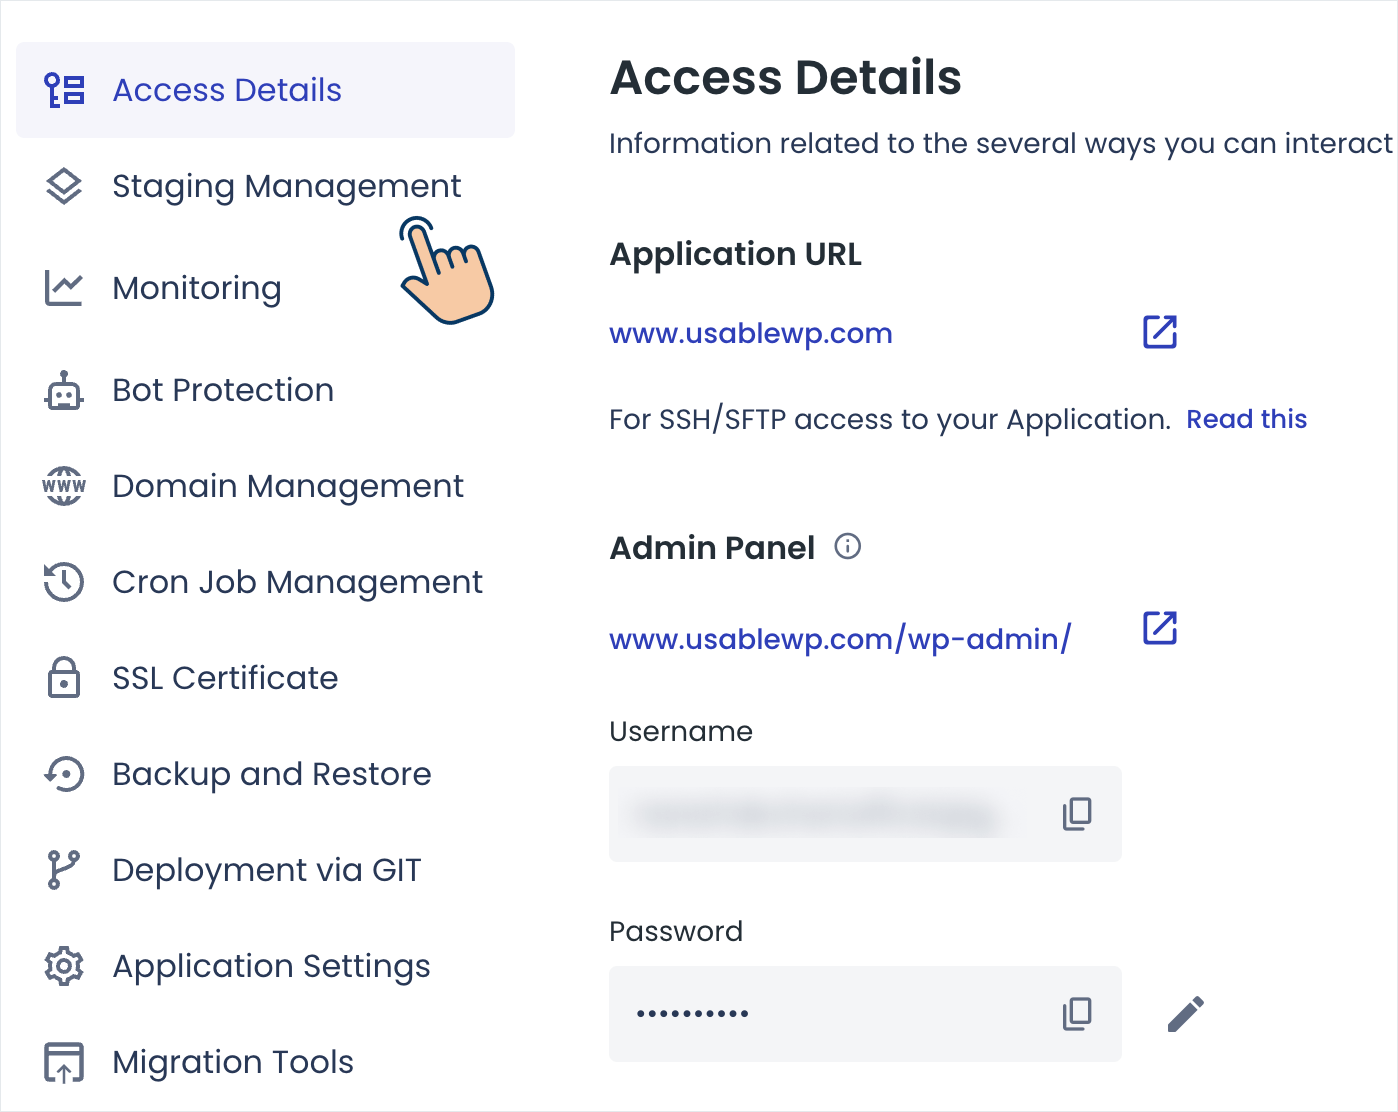
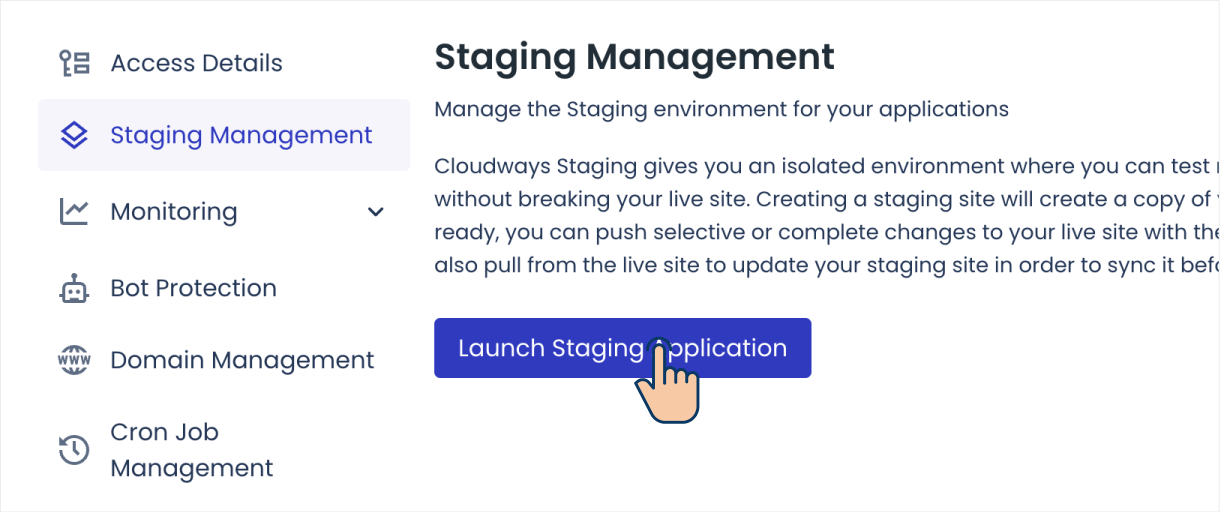
Next, if you notice the navigation menu on the left, there is a “Staging Management” link.
Click on it and then click on the “Launch Staging Application” button:
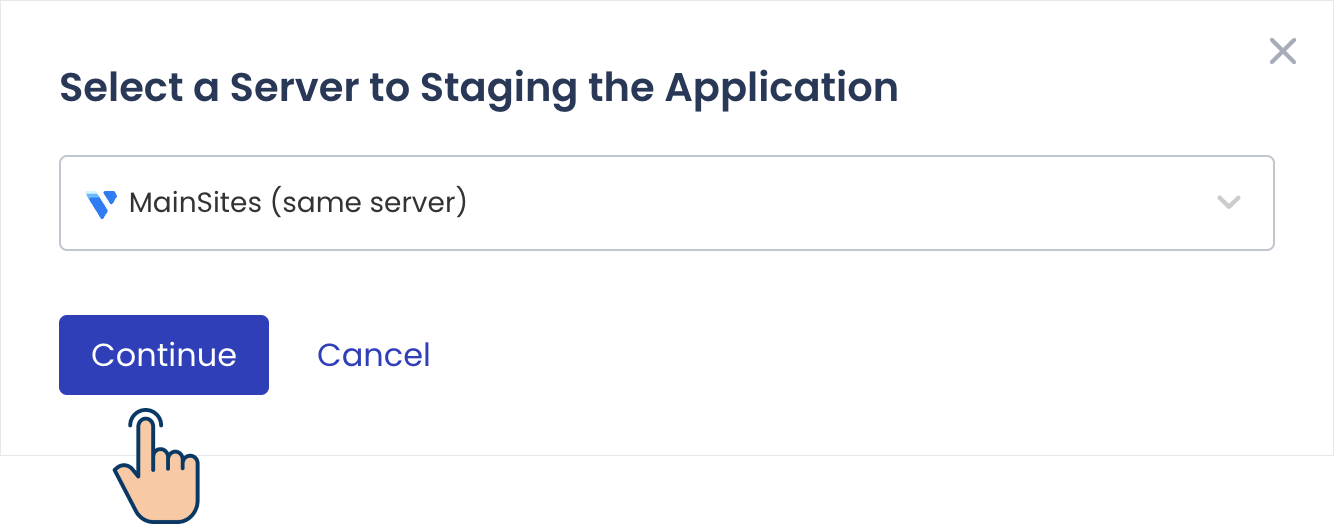
This will bring a popup for selecting a server to create the staging site:
I have only one server, and I selected it.
Finally, click on the “Continue” button to create the staging site.
That’s all.
Cloudways will now take at least five minutes to create the staging site. So please be patient.
After five minutes…
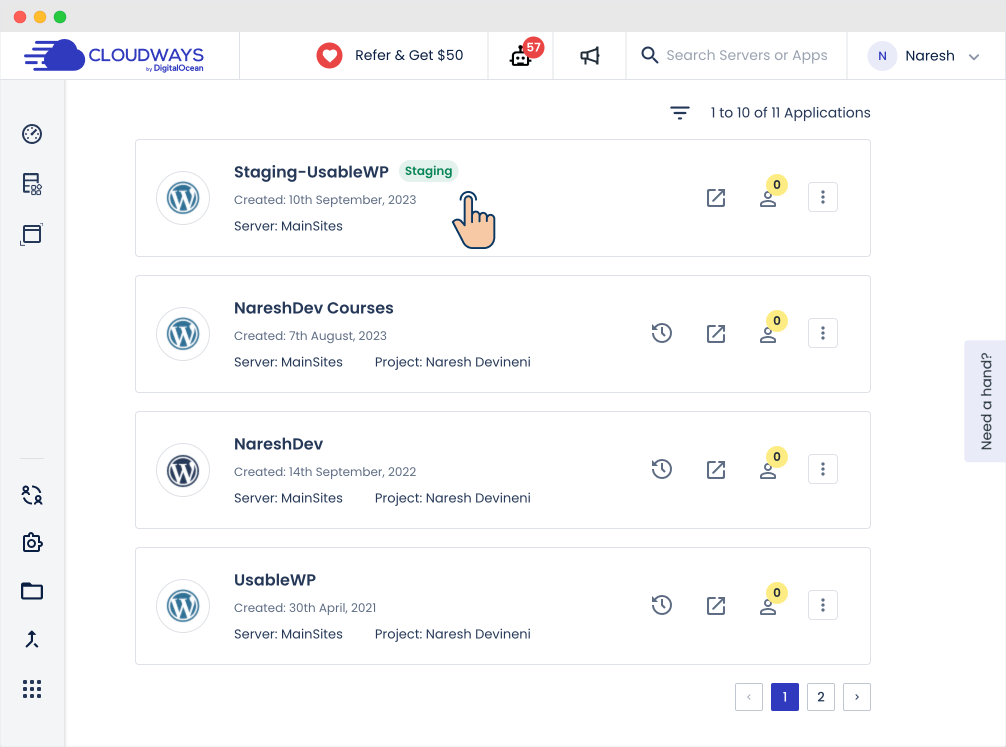
The staging site is now created, and you can access it by going to the “Applications” screen of the Cloudways dashboard.
Next, to access the URL and other details of the staging site, click on it from the “Applications” screen, and you will be taken to the management screen of the staging site.
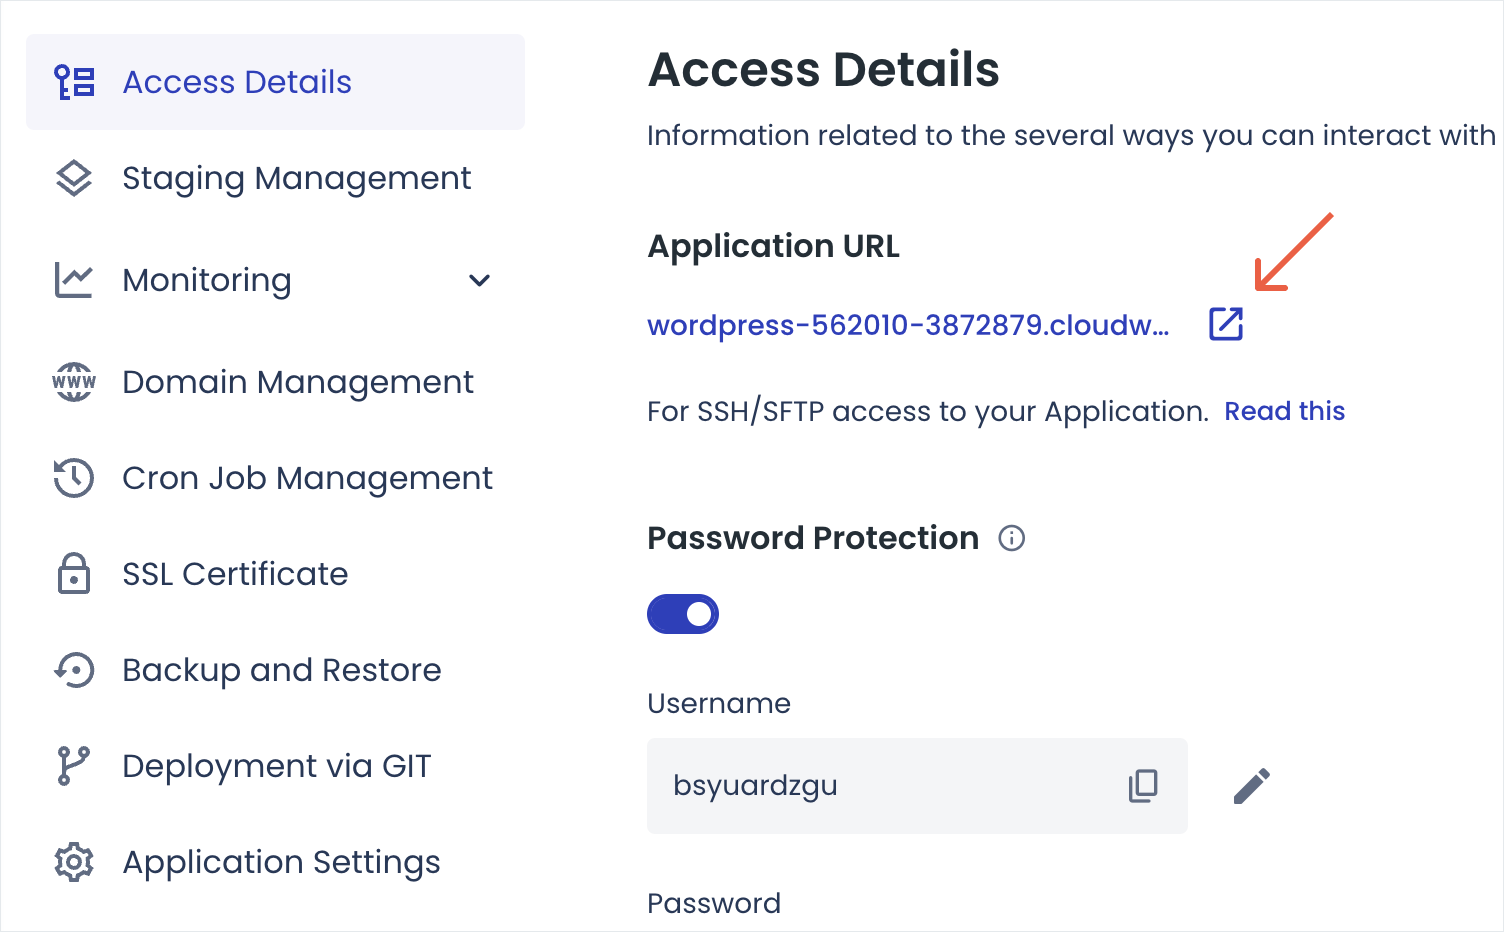
Then, click on the “Application URL” to access the staging site.
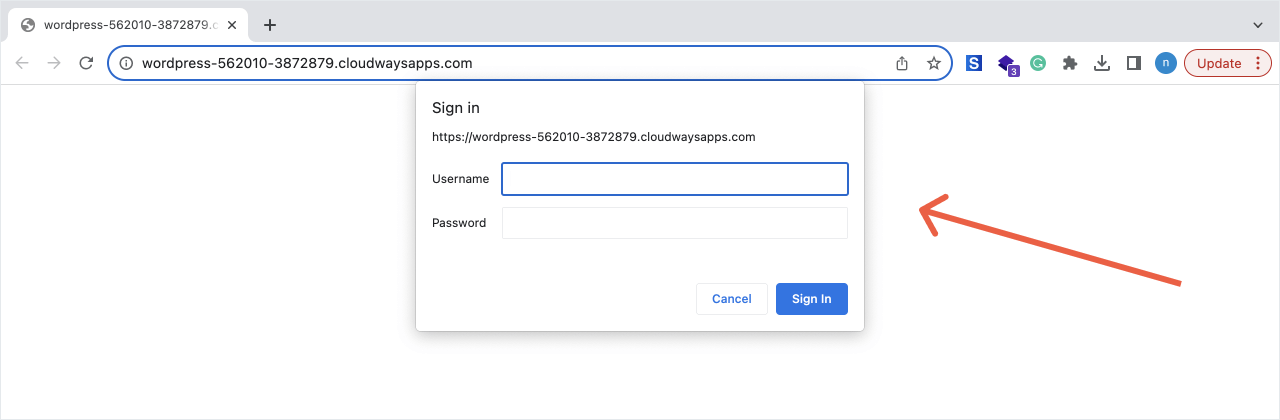
And as soon as the URL is open in the browser, you’ll be asked for a username and password:
“What is the Username and Password, Bro? Do I have to provide my admin credentials here?”
Nope.
The popup you’re seeing is the server-based authentication forced by the browser. So, providing your admin credentials doesn’t work here.
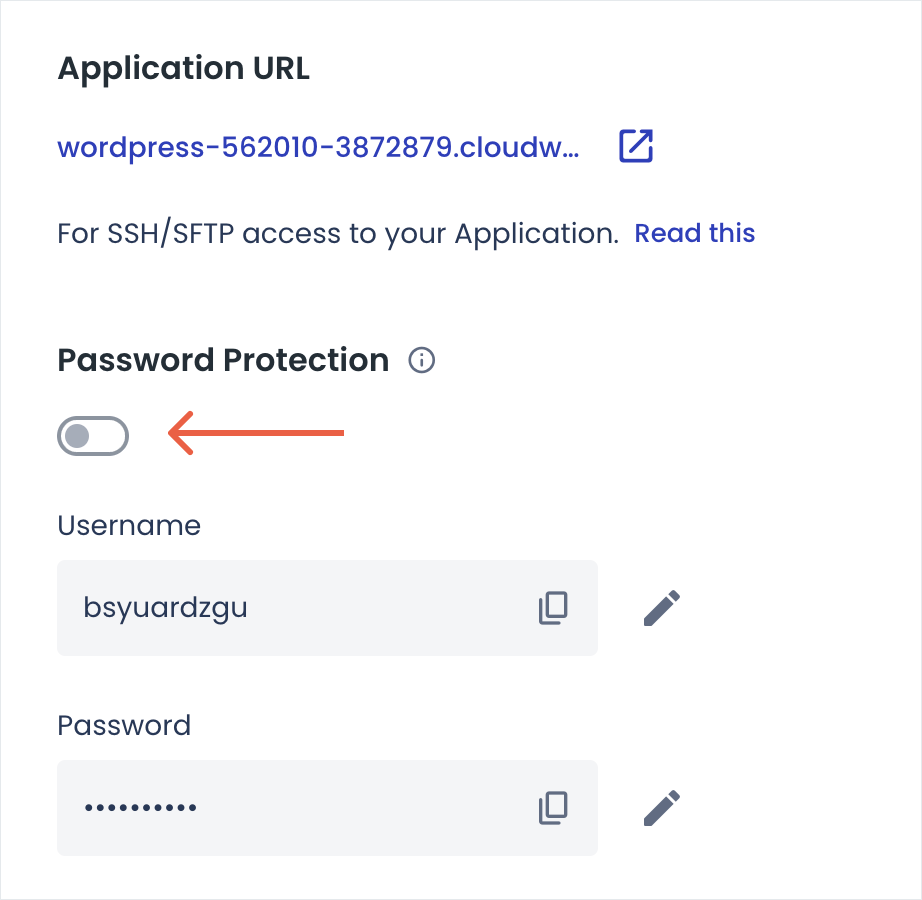
Instead, if you notice the “Access Details” screen of your Site on Cloudways, there is a section called “Password Protection” and it is located right underneath the “Application URL” section:
Use the “Username” and “Password” details located inside the “Password Protection” section to access the website.
After this, you should be able to access and move around your staging site as usual.
Also, the staging site is not easily accessible by the general public unless you provide them with the URL, so you don’t really need additional password protection.
So, you can turn it off.
If you don’t turn it off, you might have to enter these details every time you access the website, and it will become annoying if you’re troubleshooting an issue.
Anyway, with or without password protection, you should be able to log inside the admin dashboard as is by adding “wp-admin” at the end of the Application URL.
Now for the admin credentials, you can still use the production site’s credentials to access the admin side of the staging site.
“Okay! But how do I access the files of my website on Cloudways?”
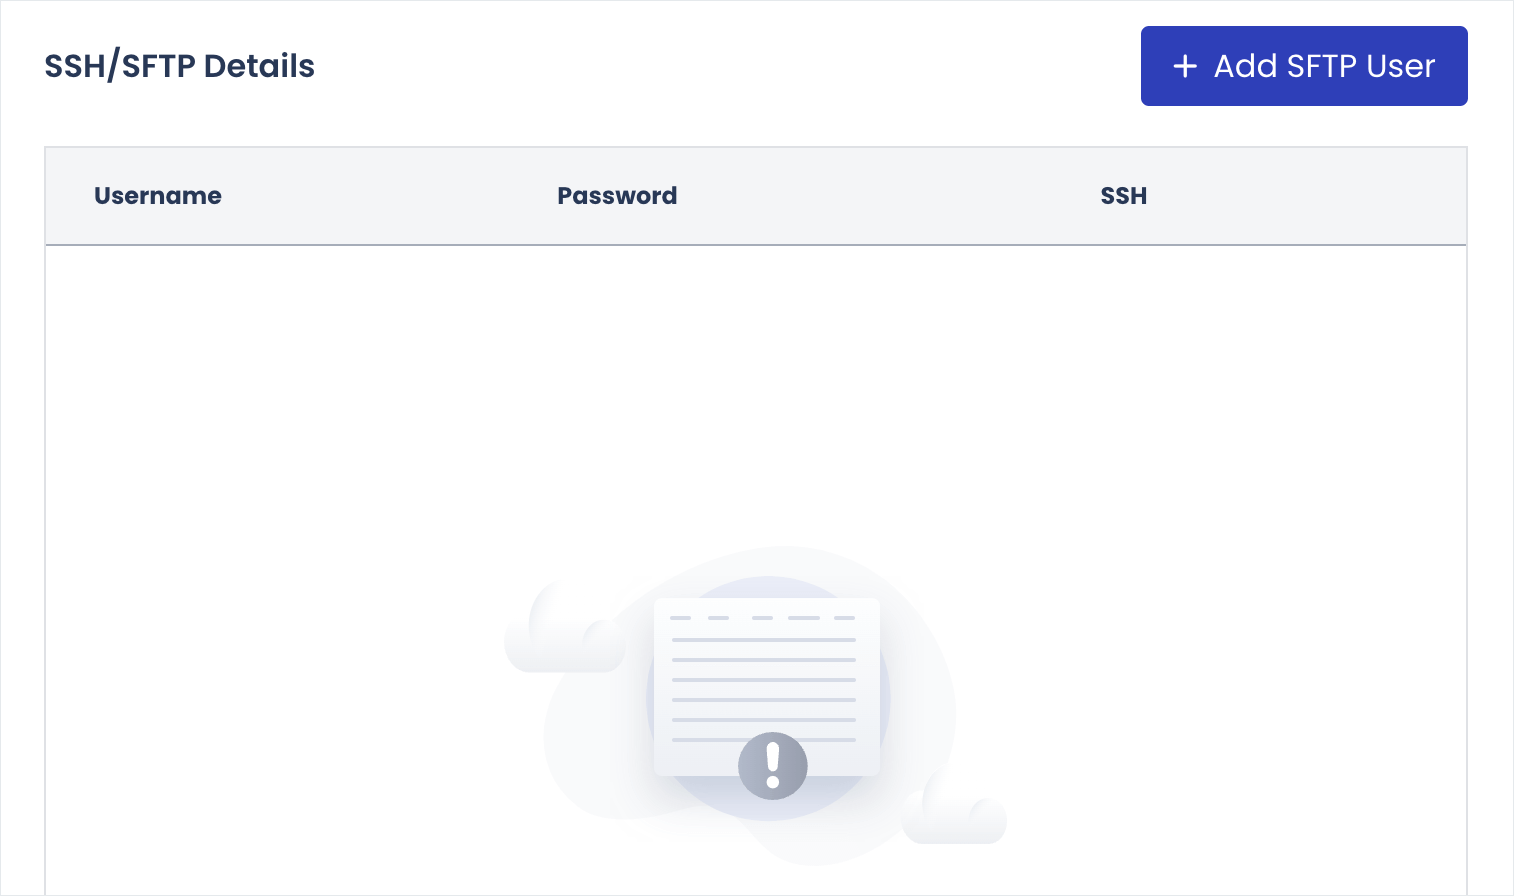
You need to create an SFTP account for that.
If you scroll a bit down from the “Password Protection”, you should be able to create a new SFTP account for accessing the files of your staging site:
Please remember. When you clone a site, because you’re cloning the database, you’ll be cloning your admin account and other user accounts as is.
So, you can still use the production site’s credentials to access the admin side of the staging site as well.
However, the SFTP credentials don’t get cloned because they are created at the server level.
So, you need to create a new SFTP account that is specific to the staging site.
If don’t know how to access files via SFTP, I have created a detailed article about it.
Cloudways: How to push changes from staging site to the production site
Once you’re done playing, if you want to apply the changes you made on the “Staging site” to the “Production website”, you can do so in four easy steps:
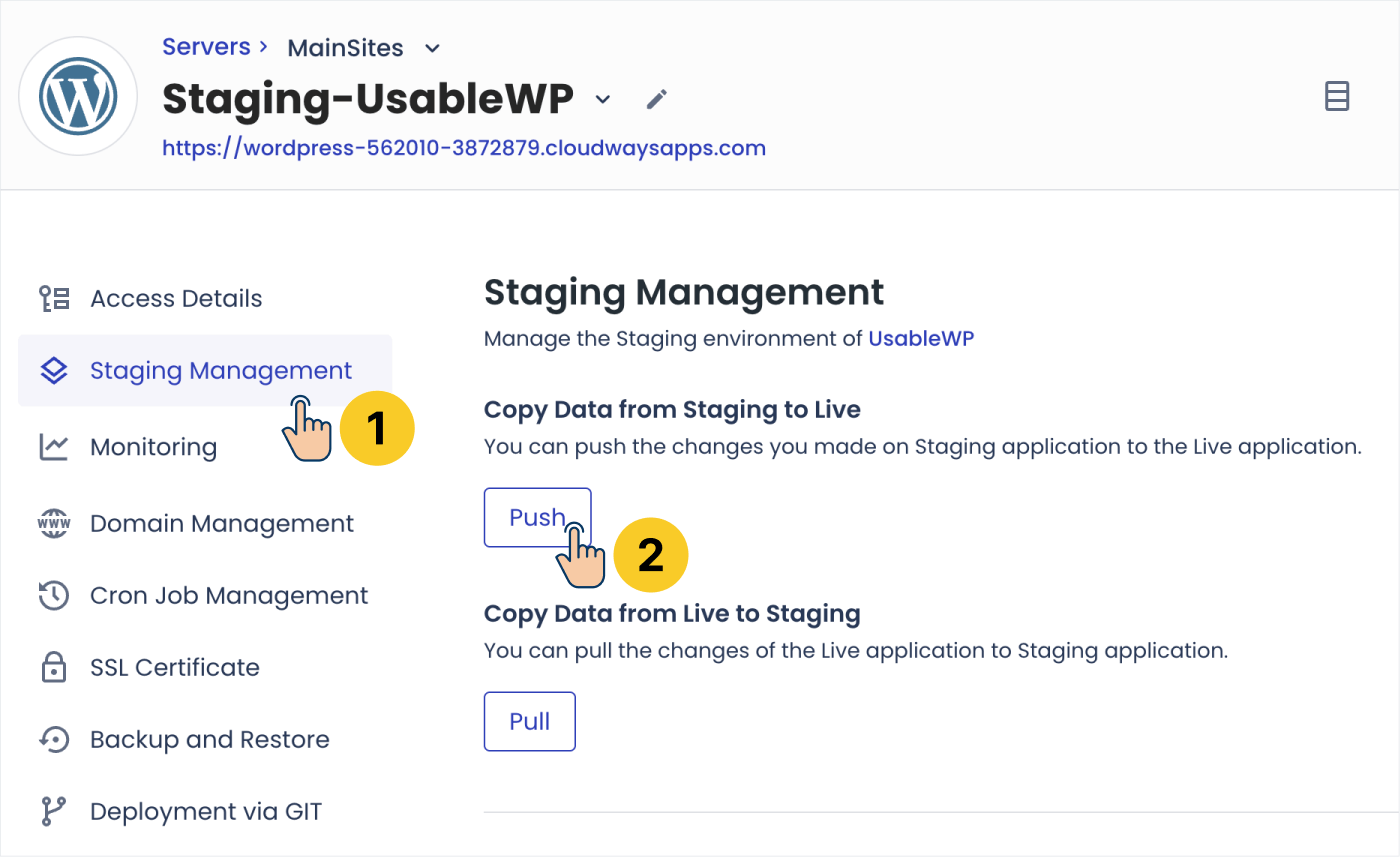
Step 1: On the Cloudways dashboard, Access the “Staging Management” screen of the staging website that you have created recently:
And then click on the “Push” button.
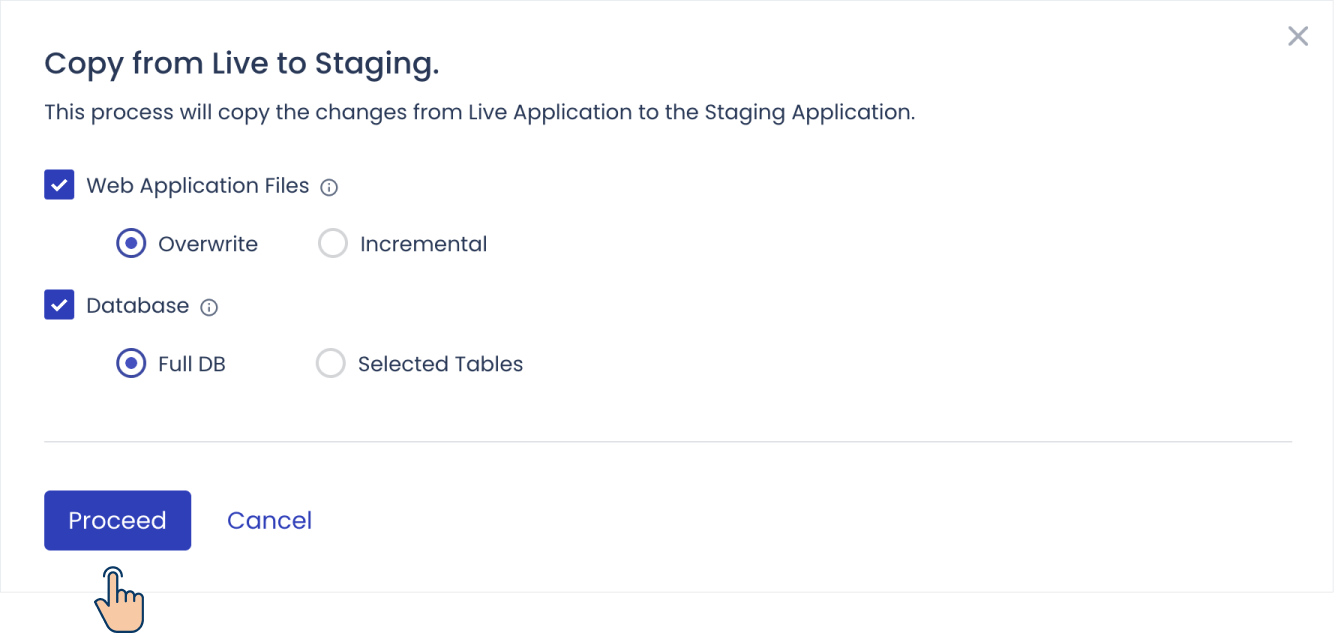
This will now bring up a popup with settings related to copying the change from staging to the production website:
I have made both file-based changes and database-based changes, so I will make sure both the “Web Application Files” and “Database” options are selected.
Finally, I will click on the “Proceed” button to push the changes to the live website.
Also, please remember not to automatically push staging changes to the live site if you are running an eCommerce store or any website that involves tracking user data.
The thing is, While you were working on the staging site, chances are you could have received a new order on the live website, and you could easily erase that order.
So, if you’re running any eCommerce store, I recommend updating the live site manually by remembering the changes you made on the staging site.
Cloudways: Make sure the staging site is up-to-date with the production site whenever you start re-working on the staging site
Before we start working on the staging site, we need to make sure that the staging site is an exact replica of the live website.
Unfortunately, Cloudways doesn’t automatically update the staging site every time the live site is changed.
So, we have to manually pull the latest version of the live to the staging site.
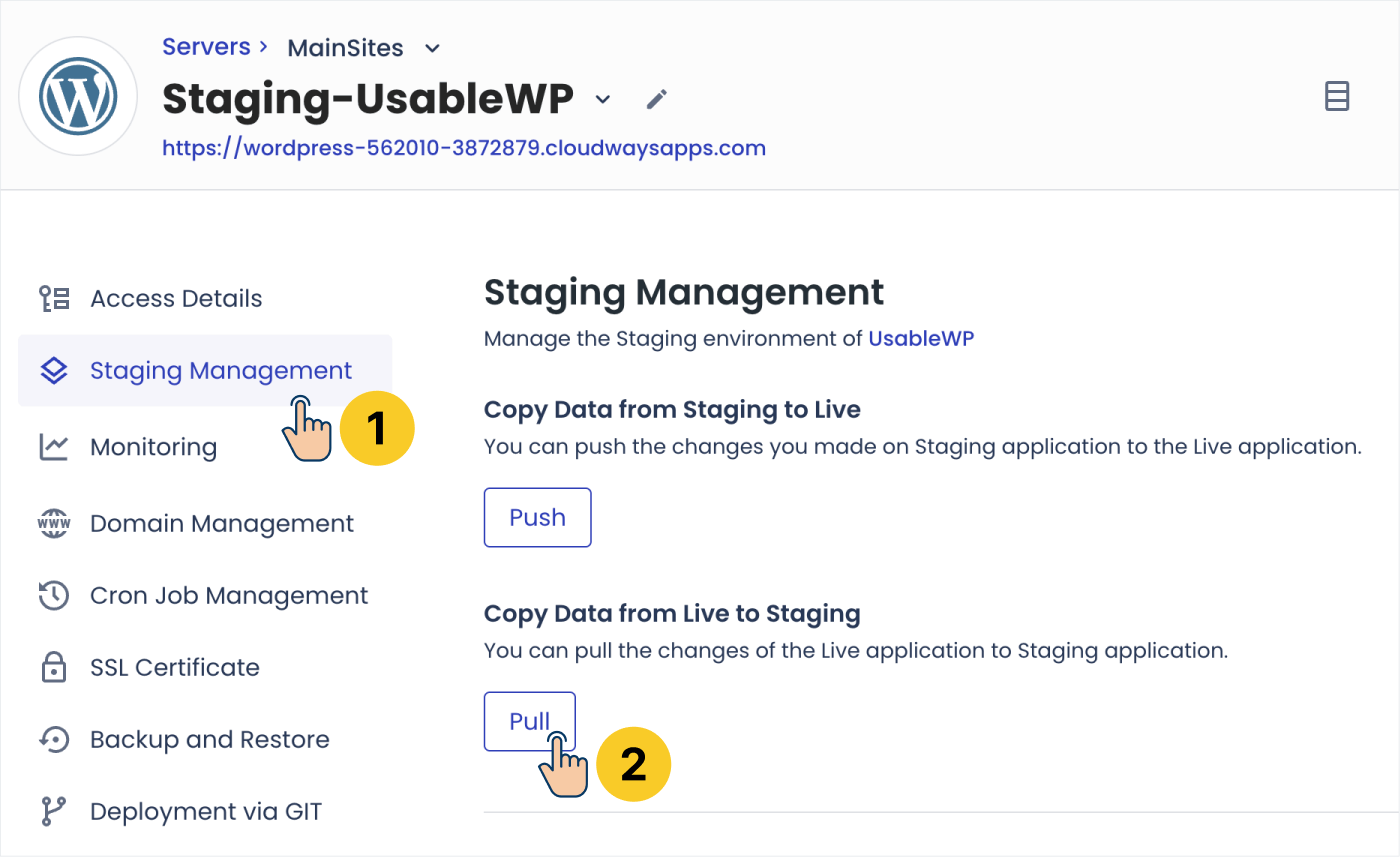
To achieve this, access the staging site from the Cloudways dashboard:
Next, click on the “Staging Management” and then click on the “Pull” button:
This will now bring up a popup:
Here, make sure that both the “Web Application Files” and “Database” options are checked because we want to copy the entire live site.
Finally, click on the “Proceed” button to copy the latest version of the live site to the staging site.
And only then start working on the staging site.
If you don’t follow this process, the content and plugins on the staging site will be different from the live site, and the troubleshooting process or experiments might not yield accurate results.
Use a third-party hosting service to create a WordPress staging site
Not every hosting service provides a staging site feature.
If that is the case with you, don’t worry.
The next best method for creating a staging is to use a third-party hosting service like InstaWP.
Although it is not super convenient, it is still easy and reliable.
However:
There could be a slight cost involved depending on the site size.
Once the staging site is created, pushing the changes between the live site and the staging site is hard. You have to take the manual approach for reliability.
InstaWP allows us to create a staging site for free if the overall file size of the website is less than 1 GB, a.k.a 1000 MB.
If the site size crosses 1 GB, and if it is less than 5 GB, InstaWP costs you $6 per month. If the site size is larger than 5 GB, then InstaWP costs you $29 per month.
“Bro! Is it worth spending money just for the sake of creating a staging site?”
I have to say it is worth it because I experienced the nightmares of not having a staging site.
The recommended advice here is to switch to a hosting service that provides built-in staging site support. This will help you avoid the extra costs of having a separate server for a staging site.
Here are some of the best hosting services with good staging features:
InstaWP – Yes, it is also a very good web hosting company, like others
If I had to pick only one, I would pick WPEngine because it is the most reliable web hosting company with the most reliable staging site features.
But if you can’t afford to move to one of the above hosting services for any reason, your next bet is using a service like InstaWP (Easy) or creating a staging site locally on your personal computer (Hard).
Let’s now see how to create a staging site using InstaWP
We can achieve this in four easy steps.
Step 1: Go to InstaWP, sign up for an account, and keep yourself logged in.
If your site size is less than 1GB, you don’t need to spend money and sign up for a free account.
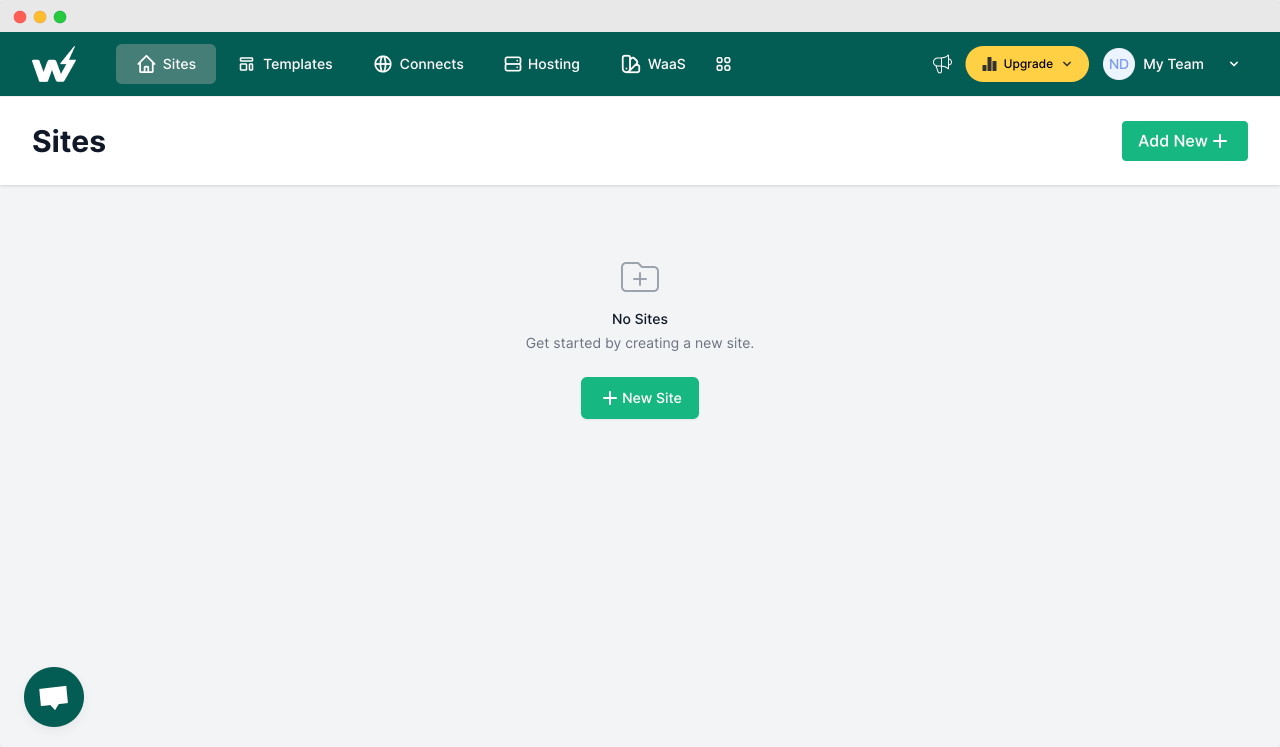
Either way, your next step is to create an account and login to the InstaWP’s dashboard:
You don’t have to do anything else on the InstaWP’s website.
Step 2: Install the “InstaWP Connect” plugin on your WordPress site
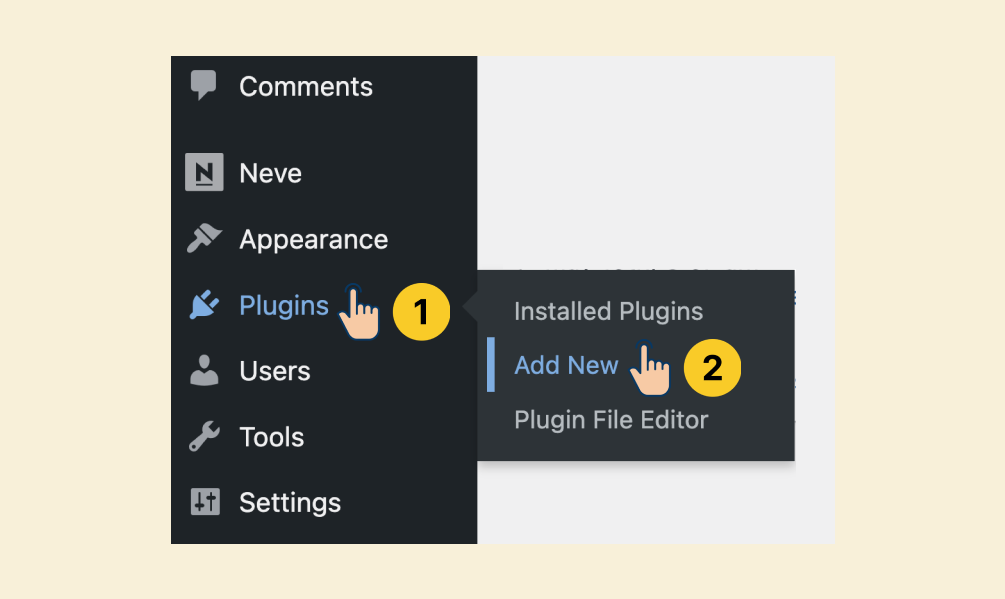
By keeping the “InstaWP dashboard” browser tab, open a new tab, and log into your WordPress site’s Admin Dashboard.
Next, from the Admin menu on the left, go to the “Plugins” and then click on “Add New”:
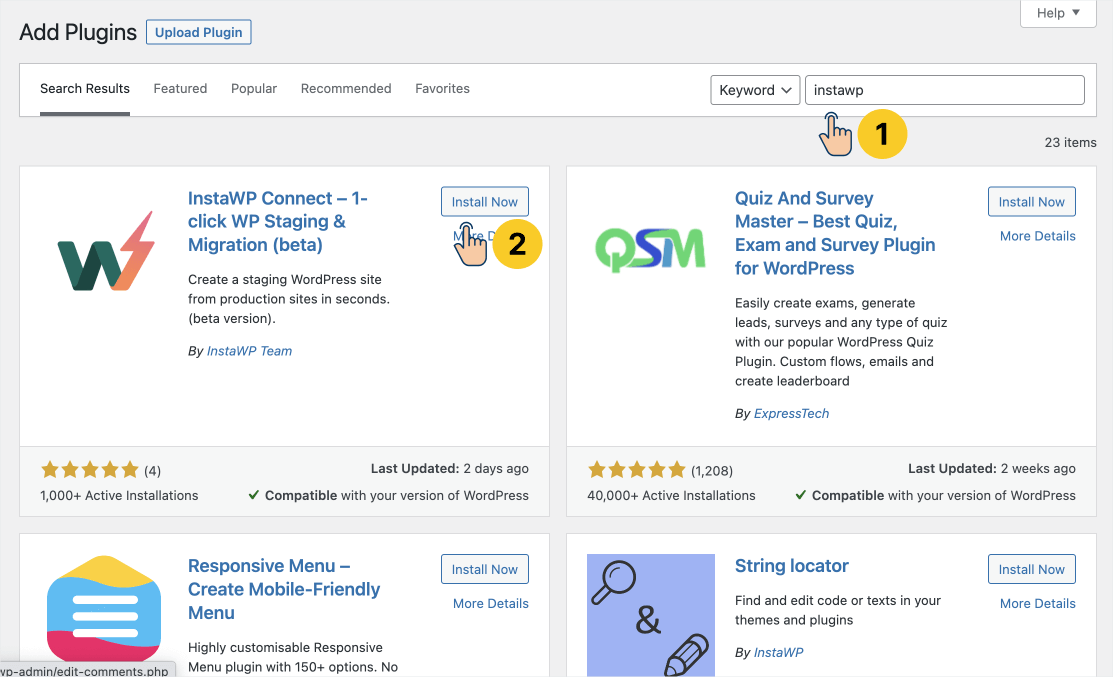
Next:
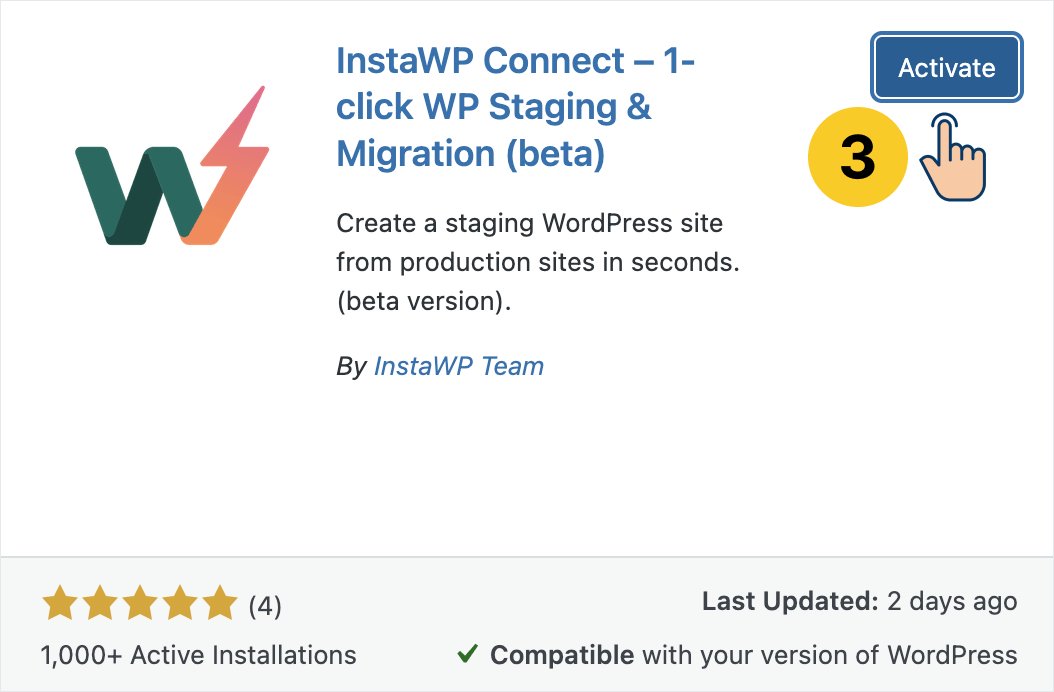
Search for “InstaWP Connect”
Install it
Activate it
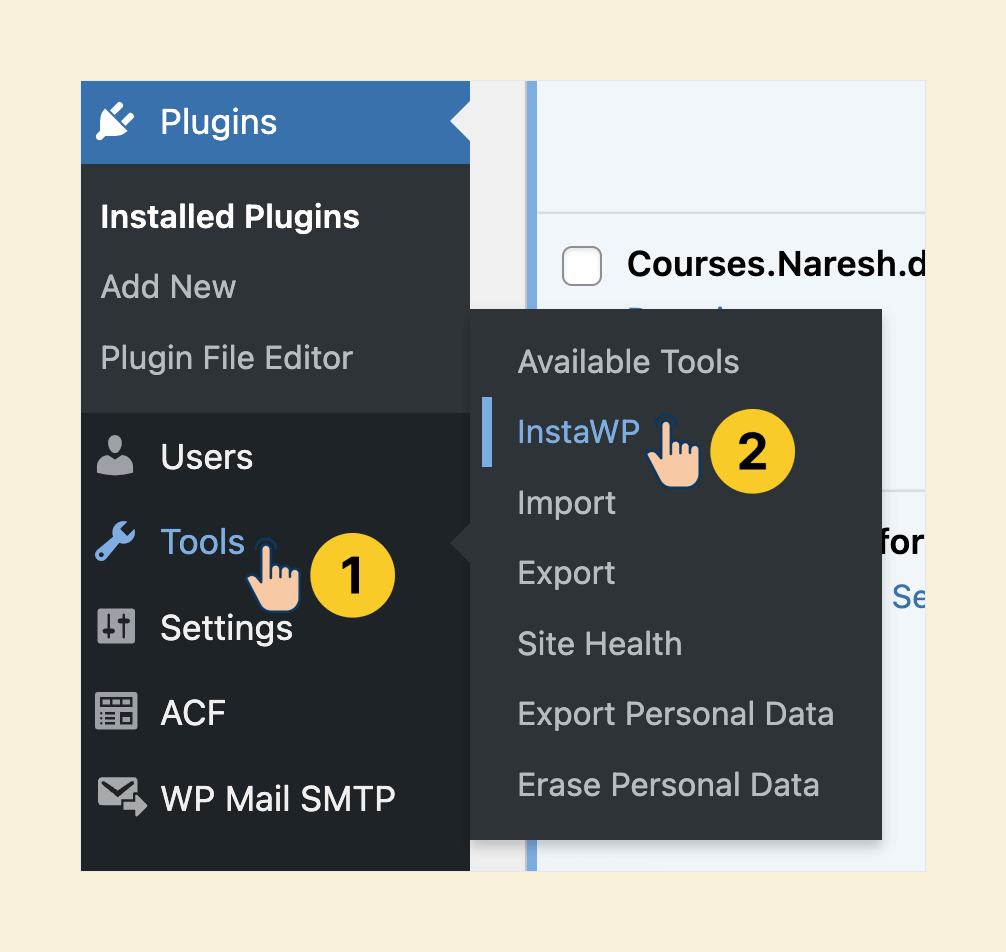
Once the plugin is activated, from the admin menu on the left, go to “Tools” and then click on “InstaWP”:
This will now take us to the InstaWP settings screen inside the admin dashboard.
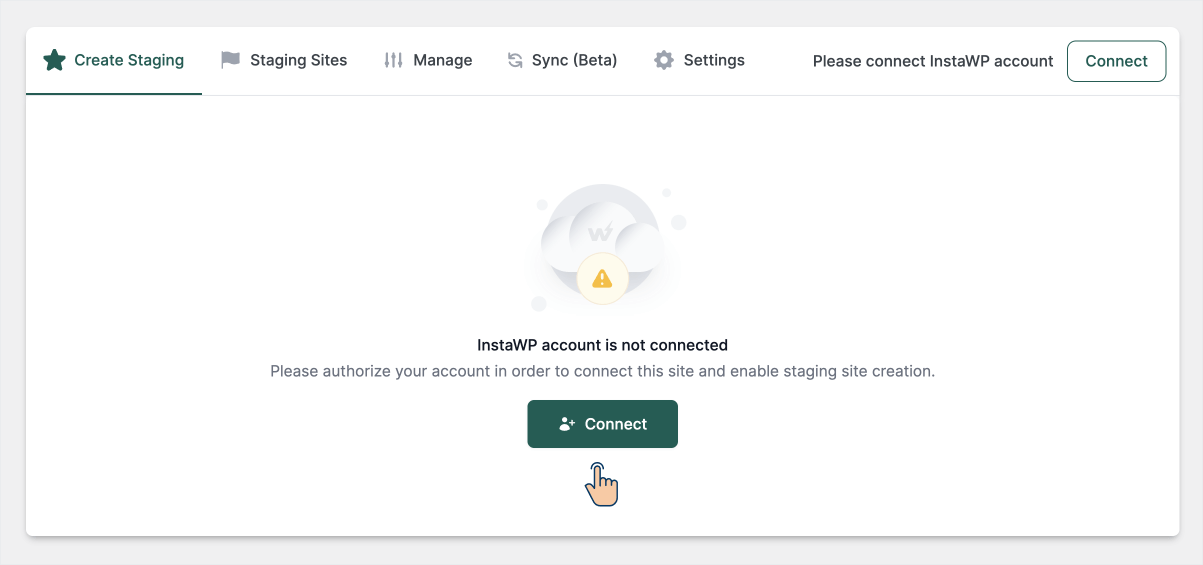
Now, in order to create a staging site using InstaWP, we first need to connect our WordPress site to the InstaWP account that we have created recently.
To achieve this, make sure you are on the “Create Staging” tab and then click on the “Connect” button that is located at the center of the screen or on the top-right-hand corner of the screen:
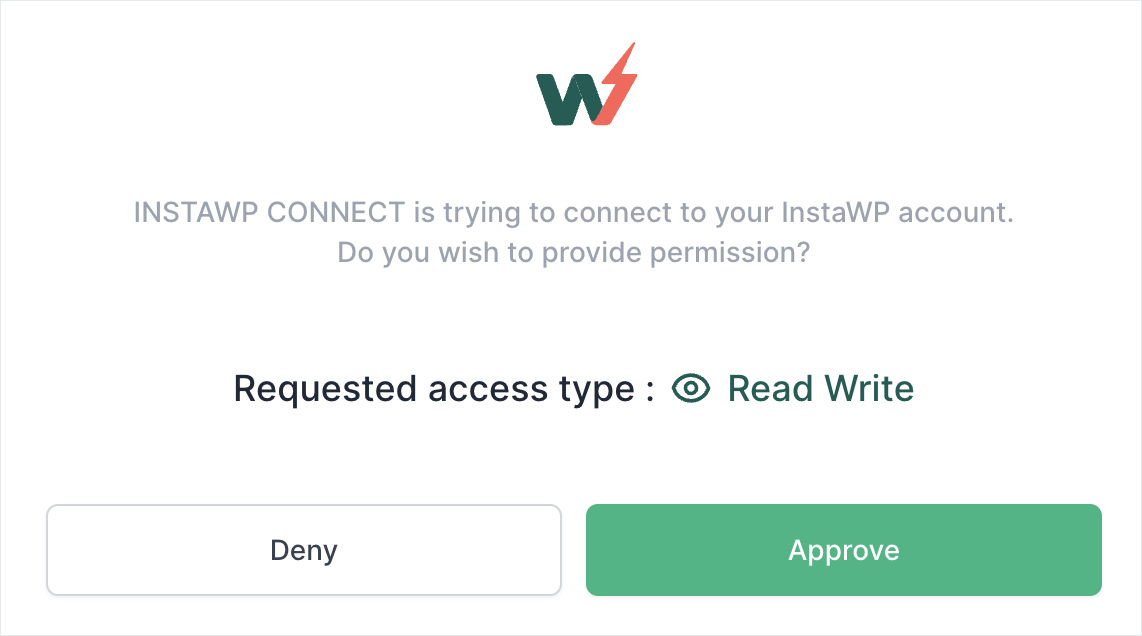
This will open up the InstaWP app in a new tab for the approval:
Click on the “Approve” button, and you’ll be redirected back to the “InstaWP” settings screen inside the WordPress Admin Dashboard.
You’ll now see that “Your account is connected” at the top-right-hand corner of the screen instead of the “Connect” button.
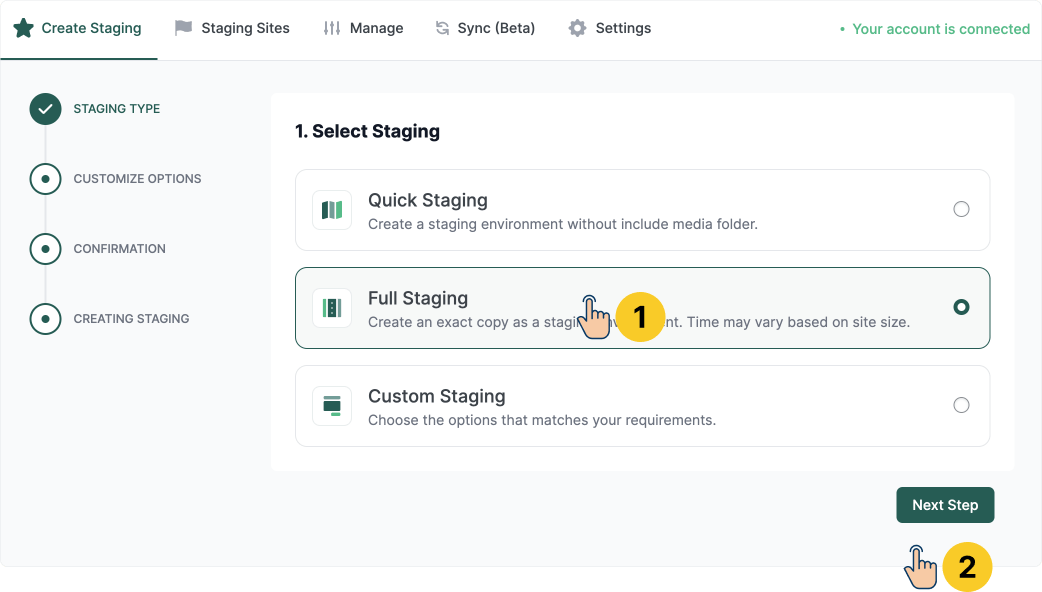
Next, for the “Staging Type”, choose “Full Staging” and click on the “Next Step” button.
We chose “Full staging” because it creates an exact copy of our live site as a staging environment.
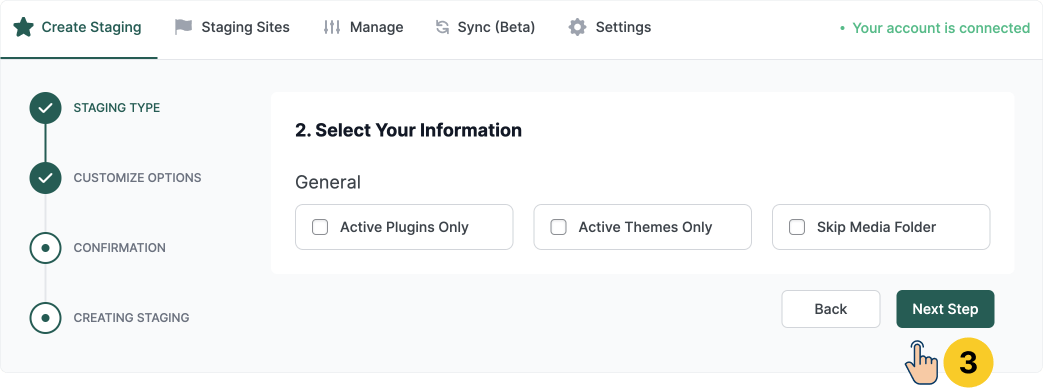
For the “Customize Options” step, leave all the options as is and click on the “Next Step” again.
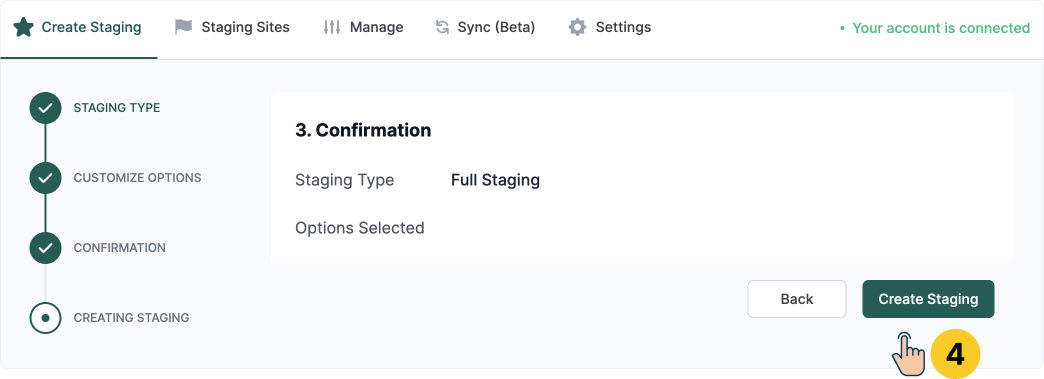
Finally, click on the “Create Staging” button to start the process.
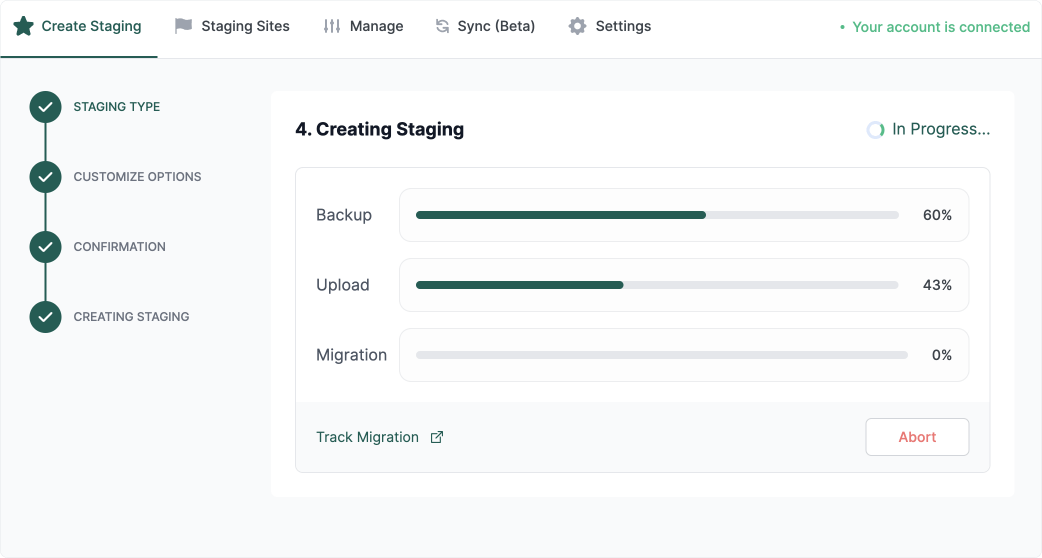
InstaWP will now take some time to clone your production website on its own server.
Depending on the size of the website, this could take up to one hour because the files are getting transferred from one server to an entirely different server.
This was not the case with the built-in staging feature of a hosting service because, in that case, files are getting transferred from one folder to another on the same server. So it was much quicker.
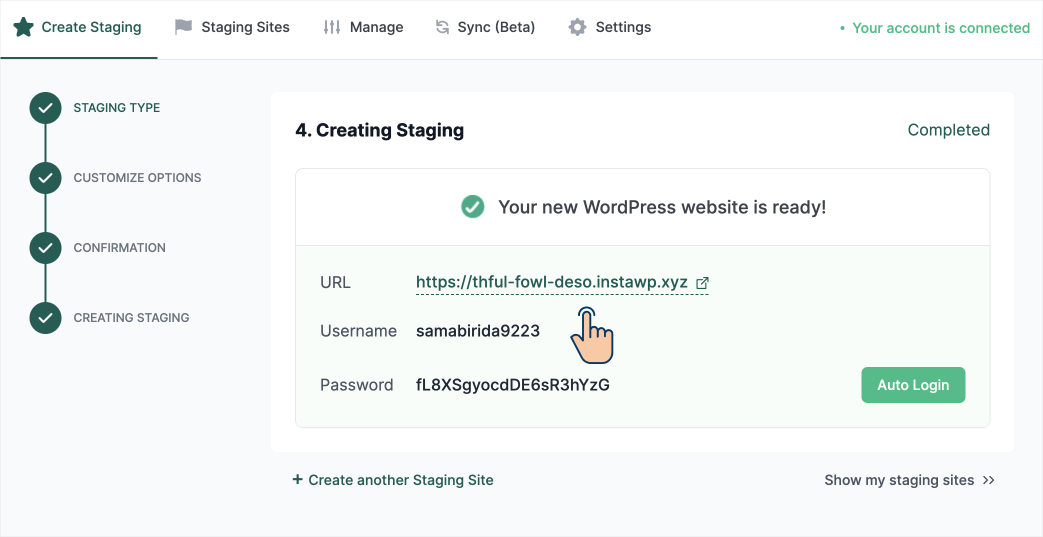
Anyway, after 20 minutes, the staging site creation process is now complete, and InstaWP has provided the access details of the staging site:
The access details include the URL, Username, and Password of the staging site.
Click on the URL and use the credentials provided to log inside the admin dashboard of your staging site.
You can now perform any action you want on the staging site.
Easy, right?
InstaWP: Accessing the files of the staging site via File Editor
If you’re using a free account, InstaWP doesn’t allow us to create an SFTP account.
But it provides a browser-based Code Editor to help you edit the files of your staging website quickly.
How cool is that?
Anyway, to access the Code Editor, visit the InstaWP dashboard and find your staging site.
Next, hover over the name of the staging site and then click on “Code Editor”:
That’s all.
InstaWP: How to push changes from staging site to the production site or vice versa
Once the staging site is created, if you want to automatically push the changes between the staging site and the production site, unfortunately, there is no 100% reliable way to achieve this right now.
Not just InstaWP but any other service that is similar has the same problem.
This is because the staging site is being hosted on a totally different server, and if there is any network issue while pushing the changes from staging to the production site, it could break the production site in a really bad way.
So, the only solution I recommend is remembering the changes you made on the staging site and manually performing those changes on the production site.
If you want to update the staging site with the changes from the production site, then I would recommend deleting the old staging site and creating a new staging site from scratch.
Use a plugin to create a WordPress staging site
Before things get hard, this is the last easiest way to create a staging site.
But it is also the least reliable and most cluttered way to create a staging site.
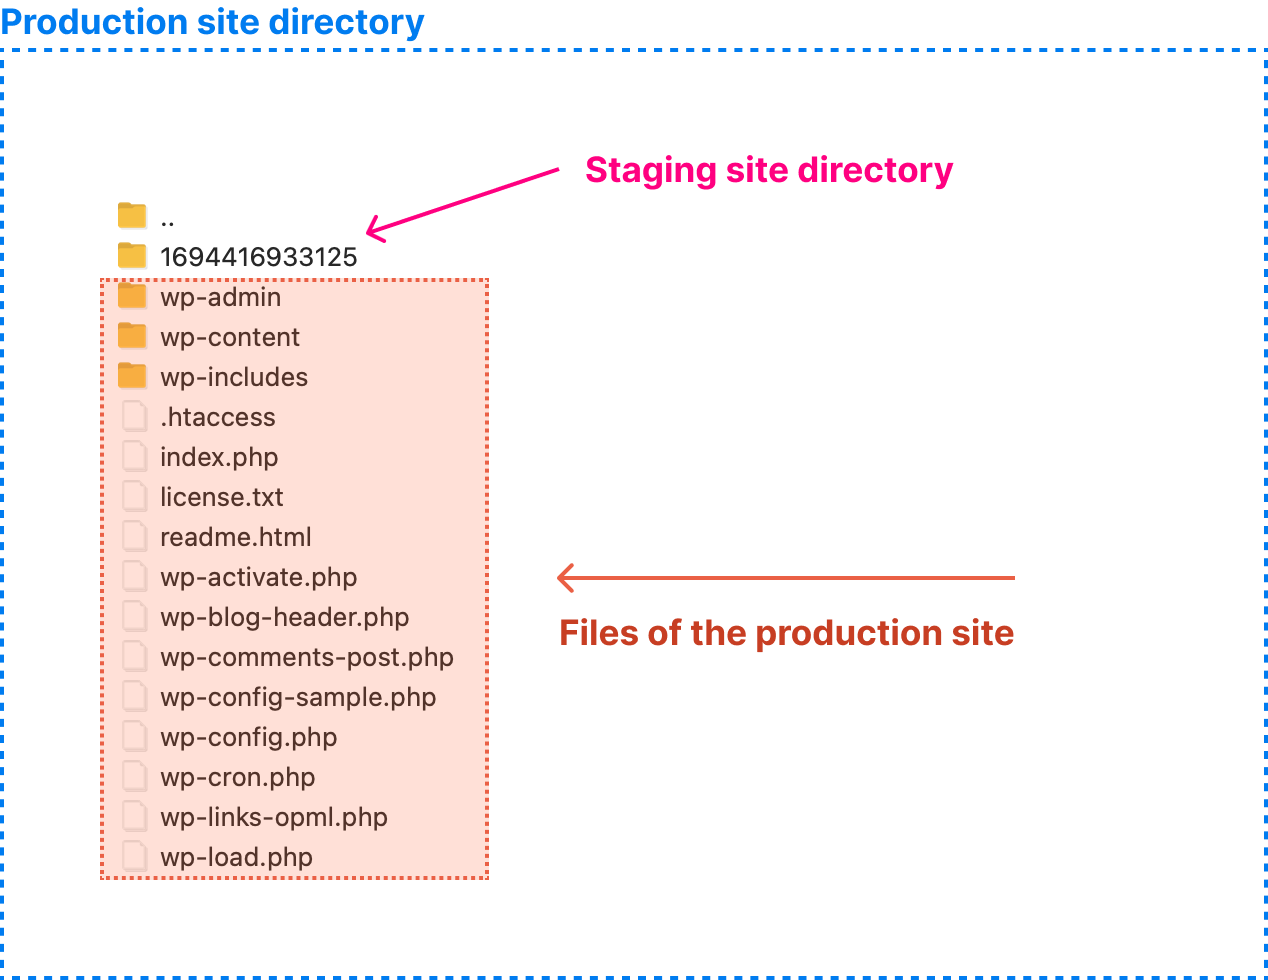
It is not so reliable because a staging site is created by creating a sub-directory inside the production site’s main directory:
Simply put, the staging site is put inside the folder structure of the production website, and it forces you to access the staging site as follows:
https://production-site.com/staging-site
So, in some cases, it could compromise the much-needed isolation between the staging and production sites.
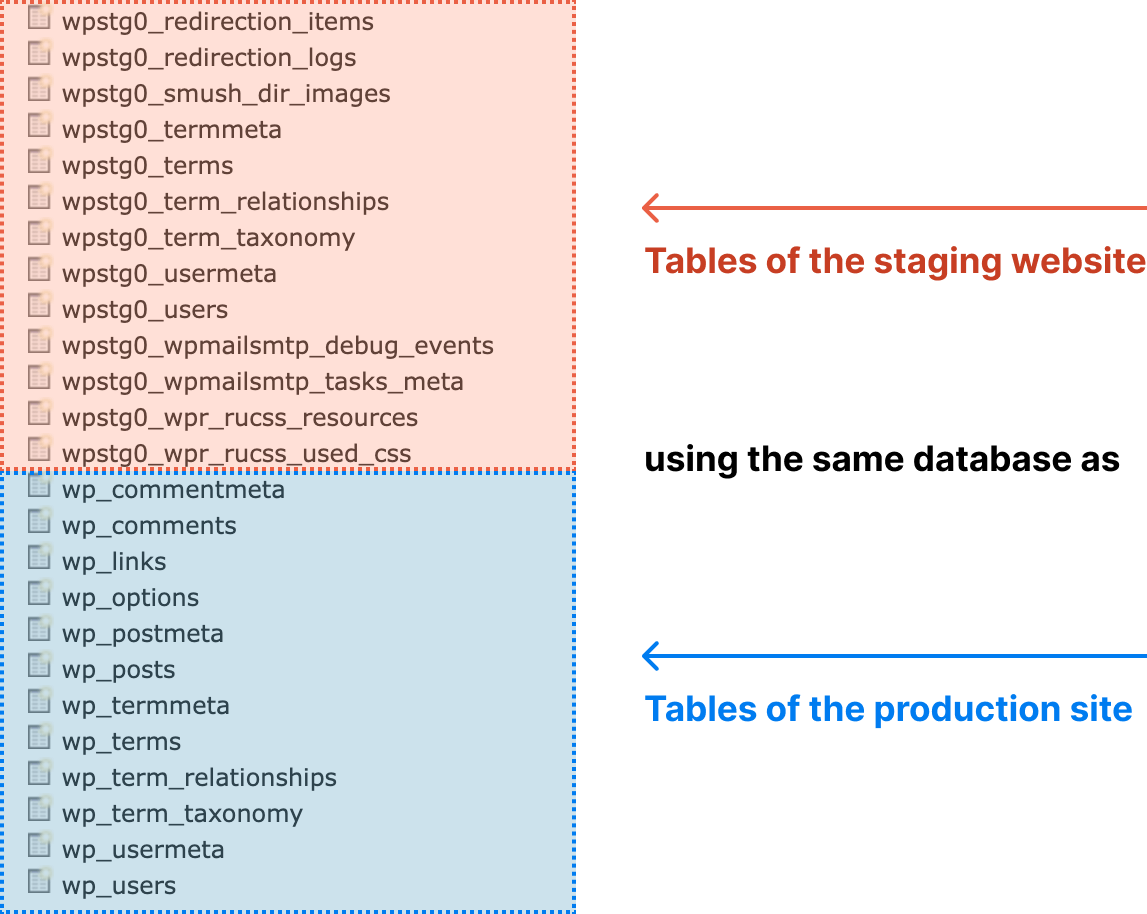
This technique also alters the database of the production website and adds extra database tables to it. This leads to the cluttering of the database and causes redirection issues:
So, because of all this, there is a bit of uncertainty that the production site could break.
And I have yet to find a plugin that creates a staging site in a reliable way.
If one plugin is working seamlessly on one website, it is causing problems on the other.
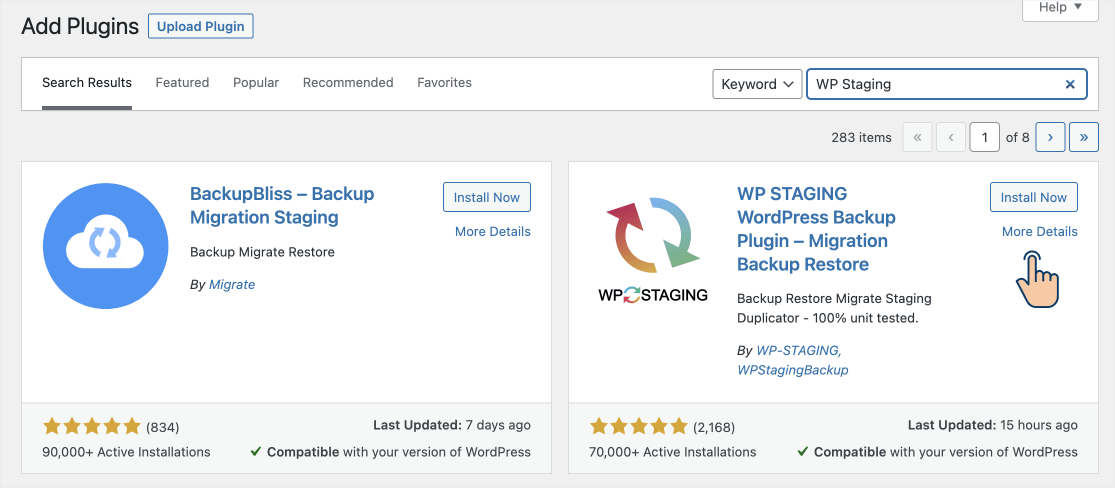
So, use the following staging plugins only if you don’t have any other option:
WP Staging – On one of my websites, I got stuck on the staging site’s dashboard and was not able to switch back to the production site. But it doesn’t mean you’ll have the same experience.
Backup Bliss – I personally haven’t faced any problems yet. But it doesn’t mean you’ll have the same experience.
Not just these two plugins but any plugin that creates a staging site inside the production website will have the same problems.
Also, take a backup of your original website before using these plugins. I had to perform a server-level reset because the WP Staging plugin created problems.
“Hey! InstaWP is also a plugin, right? So, Why is it reliable?”
Good question.
InstaWP is not a pure-plugin-based solution. It is more of a service that creates a staging site on a different server altogether. In other words, it doesn’t put the staging site in the same folder as the production website.
There is a reliable isolation between the staging and production sites so that one site doesn’t break another unless you manually push faulty changes.
It only uses the plugin to transfer files to a different server.
Anyway, just remember that pure-plugin-based solutions like WP Staging and Backup Bliss are double-edged swords.
And, by knowing what you’re getting into, here is how to use pure-plugin-based solutions to create a staging site.
How to use the WP Staging plugin to create a staging website
First, go ahead and install and activate the WP Staging plugin:
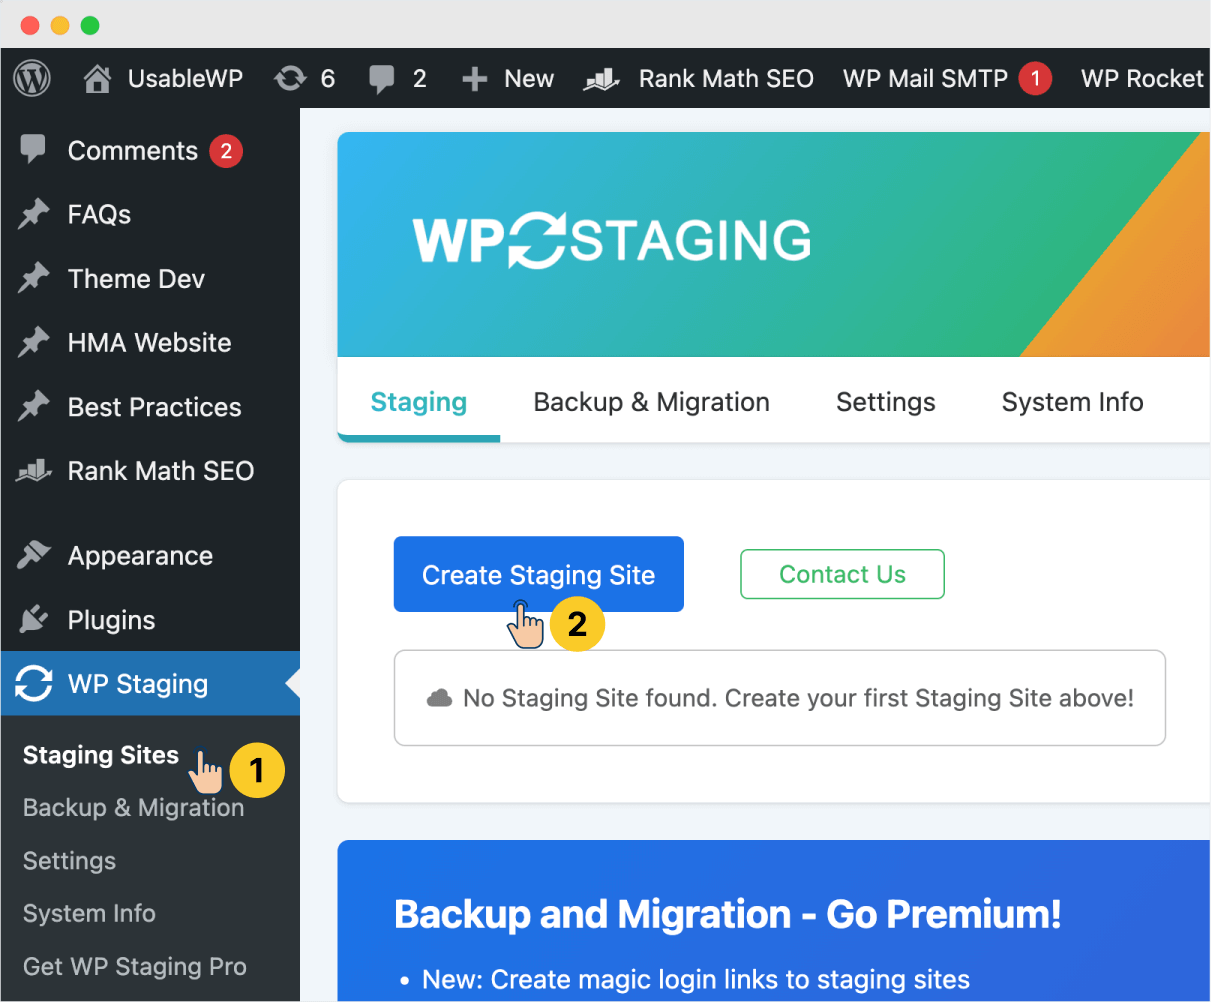
Next, from the admin menu on the left, go to “WP Staging” and click on “Staging Sites”:
Then, click on the “Create Staging Site” button.
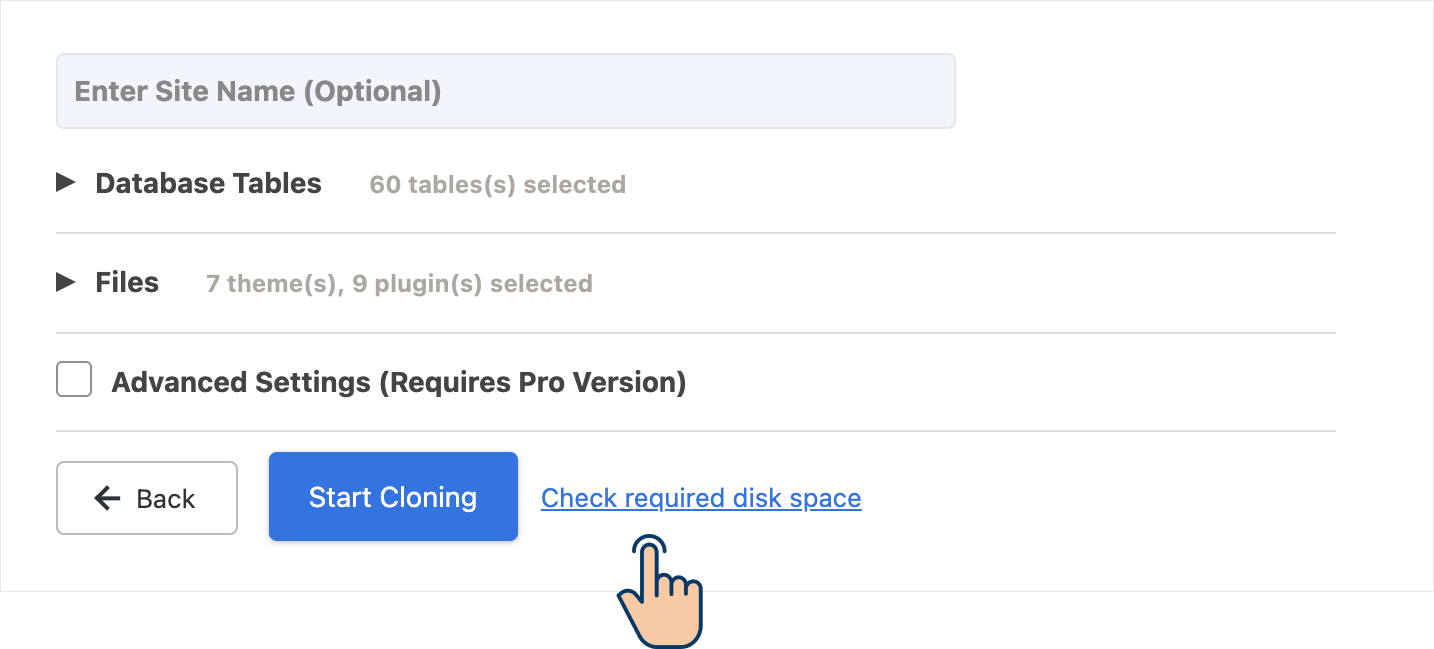
This will bring up the next step, where you can first check the available disk space on your server:
Disk space is not usually a concern if the web hosting company provides a built-in staging feature.
But when creating a staging environment using a purely plugin-based solution, it is important that you have enough disk space because web hosting treats it differently.
If you don’t have enough disk space because the staging site takes an additional amount of disk space that is the same as the production site, overused disk space will cause the web hosting company to shut down your production site or ask you to upgrade the disk space.
In most cases, utilizing all the disk space will negatively impact the performance of the production site.
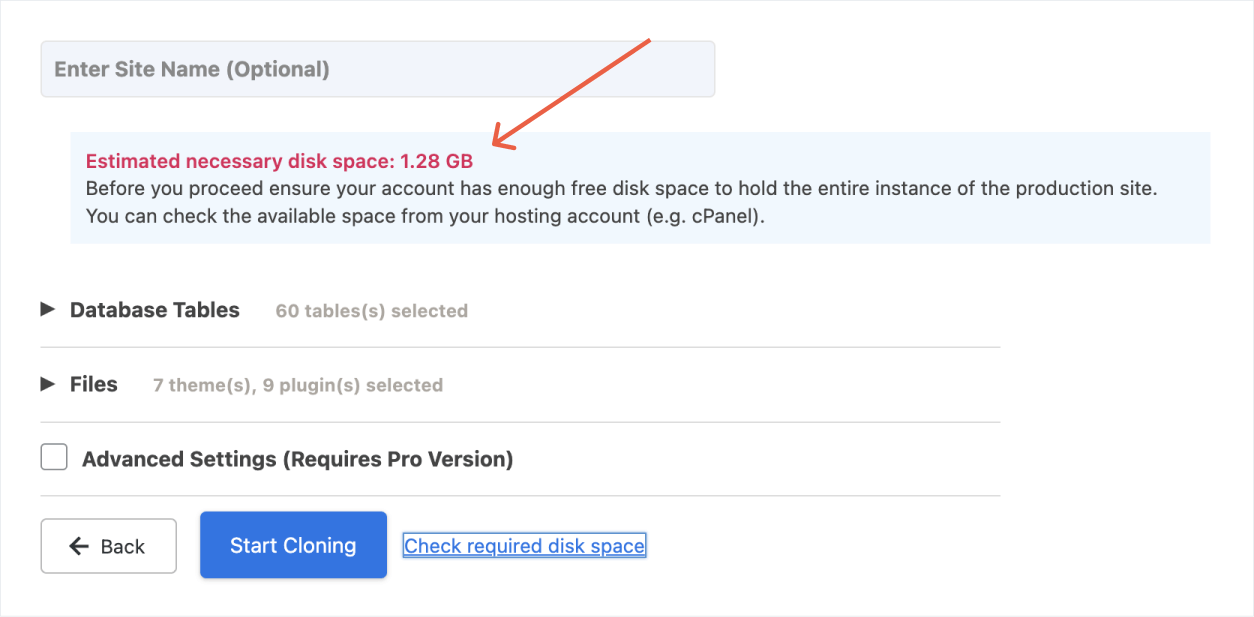
In my case, my site is currently occupying around 1.28 GB. This means I have plenty of disk space for the staging environment.
So, I will just click the “Start Cloning” button to start the staging process.
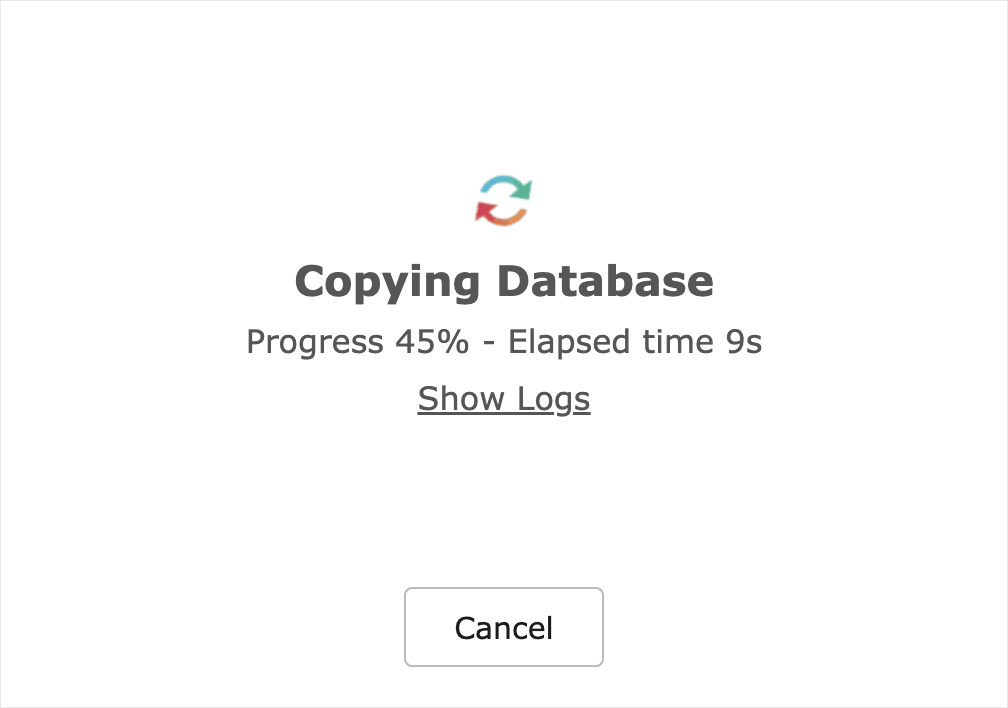
WP Staging plugin will now raise a popup with the progress indication:
The cloning process could take a good amount of time, depending on the size of the website.
But usually, it is fairly quick because the files are just being copied to a sub-directory of the production site.
Moving files in the same location takes less time when compared to moving files to a different server.
Anyway, my staging site is now created in less than five minutes.
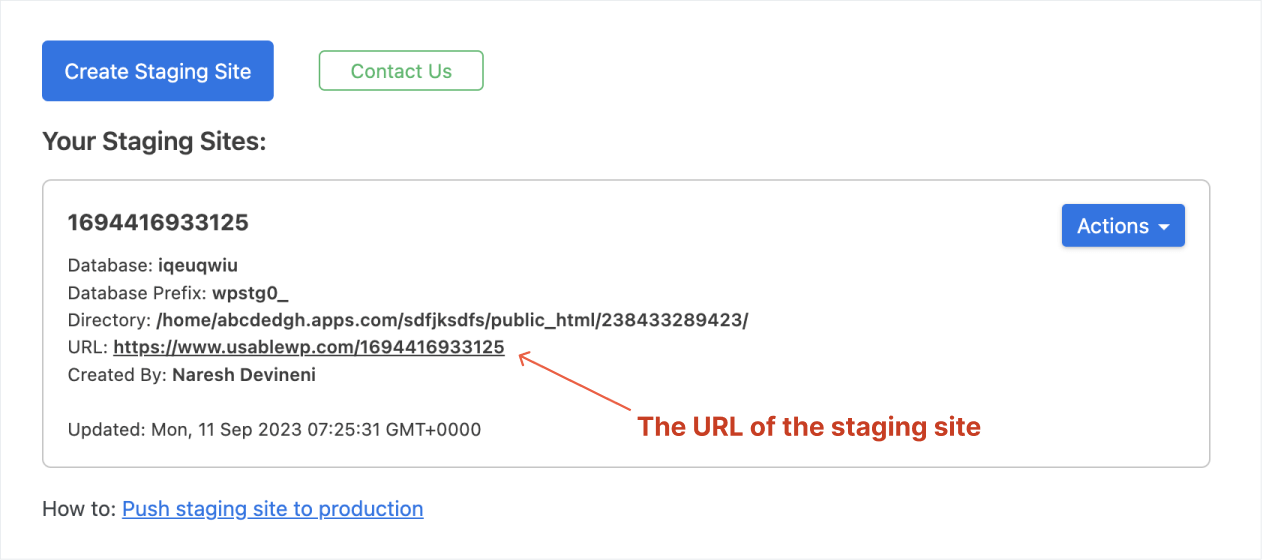
Close the “Success” popup to find the access details of the staging site.
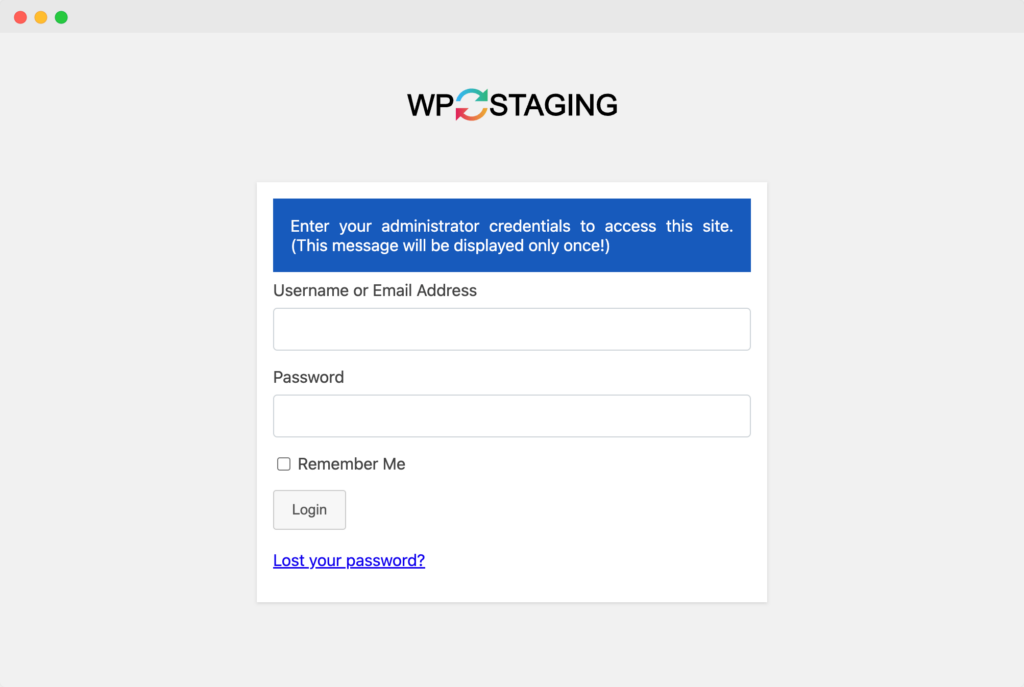
Next, you can access the staging site by clicking on the URL of the staging site and entering your WordPress Admin credentials.
That’s how you do it.
Backup Bliss, just another plugin-based staging solution, works in a pretty similar way too. So, try it out if you didn’t get good results with WP Staging.
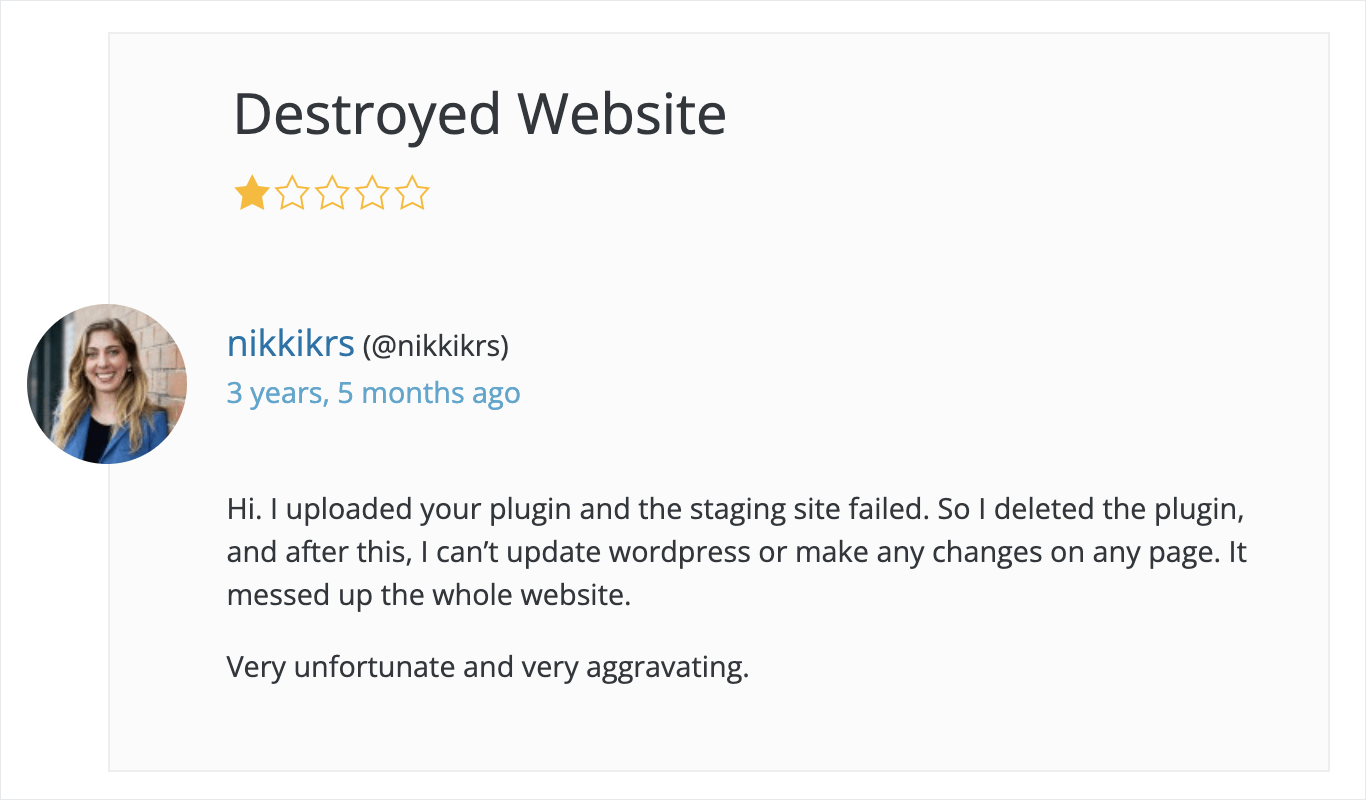
But fair warning again. Plugin-based staging solutions could ruin your website real hard.
WP Staging: How to push changes from the staging site to the production site
Only the Pro version of the WP Staging plugin will allow you to push the changes from the staging site to the production site and you can learn more about it here.
But honestly, if you were to pay for a purely-plugin-based solution like WP Staging, I would recommend investing in a hosting company that provides built-in staging feature.
Here are some of the best hosting services with good staging features:
InstaWP – Yes, it is also a very good web hosting company, like others
How to access files of the staging site when it is created using a plugin like WP Staging
Because the staging site was created inside the production site’s directory, you could use the same SFTP or SSH credentials that you use for accessing the files of your production site.
WP Staging: How to delete the staging site
It is important that you delete the staging site created with purely-plugin-based solution like WP Staging.
This is because it has currently cluttered your database.
So, once you are done experimenting with the staging site, just delete it.
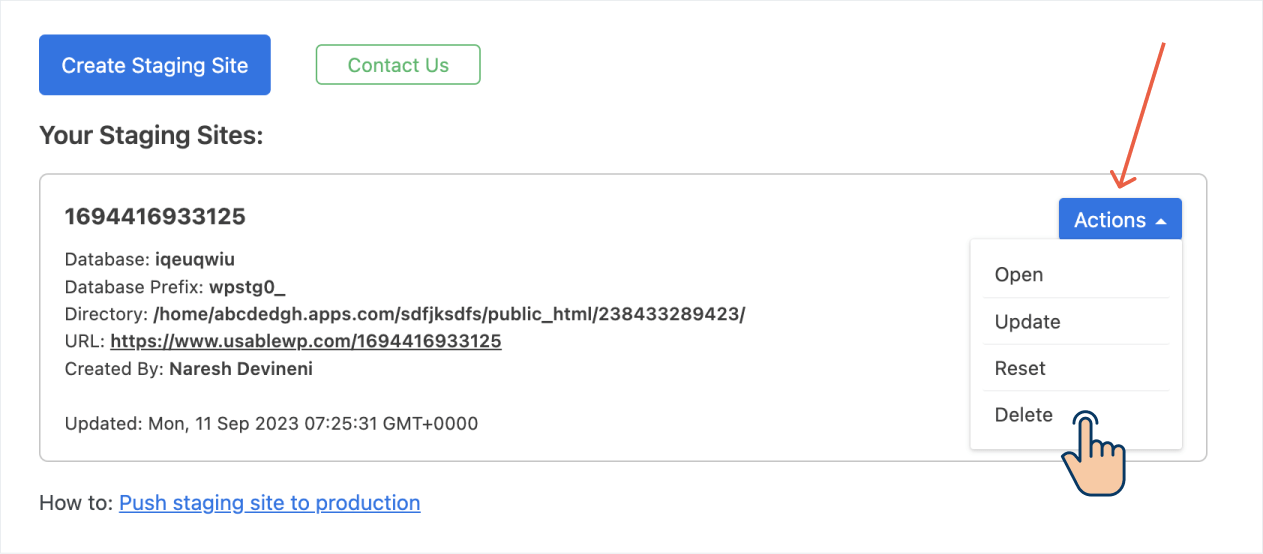
To achieve this, make sure you’re inside the Admin dashboard, and from the Admin Menu on the left, go to “WP Staging” and then click on “Staging Sites”.
Next, if you notice, there is an “Actions” inside the box related to the staging site.
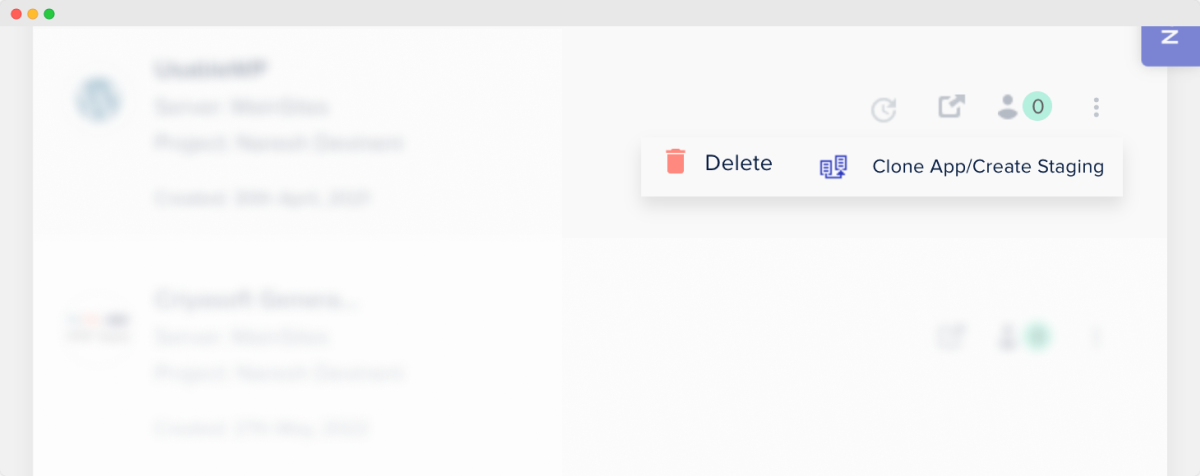
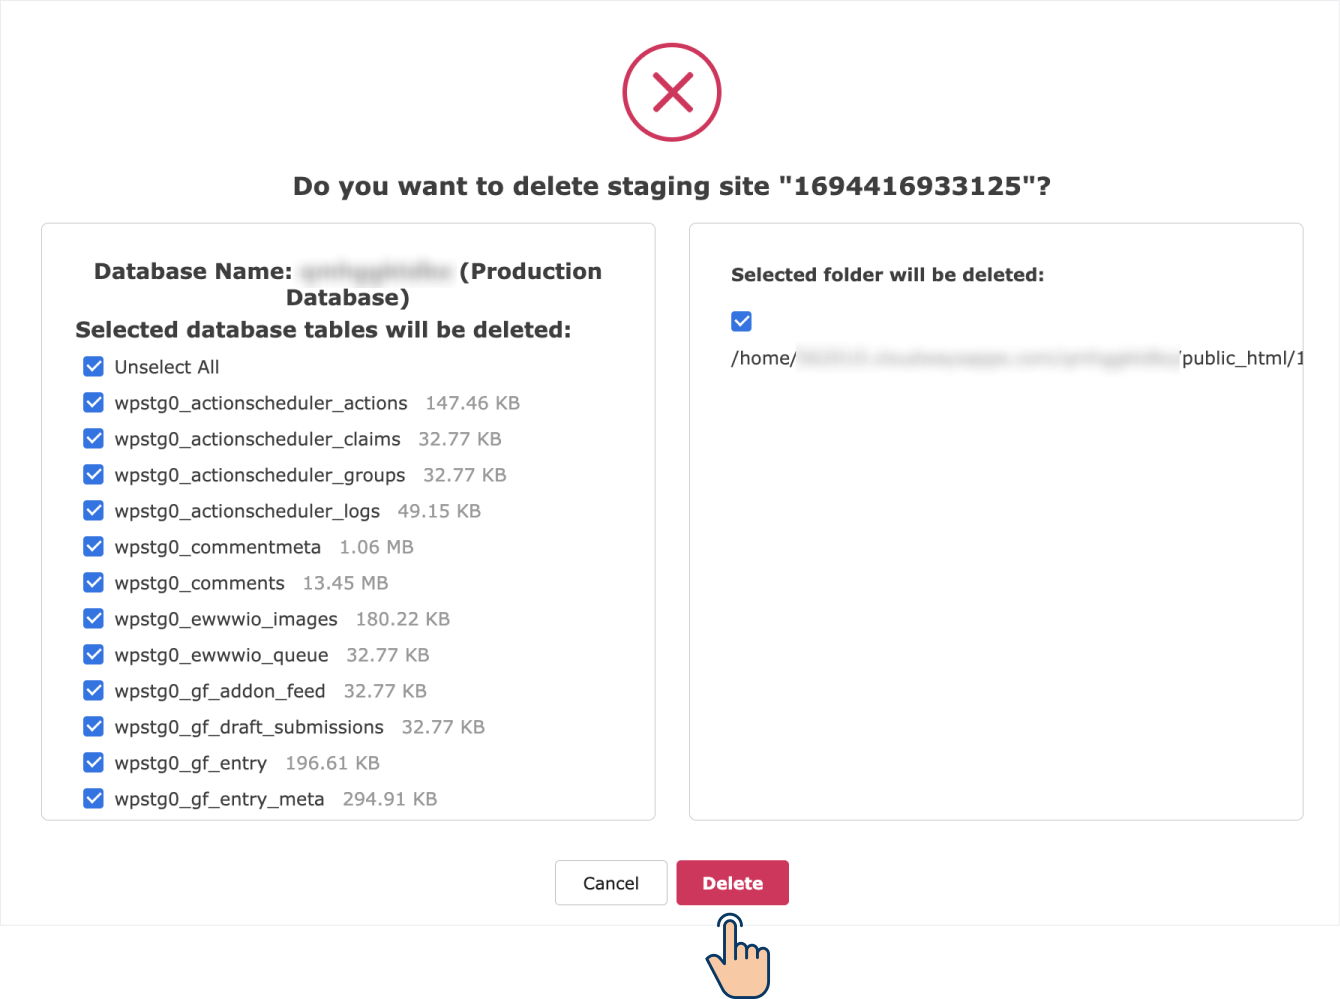
Click on it and then click on the “Delete” option to bring up the confirmation popup.
From the popup, make sure all the database tables related to the staging site and the directory related to the staging site are deleted:
Finally, click on the “Delete” button to get rid of the staging site permanently.
Later, when you need the staging site again, you could always create new staging site.
Irritating things noticed about creating staging sites with purely-plugin-based staging solutions
After deleting the staging site created with the WP Staging plugin, I tried deleting the plugin but I couldn’t find the plugin on the “Plugins” screen. Too bad.
BackupBliss plugin doesn’t provide a way to delete the staging site created. Too bad.
Because of both these issues, I had to perform a total website restore from yesterday’s backup.
So, I would once again recommend staying away from these plugins.
Frequently asked questions
Does WordPress provide staging?
No, WordPress doesn’t provide staging by default. Instead, the web hosting company and other third-party services provide staging functionality.
What is the difference between staging and live?
The only difference between the staging site and the live site is, that a staging is not visible to people on the internet unless a link is shared with them personally by you. So, you can perform experiments on it without thing that some might notice. Apart from that, we should always strive to make the staging site an exact replica of the live website.
How do I manually create a staging site in WordPress?
Manually creating a staging site simply means manually migrating your website from one web host to another by using a plugin Duplicator. This is a time-consuming, hectic, and error-prone process even for WordPress developers. So, I would recommend using a tool like InstaWP or moving to a hosting service that provides a built-in staging feature.
Can you use all of the functionality of your live site on the staging site?
Yes, that’s the purpose of a staging site and most hosting services or tools like InstaWP will help you create a staging site which is an exact replica of the live website.
Plugins and themes: How do plugins such as Jetpack work on staging sites?
Plugins and themes would work exactly the way they work on the staging site. But plugins like Jetpack are not that useful on the staging site. Most features of the Jetpack plugin can be tested on live sites only. So, I would recommend trying out Jetpack settings on the live site to test their impact. Always take a backup before doing any experiments on the live site.
Same for the FTP account, is it necessary to create a new one?
It depends on the approach you took in creating the staging site. If you have created the staging site using the web hosting’s built-in staging feature, you need to create a new FTP account because the web hosting company technically created a separate website on a separate folder. If you are using a third-party service like InstaWP, because your site got created on a separate server altogether, you need to create a new FTP account. But if you have used a plugin like WP Staging or WPVivid, because they create the staging site as a sub-directory of the production site, you can use the same FTP credentials.
Would this complicate things when switching from the staging site to replacing what is currently the live site?
Yes, but only if your website has a lot of user activity. For example, if you are running an e-commerce website, while you were working on the staging site, you could have received a purchase from the customer. If you replace the staging site with the live site, you can easily lose the order. This happened to many of my clients when they were not careful. So, if your website changes frequently with new e-commerce or new user-generated content, I would recommend applying the staging site changes manually on the live site.
The Conclusion
That’s all I wanted to convey about creating staging websites.
I have shared all my experiences.
If you know any other reliable technique for creating staging sites, please let me know in the comments below :)


 © 2026 UsableWP. A project by Naresh Devineni.