How to create FTP access for your website
Why do you need an FTP access for your website?
When you launch your website online, your website files are stored on a remote web server.
This web server will help people on the internet access your website.
But after launching your website, every now and then, you might need to edit the website files.
And you can achieve this in two ways:
- Using the “File Manager” provided by the hosting service.
- Using an FTP software that is installed on your personal computer.
Some hosting services include file managers as part of their interface and some don’t.
For example, Managed WordPress Hosting services almost never provide a file manager.
So, we need a way to access the files of our website and this is where the FTP access comes in handy.
So, What is FTP access?
FTP stands for File Transfer Protocol.
FTP helps you access your website files located on the remote web server and it allows you to do this from a software installed on your personal computer.
Basically, FTP will help you:
- Download files from a remote web server to your personal computer.
- Upload files to a remote web server from your personal computer.
- Create, edit, and delete files on the remote server.
How to use FTP?
Accessing your site files via FTP is a two-step process:
- Create an FTP account to get FTP credentials.
- Log into your remote web server using those credentials and a tool like Filezilla.
Step 1: Create an FTP account to get FTP credentials
An FTP Account can be easily created using the Admin Panel of your Web hosting service.
Most web hosting services will let you create an FTP account via cPanel or Plesk.
But some web hosts uses their own customized panel instead of cPanel.
So, there is no standarised interface to create an FTP account.
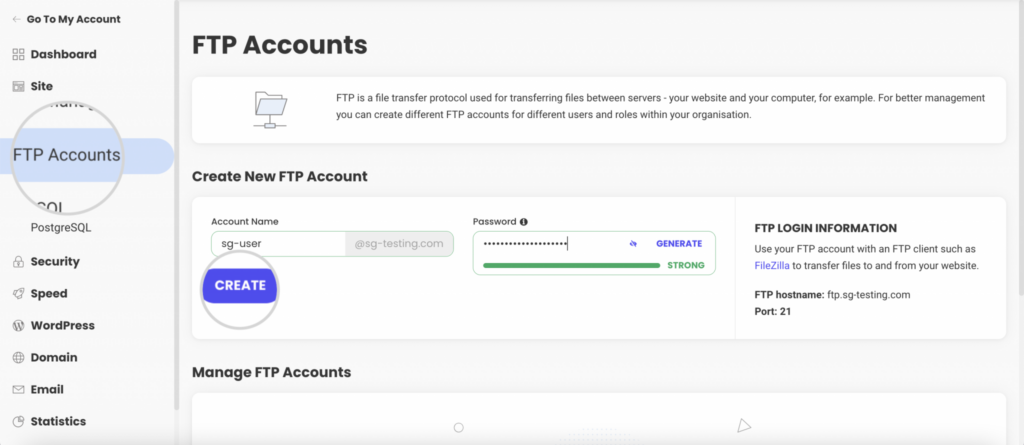
For example, here is the FTP Admin panel of Siteground:
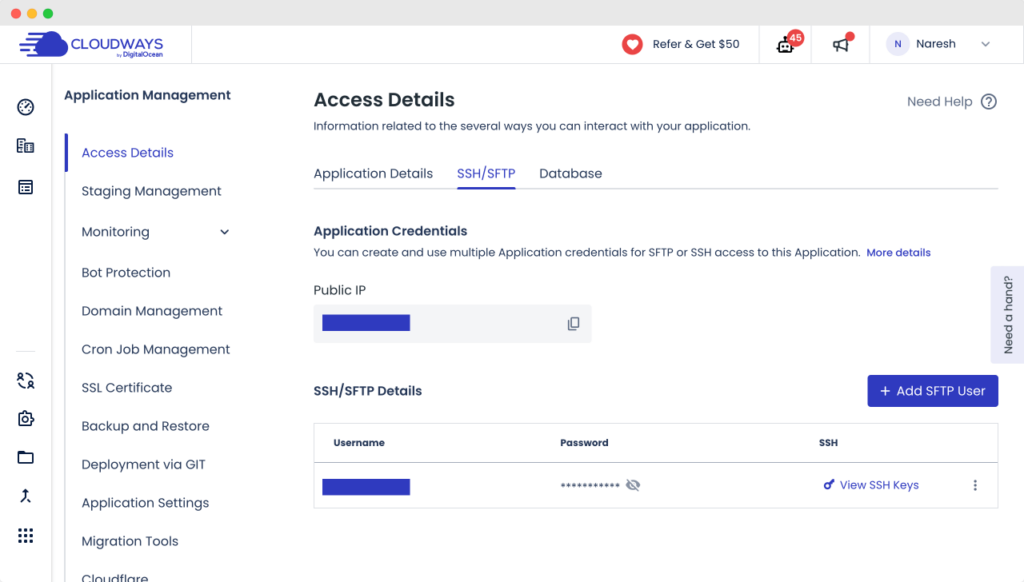
And Here is the FTP Admin Panel of Cloudways:
They look nothing like each other, right?
So the best way to learn about how to create an FTP account with your web host is to follow the guide provided by your web host itself.
Simply put, we need to find an FTP account creation guide that is specific to your web host.
To achieve that, go to Google Search and type:
“[Your Web Host Name] How to create an FTP account“
For example, “Siteground How to create an FTP account”.
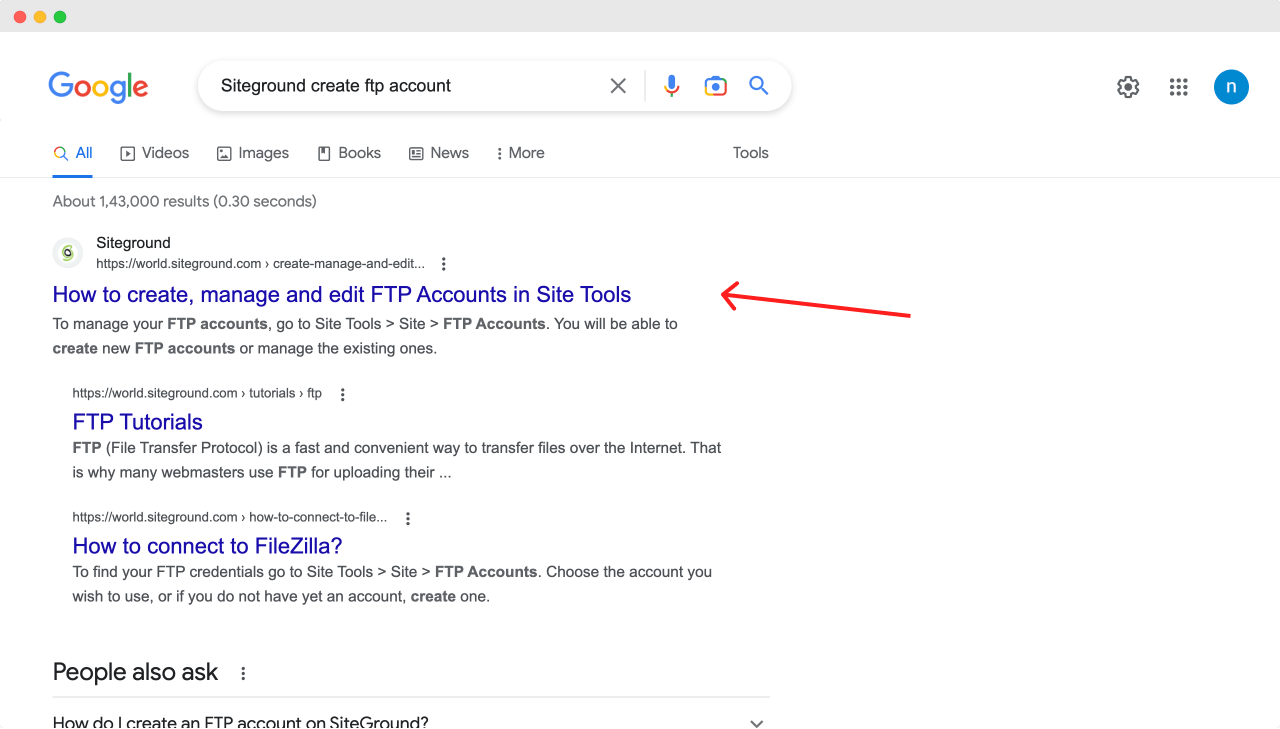
In most cases, you’ll find the guide within the first few results.
But if you can’t find it, reach out to the support team of your web hosting company and they will help you out.
Once you find the guide, follow it and create an FTP account for your website.
Introducing SFTP (Secure File Transfer Protocol)
Now, there are two versions of FTP:
- Non-secure FTP
- Secure FTP (SFTP)
Some web hosts will let you create an SFTP account instead of an FTP account.
SFTP simply means a secure version of FTP.
If your web hosting is providing an SFTP account, it is a good thing.
But at the end of the day, both SFTP and FTP do only one thing i.e. helping you manage your website files from your computer.
Anyway, after creating the (S)FTP account, you’ll get the following credentials:
- Host name
- Username
- Password
- Port number
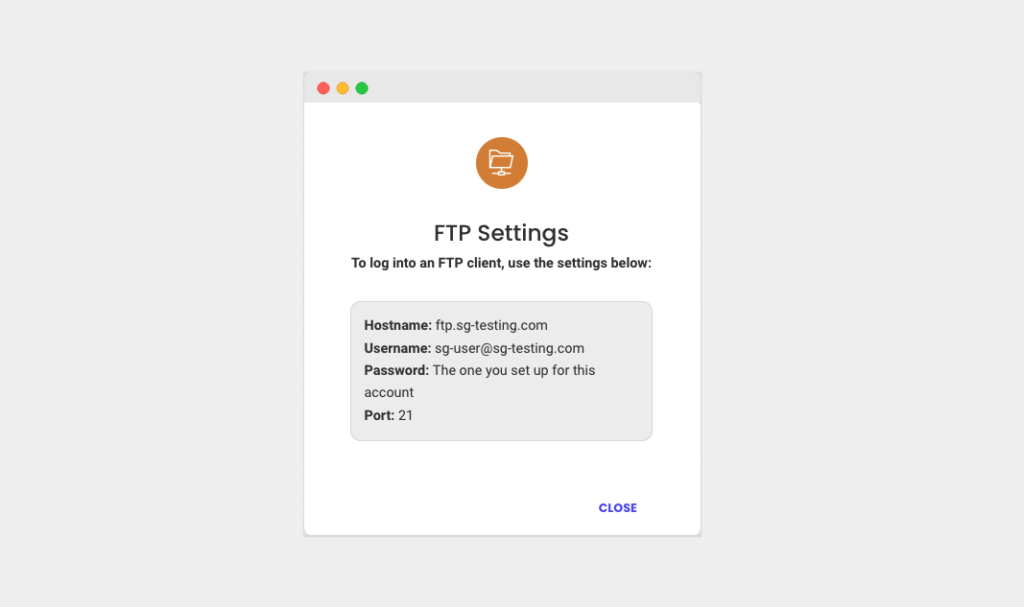
All these four credentials are important for accessing your remote website files using (S)FTP.
Now, remember the Username and Password in a secure way.
Keep an eye on the “Port” number
The default value for an FTP port is 21.
And for SFTP, the port number is 22.
But these default port numbers could change if we are dealing with SFTP (Secure File Transfer Protocol).
If we are using SFTP, the port number could be different from one web host to another.
For example, WPEngine changes its SFTP port for every site you create.
Sometimes it is 2222 and sometimes the port is 2342, etc.
You get the idea, right?
So, watch out for the port number.
Step 2: Access the files using an (S)FTP tool like Filezilla
Now that you have created an (S)FTP account with your hosting service, the next step is to access the files via (S)FTP.
For that, we need to log into your remote server using those credentials.
But how do log in?
This is FTP software like Filezilla comes in.
An FTP tool acts as the bridge between your computer and the remote web server.
There are many FTP tools, for example:
After using all of them for over a decade, Filezilla is my go-to FTP tool because it is free and supports Windows, Linux, and MacOS without any hiccups.
So, I will be teaching you how to use Filezilla for the purpose of this article.
How to use Filezilla
Come on, first, visit the download page on the FileZilla website.
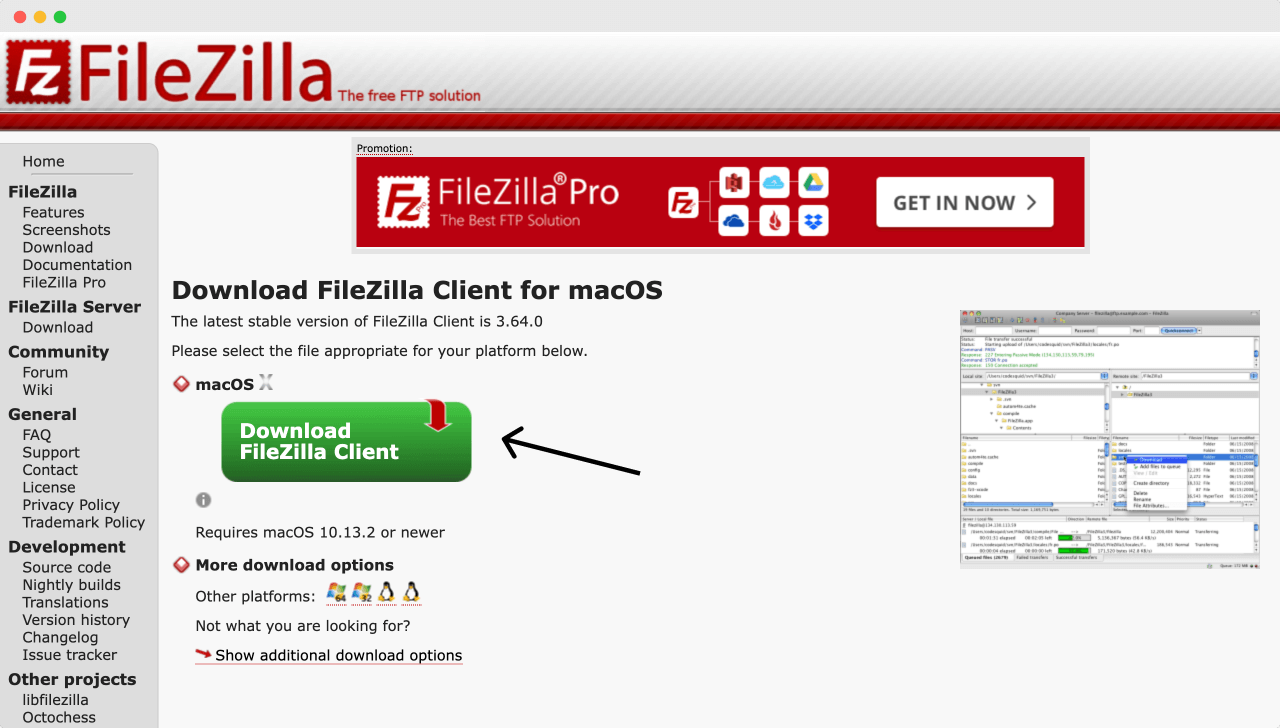
The download page will automatically detect your operating system.
So, just download Filezilla and install it. It should be an easy installation.
Once the installation is done, open up Filezilla. You should see something like this:
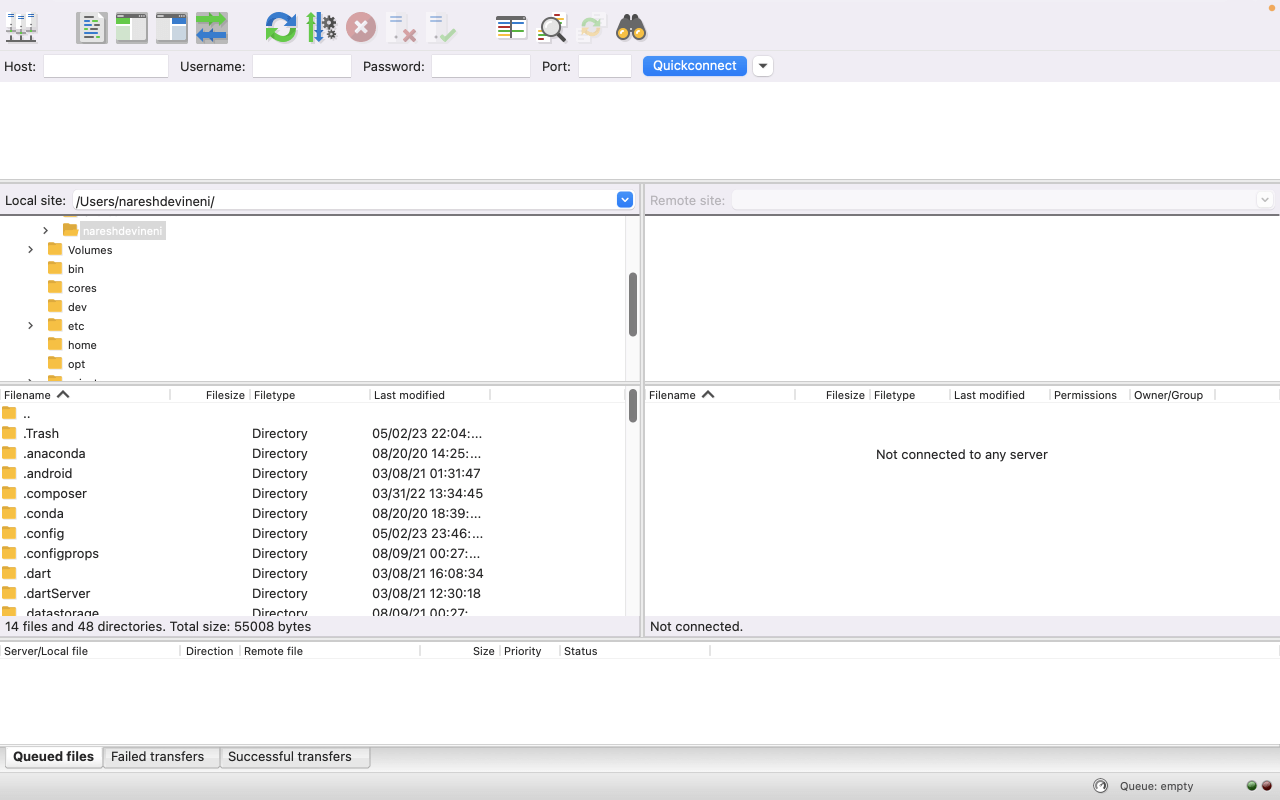
Next, inside Filezilla, we need to enter the FTP credentials provided by your web host to access your website files.
For that, we need to use the “Quickconnect” bar located at the top portion of Filezilla:

Come on, enter your credentials in their respective fields, and hit the “Quickconnect” button to access your site files via FTP.
If you are connecting to the remote web server for the first time, your computer will ask you whether you trust the remote web server or not.
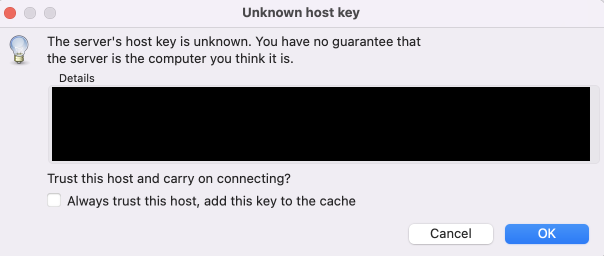
Just click on the “OK” button (also make sure not have any virus on your personal computer).
If all goes well, you should see:
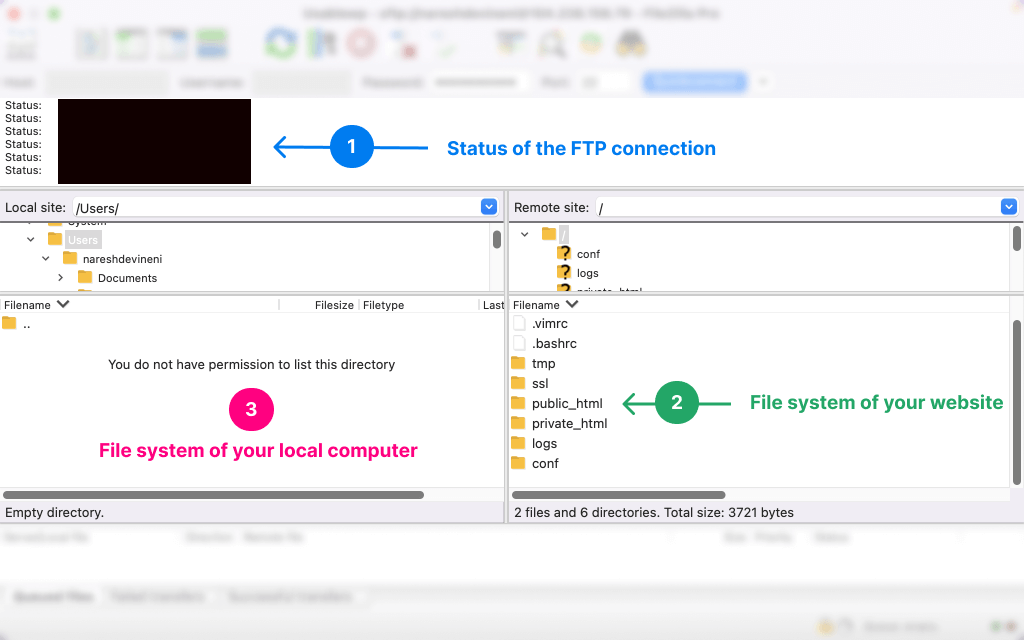
The interface of Filezilla can be divided into three major sections:
- The Status section: The status of the FTP connection is located at the top portion of the interface (1). If something goes wrong, the status section will display error notices. So, keep an eye on this.
- The remote file system section: the remote file system of your website is located on the right-hand side of Filezilla’s interface (2). If you want to manage the files of your website, use this section.
- The local file system: the file system of your personal computer is located on the left-hand side of the interface (3). If you want to upload your local files to the server, use this section.
The public_html directory
Mostly, on any web server, your website files are stored under the “public_html” folder.
So, don’t touch the other folders like logs, conf, etc., and go directly inside the “public_html” folder by double-clicking on the folder name.
Be careful while managing the website files using FTP
Now be cautious with your website files.
If you accidentally delete any file inside the “public_html” folder, your site could break down by throwing a Fatal error.
It is not easy to restore files on the remote server. So, just be careful with what you do using an FTP tool like Filezilla.
Don’t forget to save the file changes
When you have edited some files using Filezilla, make sure to save the file changes by using the commands:
- CTRL + S on Windows and Linux
- CMD + S on MacOS
When I was a beginner, I used to forget to save the file changes and paid a big price for my negligence.
Don’t do that.
Saving the FTP credentials for future use
So far, we have seen how to use the “Quickconnect” bar to connect to the remote server.
As the name suggests, one problem with the Quickconnect bar is it doesn’t save the FTP credentials for future use.
Once you close Filezilla, those credentials are gone. You have to re-enter those credentials when you open up Filezilla again.
The thing is, sometimes you need to make frequent file changes and it will become cumbersome to keep entering the FTP credentials every time you close Filezilla.
If that is the case, I want you to save the FTP credentials using the “Site Manager” feature of Filezilla.
If you notice, there is this big “Server icon” located on the top left-hand corner of the interface:
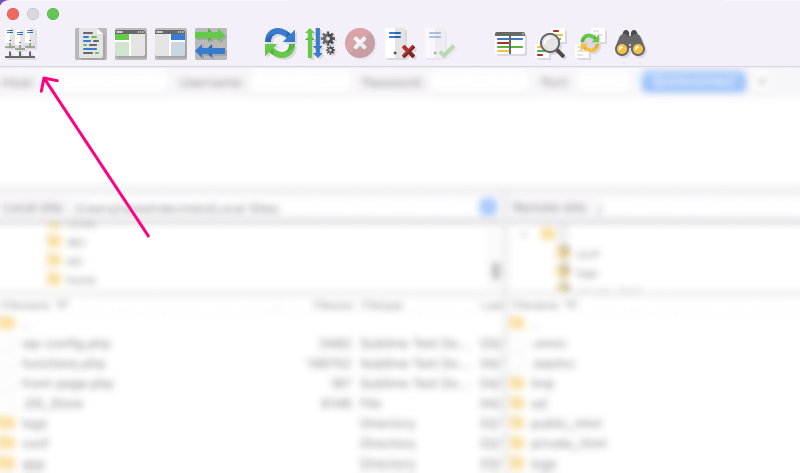
Click on it to bring up the “Site Manager” dialog box.
From here, we can save the credentials in three easy steps:
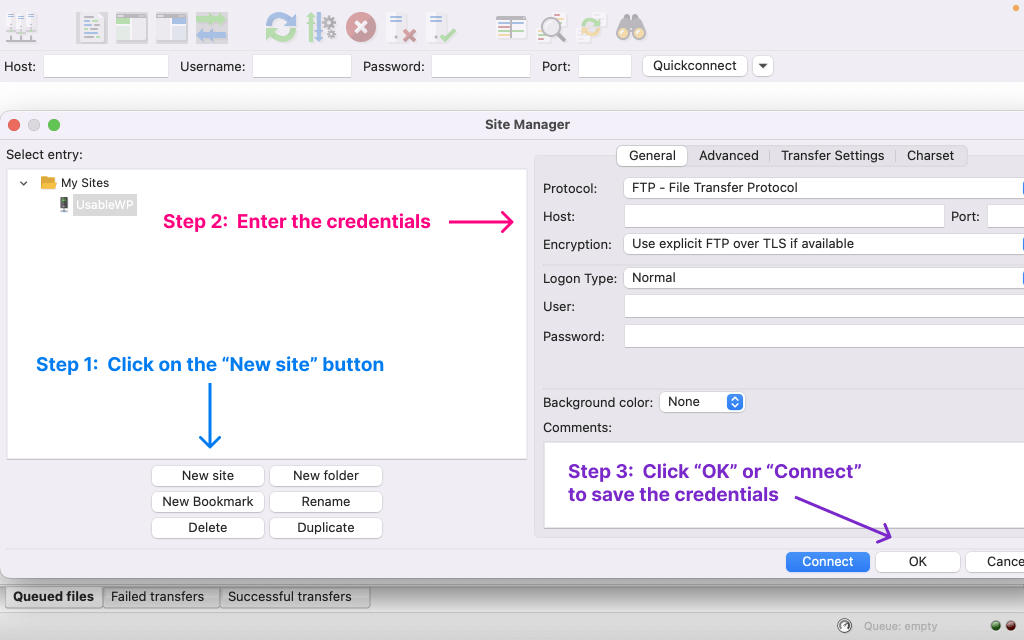
- Click on the “New site” button
- Enter the credentials on the right-hand side of the interface
- Finally, click on the “OK” button to save the credentials.
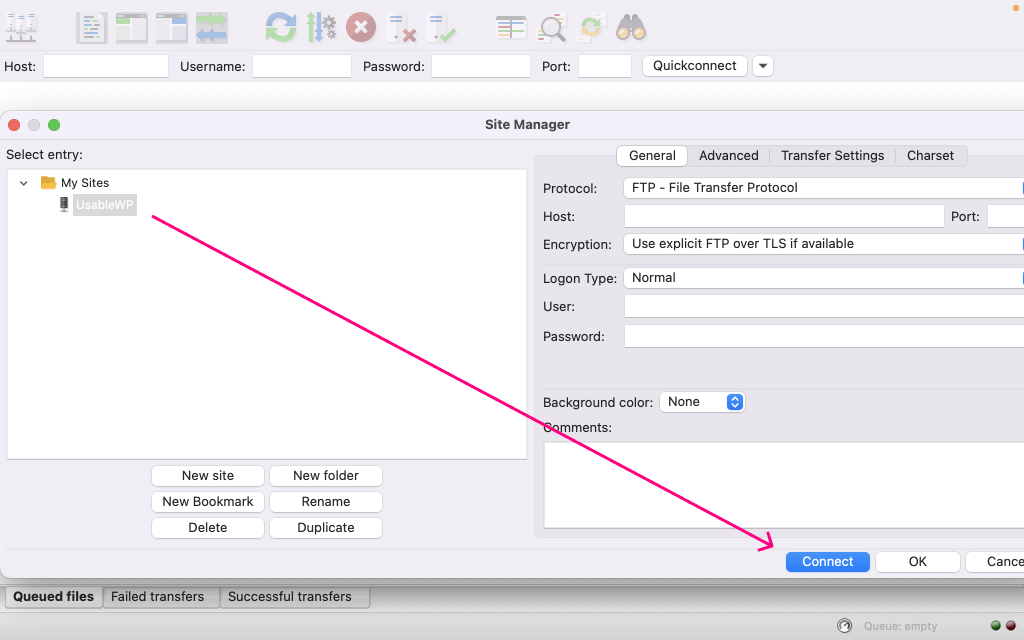
From the next time onwards, in order to connect to our remote website file system, all we have to do is:
- Click on the “Site Manager” icon
- Select the website
- Click on the “Connect” button to access your remote website file system
That’s all.
Easy, right?
The conclusion
That’s all for this lesson.
Most people get scared by FTP.
But if we are careful, it is one of the most time-saving tool of your website management experience.
I hope you found it useful.
I will see you inside the next guide :)

Previous Article

 © 2026 UsableWP. A project by Naresh Devineni.