Just enough command line interface(CLI) for website owners: Don’t worry. It is easy.
What is a Command Line Interface(CLI)?
The Command Line Interface (CLI) lets you control your computer by typing text-based instructions directly.
Actually, let’s back up a little bit.
There are two ways that you can interact with a computer and get things done:
- Command Line Interface (CLI)
- Graphical User Interface (GUI)
During the initial days of computer invention, people were provided with a Command Line Interface (CLI) to get the tasks done on the computer:
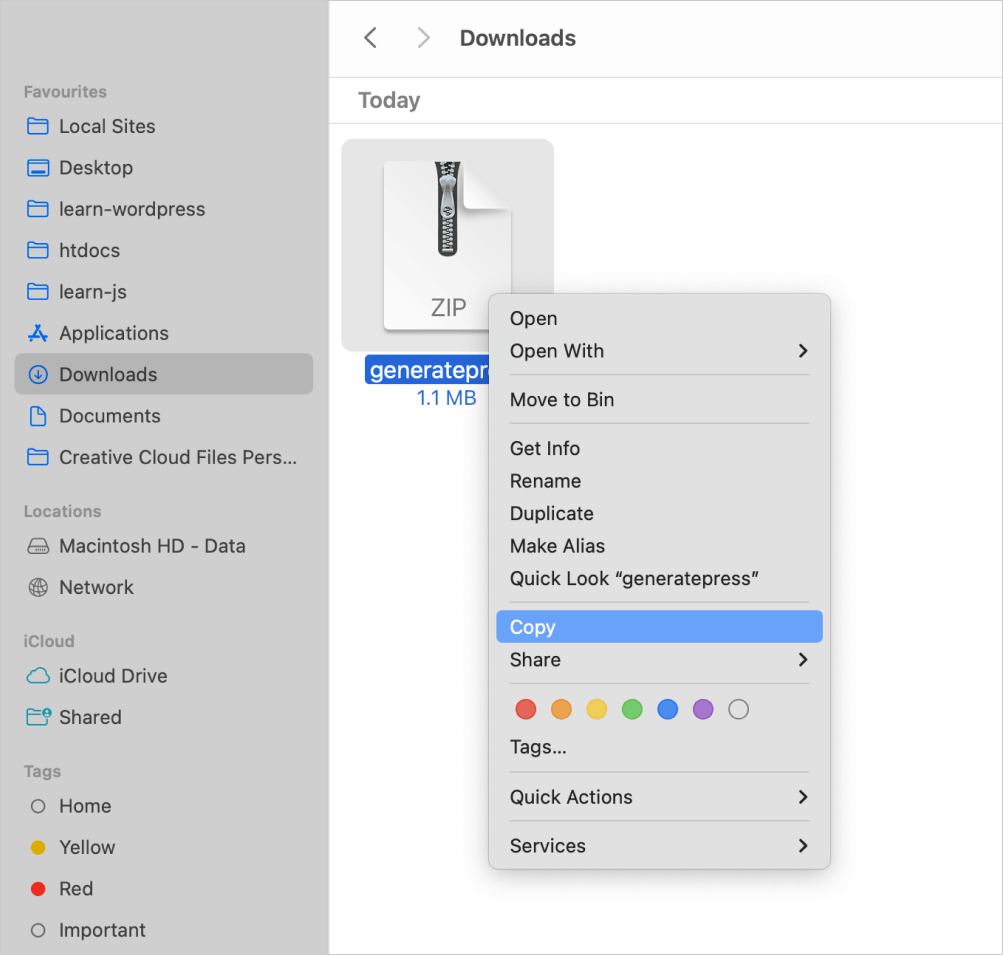
For example, let’s say you have a theme file called generatepress.zip, and you want to copy it from the “Downloads” directory to “Documents” on your computer’s hard disk (macOS).
You can achieve the above task by using the following command by opening up the macOS or any Unix-based OS “Terminal” app:
cp /Users/nareshdevineni/Downloads/generatepress.zip /Users/nareshdevineni/Documents
If you type the above command on the Command Line Interface (CLI), the computer will copy the file for you.
“cp what? That’s a lot to type just to copy a file 🙈”
Haha, I can understand.
Not just you; most people think that typing commands on a CLI is difficult.
This is why computer makers developed a Graphic User Interface (GUI) to help people use computers more easily.
A Graphical User Interface (GUI) will allow you to provide instructions to the computer by using:
- Mouse clicks
- Drag and Drop mechanisms.
For example, if you want to copy a file, instead of typing the copy Command and painstakingly typing the file paths manually, you can instead perform:
1) A right-click on the file
2) And paste the file anywhere you want
Easy, right?
Taking the usage of Graphical User Interfaces(GUIs) even further, software development companies released software such as:
- Microsoft PowerPoint to help you make presentations
- Adobe Photoshop to help you create images
- Autocad to help you design complex physical structures such as buildings, cars, etc.
- The list goes on and on

Today, many people make a living by providing services using GUI provided by computer makers and software companies.
I am one of them.
Having said that, in some cases, using GUIs comes at the cost of performance and time waste.
A CLI is just a plain computer window with pure text inside it:

It doesn’t display graphical elements such as icons, buttons, images, etc.
It displays output only through text commands.
So, CLIs tend to consume less computer resources. A CLI is quick to open and use.
However, GUIs tend to consume more computer resources than CLIs because they include graphical elements like windows, icons, buttons, etc.
These elements require processing power and memory, which can slow overall performance, especially on third-party servers where resources are limited and must be efficiently allocated.
For example, If you have ever used your web hosting’s file manager to take the backup of the website files, it takes forever to compress and download them:

Sometimes, we may not be able to perform the task altogether because of timeouts.
This is because using a web hosting’s file manager through a web browser’s GUI can introduce additional network latency compared to direct file system access via CLI.
Each action performed in the GUI-based file manager, such as opening directories, compressing files, or downloading them, requires communication between the user’s device and the server hosting the file manager.
This network communication overhead usually results in slower response times, especially for tasks involving large files or directories.
So, when you want to work with your website files located on your web host’s server, it is recommended that you use a CLI to perform tasks.
Anyway, before we start learning the basics of the command line, I want to share a real-world nightmare experience I had to go through because I was not using the command line.
I once struggled a lot to move a 3.8GB WordPress website by using the GUI provided by the hosting services
Three years ago, I once received a request from a client asking to move a 3.8GB site from Siteground hosting to Kinsta.
Here is how the over-simplified process of the migration looks like:
- First, I should compress the
wp-contentdirectory (3.8GB) located on the Siteground Server as a zip file. - Next, I should download the compressed
wp-content.zipfile - Then, I should upload the
wp-content.zipfile to the Kinsta Server - Finally, I should unzip the
wp-content.zipfile on the Kinsta Server
For the first step of compressing the wp-content directory (3.8GB), I tried Siteground’s file manager because it is an easy approach.
But I faced timeout after timeout. Almost 1 hour was wasted trying.
But luckily, somehow, the wp-content.zip file was created soon after 1 hour.
Next, it took me ten minutes to download the zip file.
Then, it took me another ten minutes to upload the zip file to Kinsta’s server.
Finally, it took me a lot more time to unzip the file using Kinsta’s file manager.
The file migration was supposed to take 20 minutes, but it took nearly two hours because I was using an easy-to-use GUI provided by both hosting services.
But guess how much time it would take if I followed the same process on a Command Line?
Come on, go ahead and guess…
“20 minutes, Bro?”
Haha. It takes less than 10 minutes because the Command Line has more direct access to the computer’s file system than a browser-based Web GUI.
A bit later in this article, I will show the 12 commands I used in the span of 10 minutes to get the job done.
I don’t want to show them now because I don’t want to scare you 🤣
Anyway, that’s the power of the command line in terms of performing tasks for the internet.
So, it is important that you learn Command Line if you want to get things done fast.
“But bro, you are scaring me already 🙈”
It’s okay, don’t worry.
Typing commands may be difficult initially, but you’ll become habituated to them once you start typing them regularly. Simply put, it gets better with practice.
Shall we learn some of the most useful commands as a WordPress site owner?
First, we will try different commands locally on your computer, and once you get some confidence, we will try the same commands on a remote web server.
Okay?
“Yep!”
Cool.
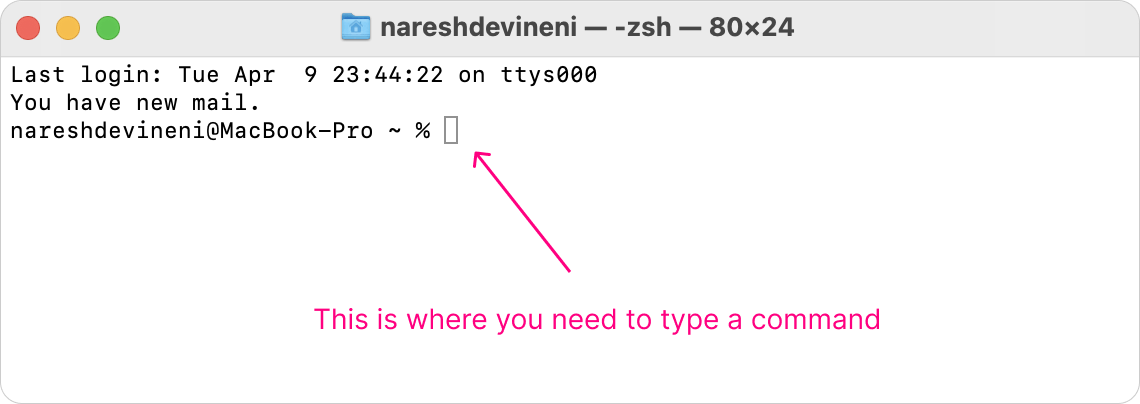
First, you must learn how to open up a command line tool on your computer.
Another name for the command line is “terminal”.
So, from now on, you’ll hear the words command line and terminal interchangeably.
The way you open up a terminal tool depends on the operating system you’re using.
If you’re using macOS or any other Unix-based operating system like Ubuntu, there is a pre-installed app called “Terminal”.
To use the Command Line on macOS or on Unix-based OS, you just need to open the “Terminal” app.

The “Terminal” app looks similar to this as soon as it opens up:
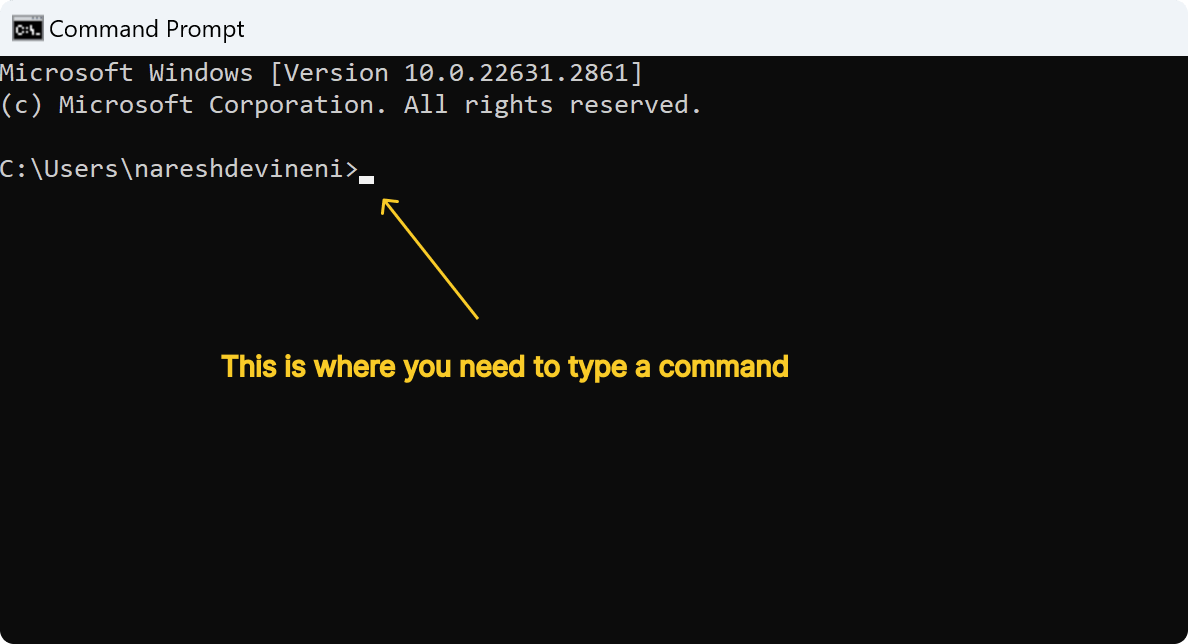
If you’re using Windows OS, there is a pre-installed app called “Command Prompt”:
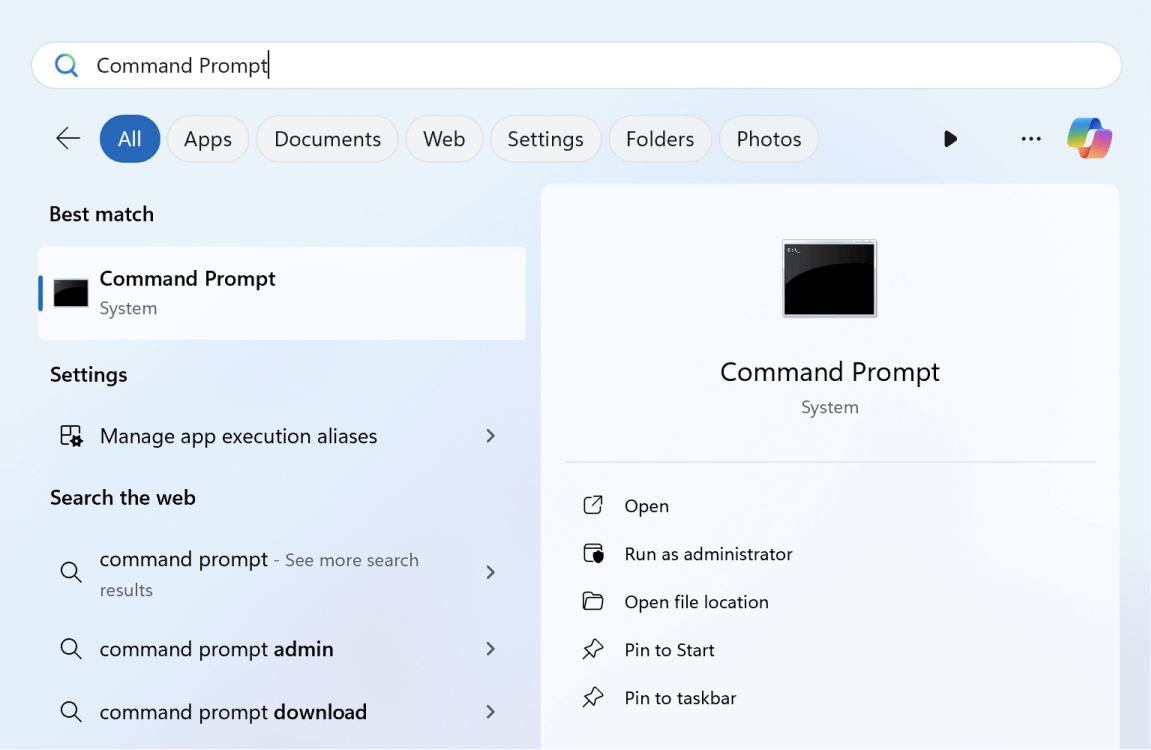
To use the Command Line on your Windows OS, you need to open up the “Command Prompt” app.
The “Command Prompt” app looks similar to this as soon as it opens up:
The Terminal App on macOS and other Unix-based OS is different from Command Prompt from Windows OS
Long story short: The command names will change based on the operating system. Only a few command names will remain the same across all operating systems.
macOS is a Unix-based operating system, and so is Ubuntu, Fedora, Debian, CentOS, etc.
The thing is, apart from very few differences, all Unix-based operating systems will have the same command names that you can use on a CLI.
In other words, Ubuntu is a Unix-based OS, and macOS is a Unix-based OS, too. So, the commands to complete a task will look the same.
However, Windows OS differs from Unix-based operating systems like macOS, Ubuntu, Fedora, etc.
So, the command names will drastically change. Only a few commands have the same name.
For example, if you want to copy a file from one folder to another:
On Windows Command Prompt, you’ll use the copy command like this:
copy C:\Users\nareshdevineni\Downloads\generatepress.zip E:\themesBut on macOS and other Unix-based operating systems, you’ll use the cp command instead of the copy command:
cp /Users/nareshdevineni/Downloads/generatepress.zip /Users/nareshdevineni/themesPlease keep this in mind.
We open up a command line tool to perform operations on files and directories.
That is what the Command Line Tool does the best.
It helps you manage directories and their files in a quick span of time.
In fact, here are the most common tasks we perform when using a command line tool:
- Listing the files of a directory that you are currently inside
- Navigating between various directories on your computer
- Copying and pasting a file or directory in a different location
- Moving files or a directory from one location to another
- Running executable files inside a particular directory
- Compressing and zipping files and directories and extracting them later
- Creating a file, multiple files, or a directory
- Deleting a file, multiples, or a directory
- Finally, connecting to a remote computer, let’s say “web server”, to perform the above operations :D
- Figuring out where exactly you are inside the file system of your computer
As you can see, we will mostly deal with directory and file operations.
But before you learn how to deal with the above scenarios, you need to understand the concept of the “Home” directory.
The starting point: Understanding the “home” directory
When we open a command line tool, we are automatically placed inside something called the “home” directory.
The “home” directory is not a directory that is named “home”.
Instead, the “home” directory represents the main directory of a logged user account on the computer.
Most people protect access to their computer by creating an account with a username and password:

And a computer can have any number of user accounts.
Therefore, it is important for the computer not to let one user account access the files on other user accounts.
So, when you create a user account on a computer, the operating system typically creates a dedicated directory for that particular user account.
This isolation helps ensure your files are inaccessible by other user accounts on the same machine.
All operating systems do this. Windows, macOS, Unix, etc.
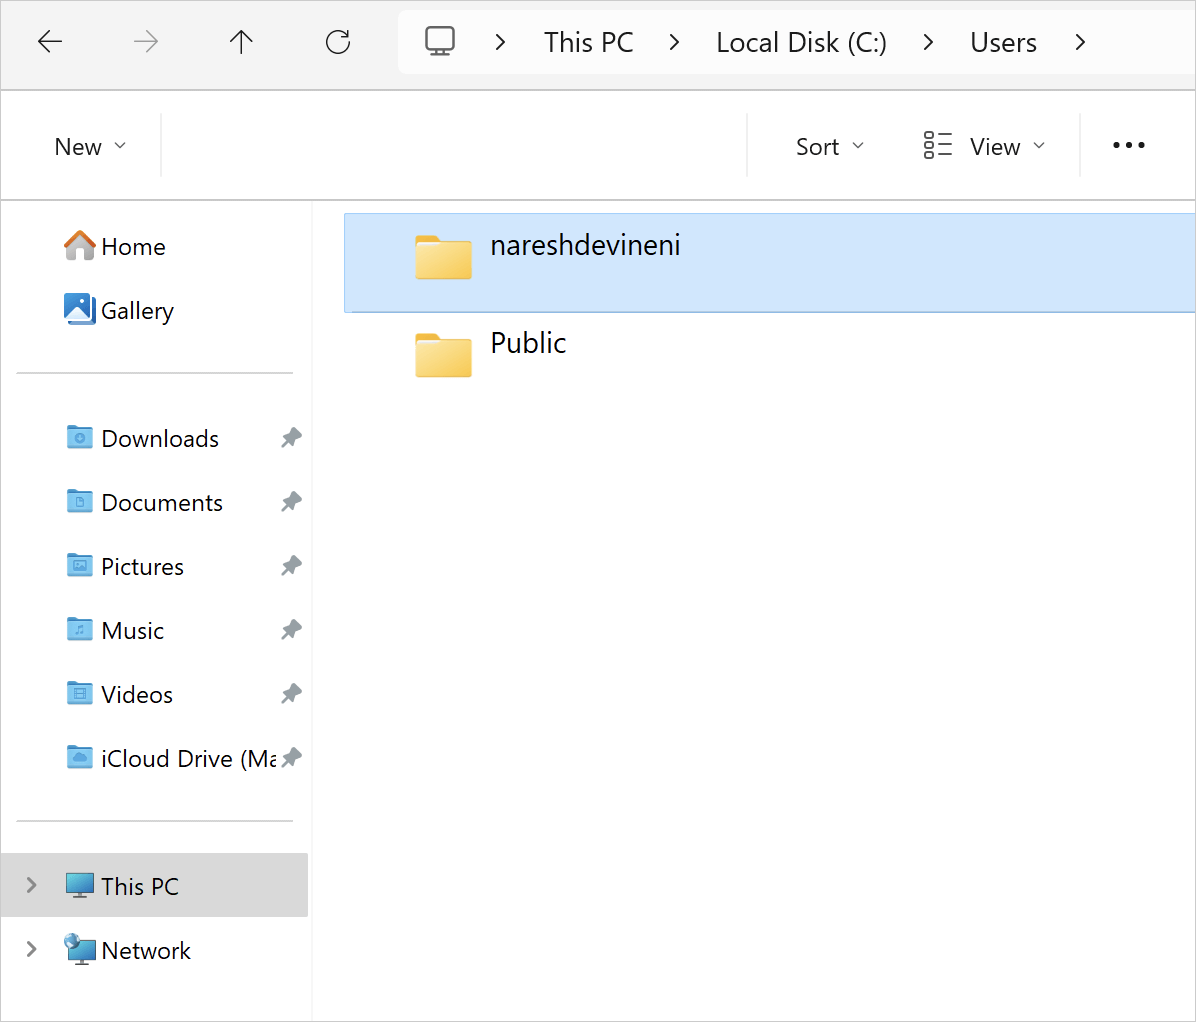
For example, when I created an account on my MacBook Pro, it created a dedicated directory named “nareshdevineni”, and it was put inside the “Users” directory:

The same thing happened when I created a user account on Windows OS, too.
When I created an account on Windows OS, it created a dedicated directory named “nareshdevineni”, and it was put inside the “Users” directory:
We call this user account’s dedicated directory the “home” directory of that particular user account.
I am explaining the purpose of the “home” directory because whenever you open a CLI, you are automatically placed inside your user account’s home directory.
Let me elaborate.
The “home” directory is similar to the “home” screen we see immediately after logging into a computer.
If you observe, whenever you log into your personal computer, you’ll be taken to the “Desktop” directory automatically.

And you’ll start controlling your computer using this desktop and the toolbar options.
Similarly, when you open a command line tool on any operating system, you’ll be automatically taken to your user account’s directory.

For example, when I open up Command Line after logging into my computer, it automatically places me inside my user account’s folder called “nareshdevineni” because that’s my “home” directory.
From now on, I will call the personal user account directory as the “home” directory.
Anyway, the same is happening on both macOS and Unix OS, too:

On macOS or Unix, the ~ (tilde character on keyboard) represents the user account’s home directory.
Alright, now that you know where you are currently inside your Command Line tool, it is time to try some basic commands.
Listing the contents of a directory that you are currently inside
Because we are opening up a CLI tool to deal with files and directories, it is important that we know what files and directories are present inside a particular directory and then perform some tasks on them.
If you are using a graphic interface, we achieve this with the help of mouse clicks.
However, because we are using a CLI, we need to use a command to achieve it.
On Command Prompt(Windows OS), you can see the directory contents by typing the dir command and then hit the “enter” key on the keyboard
Come on, open up the command prompt on your Windows machine.
As I said before, when you open up a CLI tool like Command Prompt, you are directly placed inside the “home” directory.
So, when you type dir command and hit enter inside the Command Prompt, it will give a list of files and directories inside your “home” directory:

As you can see, it looks like my user account’s home directory, “nareshdevineni” has many directories. I have highlighted them using the yellow border.
Also, if you notice, on the left-hand side of each directory name, you can see the time and date of when that particular directory or file was created.
Anyway…
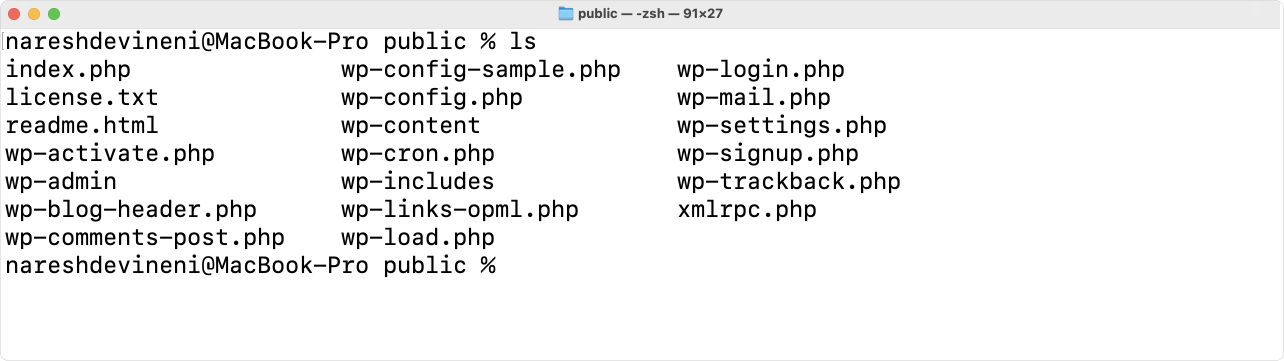
If you are using a Unix-based operating system such as macOS or Ubuntu, you can see the list of files by typing the ls command:

But unlike Windows OS dir command, by default, the ls command does not show additional details about the files and directories that are being listed.
We can fix this by adding a modifier to the ls command.
Introducing command modifiers
Every time you type a command in a terminal, it produces an output or triggers a behaviour.
We can change the default output or the default behaviour of a command by adding modifiers to it.
For example, previously, when we typed the ls command on my macOS terminal, it only displayed the names of directories and files, but their creation date and other information were not displayed.
We can easily fix this by typing the ls command with a modifier called -l:
ls -lAnd we can now see more information about each directory and file that is listed:

That’s the power of a modifier, and there are many modifiers that cover all the tasks that you perform when using GUI, such as, sorting the order of the files.
How to reveal hidden files in a directory
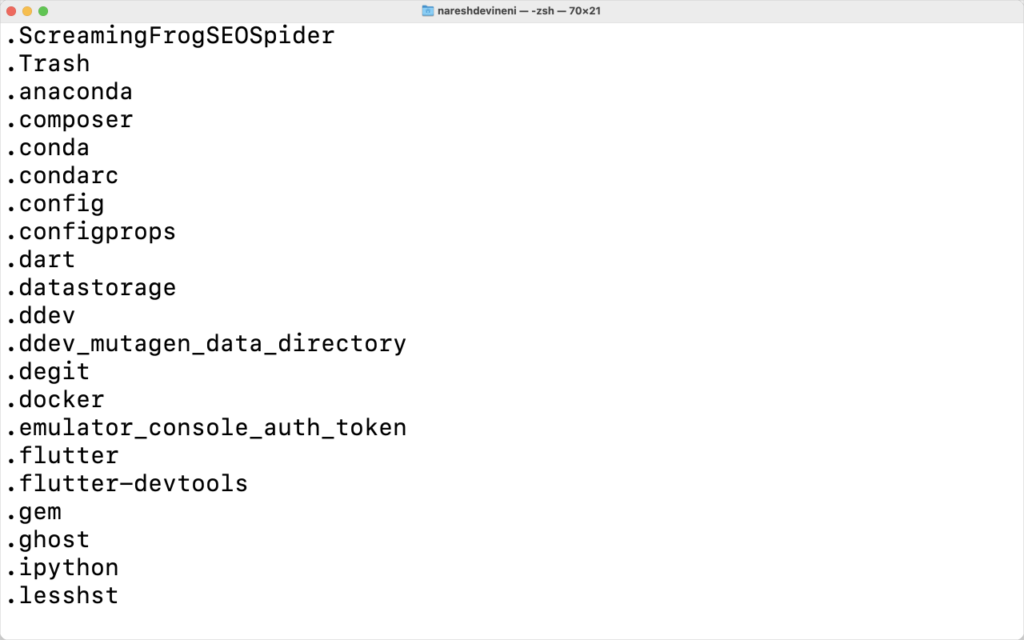
The ls command doesn’t reveal the hidden files by default and we can change that by using the -a modifier:
ls -aIf you notice, all the names of the hidden files are starting with a single dot ( . ):
You can also use multiple command modifiers at the same time:
ls -a -lThe above command will list all the files (including the hidden files) along with the meta information such as when they were created, who created them, etc.

Remember that when you are using more than one modifier, each modifier must be separated with a space:
ls -a -l“Got it bro! How many modifiers are there?”
Actually, a lot.
You can see the full list of modifiers of a particular command and how to use them by using the MAN command
MAN stands for manual. It is a Unix-based OS command.
We use the MAN command followed by another command name, which will give us all the details about using a command and its modifiers.
For example, here is how to see the manual and modifiers of the ls command:
MAN lsThis will now list all the details about using the ls command:

If you scroll down a little more, you can see the list of modifiers for the ls command and what they do:

Easy, right?
Also, if you notice, the command modifiers use a combination of two characters: a dash ( – ) followed by an alphabetical character ( a – z ).
For example, -c, -l, -m, etc.
You get the idea, right?
Come on, go ahead and try out a few of them and see how they work.
“Hey! I am unable to come outside of the manual. It is not letting me try the modifiers”.
You are right. To type commands again, you need to exit MAN mode by pressing the q key on the keyboard.
Pressing the q key will help you exit the manual:
“Bro, I use Windows OS, and it looks like the MAN command doesn’t exist”.
Haha, the MAN command doesn’t exist on Windows. What did you expect from the rivalry between Microsoft and the Linux world?
Having said that, command modifiers exist for Windows commands, too.
Instead of using the MAN command, you have to use /? in the following way:
dir /?You can now see the manual of the dir command:

If you notice, what you’re seeing is not the full manual.
Unlike macOS Terminal, you can not scroll down to see the full manual, either.
Instead, you’ll see an instruction that says, “Press any key…” and when you press any key on your keyboard, you can uncover some more portions of the manual that fit on your screen.
And you have to keep pressing a key until you can access all the manual’s contents.
Finally, just like the macOS terminal, you can press the q key on the keyboard to exit out of the manual.
For Windows, the syntax for using modifiers is different
As you already know, on macOS and other Unix-based OS, the syntax for using a modifier is the following:
command name ( ls ) followed by a space, followed by a dash ( – ) and the modifier character ( a – z A – Z ).
For example:
ls -aHowever, on Windows, it is the “command name ( dir )” followed by a space, followed by a forward slash ( / ) and the modifier character ( a – z A – Z ).
dir /hAlso, command modifier characters are case-sensitive (on any OS)
That means, -l has a different purpose when compared to its capital version of the modifier -L.
For example, here is how the ls command’s lowercase “c” modifier is different from the uppercase “C”
| ls -c | ls -C |
Use time when file status was last changed for sorting or printing. | Force multi-column output; this is the default when output is to a terminal. |
As you can see, the purpose of lowercase modifiers is different from that of their uppercase counterparts.
Be careful here, and always use the manual when you’re doubtful.
Anyway, now that you know how to list the contents of a particular directory, let’s see how to…
Move between the directories
Usually, the first thing you do when you open a CLI is list the contents of your home directory and then look for a directory to move into.
So, as a command line user, the most important skill you must have is being able to easily move between directories of your file system.
cd is the command you must use to move between the directories.
cd stands for “change directory”.
So far, we have only dealt with commands that don’t accept any arguments to be useful.
But the cd command needs input about where it should take you.
Simply put, it accepts a single argument: the path and name of the destination directory.
Here is the syntax for using the cd command:
cd /path/to/destination
Luckily, the cd command name is the same for Windows OS and all Unix-based OS, such as macOS, Ubuntu, etc.
Come on, let’s learn how to use the cd command with the help of some of the most common scenarios.
Scenario 1: How to enter into a child directory of the current directory
.
└── Users/
    └── nareshdevineni/ <- We are here currently
        ├── Applications
        ├── Documents
        ├── Downloads
        └── Desktop
Imagine that you are dealing with the above directory structure and are currently inside the “home” directory as usual.
Your task now is to go inside the “Downloads” directory.
How do we achieve that?
If you notice the above tree structure, the “Downloads” directory is a child directory of the “home” directory.
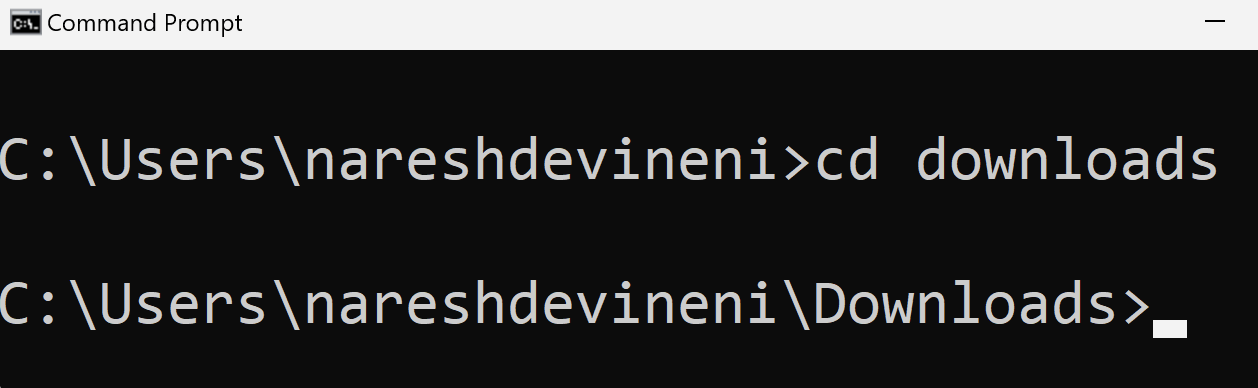
Whenever you want to go inside a child directory of the current directory you’re in, you can directly type the name of the child directory next to the cd command:
cd directory_nameIn our case, it is:
cd DownloadsThat’s all. You are now inside the “Downloads” directory.
Next, get into the habit of listing the contents of the entered directory.
Come on, type ls or dir command depending on your OS:
Wow, there are so many images inside my downloads directory because I am creating them for this article :P
Scenario 2: How to move back up to a parent directory (one level)
Once you are inside a child directory, It is common to go back to the parent directory because the file you’re looking for doesn’t exist or for some other reason.
You can go back to the parent directory by using the cd command with two dots:
cd ..This will tell the CLI tool to move you back up one level to the parent directory of the current directory.
The .. is a special symbol representing the immediate parent directory of the current directory.
For example, during our previous exercise, I went inside the “Downloads” directory:
.
└── Users/
    └── nareshdevineni/
        ├── Applications
        ├── Documents
        ├── Downloads <- I am here
        └── Desktop
If I run the cd .. command, I will be moved up one level and will be placed inside the “nareshdevineni” directory ( the immediate parent directory of “Downloads” ):
.
└── Users/
    └── nareshdevineni/ <- I am back here
        ├── Applications
        ├── Documents
        ├── Downloads <- From here
        └── Desktop
You can now enter into a different child directory again by using the cd command as usual:
cd ..
cd Applications
Using a directory separator
Sometimes, on the internet, you’ll see that the two dots are followed by a forward slash ( / ):
cd ../
It does the same job as cd .. command without the forward slash.
But why use a forward slash ( / ) at the end?
Long story short, the forward slash is acting as a directory separator when you are typing more than one directory.

This will make more sense in the next scenario…
Scenario 3: How to move back up to a parent directory (two levels)
Let’s just say you’re still inside the “Downloads” directory, and you want to move up two levels and land in the parent directory “Users”:
.
└── Users/ <- I want to directly land here
    └── nareshdevineni/
        ├── Applications
        ├── Documents
        ├── Downloads <- From here
        └── Desktop
If you want to move two levels, the only way to achieve it is to move up one level first and then move up another level.
There are two approaches to achieve this. Both approaches have their own purpose, so depending on the context of the task, going with either of them is fine.
Approach 1: Move up one level at a time by executing cd .. two times in a row.
cd ..
cd ..
That means running the cd .. command for the first time to move up to the direct parent directory:
.
└── Users/
    └── nareshdevineni/ <- Go here first
        ├── Applications
        ├── Documents
        ├── Downloads <- From here
        └── Desktop
Then, run the cd .. command again to move up one more level:
.
└── Users/ <- Go here
    └── nareshdevineni/ <- From here
        ├── Applications
        ├── Documents
        ├── Downloads
        └── Desktop
Approach 2: You can also jump up two levels in a single command like this:
cd ../..In the context of cd ../.. command, the forward-slash ( / ) acts as a directory separator between the immediate parent directory and the grandparent directory.
This is better explained with an example.
.
└── Users/
    └── nareshdevineni/ <- And the cd..will take your here
        ├── Applications
        ├── Documents
        ├── Downloads <- You're here currently
        └── Desktop
When a CLI tool sees cd ../.. command:
- It first sees
cd..and moves you to one level up in the directory hierarchy. That is, it puts you inside the “nareshdevineni” directory. - Next, it sees the forward slash ( / ) as a directory separator and thinks, “Oh, we need to move into another directory in a row”.
- Finally, after running the
cd../command, it sees another last two dots (cd ../..) and takes you one more level up. That is, it puts you inside the “Users” directory.
So, when the command cd ../.. is executed, you’ll move two levels up directly.
.
└── Users/ <- You'll land here directly
    └── nareshdevineni/
        ├── Applications
        ├── Documents
        ├── Downloads <- From here
        └── Desktop
You can move any number of levels up if you want to by adding /../ to the cd command:
cd ../../../../For example, the above code moves you up four levels of parent directories in a single command.
Scenario 4: How to move to a sibling directory in a single command
Yet another common scenario is moving to a sibling directory at the same level.
.
└── Users/
    └── nareshdevineni/
        ├── Applications
        ├── Documents <- But you want to move here
        ├── Downloads <- You're are currently here.
        └── Desktop
You can achieve this by going up one level to the parent directory and then going down into the desired child directory.
If you are okay with typing two commands, here is a solution:
cd ..
cd Documents
In the above solution, first, we move up one level to the parent directory, which is “nareshdevineni”, and then we move down into the “Documents” directory.
But you can also achieve the same in a single command, too:
cd ../DocumentsAbsolute Paths vs Relative Paths
So far, we have been dealing with relative paths, but now it is time to deal with absolute paths
When you type the command cd Documents, you are instructing the CLI tool that “Inside the current directory, there is a child directory named Documents. Please go inside it.”
Similarly, When you type the command cd .., you are instructing the CLI tool to “Go to the immediate parent directory of the current directory.”
In both the above cases, you are not explicitly typing the name of the current directory.
This is why cd .. is a relative path.
Because you are typing the command inside the current directory, you are asking the CLI tool to move around the current directory without using the current directory’s name, and the CLI tool can understand this context.
But sometimes, these relative paths will take forever to reach your destination.
For example, imagine the following directory structure:
/ (root directory)
└── Users/
    └── nareshdevineni/
        ├── Applications
        ├── Documents/
        │   └── Backup/
        │       └── Courses/
        │           └── Web Development/
        │               ├── Learn WordPress/ <- You're here
        │               │   ├── lesson-1/
        │               │   │   └── lesson-1.mp4
        │               │   └── lesson-2/
        │               │       └── lesson-2.mp4
        │               ├── Learn HTML & CSS
        │               └── Learn Javascript
        ├── Downloads
        └── Desktop <- But you want to come here
Your task here is to move from the “Learn WordPress” directory to the “Desktop” directory.
That is literally moving five levels up to reach the “nareshdevineni” directory and then going one level down into the “Desktop” directory.
You can definitely use a relative path and type something like this to achieve the above task:
cd ../../../../../DesktopThis is totally fine. But you have to think a lot to write this command because you need to move up five levels.
If the directory structure of the file system is huge, then it is not worth using the relative path because it becomes impossible to count how many levels you have to move up and down.
The easy way here is to use the absolute path (full path) to achieve the above task:
cd /Users/nareshdevineni/DesktopIf you notice the above command, I provided the full path of the “Desktop” directory to the cd command.
Absolute paths specify the entire path from the root directory to the desired location.
In other words, any absolute path with start with the root directory of your file system.
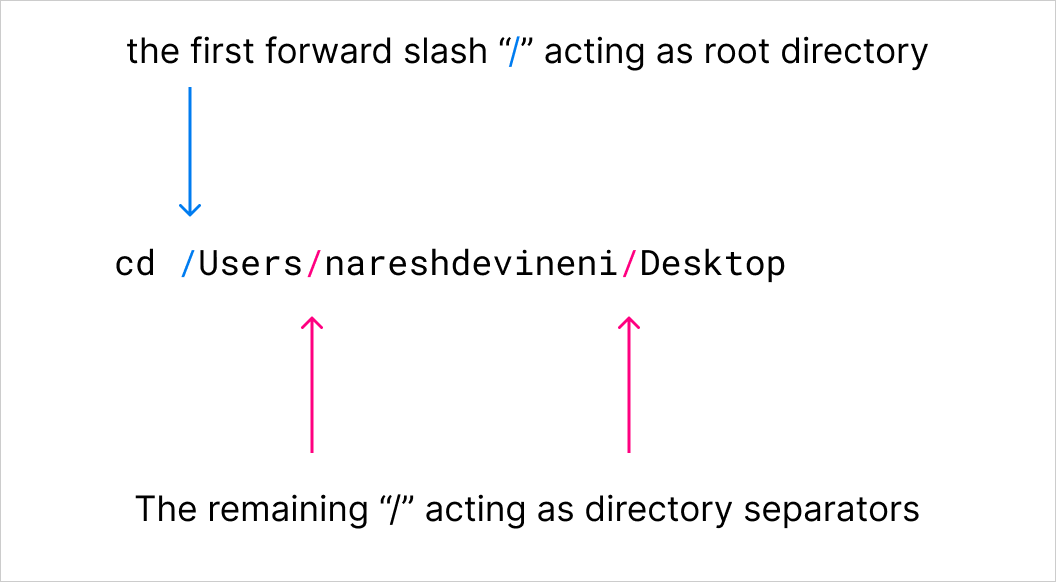
When we are using an absolute path inside macOS or other Unix-based OS, the first forward slash ( / ) represents the root directory of the computer’s file system. It is not a directory separator:
/
└── Users/
    └── nareshdevineni/
        ├── Applications
        ├── Documents/
        │   └── Backup/
        │       └── Courses/
        │           └── Web Development/
        │               ├── Learn WordPress/
        │               │   ├── lesson-1/
        │               │   │   └── lesson-1.mp4 <- full path for this
        │               │   └── lesson-2/
        │               │       └── lesson-2.mp4
        │               ├── Learn HTML & CSS
        │               └── Learn Javascript
        ├── Downloads
        └── Desktop
Another example: Here is what a full path looks like for the lesson-1.mp4:
/Users/nareshdevineni/Documents/Backup/Courses/Web Development/Learn WordPress/lesson-1/lesson-1.mp4.
Also, on WindowsOS, if the file lesson-1.mp4 is located somewhere inside the E:/ drive, the full path could look like this:
E:/Backup/Courses/Web Development/Learn WordPress/lesson-1/lesson-1.mp4I can’t stress it enough, on macOS, please remember that the first forward slash represents the root directory:
cd /Users/nareshdevineni/DesktopHowever, on WindowsOS, individual drive partitions act as their own root directory. So, we have to mention the drive name explicitly for the root directory:
cd C:/Users/nareshdevineni/DesktopAnyway, that’s all you need to know about moving between directories for now.
The shortcut for reaching the “home” directory fast
.
└── Users/
    └── nareshdevineni/ <- And you want to come here
        ├── Applications
        ├── Documents/
        │   └── Backup/
        │       └── Courses/
        │           └── Web Development/
        │               ├── Learn WordPress/ <- You're here
        │               │   ├── lesson-1/
        │               │   │   └── lesson-1.mp4
        │               │   └── lesson-2/
        │               │       └── lesson-2.mp4
        │               ├── Learn HTML & CSS
        │               └── Learn Javascript
        ├── Downloads
        └── Desktop
As you already know now, you can do it in two ways:
- By using the relative path:
cd ../../../../.. - By using the absolute path: cd /Users/nareshdevineni
However, there is also a third way:
cd ~On Unix-based operating systems like macOS, Ubuntu, etc., the tilde ( ~ ) character on the keyboard represents the “home” directory of your user account.
So, by typing cd ~, no matter how deep you are inside the file system, you can directly land inside the “home” directory of your user account:
In fact, this is why you’ll see the ~ (tilde) character when you open the Terminal app on macOS.

It means you’re currently inside the “home” directory of your user account.
Also, whenever you are typing a full path (absolute path), you can use the ~ (tilde) character to replace /Users/account_name.
For example, instead of typing:
/Users/nareshdevineni/DownloadsYou can just type:
~/DownloadsHere is how it looks with various commands:
cd ~/Downloads
copy ~/Projects/portfolio ~/Backups
Looks concise when compared to the following:
cd /Users/nareshdevineni/Downloads
copy /Users/nareshdevineni/Projects/portfolio /Users/nareshdevineni/Backups
Isn’t it?
“Yep, but what about Command Prompt? It looks like it can not recognise the ~ (tilde) character at all”
That’s a great question! On Command Prompt (Windows OS), there isn’t a single key that directly represents the Home directory like the tilde (~) key on macOS.
So, you either have to use the regular relative path or an absolute path to reach your destination.
Next, let’s learn about copying and moving files between various directories.
How to copy and paste a file or directory from one location to another
On macOS:
We can use the cp command to copy and paste a file or an entire directory.

The cp command accepts two input arguments because we are copying and pasting in a single command:
- Path for the source file or directory that we want to copy
- Path for the destination directory where we want to paste the copied file or directory
On WindowsOS, if we want to copy a file:
We need to use the copy command:

Just like the cp command, the copy command accepts two input arguments:
- Path for the source file
- Path for the destination directory where we want to paste the copied file
On WindowsOS, if we want to copy a directory and its content:
We need to use the xcopy command:

Yes, on WindowsOS, the command for copying a file is different from the command for copying an entire directory.
Come on, let’s practice these commands using some scenarios.
Scenario 1: How to copy and paste a single file
Create the following file structure on your computer if you want to follow along with me.
.
└── Users/
    └── nareshdevineni/
        ├── Project_backups
        └── Projects/
            └── portfolio_website/
                ├── index.html
                ├── about.html
                ├── my-photo.jpeg <- I want to copy this file
                ├── images/ <- And paste it inside this folder
                │   ├── my-pet-photo.jpeg
                │   └── services-icon.png
                └── assets/
                    ├── style.css
                    └── index.js
If you notice, there is an image called my-photo.jpeg file inside the portfolio_website directory.
Our task is to copy and paste the my-photo.jpeg file inside the images directory.
And as usual, we are currently in the “home” directory inside the CLI.
We can perform the task in two easy steps:
- Move inside the source directory of the file that we want to copy
- Copy the file and paste it inside the destination directory using the
cpcommand for macOS or using thecopycommand if we are on Windows OS.
Step 1: Move inside the source directory of the file that we want to copy
.
└── Users/
    └── nareshdevineni/ <- We are currently here
        ├── Project_backups
        └── Projects/
            └── portfolio_website/
                ├── index.html
                ├── about.html
                ├── my-photo.jpeg <- But the file is located here
                ├── images/
                │   ├── my-pet-photo.jpeg
                │   └── services-icon.png
                └── assets/
                    ├── style.css
                    └── index.js
We are currently inside the home directory, but the file we want to copy is located inside the portfolio_website directory.
So, we need to first move inside the portfolio_website directory to get access to the file:
| On macOS | On Windows OS |
cd Projects/portfolio_website | cd Projects/portfolio_website |
When I am going down multiple levels of directories, I go down one level at a time by listing the current directory files along the way. I repeat the process until I reach the destination directory:
Tip from the above video: You don’t have to type the full name of a directory or a file when typing them in the CLI. Instead, if you know the name of the file or directory correctly, type the first few characters of the name and then hit the tab key to force the CLI tool to fill in the rest of the name for you.
Anyway, we are now inside the directory that contains the file we want to copy.
Next…
Step 2: Copy the file and paste it inside the destination directory
We can achieve both copying and pasting in a single command:
| On macOS | On Windows OS |
cp my-photo.jpeg images | |
Both the commands copy my-photo.jpeg from the current directory (portfolio_website) to the images directory within it.
You can also use absolute paths to achieve this task because sometimes you have to perform this task from an unknown location where using relative paths is impossible.
cp ~/Projects/portfolio_project/my-photo.jpeg ~/Projects/portfolio_project/imagesHere is the final directory structure after executing the above command:
.
└── Projects/
    └── portfolio_website/
        ├── index.html
        ├── about.html
        ├── my-photo.jpeg <- This file
        ├── images/
        │   ├── my-pet-photo.jpeg
        │   ├── services-icon.png
        │   └── my-photo.jpeg <- Just got copied here
        └── assets/
            ├── style.css
            └── index.js
Nice, right?
Scenario 2: How to copy and paste an entire directory
Sometimes, as a backup, we will end up copying the entire directory.
To achieve this, we can still use the cp command on macOS, but we need to xcopy command on WindowsOS instead of the copy command.
Anyway, here is the scenario and the directory structure:
.
└── Users/
    └── nareshdevineni/
        ├── Project_backups <- And paste it inside this directory
        └── Projects/
            └── portfolio_website/ <- I want to copy this entire folder
                ├── index.html
                ├── about.html
                ├── my-photo.jpeg
                ├── images/
                │   ├── my-pet-photo.jpeg
                │   ├── services-icon.png
                │   └── my-photo.jpeg
                └── assets/
                    ├── style.css
                    └── index.js
We are currently inside the “home” directory as usual, and we want to copy the entire portfolio_website directory and paste it into the Project_backups directory.
You already know how to achieve this on macOS.
Type the following command and hit enter:
cp Projects/portfolio_website ~/Project_backupsAnd bang! There is an error in the terminal:

“What? What happened? I can not understand the error.”
Haha, don’t worry.
We are receiving the error message because without using the modifier -r, the cp command can not be used to copy an entire directory.
In other words, on macOS and other Unix-based OS, when we are trying to copy a directory with all the files inside it, we need to provide the -r modifier to the cp command:
cp -r portfolio_website ~/Project_backupsThe -r command modifier stands for recursiveness, and it explicitly tells the terminal that you need to copy the portfolio_website directory and all the files inside it in a recursive way so that the entire directory is copied properly.
Anyway, the copying is now successful.
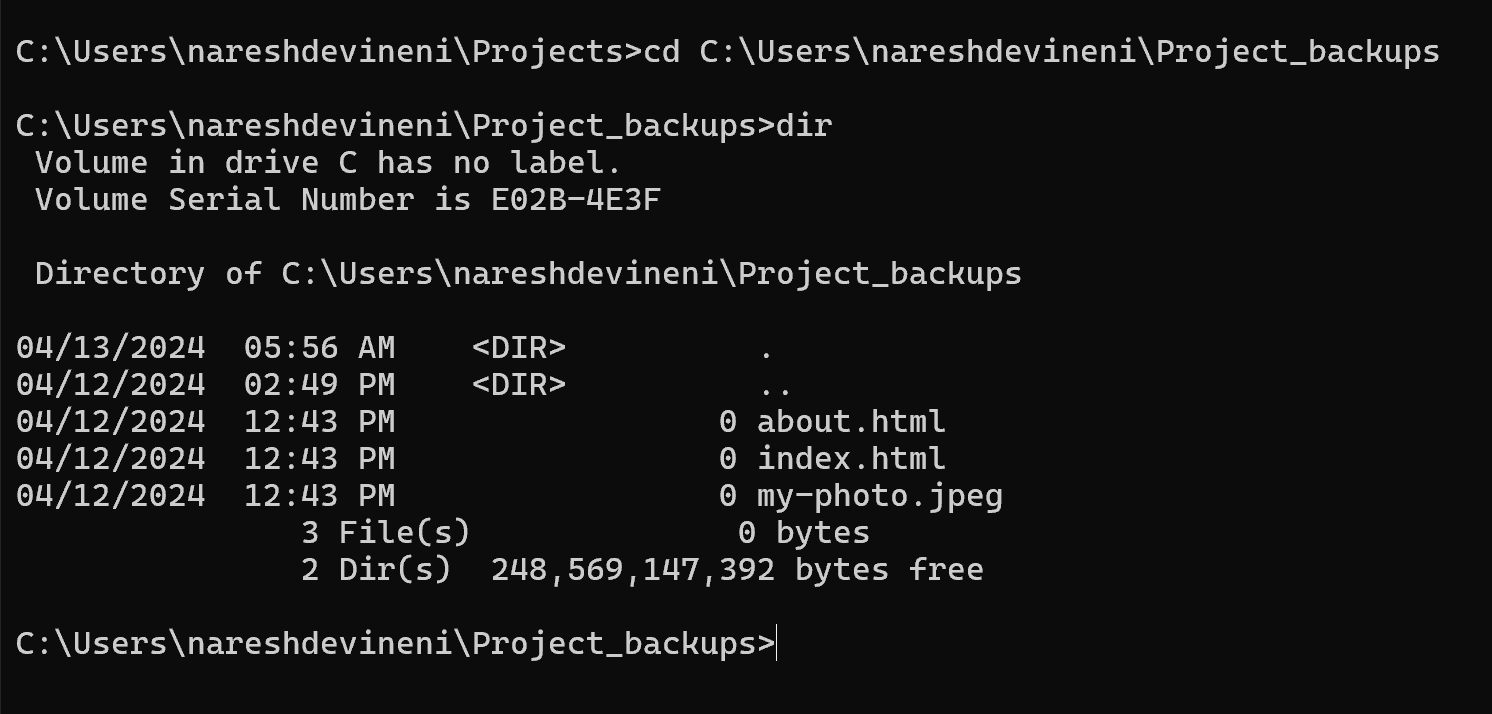
We can verify it by going inside the Project_backups directory in the following way:
cd ~/Project_backups/portfolio_website
ls
Indeed, the entire portfolio_website folder got copied successfully.
On WindowsOS, you need to use the xcopy command to copy the entire directory
First, let’s go inside the Projects directory from the “home” directory.
cd ProjectsNext, let’s copy the entire portfolio_website folder:
xcopy portfolio_website C:/Users/nareshdevineni/Project_backups
And bang! An error.
Can you identify why?
Sometimes, the terminal error messages are straightforward and easy to understand.
But sometimes, they are cryptic 🤣
Anyway, the reason behind the error is that when I provided the full path to the Project_backups directory, I used forward slashes as the directory separators:
C:/Users/nareshdevineni/Project_backupsInstead, to solve the error, we must use backward slashes for directory separators:
C:\Users\nareshdevineni\Project_backups“But bro, we used forward slashes as directory separators when using the cd command, right?”
Yeah, we did. cd command was lenient enough to accept that, but the xcopy command is following WindowOS rules.
In fact, all of WindowsOS uses backward slashes for directory separators.
We can see this in the command prompt too:

So, why not just follow the rules?
Here is the updated xcopy command to copy the portfolio_website directory:
xcopy portfolio_website C:\Users\nareshdevineni\Project_backups
“And there we go. Cool, the files got copied now. Phew.”
Haha, not so fast. There are two problems.
“What now?”
Problem 1: If you notice the command prompt’s feedback in the image, it says that only three files got copied.
The problem is the images directory, assets directory and their files are not copied. They were skipped.
.
└── Users/
    └── nareshdevineni/
        ├── Project_backups
        └── Projects/
            └── portfolio_website/
                ├── index.html
                ├── about.html
                ├── my-photo.jpeg
                ├── images/ <- skipped from copying
                │   ├── my-pet-photo.jpeg <- skipped from copying
                │   ├── services-icon.png <- skipped from copying
                │   └── my-photo.jpeg <- skipped from copying
                └── assets/ <- skipped from copying
                    ├── style.css <- skipped from copying
                    └── index.js  <- skipped from copying
We can verify this by going inside the Project_backups directory:
As you can see, you can not see the images and assets directories because they were not copied.
Here is how we can fix this first problem:
xcopy portfolio_website C:\Users\nareshdevineni\Project_backups /sIf you notice, I have added /s modifier at the end of the command, and now all the files have been copied in a recursive manner.
The /s modifier is similar to -r modifier for cp command on macOS.
Problem 2: If you notice the above image, the files got copied as individual files. They are not inside the portfolio_website directory. In fact, the portfolio_website directory didn’t get copied at all. Only its files got copied.
“Oh yeah! I saw it just now. How do we fix this problem?”
Unfortunately, it is not easy to fix this problem because all the built-in copy commands of WindowsOS can not copy the main directory. They can only copy sub-directories.
And it is limitations like this that make people say that Unix-based terminals are far better than Command Prompt.
Anyway, next…
When you use a directory name or file name that contains space, use “double quotes”
When typing any command, if that particular command accepts a file or directory name, we have to deal with names that contain spaces.
For example, imagine that there is a directory named “Local sites”, and you want to move into it using the cd command:
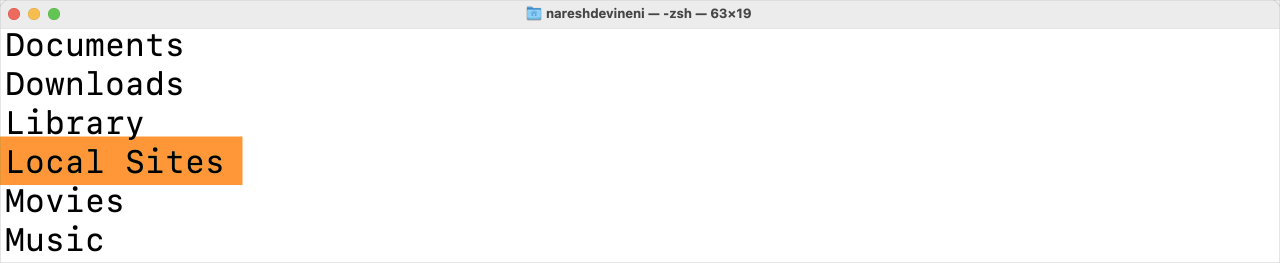
If you notice, there is a space between the words “Local” and “sites”.
If you are dealing with such a file or directory name, you can’t use the cd command like this:
cd Local sitesIf you do so, you will get an error.
Instead, put double quotes around the directory or file name:
cd "Local sites"This technique works on any Windows OS, macOS, and other Unix-based OS.
Please keep this in mind for other commands.
Also, for some reason, if you can not use quotes, you can escape the space in the name with a backward slash:
cd Local\ sitesBut this technique only works on macOS, and other Unix-based OS but not on Windows OS.
How to move a file or directory permanently from one location to another
We achieve this by using the mv command on Unix-based OS, and move command on WindowsOS.
Both the commands accept two input arguments:
- Path for the source file or directory that we want to move to a different location
- Path for the destination directory where we want to move the file or directory permanently


mv and move commands work similarly to the cp and copy commands. It is just that the move commands will move the files and directories.
The point I am trying to convey is if you know how to use the cp or copy command, then you already know how to use the mv or move command.
Also, most people get confused about moving vs copying.
So, just to be on the same page…
When we copy and paste a file or directory, it’s like making a photocopy. The original file or directory stays intact while you create a new, identical copy in another location.
In other words, the original file or directory stays safe in its original spot, untouched by the copy process.
.
└── Projects/
    └── portfolio_website/
        ├── index.html
        ├── about.html
        ├── my-photo.jpeg <- This file
        ├── images/
        │   ├── my-pet-photo.jpeg
        │   ├── services-icon.png
        │   └── my-photo.jpeg <- Just got copied here
        └── assets/
            ├── style.css
            └── index.js
However, moving a file or directory is more like relocating.
Imagine picking up a book from one shelf and placing it on another.
In the digital world, moving a file or directory deletes it from its original location and places it in the new location.
.
└── Users/
    └── nareshdevineni/
        ├── Project_backups
        └── Projects/
            └── portfolio_website/
                ├── index.html
                ├── about.html <- my-photo.jpeg was previously here
                ├── images/
                │   ├── my-pet-photo.jpeg
                │   ├── services-icon.png
                │   └── my-photo.jpeg <- But now it is moved here permanently
                └── assets/
                    ├── style.css
                    └── index.js
We already know how to clone a file or directory (copy and paste).
Now, let’s see how to move a file or directory to a new location permanently with some scenarios.
Scenario 1: How to move a single file
.
└── Projects/
    └── portfolio_website/
        ├── index.html
        ├── about.html
        ├── my-photo.jpeg <- Move this file
        ├── images/ <- into this directory permanently
        │   ├── my-pet-photo.jpeg
        │   ├── services-icon.png
        └── assets/
            ├── style.css
            └── index.js
Last time, we copied the my-photo.jpeg file inside the images directory. But this duplicated the my-photo.jpeg file by copying and pasting it.
My actual intention was to move to file to the images directory because my-photo.jpeg belongs there.
Now that we know that we can move files instead of copying them. I want to retry the scenario.
Also, you now have enough skillset to do by yourself without me trying to feed you the solution :D
Go ahead and try moving the file by yourself.
…
…
…
Did you do it?
“Yep! It was easy. I am on Windows, so I went with the move command for relocating the file.”
Cool :)
It is good to hear that.
Anyway, for people who couldn’t do it by themselves, it’s okay. It takes time to wrap around commands. It took me years :P
Here is the solution:
On macOS and Unix-based OS, assuming you’re in your “home” directory:
cd Projects/portfolio_website/
mv my-photo.jpeg images
If you’re going with the absolute path, you can skip the “cd”ing into the portfolio_website directory and type something like this:
mv ~/Projects/portfolio_website/my-photo.jpeg ~/Projects/portfolio_website/images On Windows, assuming you’re in your “home” directory:
cd Projects/portfolio_website/
move my-photo.jpeg images
If you’re going with the absolute path, you can skip the “cd”ing into the portfolio_website directory and type something like this:
move C:\Users\nareshdevineni\Projects\portfolio_website\my-photo.jpeg C:\Users\nareshdevineni\Projects\portfolio_website\images Please notice that I am using a backward slash ( \ ) as a directory separator on Windows.
Scenario 2: How to move an entire directory
.
└── Users/
    └── nareshdevineni/
        ├── old_projects <- 2. here
        └── Projects/
            └── portfolio_website/ <- 1. move this entire directory
                ├── index.html
                ├── about.html
                ├── images/
                │   ├── my-pet-photo.jpeg
                │   ├── services-icon.png
                │   └── my-photo.jpeg
                └── assets/
                    ├── style.css
                    └── index.js
Here is the task: I want to shelve the portfolio_website project. So, I want to move inside the old_projects directory.
When we tried copying directories, there were no issues on macOS, but there were a lot of complications with Windows commands.
The case is similar when it comes to the move commands as well.
On macOS and Unix-based OS, assuming you’re in your “home” directory:
cd Projects/
mv portfolio_website ../old_projects
If you notice the folder tree structure above, you can see that the Projects directory and the old_projects directory are on the same level.
So, as the destination for moving the file, I used ../old_projects.
Because I am tying the above command by staying inside the Projects folder, I am going up to the level where the terminal finds the old_projects directory.
If it is confusing and hard to wrap your brain around, by all means, go with an absolute path:
mv ~/Projects/portfolio_website ~/old_projects For the first time, the absolute path makes the command easy to read :P
Also, we don’t need to use the -r modifier with the mv command.
One less thing to worry about, Isn’t it? :)
On Windows, assuming you’re in your “home” directory:
cd Projects/portfolio_website/
move portfolio_website ../old_projects
If you’re going with the absolute path, you can skip the “cd”ing into the portfolio_website directory and type something like this:
move C:\Users\nareshdevineni\Projects\portfolio_website C:\Users\nareshdevineni\old_projects Please notice that I am using a backward slash ( \ ) as a directory separator on Windows.
Having said that, there is a problem.
When I tried entering the above command, bang! Error again!

This time, it is “Access is denied error”.
This means we don’t have permission to move the directory.
We could face permission issues for many reasons, and one of the most common is that we have already opened the file or directory in another program.
For example, if we are trying to move portfolio_website directory while it is already open inside a code editor or GUI File Explorer, then the terminal will not let us move the directory at all.
In my case, I opened up portfolio_website directory inside the file explorer. So, the permission was denied because the directory was already open in the file explorer.
If there is any other reason, we could probably fix the permission issue by running the command prompt as an administrator, too.

Having said all this, the move command didn’t change the actual folder. It only copied the contents of the folder. It behaved just like the copy command.
There are so many other limitations, too.
So, in my personal opinion, I would recommend that you learn and master Unix-based OS terminals.
I have two reasons for this:
- They are truly powerful and much more user-friendly
- As a website person, you’ll be dealing with a Unix-based web server 95% of the time
- For example, all the popular WordPress web hosts are Unix-based web servers
I could be wrong with my opinion, though. But just felt like sharing it with you.
Anyway, next…
How to compress a directory and create a tar file
Here is the file and directory structure of a WordPress website:

If you notice, there is a directory called wp-content.
The wp-content contains the themes, plugins, and files you uploaded to your website.
So, if you want to migrate a WordPress website, it is the wp-content directory that must be downloaded and moved.
The first thing I would do when migrating a WordPress site is compress the wp-content directory as a tar file so that I can download it and move it.
Unlike plugins and GUI-based File managers, Because CLI tools have direct access to the file system, creating a tar file and moving it using a command rsync is really fast.
Plugins and GUI-based File managers will take forever to create tar files or transfer the files of a large WordPress website. Not to mention the nightmares I went through going this route.
“Bro stop! What is a tar file?”
Oops…sorry that I missed that detail.
A tar file is similar to a zip file.
Here is a quick comparison run down.
Both zip and tar formats bundle files and directories.
But a zip format performs both bundling and compressing in a single go.
Bundling is different from compressing.
I am saying this because the tar format doesn’t compress files or directories by default. We have to use a third-party compression system like gzip to add compression benefits for the tar files.
A zip file format is Cross-OS compatible. That means all OS can understand work with zip files. For example, you can create a zip file on MacOS, and you can easily extract it from Windows OS.
However, tar archives are commonly used in Unix-based systems like Linux and macOS. So, if you have created a tar file on macOS and want to extract it on Windows OS, you have to install a software like WinRAR or 7-zip.
If you primarily work in a Unix-based environment, tar with compression (e.g., tar.gz or tar.bz2) is usually preferred.
As a website guy, I would recommend you learn to work with both zip and tar files.
For the purposes of this article, we will learn how to create and compress a tar file.
If you are a website developer, you’ll often deal with tar files when compared to zip files.
Having said that, if you learn to work with tar files, you can also learn how to work with zip files on your own.
Anyway, now that you have a reason to learn how to create tar files, let’s take action.
Creating a tar file on macOS and extracting it:
Creating a compressed tar file is easy. Here is the usage:
List:    tar -tf <archive-filename>
Extract: tar -xf <archive-filename>
Create:  tar -cf <archive-filename> [filenames...]
We want to create a tar file, right? So, we need to use:
tar -cfHere is the task:
I want to compress the wp-content directory of one of my WordPress websites in tar format with a gzip compression mechanism.
So, I am currently inside the directory of a WordPress website:
And here is how I created a gzip-compressed tar file version of the wp-content directory:
tar -czvf wp-content-backup.tar.gz wp-contentHere is the result of executing the tar command:

Here is what’s happening.
tar -czvf wp-content-backup.tar.gz wp-contentFirst of all, as part of the tar command, we are using the modifier -czvf and here is the breakdown of it:
-c: This option indicates that you’re creating a new archive.-z: This option specifies that you want to use gzip compression to compress the archive. This option is optional if you don’t want to use compression and just use “-cvf”.-v: This option enables verbose mode, which provides detailed information about the files being archived and the compression process. This is why you’re seeing a long list of files in the above video. If you don’t want to see the file list, you can just use “-czf”.-f: This option is followed by the name of the archive file you want to create. It specifies the archive filename. This option allows us to choose the filename for our tar file.
Next, I am providing the name of the tar file that we are creating:
tar -czvf wp-content-backup.tar.gz wp-contentIf you notice, the filename I provided ends with the .gz file format. This is because I want to create a gzip-compressed tar file.
If you don’t want to use gzip compression, make sure the file name ends with plain old .tar.
Finally, I will provide the name of the directory that I want to compress and tar:
tar -czvf wp-content-backup.tar.gz wp-contentYou can also provide multiple file names and multiple directory names that you want to compress in a single go like this:
tar -czvf wp-content-backup.tar.gz wp-content wp-includes wp-config.phpThat’s all.
How to extract a tar file
After a tar file is created, extracting it is easy, too:
tar -xf /path/to/file/we_need_extractIf tar’s -cf modifier creates a tar file, the -xf modifier extracts the existing tar file.
Anyway, to extract a tar file, go inside the directory where you want to extract it.
In my case, I want to extract the file inside the public (root) folder of my WordPress site. So, I will cd into it and then extract it:
cd wp-sites/nareshdev/public
tar -xf wp-content-backup.tar.gz
That’s all. That’s how you extract a tar file.
And I have a small challenge for you.
Learn how to create a zip file in a similar way :D
Creating a zip file on WindowsOS:
We must use Powershell to create a zip file on Windows OS:
powershell Compress-Archive -Path my_folder -DestinationPath my_folder.zipDiscussing PowerShell is out of the scope of this article.
Next…
Create a file, write content to it, save it, close the file, and finally open it up later for viewing or editing
Creating and managing files directly from the terminal is not that uncommon, too.
Creating a file on macOS and other Unix-based OS:
We can easily create any type of file using the touch command:
touch userlist.txtThe above command creates a file called userlist.txt on the directory that you are currently in.
Having said that, sometimes, creating a file is not enough.
In most cases, we want to create a file, open it up inside a text editor right away, type something and finally save the changes to the file.
To achieve this, we can use the nano command:
nano [filename]For example:
nano userlist.txtIf the filename provided doesn’t exist, the nano command creates a file with the name provided and will open up the text editor inside the terminal directly:

You can now use the above interface just like any text editor and start typing:
Once you are done typing, save the file by hitting ctrl + x keyboard shortcut:

Hitting ctrl + x will now bring up confirmation options:

If you notice the bottom side of the screen, you have three options:
- Typing “y” on the keyboard will save the changes to the file
- Typing “n” will not save changes to the file
- Typing “c” will cancel the exit and bring you back to the editor to keep adding more text
I want to save the changes, so I hit the “y” key on the keyboard and finally hit the “enter” key to exit the nano editor.
That’s all.
That’s exactly how you create a file and save its content using the nano editor of the CLI tool.
How to open an already existing file for viewing or editing
You can use the nano command and its editor again:
nano [filename_to_open]For example:
nano userlist.txtIf there is a file with the name provided, the nano command will open up the file directly inside the text editor so that you can edit it.
Challenge:
If you want to edit an existing file, you can also use the cat command.
Learn about the cat command and how it is different from the nano command.
Creating a file on Windows OS:
You can use the echo command to achieve this:
echo Hello, this is my file content. > example.txtThis command will create a file named “example.txt” on the directory you’re currently inside. Write “Hello, this is my file content.” into it.
Honestly, I have never worked with a Windows server. So, I never really had to create a file using the echo command.
Also, the echo command can be used for other tasks, too. More on this shortly.
Things will get easy from now.
How to create a directory using Command Line Interface (CLI)
On macOS, Windows OS, and other Unix-based OS, we can use the mkdir command to create a directory:
mkdir [directory_name_to_create]For example:
mkdir backupsThe above command will create a new empty directory named backups inside the directory that you’re currently in.
How to remove (delete) a directory or a file
Removing a file or directory is easy, too.
Removing a file on macOS and Unix-based OS:
We can use the rm command to achieve this.
rm [path_and_file_name_to_remove]For example:
rm userlist.txtBefore running the above command, please make sure you are inside the directory where the file exists.
Removing a directory on macOS and Unix-based OS:
We can use the rm command for removing directories, too:
rm -r [path_and_file_name_to_remove]When removing a directory, we must supply the -r modifier to the rm command.
The -r modifier will make sure all the sub-directories are removed in a recursive way.
For example:
rm -r ~/Documents/backupsWhen a file or directory is removed with rm command, it is like permanently deleting them.
So, be careful and think twice before removing them.
Removing a file on Windows OS
We can use the del command to achieve this.
del [path_and_file_name_to_remove]For example:
del userlist.txtRemoving a directory on Windows OS
We can use rmdir command to achieve this:
rmdir /s /q [directory_name]For example:
rmdir /s /q C:\Users\nareshdevinei\backupsIf you notice, I am using two modifiers for deleting a directory and here are their purpose:
/s: Removes all directories and files in the specified directory in addition to the directory itself./q: Quiet mode, which suppresses prompts for confirmation to delete files or directories.
After running the above command, the directory “backups” and all its contents will be permanently deleted from the specified location.
That’s all.
One last CLI trick to end this lesson.
How to get the present working directory
Once we start using the CLI tools more and more, we will get habituated to digging deeper and deeper into the file system we are working with.
Also, different computers with the same OS could have different file structures, and we might fail to find files or directories.
In both cases, sometimes, we get the question: “In which directory am I currently inside and where is it located?”
On macOS and Unix-based OS, you can get the answer to that question using the pwd command:
pwdThe pwd command stands for “Present working directory”, and it prints the absolute path to the directory that you are currently inside:
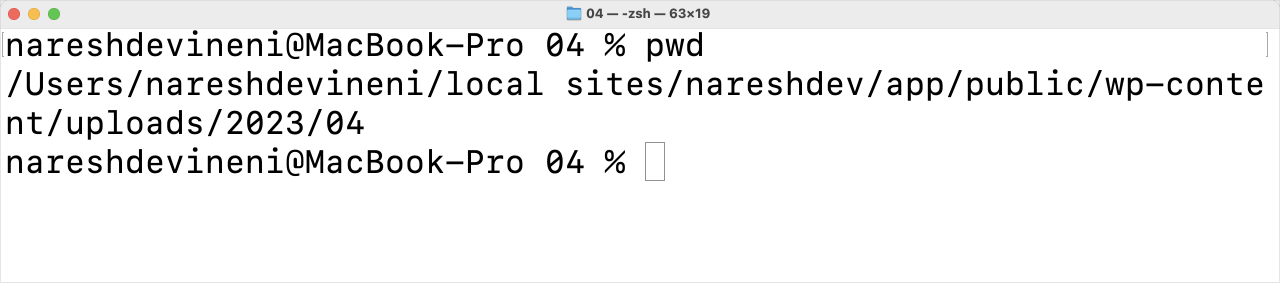
For example, if you notice the above screenshot, I was inside a directory named 04 and I have no clue where is this 04 is located.
So, I used the pwd command to get the full path of 04 directory to get an understanding of where I am.
Anyway, the Windows OS alternative to pwd command is:
echo %cd%We have already seen the echo command when trying to create a file. However, we can also use the echo command to get the full path of the present working directory.
One last challenge for this lesson
On Windows OS, figure out the other practical purposes of the echo command.
The Conclusion: we have come pretty far
You now know how to handle the most useful CLI commands.
If you have made it this far, congratulate yourself because you’re now a command line user :)
This also means you can now research and understand how to use any command that goes into a CLI tool.
And there is so much more to learn.
I created this lesson so that you’ll feel comfortable accessing your website files via SSH (Secure Shell) or migrating WordPress websites through the command line.
We will use the same commands once we log into the website’s file system on the server.
We will do exactly that in the next lesson, where I will show you how to access your website files using SSH (Secure Shell).
If you want to learn more about CLI and advance your skills, I highly recommend the clig.dev website.
 © 2026 UsableWP. A project by Naresh Devineni.