WP-CLI: How to manage your WordPress site in an incredibly fast way using Command Line
So, What is WP-CLI?
WP-CLI helps you manage your WordPress website through the command line, and it does so in an incredibly fast way :D
In other words, WP-CLI is a powerful command-line tool that is specifically designed for WordPress management.
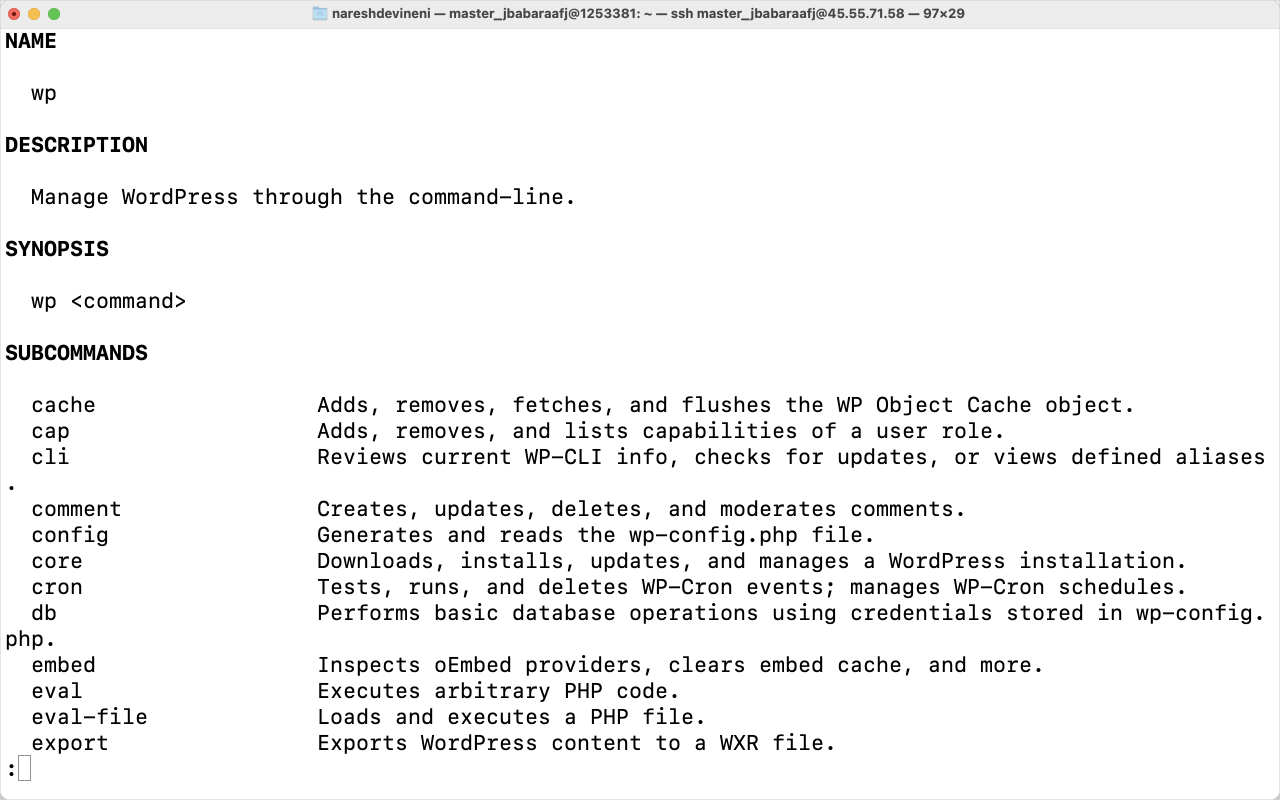
Here is what WP-CLI is capable of doing:
- Manage Core WordPress Software: Download, install, and update the WordPress installation.
- Manage Plugins: Install, activate, update, deactivate, and delete plugins
- Manage Themes: Install, activate, update, deactivate, and delete themes
- Manage Maintenance Mode: Activate, deactivate, and check the maintenance mode of a site
- Manage users along with their roles, capabilities, and meta.
- Manage comments: Create, update, delete, and moderate comments.
- Manage Database: Export, Import, and perform other important operations on the Database
The list goes on and on.
Apart from writing content for your website, you can use WP-CLI to do most of the other important things.
To understand how powerful WP-CLI is, see the full list of WP-CLI commands and their purposes on WordPress.org Documentation.
In this article, we will learn how to install and manage your WordPress site using WP-CLI and its commands.
How to start managing your WordPress site using WP-CLI
You can achieve this in three easy steps:
- Log into your web server using Secure Shell (SSH)
- Check if WP-CLI has already been installed on your web server. If it is not, then install it. If you’re not allowed to do it, It’s okay.
- Use WP-CLI commands to manage your WordPress site
Step 1: Log into your web server using the Secure Shell (SSH) command
WP-CLI is a command-line interface for managing your WordPress site, right?
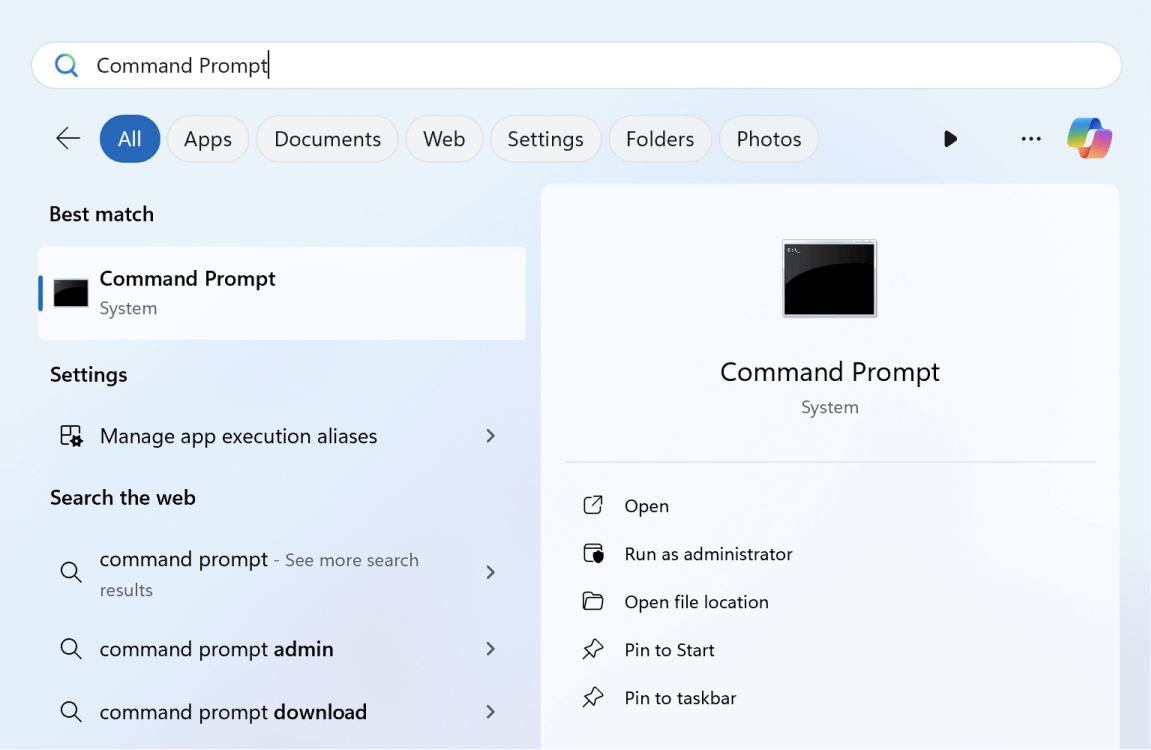
So, to start using it, you have to use a command-line tool like Command Prompt or Terminal and then use that tool to log into the web server.
If you’re on a macOS or other UNIX-based OS, use the “Terminal” app as your CLI tool.
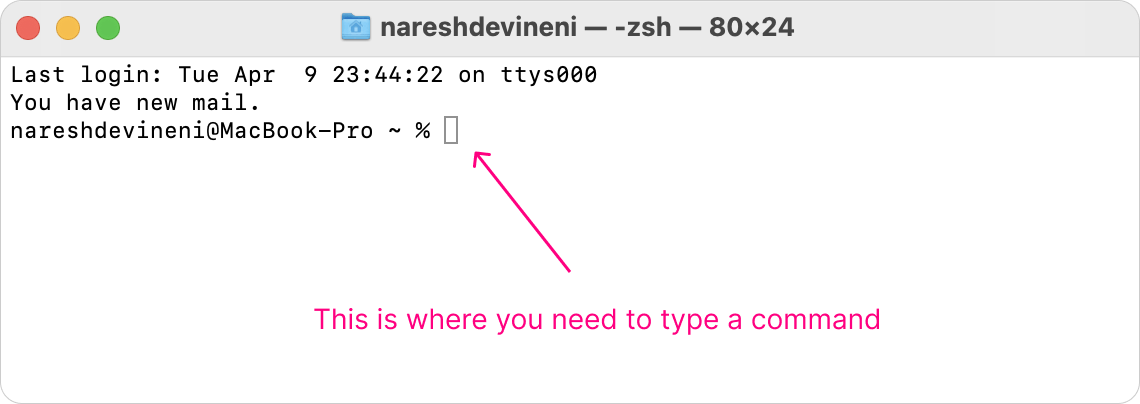
If you’re on WindowsOS, use PuTTY or Command Prompt:
If you have no clue about what a command line tool means, I highly recommend learning it before you lay hands on WP-CLI:
Just enough Command Line Interface for WordPress site owners and Developers
Next, after you open up your Command Line tool, you must log into your WordPress site’s web server using Secure Shell (SSH).
SSH provides a secure way to log into your web server via the command line.
The SSH command looks like this:
ssh server_username@server.ip.addressFor example:
ssh master_dkwdgwsprk@143.93.77.228Here is a small video about how I logged into my web server using SSH:
If you have no clue about how to do it for yourself, read the following article and come back after logging in:
How to connect to your WordPress site using Secure Shell (SSH)
“Why do we need to log into our web server via the command line, bro?”
Simple.
You must log in to your WordPress Admin Dashboard to manage your website, right?
Similarly, you need to log into your web server via SSH to start managing your WordPress site using WP-CLI.
WP-CLI allows you to manage your entire WordPress site, and it requires authentication that you are indeed the site’s owner or developer.
Logging into the web server of your WP site tells you that you are authorized to run WP-CLI commands.
Step 2: Check if WP-CLI has already been installed on your web server. If it is not, then install it. If you’re not allowed to do it, It’s okay.
WP-CLI is not part of the core WordPress Ecosystem. It is a third-party tool that the web hosting company must install on their web servers.
Many WordPress-dedicated hosting services already have WP-CLI preinstalled on their servers because it is a useful tool.
For example, Kinsta, Cloudways, and similar hosting services install WP-CLI automatically when they create our web server.
So, before trying to install WP-CLI, check if it is already installed by just typing wp command or the following command in the CLI tool:
wp --versionIf the WP-CLI is installed, we will see its version number as the result of running wp --version command.

If it is not already installed, then the CLI will throw an error saying the wp command is not found:
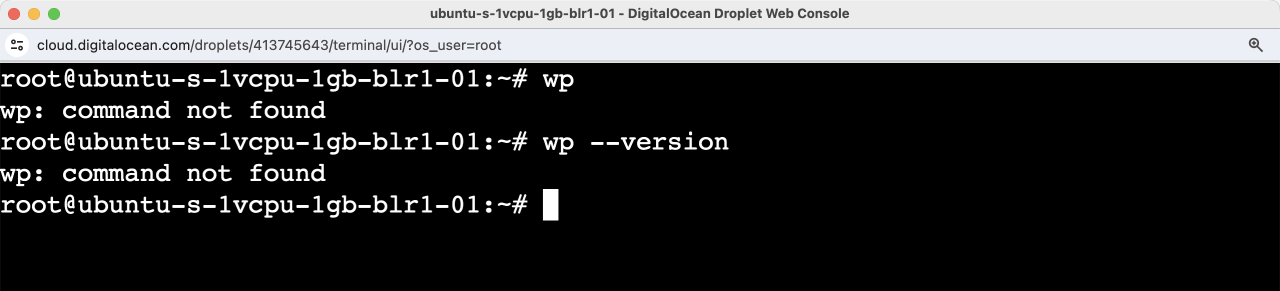
If that is the case, we need to install WP-CLI.
How to install WP-CLI
Most web servers online run UNIX-based OS, such as Ubuntu, Debian, CentOS, etc.
And here is how to install WP-CLI on any UNIX-based OS.
First, download wp-cli.phar using curl or wget commands:
curl -O https://raw.githubusercontent.com/wp-cli/builds/gh-pages/phar/wp-cli.phar
Next, check if wp-cli tool is working by typing the following command:
php wp-cli.phar --infoIf everything goes well, you should see something like this:
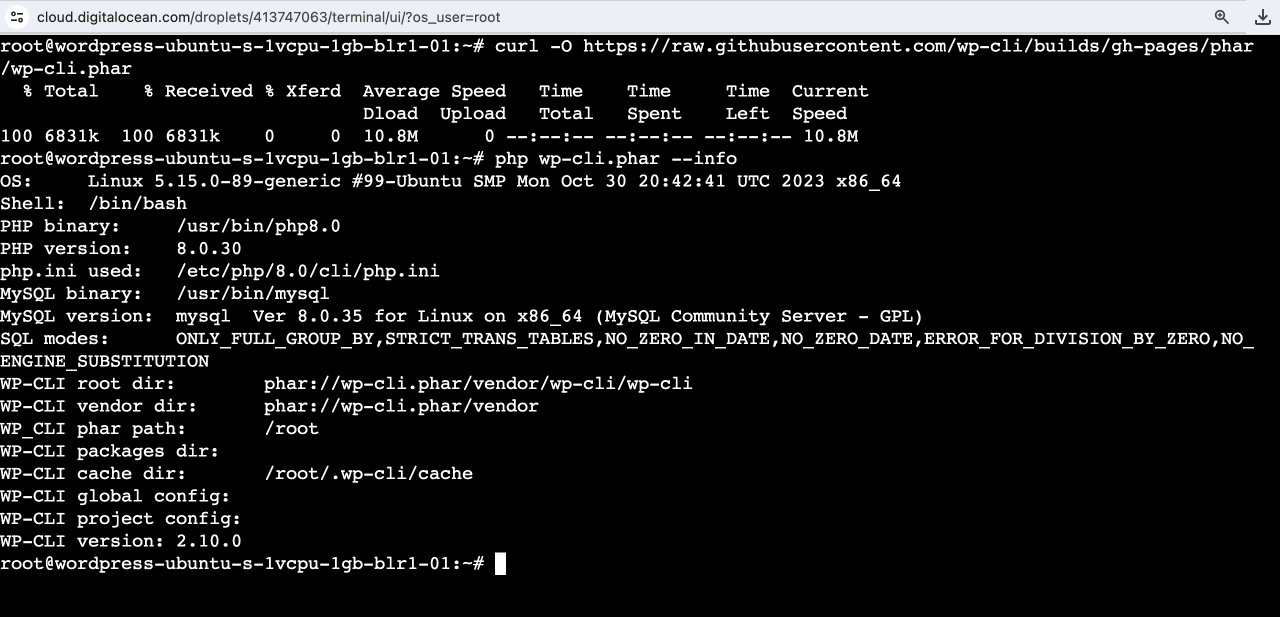
This means WP-CLI has been successfully installed on your web server.
And, php wp-cli.phar is the command we must use to manage our WordPress site using WP-CLI.
However, the command php wp-cli.phar is not easy to type if we use WP-CLI regularly.
And luckily, we can create a shortcut command named wp by running the following commands:
chmod +x wp-cli.phar
sudo mv wp-cli.phar /usr/local/bin/wp
After running the above commands, we have successfully replaced the php wp-cli.phar command with the wp command.
In other words, we can start using WP-CLI by running the wp command instead of php wp-cli.phar command.
For example, instead of typing:
php wp-cli.phar plugin list
php wp-cli.phar plugin install wordfence
We can use:
wp plugin list
wp plugin install wordfence
See how easy it is to type wp rather than whole php wp-cli.php?
Anyway, if the shortcut creation went well, you should see the following output inside your terminal when you run wp --info in the terminal:
root@wordpress-ubuntu-s-1vcpu-1gb-blr1-01:~# wp --info
OS:     Linux 5.15.0-89-generic #99-Ubuntu SMP Mon Oct 30 20:42:41 UTC 2023 x86_64
Shell:  /bin/bash
PHP binary:     /usr/bin/php8.0
PHP version:    8.0.30
php.ini used:   /etc/php/8.0/cli/php.ini
MySQL binary:   /usr/bin/mysql
MySQL version:  mysql  Ver 8.0.35 for Linux on x86_64 (MySQL Community Server - GPL)
SQL modes:      ONLY_FULL_GROUP_BY,STRICT_TRANS_TABLES,NO_ZERO_IN_DATE,NO_ZERO_DATE,ERROR_FOR_DIVISION_BY_ZERO,NO_ENGINE_SUBSTITUTION
WP-CLI root dir:        phar://wp-cli.phar/vendor/wp-cli/wp-cli
WP-CLI vendor dir:      phar://wp-cli.phar/vendor
WP_CLI phar path:       /root
WP-CLI packages dir:
WP-CLI cache dir:       /root/.wp-cli/cache
WP-CLI global config:
WP-CLI project config:
WP-CLI version: 2.10.0
That’s all.
That’s exactly how you install WP-CLI and create a shortcut for it on a UNIX-based OS like macOS, Ubuntu, etc.
If the above approach didn’t work out, read the following article from Delicious Brains to explore other ways to install WP-CLI:
The Complete Guide to Installing WP-CLI
You can also read the documentation about various ways of installing WP-CLI on the wordpress.org website:
Once the installation is successful…
Step 3: Use WP-CLI commands to manage your WordPress site
Before start using WP-CLI commands in the terminal, it is important that we understand the structure of the wp command:
wp <task_is_related_to> <specific_task> [--<option>=<value>] [<arguments>...]For example, if the task is related to managing plugins and the specific task is about installing a particular plugin, here is how the wp command is structured:
wp plugin install wordfenceAnother example: If the task is related to the database and the specific task is to export the database:
wp db export database-name.sqlYou get the idea, right?
One more important thing…
You must run the wp-cli commands by going inside the directory where WordPress is installed
This is the default behaviour of WP-CLI.
For example, when I log into my web server using SSH, I am automatically placed inside a top-level directory called Applications.
.
└── Root Directory/
    └── Applications/ <- I am currently here
        └── zsjfsddfksa/
            └── public_html/
                ├── wp-content
                ├── wp-admin
                ├── wp-includes
                └── wp-config.php
But my WordPress installation files are further down the hierarchy and placed inside the public_html directory:
.
└── Root Directory/
    └── Applications/
        └── zsjfsddfksa/
            └── public_html/ <- You must enter into this directory
                ├── wp-content
                ├── wp-admin
                ├── wp-includes
                └── wp-config.php
So, to manage my WordPress site using WP-CLI, I must go inside the public_html directory where WordPress files are located:
cd zsjfsddfksa/public_htmlIf not, and If I try to run WP-CLI commands from a non-WordPress installation directory like “Applications”, it will throw an error saying, “This does not seem to be a WordPress installation.”:

But once I enter into the WordPress installation directory and run the same wp command again, this time it is successful:

So, please remember to run wp cli commands only inside the WordPress installation directory.
Finally, let’s learn some of the important WP-CLI commands using some scenarios.
Scenario 1: How to export the database using WP-CLI for backup purposes
The main reason I was forced to learn WP-CLI is that it is easy to export and import large database files quickly (without experiencing timeouts).
My client had a website with a 3.8 GB database, and when I tried to migrate the site to a different server, I faced frequent migration timeouts when I tried to export the database using a plugin or PhpMyAdmin.
Then, I learned about WP-CLI because it is powered by the command line. This helped me complete the task in less than five minutes without experiencing any timeouts.
Where are five minutes versus where are two hours of timeout (nightmare) experience?
That’s the power of WP-CLI when it comes to dealing with large databases and saving a ton of time.
Anyway, coming back to the task at hand, we can easily export our WordPress site’s database using the wp db export command.
Here is its syntax:
wp db export <location_for_saving_exported_db_file_and_its_file_name>And here is its real-world usage:
wp db export ./db-backup/site.sql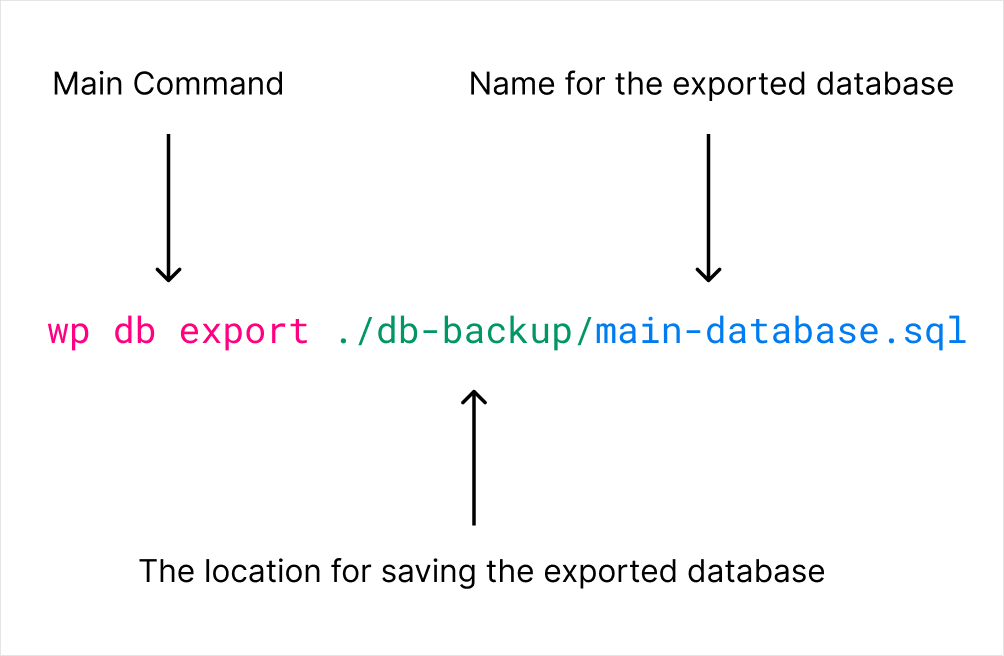
Running the above command results in downloading the site’s database in less than 20 seconds:
The save location can be anywhere inside your web server’s file system, and the name of the exported database file can be anything you want.
If you’re facing any errors related to permissions, try running the same command by using the --allow-root argument:
wp db export ./db-backup/site.sql --allow-rootThere are many security concerns if you’re using the --allow-root argument. So, use it only if you don’t have any other option.
The –allow-root is not the only option
There are so many options that change the way the wp db export operation behaves. You can see all the options of the wp db export command here: wp db export options
These options are helpful for achieving many of your unique scenarios.
Scenario 2: How to import the database
For some reason, you often export the site’s database to import it back later.
When the need comes, you can easily import the site’s database using wp db import command:
wp db import <path_to_the_database_file_we_want_to_import>For example:
wp db import ./db-backup/site.sqlAs you can see, the command expects us to provide a path to the database file we want to import.
Scenario 3: How to perform search and replace operation on the database
We can easily achieve this using the wp search-replace command:
wp search-replace <old_value> <new_value>There are two frequent reasons why you might need to perform a search and replace operation on your database:
1) Domain Change
When you change your website’s domain, for example, from naresh.local to naresh.com, all internal links and references to the old domain must be updated.
You can use a search-and-replace operation to efficiently update URLs throughout the database, ensuring your website functions correctly on the new domain.
Here is to replace an old domain with a new one:
wp search-replace http://naresh.local https://naresh.comThe above command will go ahead and replace all the instances of http://naresh.local with https://naresh.com.
But wait, not so fast. Don’t run the command yet.
Before running the above command directly, it is important that the wp search-replace must have a dry run that doesn’t perform the changes on the database:
wp search-replace http://naresh.local https://naresh.com --dry-run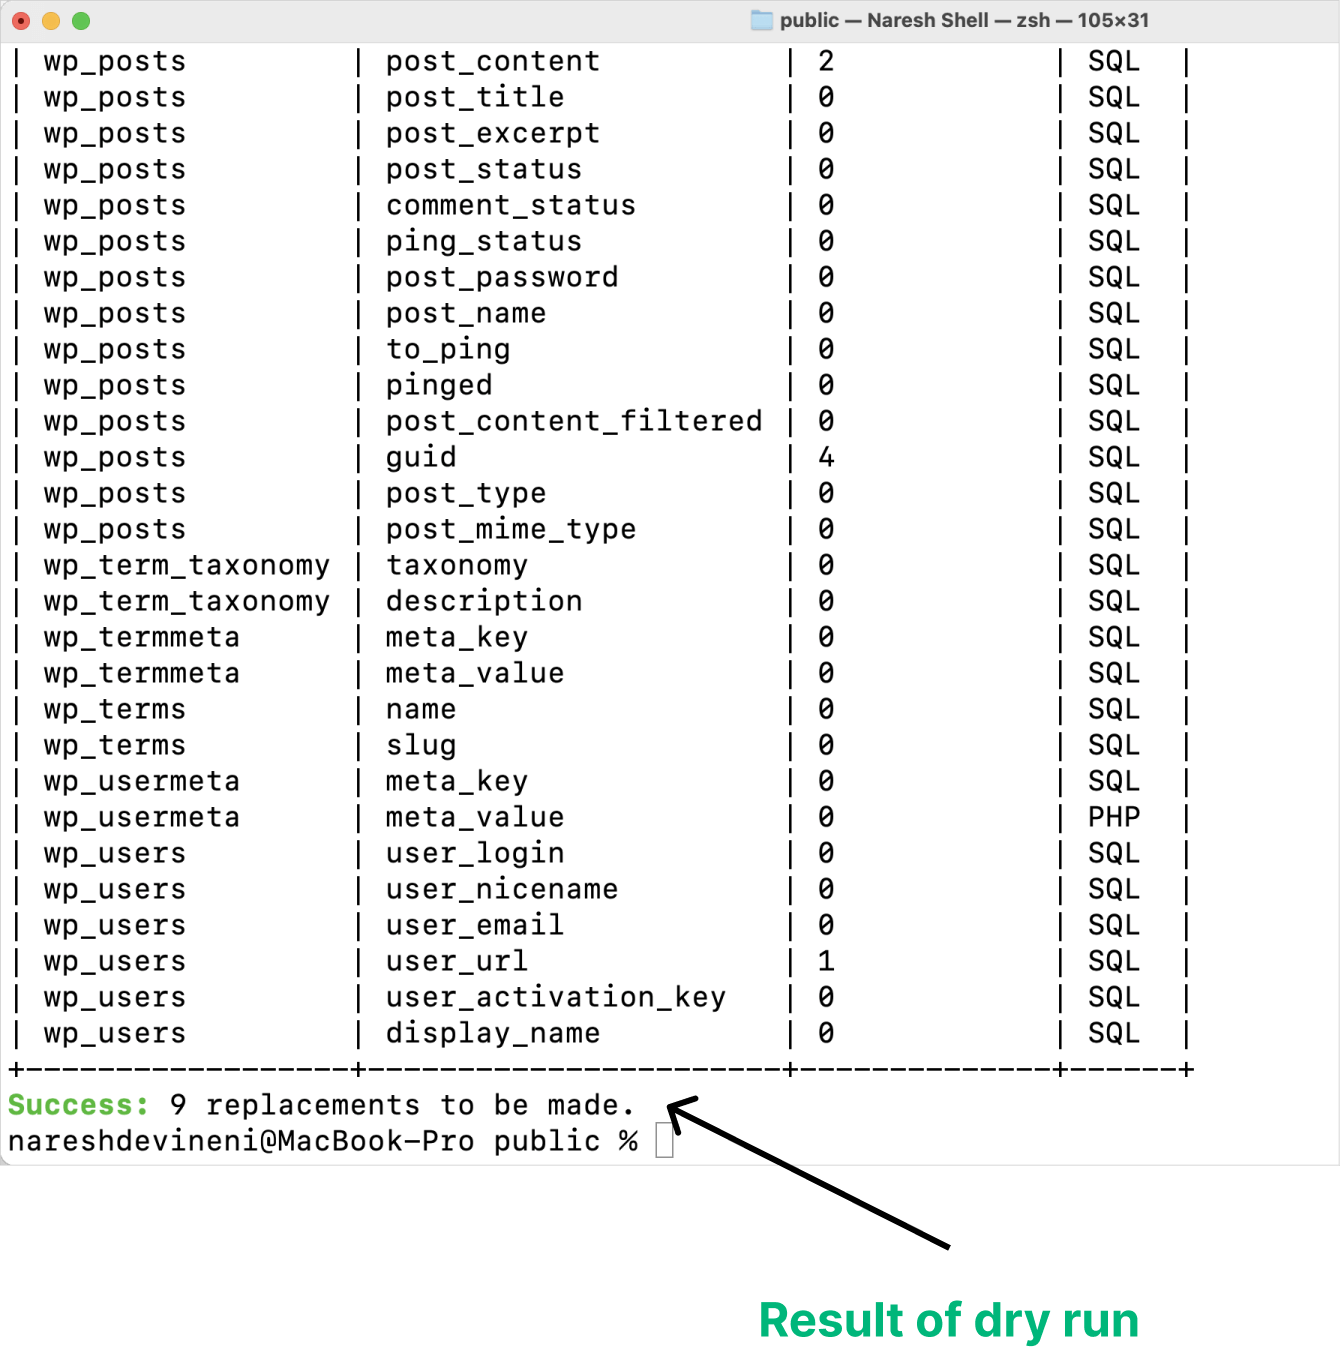
See the result of running the search-replace operation with the --dry-run option.
It says 9 replacements to be made. This means replacement is not performed.
In other words, it just found that there are 9 instances of the http://naresh.local found inside the database, but those 9 instances are not replaced with https://naresh.com.
The --dry-run option allows you to simulate the search and replace operation without actually modifying any data in the database.
This is crucial for testing purposes, especially when dealing with sensitive data or performing complex search and replace operations.
Simply put, it provides a safety net to preview the changes before applying them.
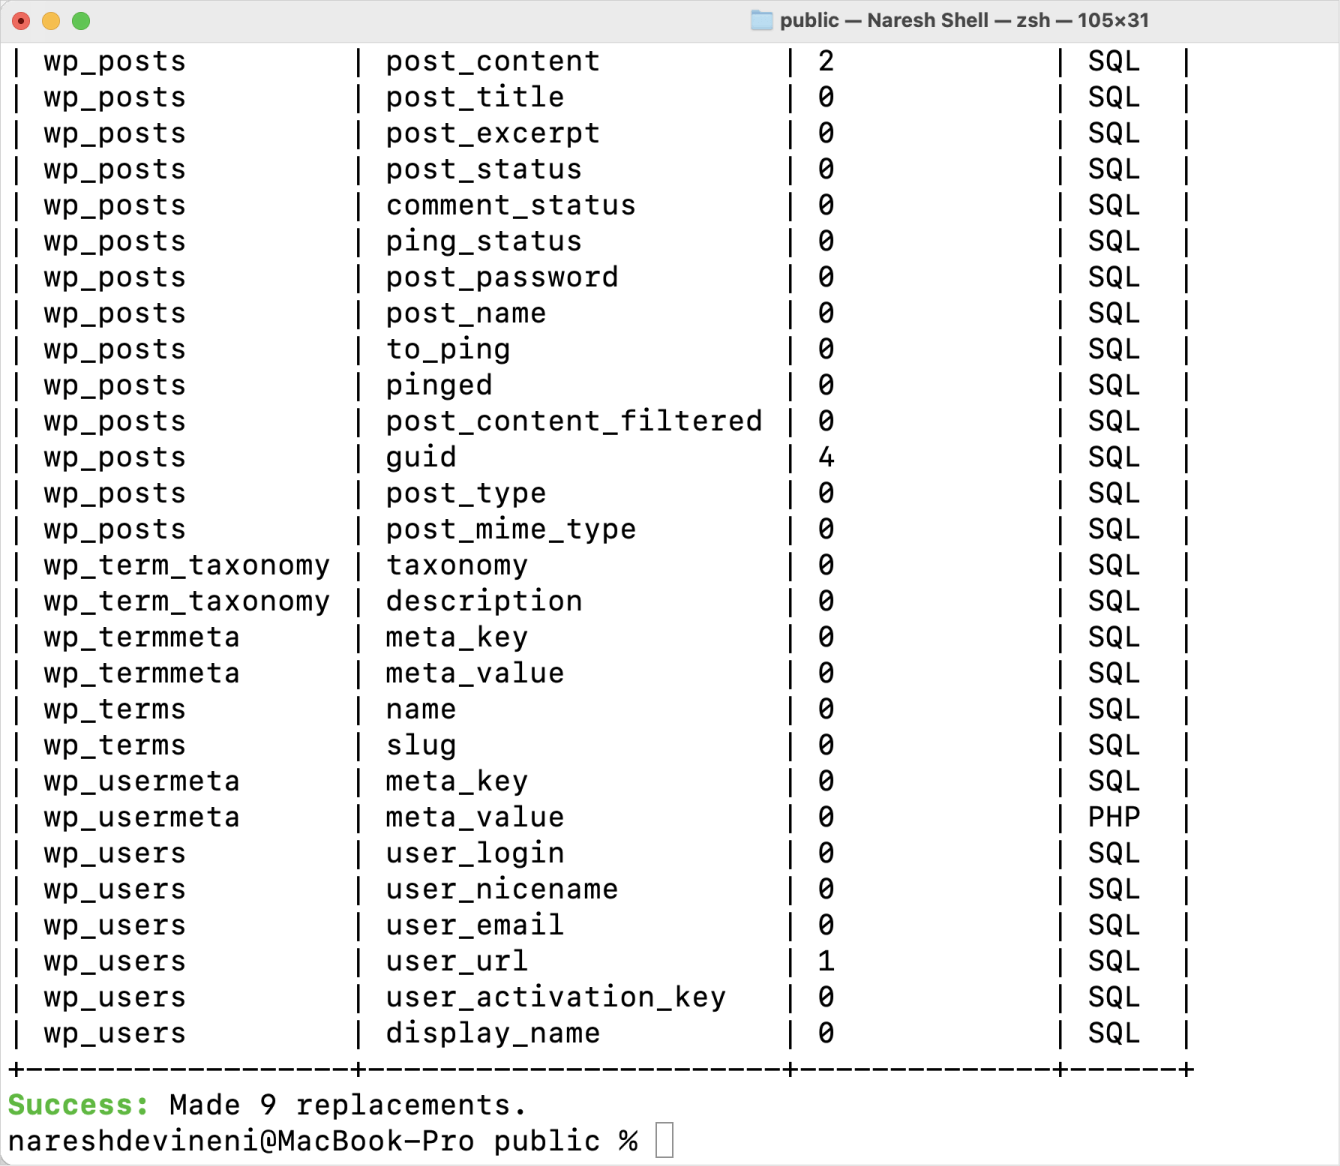
And only when you’re satisfied with the results of a dry run you must execute the actual search and replace operation that performs changes on the database by removing the --dry-run option from the command:
wp search-replace http://naresh.local https://naresh.comAnd this time, the command made 9 replacements inside the database.
2) Data Inconsistency
Sometimes, data inconsistencies can creep into your database due to typos, manual errors, or outdated information.
For example, the College of Mount Saint Vincent recently transformed into the University of Mount Saint Vincent.
However, the text “College of Mount Saint Vincent” is being used on hundreds of pages on the site.
Our task now is to replace all the instances of the text “College of Mount Saint Vincent” with “University of Mount Saint Vincent”.
We can easily and quickly achieve this using the wp search-replace command because manually performing this kind of operation takes forever, with hundreds of references all over the website.
Before performing the task for real, do the dry run first:
wp search-replace 'Colleage of Mount Saint Vincent' 'University of Mount Saint Vincent' --dry-runAlso, If you notice, because we are dealing with pure text data, we are surrounding the old and new text values with quotes:

Anyway, if you’re satisfied with the result of the dry run, perform the task for real by excluding the --dry-run option:
wp search-replace 'Colleage of Mount Saint Vincent' 'University of Mount Saint Vincent'That’s all.
The –dry-run is not the only option
There are so many options that change the way the search-replace operation behaves. You can see all the options of the wp search-replace command here: wp search-replace options
These options are helpful for achieving many of your unique scenarios.
Scenario 4: Updating all the plugins
WordPress plugins receive regular updates because plugin developers will keep releasing new features and fixing security issues and bugs.
If you’re running a busy site with many plugins that receive regular updates, one option is to enable automatic plugin updates.
However, a potential downside of automatic updates is that they could break your website by throwing fatal errors, and as a result, they could break your business when you’re asleep, and you’ll wake up to a bad morning.
One of many problems with not enabling automatic plugin updates is manually updating all the plugins one by one by going to the admin dashboard.
This takes a lot of time and requires a lot of clicking.
An efficient solution to this problem is being able to update all the plugins by running a single WP-CLI command:
wp plugin update --allThat’s all it takes to update all the plugins on the site in a single go. This saves you a ton of time.
I love WP-CLI :D
Scenario 5: Update the Core WordPress software when your web host is not providing the latest update
Sometimes, web hosting companies will stop you from updating the WordPress Core Software to its latest version.
This usually happens with a positive intention that a new update could break your website. So, the block that updates from showing inside the WordPress Admin Dashboard.
But sometimes, this could hurt you too.
What if there is a security update?
If the new update concerns security and you can’t upgrade because of some restrictions, your website could be hacked.
There are many urgent scenarios where you are forced to upgrade irrespective of the hosting restrictions.
If that is the case with you, WP-CLI will help you overcome the problem with just a single command:
wp core updateYep, that’s all it takes :D
Scenario 6: Deactivate all the plugins at once for troubleshooting purposes and then reactivate one plugin at a time
Sometimes, your website will face a fatal error, and you’ll be locked out of accessing the WordPress Admin Dashboard.
And as part of the troubleshooting process, you might end up deactivating all the plugins to see if the error goes away.
With you being locked out of Admin Dashboard, the best way to deactivate all the plugins is using WP-CLI:
wp plugin deactivate --allYep, that’s all it takes to deactivate all the plugins simultaneously:

You can verify the deactivation by running the following command:
wp plugin list --status=inactiveIf the error disappears after deactivating all the plugins, then the problem will definitely be with one of the plugins.
To confirm this, activate plugins one by one to see if the errors appear after activating a particular plugin:
wp plugin activate plugin-slugFor example:
wp plugin activate advanced-custom-fieldsRepeat this process until the culprit is found.
You can do this with the Admin Dashboard, too. But WP-CLI makes this happen pretty fast.
Advanced Scenario 7: Running a bash script to install and activate plugins in a bulk way
I am saving the best scenario for the last.
This is a bit of an advanced scenario that saves you a lot of time. So, bear with me :)
The thing is, many web design agencies niche down to build only certain kinds of websites for their clients.
For example, some of them only build membership websites, and some of them only build simple business websites for Yoga centres.
So, it makes sense for them to install the same plugins for all their websites.
Or you’re probably a WordPress developer who wants to install a common set of plugins every time you build a site.
Either way, an easy and reliable way to install the same set of plugins repeatedly on different sites is by using WP-CLI.
Again, there are two ways to achieve this.
Approach 1: Install the plugins you want one by one using the wp plugin command:
By default, WP-CLI does not support installing and activating multiple plugins simultaneously with a single command.
So, you have to write individual wp plugin install commands to install multiple plugins one by one:
wp plugin install plugin-slug --activate
wp plugin install plugin-slug --activate
wp plugin install plugin-slug --activate
You can easily find the plugin slug by visiting the wordpress.org URL for the plugin.
The plugin slug is found at the end of the wordpress.org’s plugin download page URL:
https://wordpress.org/plugins/contact-form-7/You can also install a plugin using its zip file:
wp plugin install ~/premium-plugins/wp-rocket.zip --activateHere is a real-world by combining the above techniques:
wp plugin install wordpress-seo --activate
wp plugin install wpforms --activate
wp plugin install advanced-custom-fields --activate
wp plugin install ~/premium-plugins/wp-rocket.zip --activate
wp plugin install ~/premium-plugins/perfmatters.zip --activate
Having said that, you don’t have to type these commands every time you use them.
You can tweak the above commands to your needs and save them somewhere so that you can copy and paste them whenever you want to install the plugins quickly and in bulk.
But wait, there is a better way to achieve this.
Approach 2: Install plugins in bulk using a bash script
“Hey! Stop! What is a bash script?”
Bash scripts are usually used to automate tasks on a Unix-based system, such as macOS, Ubuntu, Debian, etc.
In other words, a bash script allows you to write a series of commands that can be executed sequentially or conditionally.
This makes a bash script ideal for automating repetitive tasks, saving a ton of time, and improving productivity.
Coming back to the task at hand, when it comes to WordPress management with WP-CLI, bash scripts can be particularly useful for performing actions like installing and activating multiple plugins simultaneously.
This is better shown than explained.
Here is the task: Install plugins in bulk as a starting point for any WordPress website I build
We can achieve this in four easy steps.
Step 1: Create a text file and save the plugin list inside it
I would recommend creating this text file outside of the WordPress installation directory because you’ll be using this file for many WordPress sites.
I have the habit of putting the plugin list in my web server’s home directory.
So, I log into my web server using SSH and will navigate to the “home” directory:
cd ~If you have no clue what a “home” directory means, read it here and come back.
Next, I will create a new directory called site-dev-helpers and I will move into it:
mkdir site-dev-helpers
cd site-dev-helpers
Then, run the below command to create a new text file called plugin-list.txt and open it up inside a text editor called “Nano”:
nano plugin-list.txt“Nano” is the pre-built text editor for CLI tools on most UNIX-based OS, such as macOS, Ubuntu, etc.
After entering the plugin list, the nano editor looks like this:
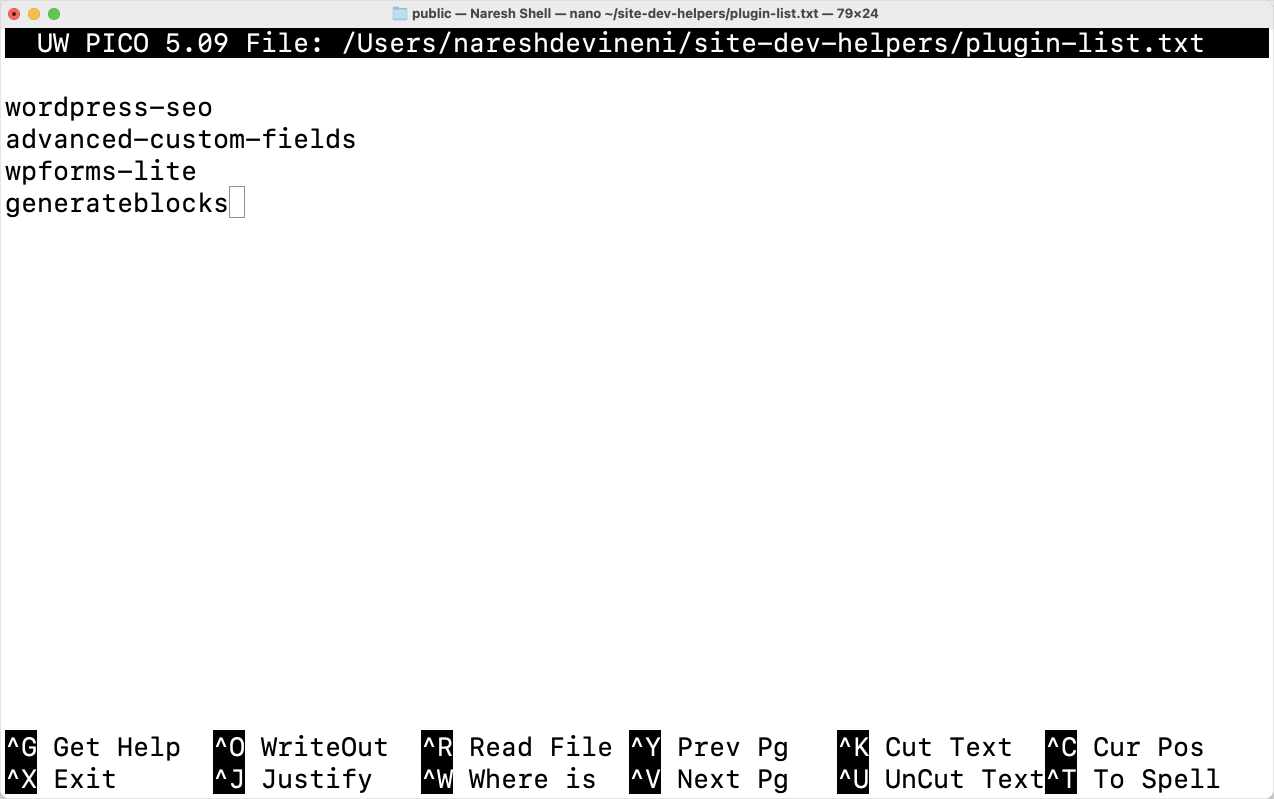
If you notice, I have only entered the individual plugin slugs, one per line.
The actual wp plugin install command will be written inside the bash script file in the next step.
Anyway, Once you are done typing plugin slugs, save the file by hitting ctrl + x keyboard shortcut and confirm the changes by typing “yes” or “y” and then hitting enter on the keyboard.
Step 2: Create a bash script that reads the plugin list file and installs and activates each plugin using WP-CLI.
To achieve this, I will move inside my site-dev-helper directory again, and this time, I will create a file called install-plugins.sh:
cd ~/site-dev-helpers
nano install-plugins.sh
Bash scripts end with .sh extension.
Next, inside the nano editor, you can following example code and tweak it to your needs:
#!/bin/bash

# Navigate to the WordPress installation directory
cd /path/to/your/wordpress/installation

# Loop through each line in plugin-list.txt and install/activate the plugin
while IFS= read -r plugin_slug; do
    # Install the plugin and activate it
    wp plugin install "$plugin_slug" --activate
done < ~/path/to/plugin-list.txt
Replace /path/to/your/wordpress/installation with the actual path to your WordPress installation directory and /path/to/plugin-list.txt with the path to your plugin list file.
Also, I want you to read the comments and understand the above code.
In any bash script file, the comments start with “#”. For example:
# Navigate to the WordPress installation directoryAnyway, here is my final bash script for this exercise:
#!/bin/bash

# Navigate to the WordPress installation directory
cd ~/"Local sites"/Naresh/app/public

# Loop through each line in plugin-list.txt and install/activate the plugin
while IFS= read -r plugin_slug; do
    # Install the plugin and activate it
    wp plugin install "$plugin_slug" --activate
done < ~/site-dev-helpers/plugin-list.txt
Step 3: Set Execution Permissions for the install-plugins.sh bash script
In other words, make the script executable by running the following command in your terminal:
chmod +x /path/to/install-plugins.shIn my case, it is:
chmod +x ~/site-dev-helpers/install-plugins.shStep 4: Finally, execute the script to install and activate plugins in bulk
To achieve it, just provide the path to the script file and hit enter inside the terminal:
/path/to/install-plugins.shIn my case:
~/site-dev-helpers/install-plugins.shThat’s all.
If you now run wp plugin list command, you can see all the plugins active on the site:

That’s it for this scenario.
If I have one recommendation for you in the context of WP-CLI, learn bash scripting and use WP-CLI with bash script to automate your regular tasks.
Invest your time in it and thank me later :D
Another use case for WP-CLI and Bash scripting…
Rare but cool user management scenarios using WP-CLI
You can easily manage the website users using WP-CLI.
For example, you can create a new user pretty fast using the wp user create command:
wp user create username user@example.com --role=author --user_pass=password123
Similarly, you can list users, delete them, change their roles and passwords, too:
wp user list --fields=ID,user_login,user_email,roles
wp user update user_id --user_email=user@example.com
wp user update user_id --user_pass=strongpassword
wp user delete user_id --reassign=destination_user_id
wp user set-role user_id administrator
Not only that, but you don’t have to deal with one user at a time.
Before proceeding forward, because you are dealing with bulk user data, please note that:
- The following bash scripts are just examples. You must modify them to fit your specific needs.
- Ensure you understand the commands and their implications before running them on your live website.
- Always create backups before making significant changes.
- Consider security best practices like using environment variables for database credentials.
Using a bash script, you can create bulk user accounts without using a plugin:
#!/bin/bash

# Define a file containing usernames and roles (one line per user: username,role)
user_data_file="users.csv"

# Loop through each line in the user data file
while IFS=',' read -r username role; do
  # Create the user with the specified role
  wp user create "$username" --user_pass=random_password --role="$role"
done < "$user_data_file"
Here is what’s happening:
- This script reads a CSV file (
users.csv) containing usernames and roles (comma-separated). - It loops through each line, creating a user with the provided username, a random password (generated by the script), and the specified role.
- Note: Using random passwords requires additional steps like emailing them to the users or setting up a password reset mechanism.
Using a bash script to deactivate Inactive Users
# Define the number of days for inactivity threshold (e.g., 30 days)
inactive_days=30

# Use WP database query to find inactive users
inactive_users=$(mysql -h your_host -u your_user -p your_db_name -e "SELECT user_login FROM wp_users WHERE user_registered < DATE_SUB(CURDATE(), INTERVAL $inactive_days DAY);")

# Loop through each inactive username and deactivate the user
for user in $inactive_users; do
  wp user deactivate "$user"
done
Here is what’s happening:
- This script defines an inactivity threshold (e.g., 30 days) and uses a MySQL query to fetch usernames of users who haven’t registered within that timeframe.
- It then iterates through the list and deactivates each user using
wp user deactivate.
Non-bash script scenario: Find all users with a specific email domain (e.g., “@mycompany.com”)
This will help you create notifications that are specific to a particular company’s users, for example, prompting them to attend a live workshop.
wp user list | grep "@mycompany.com"The Conclusion
That’s all for now.
I will keep improving this article with new real-world scenarios.
I will see you in the next article.
 © 2026 UsableWP. A project by Naresh Devineni.