Using Custom WordPress Menus

In the world of WordPress, we call the navigation menu in the above picture as a “Custom Menu”
Custom menus are also a theme feature. So, creating and outputting a full-fledged custom menu is probably the easiest job while developing a WordPress website.
It takes four steps to create and output a custom menu to the browser.
- Register the custom menu inside your theme by providing a unique Menu ID and a small description of the menu. While the Menu ID helps us output the menu to the frontend in step 4, the description helps us recognize and properly link the custom menu in step 3
- Create the custom menu using the Admin Dashboard -> Appearance -> Menus
- Link the newly created custom menu from step 2 to the menu ID from step 1
- Finally, Output the custom menu using the menu ID
“What?”
Alright alright, I agree that the above description and the image is a bit skeptical. Trust me, everything will make sense to you once you are done with step 4. Have a leap of faith in me, will you? ( Between I am writing this lesson just after watching the Spider-Man: Into the Spider-Verse movie )
Step 1: Register the menu
The register_nav_menus() WordPress function helps us to register multiple navigation menus at the same time.
It also enables theme support for custom menus. So you don’t have to use:
add_theme_support( 'menus' );
Anyway, For now, we will be registering just one custom menu. But, as we build our website, we will come back to this function and register more menus.
From now onwards, I will use the word “custom menu” and “menu” interchangeably. Because they both convey the same meaning, isn’t it?
So, open up the functions.php file and put the following code inside the nd_dosth_theme_setup action:
// Register Navigation Menus
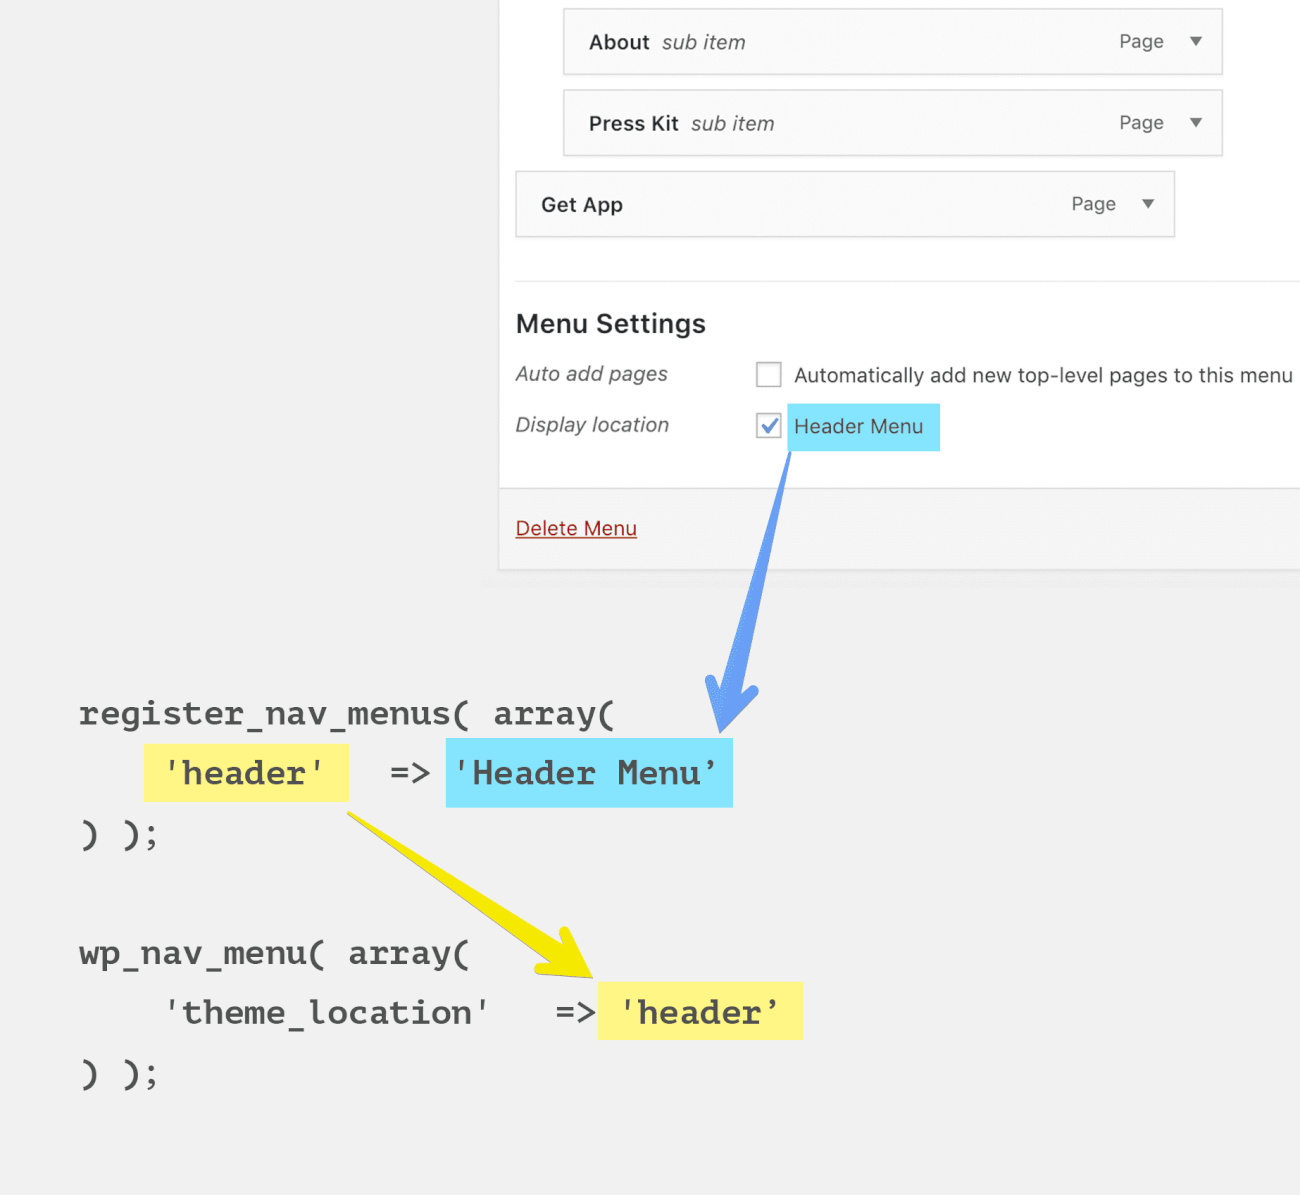
register_nav_menus( array(
'header' => 'Header Menu',
) );
Here is the final nd_dosth_theme_setup action after adding the above code.
function nd_dosth_theme_setup() {

    // Add <title> tag support
    add_theme_support( 'title-tag' );

    // Add custom-logo support
    add_theme_support( 'custom-logo' );

    // Register Navigation Menus
    register_nav_menus( array(
        'header'   => 'Header Menu',
    ) );

}
add_action( 'after_setup_theme', 'nd_dosth_theme_setup');
Now, let’s break it down.
The register_nav_menus() function accepts an Associative array. Every item in this array will be registered as a custom navigation menu.
So, For each custom menu, we have to provide a self-descriptive Menu ID as the key and a small description as the value to the key so that we can easily recognize and use them.
Both Menu ID and Description must be a proper PHP strings.
In our case, we are registering a primary menu that we want to display only in the header portion of the website. So, I gave this menu a self-descriptive Menu ID called “header” and “Header Menu” as the description. But, it is just a convenient naming convention that you don’t have to follow.
“Hey! I got a question! Why are you not using the translation WordPress function for the location description?”
Do you mean like this?
“Yep! This is what I saw while reading an article on the Internet.”
Oh! So you did your research before reading this book. I really appreciate it.
Coming back to your question, We have to make our theme translation ready and we will do that in the next lesson. For now, let’s just focus on the WordPress menus.
Anyway, now that we have registered a menu successfully, next comes step 2.
Step 2: Create the menu by clicking, dragging, and dropping
Go to the Admin Dashboard -> Appearances -> Menus
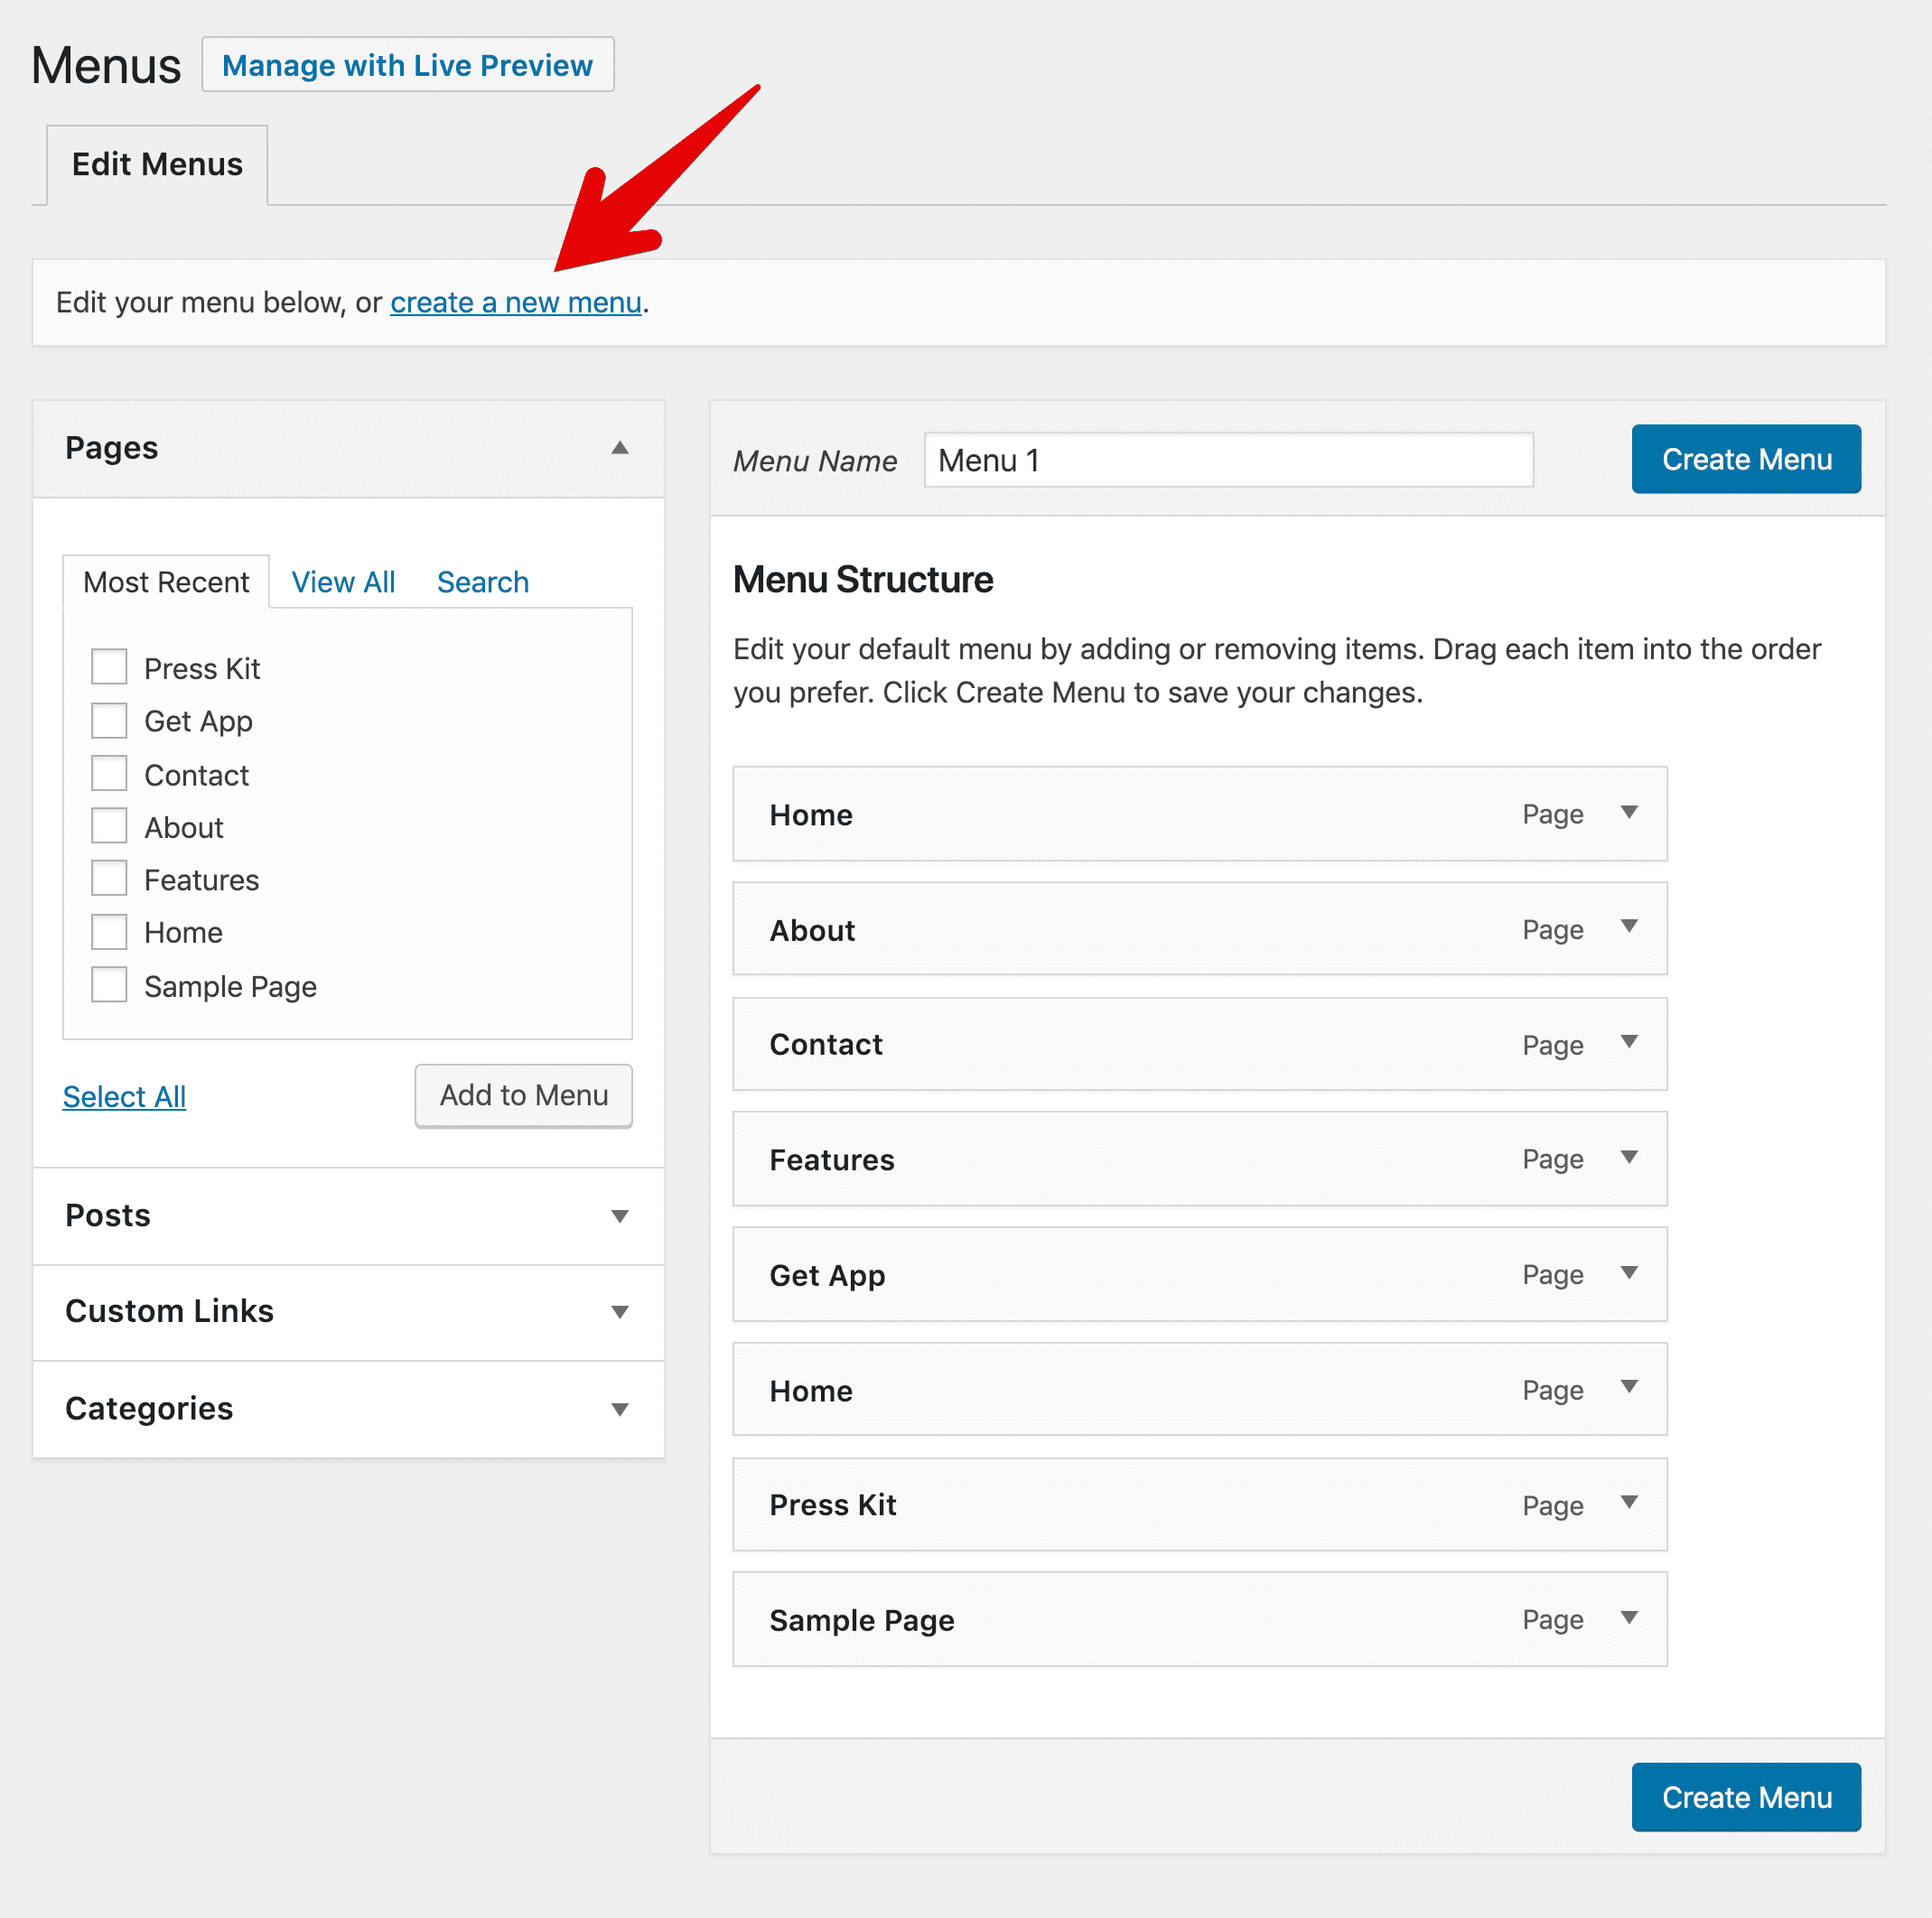
And, to our surprise has already put all our site pages as menu items in the default menu. You can edit the default menu to fit your needs, but heck! We will create a new menu from scratch.
If you notice the above picture, there is also a “Create a new menu” link. So click on it to get an empty playground.
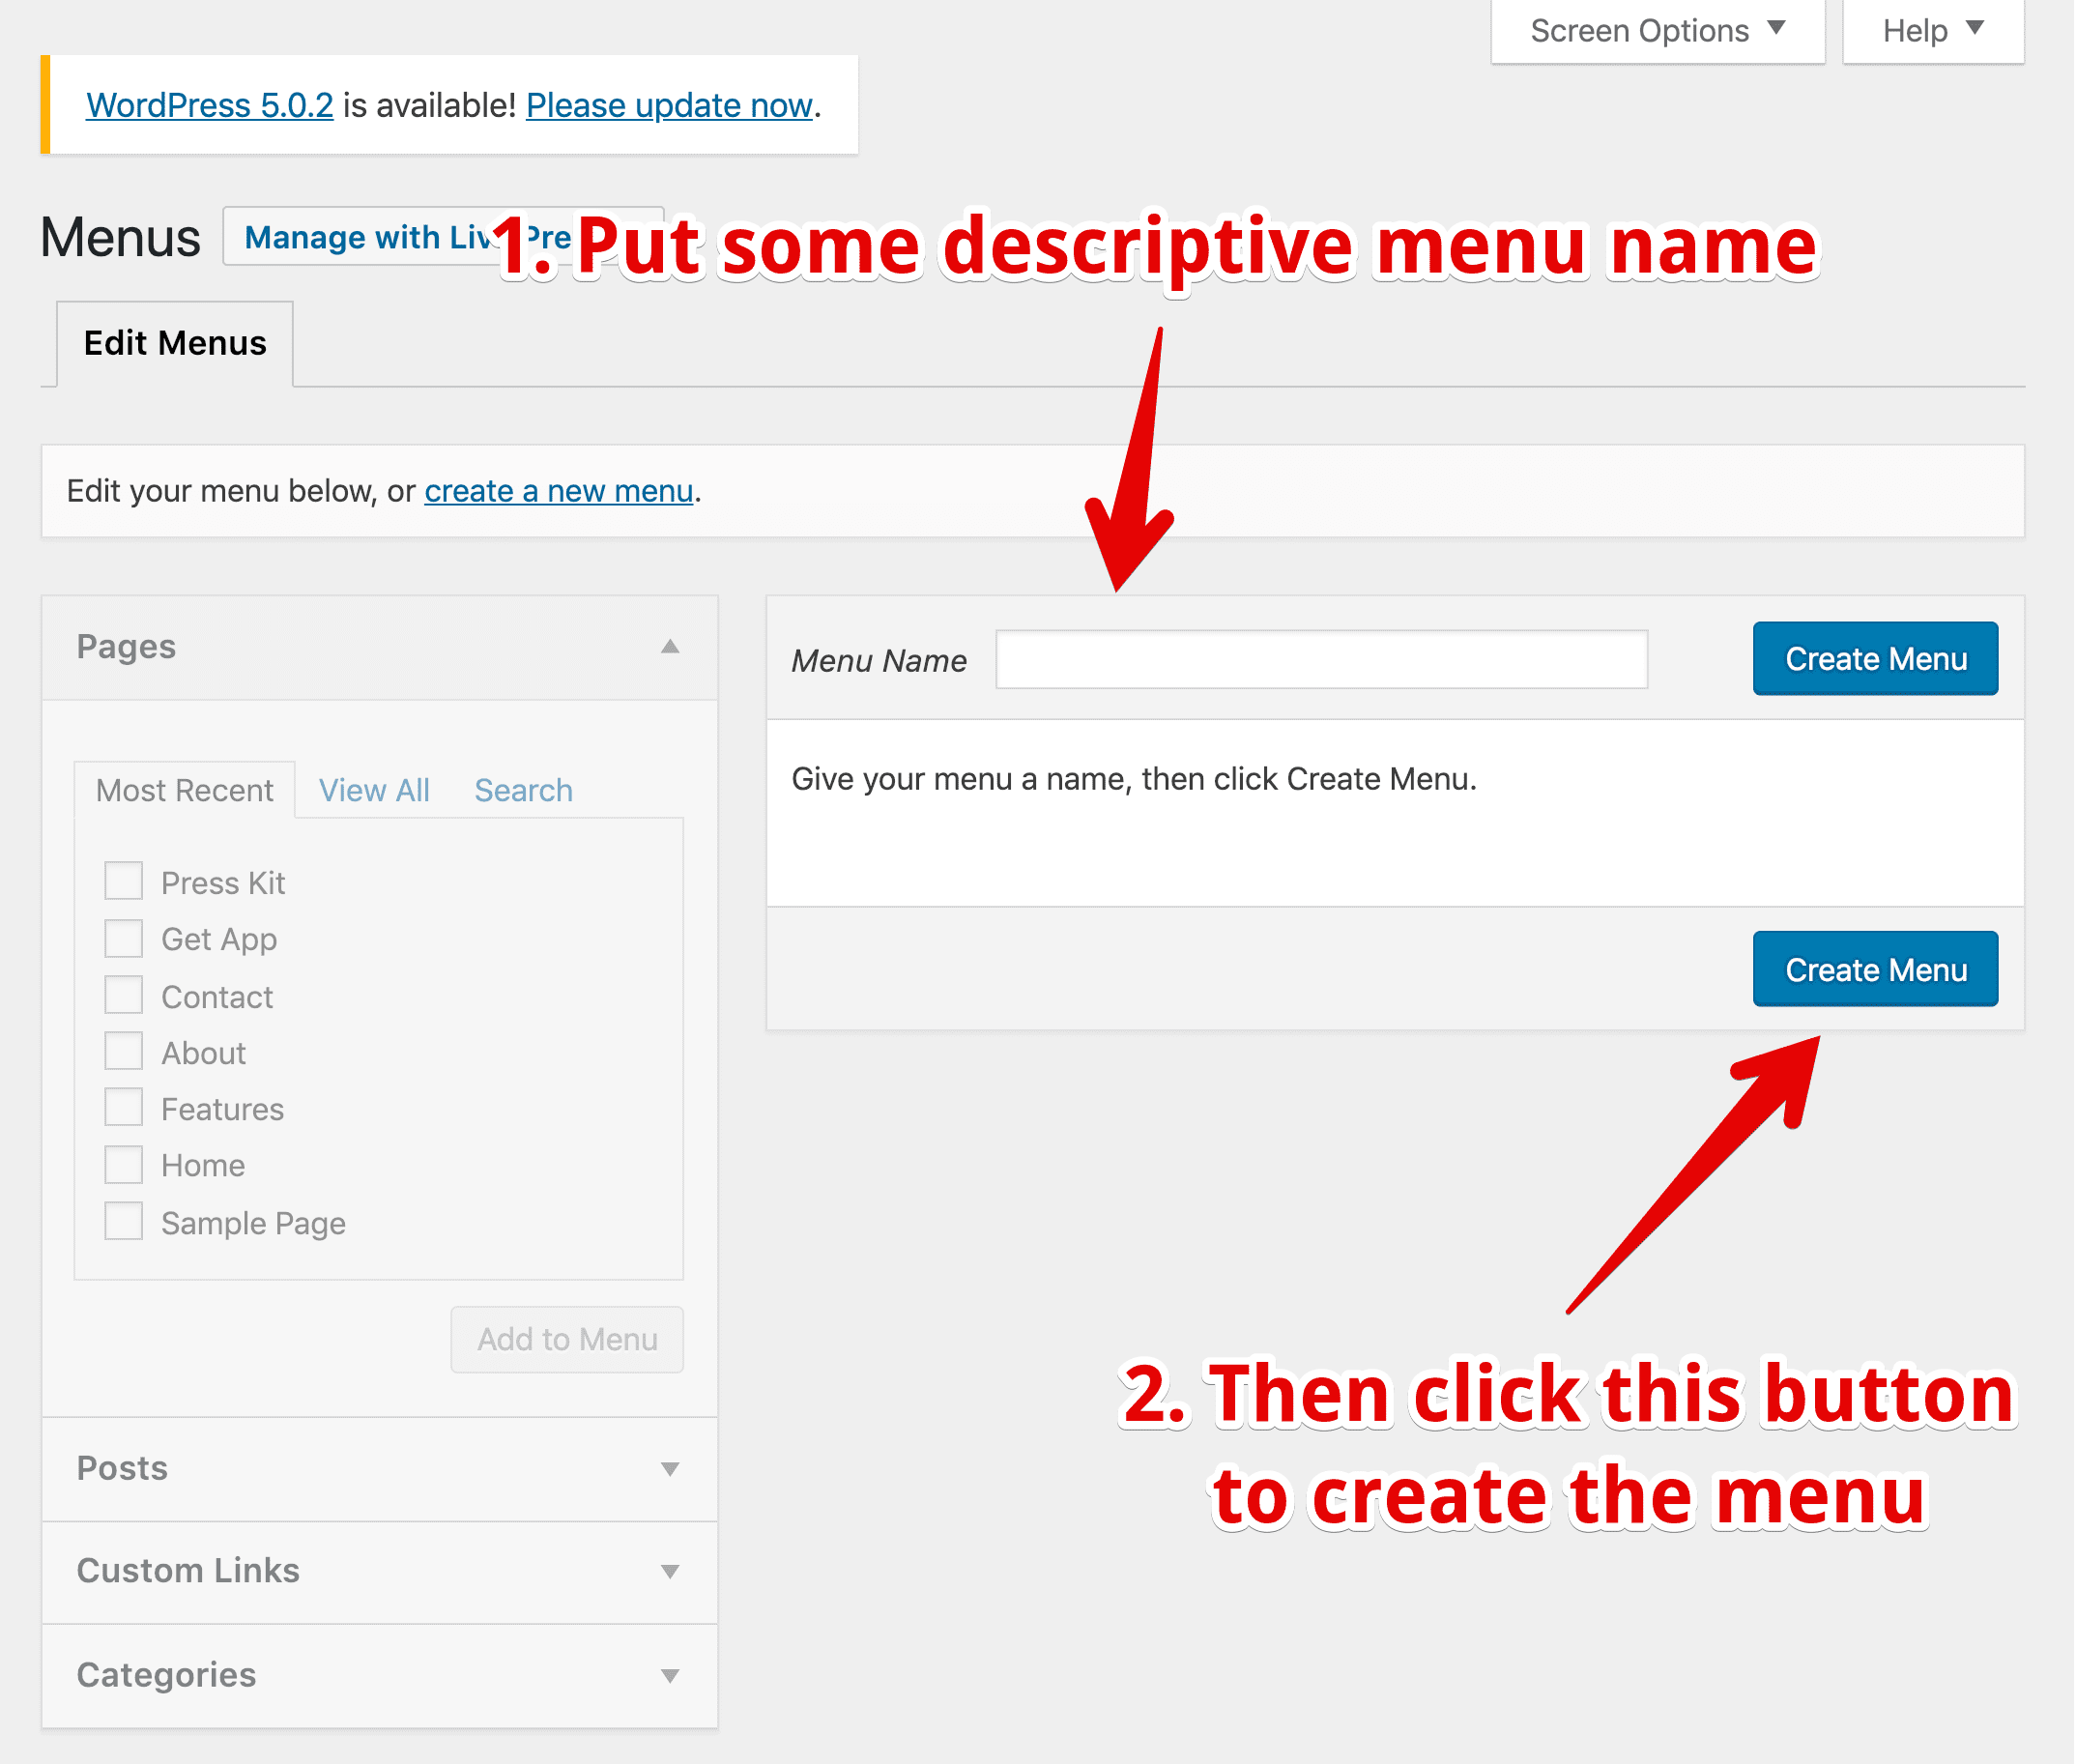
Just like WordPress says, Give the menu a name. I am gonna name this menu “Header Menu”. WordPress puts this menu name to good use inside widgets.
If you notice, the options on the left side of the screen are greyed out. You can not use this interface until you create the menu.
So, click on the Create Menu button. And, As soon as you hit this button, WordPress will reload the page and this time, the options on the left side of the screen are accessible.
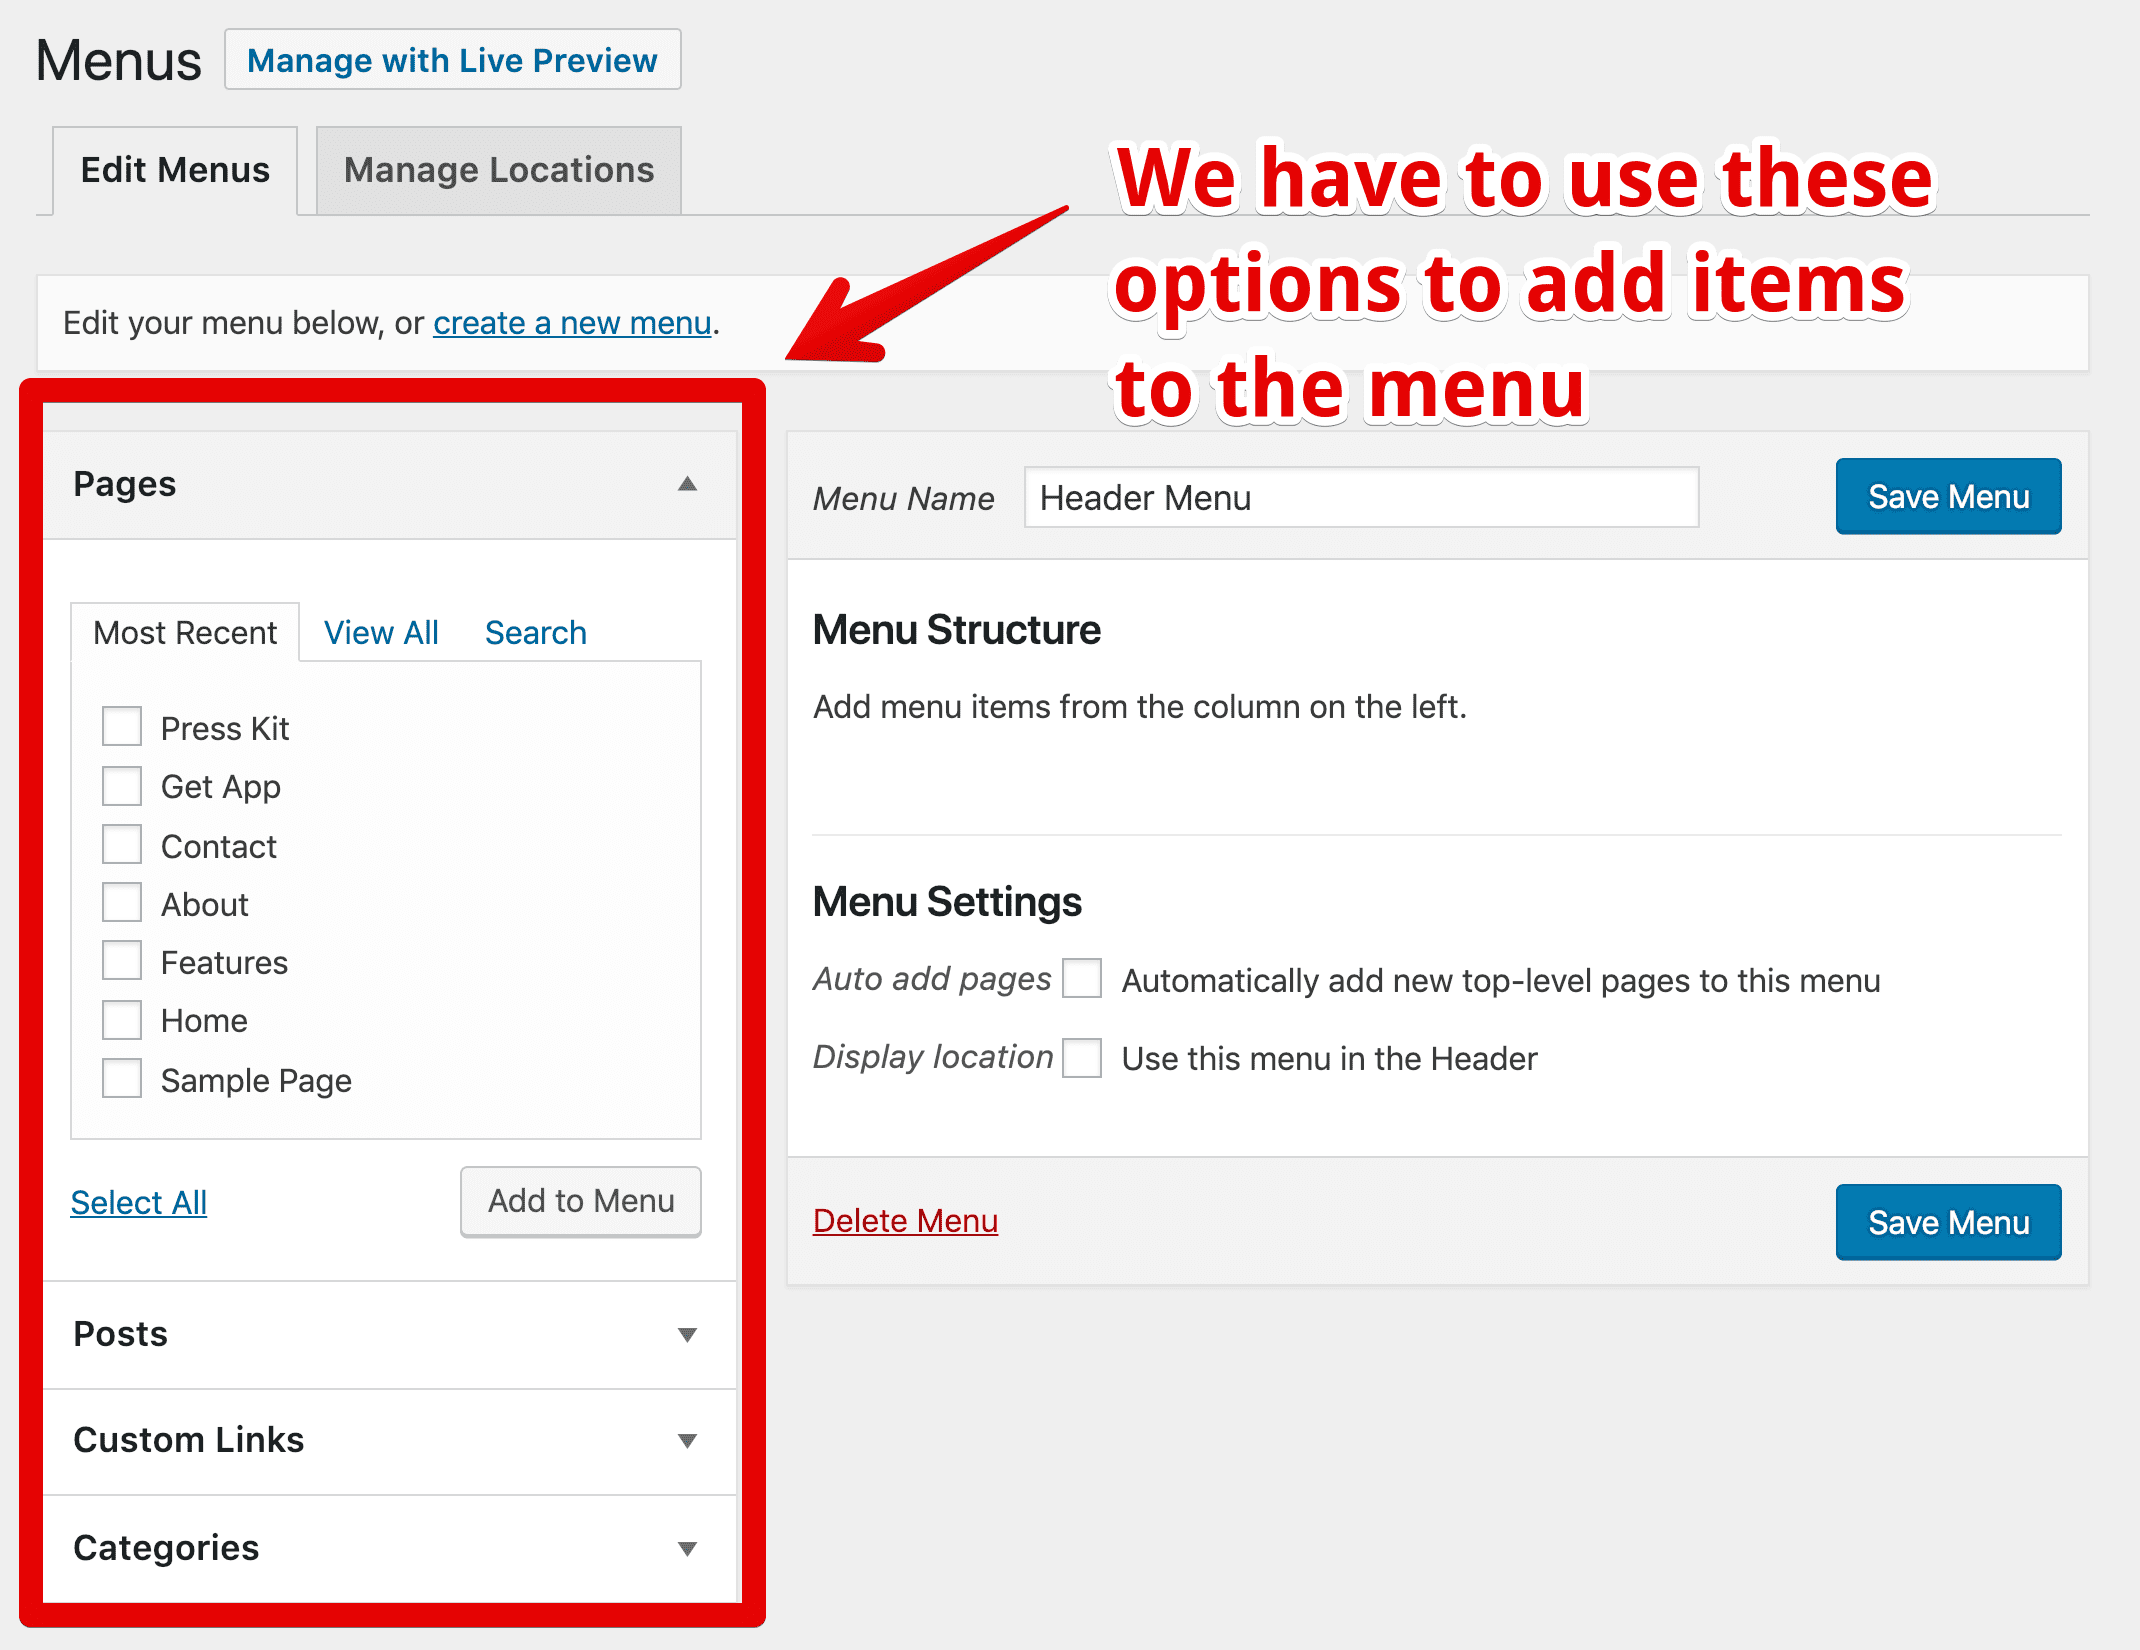
Now that you can access options on the left side of the screen, let’s use them to add some items to our Header Menu.
If you observe the accordions with options on the left side of the screen, you can easily tell that WordPress is allowing us to add the following items to the menu:
- A Page
- A Post
- A Custom link. Along with an internal URL, You can also create a custom link that points to an external website like google.com
- Blog post categories
- Blog post tags
- A custom post type based post
Long theory short, we can create a very dynamic custom menu.
In our case, for now, we will be using the Header menu with pages only.
So, let’s start by adding the “Home” page to the menu.
To add the “Home” page, first make sure the “Pages” box is open. If it is not open, click on it.
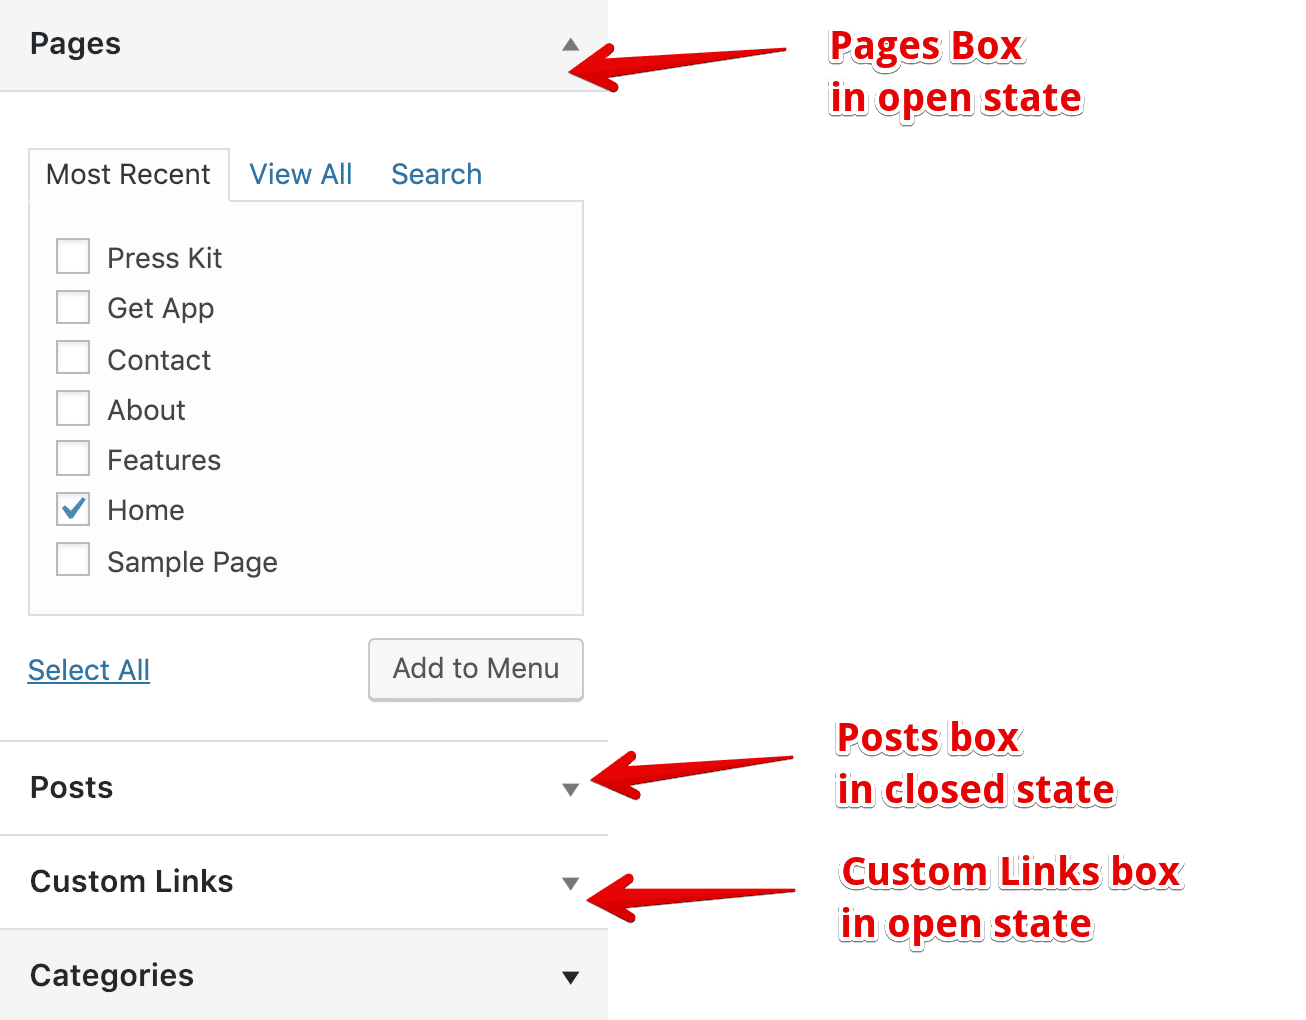
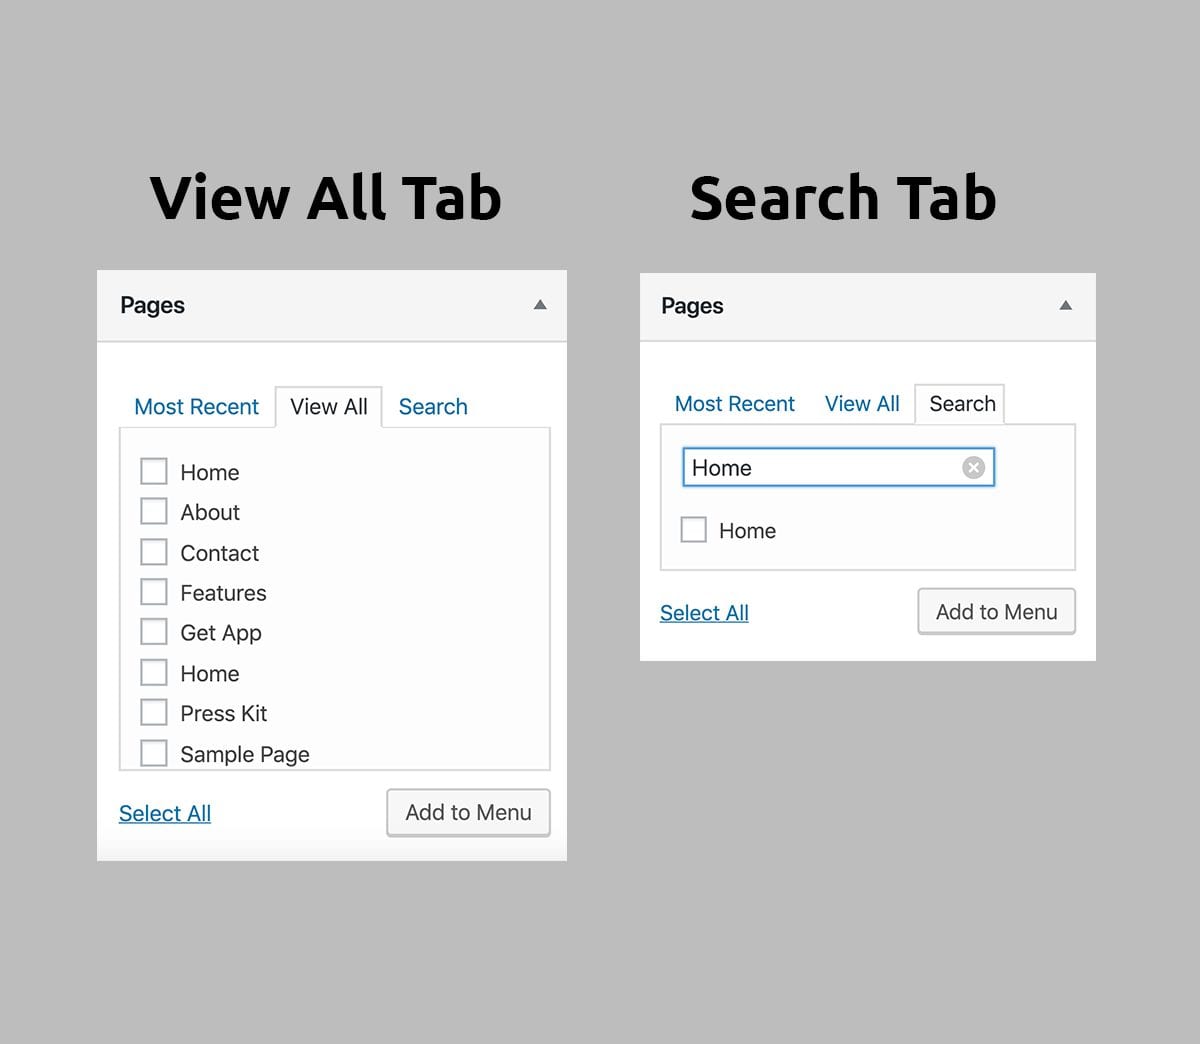
Inside the Pages box, by default, “Most Recent” tab will be active. You can only see the most recently created pages in this tab. So, if you have a website with a large number of pages, you either have to switch to the “View All” tab or You can search for a page using the “Search Tab”.
In our case, the “Home” page is already visible inside the Most Recent tab.
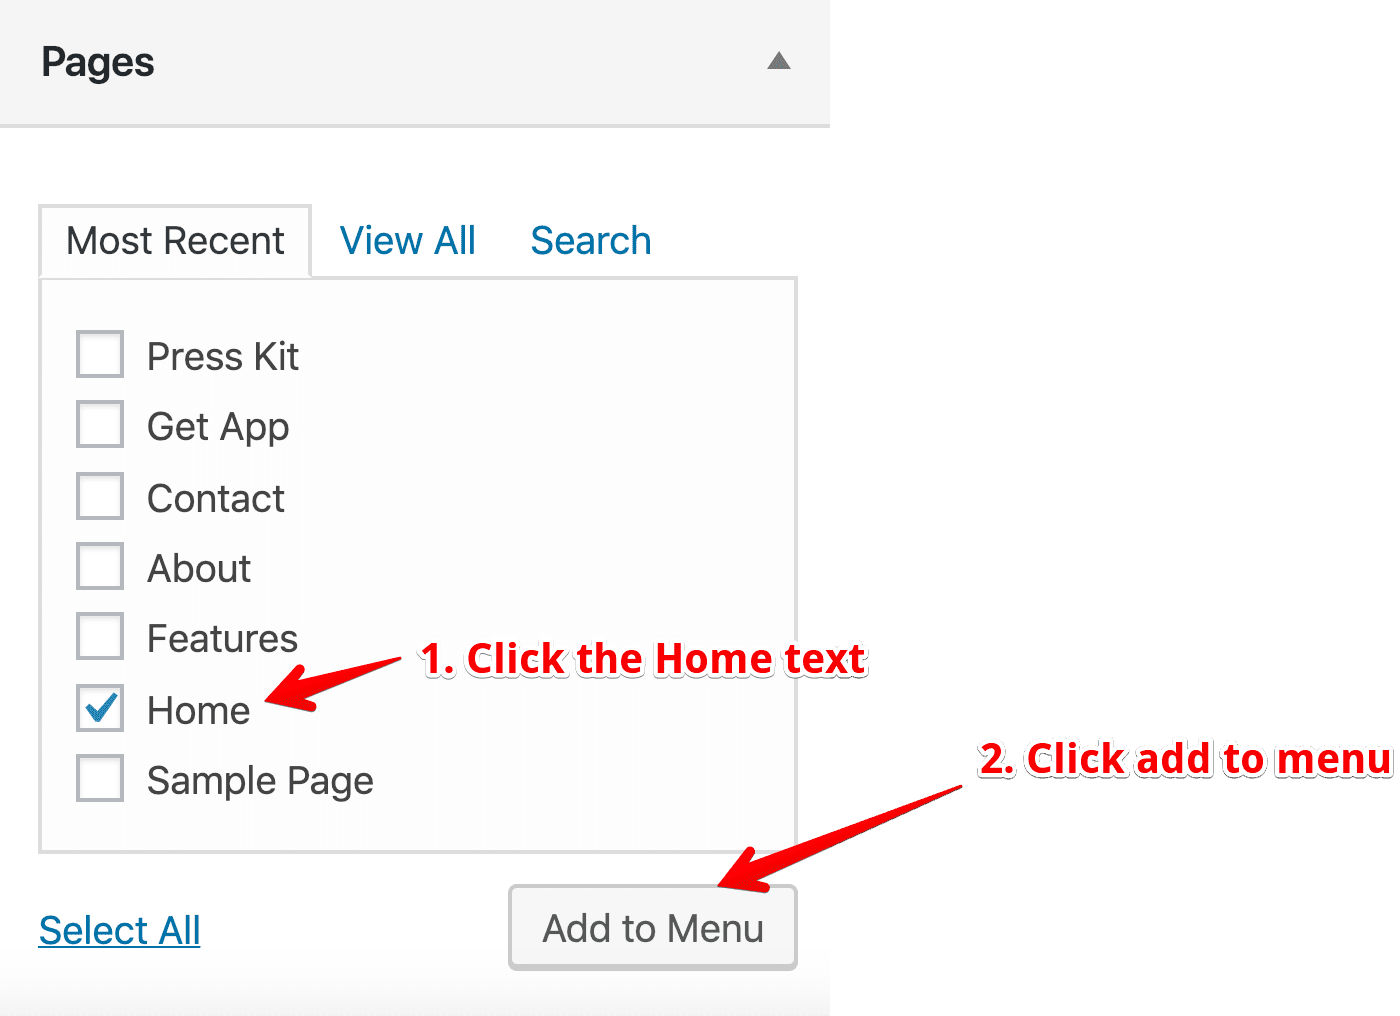
So, let’s click on it to select it. The checkbox beside the “Home” text will display a tick mark in it indicating that the page has been selected.
Next, click on the “Add to Menu” button to add the “Home” page to the menu.
As soon as you click on the button, WordPress adds “Home” page as a menu item to the Menu Structure.
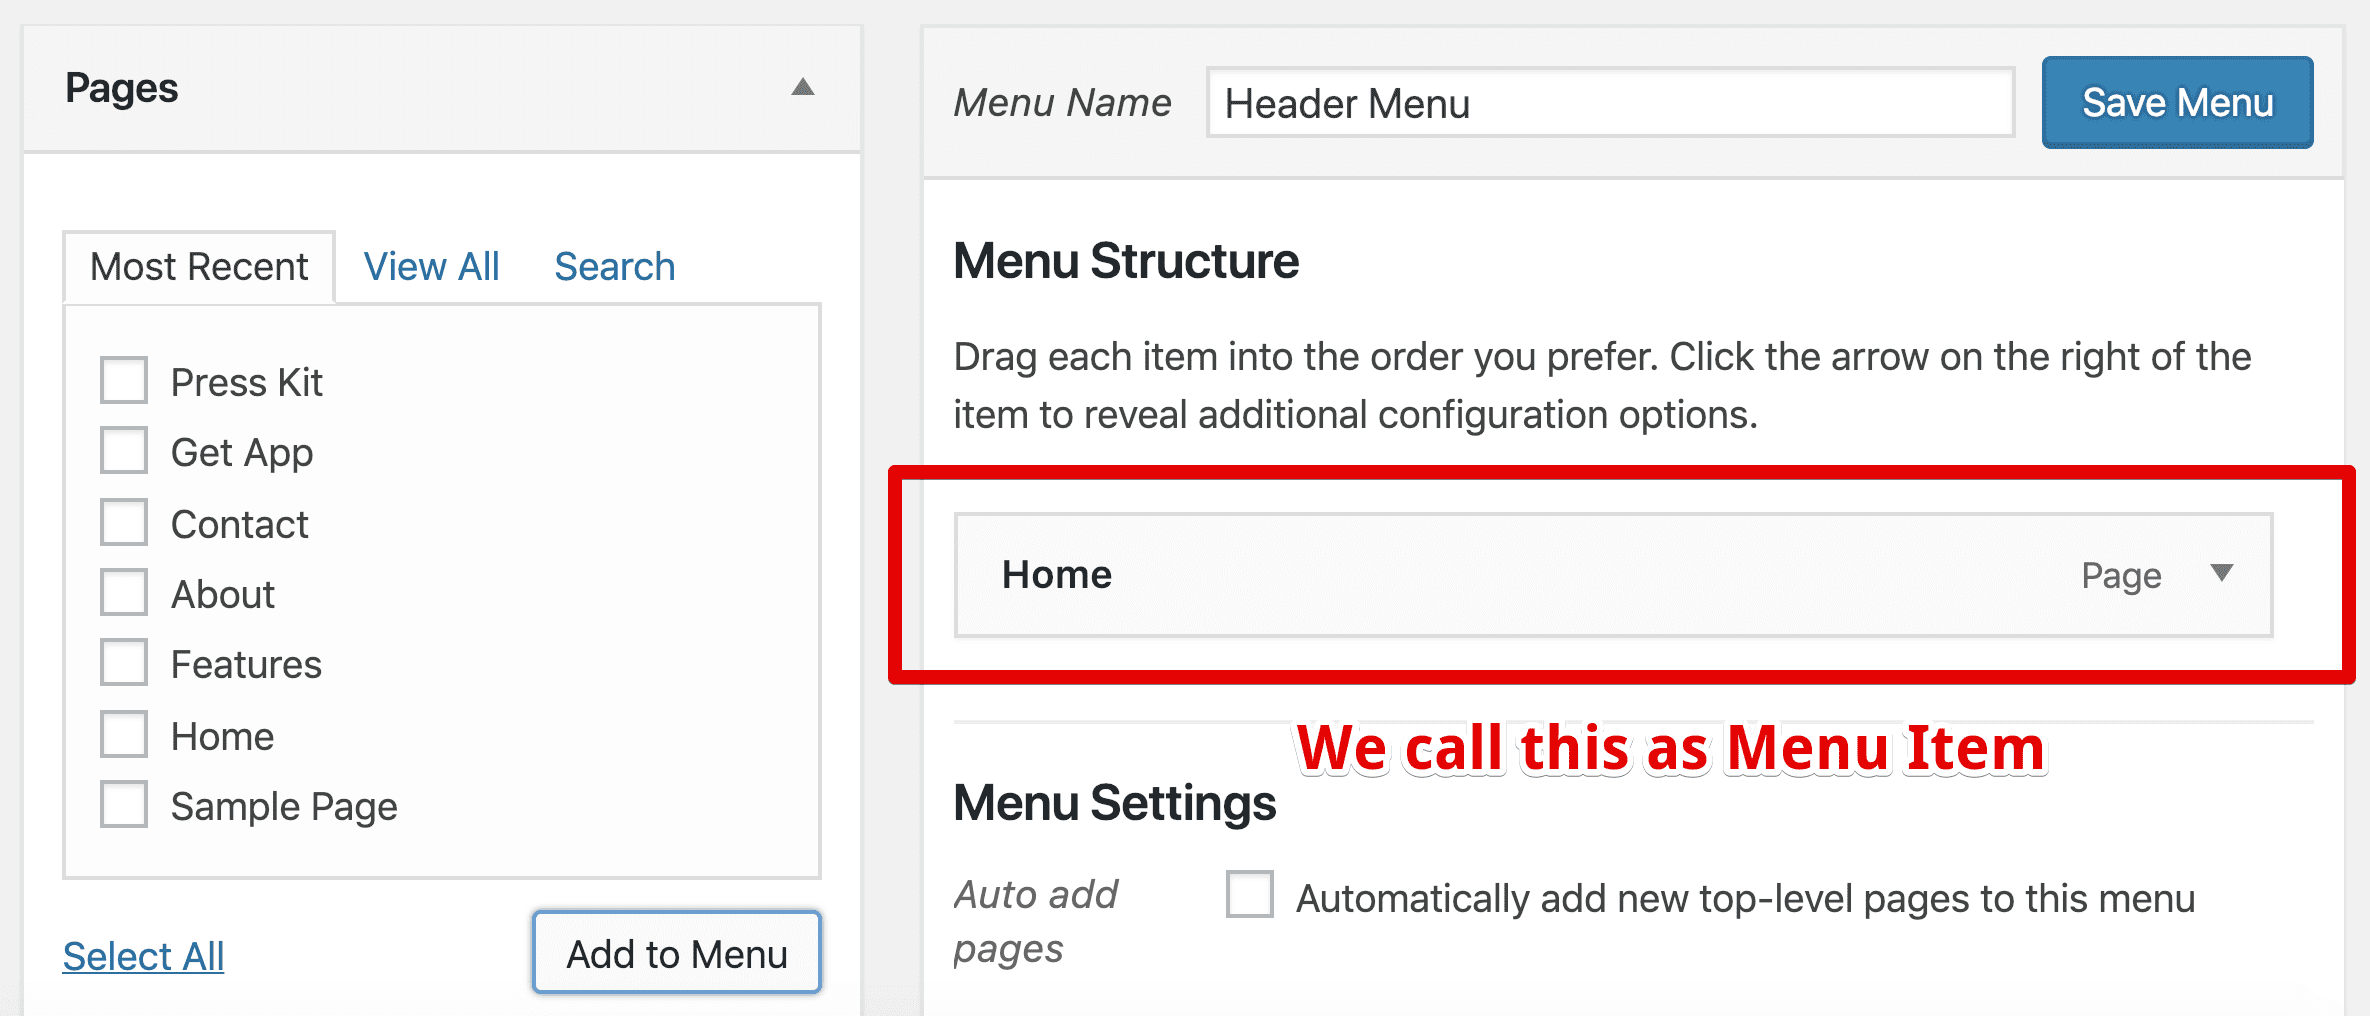
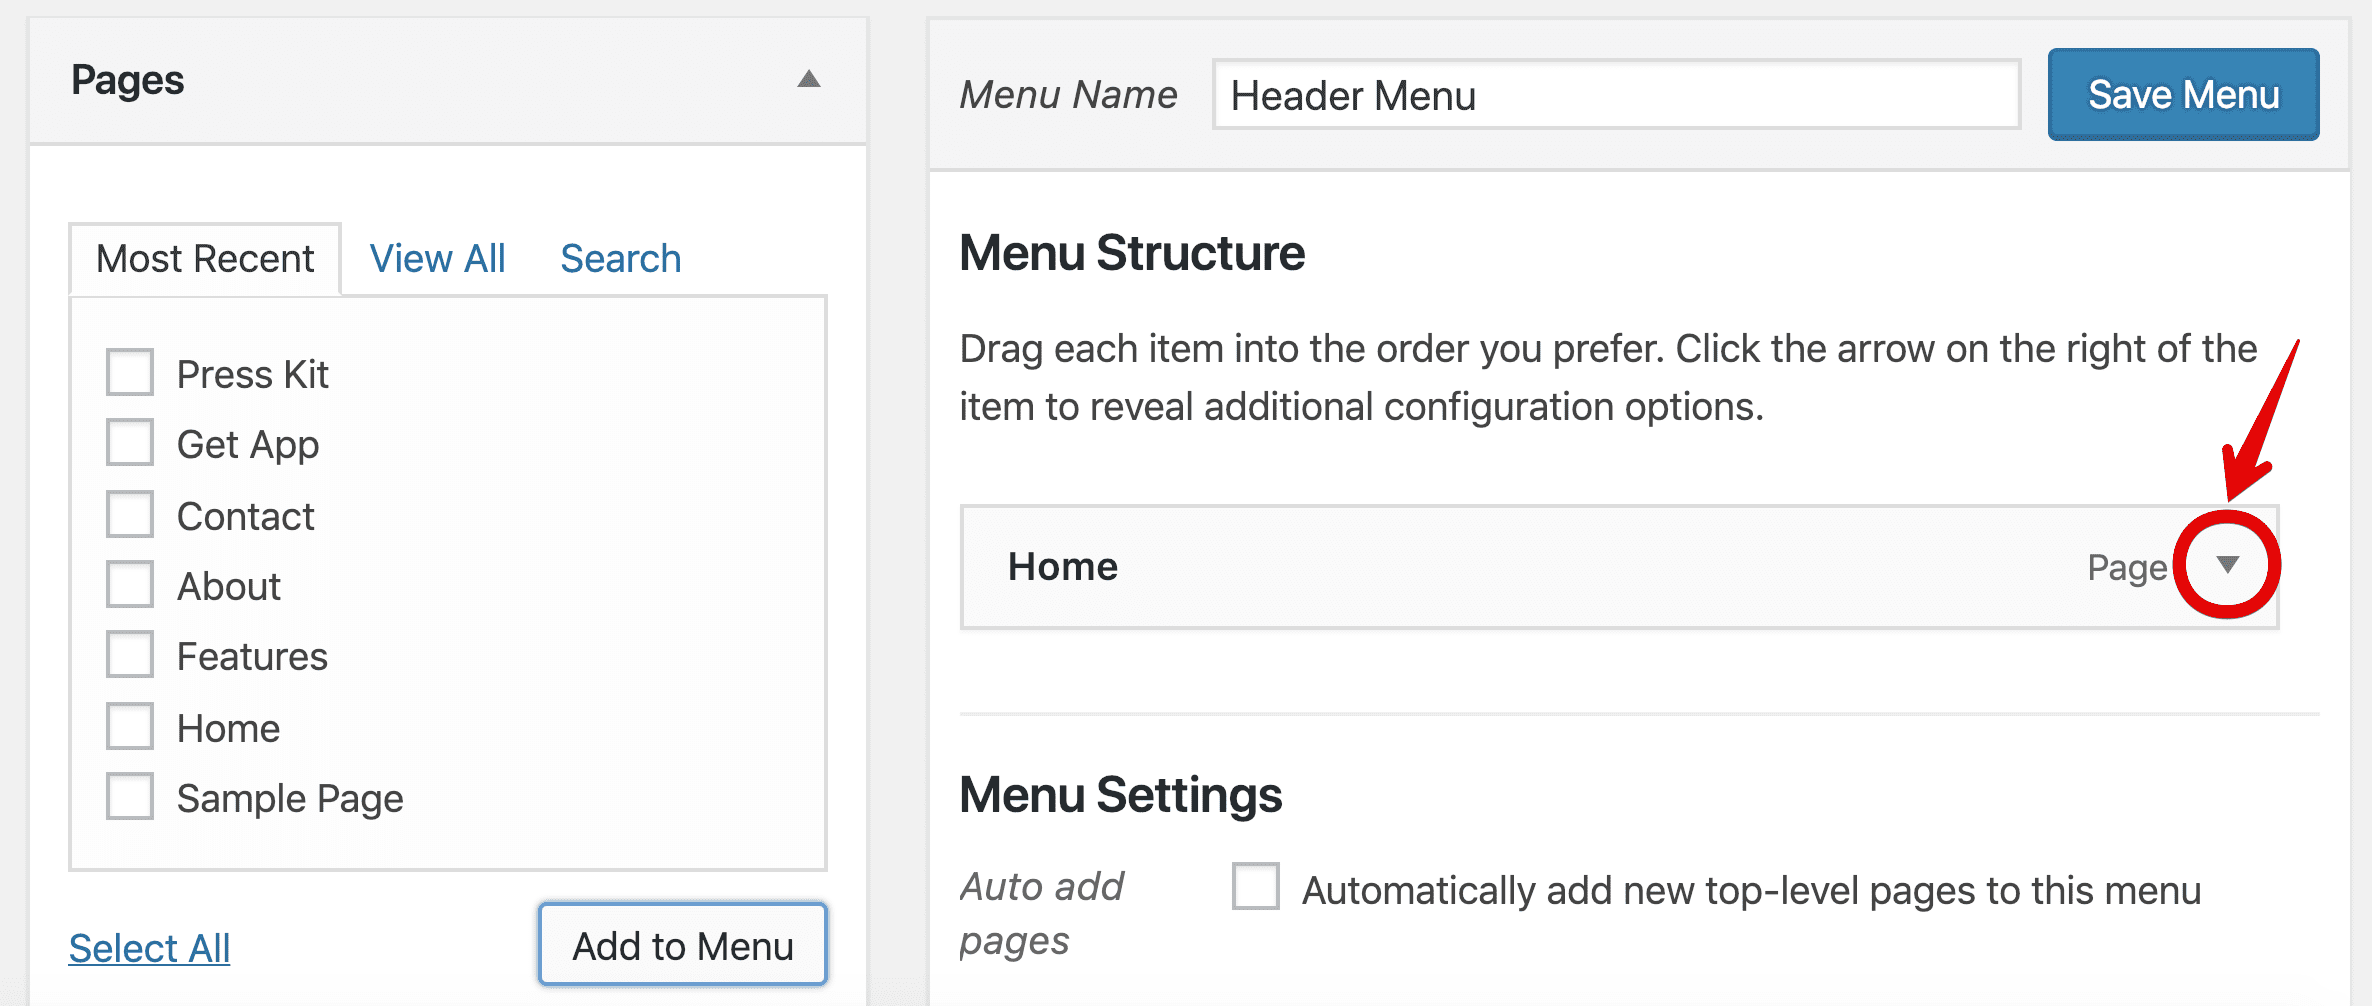
If you notice, the “Home” menu item is a box too. So, you can open it and close it. By default, every menu item’s box would be closed state and you can open it up only by precisely clicking on the little arrow-down icon located at the right-hand corner of the menu item.
Clicking doesn’t really work on the rest of the menu item area because the remaining area will be used by us to adjust the Menu structure by dragging and dropping menu items. You’ll understand this in a moment.
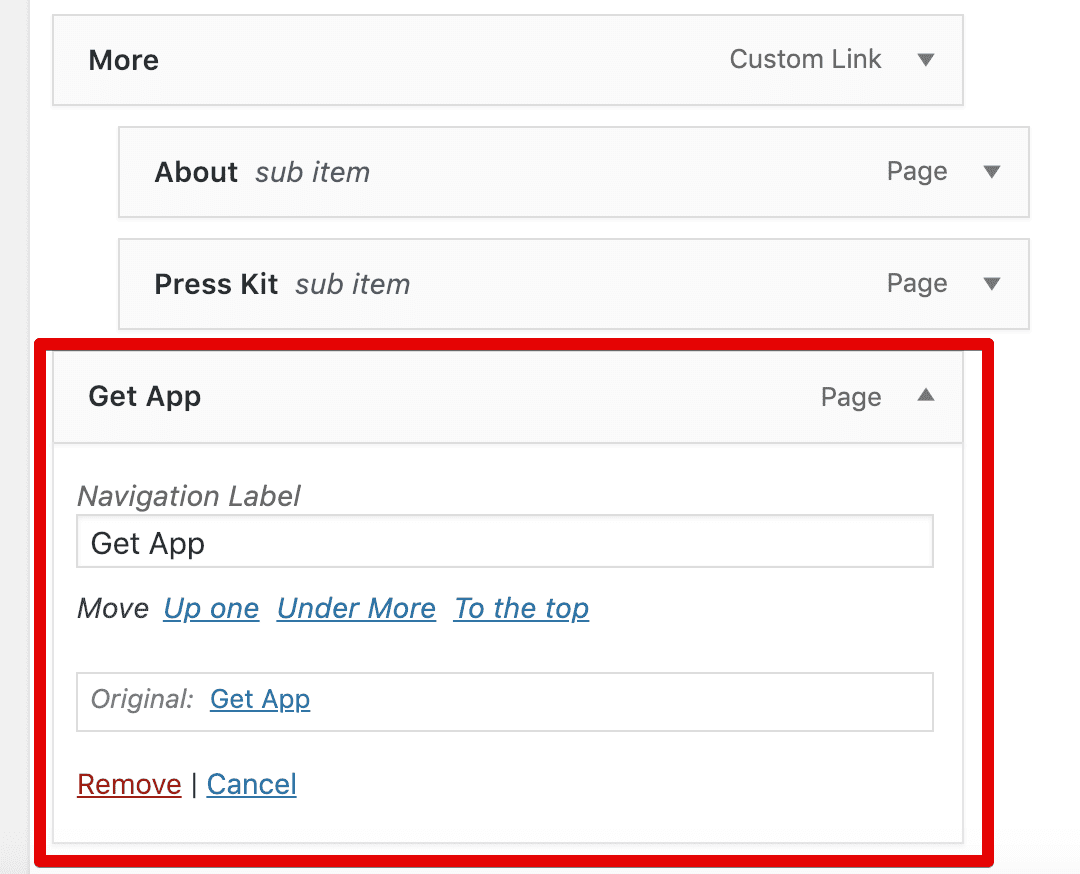
Anyway, let’s open up “Home” menu item box and see what we have in store for us.
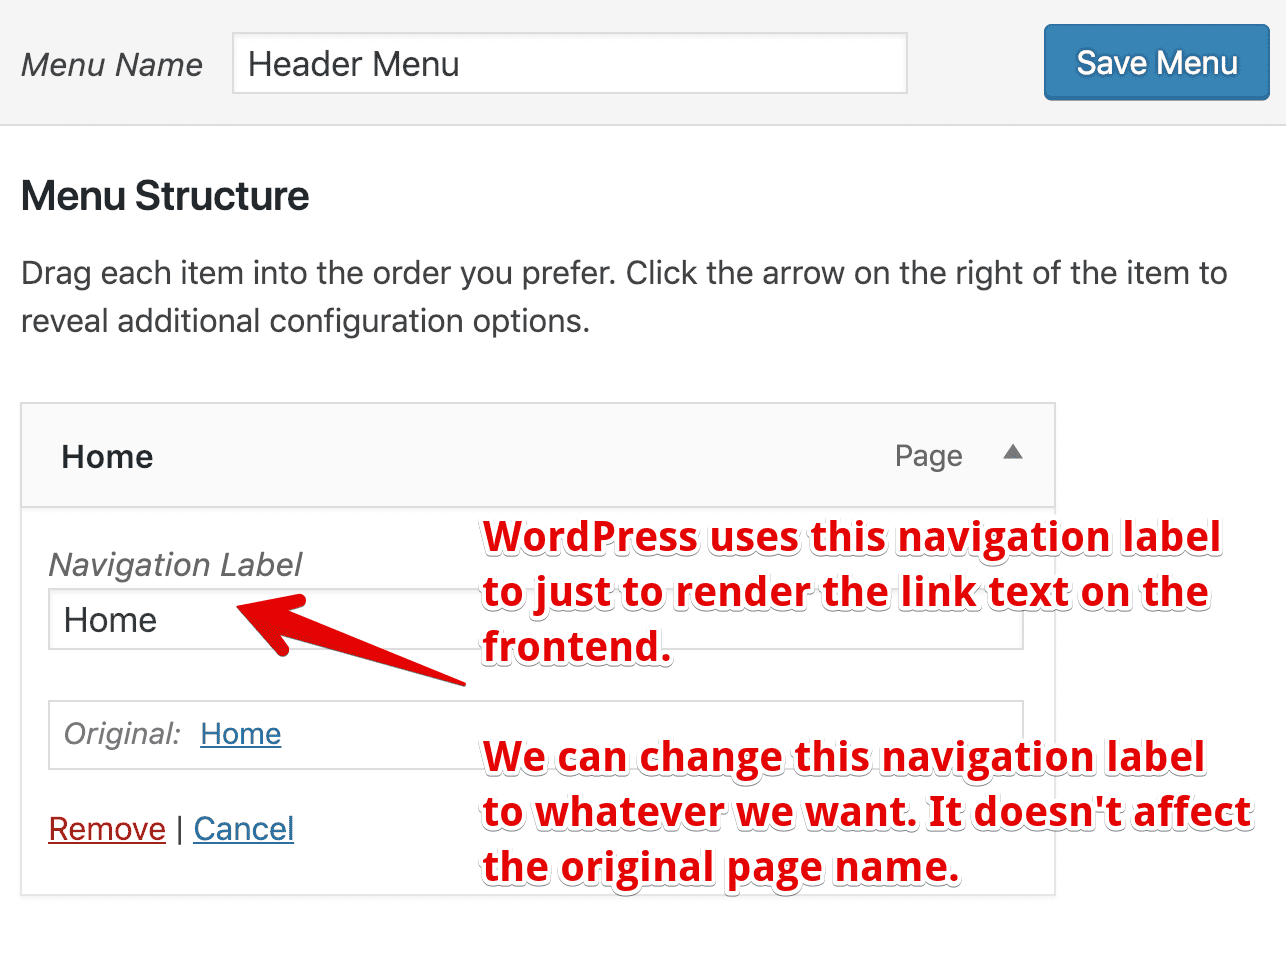
The first option you’ll see is “Navigation Label”. By default, WordPress will use the original page title that we have provided during the page creation. But, we can change it to whatever we want without affecting/modifying the original page title.
WordPress uses this “Navigation Label” only when outputting the link text for the “Home” menu item. Not anywhere else. So feel to rename the Navigation Label to anything you want.
WordPress is also displaying the original page name for our reference.
How convenient?
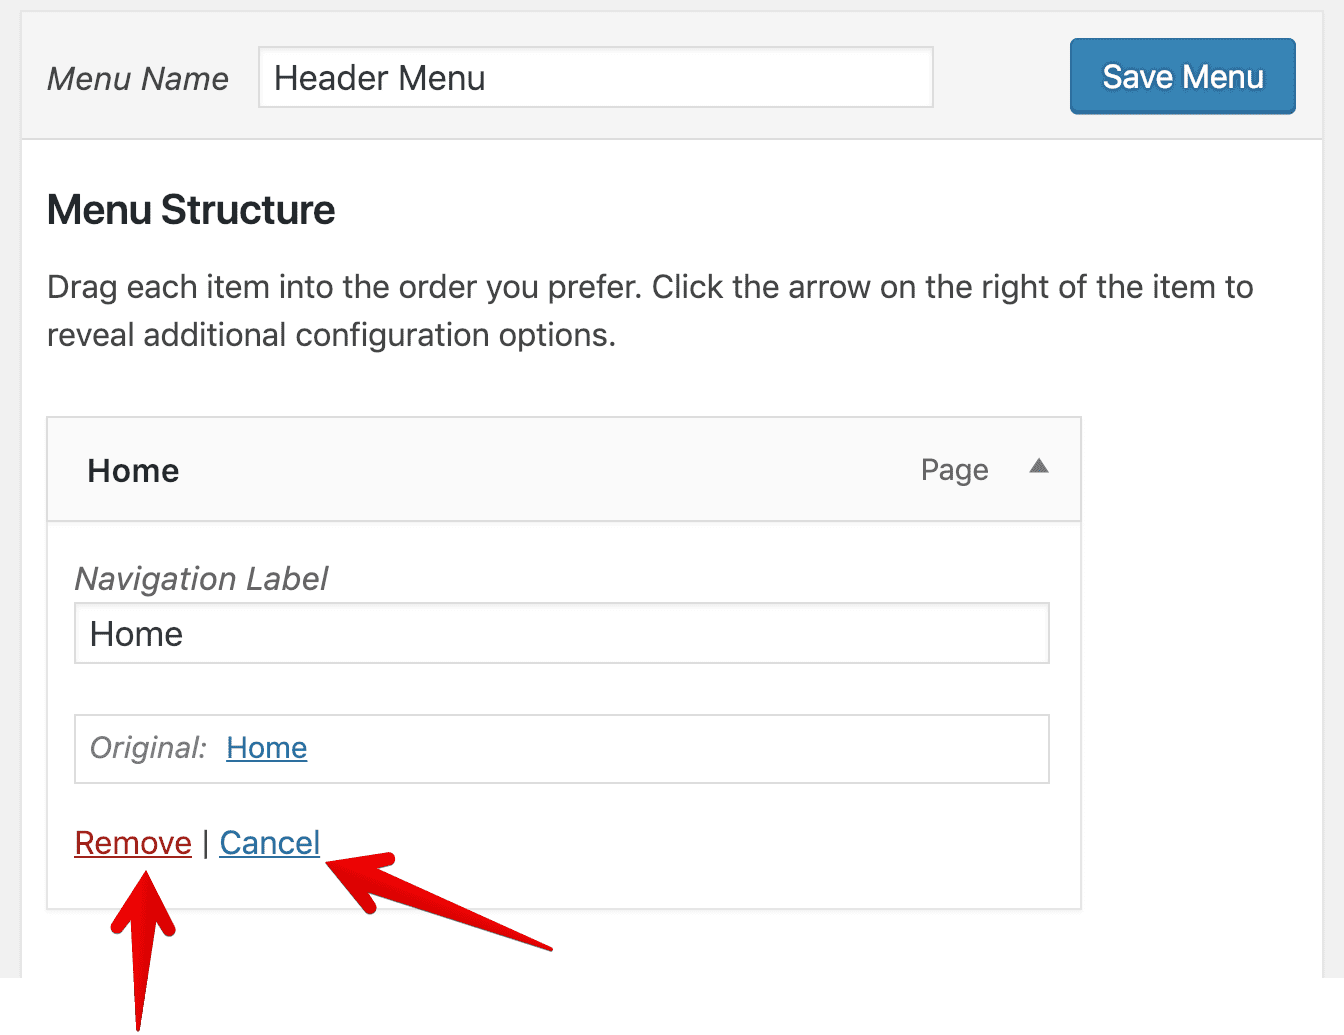
Next, we can remove the menu item from the menu structure using the “Remove” link.
If you made some changes, but you don’t like them, you can always click on the “Cancel” link to discard any unwanted changes.
Let’s move on and add other items to the Menu.
For starters, let’s add the following pages to the menu:
- Features
- Contact
You can add multiple items to the menu at the same time by selecting multiple pages in single go.
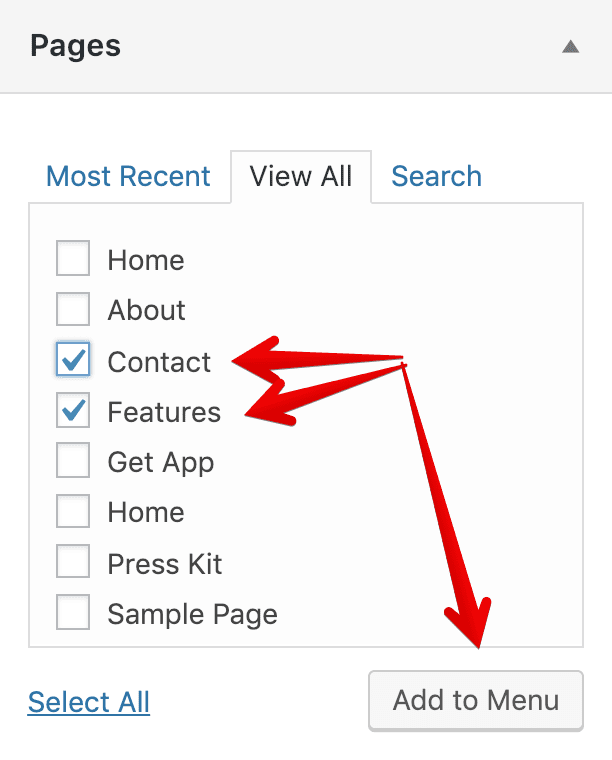
So, go ahead and select the “Contact” page and the “Features” page and click on the “Add to Menu” button to add these pages to the menu.
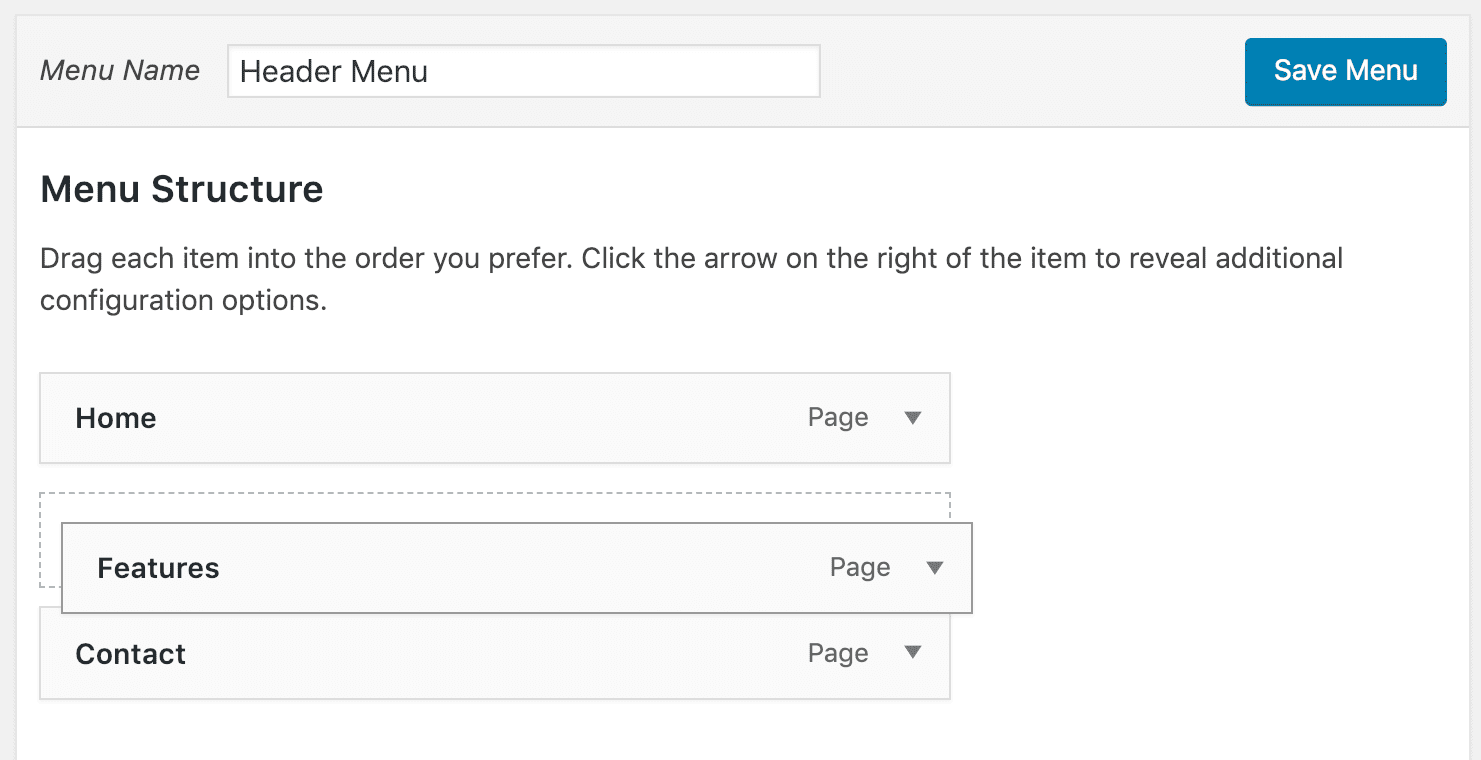
Once you done, you can see the following menu structure.
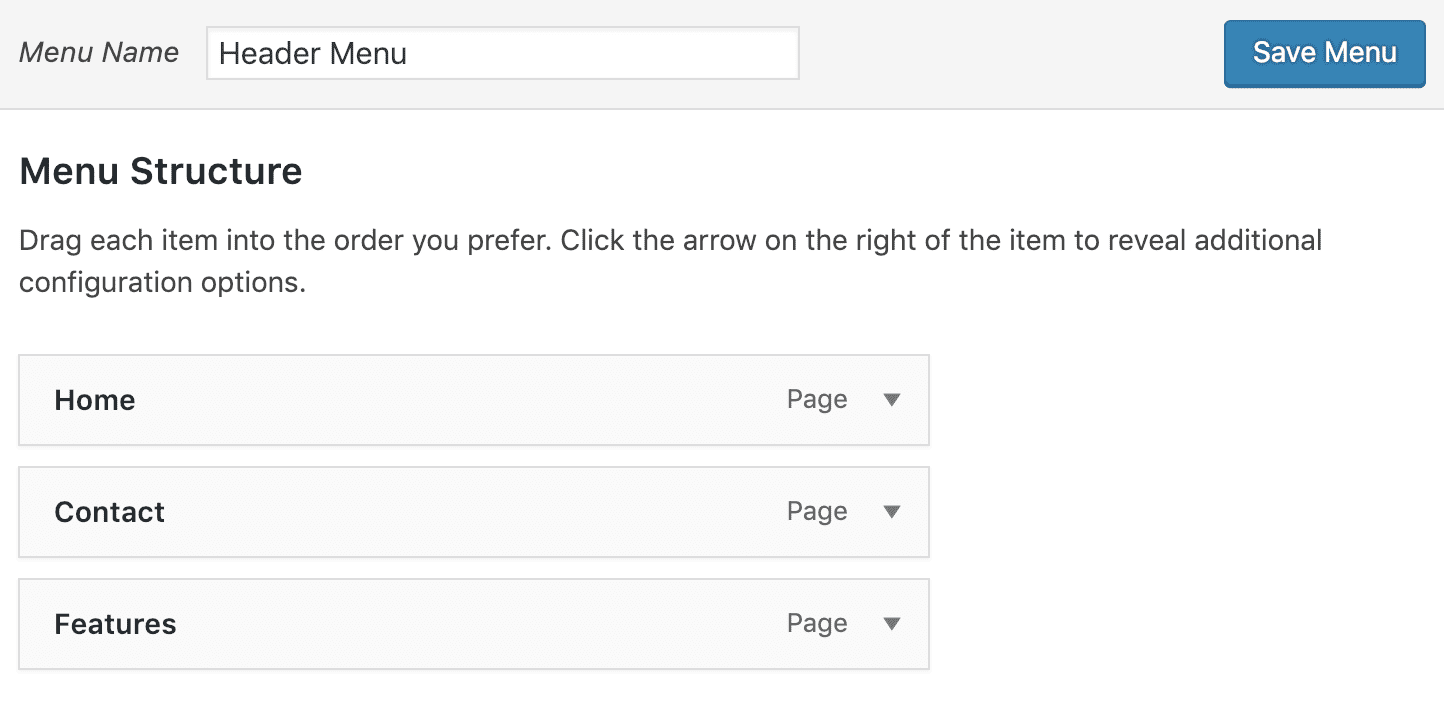
Oh! there is one problem with the above menu structure. If you look at the header design, “Features” menu item is coming first followed by the “Contact” menu item and the client is very picky about the order of the menu items on the frontend.
But in our menu structure, “Contact” menu item is coming first followed by the “Features” menu item.
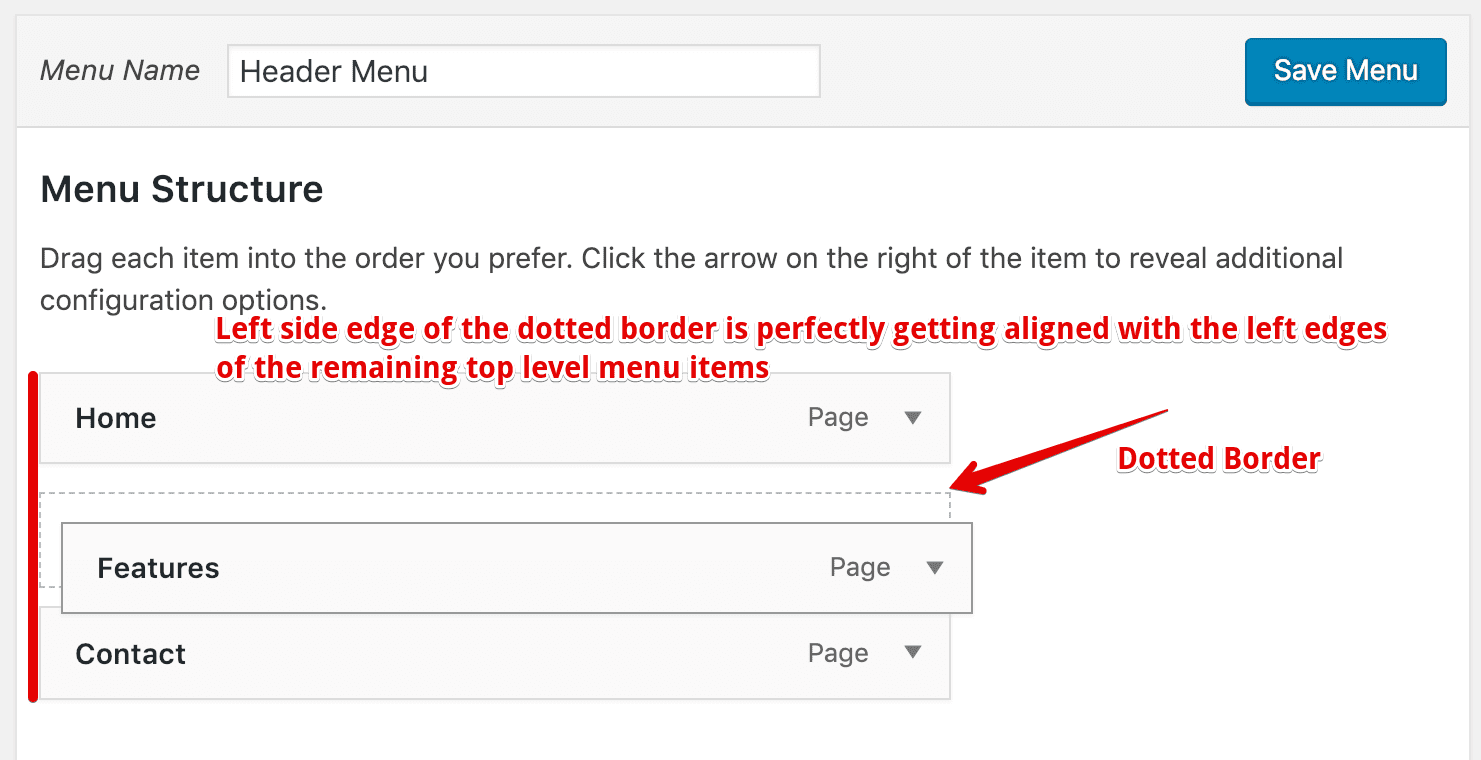
So, let’s fix this problem. Click and Drag the “Features” menu item to the top of the “Contact” menu link and as soon as you see a transparent box with a dotted border, drop the “features” menu item by releasing the mouse.
Now be careful here. We do not want the “Feature” menu item to be a sub-item of “Home” menu item. So, pay attention to the alignment of the dotted border near the “Features” menu item. The left-hand edge of this dotted border must perfectly get aligned with the left side edges of the remaining top-level items like “Home” and “Contact”.
This looks cool, right?
Now, let’s quickly add the remaining pages to the menu.
But, before we add other pages, If you notice the below design, the navigation area is very limited. So, there is not much room left for all the pages we have.
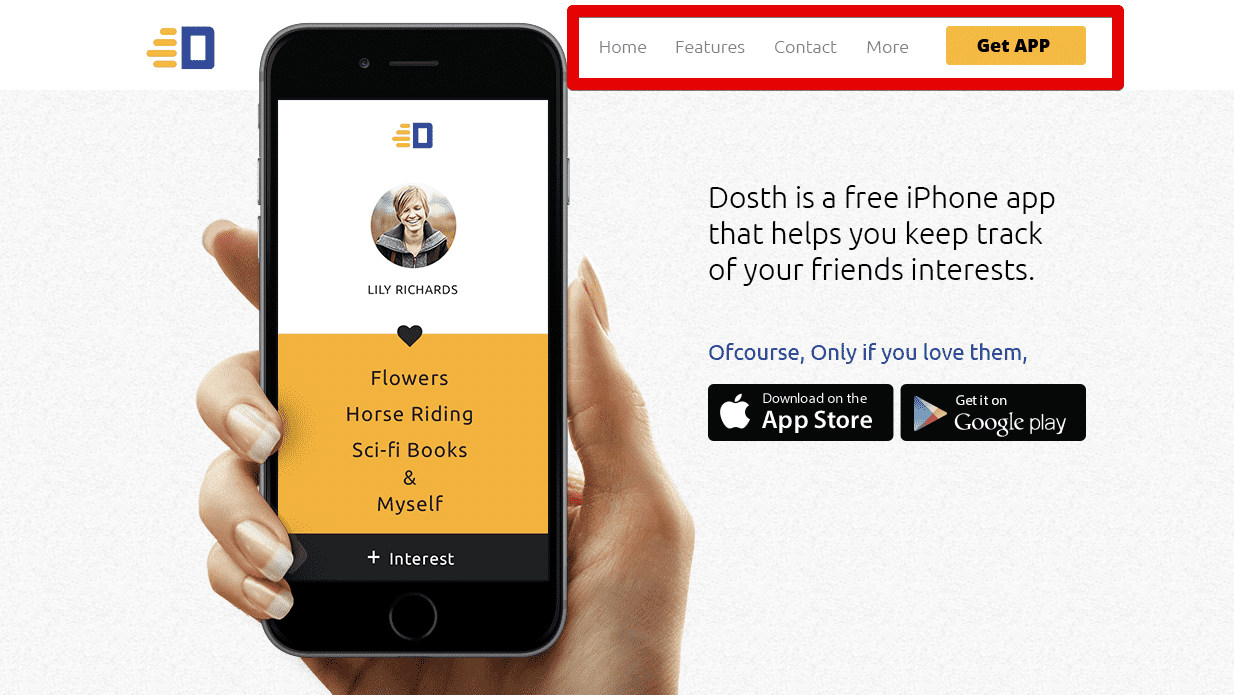
We can counter this problem by creating a custom top-level item called “More” and except “Get App” page, we will all the other remaining pages as sub-items to the “More” menu item.
And, on the frontend, we will display the sub-items using a drop-down menu.
So, let’s create a top-level custom link by opening up the “Custom Links” box located at the left-hand side of the screen.
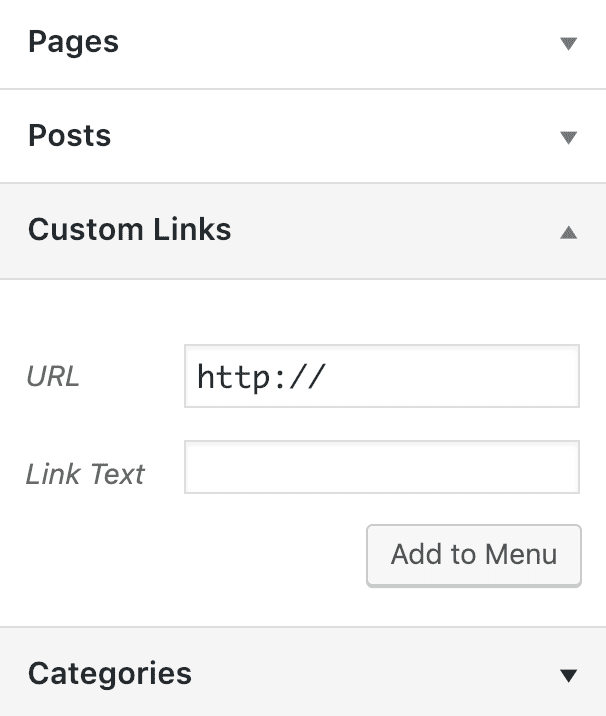
Now, remove the default value from the “URL” field and replace it with #. We are doing this because we don’t want our visitor to go anywhere when he/she clicks on the “More” menu link on the frontend.
Next, for the link text use the word “More” and click the “Add to Menu” button.
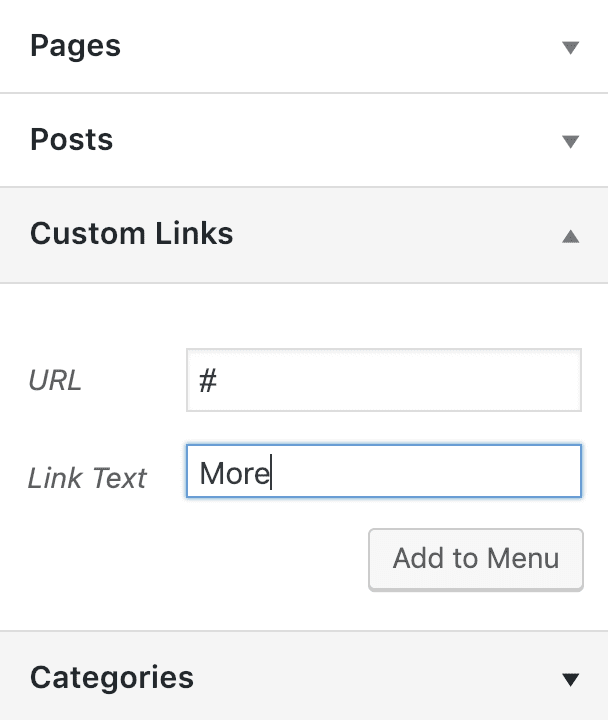
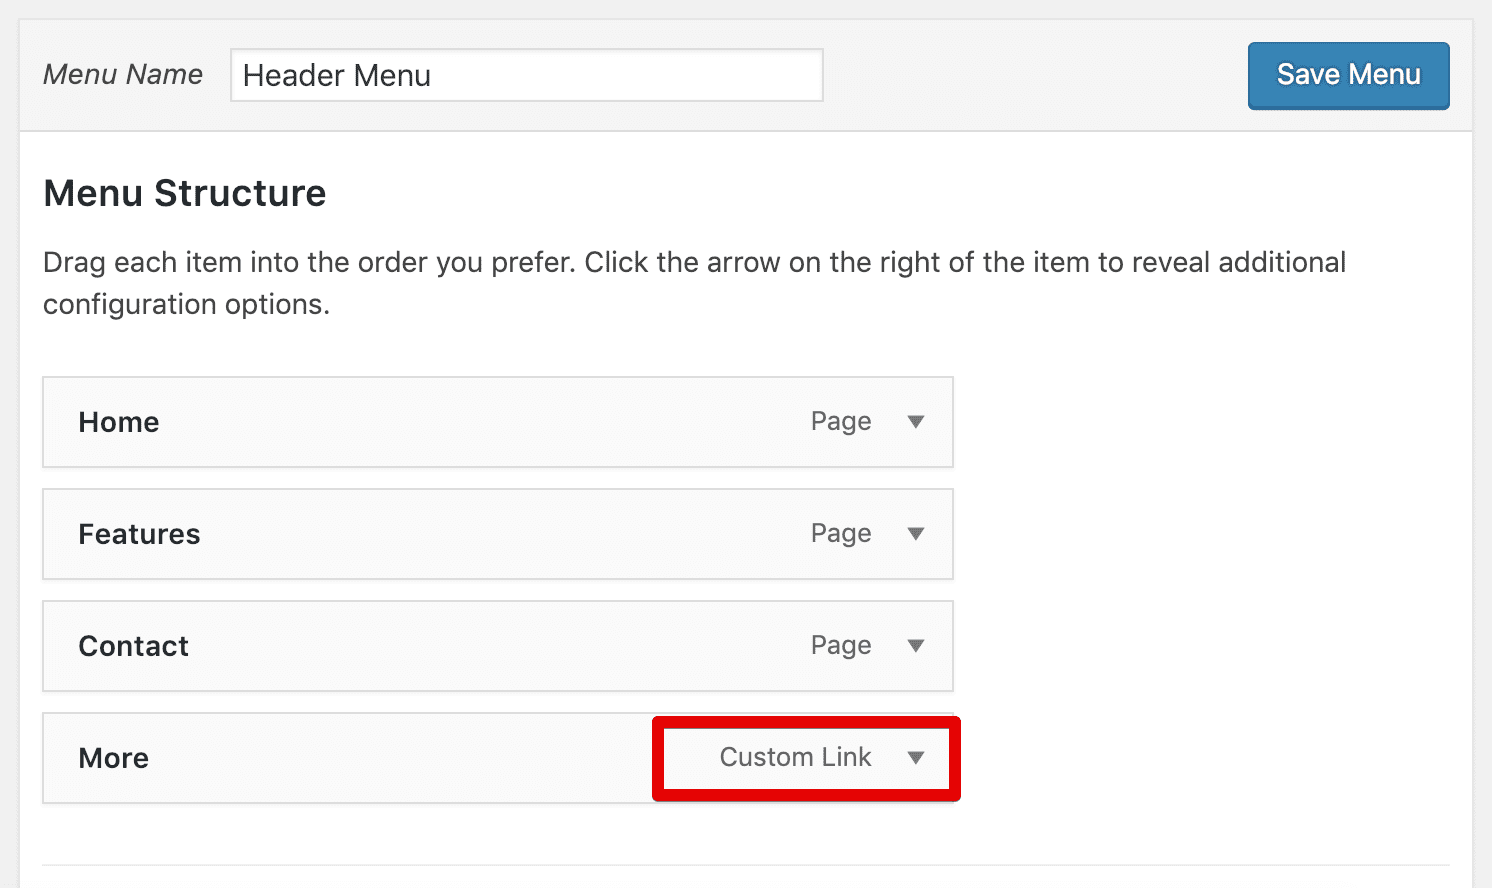
As you can see, inside Menus structure, WordPress helps us recognize a custom link by putting a neat little label on the menu item.
Now, let’s add the following pages as sub-items to the “More” menu item.
- About
- Press Kit
“Hey! How can I add the above pages as sub-items? I couldn’t find any option to do that!”
Well hey, you can not directly add the above pages as sub-items to any top-level menu items in the Menu structure. WordPress doesn’t allow you to do that.
Before anything else, let’s add the above pages to the Menu structure.
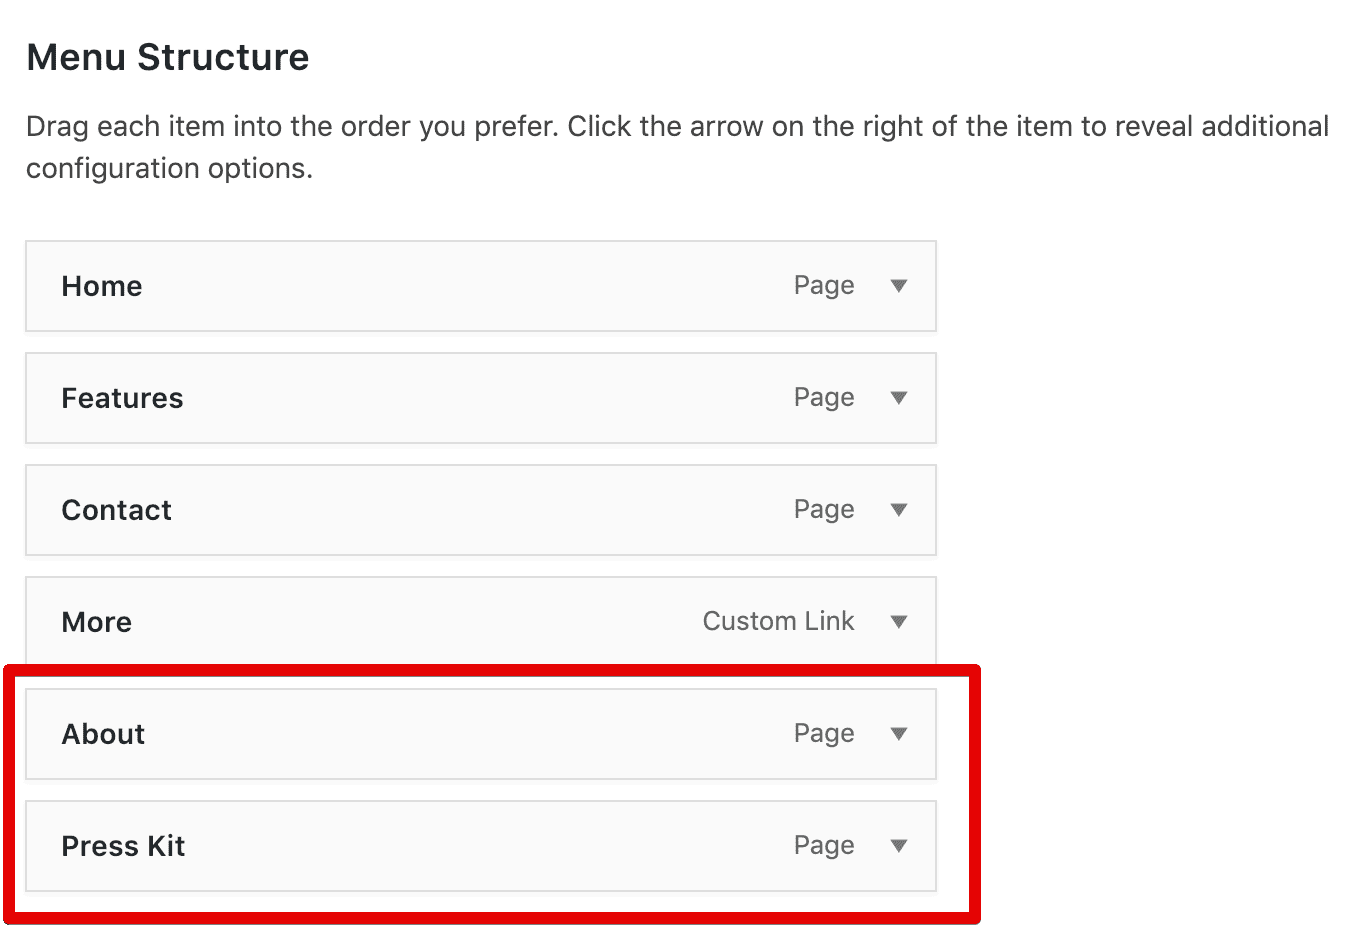
Now that these are added, let’s click and Drag the “About” menu item to the right a little bit until we see a dotted border which appears slightly inwards from the left-hand edge of the “More” menu item.
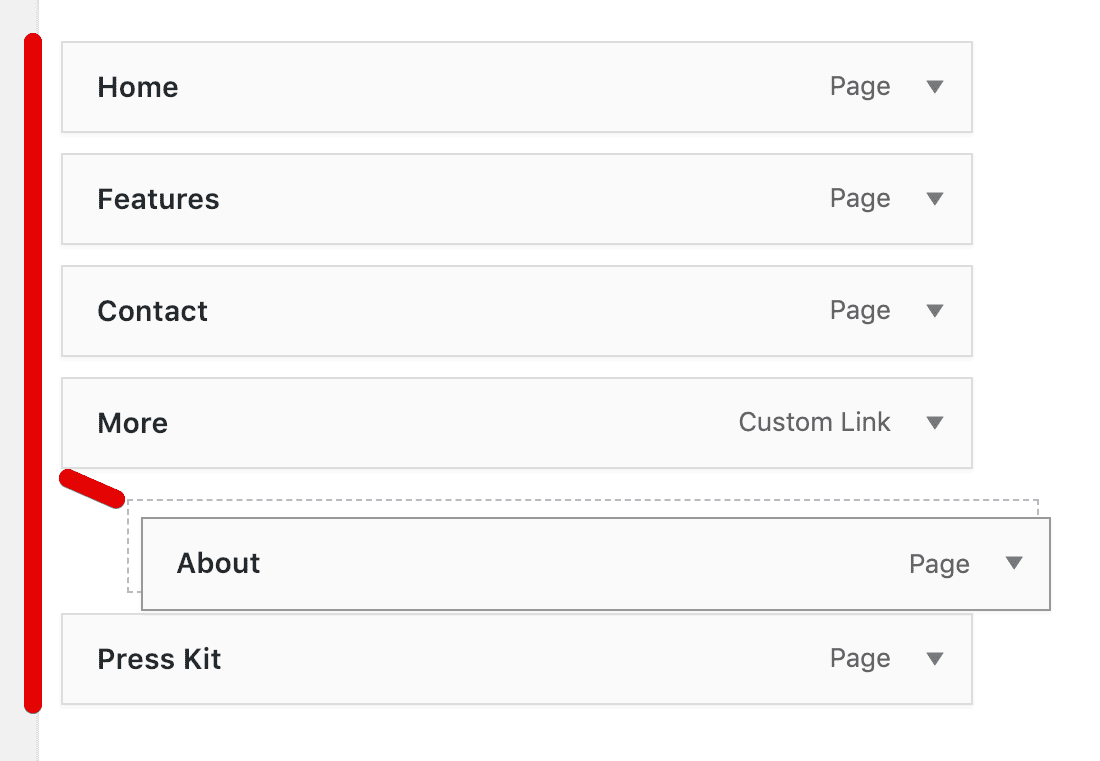
So, once you see the dotted border similar to the above image, drop the “About “menu item by releasing the mouse. Do the same to the “Press kit” page too.
You can also use this same technique to add sub-items to sub-items (3rd level menu item) by dragging further to the right-hand. It’s that easy.
Finally, add the “Get App” page to the Menu structure to complete our Header menu.
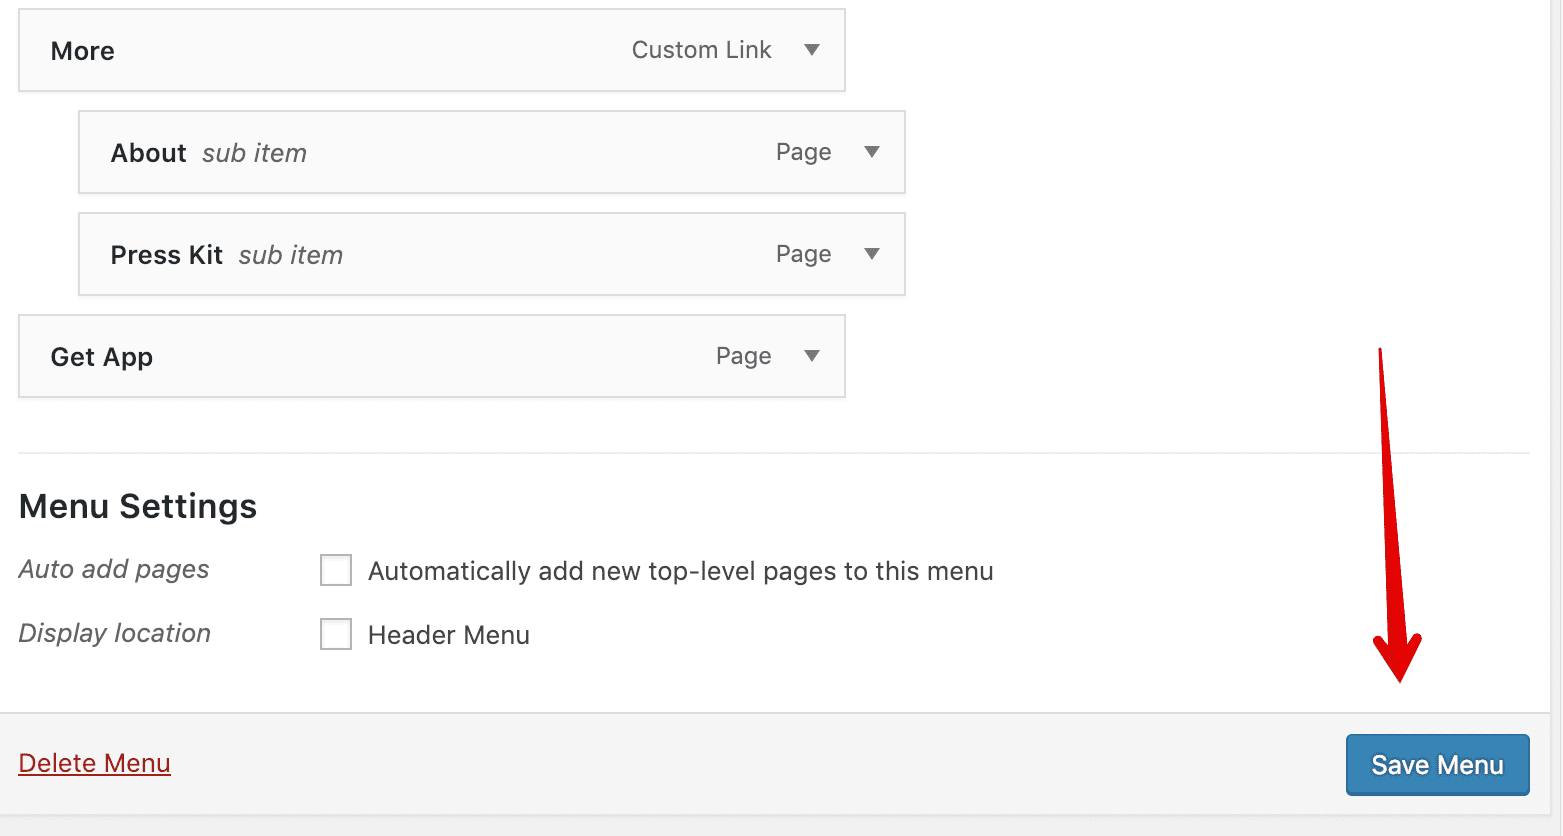
For this lesson, Here is the final Menu Structure of the “Header Menu”
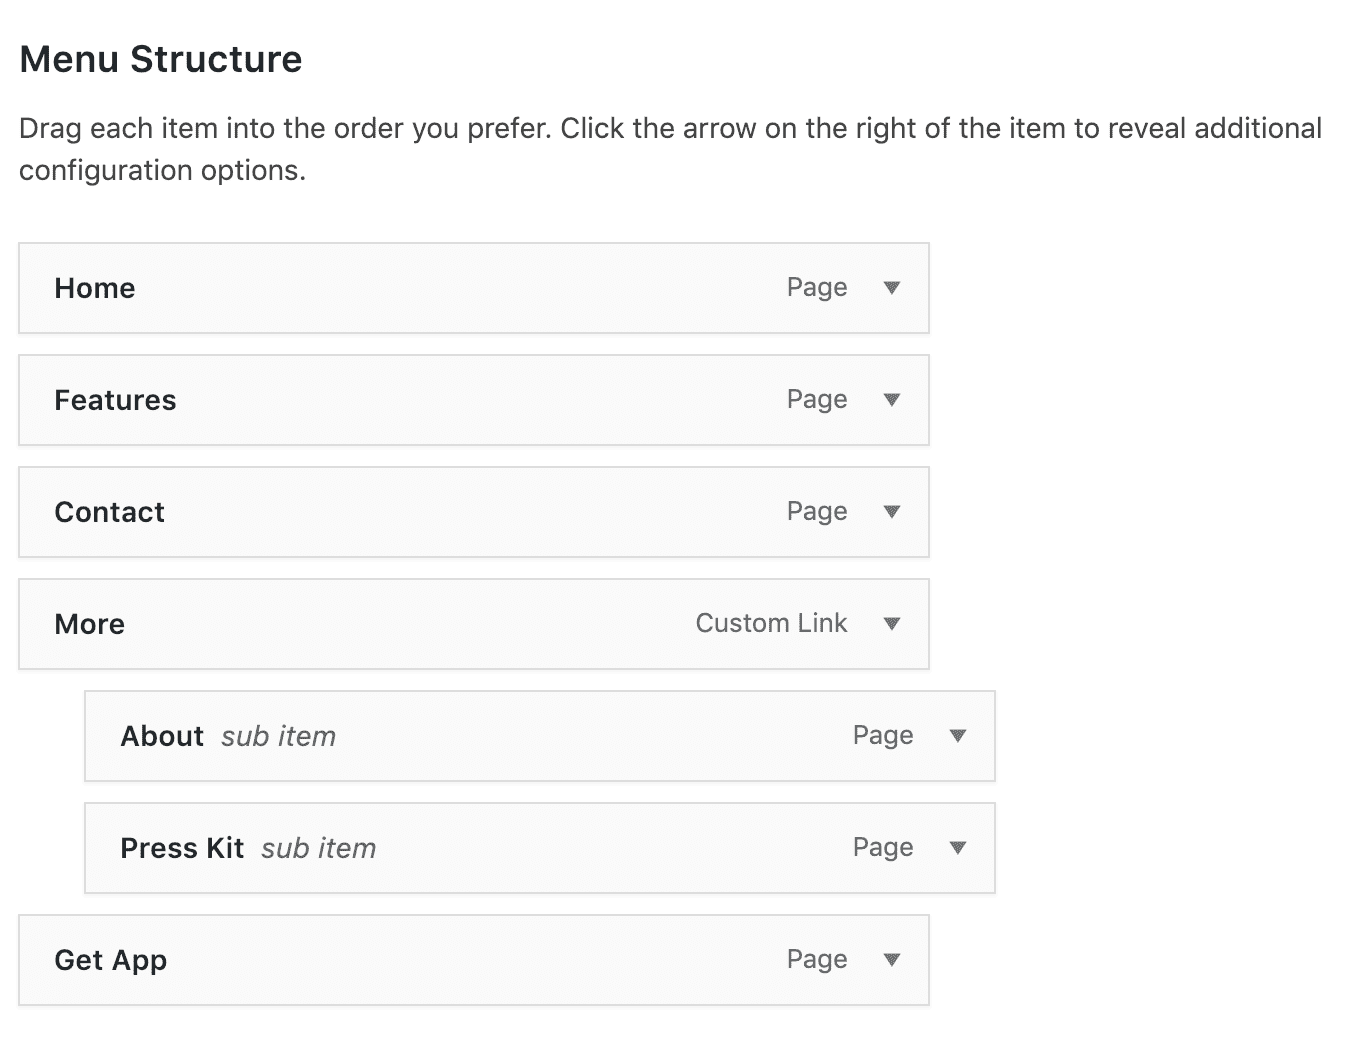
Looking great! Now, if you see the header design one last time, the “Get App” menu item is styled differently from others. So, we have to add a CSS class name to this menu item to achieve the effect.
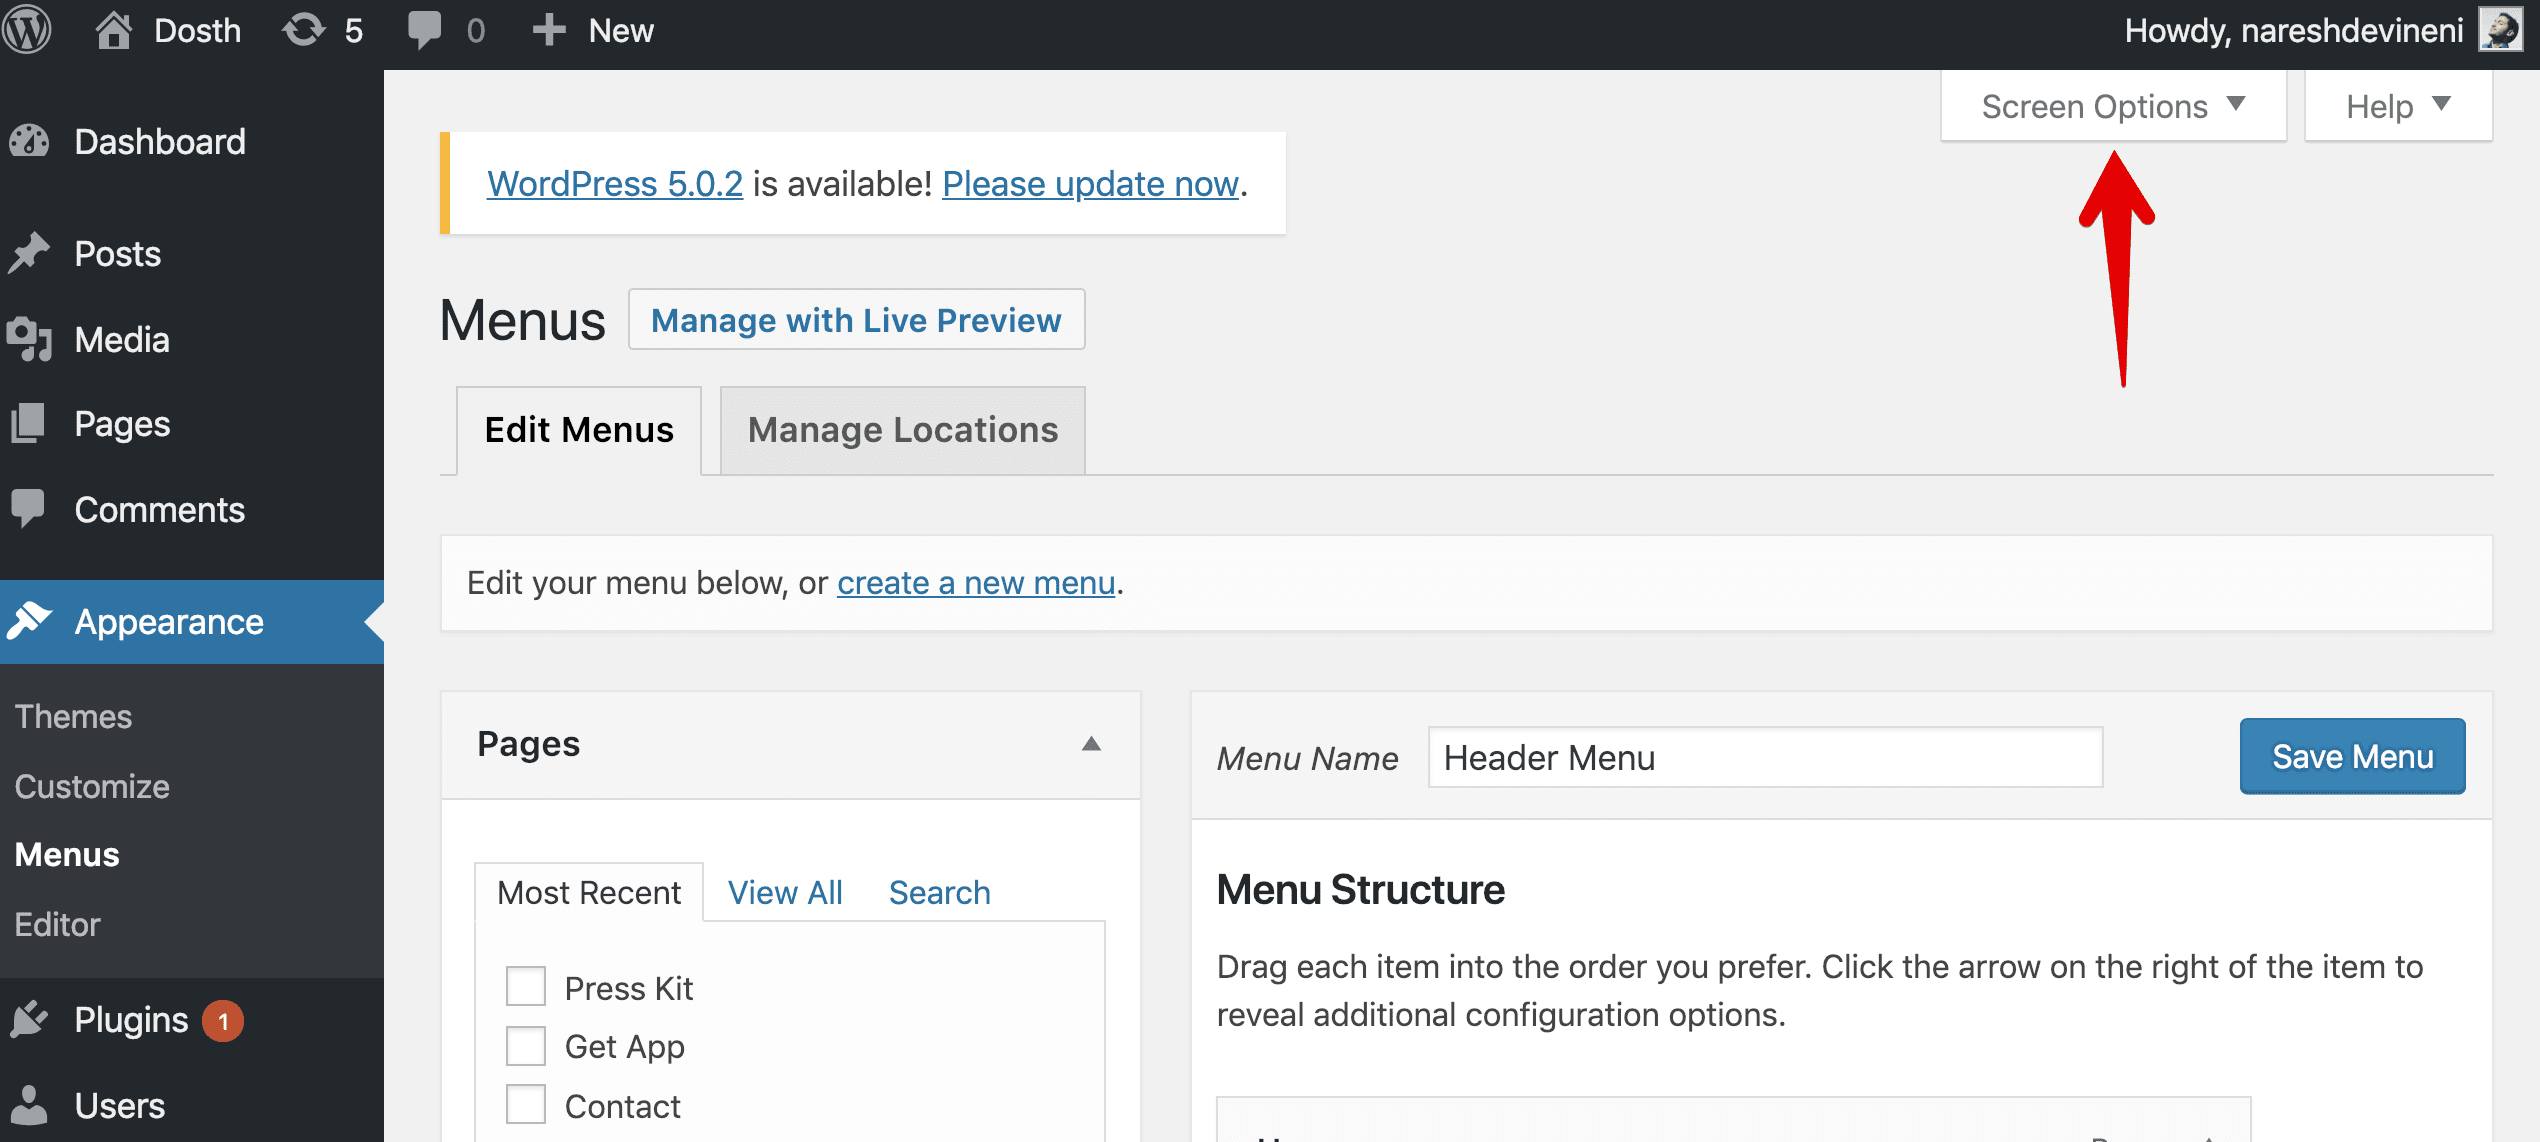
So, open up the “Get App” menu item options.
Oh! Right now, you don’t see a field for adding a CSS class name. It is not that WordPress doesn’t let you add CSS classes using the Menus Structure, It does. But we have to explicitly tell WordPress to show the CSS Classes menu option.
By default, WordPress hides some rarely used menu item options. You can un-hide these options by clicking on the “Screen Options” button located at the top left of the “Menus” panel. So let’s take a look at them.
As soon as you click on the “Screen Options”, WordPress will drop-down a form with some options and these options are divided into two categories.
1) Boxes Form Section – This set of form options allows us to show and hide each individual Box that is located at the left-hand side of the screen.
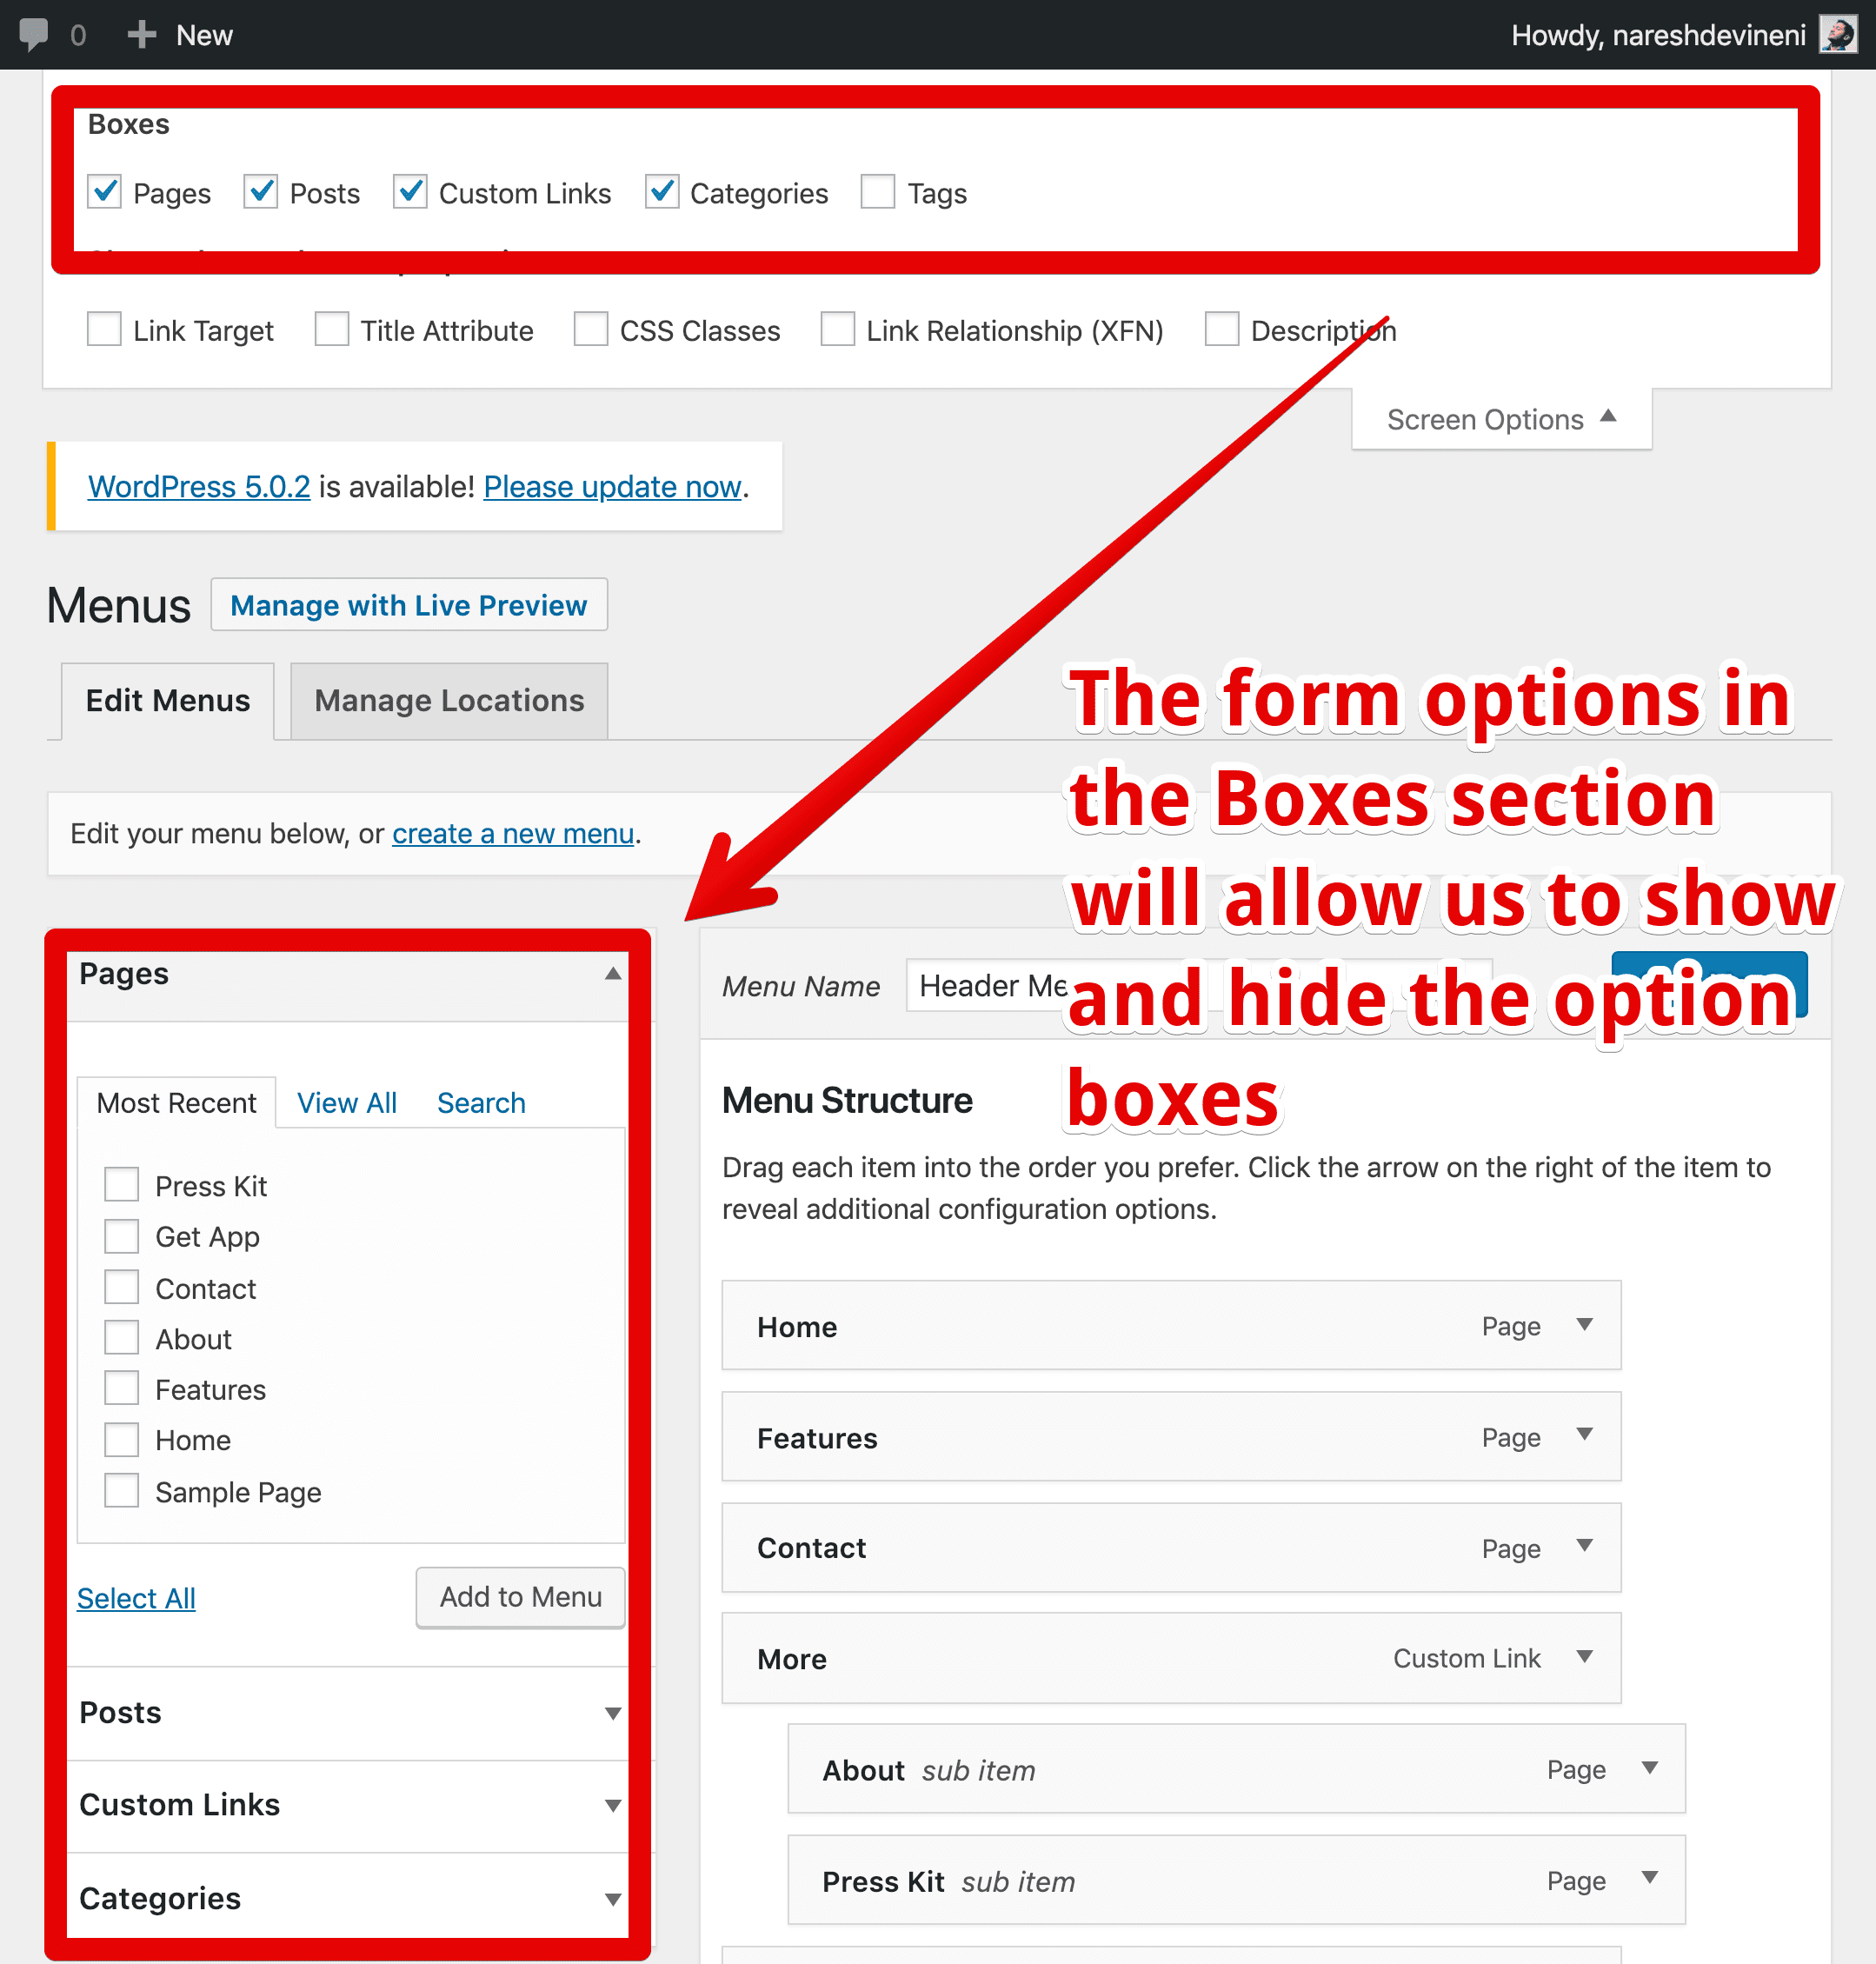
2) Show advanced menu properties Form section: You can show hide and show some advanced menu item options by toggling the checkboxes inside this section.
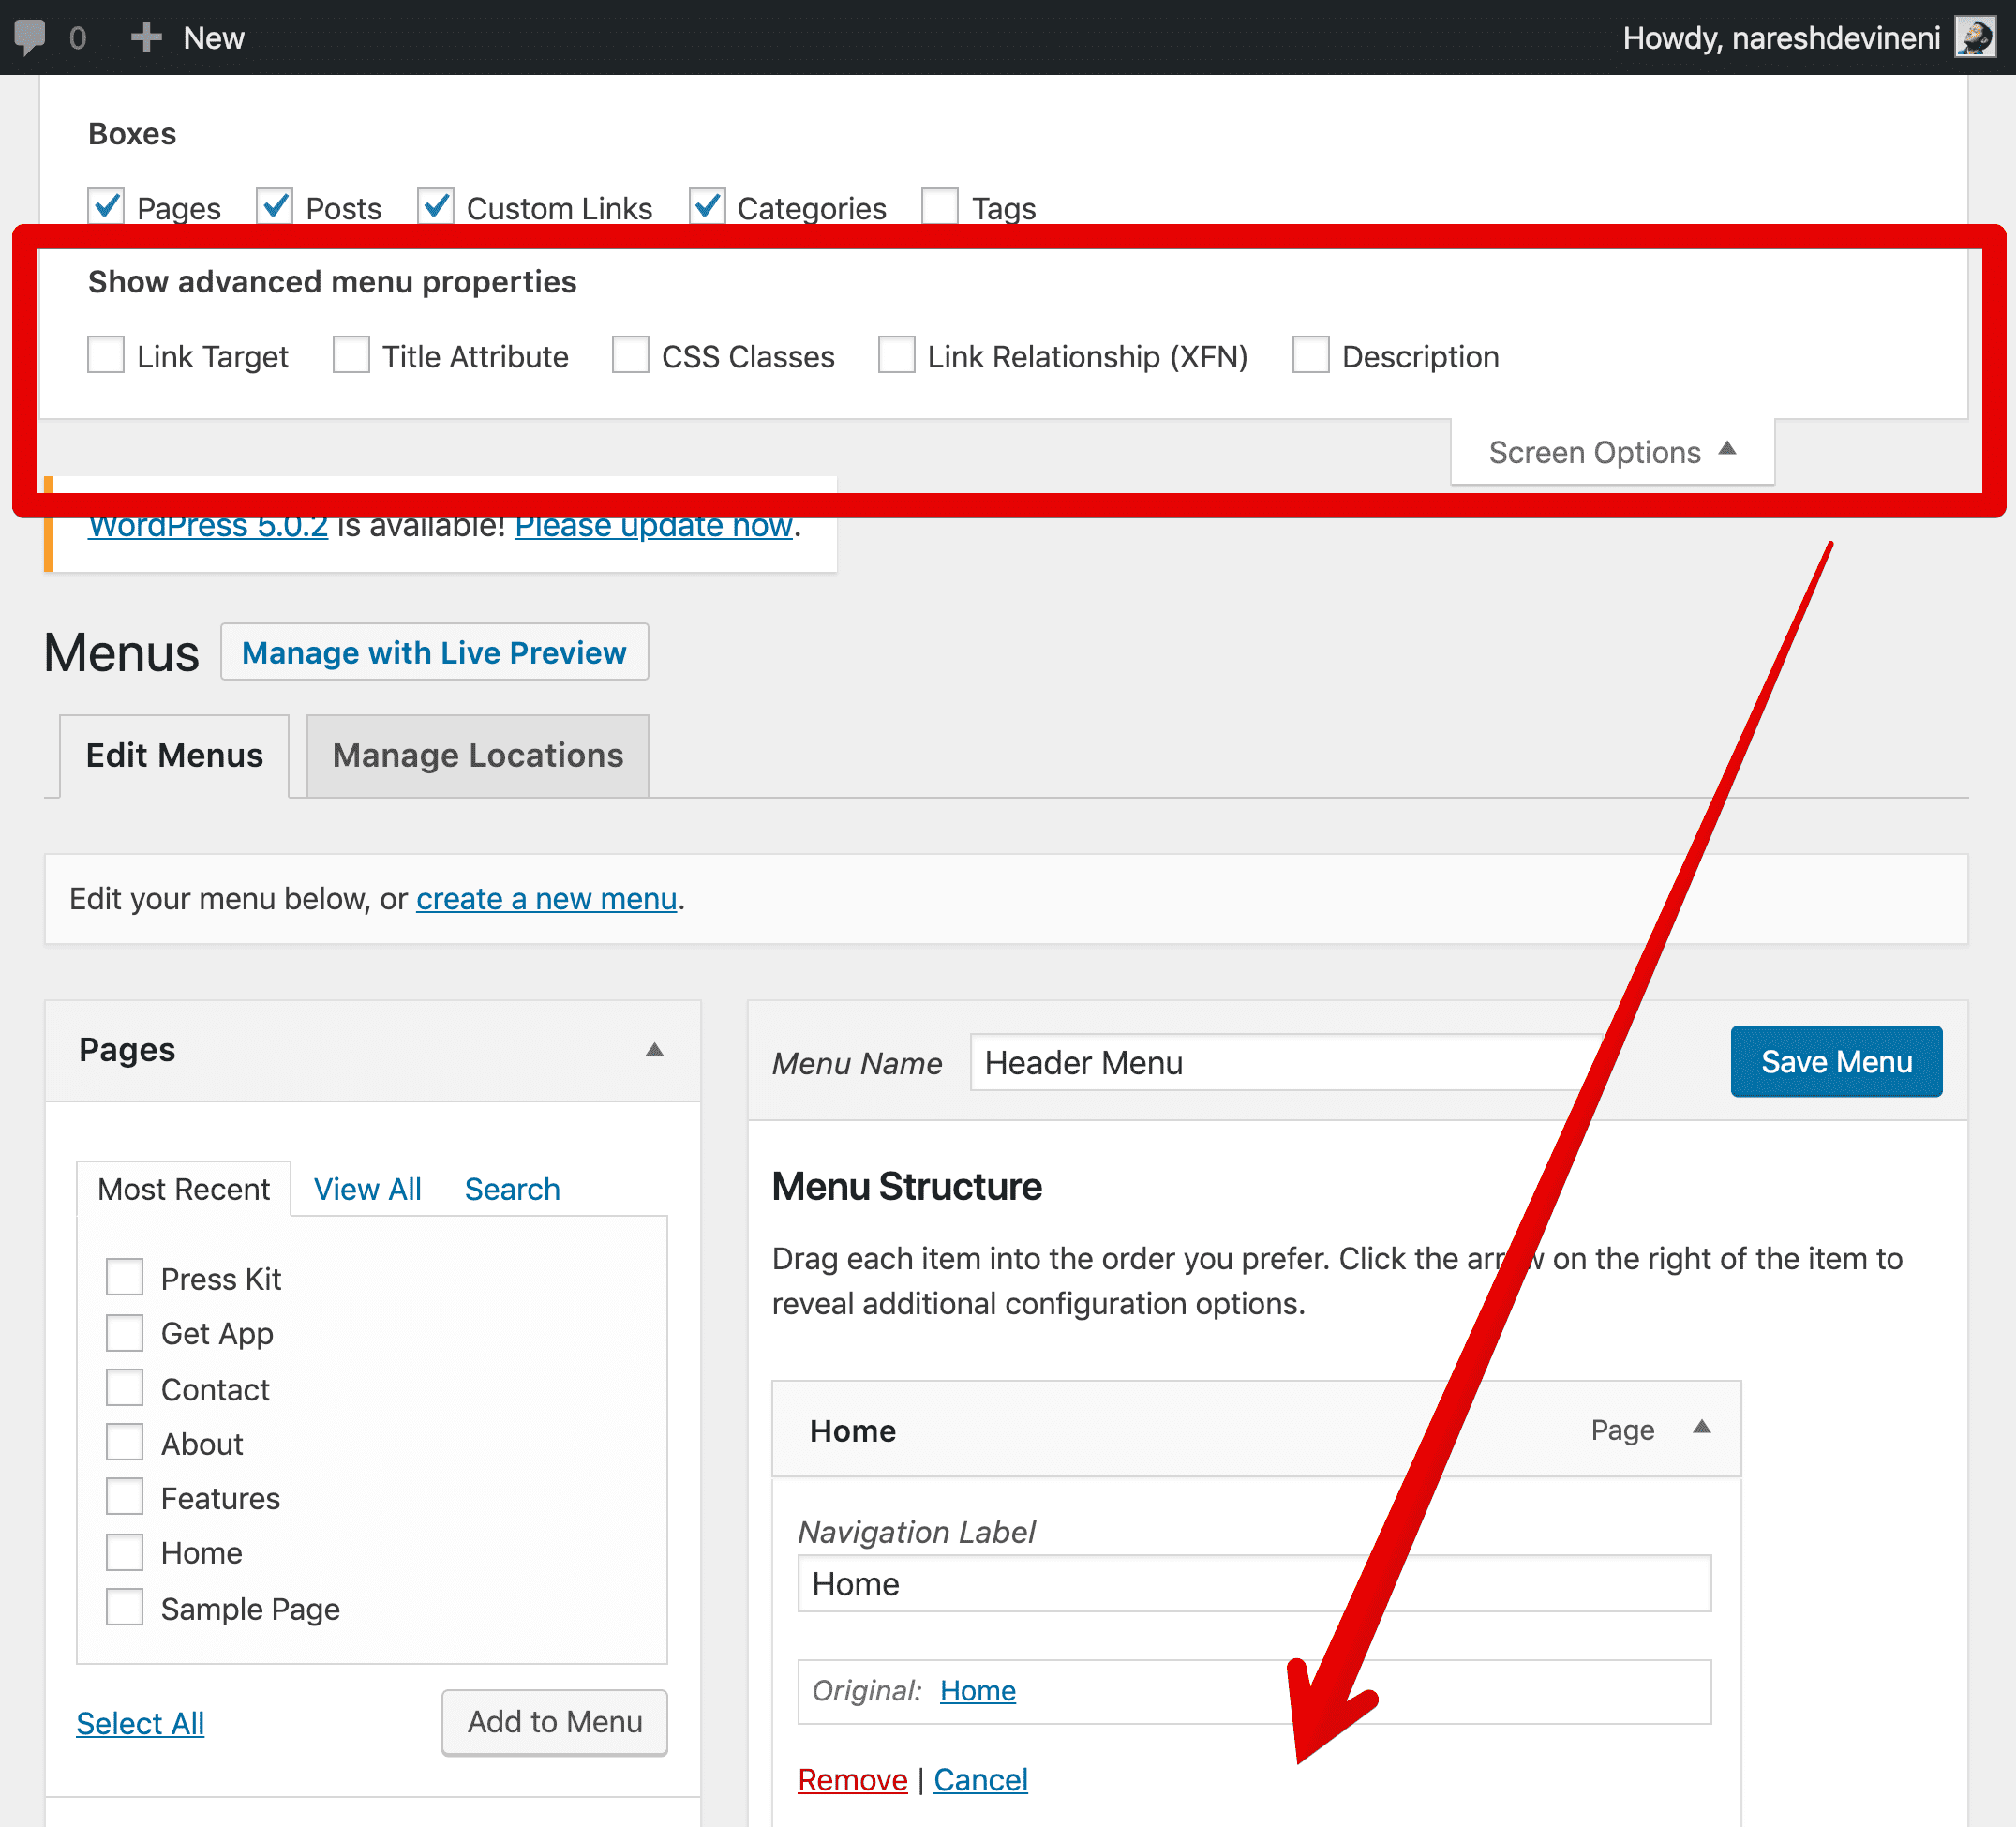
Now, turn on all the above menu options and let’s go through them one by one.
All the newly visible menu item options are self-explanatory. So, let’s go through them quickly.
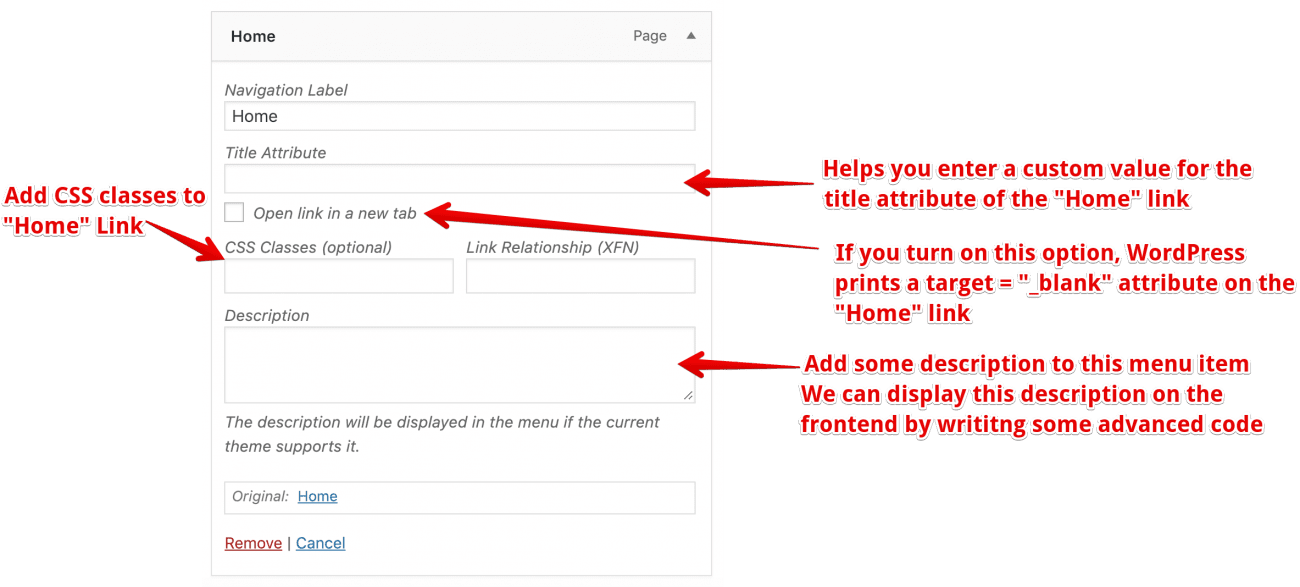
1) Title Attribute – Menu items are displayed as links in the Header menu. And this option allows us to enter a custom value for the title attribute of a menu link. SEO teams will use this option quite extensively.
2) Open link in a new tab – If you turn this option on, WordPress prints the target = “_blank”attribute on the menu link. And as you already know, this attributes forces the browser to open the menu link in a new browser tab. Theme developersuse this option quite extensively.
3) CSS Classes – This option allows you to add custom CSS classes to a menu item.Theme developersuse this option quite extensively.
4) Link Relationship – This option allows us to specify the XFN relationship relation between this menu link and the entire site. We don’t use this option that often.
5) Description – This option allows us to add some description to a menu item. We can display this description on the frontend by writing some advanced code. Again, we don’t use this option that much.
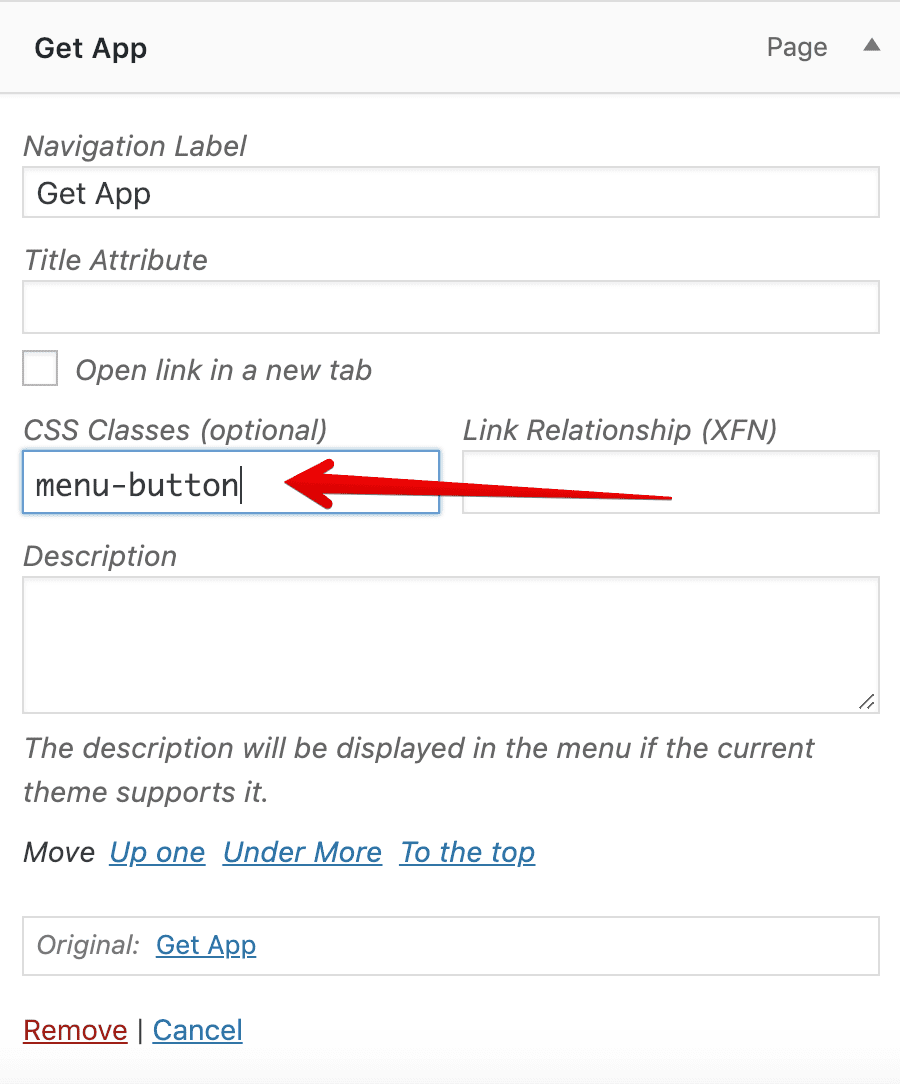
Now, let’s get back to the “Get App” menu item. To style it differently, let’s add a class called “menu-button” using the above mentioned “CSS Classes” menu item option.
And, that’s it. We are done with adding items to Header Menu. Now, before our home-electricity gets cut down, let’s go ahead save the menu by clicking on the “Save Menu” button at the bottom right corner of the screen or at the top-left side of the Menu structure.
And once the menu is saved, WordPress tells us that with a success message.

Uff…Finally-Finally, we are officially done with Step 2.
Step 3: Link the above-created custom menu to a registered navigation menu from step 1
This step is all about establishing a link between step 1 and step 2. This step is only required if we are trying to output the above created “Header” menu using one of our theme templates.
Now, to display the above created “Header Menu” using our theme, we have to link it to a registered Menu ID from step 1.
If you remember, in step 1, we have registered a menu with a ID of “header”.
“So, How do we link them? Do I have to write any code?”
No, The devil is in the details. Right underneath the “Menu Structure” section, there is “Menu Settings” section. And there are two options in it.
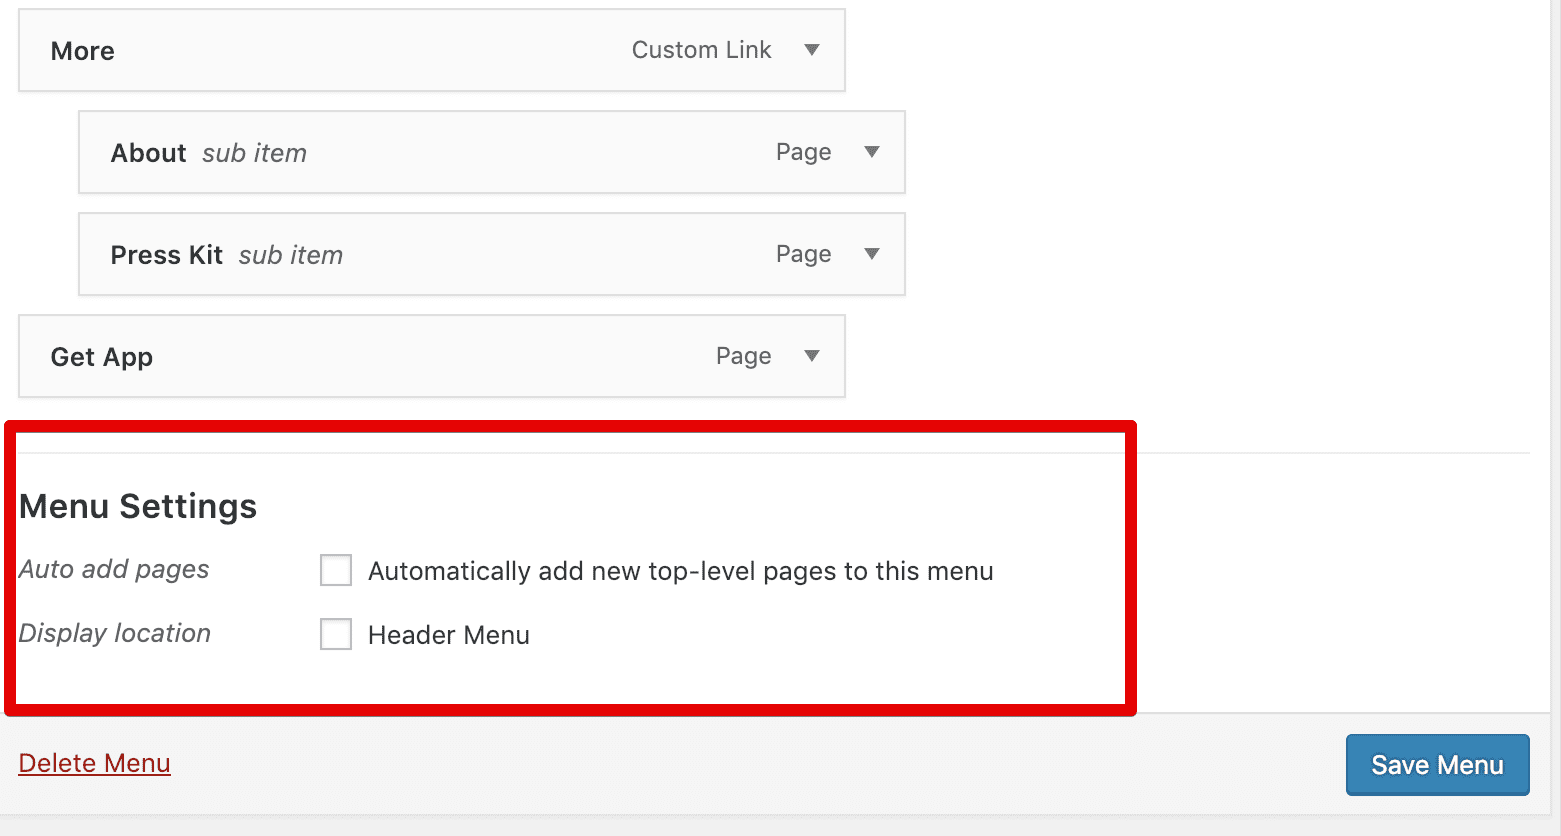
1) Auto add pages – if we select this option, WordPress will automatically add newly created pages to this menu. In the real world, we don’t usually select this option because it could add less important pages automatically to an important navigation. Also because we have limited screen-estate to display our menus, This option could also easily break the layout of the header or footer.
2) Display Location : This is the option we need to configure to link a Menu ID from step 1 with the custom created menu from step 2.
As you can see, WordPress is displaying the description of the “header” Menu ID from step 1 as a choice for “Display Location” option. If we have registered more menus in step 1, all of their Menu descriptions would get displayed here as other choices.
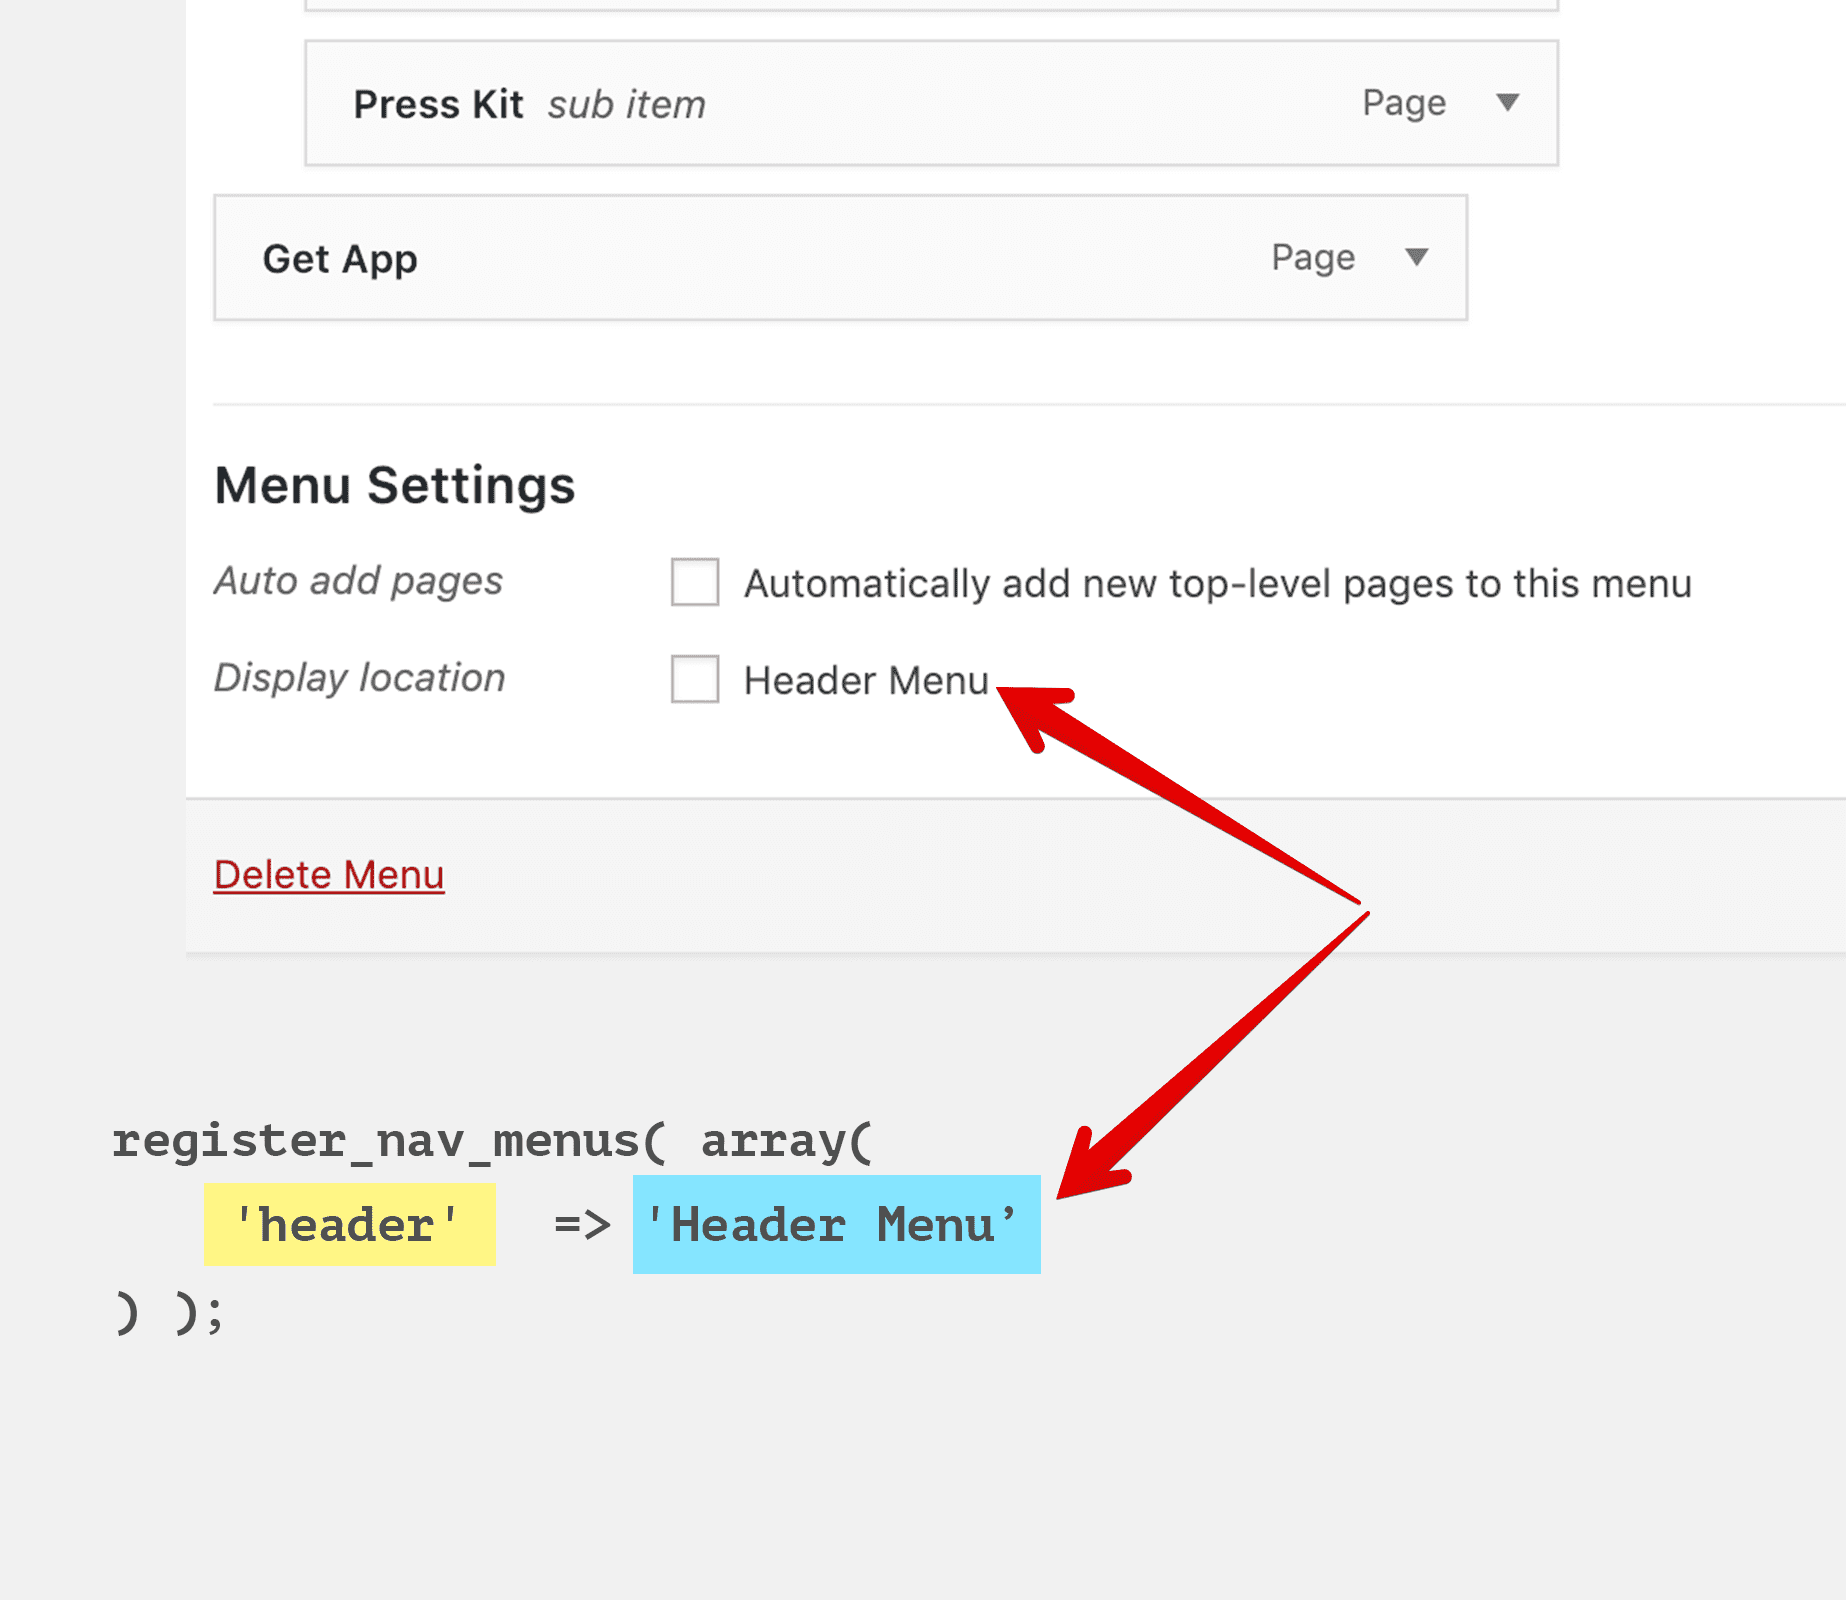
Getting the idea? So, If we choose “Header Menu” for “Display Location” option, the above-created menu from Step 2 will get linked with the registered “header” Menu ID from step 1.
So, let’s select the “Header Menu” for “Display Location” option and save the menu.
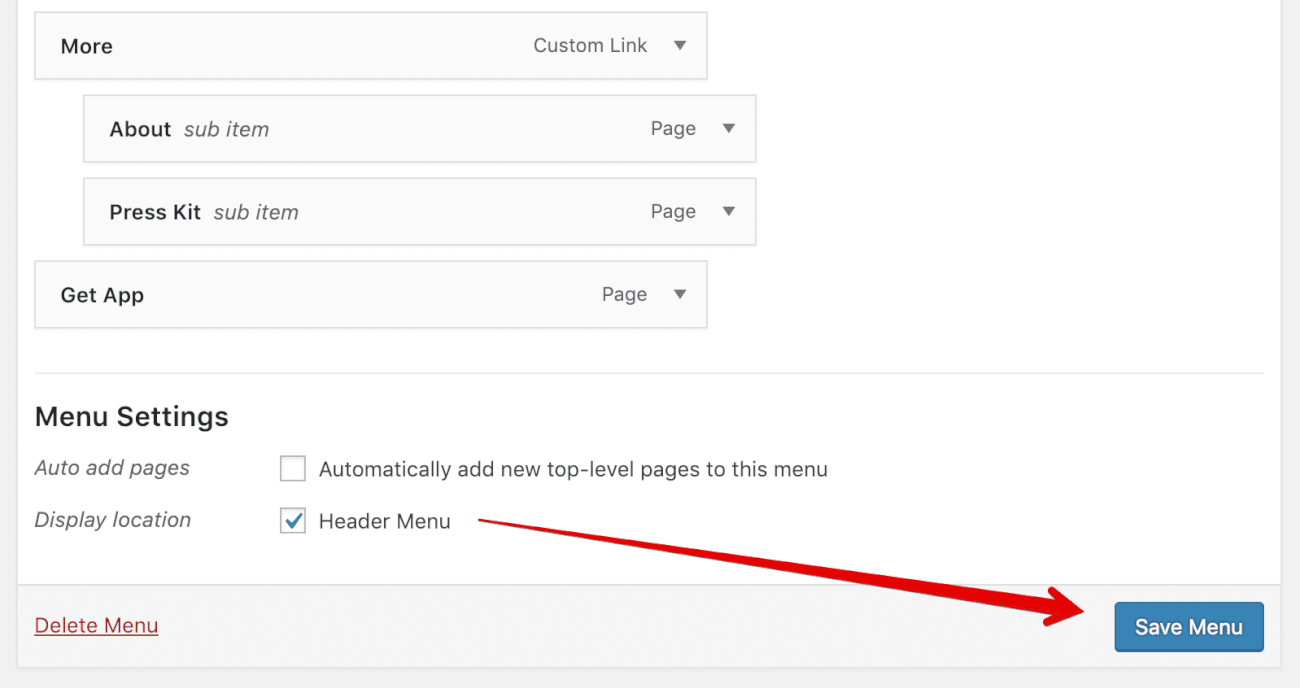
That’s it. We are done with step 3. Now, let’s display the custom menu on the frontend.
Step 4: Output the custom menu to the browser
The wp_nav_menu() WordPress function outputs a custom menu to the browser.
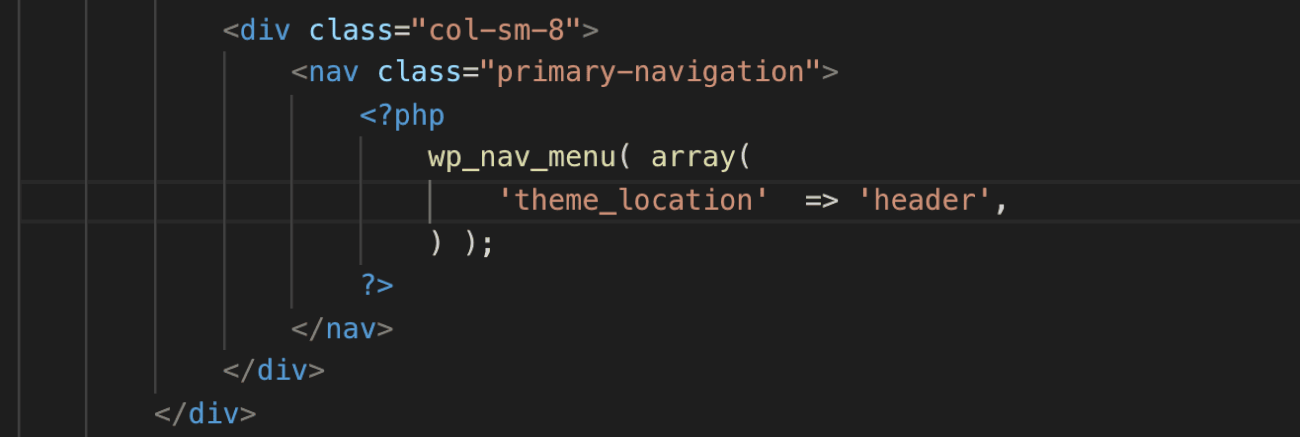
Open up the header.php file and put the following code inside the <nav> element with the class name “primary-navigation”:
<?php
    wp_nav_menu( array(
        'theme_location'  => 'header',
    ) );
?>
Now, let’s break it down.
Again, Nothing much is going on in the above code.
The wp_nav_menu() function accepts a single associative array with a lot of arguments. But out of all, “theme_location” is the most important argument.
The “theme_location” argument accepts a Menu ID that we have registered during step 1.
So, In our case, we are providing the “header” menu ID as a value to the “theme_location” argument.
Since “header” menu ID from step 1 is linked with the “Header Menu” created in step 2, the wp_nav_menu() function outputs the items of the “Header Menu” to the browser.
So, if everything works correctly, we must see the “header” navigation menu inside the header portion of the site. So, let’s switch back to the browser and visit the Homepage of our site.
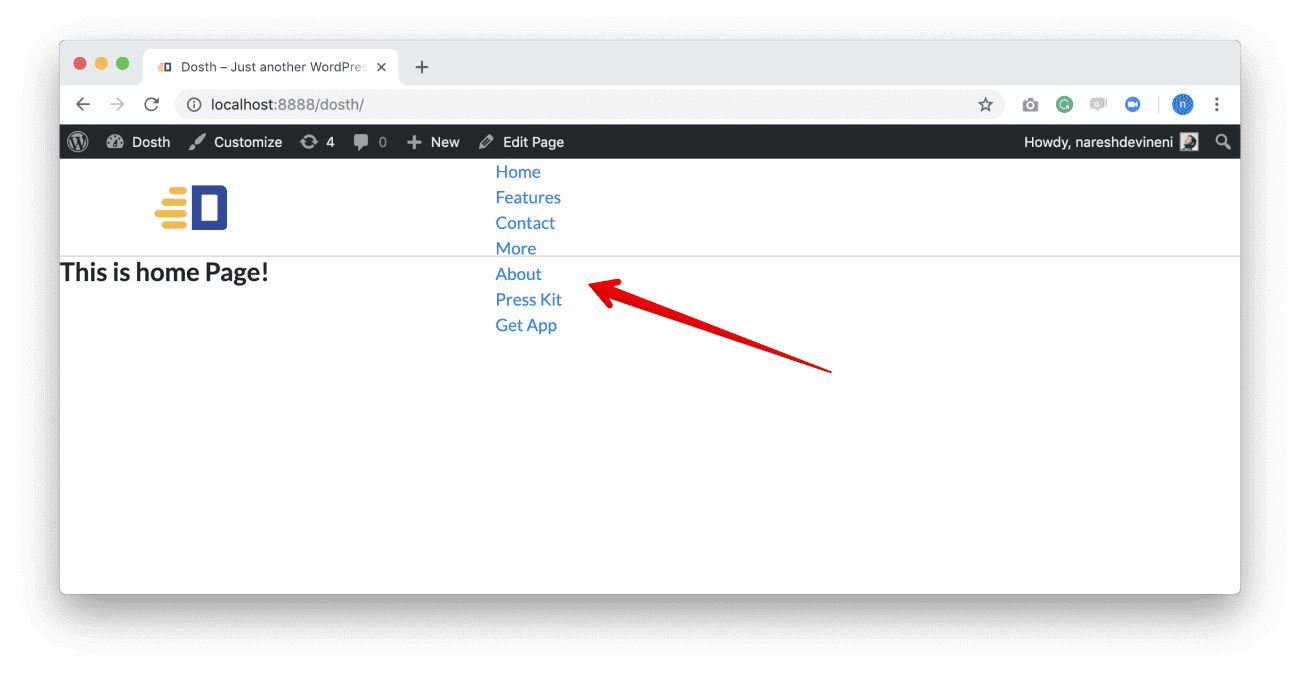
And Bingo! We linked everything perfectly. All thanks to the powerful WordPress menu system.
“Hey! Everything is ok, but you only taught us how to use the”theme_location” argument. What about the others? are they completely useless? “
No. They are useful. Most of them deal with the customization of the HTML markup of the menu. I will quickly talk about three other arguments that I regularly use. These might come in handy for you too.
The ‘items_wrap’ Argument
Oh! we forgot to see what markup is getting generated for the navigation menu. Let’s take a look at it.
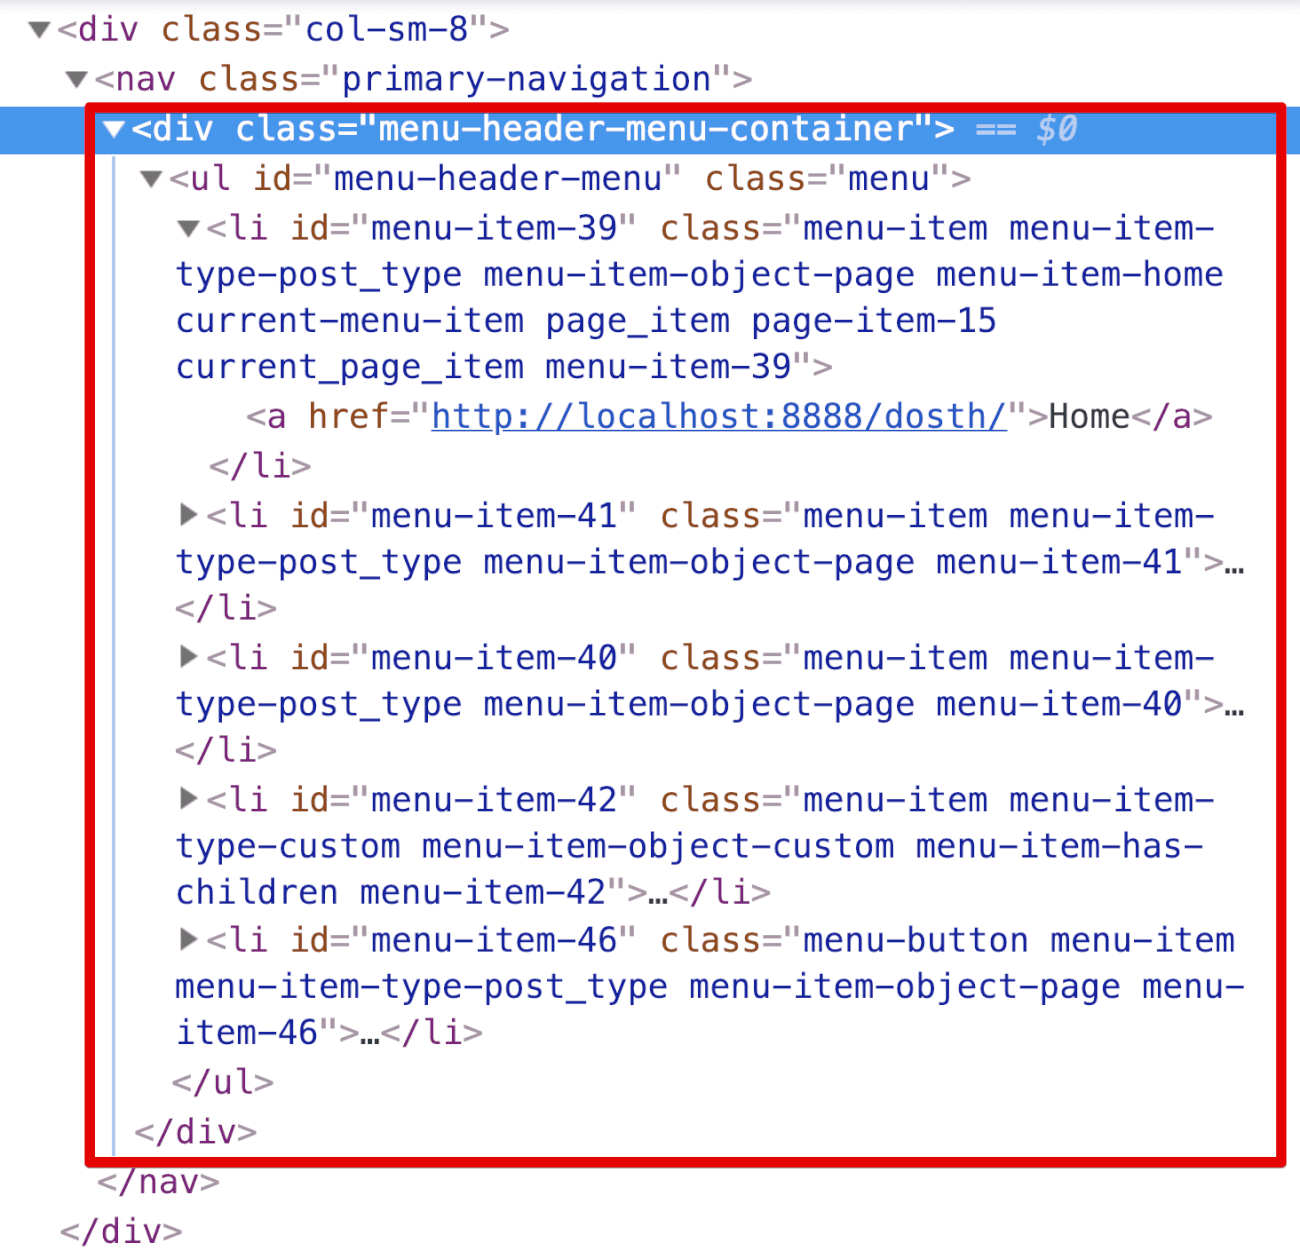
So, by default, WordPress is using an unordered list markup ( <ul></ul> ). And also there are tons of class names for every menu item.
This markup is totally fine. But what if we want to render our menu using the the ordered list markup ( <ol></ol> ) or perhaps just a basic <div> tag with a bunch of <a href='#'> tags?
The items_wrap argument allows us to do just that. But this argument is pretty limited to container level HTML elements.
What if you want more control over the markup?
The ‘walker’ Argument
You can change the entire structure of the of navigation menu with this argument. You can change every piece of it. How do you think the WordPress mega menus are built? Using this argument alone.
Now, practically explaining the above two arguments is out of scope for this book. So, I will write multiple highly detailed articles explaining these arguments individually in the future.
The ‘depth’ Argument
This is better shown than explained.
This argument accepts numbers from 0 – 3 ( Ideally ) but some clients even want the fifth level sub-items.
If we set this argument to a value of 0, all the levels of menu items that are present in the Menu structure will get outputted to the browser. Period.
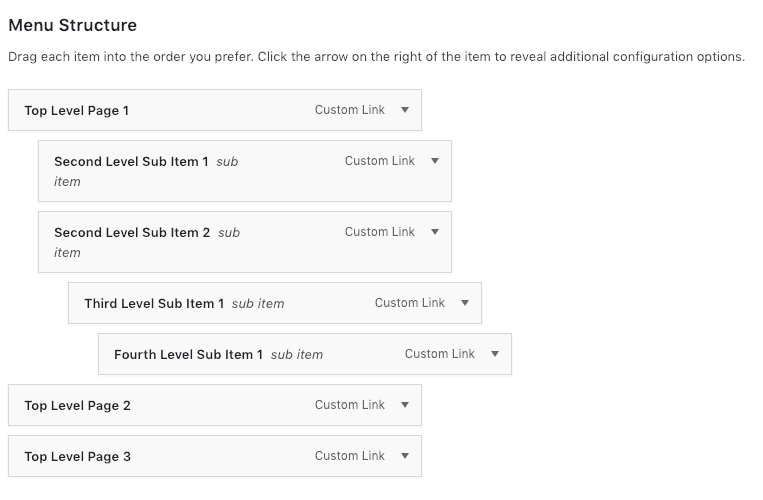
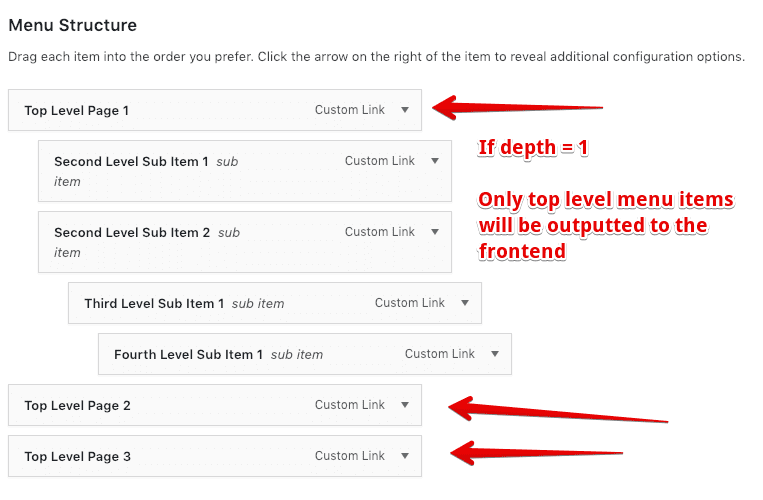
If we set this argument to a value of 1, only the top-level menu items will get outputted to the browser.
If we set this argument to a value of 2, along with the top-level menu items, second level menu items will get outputted to the browser too. But not the third level and fourth level menu items.
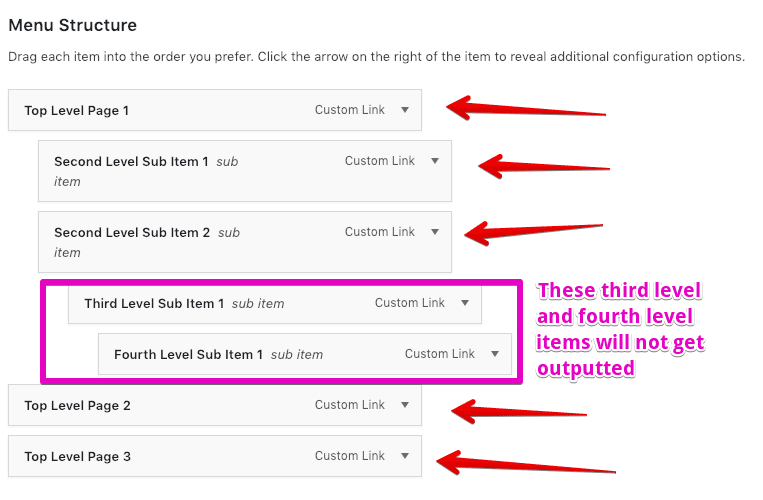
If we set this argument to a value of 3, WordPress will also output the third level menu items leaving behind the fourth level, if it exists. That’s all. You get the idea, right?
For more details about the other arguments, you can go to the function’s codex page.
Don’t worry, just play around them. If something goes wrong, just remove the problematic arguments from the array and keep it clean.
In the next lesson, We will style this navigation menu so that it looks great!
 © 2026 UsableWP. A project by Naresh Devineni.
This is a great course and is explained very well. However, in dealing with the ‘items_wrap’ Argument and the ‘walker’ Argument you said “practically explaining the above two arguments is out of scope for this book. So, I have written a multiple highly-detailed articles explaining these arguments individually.”
I’ve tried searching for these articles you mention but cannot find them anywhere. Do you have links for these? Thanks for all of your work on this.
Hi Gary, sorry for the inconvenience. To be honest, I forgot about writing those articles. That is why you couldn’t find them. I will edit the article to correct the mistake. Once again, really sorry for the incompleteness.
No problem! Been there lol. Thanks for the response. And again, great job with the course.