How to add a Panel, Section and Controls to the Customize Panel
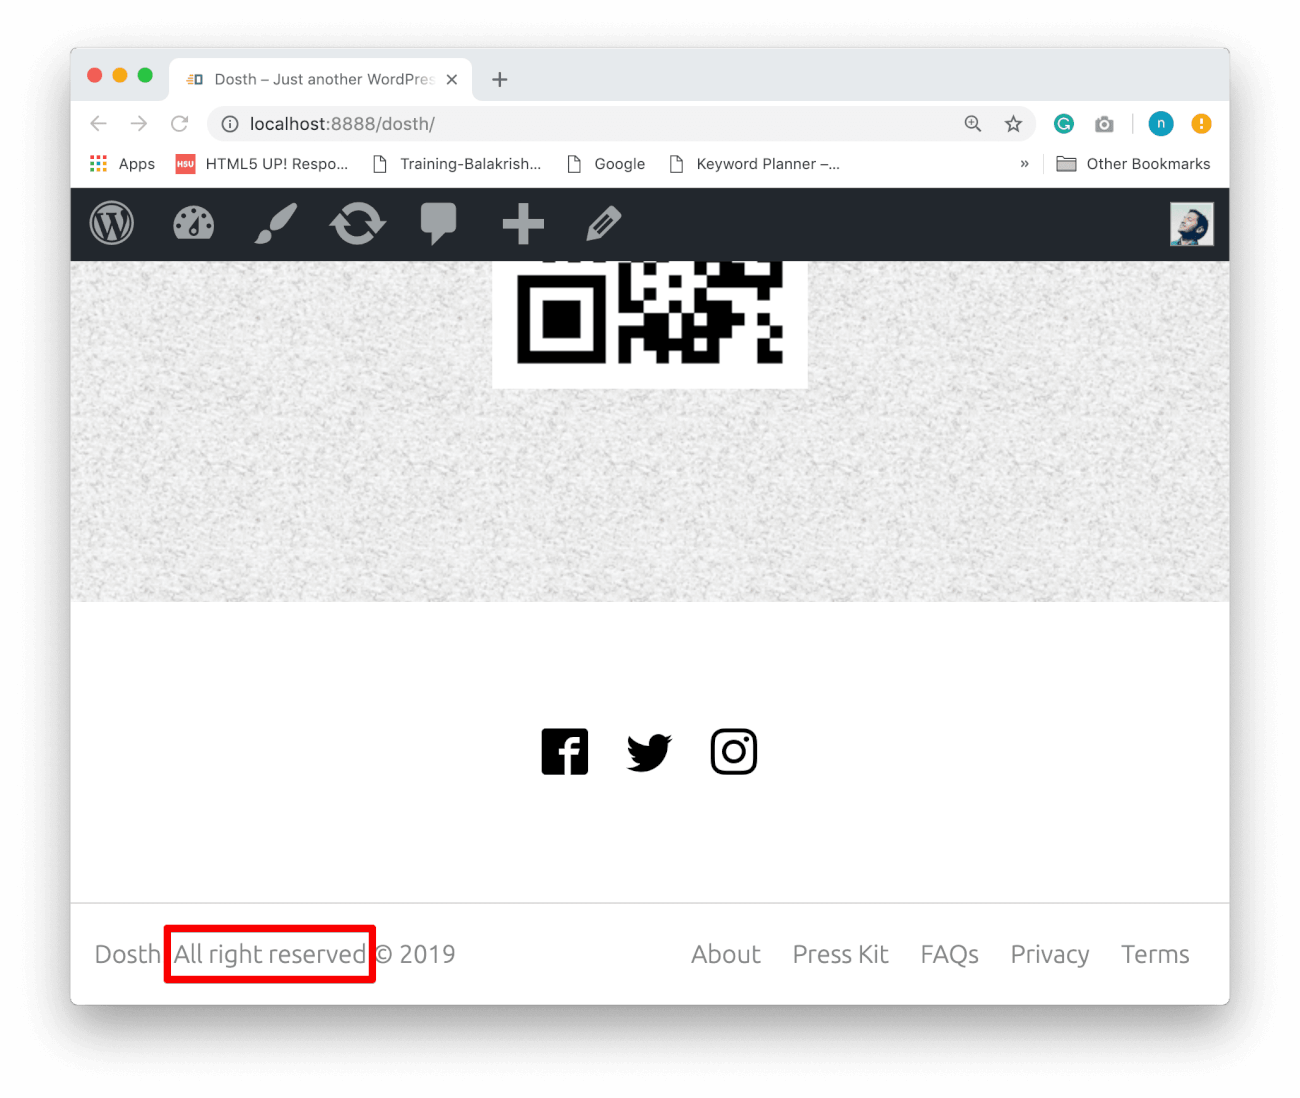
“Can we edit the copyright text in the footer? There is a typo!”
This is the most common request I get from the clients. It is not because of the typo I made, you get it, right?
Common, Let’s make the “All Rights Reserved” text in the Footer editable.
How to add a new Panel to the Customize Screen
First of all, Let’s create a New Panel inside the Customize Panel and let’s name it “Theme Options”.
Go ahead and put the following code at the end of the nd_dosth_customize_register action:
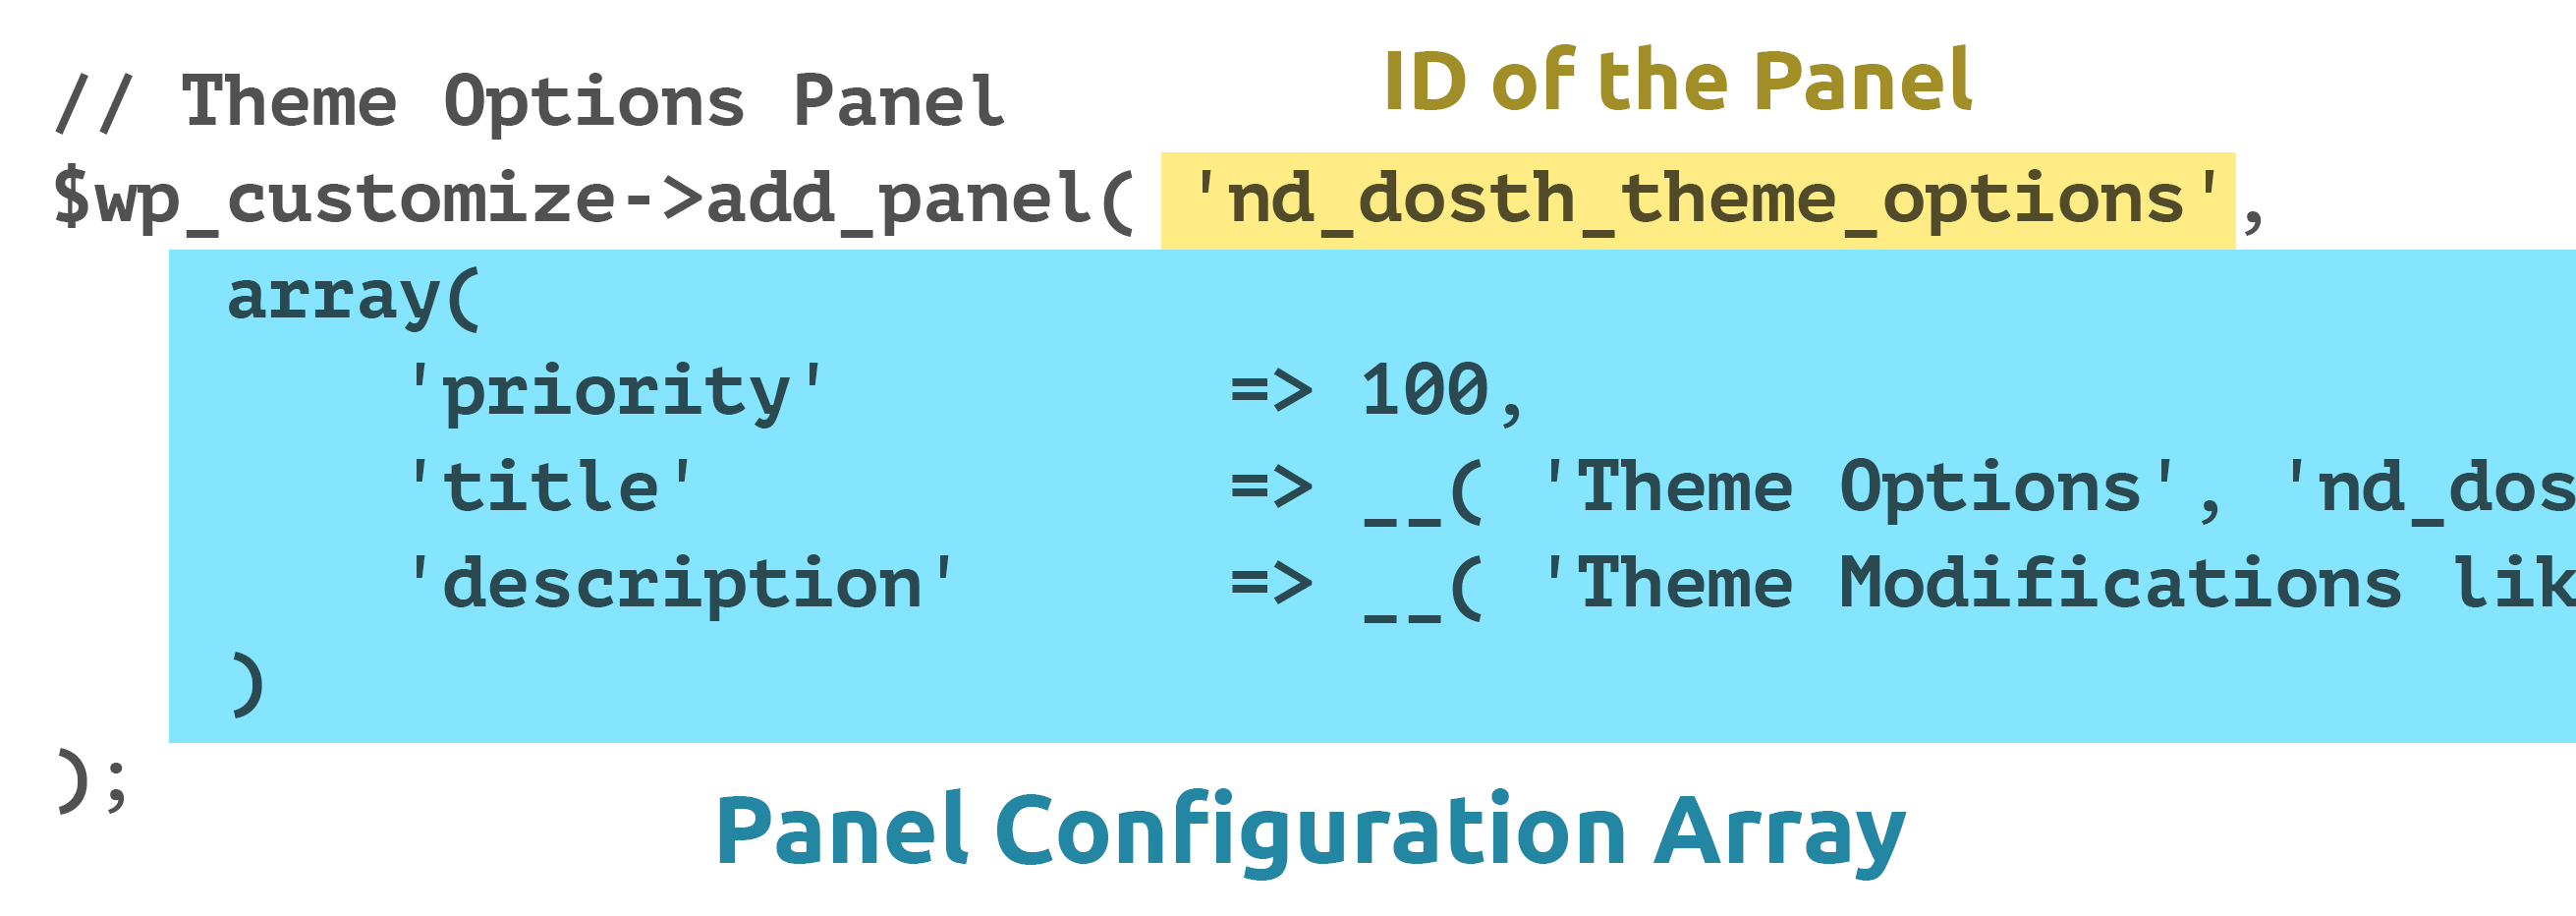
// Theme Options Panel
$wp_customize->add_panel( 'nd_dosth_theme_options',
    array(
        //'priority'       => 100,
        'title'            => __( 'Theme Options', 'nd_dosth' ),
        'description'      => __( 'Theme Modifications like color scheme, theme texts and layout preferences can be done here', 'nd_dosth' ),
    )
);
We are adding a New Panel called “Theme Options” to the Customize Panel with the help of add_panel() method on the $wp_customize object.
The add_panel() method adds a new panel to the Customize Panel.
The add_panel() method accepts two parameters.
- Unique ID for the Panel: We will use this ID to add a new section to this panel
- Configuration Array: to give the Panel:
- A Priority: Just like we changed the priority (order) of an existing Section/Panel, we can also decide where our custom Section/Panel gets placed. I thought that giving a priority of 100 would put this new Panel at the of the existing Sections/Panels, but it is that not that way. So ended up commenting out the priority argument altogether.
- A Title
- Some Description
- A Priority: Just like we changed the priority (order) of an existing Section/Panel, we can also decide where our custom Section/Panel gets placed. I thought that giving a priority of 100 would put this new Panel at the of the existing Sections/Panels, but it is that not that way. So ended up commenting out the priority argument altogether.
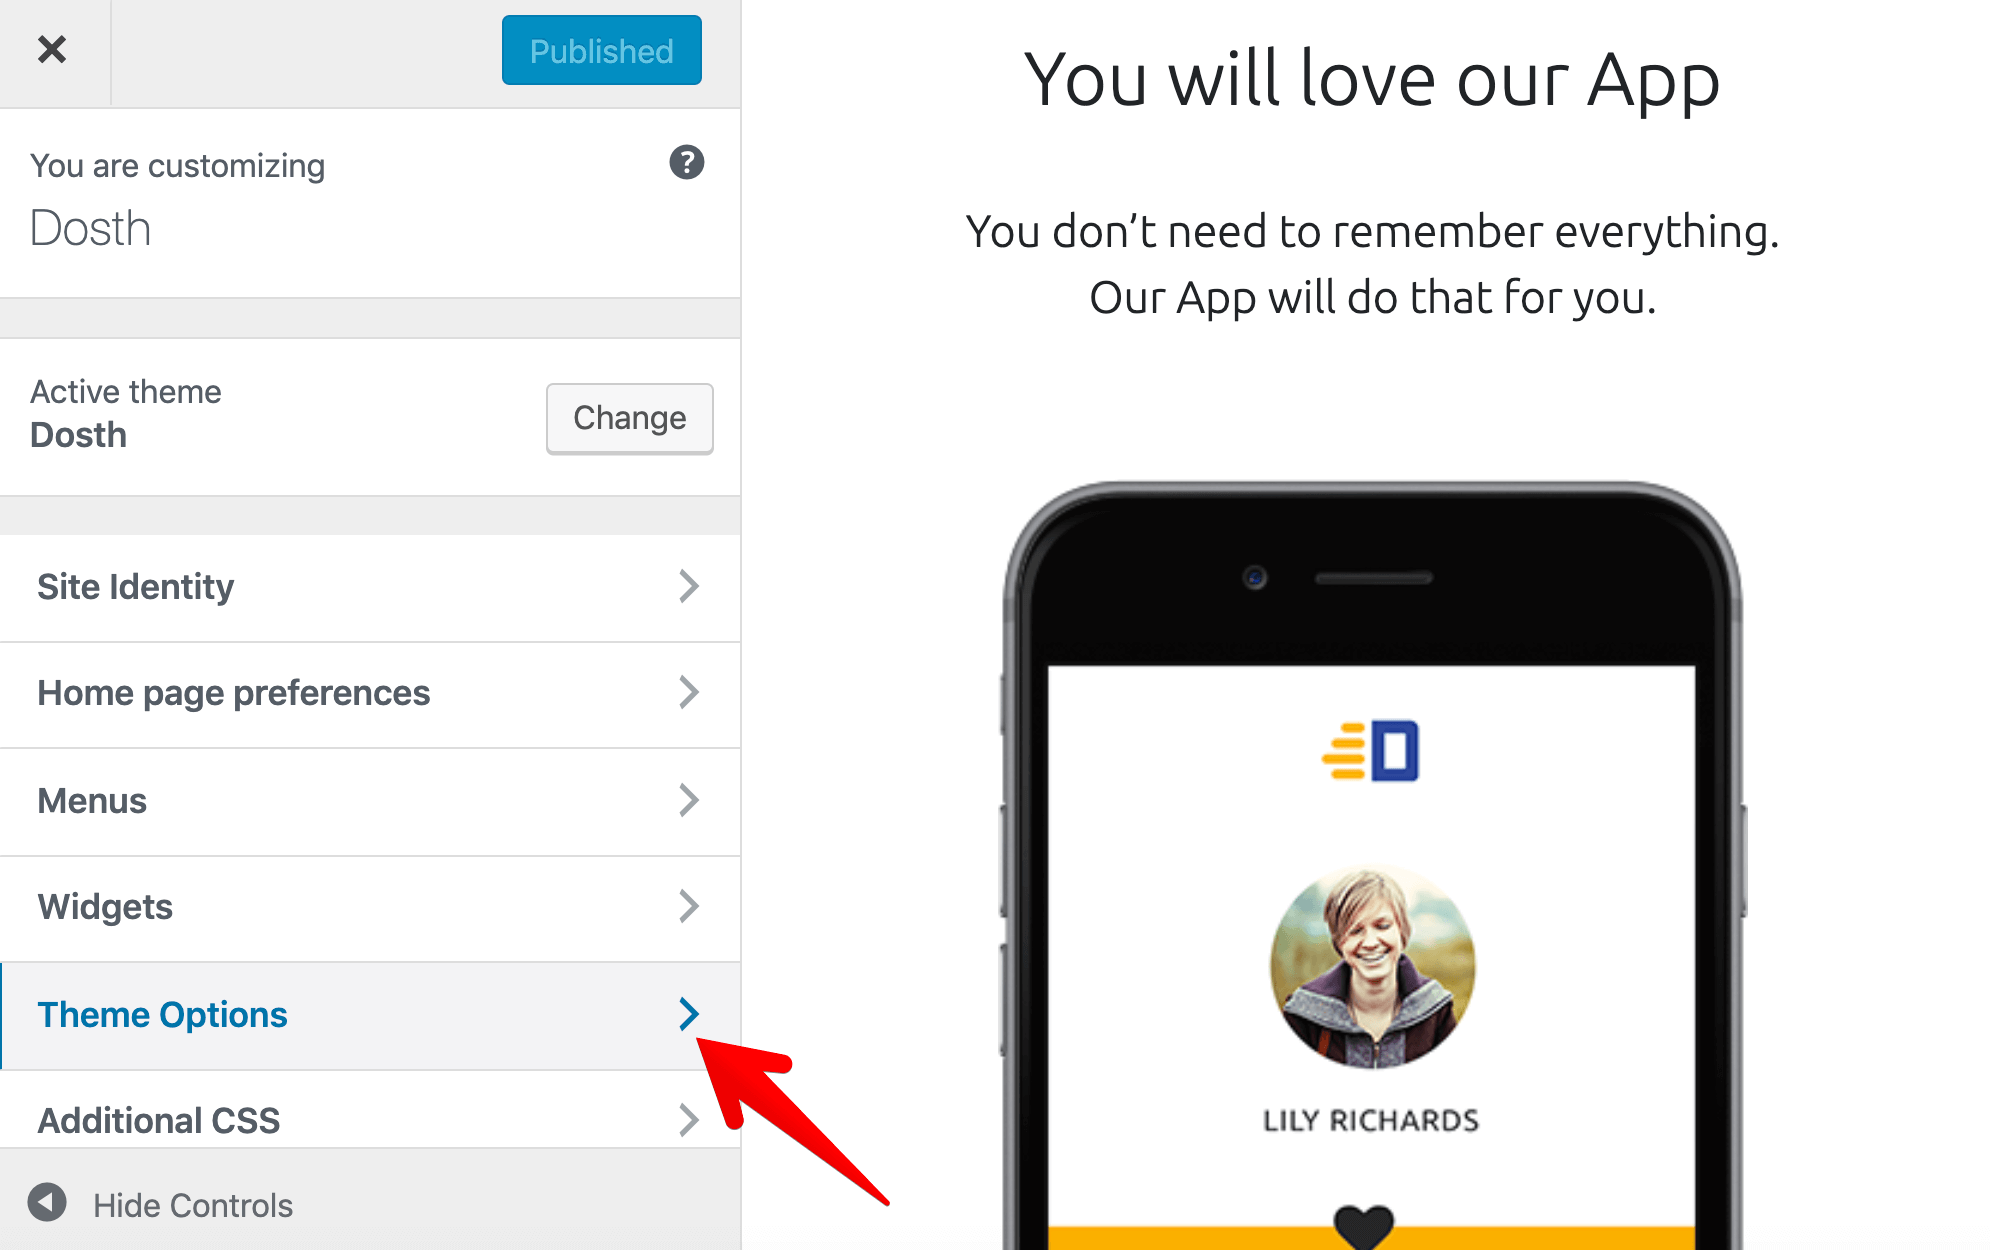
Now that we have created the “Theme Options” Panel, if you now refresh the “Customize” screen, You’ll not see the new Panel yet!
Always remember, Be it a Panel with multiple sections or Be it just a Section, you’ll only find it if there are any Settings inside it. Currently, we have only added Panel, It neither contains Sections nor Settings to play with. So, WordPress is hiding the Panel for the time being.
Next, a Panel cannot host Settings directly. A Setting can only be placed inside a Section. So, let’s create a new Section called “Text Options” and add it to the Panel we have created above.
How to add a new Section
Put the following code at the end of the nd_dosth_customize_register action:
// Text Options Section Inside Theme
$wp_customize->add_section( 'nd_dosth_text_options',
    array(
        'title'         => __( 'Text Options', 'nd_dosth' ),
        'priority'      => 1,
        'panel'         => 'nd_dosth_theme_options'
    )
);
We are adding a New Section called “Text Options” with the help of add_section() method on the $wp_customize object.
And we are adding this Section to the “Theme Options” Panel.
Just like add_panel() method, the add_section() method accepts two parameters.
- Unique ID for the Section: We will use this ID to add a new setting to this section
- Configuration Array: to give the Section a title, some description, priority, etc.
Also, Configuration array accepts “panel” ID argument. Using this argument, we can put this Section inside a particular Panel.
If you don’t want to put this Section inside a Panel, you can omit the “panel” argument and WordPress will add this Section along with the other Sections in the Customize Panel.

In our case, I want to add the “Text Options” Section to the “Theme Options” panel, So, I have provided the ID of the Panel “nd_dosth_theme_options” to the Section’s “panel” argument.
As I said before, you still can not see the newly created Panel nor the Section inside the Customize Panel yet!
Now let’s add a Setting called “Copyright Text”.
How to add a Setting to the Database
Go ahead put the following code at the end of the nd_dosth_customize_register action:
// Setting for Copyright text.
$wp_customize->add_setting( 'nd_dosth_copyright_text',
    array(
        'default'           => __( 'All rights reserved ', 'nd_dosth' ),
        'sanitize_callback' => 'sanitize_text_field',
        'transport'         => 'refresh',
    )
);
We are adding a new Setting called “nd_dosth_copyright_text” to the WP_OPTIONS table of our WordPress database with the help of add_setting() method on the $wp_customize object.
Just like add_panel()and the add_section() methods, the add_setting() method accepts two parameters.
- Unique ID for the Setting: We will use this ID to link this new setting to a Control like HTML text field.
- Configuration Array: to give the Setting
- A default value: You can provide a default value for the Setting so that if the Client likes the default value, he/she doesn’t have to update the Setting at all.
A default value also helps in eliminating empty text areas when the theme is activated for the first time. Developers who distribute their themes for mass usage uses this default value to provide some dummy text.
In our case, we are providing “All rights reserved” as the default value. - A sanitization callback function: You can provide a PHP callback function to sanitize the Data entered by the user for this setting.
As I have said before, you can not trust the user data, even if it is you. By default, WordPress provides Sanitization callback functions for some HTML fields only. For the others, we have to define a Sanitization Function ourselves and provide it to this argument.
In our case, we have provided “sanitize_text_field” as the callback function. This function ships with WordPress. You can just use it directly as we did above!
We will see this in action in an upcoming lesson. - A Transport Type: You can provide “refresh” or “postMessage” as a value for this argument. If you provide “refresh”, WordPress refresh the entire Customize Panel to show you the changes affected by the Setting. It is just like a normal web page refresh and slows you down.
If you provide “postMessage”, WordPress will only refresh a part of Customize Panel where the change took place. It is like AJAX and improves user experience. You’ll understand this once we see “postMessage” in action in the next lesson. - Capability: The default value for capability is “edit_theme_options”. That means, only a user with “edit_theme_options” capability should be able to edit theme options.
And this is what we need, so I omitted this argument altogether.
- A default value: You can provide a default value for the Setting so that if the Client likes the default value, he/she doesn’t have to update the Setting at all.
Technically, we can not add a Setting to a Panel nor Section. This is why we did not provide a Section ID in the Setting’s configuration array.
A Setting just holds a piece of Data in the Database. And we manage this piece of Data with the Help of a Control (Form Field) and we can add this Form Field to any Section inside the Customize Panel.
How to add a Control and link it to the Setting and a particular Section
Go ahead put the following code at the end of the nd_dosth_customize_register action, to be precise, anywhere after the “nd_dosth_copyright” Setting we have added previously.
// Control for Copyright text
$wp_customize->add_control( 'nd_dosth_copyright_text',
array(
'type' => 'text',
'priority' => 10,
'section' => 'nd_dosth_text_options',
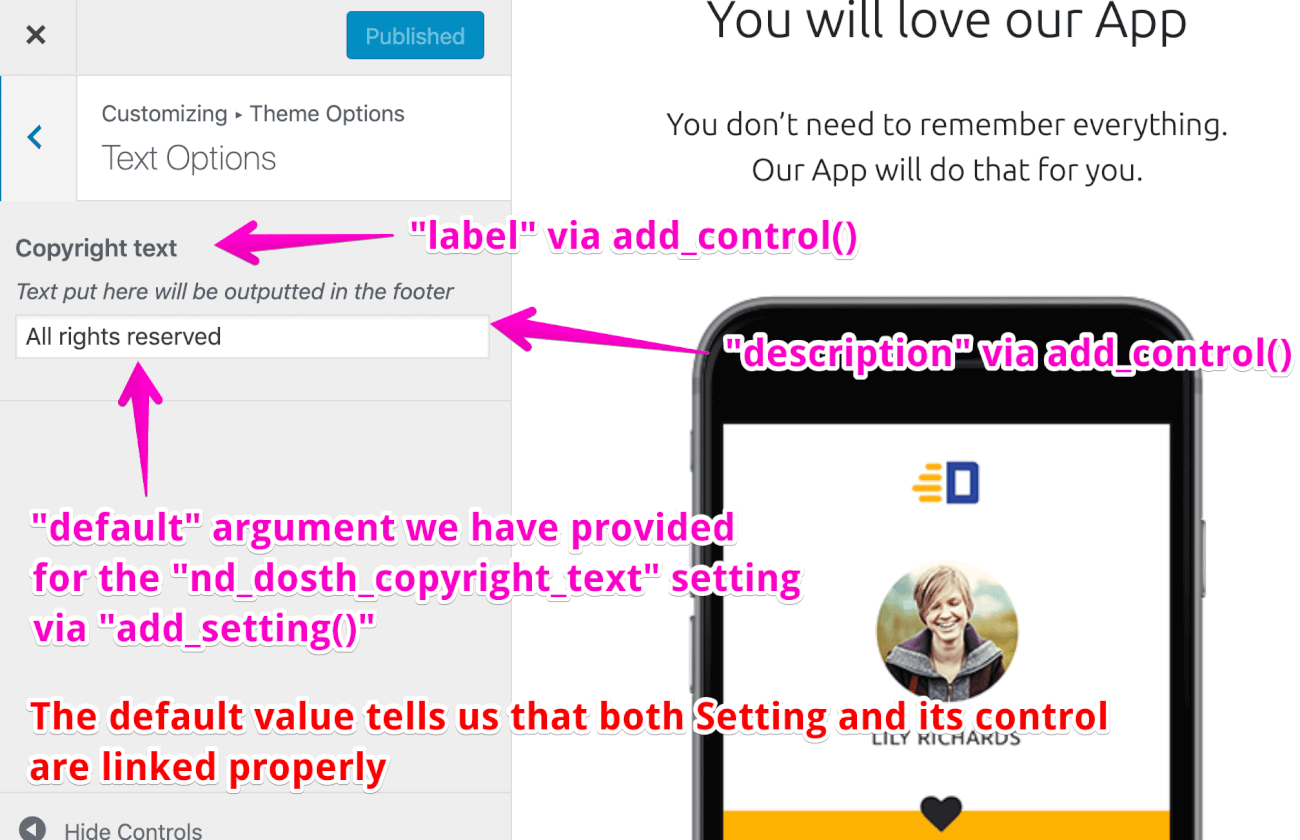
'label' => 'Copyright text',
'description' => 'Text put here will be outputted in the footer',
)
);
The add_control() method adds a Form field of a certain type to a particular Section and links this Form field to the specified Setting.
Again, The add_control() method accepts two parameters.
- Unique ID of the Setting: We have to provide the ID of the Setting which this “Control” (Form Field) manages
- Configuration Array: We can provide the following arguments to this array:
- type: We have to specify the type of the Form Field. For example, If we specify the type as “text”, an HTML “text” input field will be outputted by WordPress.
If we specify “radio”, an HTML “radio” input field will be outputted.
Currently, WordPress supports the following types:text,checkbox,radio,select,textarea,dropdown-pages,email,url,number,hidden, anddate
In our case, I want a “text” form field to enter the copyright text. If it is a paragraph, I would have chosen “textarea”. - priority: Just like Sections, Controls can have priority too! You can control the order of the “Control” using this argument.
In our case, I am going with a priority of 1 for no reason. I Just wanted to tell you that this option exists. - section: As I said before, you have to put this Control inside a particular Section.
In our case, I want to put this Control inside the “nd_dosth_text_options” Section that we have recently created. - label: Label for the HTML Form field that this Control outputs. The label must be descriptive and should be easily understandable by the client.
In our case, I want the client to enter the Copyright text here, So I have provided “Copyright Text” - description: Sometimes, we need to give more idea about a particular option, for example, what it does and the location where the value of this “Setting” is outputted.
In our case, we are outputting the copyright text in the footer, So I have provided “Text put here will be outputted in the footer”
- type: We have to specify the type of the Form Field. For example, If we specify the type as “text”, an HTML “text” input field will be outputted by WordPress.

And this how a Setting is linked with a Control and how a Control is linked with a Section.
If you now go the Customize panel and refresh it, you will indeed find a Panel called “Theme Options”:
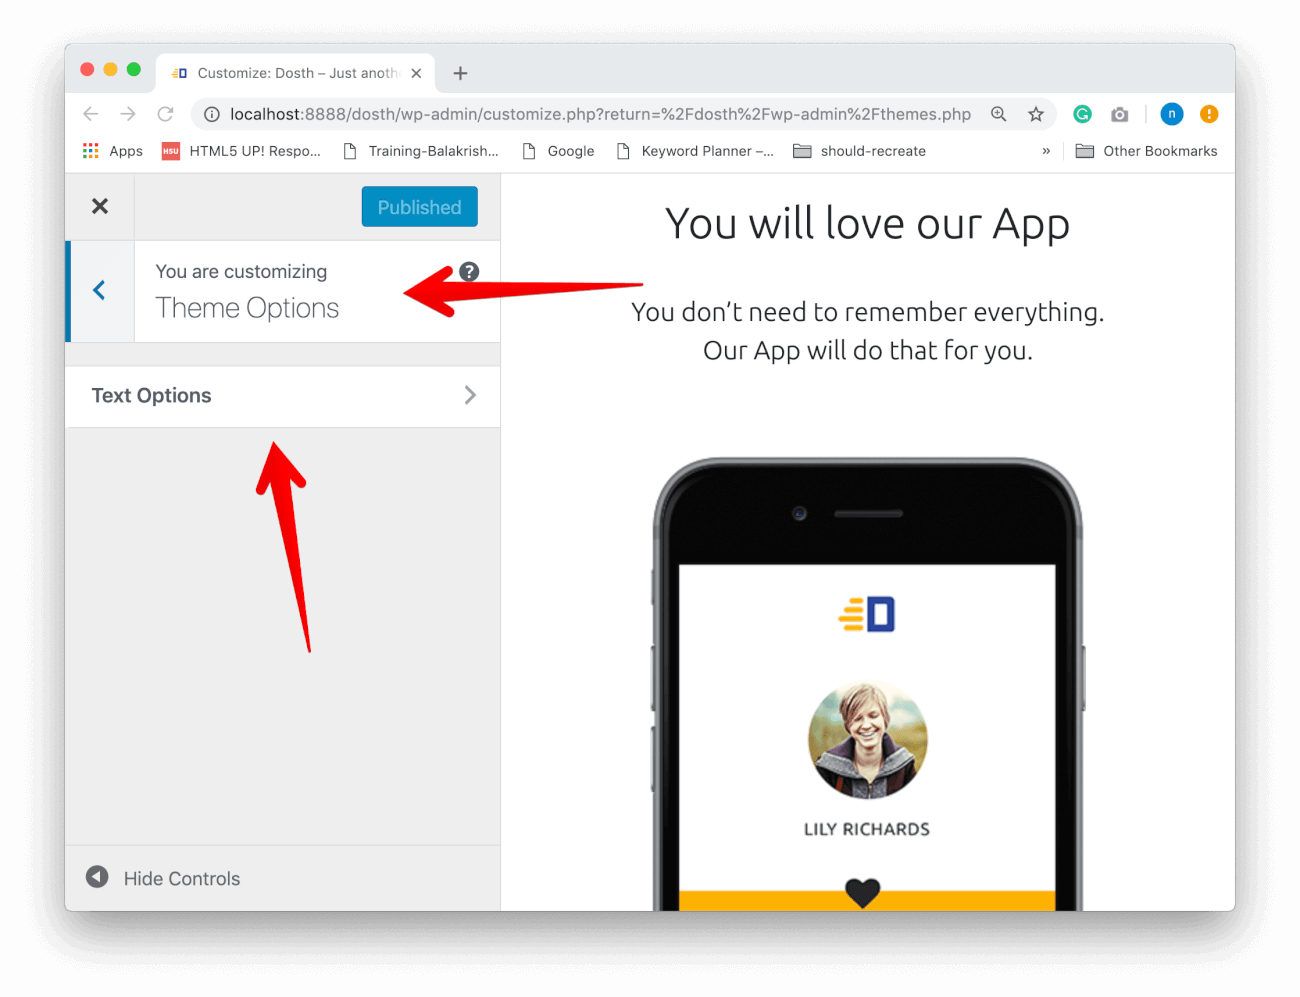
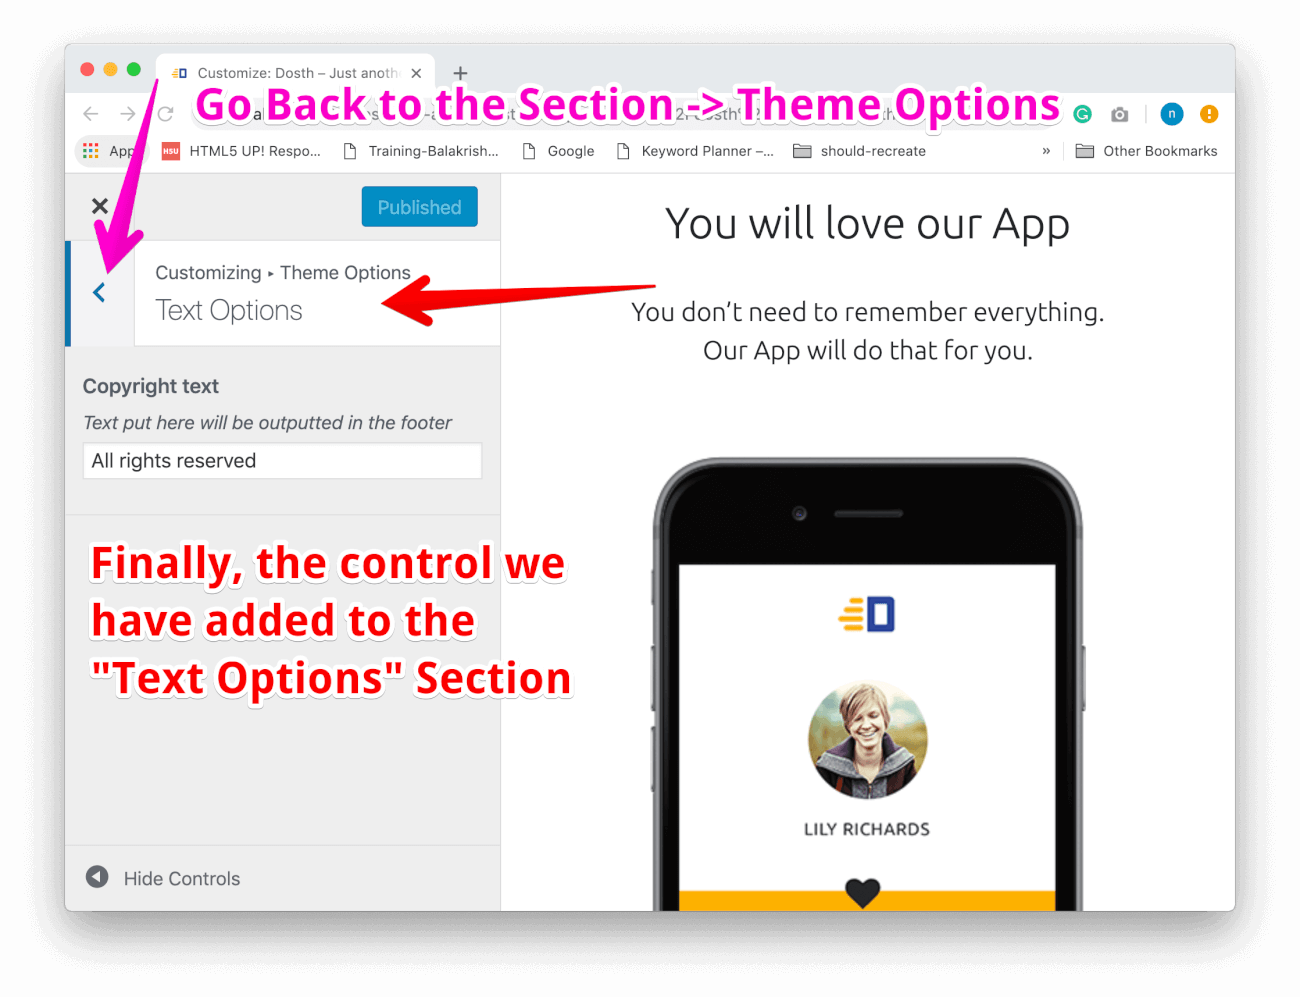
And if you go inside it, you will find a Section called “Text Options”
And if you go inside it, you will finally find a control called “Copyright Text”.
As you can see, the arguments we have provided for the Control is showing up in their respective locations.
Uff! That’s all it takes to create a Panel -> Section -> Setting and its Control.
In the next lesson, we will learn how to grab the “Copyright Text” Setting value and output it to the frontend.
 © 2026 UsableWP. A project by Naresh Devineni.
Thank you for this great tutorial 😻
I am glad :)
it is store on database table but not show on page.
Very nice presentation.Really helpful blog for a new developer