Using ACF Plugin to create advanced custom fields
ACF plugin comes in Free and Premium versions.
For the purposes of this course, I will be going with the free version. I only bought the Premium version for the Repeater Field.
Anyway, once you are done with mastering the free plugin, If you want to some more luxury, you can go with the premium version.
So, let’s install the free plugin.
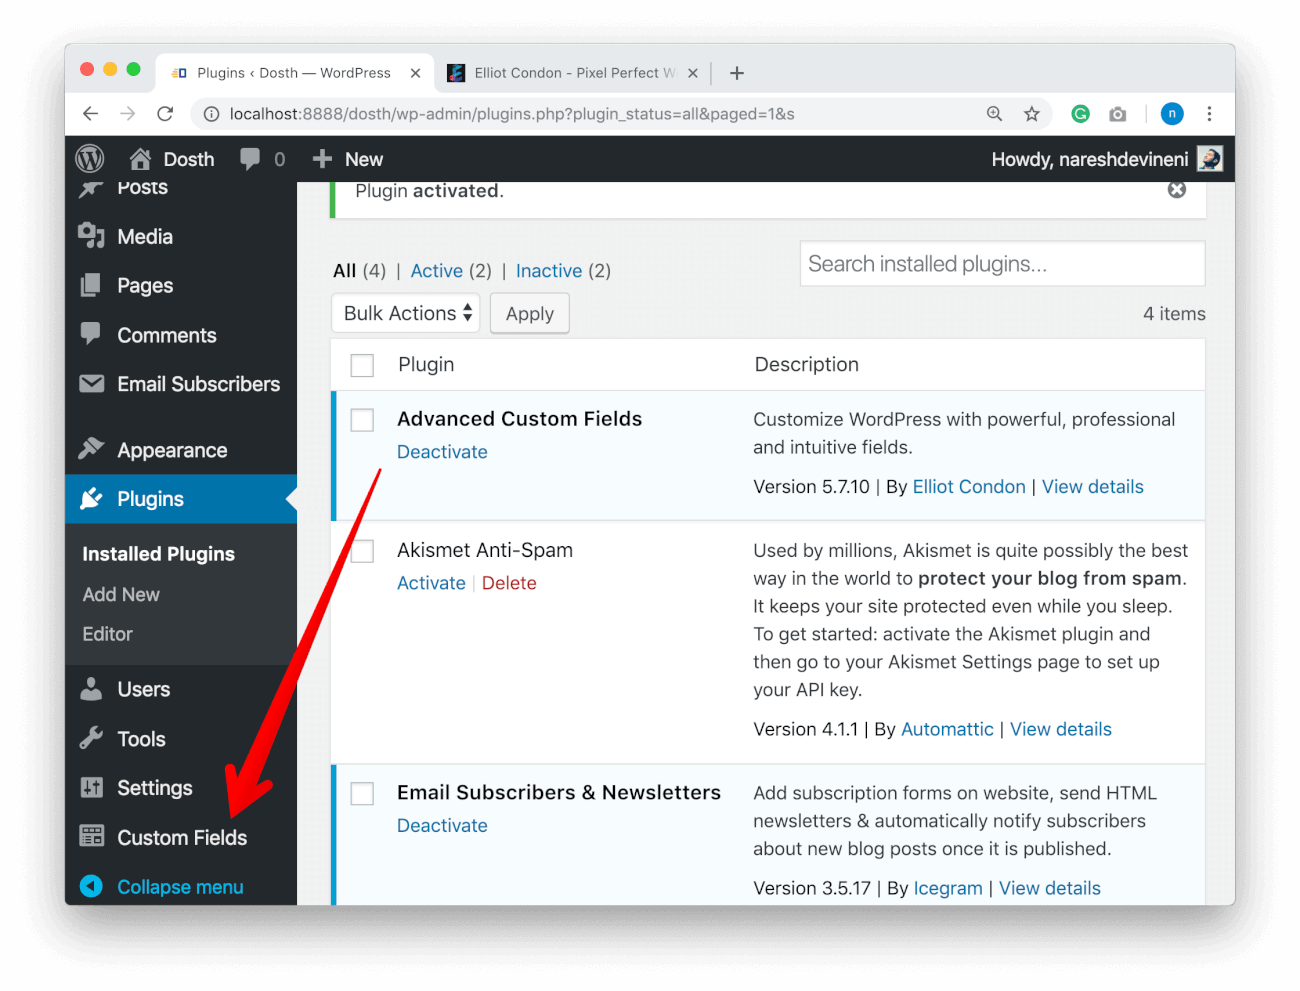
Go to Admin Dashboard -> Plugins -> Add new
Then search for “Advanced Custom Fields”.
You’ll get tons of results. Most of them are plugins that extend The ACF plugin itself. So, look for the Author Name: Elliot Condon and install the plugin. At the time creating this lesson, the Logo has a Green Background Color.
This plugin adds a new panel called “Custom Fields” to the Main Menu of the Admin Dashboard. So, Click on it to start creating the Custom Fields.
ACF plugin divides the Custom Fields into Groups. So, we have to create a Field Group first and then create Custom Fields inside this Field Group.
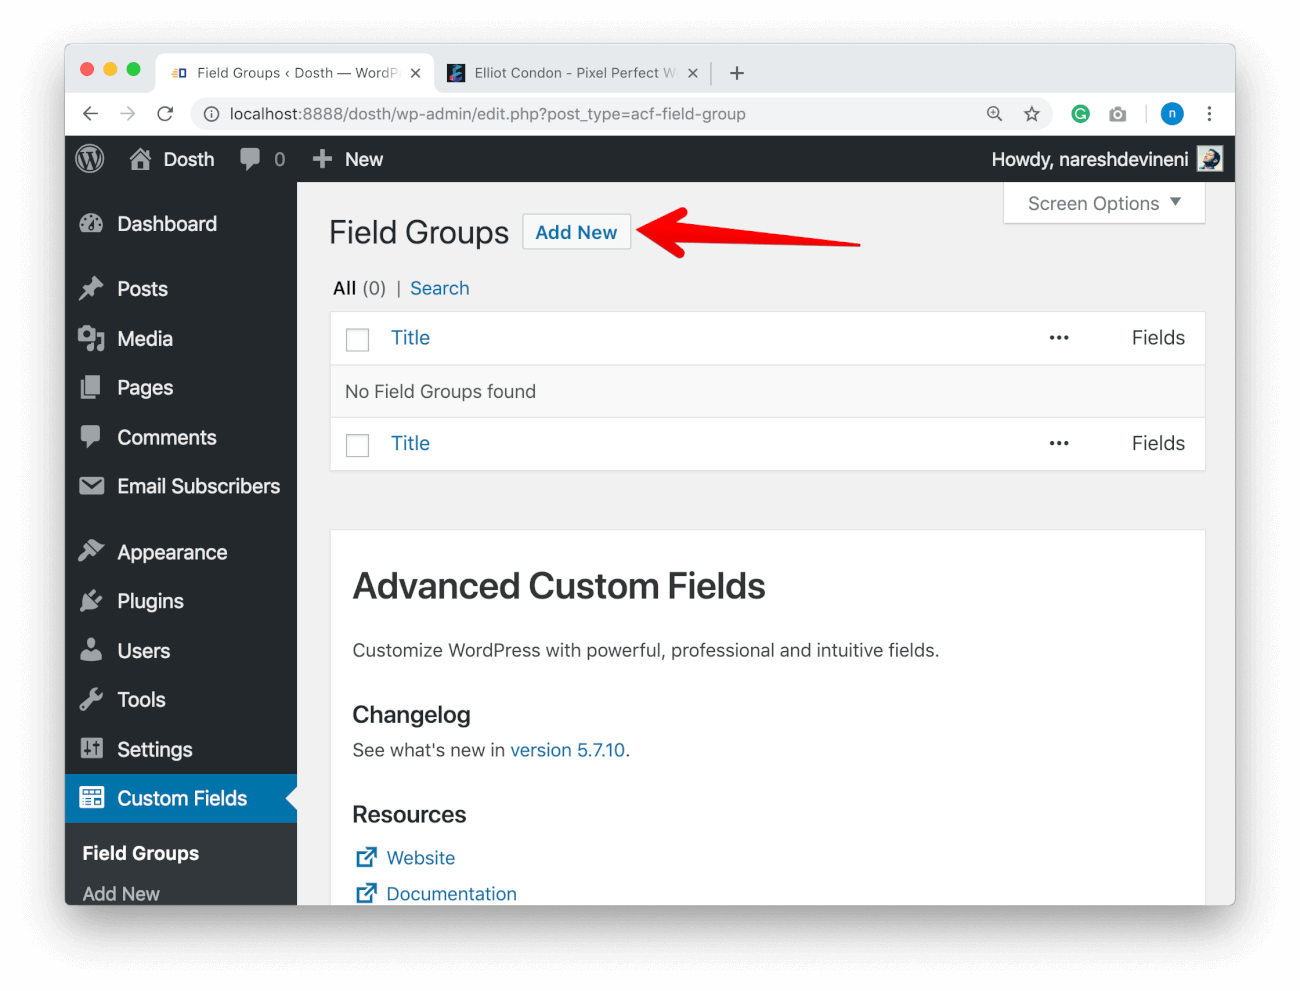
To create a Field Group, click on the “Add New” button.
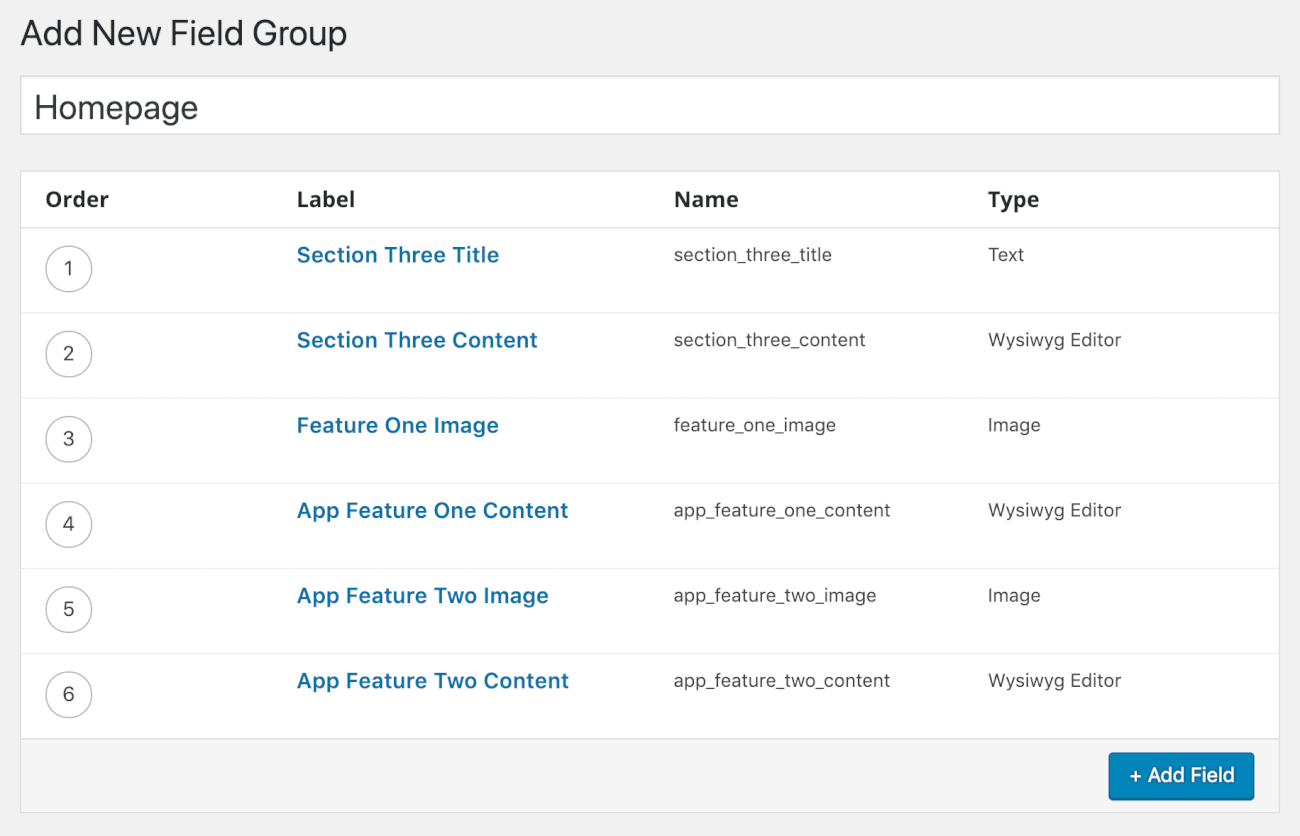
Next, we have to enter a Title for the Field Group. You can name it whatever you want. But because we are creating a Field Group for our Homepage, I would love to name this field Group “Homepage”.
But before we add Homepage related custom fields to this Group, we have to decide what fields we need in first place by taking a look at the mockup design of the Third Section of the Homepage.
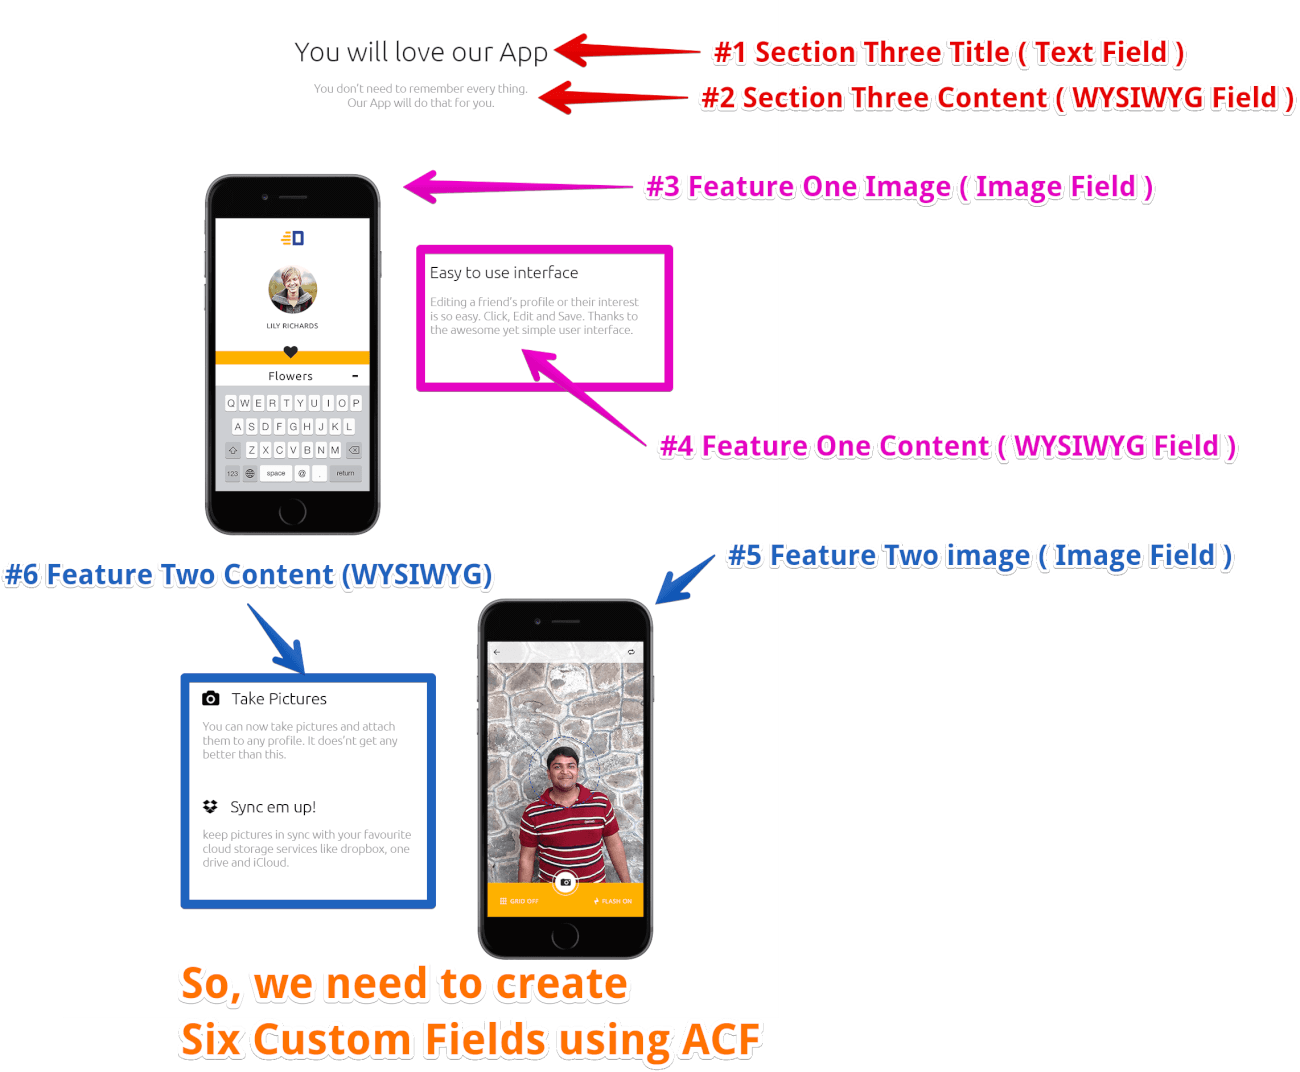
By taking a look at the above mockup, I came to the conclusion that we need to create six custom fields to build this content so that it is easier for the Client / Content Editor.
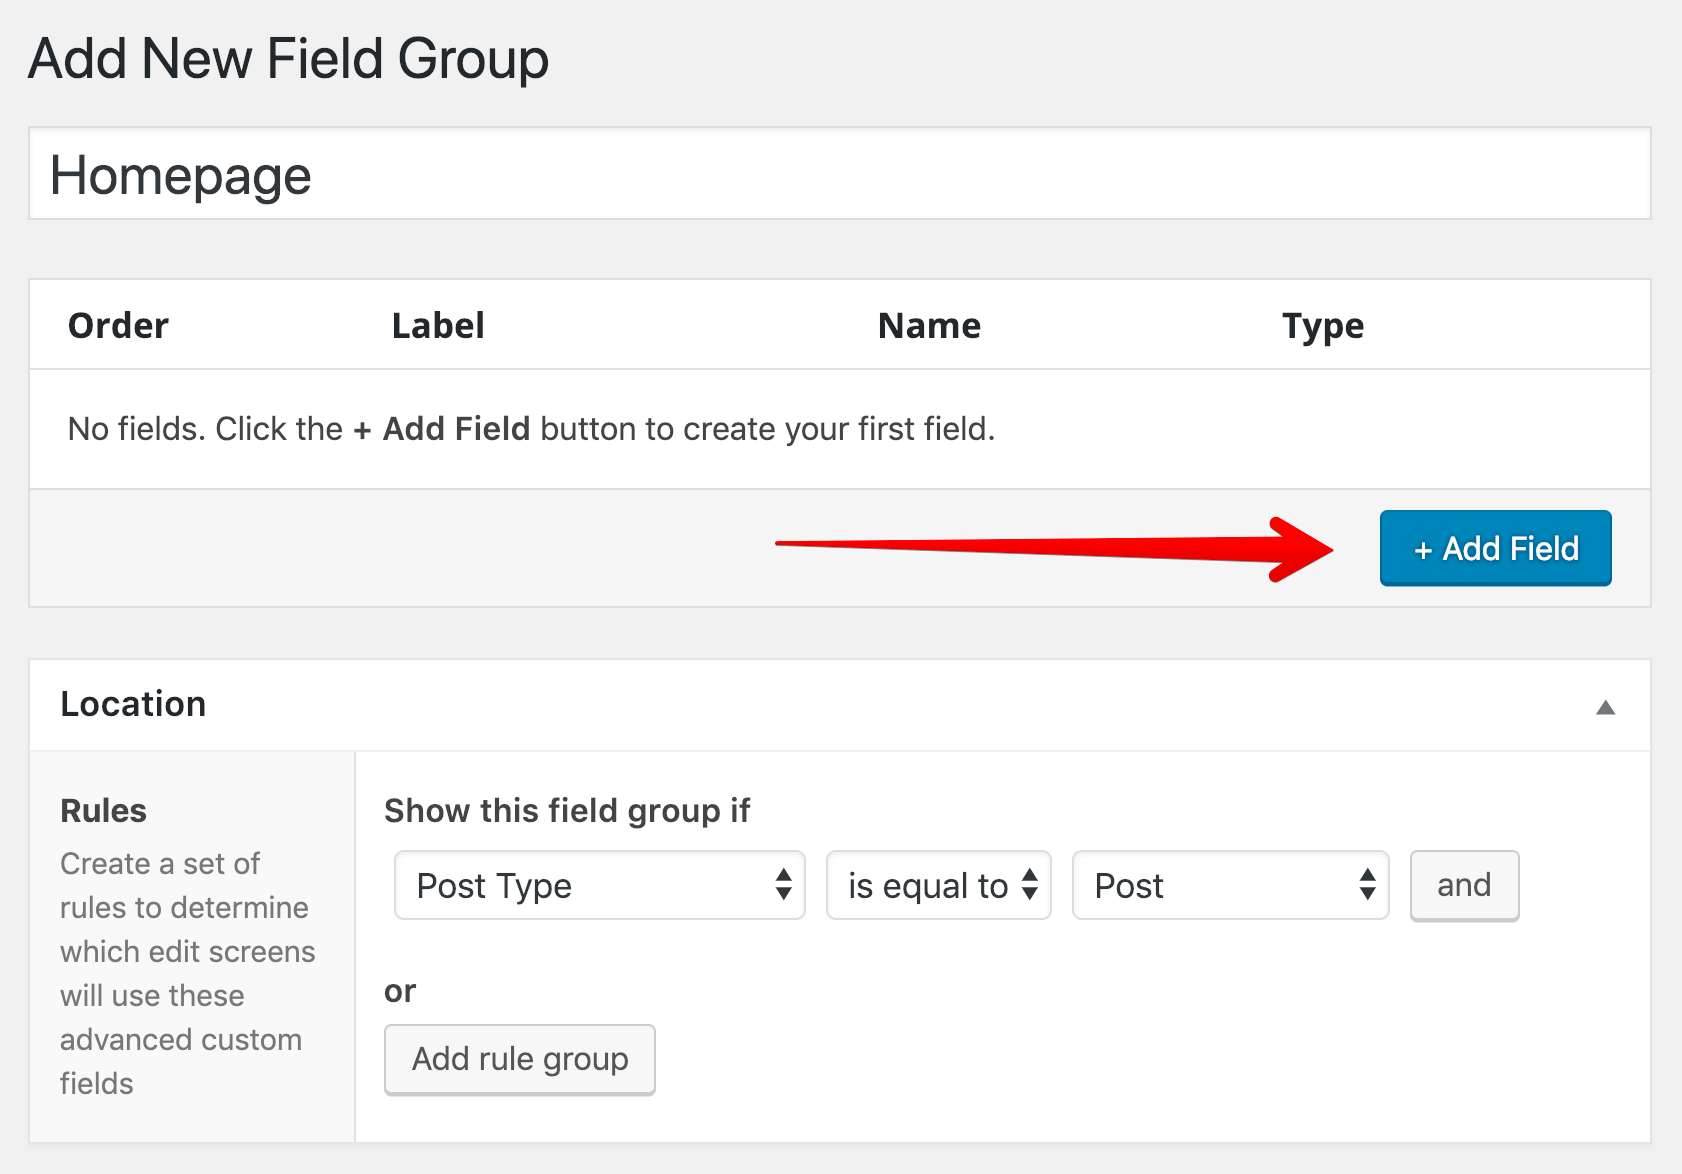
So, click on the “Add Field” button to add a new Custom Field to this Field Group.
1) First Custom Field Options
As soon as you click on this button, the ACF plugin will slide down a bunch of Field Options to help us configure the new Custom Field.
Common, let’s go through them one by one.
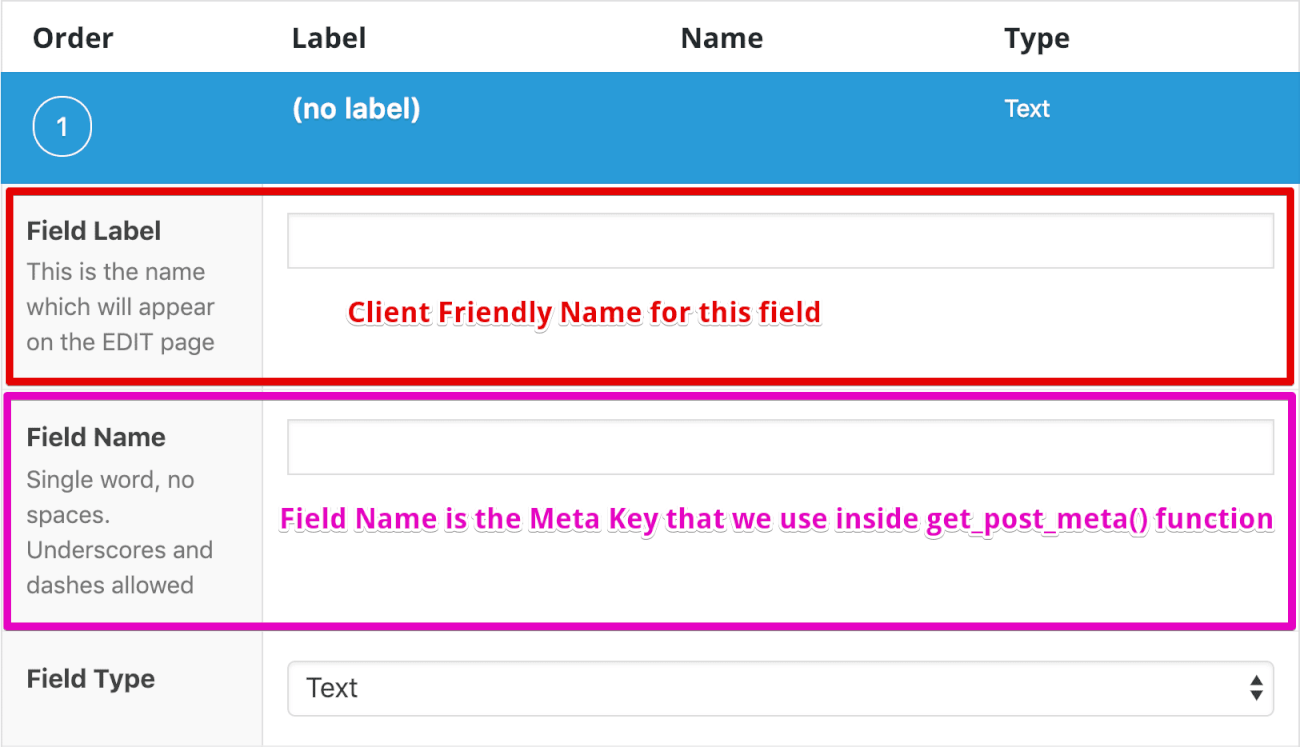
Field Label
For the Field Label option, we have to provide a name in such a way that a Client/Content editor should be able to figure out where this particular field is being put to use.
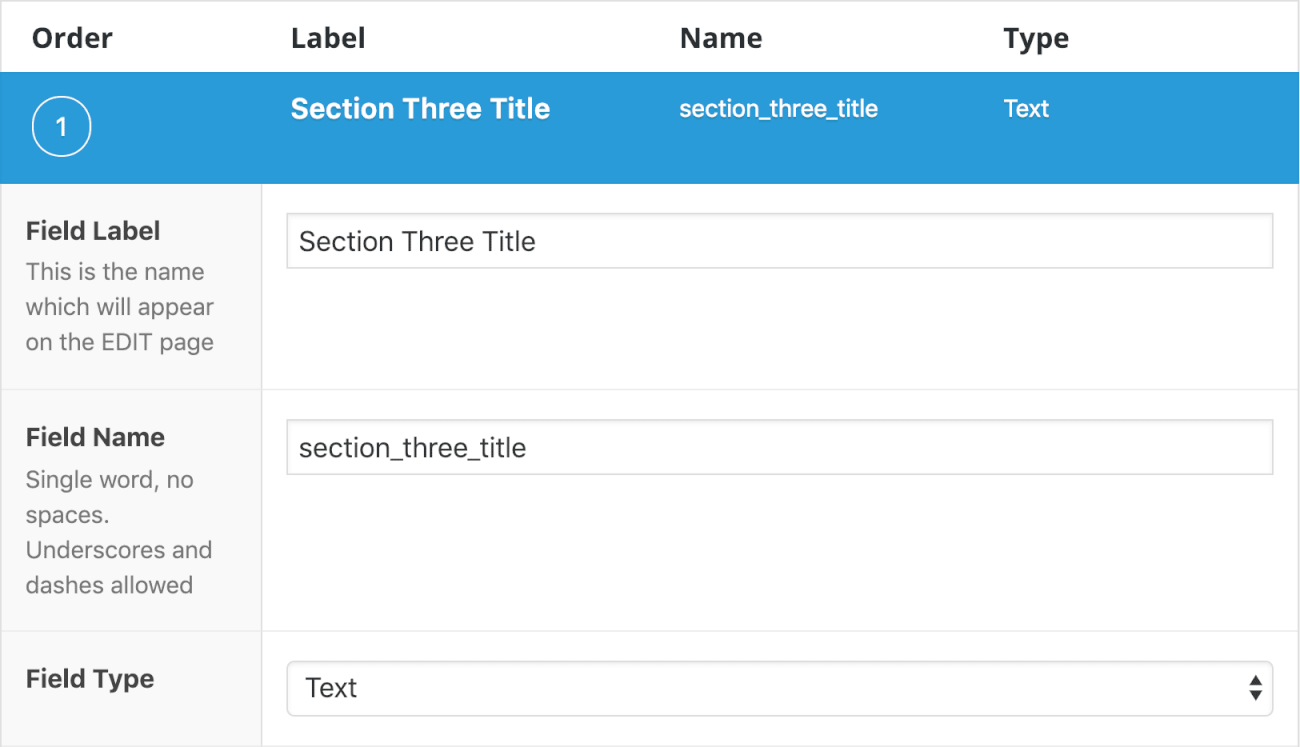
In our case, we are creating this field for Section Three Title of our Homepage. So, I went “Section Three Title”.
Field Name
As soon as you enter the Field Label and move out of it, the ACF Plugin will generate the Field Name automatically. And If you observe the Field Name, it is same as Field Label except with underscores instead of spaces and all letters are lowercased.
The value we provide here is used as the $key parameter inside the get_post_meta() WordPress function to display this field’s content on the frontend. To be precise, Field Name is equivalent to the “Name” Field inside the default Custom Fields section.

But, if the automatically generated Field Name ( Meta Key ) doesn’t fit your needs, you can always change it to whatever you want.
Field Type
I went with Text Field because we don’t need a Textarea or WYSIWYG field for a Headline.
Here are other field types that we can use.

Other Field Options
Rest of the options are self-descriptive and honestly, except for the Default Value field, I never used any one of them. But feel free to explore them.
It’s Easy
Now that you understand How to create a custom field using ACF, go ahead and create the other Custom Fields with the following Meta Keys and Field Types:
Tip: Click on the Edit link of Individual Custom Fields to hide and show their respective configuration options.
2) Section Three Content:
Field Label: Section Three Content
Field Name: section_three_content
Field Type: WYSIWYG Editor
3) App Feature One Image:
Field Label: App Feature One Image
Field Name: app_feature_one_content
Field Type: Image
Return Value: Image URL
Maximum: File Size: 0.4mb
Preview Size: Full
When it comes Image Field Type, we also need to configure the “Return Value” that we output to the frontend using the get_post_meta() function.
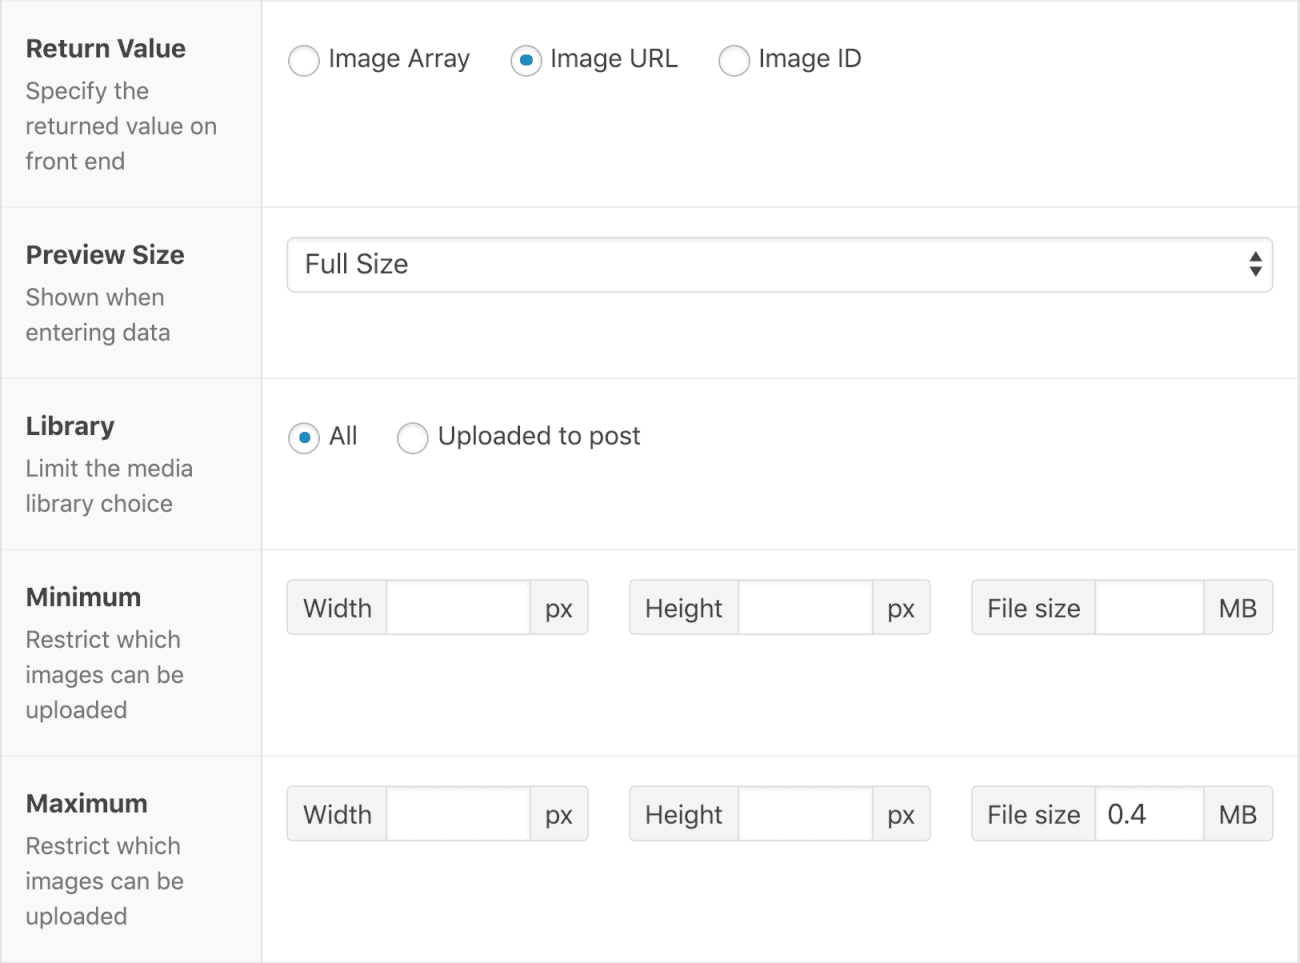
Most of the time, I will go with the “Image URL” for “Return Value” option because I always end up using just the URL. If we select “Image Array” we will get a bunch of other data about the image which we almost never use.
But this doesn’t mean the “Image ID” is never used by us. I use Image ID for return value when I need more control over the Image Dimensions. Because when we acquire the ID of an Image, we can display the Image at any size we want. This option helps us to keep Page load speed in check!
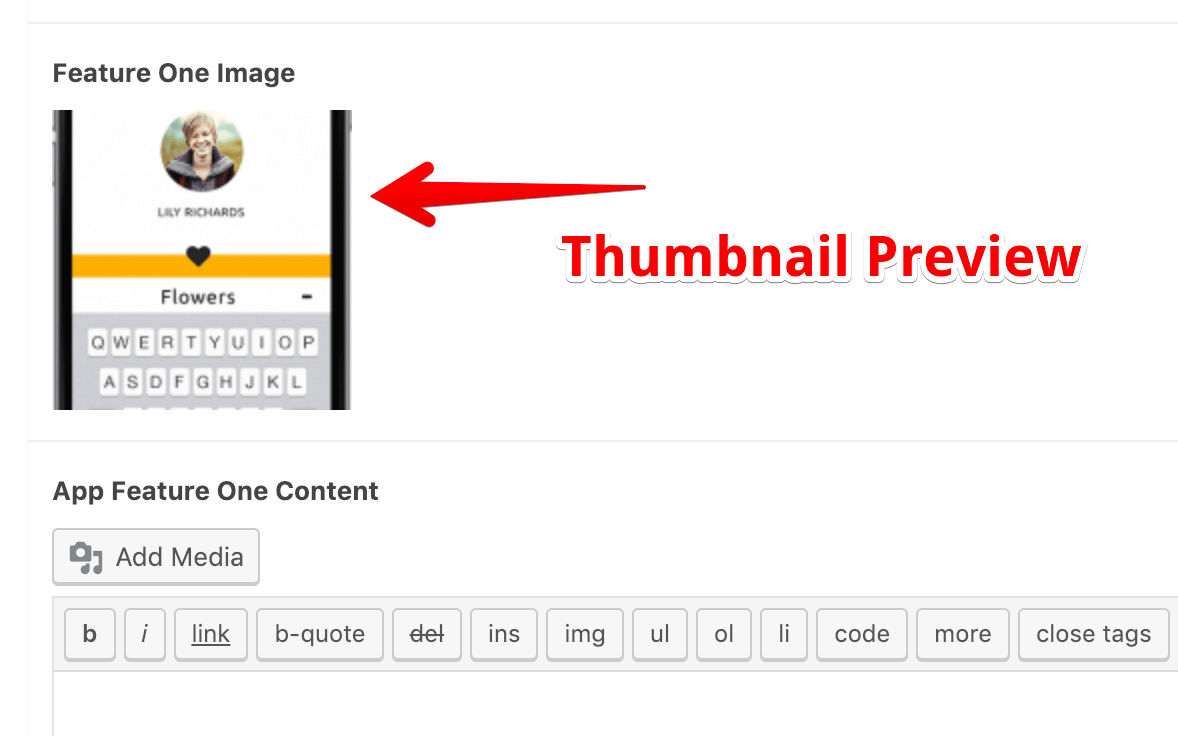
Special Mention: Preview Size Setting: When we upload the Image on the Homepage Edit screen, we better display the complete image. If not, some clients could get confused by seeing half image like this:
Also, Some clients upload high-resolution images and then asks me to optimize the site for the Page load speed, so as a precaution I only let clients upload an image with less than 401kb size with the help of Maximum option.
4) App Feature One Content:
Field Label: App Feature One Content
Field Name: app_feature_one_content
Field Type: WYSIWYG Editor
5) App Feature Two Image:
Field Label: App Feature Two Image
Field Name: app_feature_two_content
Field Type: Image
Return Value: Image URL
Maximum: File Size: 0.4mb
6) App Feature Two Content:
Field Label: App Feature Two Content
Field Name: app_feature_two_content
Field Type: WYSIWYG Editor
Here are the Final Set of Custom Fields and their Meta keys for Homepage Field Group:
Location Rules: Creating Custom Fields is not enough
Next, we have to assign these custom fields to the Homepage using the “Locations” section of the “Add New Field Group” screen.
This section is located right underneath the “Add Field” button.
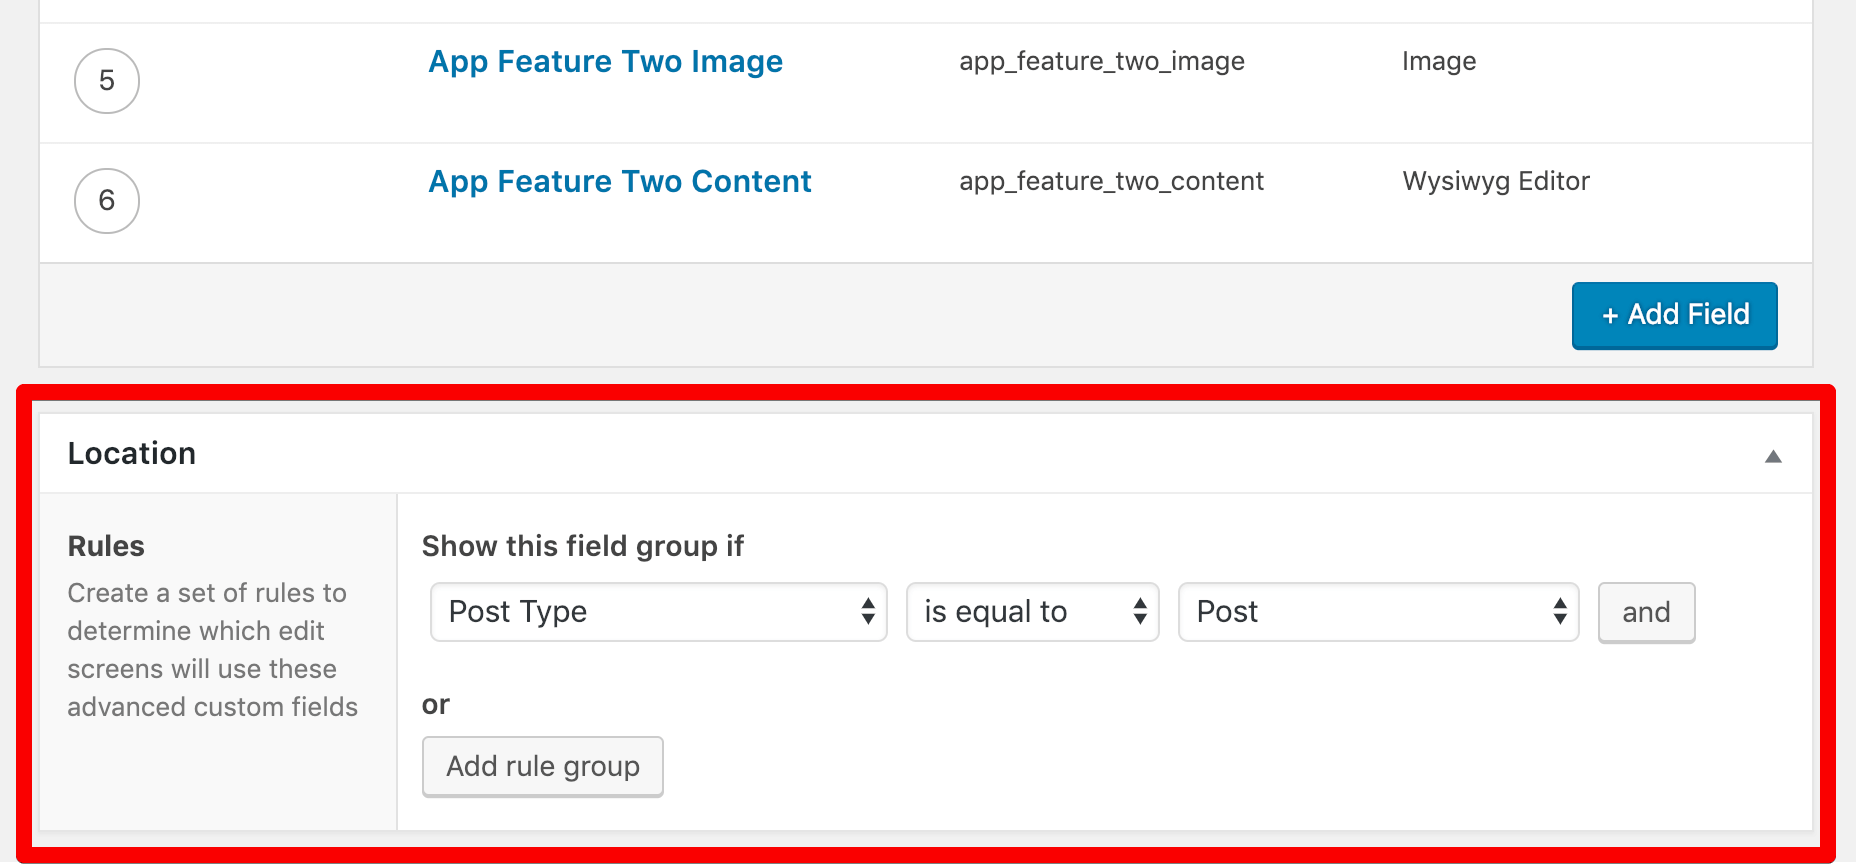
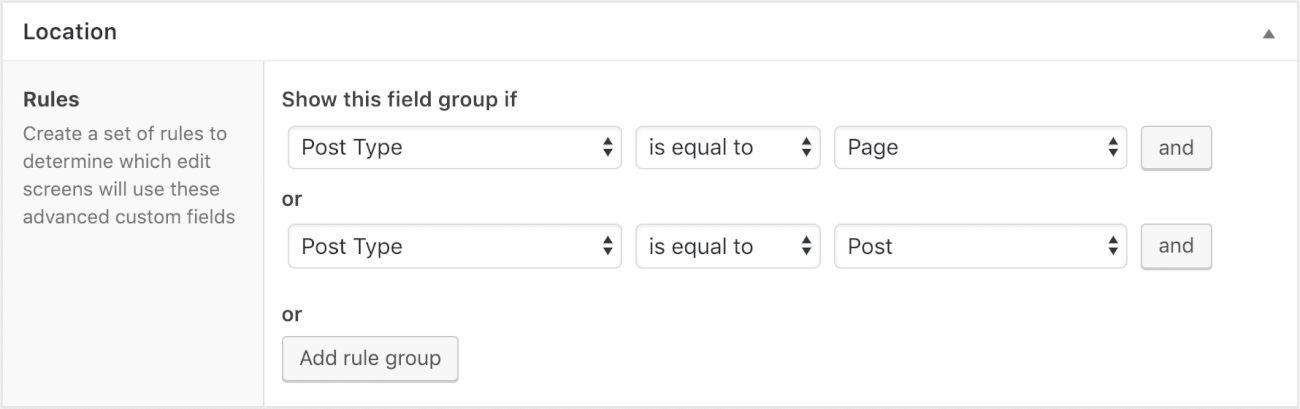
ACF plugin allows us to create rules which help us control the appearance of a particular Field Group in the Admin Dashboard.
For example, if we want to display Field Group on all the Pages, we can create saying:
Show this Field Group if Post Type is equal to Page, like this:
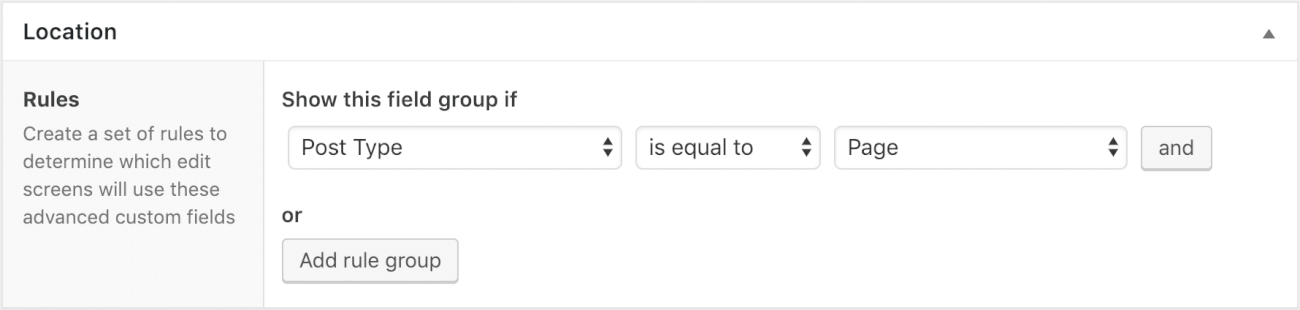
We can further control its appearance by adding another “AND”, “OR” Rule.
These booleans rules are just Like PHP Conditional Operators &&, || etc. Except, instead of writing code, we use the Rules interface here.
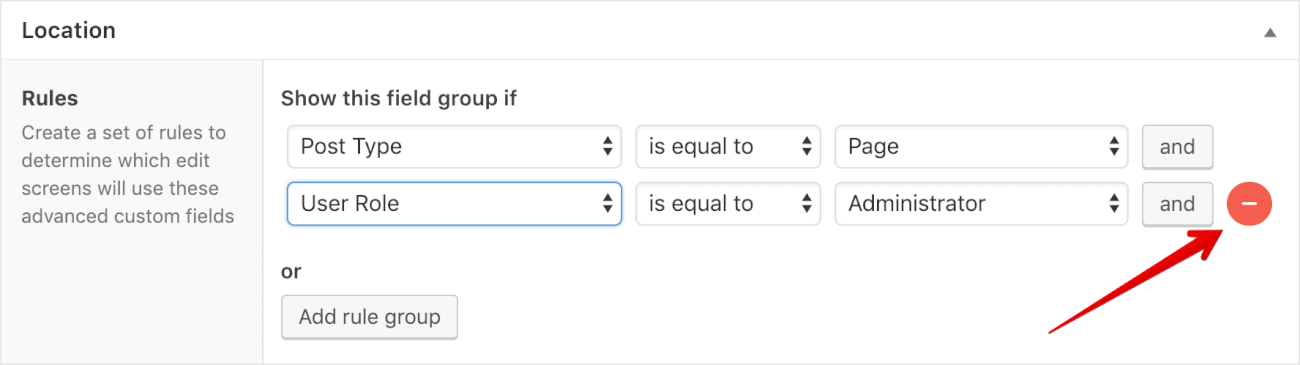
The “AND” Rule
Let’s just say I want to show this Field Group only on pages and only when the site Administrator is accessing the Pages. To achieve this, I add “And” rule by clicking on the “And” button at the right-hand side of the existing rule, like this:
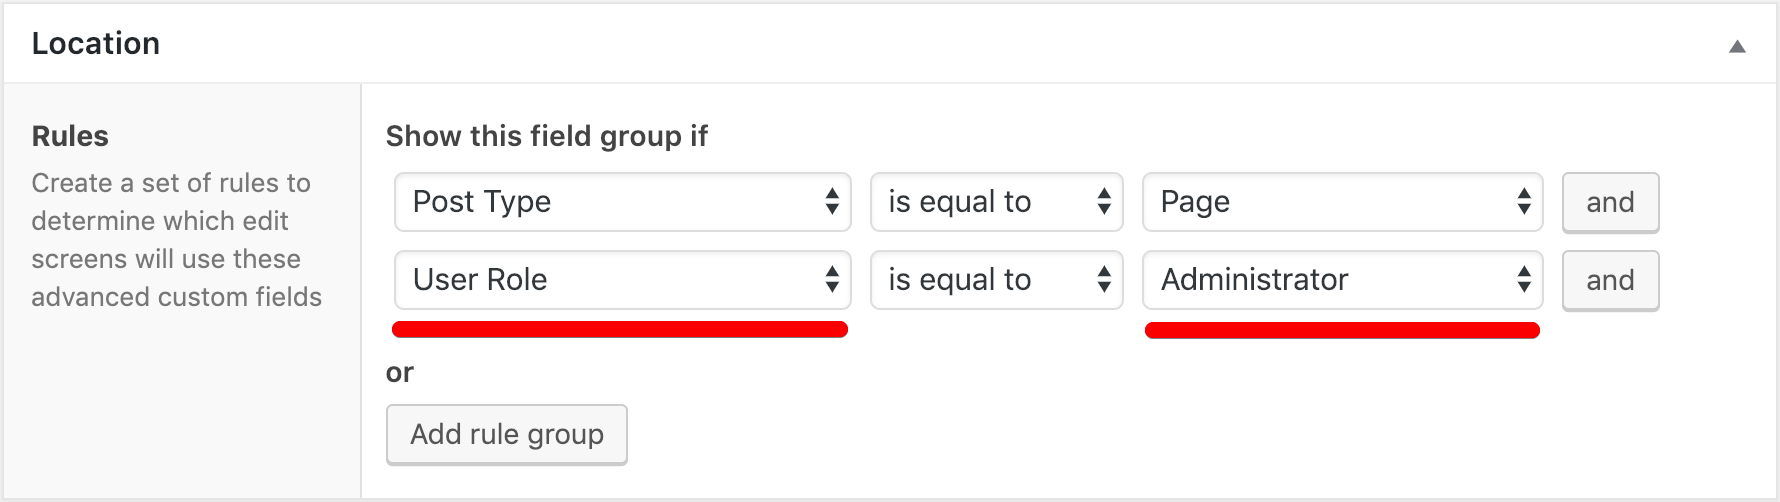
The “AND” rule is particularly helpful if you want all the conditions to be true. If even one of the condition is false, This Field Group will not showup on the Edit Page screen of a particular page.
The “OR” Rule
If we want to show this Field Group both on Pages and Blog Posts, We need to create a new “Rule Group” by clicking on “Add Rule Group” button saying:
Removing a Rule
If you want to remove a certain rule, you can put your mouse cursor at the end of the rule to get “Remove” button.
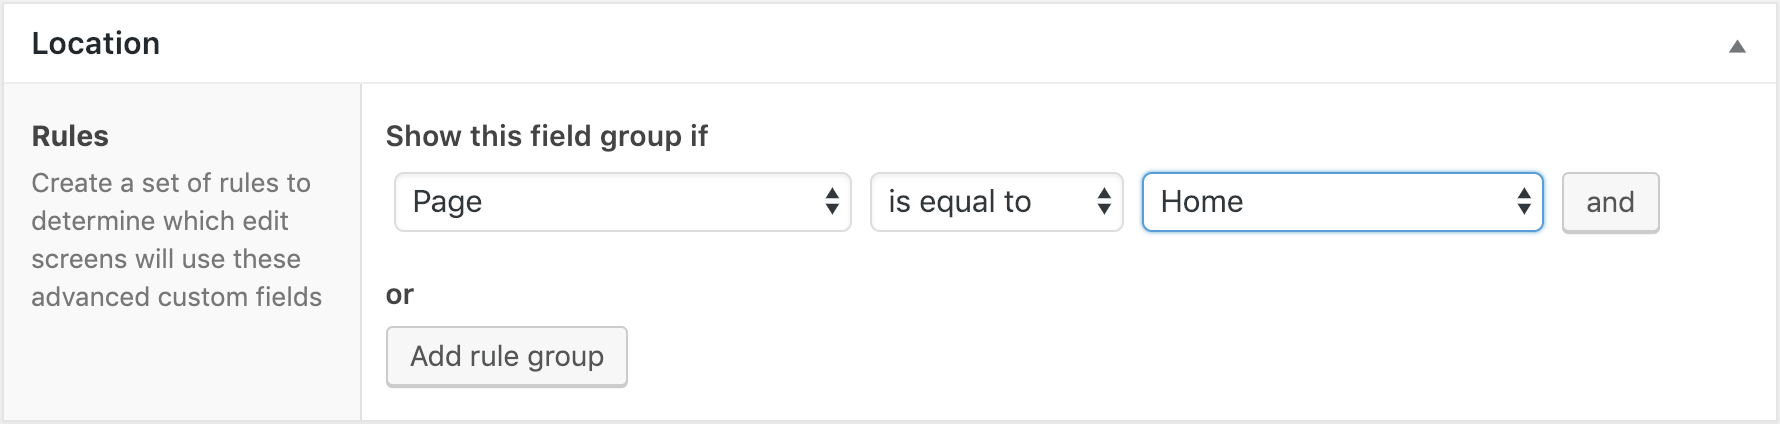
Let’s display our newly Created Field Group only on Homepage
In our case, we only want to display this Field Group on the Homepage. So, configure the Location rule to say:
Show this field group if: Page is equals to Home:
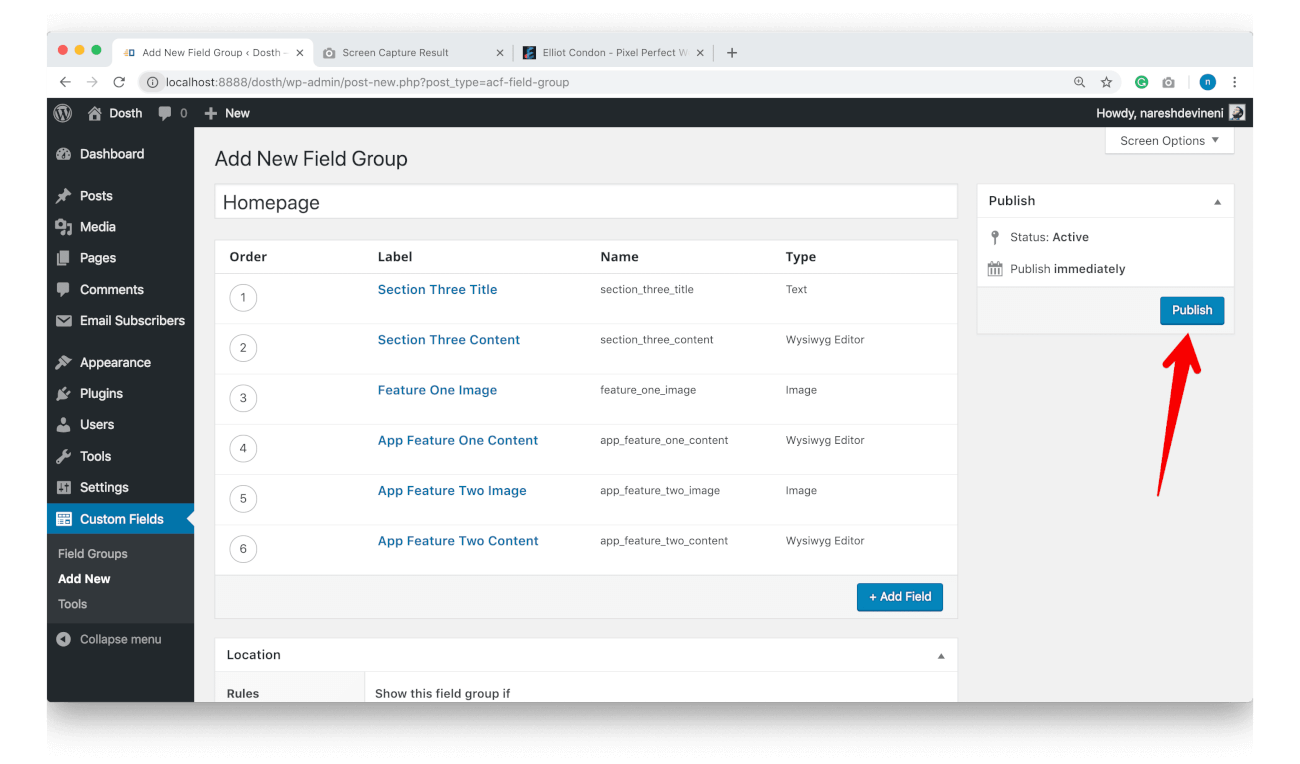
Publish the Field Group
Again, Feel free to explore other settings. Play around with them. I you are with your play, go ahead and publish the Field Group by clicking on the “Publish” button located at the Top Right-hand side of the screen.
Let’s Add Content to these fields
Go to Pages -> Home -> Edit Screen
You can see all the new added Custom Fields if you scroll down a bit:
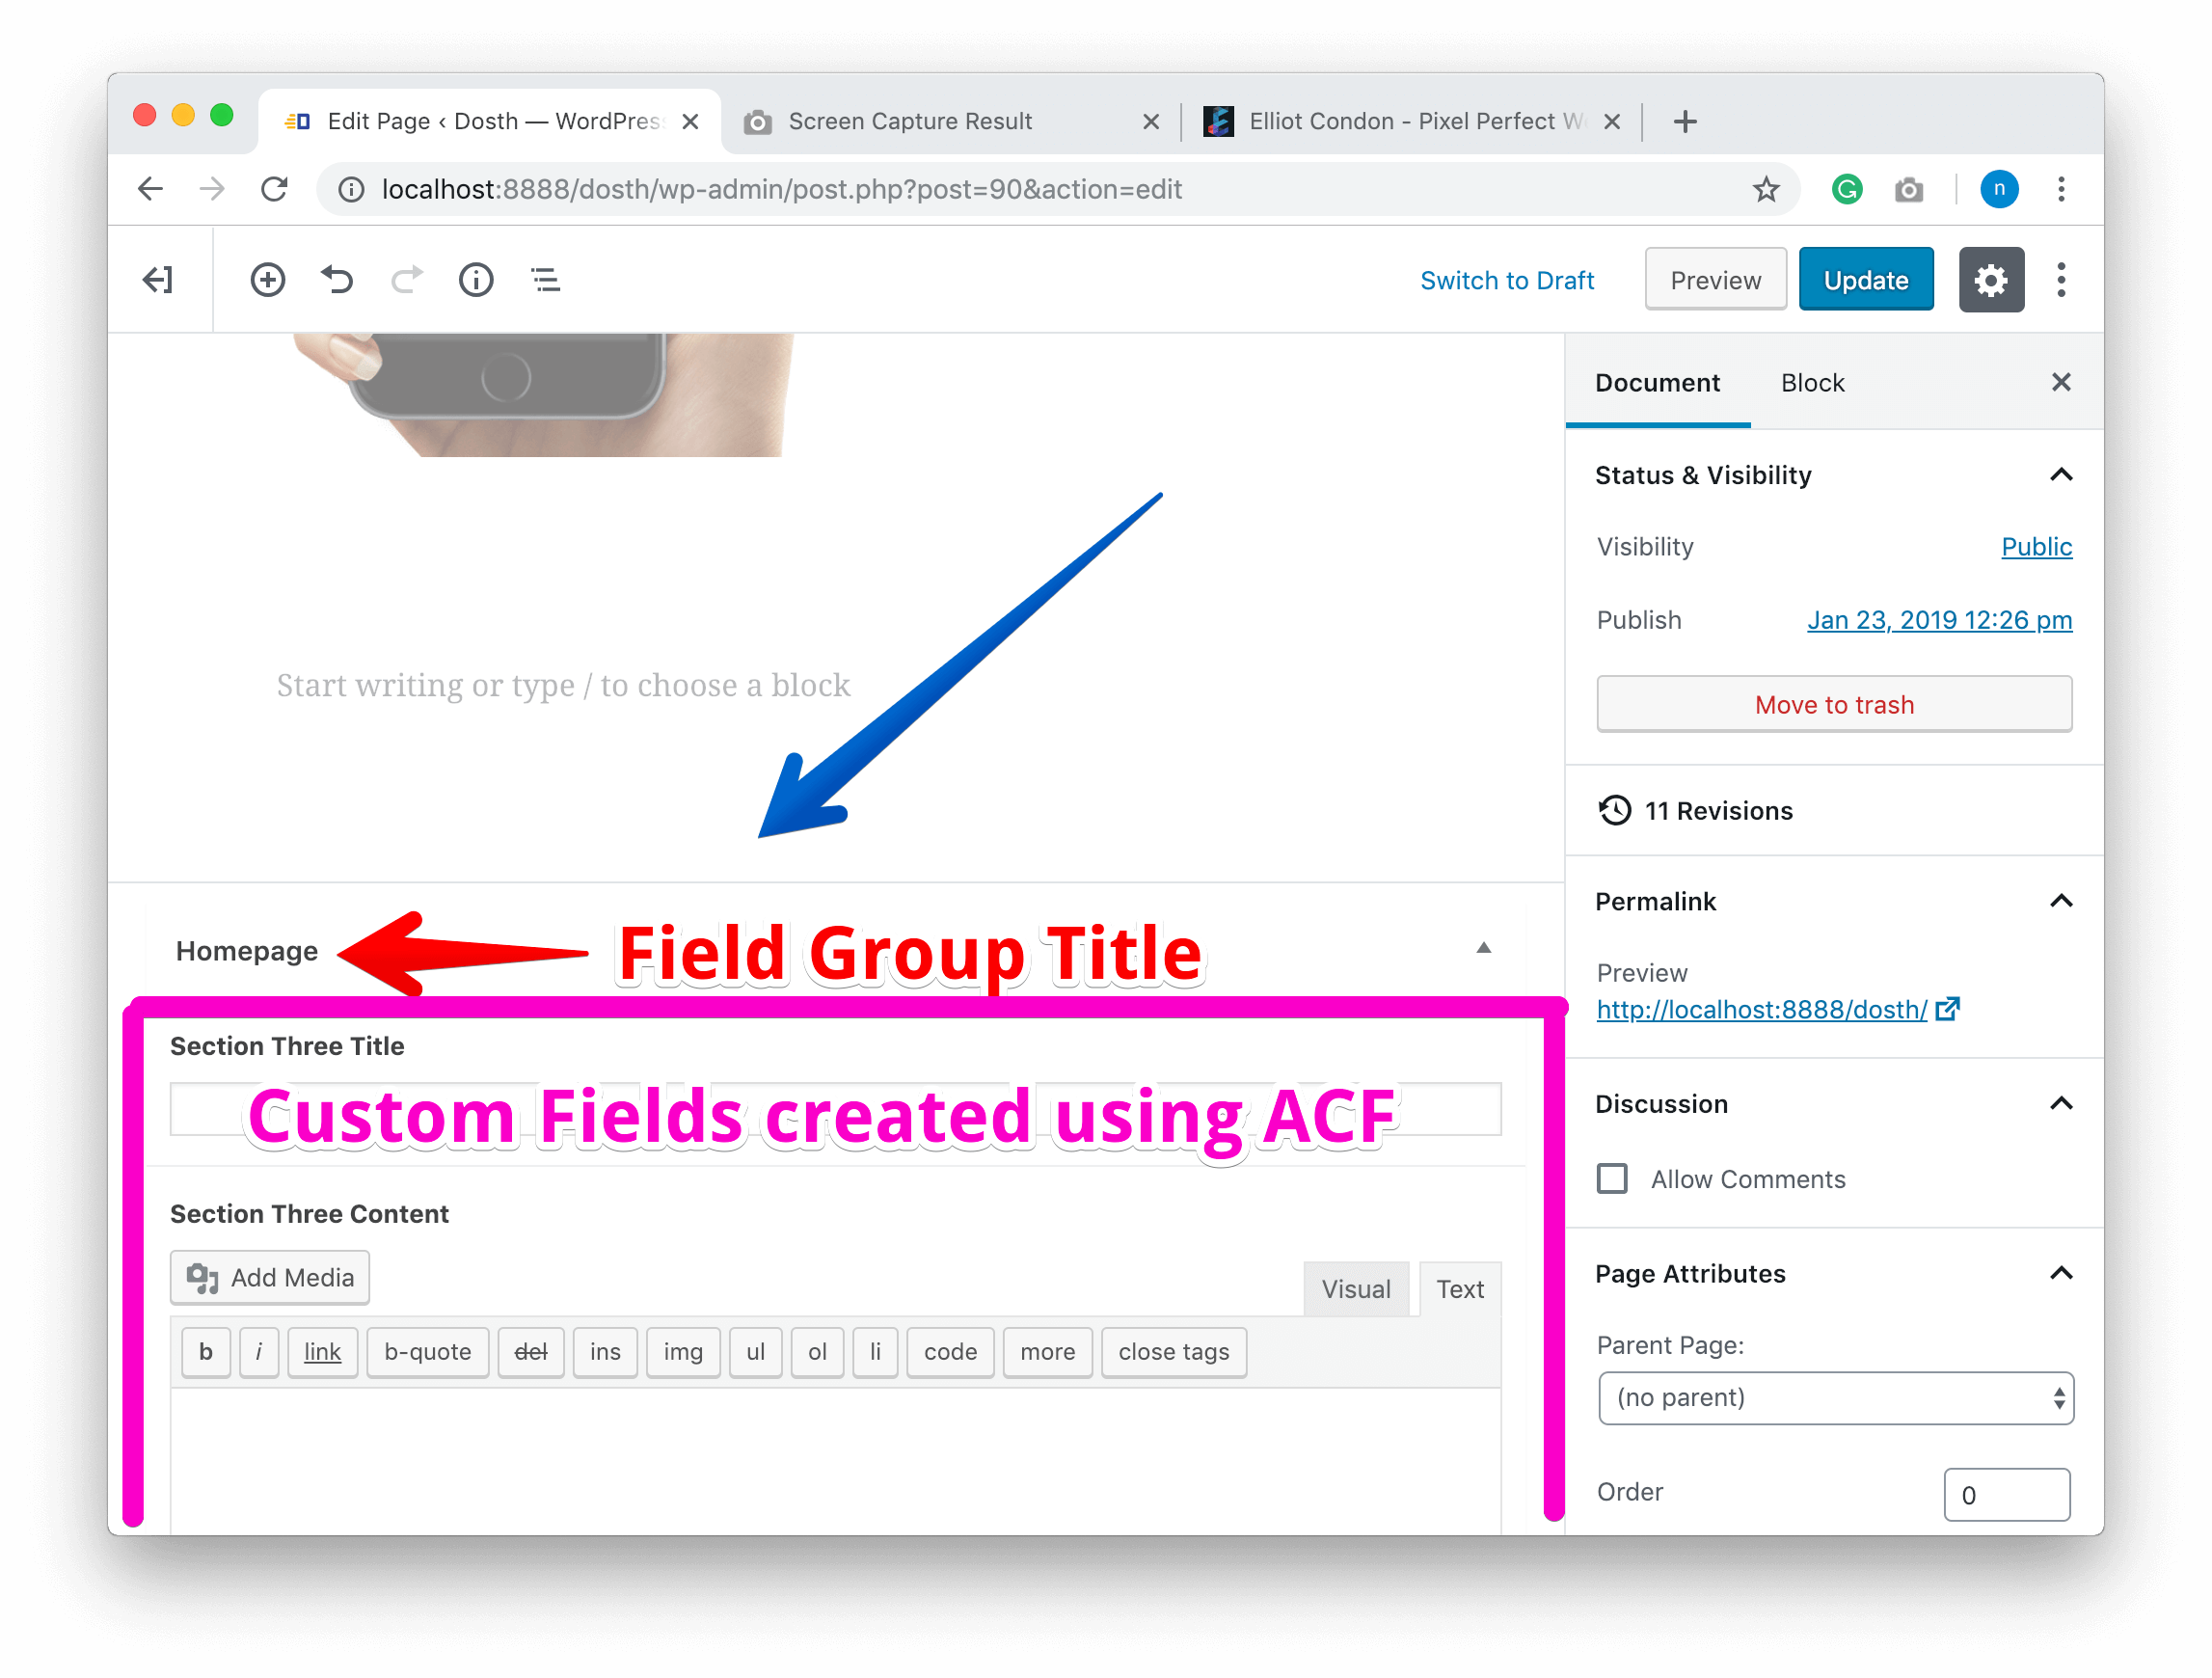
But, if you notice, the Default Custom Fields section by WordPress are now nowhere to be seen. This means we can no longer edit the content of “Watch Dosth in Action” section content that we added.
Now, this doesn’t mean the content we entered is lost. It is still there in the database inside postmeta table.
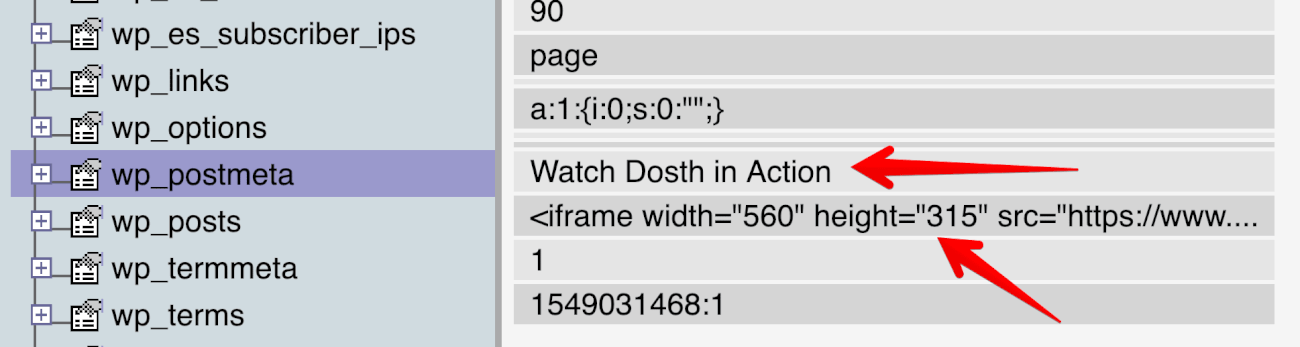
And, It is still getting outputted to the frontend. It’s just that we can not access them on the Homepage Edit screen. Simply put, they are hidden.
“Why? and How?”
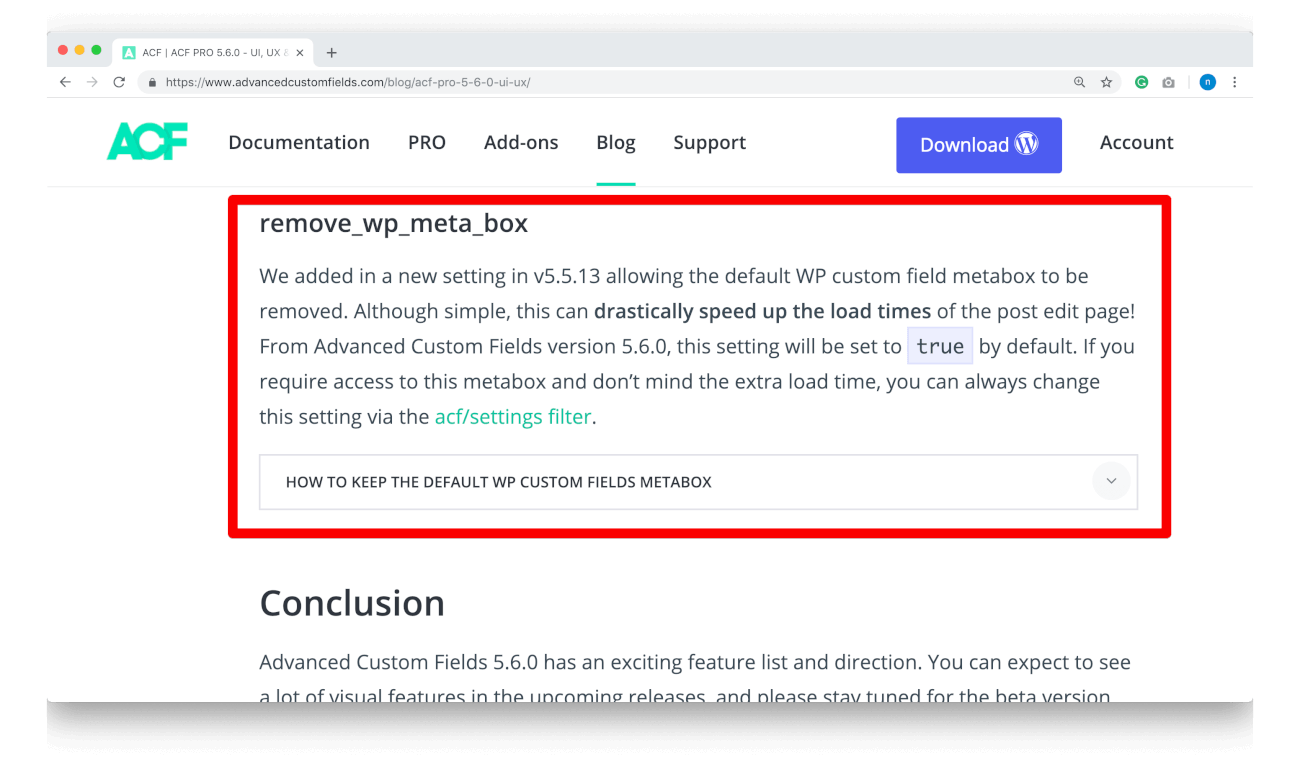
ACF plugin is the Culprit here. From version 5.6.0, this plugin automatically hides the default Custom Field section. They mentioned it clearly on their blog post about version 5.6.0 release:
Be it for a good reason or a bad reason. Any plugin you install can hide any section of your Admin Dashboard.
And this is what I meant when I said a third party plugin breaks the content of the site. If you are not aware of the fact that the plugins can do this to your site, you’ll end up banging your head every time a plugin releases a new version of it.
“I understand that this is a serious problem. But, What is the solution now? Can’t we bring this section back?”
Yes, we can bring it back. They also provided the solution about how to bring it back on the following link:
But, we are not going to do that. Instead, I will show you a neat little trick that works fine with the ACF plugin.
“What’s that? Recreating those fields again ACF?”
You’re are spot on! Let’s do just that. The surprise will come at the end.
Recreating the default custom fields with ACF Plugin
Create the following custom fields inside Homepage Field Group of ACF plugin:
1) Second Section Headline:
Field Label: Second Section Headline
Field Name: second_section_headline
Field Type: Text
2) Section Two Content:
Field Label: Section Two Content
Field Name: section_two_content
Field Type: WYSIWYG Editor
Here is the update Homepage Field Group:
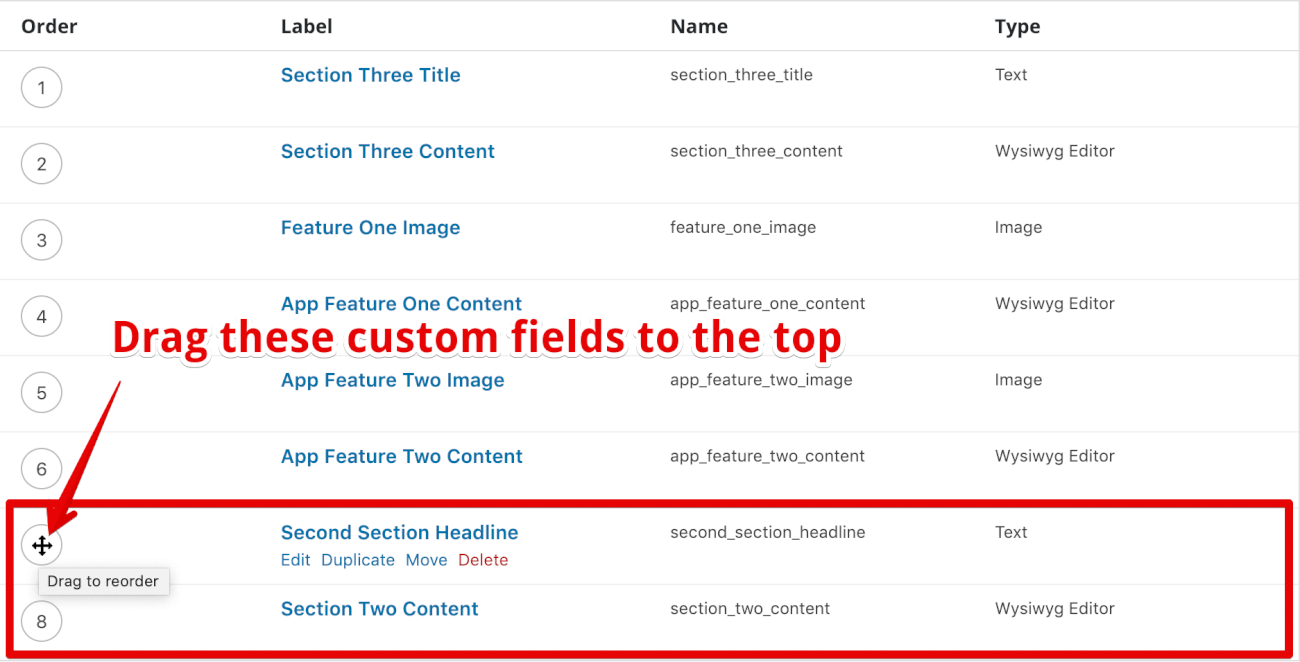
Every time we add a new field to the field group, it gets added after the existing the fields.
But we need Section Two related fields at the top of the Section Three fields. So, reorder them by putting your cursor on the field-specific numbers located on the left-hand side of the individual field. These digits represent the order of the Fields and it is important that we display these fields in the correct order on the Edit Screen.
It helps the Clients/ Content Editors and even us when entering the content.
Once you are done with reordering, don’t forget to update the Field group by clicking on the “Update” button.
Here is the updated order of the Custom Fields:
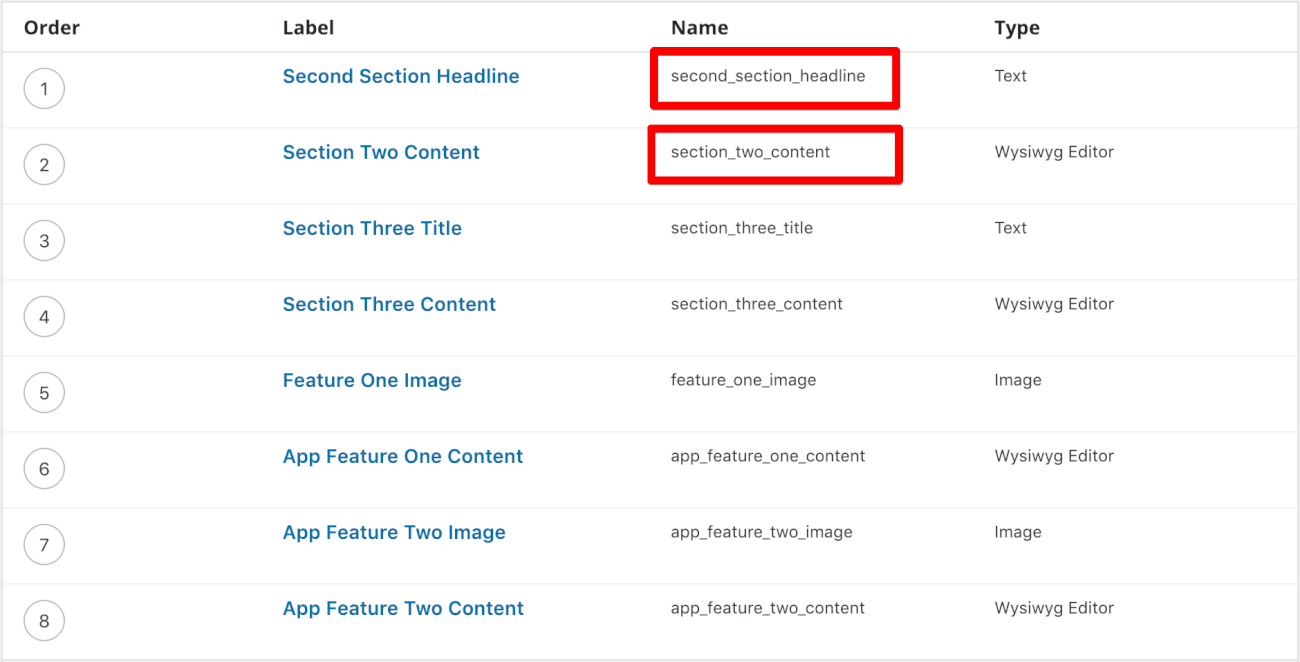
Also, if you notice, the Meta Keys of these “Section Two” related fields in the above screenshot, are same as Meta Keys we entered while creating the Old “Section Two” related fields using the Default Custom Fields.

Now see what happens when we visit the Homepage Edit Screen in the Dashboard! Common, let’s switch to it by going to.
Admin Dashboard -> Pages -> Home -> Edit Screen
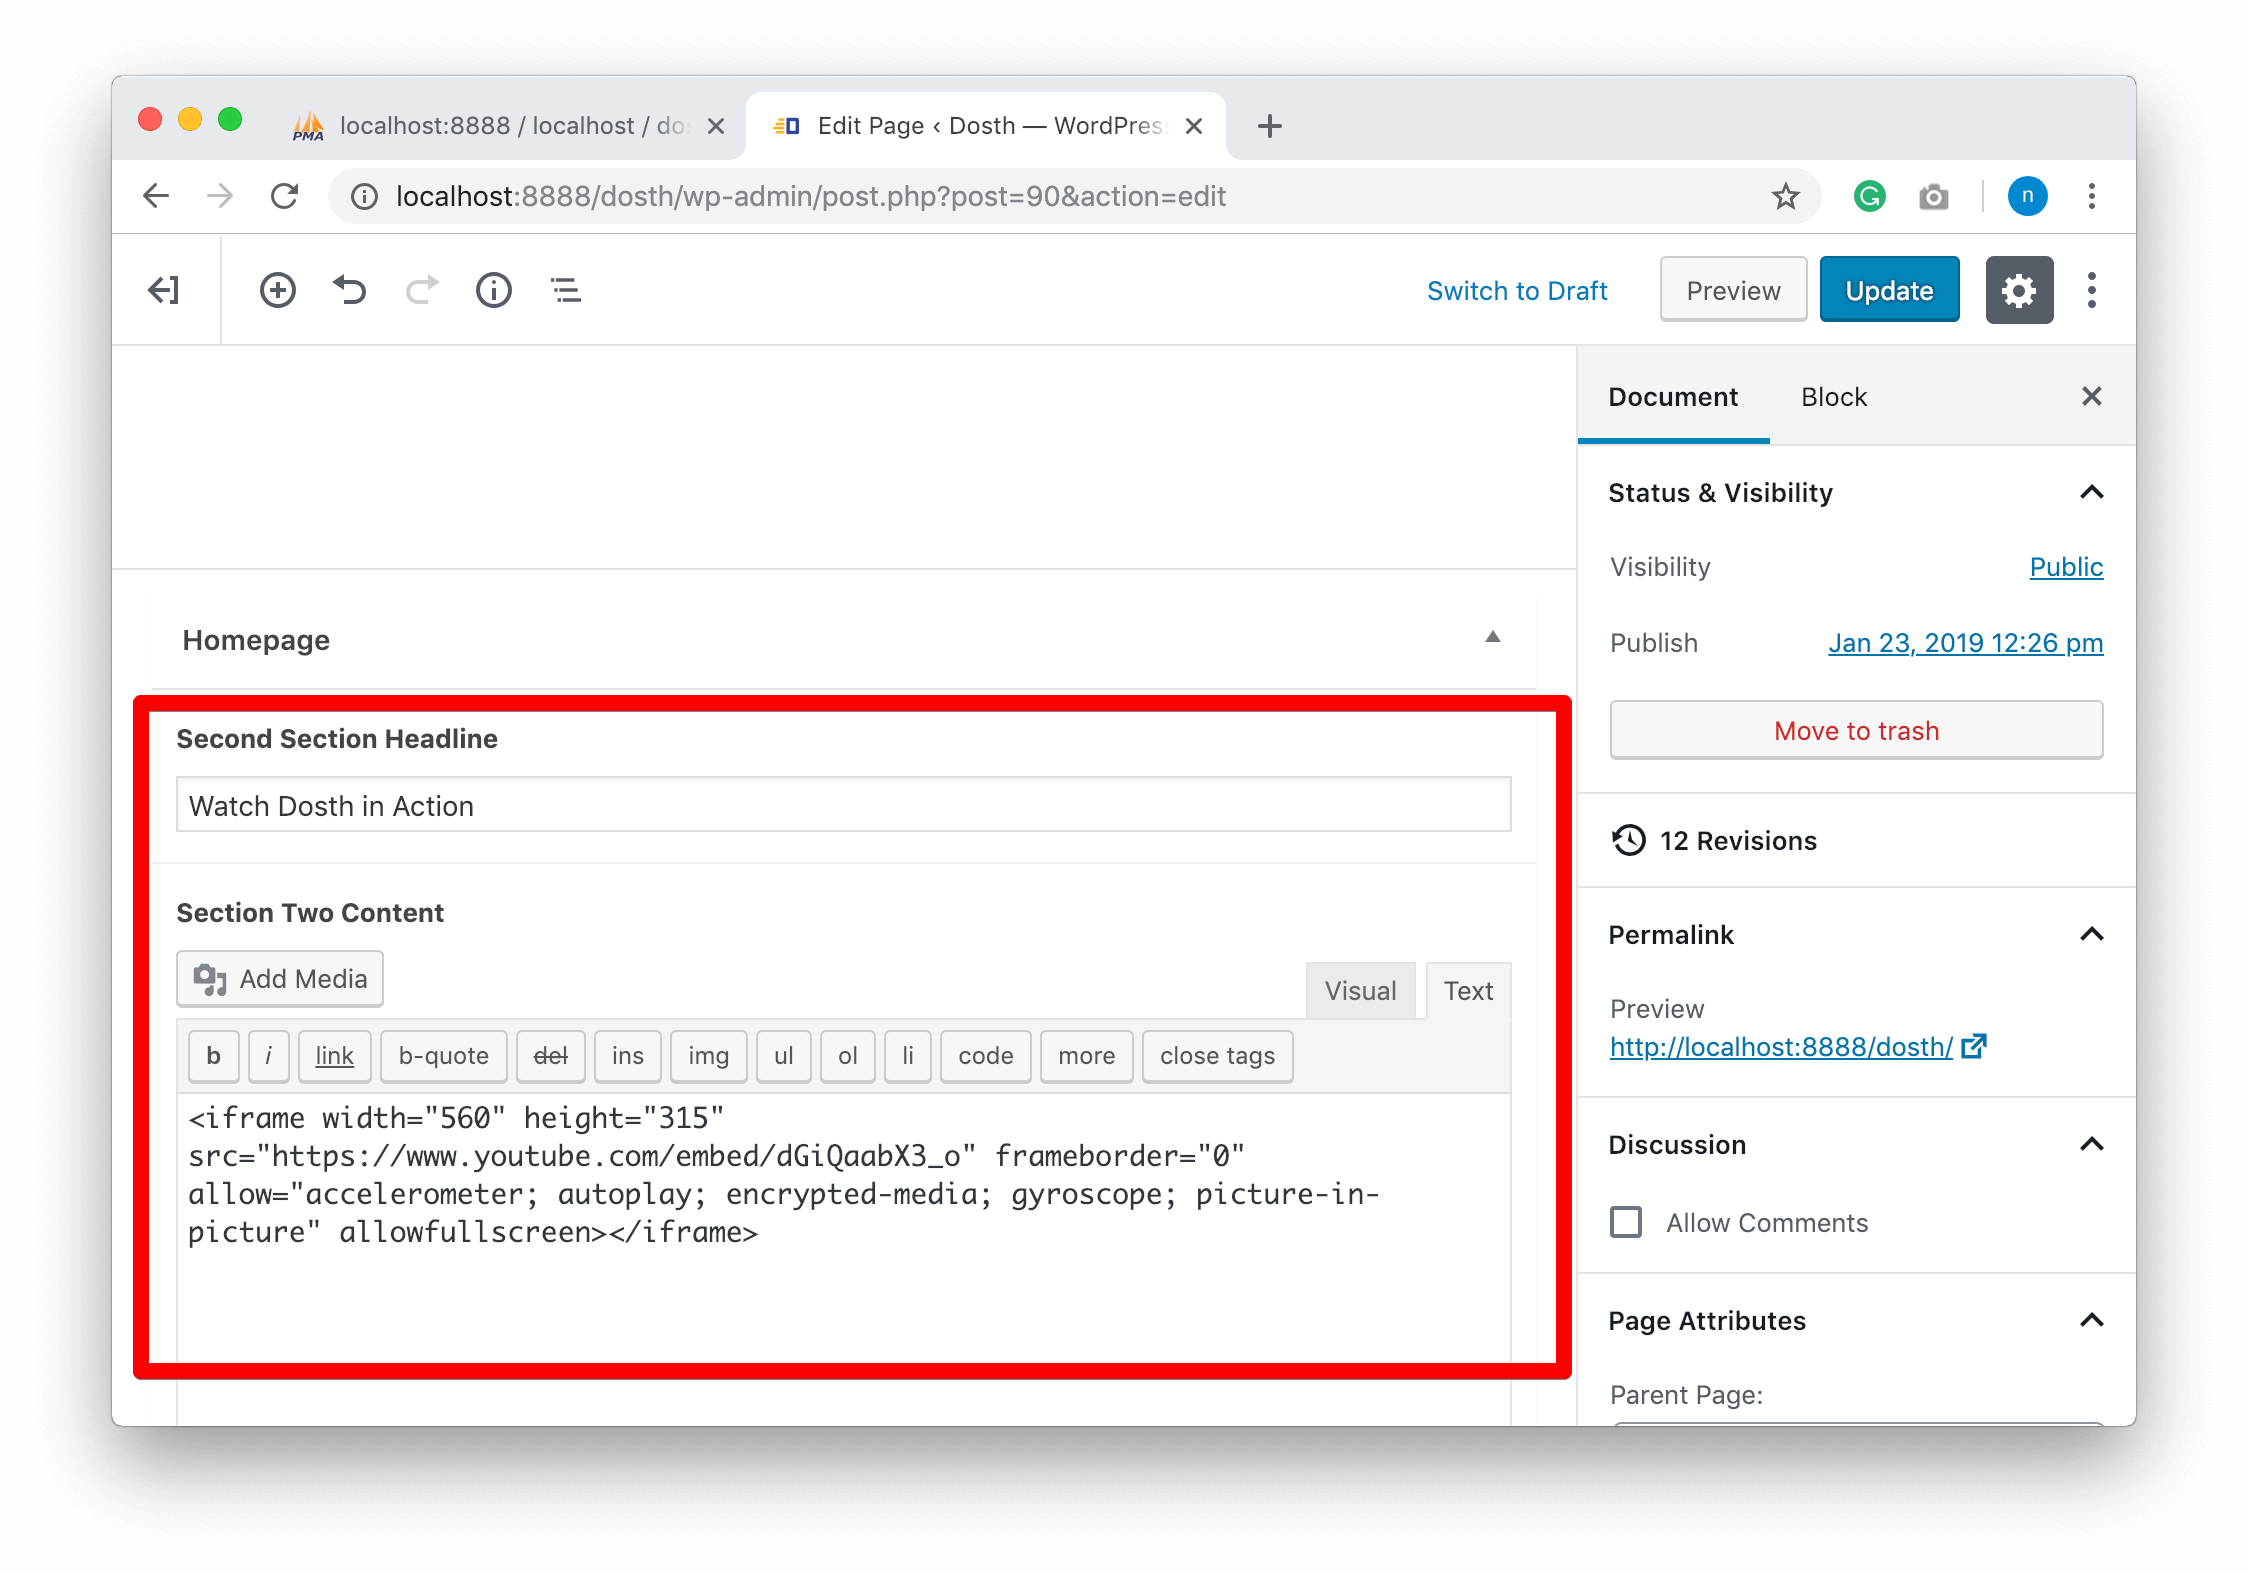
“Hey! The content we entered previously is back!!!!!!!!!”
Haha yes. This is the surprise I am talking about previously. We used the same Meta Keys to experiment whether we can still access and display the old values we entered at the beginning of this lesson.
And this experiment is indeed successful because of ACF plugin using the WordPress provided functions to create the custom fields.
The thing is, when we are creating Custom Fields in WordPress, if we use an existing Meta Key ( Name ) for a new field, WordPress just overwrites the old one. But it keeps content the intact.
Also, it doesn’t throw any errors. So, be careful.
Anyway, now that have everything in place, let’s enter content for the rest of the Sections.
Let’s really add the content this time!
In the Exercise files directory, I have provided a Word Document named “dosth-site-content”. Open that up. You’ll find a section dedicated to Homepage Content.
Now, add the content inside this word document to the corresponding custom fields inside our Homepage Edit Screen, like this:
Section Three Title and Content:
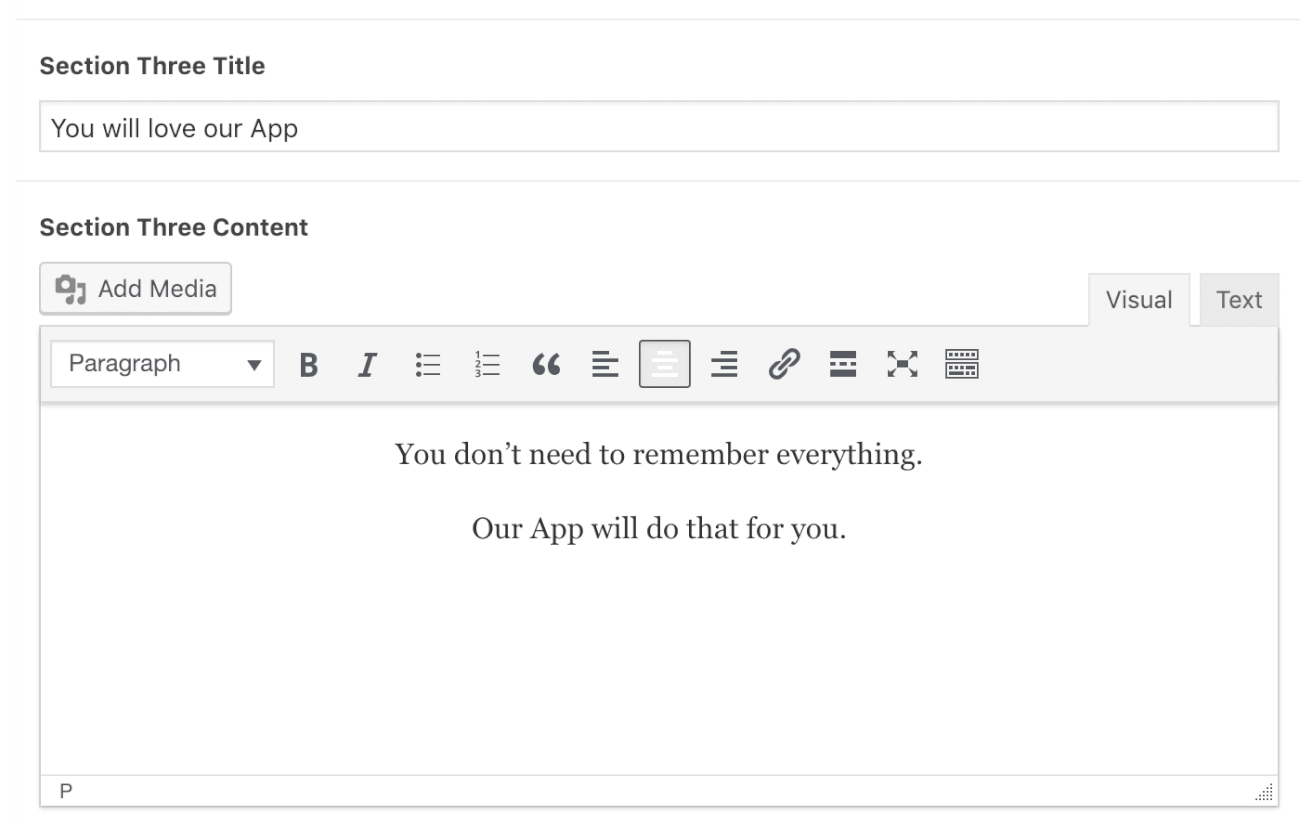
If you observe the mockup, Section Content is center aligned. So, I am center aligning the content using the WYSIWYG options instead of using CSS. I am doing this because I want to give the client complete control of the text alignment whenever or wherever it is possible.
App Feature One Image and Content:
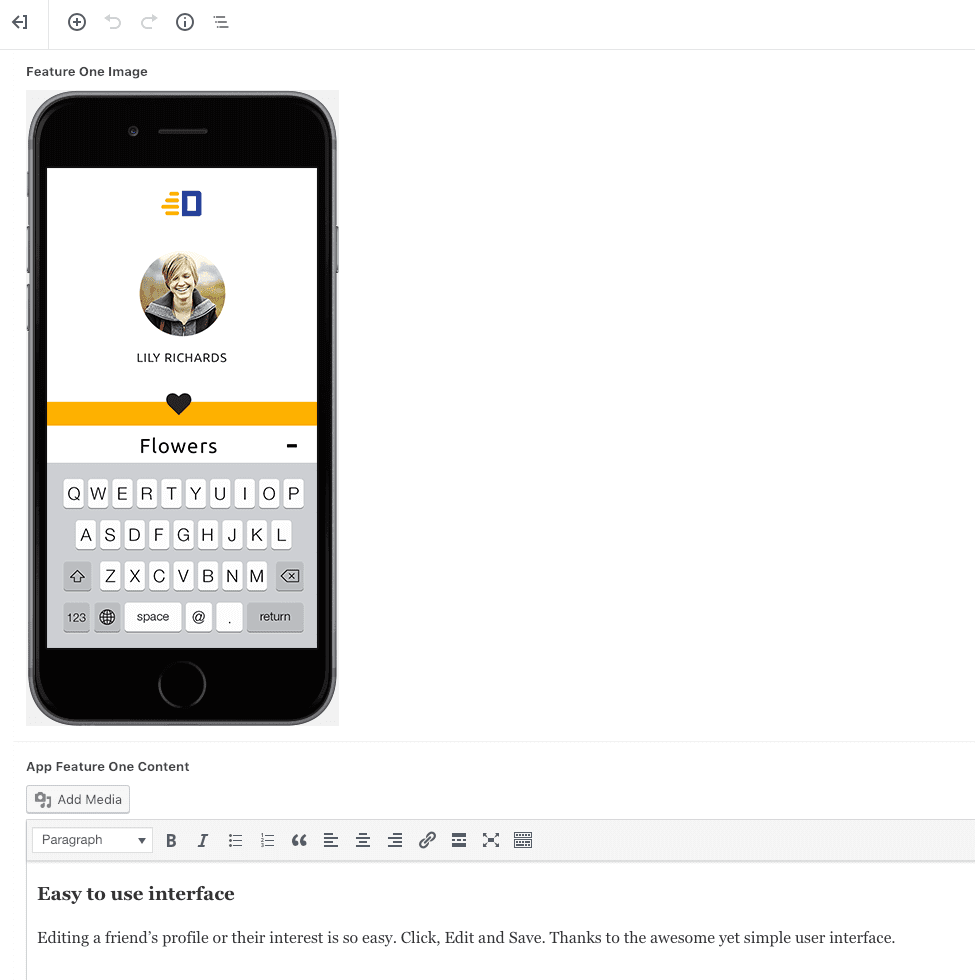
AH! I really love when I see a full preview of the Uploaded image. It is just so peaceful :P
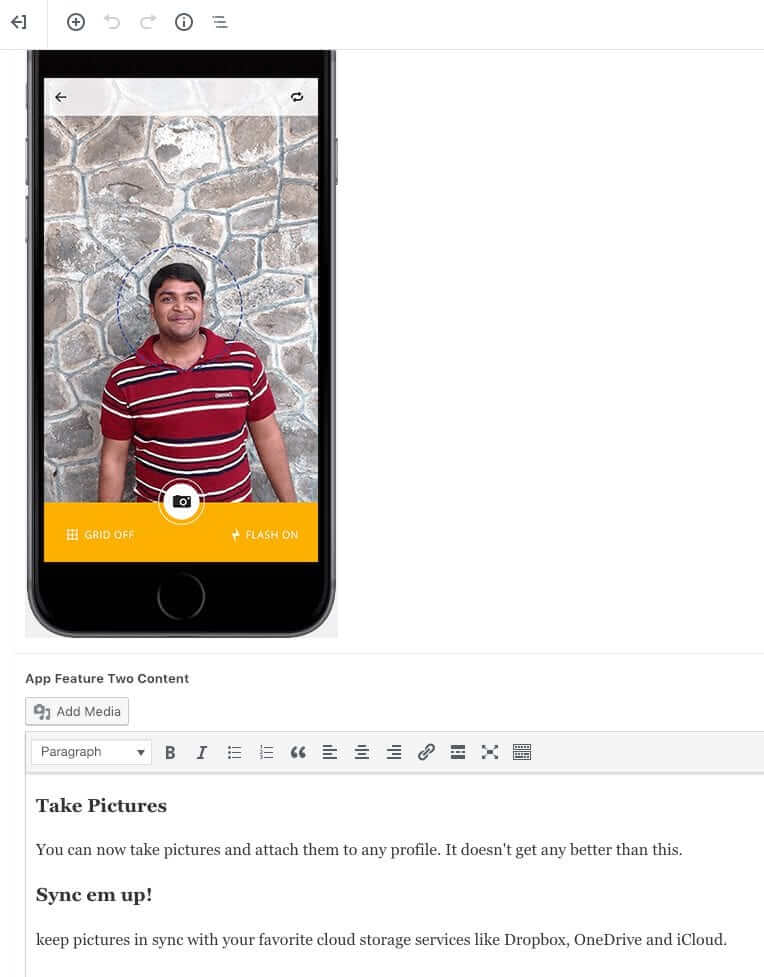
App Feature Two Image and Content:
That’s all. Now that we have entered the content, it is time to output it to the frontend. And we will do just that in the next lesson!
 © 2026 UsableWP. A project by Naresh Devineni.
Hello, Where are the exercise files? Are they still online?
Hi Krisna, yes, they are online:
https://github.com/nareshdevineni/dosth