How to build the footer of a WordPress website using Dynamic Sidebars and Widgets

The above image is the mockup of the footer portion of our WordPress site. It is a pretty standard minimal design. There is a “Download the App” section with the App download links followed by the email subscription collection form and the social links.
Lastly, There are a traditional copyright statement and a footer menu.
Now, we have to build this footer in such a way that the client or an administrator of the website should be easily able to add, modify and remove components from it. Simply put, we have to give them ultimate control over the footer.
“How do we accomplish that? I know it is important for them to modify stuff in the footer, But it sounds like a daunting task for me!!!”
Ah! Don’t worry, It is easy as heaven.
We will be using multiple dynamic sidebars and a number of widgets to build the content of the footer. That’s the only way to make footer editable without having to install third-party plugins.
“What?”
Introducing Dynamic Sidebars and Widgets
What is a sidebar?
A sidebar is nothing but a small area on a webpage where we find all kinds of miscellaneous information like secondary navigation, related articles, ads and so on. It is generally placed beside the main content. But we can put a sidebar anywhere that makes sense.
WordPress’s own news section is the perfect example of a sidebar.
What is a Dynamic Sidebar?
A Dynamic Sidebar is nothing but a sidebar with some dynamic content in it. That’s all.
WordPress takes the concept of sidebars to the next level by allows us to create unlimited dynamics sidebars anywhere we want on a webpage. For example, you can put a dynamic sidebar in the header portion, in the footer portion, in the off-canvas menu etc. You are not limited to put sidebars only on a webpage which displays a blog article.
“Dynamic content? How do we place dynamic content inside sidebars? Do we have to write some complex PHP code to pull content from the database?”
No. We use widgets for placing dynamic content inside the sidebars.
If there are no widgets, Dynamic sidebars are pretty much useless in WordPress.
What is a WordPress widget?
When it comes to WordPress, a widget can output some piece of content to the frontend. That’s all. In WordPress, a widget is stateful, that means, their settings and the content are saved to the database.
Also, WordPress ships with a ton of useful widgets and each of them helps us output unique content to the frontend. For example:
Image Widget: Lets you output an image.
Gallery Widget: Lets you output gallery of images.
Custom HTML Widget: Lets you output custom HTML like ads.
Search Widget: Lets you output a site search form, in a snap.
Navigation Menu Widget: Lets you output a custom menu you have created.
This list goes on and on.
Also, we can place any number of Widgets inside a Dynamic Sidebar. There is no limit.
If you realize, Widgets is a really powerful feature of WordPress. If we can properly utilize widgets, we can let the client modify every corner of a webpage.
The good news is, we can now use widgets without putting them Dynamic Sidebars. Since version 5.0, WordPress allows you to put widgets directly inside the content editor. Previously, page builders are the only way to utilize widgets outside Dynamic Sidebars.
Anyway, now that you vaguely understand the concept of Widgets and Dynamic Sidebars, Let’s start working.
There are three steps involved in building the client editable footer.
- Register a Dynamic Sidebar
- Put Widgets in it
- Display the Widgets placed inside the Dynamic Sidebar to the frontend using our theme.
1) Registering a Dynamic Sidebar using the widget_init action hook
In order to utilize Dynamic Sidebars and Widgets inside our theme, we have to register them first using the widgets_init action hook and register_sidebar() WordPress function.
Also, if you go to the Admin Dashboard -> Appearance, widgets panel is totally missing. This is because of the fact that Widgets are a theme feature too.
Of course, You can add theme support for this feature by adding the following code to your functions.php file:
// Add widgets support
add_theme_support( 'widgets' );
But don’t do it. Just like register_nav_menus() function adds theme support for the menus internally, register_sidebar() WordPress function allows us to register a dynamic sidebar and enables the theme support for the Widgets at the same time.
Anyway, before register any number of Dynamic Sidebars for the footer section, let’s analyze the footer mockup properly.
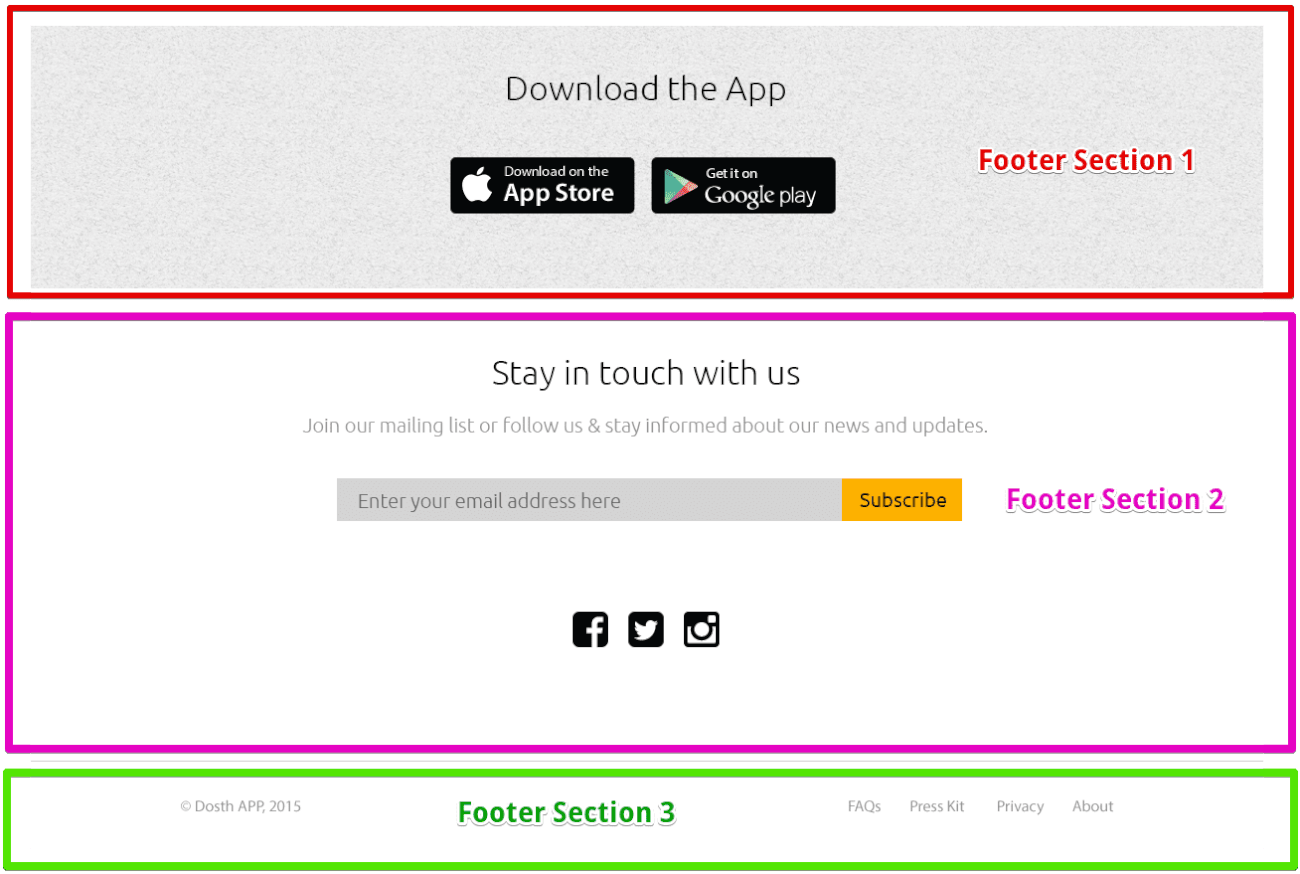
By taking a look at the above footer design, I can see three sections of content in it. And, I want the Client/Administrator to have complete control over the first two sections of the footer design. That means we may need to register two Dynamic Sidebars, one for each section in the footer.
Being said that, Footer Section 1 and Footer Section 2 are stacked on top of each other. That means you achieve the same design with just one Dynamic sidebar. Remember, You can put any number of Widgets into a single Dynamic Sidebar and style them according to your needs. But, at the end of the day, it is just about personal preference.
In our case, I decided to go with two dynamic sidebars. The only reason behind this is, I just want to show you the flexibility of the Dynamic Sidebars. That’s all. No logical reason.
“Wait! What about the third section? What if the client wants to change the menu in the footer?”
We will create that menu using the theme menu Display Location technique that you have mastered in the last lesson. But, if you want to create a third Dynamic Sidebar for the copyright statement and the menu, who’s stopping you?
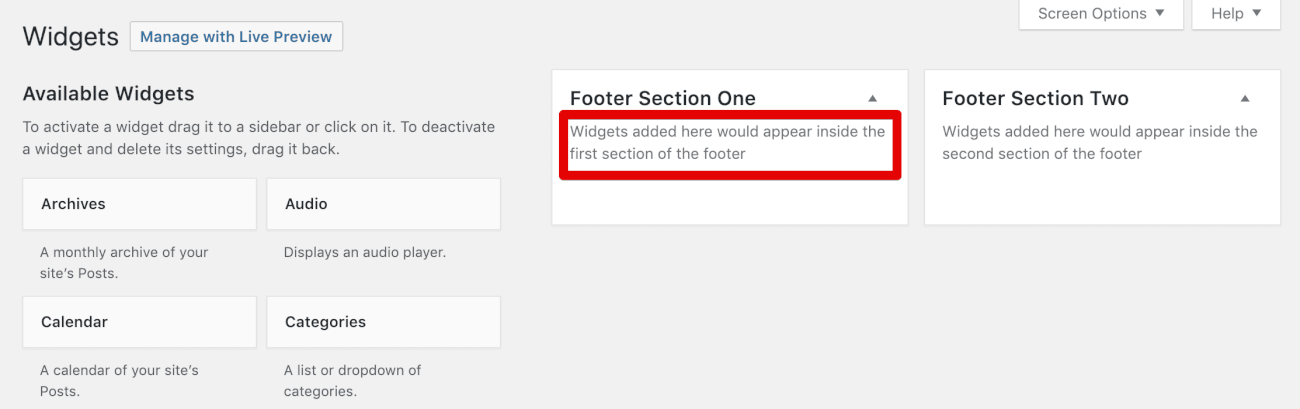
1) Anyway, open up the functions.php file and add the following code at the end of the file to register the Footer Section 1 and Section 2 dynamic sidebars:
/**
 * Register widget area.
 *
 * @link http://codex.wordpress.org/Function_Reference/register_sidebar
 */
function nd_dosth_register_sidebars() {

   register_sidebar( array(
		'name'          => esc_html__( 'Footer Section One', 'nd_dosth' ),
		'id'            => 'footer-section-one',
		'description'   => esc_html__( 'Widgets added here would appear inside the first section of the footer', 'nd_dosth' ),
'before_widget' => '',
'before_title' => '‘, ‘after_title’ => ‘
',
    ) );

    register_sidebar( array(
		'name'          => esc_html__( 'Footer Section Two', 'nd_dosth' ),
		'id'            => 'footer-section-two',
		'description'   => esc_html__( 'Widgets added here would appear inside the second section of the footer', 'nd_dosth' ),
'before_widget' => '',
'before_title' => '‘, ‘after_title’ => ‘
',
	) );

}
add_action( 'widgets_init', 'nd_dosth_register_sidebars' );
“Woah! what is that mate?”
For registering our dynamic footer sidebars, we hooked into widgets_init action hook using our nd_dosth_register_sidebars action and inside this action, we registered two dynamic sidebars.
Before we break them down, Let’s see what the above code is adding to the Widgets panel inside the Admin Dashboard.
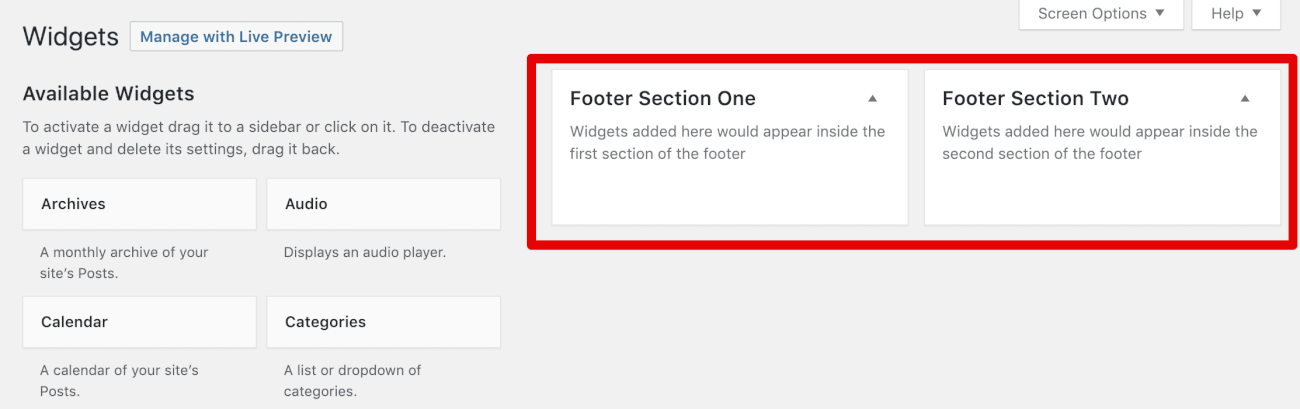
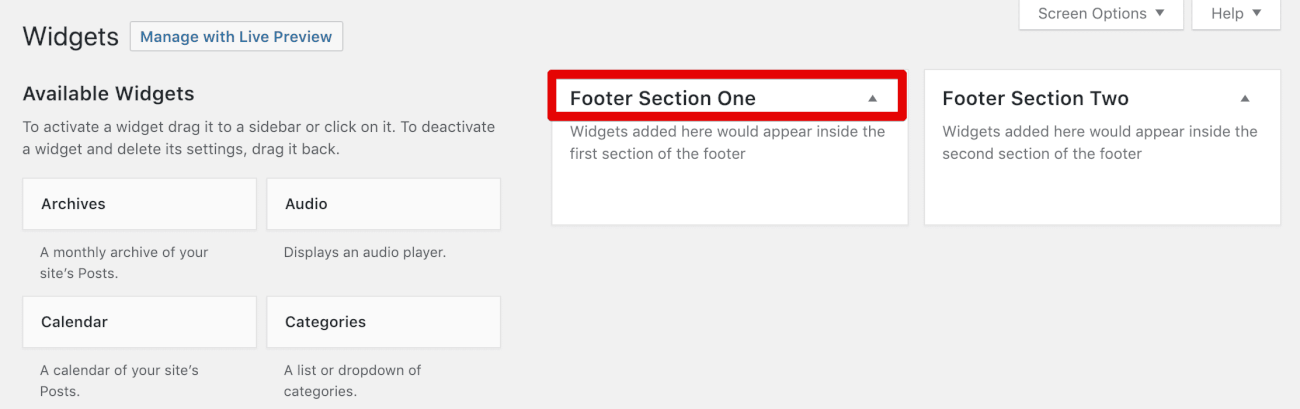
Great! WordPress has added two Dynamic Sidebars to the Widgets panel. Now let’s break down the first register_sidebar() function inside the nd_dosth_register_sidebars action.
register_sidebar( array(
    'name'          => esc_html__( 'Footer Section One', 'nd_dosth' ),
    'id'            => 'footer-section-one',
    'description'   => esc_html__( 'Widgets added here would appear inside the first section of the footer', 'nd_dosth' ),
'before_widget' => '',
'before_title' => '‘, ‘after_title’ => ‘
',
) );
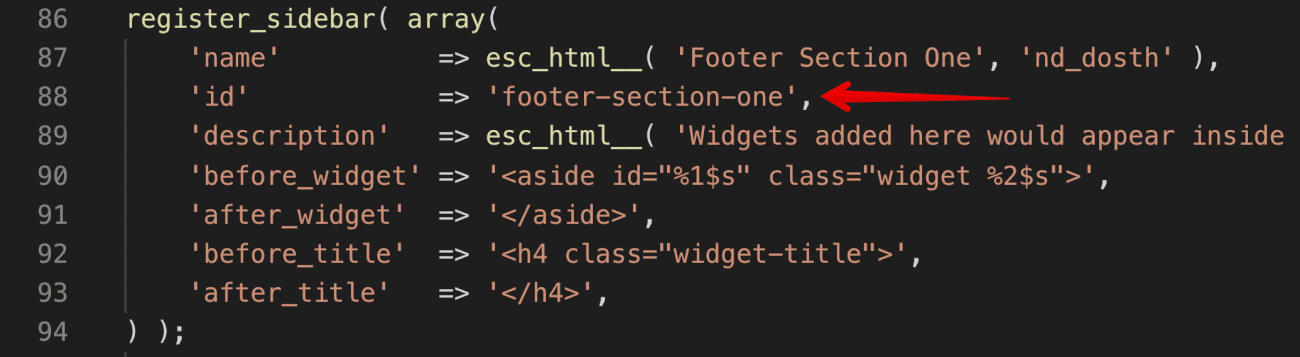
The register_sidebar() function accepts an optional single associative array with a bunch of keys.
1) name: we must provide a name to this Dynamic Sidebar as a PHP string. Also, it must be a Client friendly name for the Dynamic Sidebar. We have to write it in such a way that the client should easily judge where this Sidebar is put to use in a webpage.
In our case, we will be outputting the widgets placed in this Sidebar to the First section of the footer. Hence, we provided “Footer Section One” as the name.
WordPress uses this name as heading to the Dynamic Sidebar, like this:
And because WordPress is outputting this name as a heading to the sidebar, this needs to translation ready. So, we are using the esc_html__() translation function.
2) id: we must provide a unique ID to this Dynamic sidebar as a PHP string. The ID must unique because, inside our theme, this is the ID we use if we want to output the widgets of this sidebar to the frontend.
Also, You can not use the IDs found in the following stack-overflow answer. The IDs found in the answer are proprietary to WordPress.
3) description: Just like the ‘name’ key, WordPress uses this description to provide more insights to the Client/Administrator.
So, in our case, we are telling the Client/Administrator that “Widgets added here would appear inside the first section of the footer”.
Remaining array keys makes sense when you see the markup that a widget is generating. So, for now, let’s skip them.
The same explanation applies to the second register_sidebar() function inside the nd_dosth_register_sidebars action.
Next up, Step 2.
2) Put Widgets into the respective sidebars
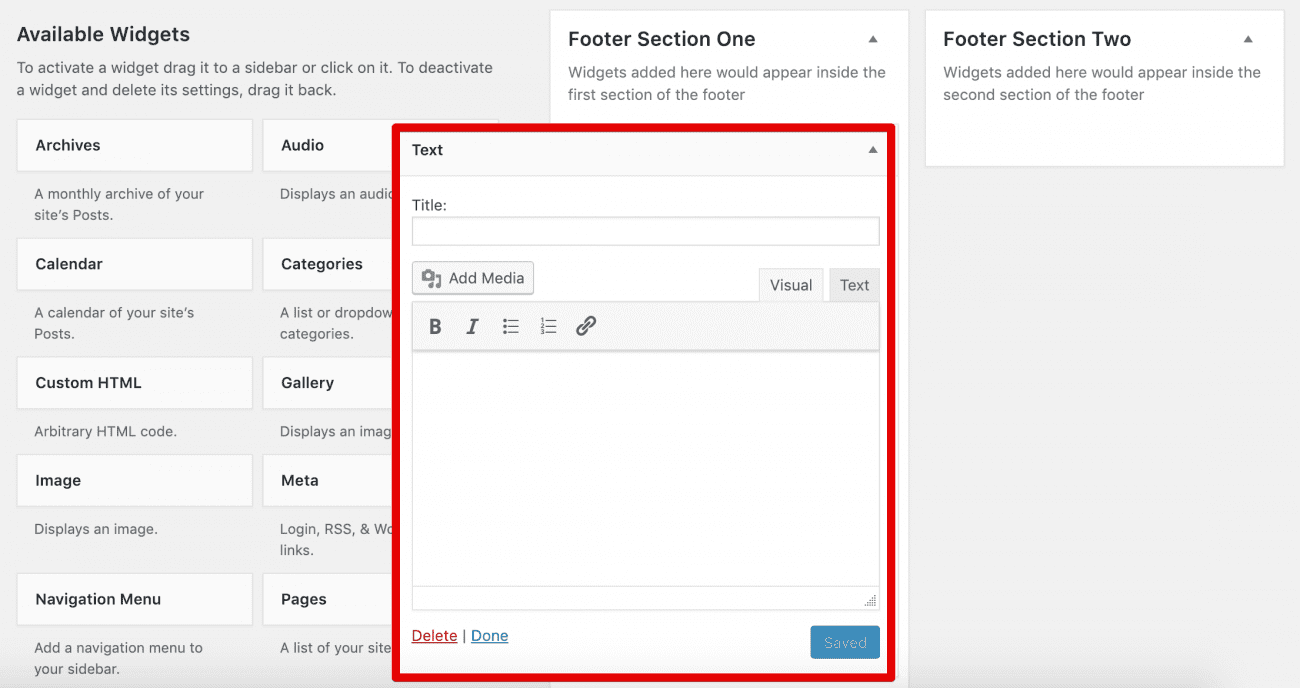
Let’s start with the content inside the Footer Section 1. Let’s take a good look at its design.
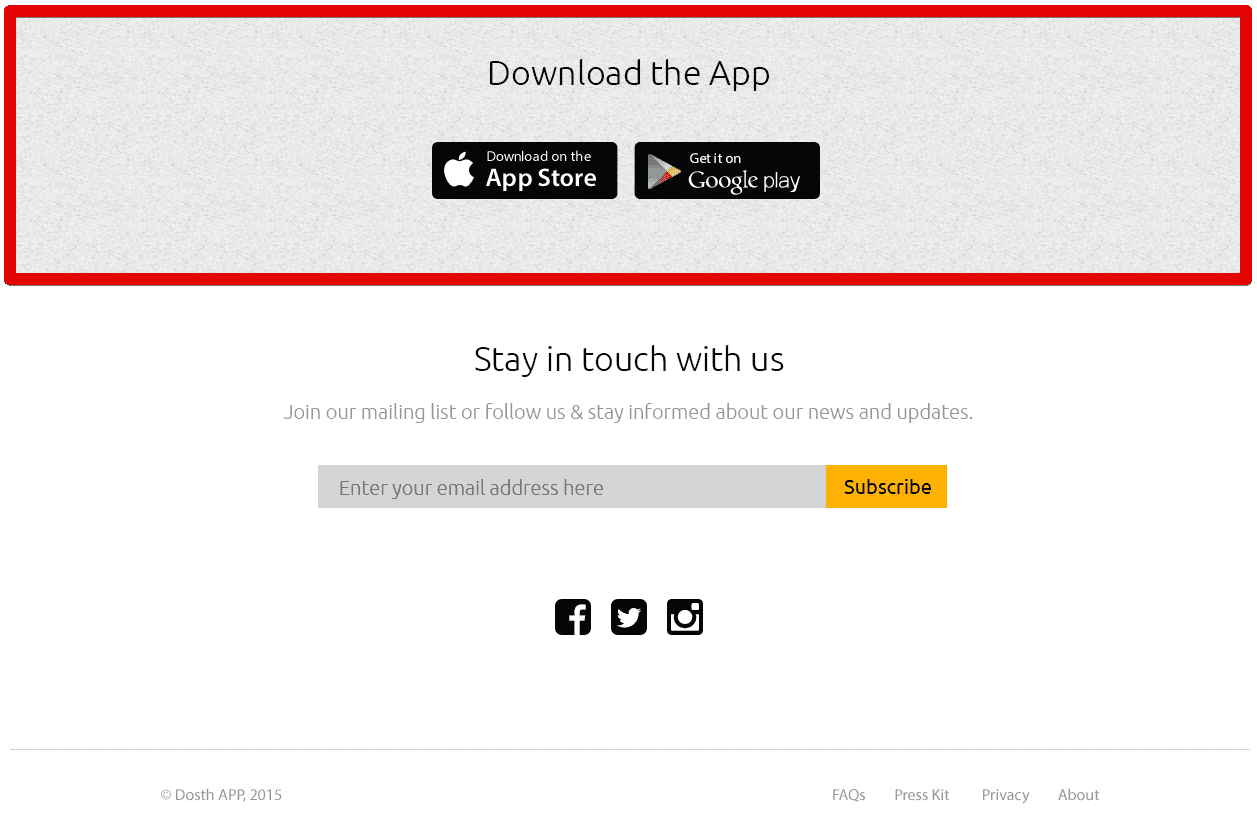
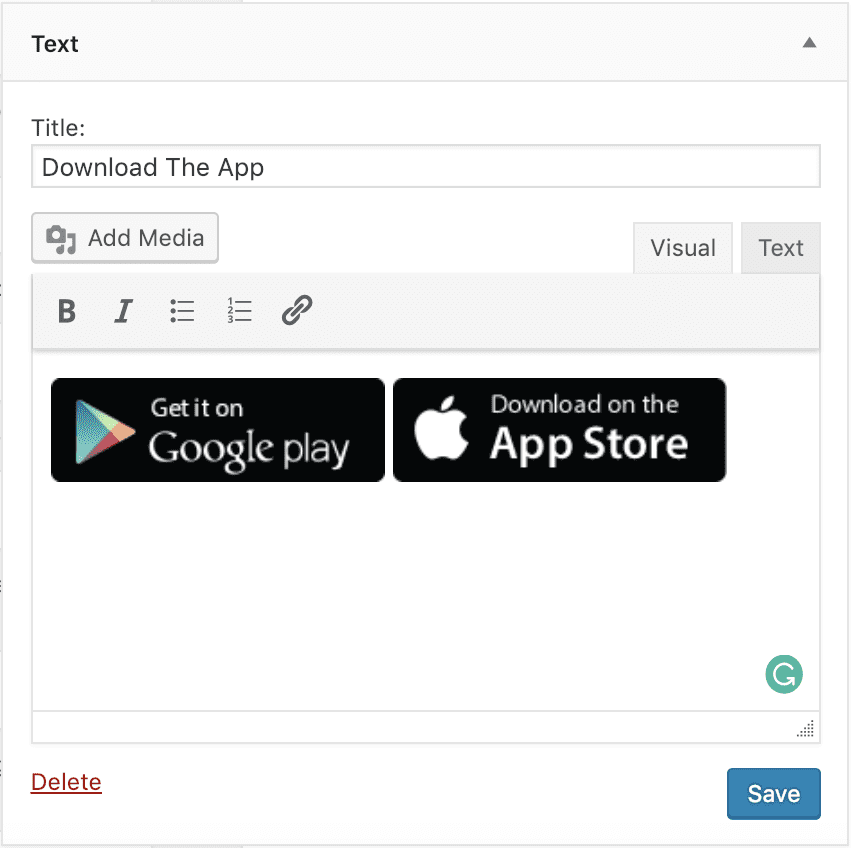
It is a pretty common “Download the App” section. There is a heading followed by two image links to the respective app stores.
It is extremely important that we choose the right Widget for the right job. And, there are two widgets which can help us build this section.
- The “Custom HTML” widget
- The “Text” widget.
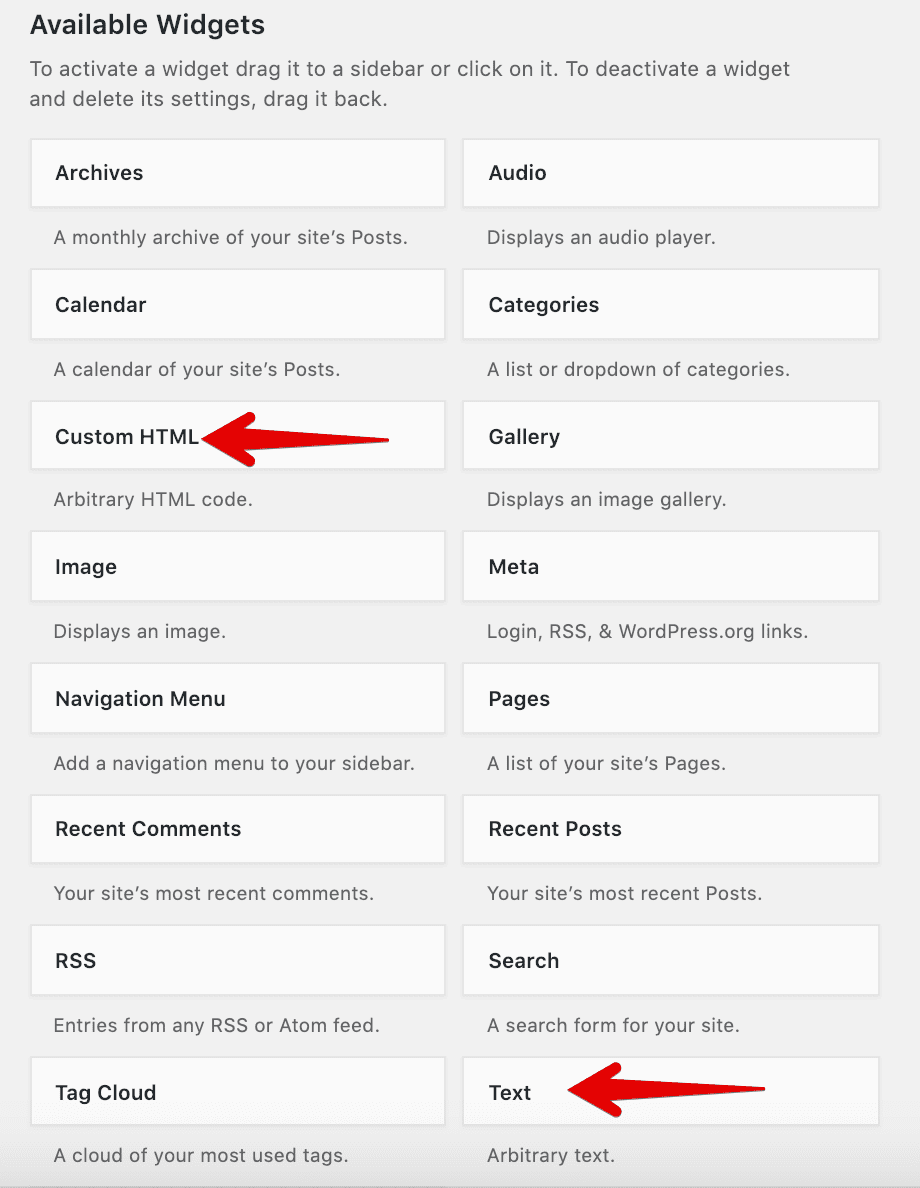
But, which widget is easy to use for the client? Most of the clients/administrators are not all good with HTML. So, the “Custom HTML” widget is not an option at all.
But, the “Text” widget is the both of Worlds. It comes with a WYSIWYG interface which houses most widely used text formatting options that we regularly use in Microsoft Word. At the same time, It also allows us to tweak the HTML. For this reason, in my opinion, there is no better Widget than the “Text” widget to build the design of the footer section 1.
So, let’s go ahead click on the “Text” widget.
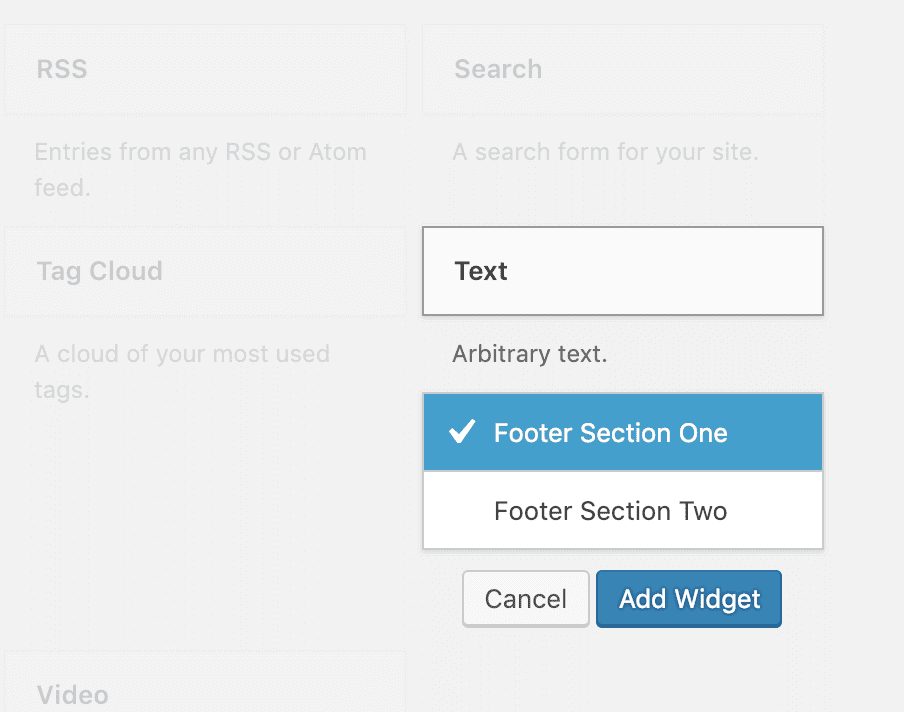
And as soon as we click on the “Text” widget, WordPress greys out the other widgets to prevent any accidental interactions.
WordPress also dropdowns the list of Dynamic Sidebars available and picks one automatically. In our case, We want to add the “Text” widget to the Footer Section One Sidebar and WordPress has already picked it by default. So, all we have to do now is to click on the “Add Widget” button to add the “Text” widget to the Footer Section One Sidebar.
And as soon as we click on the “Add Widget” button, WordPress puts the “Text” widget inside the Footer Section One Sidebar and opens up the “Text” widget Interface for us to set up the Widget for our needs.
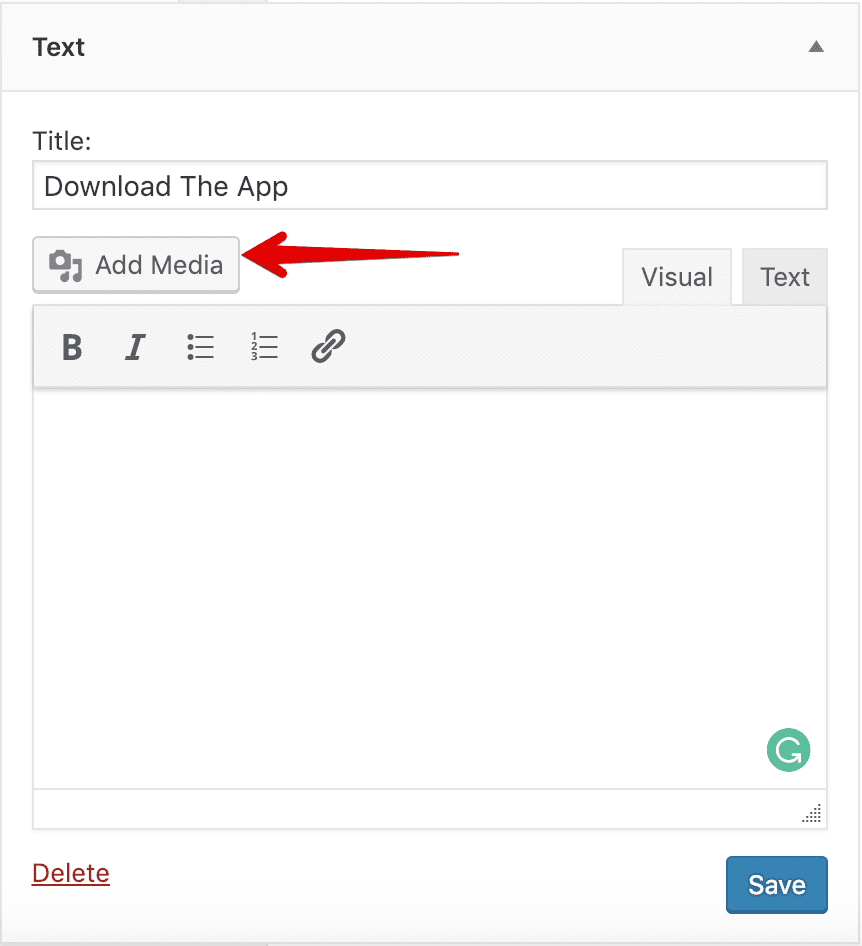
Every default WordPress Widget that has a Title field. WordPress displays this title on top of the Widget’s actual output.
In our case, let’s put “Download the App” text inside the Title field.
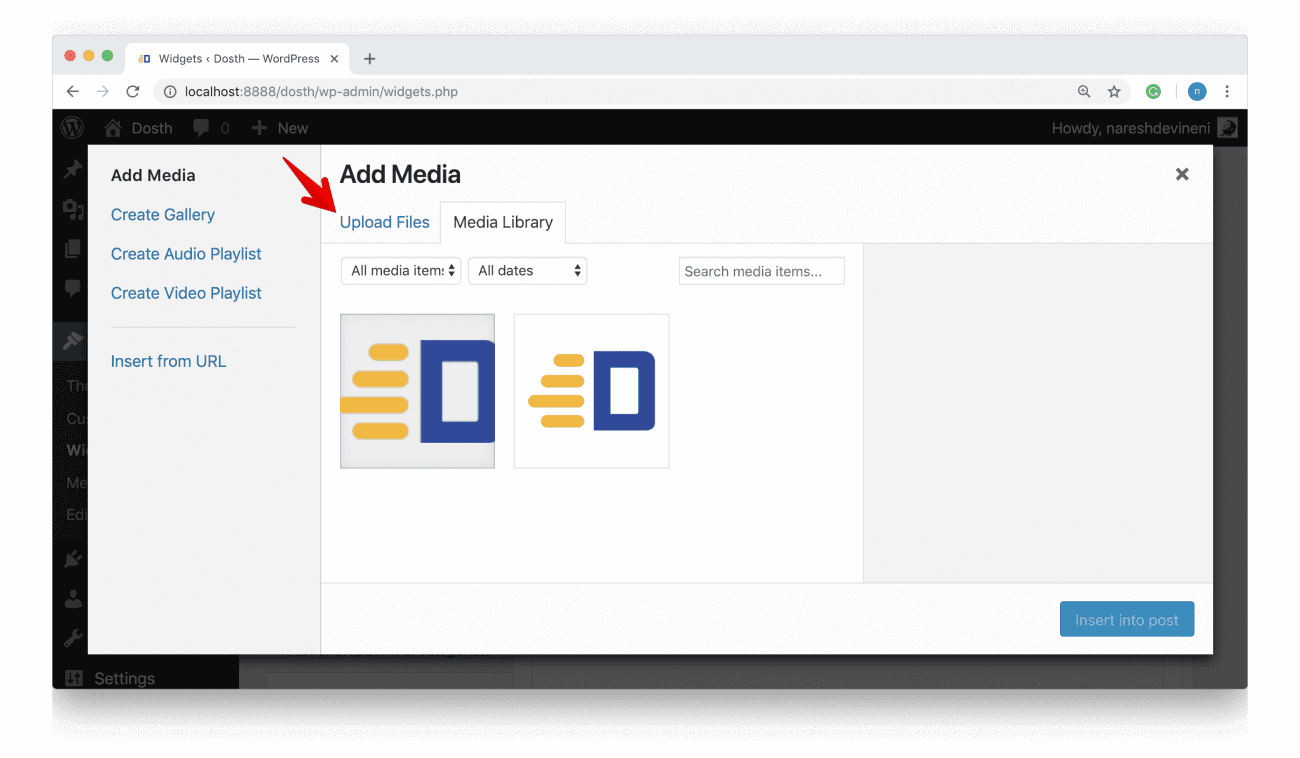
And when it comes to the images, Let’s use the “Add Media” button to add the App Store buttons. This “Add Media” button helps us add the image buttons to the WYSIWYG editor.
First, download the following App Store images:


You can also find these files in the exercises folder provided for this lesson.
Next, click on the “Add Media” button. We will get an “Add Media” window. And inside this window, there are two tabs. “Media Library” tab is selected by default. If the image download buttons are already uploaded to the WordPress Media Library, they will show up inside this tab. But, in our case, we are uploading the above app store buttons for the first time. So, click on the “Upload Files” tab.
Then click on the “Select Files” button to image app store files from your computer.
Once you have uploaded both the files, WordPress automatically selects them. Now, all you have to do is click on the “Insert into post” button to add both images to the “Text” widget’s to the WYSIWYG editor.
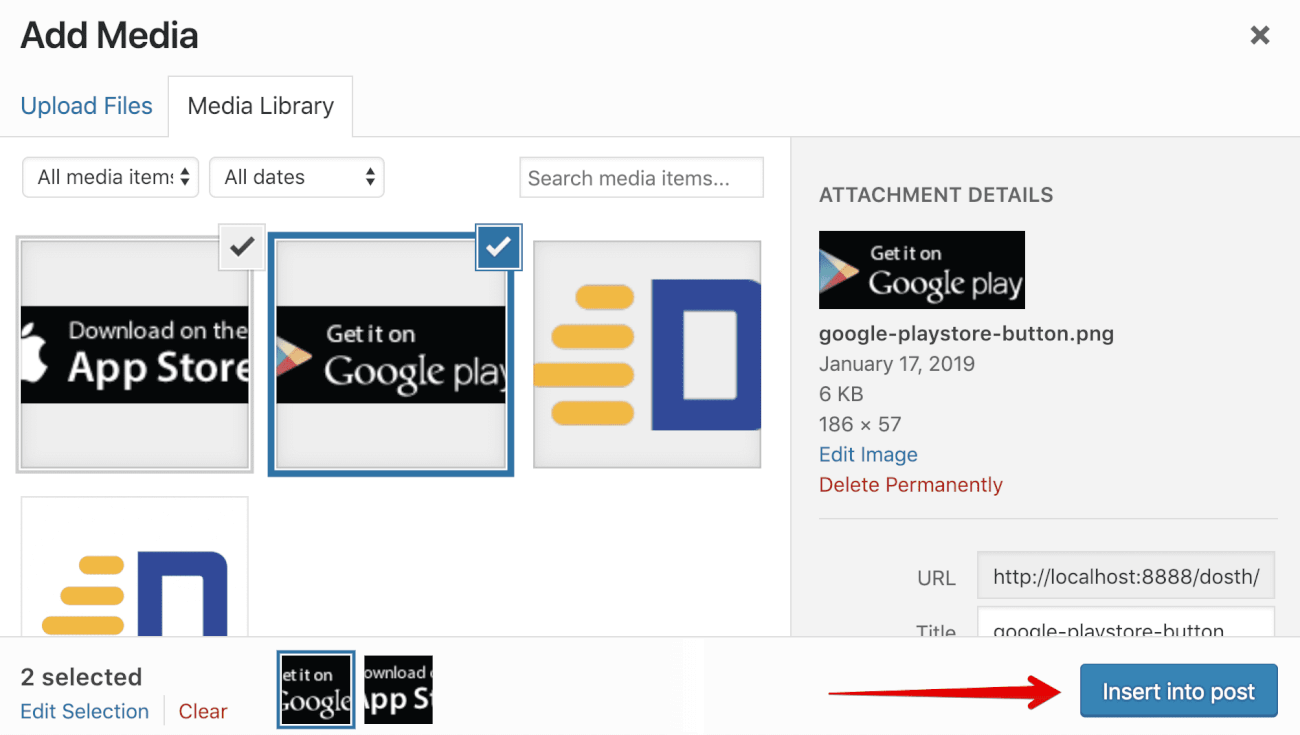
Once you click on the “Insert into post” button, the “Add Media” window goes away and WordPress adds those two images to the WYSIWYG editor, like this:
First of all, I want these images to be positioned next to each other. Images are inline elements and WordPress is aware of this, so, it already positioned them next to each other.
Next, I want to position these at the center of the viewport. To achieve this, click on the “Google Play” image inside the WYSIWYG editor to access the alignment options. Then click on the “Align Center” icon.
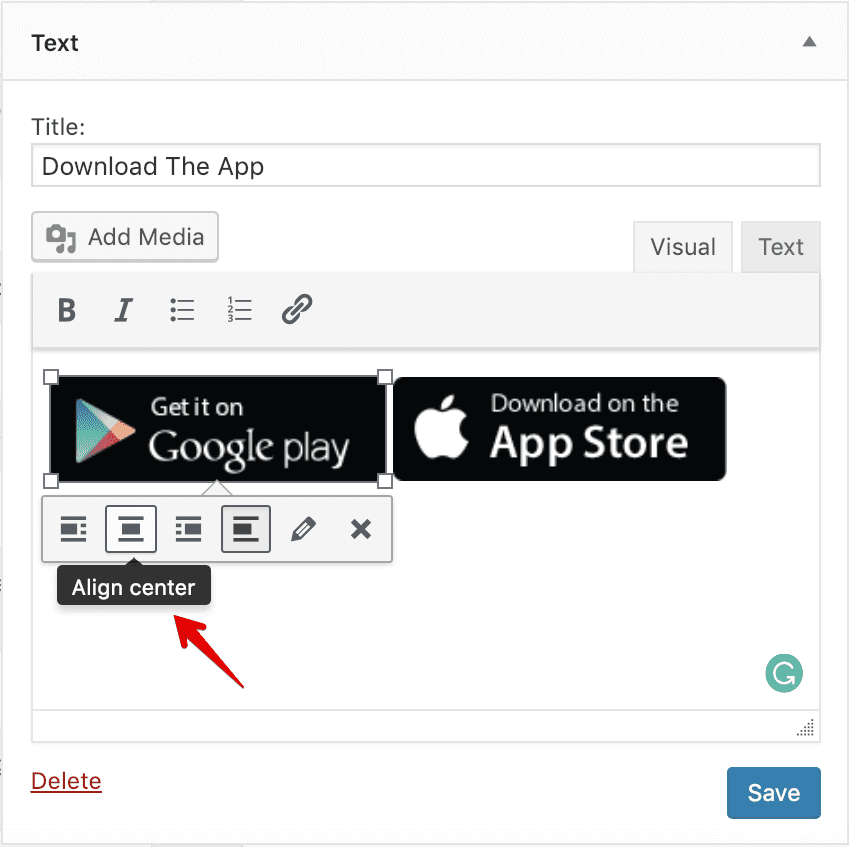
Do the same for the “App Store” button too.
Finally, they are the app download buttons, we have to link them to their respective app stores. So, click on the “Google Play” image once again. Once the image options popup, click on the pencil icon this time.
You’ll get an “Image Details” window. Inside this window, there is a section dedicated to “Display Settings”. Inside this section, the “Link To” option allows us to link this image to a custom URL. Right now, this option is set to none, change this to “Custom URL”. As soon as you choose “Custom URL”, WordPress drops down a URL field where we can enter a custom URL.
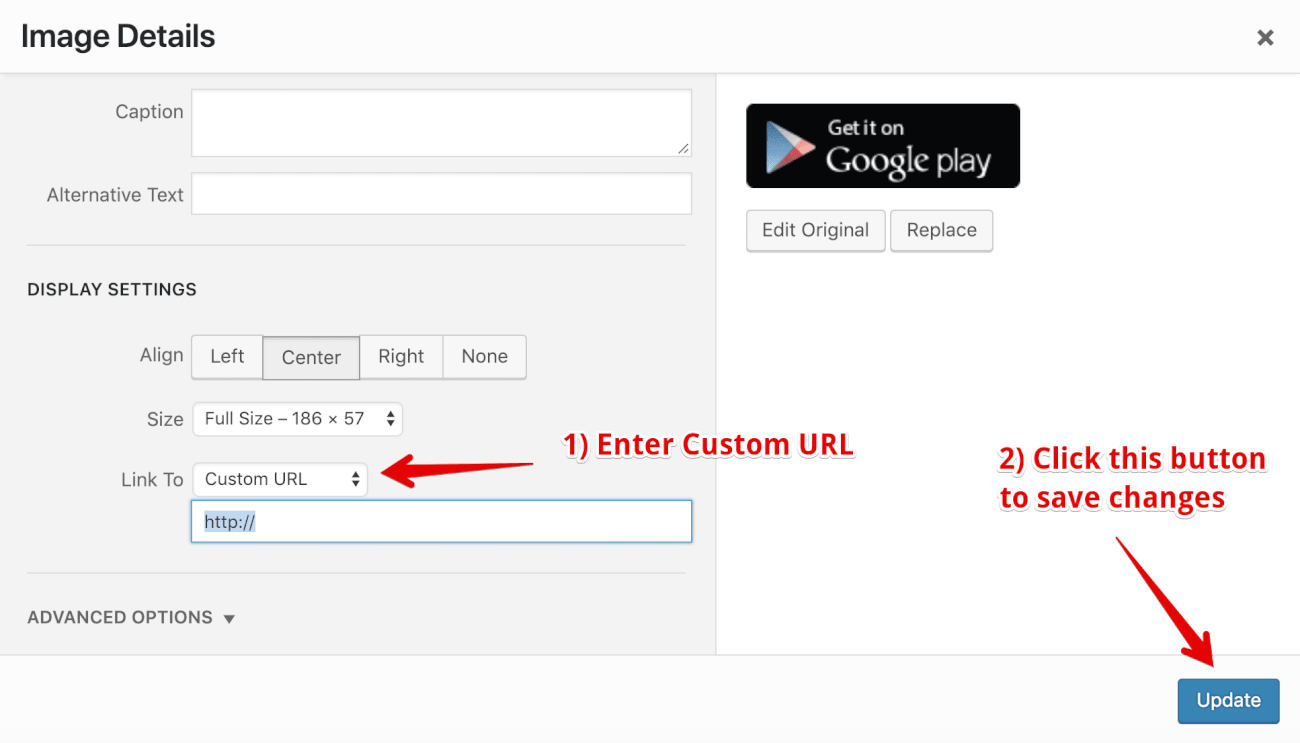
Anyway, since this is just a dummy project, enter what the custom URL you want to and click on the “Update” button which is located at the bottom right corner of the screen. I am putting #.
Next, do the same to the Apple App store button.
Up and until this point, We have done everything using the “Visual” Tab of the “Text” widget. Now, let’s switch to the “Text” tab of the widget to see and adjust the markup according to our needs.
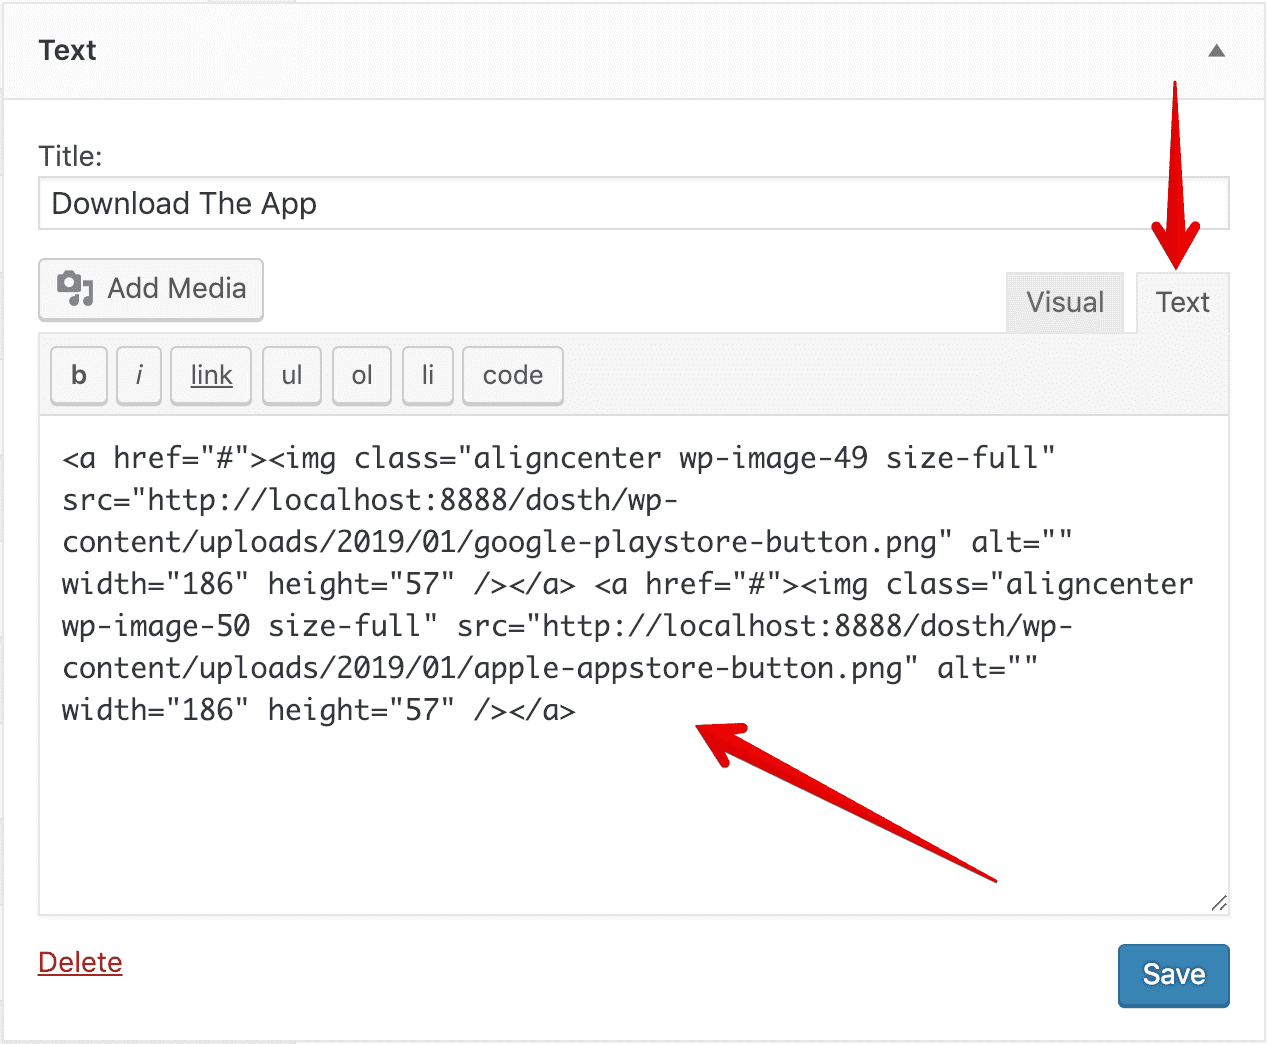
Well, WordPress is generating pretty standard HTML markup for the image links. WordPress is generating a lot of classes to give us handle over the styling of the images links. And, In my opinion, I don’t particularly see any problems with this markup. So, I will leave it as is.
Finally, click on the “Save” button to save the widget’s status.
That’s it. This is exactly how we use widgets. Not at all complicated, right?
Now comes the big question. How do we display the widgets that we placed inside the “Footer Section One” Dynamic sidebar?
3) Output the Dynamic sidebar’s widgets to the frontend using dynamic_sidebar() WordPress function
The dynamic_sidebar() function allows us to display the widgets placed inside a particular sidebar to the frontend.
It accepts the ID of a registered Sidebar as a parameter. And if you remember the ID of the “Footer Section One” sidebar is “footer-section-one”.
So, where do you want to output the “Footer Section One” sidebar?
“Such a stupid Question! In the Footer!”
Haha, Correct! So, open up the footer.php file and add the following code at the beginning of the file. That means before the wp_footer() function call. As you already know, the wp_footer() function call outputs the scripts and styles to the footer. So, we shouldn’t place any content after this function call. Every time you add any custom content to the footer, it always must be placed above this function call.
	 <footer id="site-footer">
            <?php if ( is_active_sidebar( 'footer-section-one' ) ) : ?>
                <div class="footer-section-one">
                    <?php dynamic_sidebar( 'footer-section-one' ); ?>
                </div>
            <?php endif; ?>
        </footer><!-- End of Footer -->
        <?php wp_footer(); ?>
    </body>
</html>
Nothing much is happening in the above code.
First of all, we are wrapping the dynamic sidebar code inside the <footer> element with HTML ID of site-footer.
Next, we are checking if the sidebar has any widgets using the is_sidebar_active() function call. We only want to output the Sidebar markup if there are widgets in it.
In our case, we placed a “Text” widget inside “footer-section-one” sidebar. So, the IF condition returns True and WordPress executes whatever the code we placed inside this IF condition.
And inside the IF condition, we are wrapping the dynamic_sidebar() function call inside a <div> container. Although WordPress generates a wrapper HTML element for individual widgets, It doesn’t wrap all the Widgets belonging to a particular sidebar inside an HTML element. So, We are doing this ourselves as we want to style this Footer Section differently by adding a grey textured background to it.
Finally, we are displaying the widgets placed inside the “Footer Section One” sidebar by calling the dynamic_sidebar('footer-section-one') function.
Now, let’s see what is happening on the frontend after placing the above code.
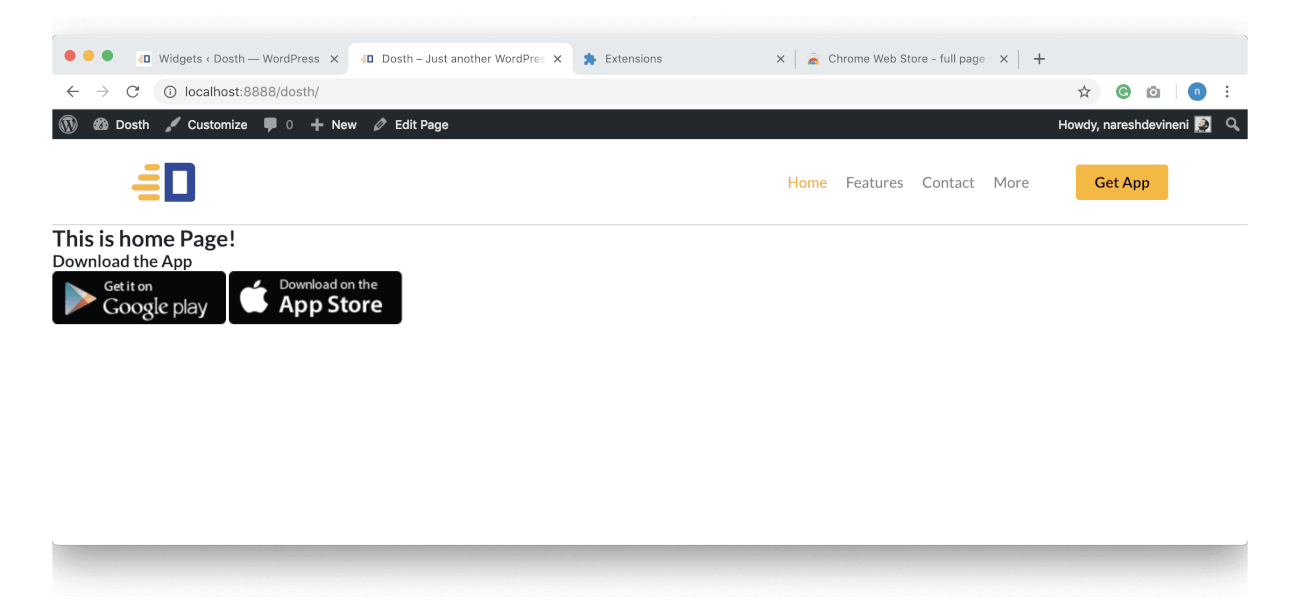
Pretty cool, right? The widget we added to the “Footer Section One” sidebar is getting outputted to the frontend. Fantastic.
Now let’s see what markup is getting generated.
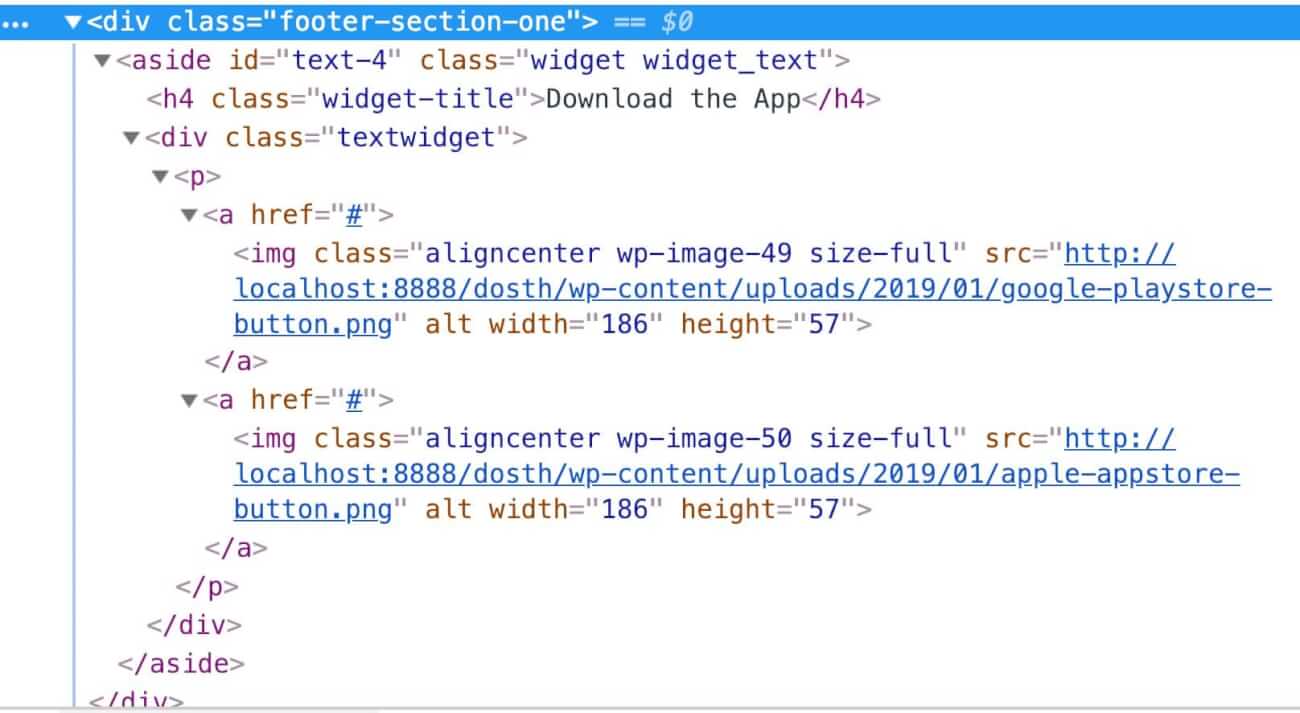
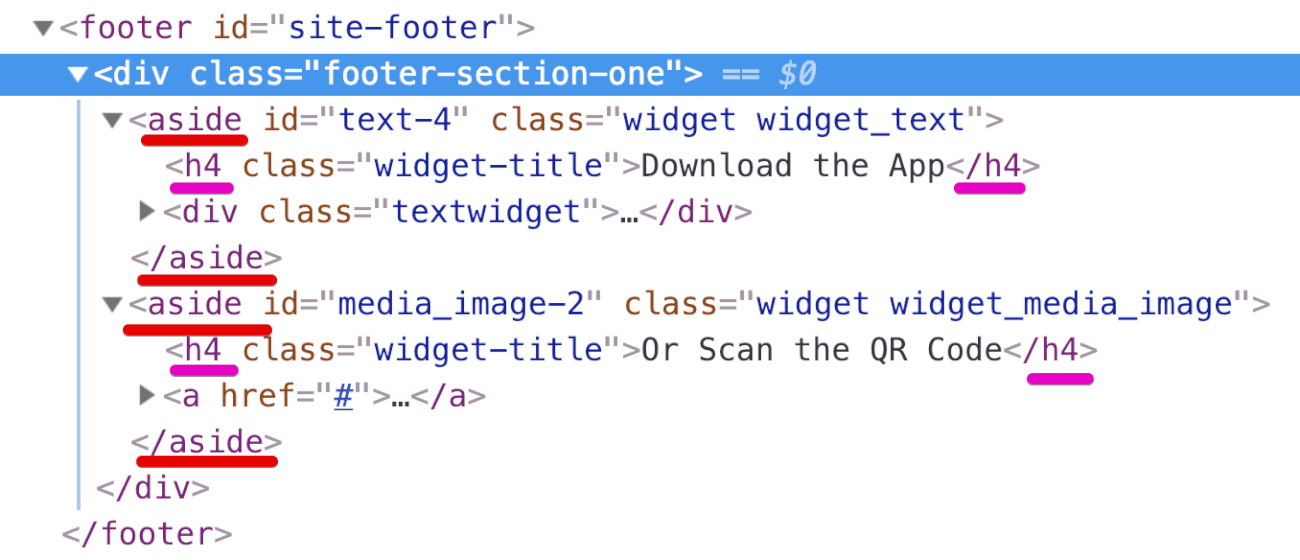
That’s a pretty standard markup, right?
If you notice, WordPress wrapped the “Download the App” Title inside the <h4> HTML heading tag and the entire widget is wrapped inside the <aside> HTML element. WordPress did this because we told it when we registered the sidebar using register_sidebar().
register_sidebar( array(
    'name'          => esc_html__( 'Footer Section One', 'nd_dosth' ),
    'id'            => 'footer-section-one',
    'description'   => esc_html__( 'Widgets added here would appear inside the first section of the footer', 'nd_dosth' ),
    'before_widget' => '<aside id="%1$s" class="widget %2$s">',
    'after_widget'  => '</aside>',
    'before_title'  => '<h4 class="widget-title">',
    'after_title'   => '</h4>',
) );
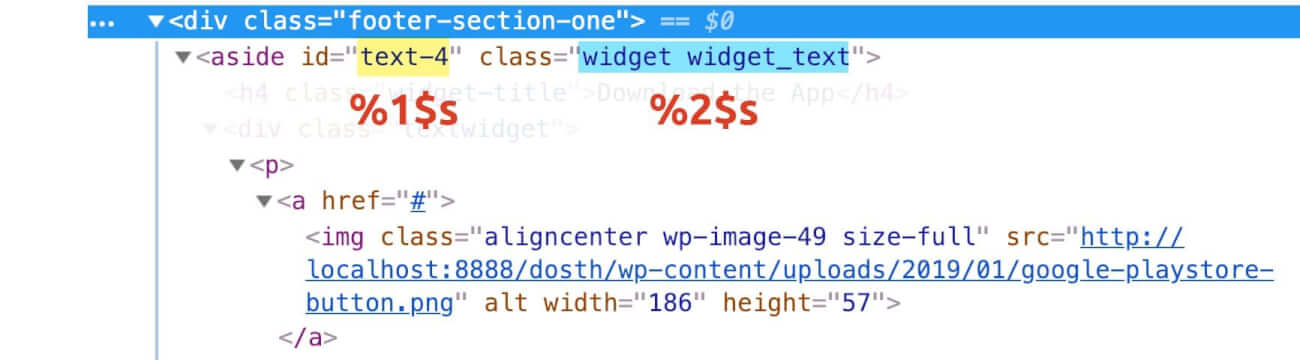
The before_widget and after_widget keys allow us to tell WordPress that “Hey! Wrap each widget inside this sidebar with this HTML markup.”
In our case, we are telling WordPress to wrap each widget inside this sidebar with <aside> HTML element.
Similarly, the before_title and after_title keys allows us to tell WordPress that “Hey! Wrap every widget’s title inside this sidebar with this HTML markup.”
In our case, we are telling WordPress to wrap every widget’s title inside this sidebar with <h4> element.

Get it?
“Cool! Got it! But what are those %1$s and %2$s symbols inside the HTML string that we set for before_widget key?”
Ah! Don’t worry about them. Those are just dynamic placeholders that tell WordPress where to output widget specific HTML ID and classes.The %1$s is a place holder for the Widget ID and %2$s is a place holder for the Widget classes.
You can even remove them if you don’t like what WordPress is outputting. But I usually keep them to style a particular widget using CSS. They are really handy.
Important Realization: I can’t stress this enough! Irrespective of the Widget being outputted, WordPress generates the same Wrapper HTML markup for every widget placed inside a particular sidebar. That means, every widget inside “Footer Section One” sidebar will be wrapped inside the <aside> HTML element. And every widget’s title will be wrapped inside the <h4> HTML heading element.
Common, let’s try it out practically. It is important that you fully understand this.
Let’s put “Image” widget inside the “Footer Section One” sidebar.
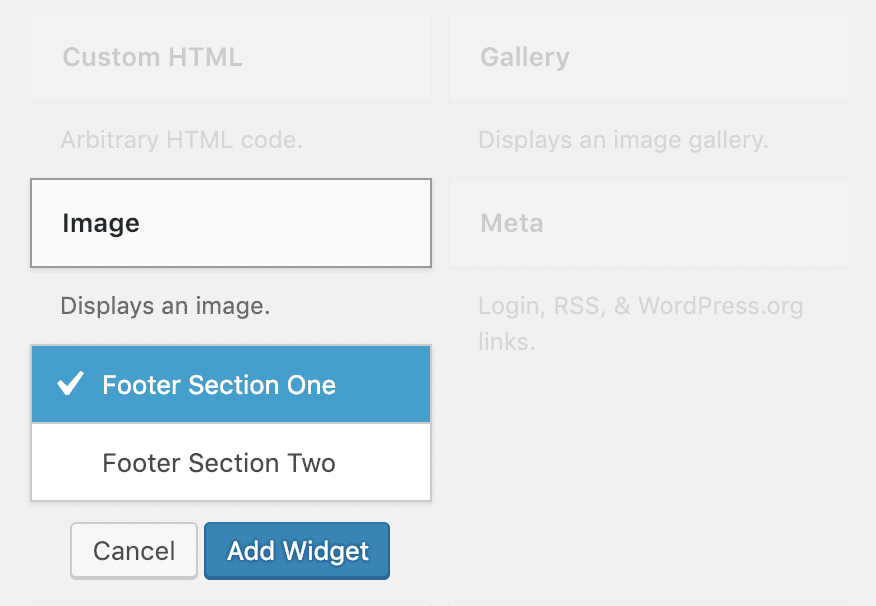
For the title of the Widget, put “Or Scan the QR Code”.
Next, download the following random QR code image:

Then, add this image to the widget by clicking on the “Add Image” button.

Also, For the “Link To” put a custom URL. In our case, it is just a dummy QR code, so I put #.
Finally, click the “Save” button. Now, head over to the Homepage of the Website and refresh it.
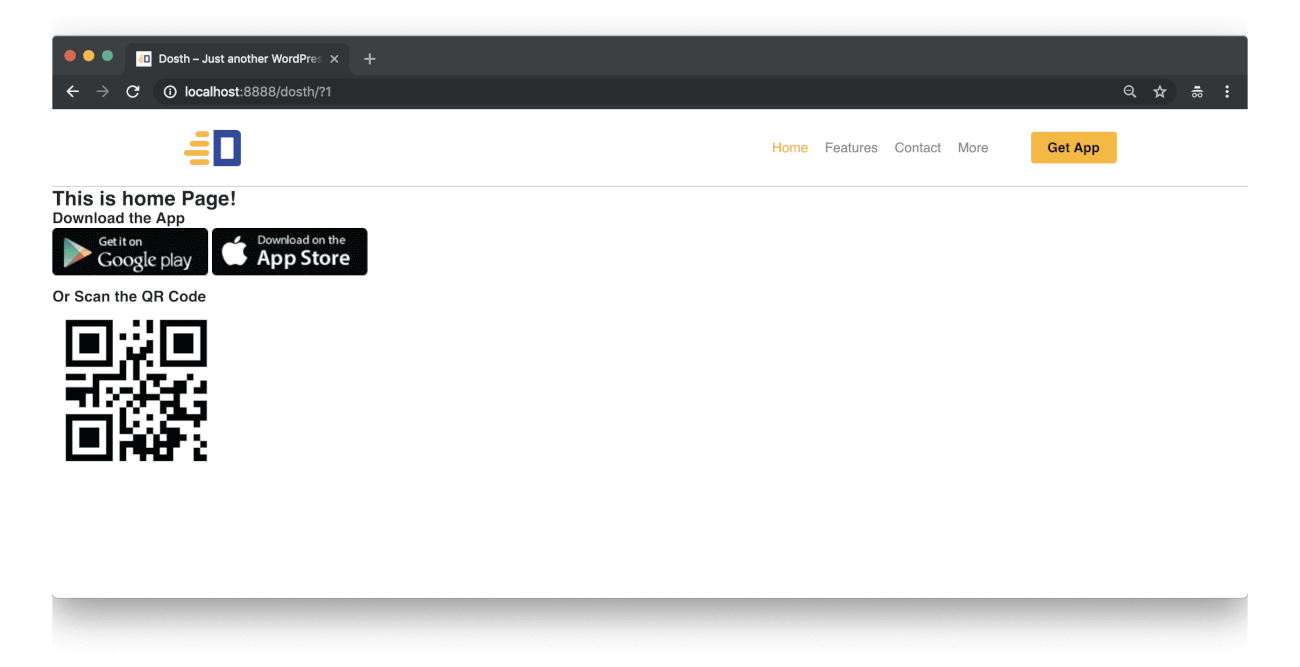
Cool, the QR code is getting outputted as expected. That was quick, isn’t it?
Anyway, now if we check out our footer markup again, you’ll see the same wrapper HTML element for both the Widgets.
But there is one problem!
And, If you remember, we center aligned the images inside the “Download the App” text widget, isn’t it?
But why it’s not working?
We will figure out the answer to both the questions in the next lesson!
 © 2026 UsableWP. A project by Naresh Devineni.