Building the important content of the Homepage using the Gutenberg Editor

From seeing the design of the Homepage’s main content, It is this part that is crucial in my opinion. It is also called the “Above The Fold Content” because this content is what the site visitor’s see without having to scroll down.
Common, let’s build this content using the Gutenberg editor.
Go to Admin Dashboard -> Pages -> Home
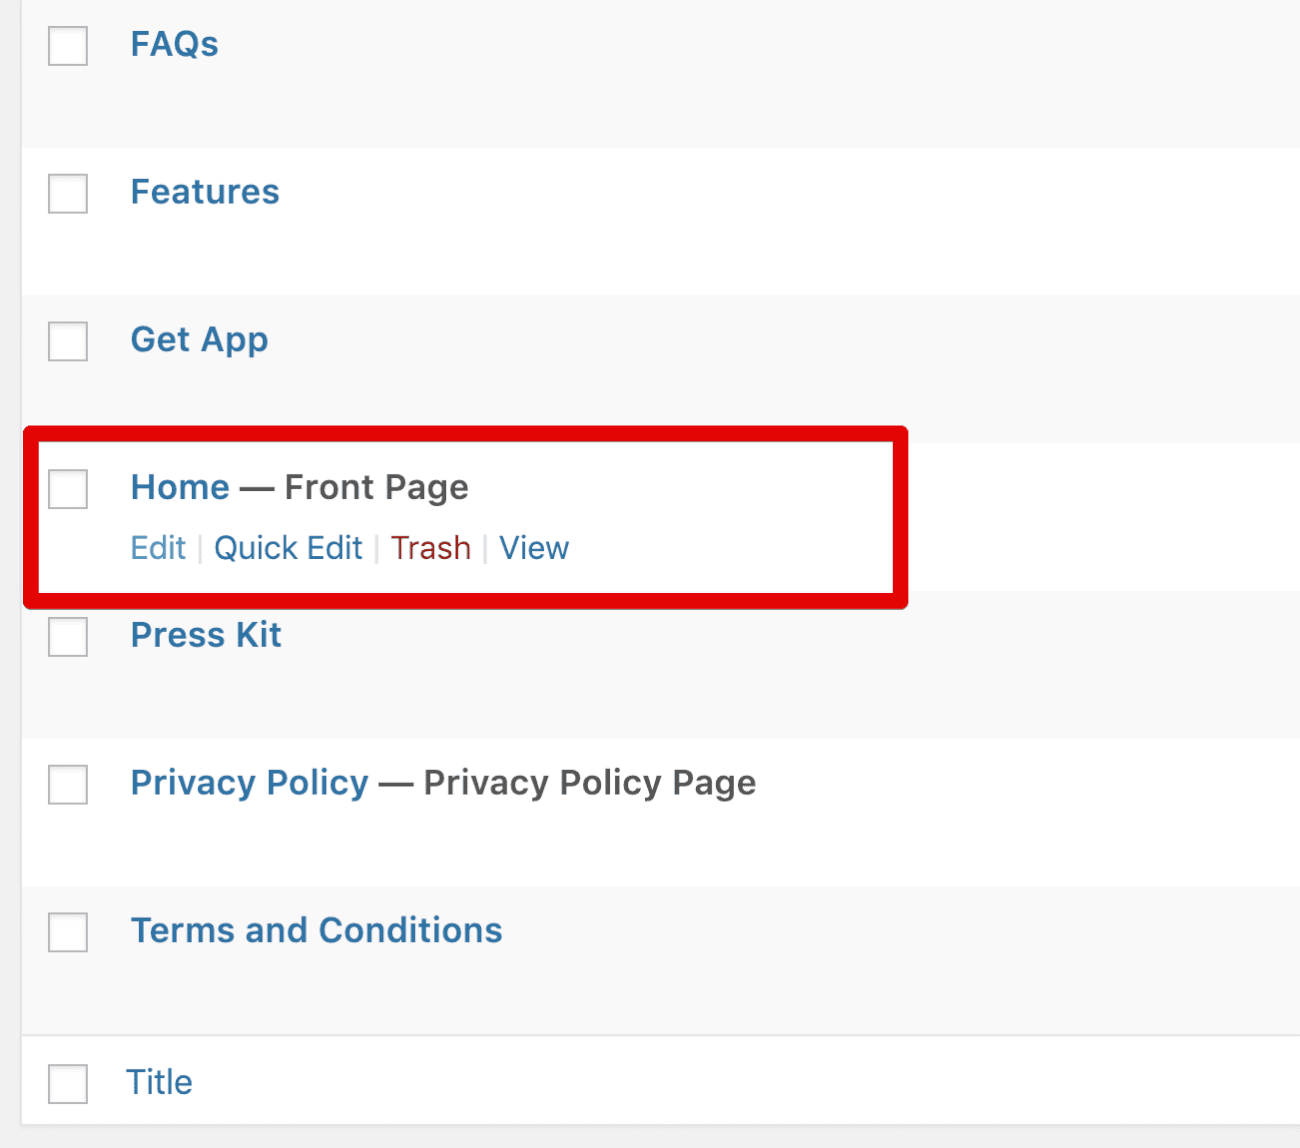
Next, Click on the edit link to edit the page.
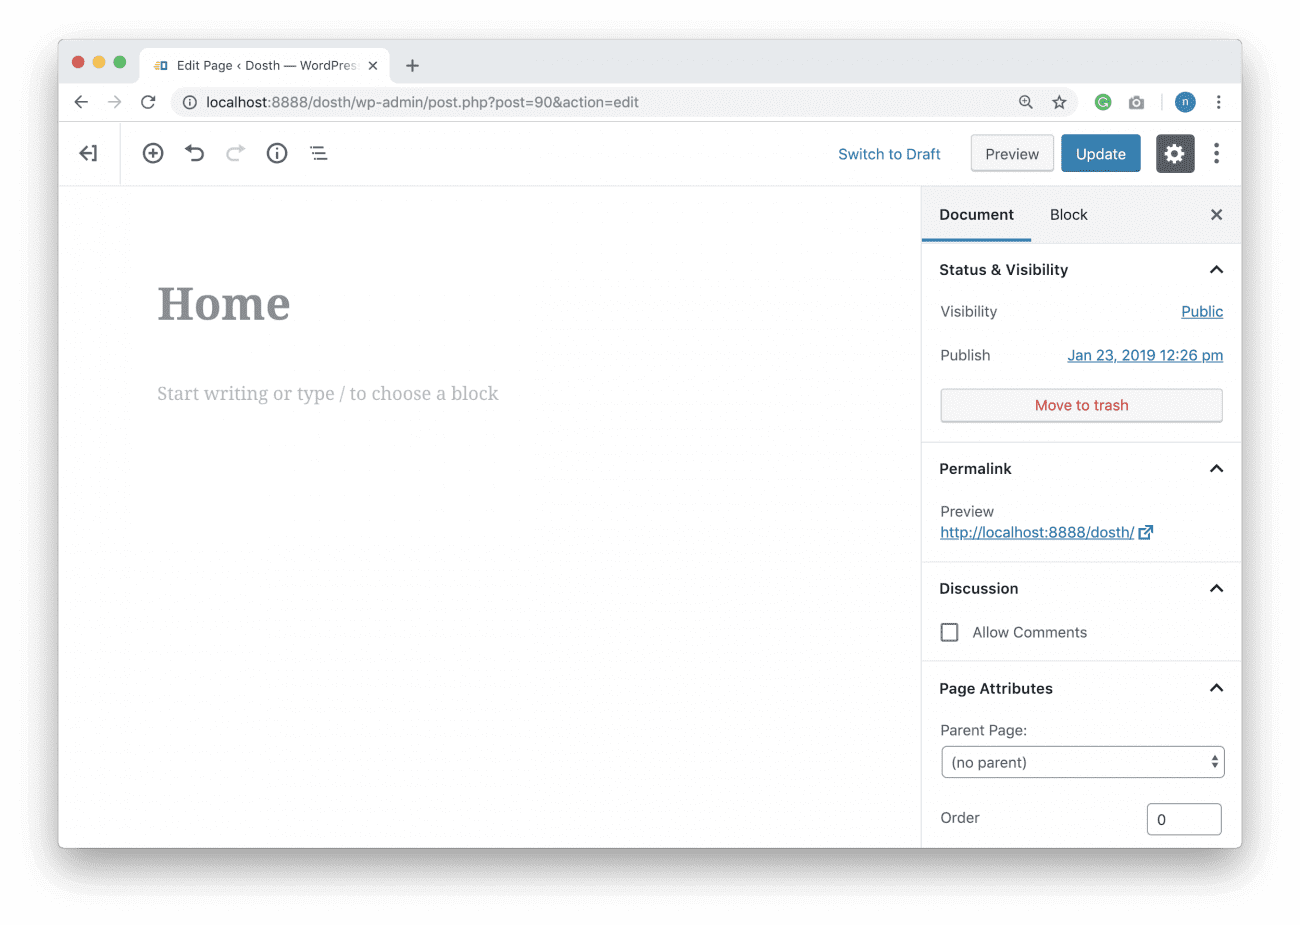
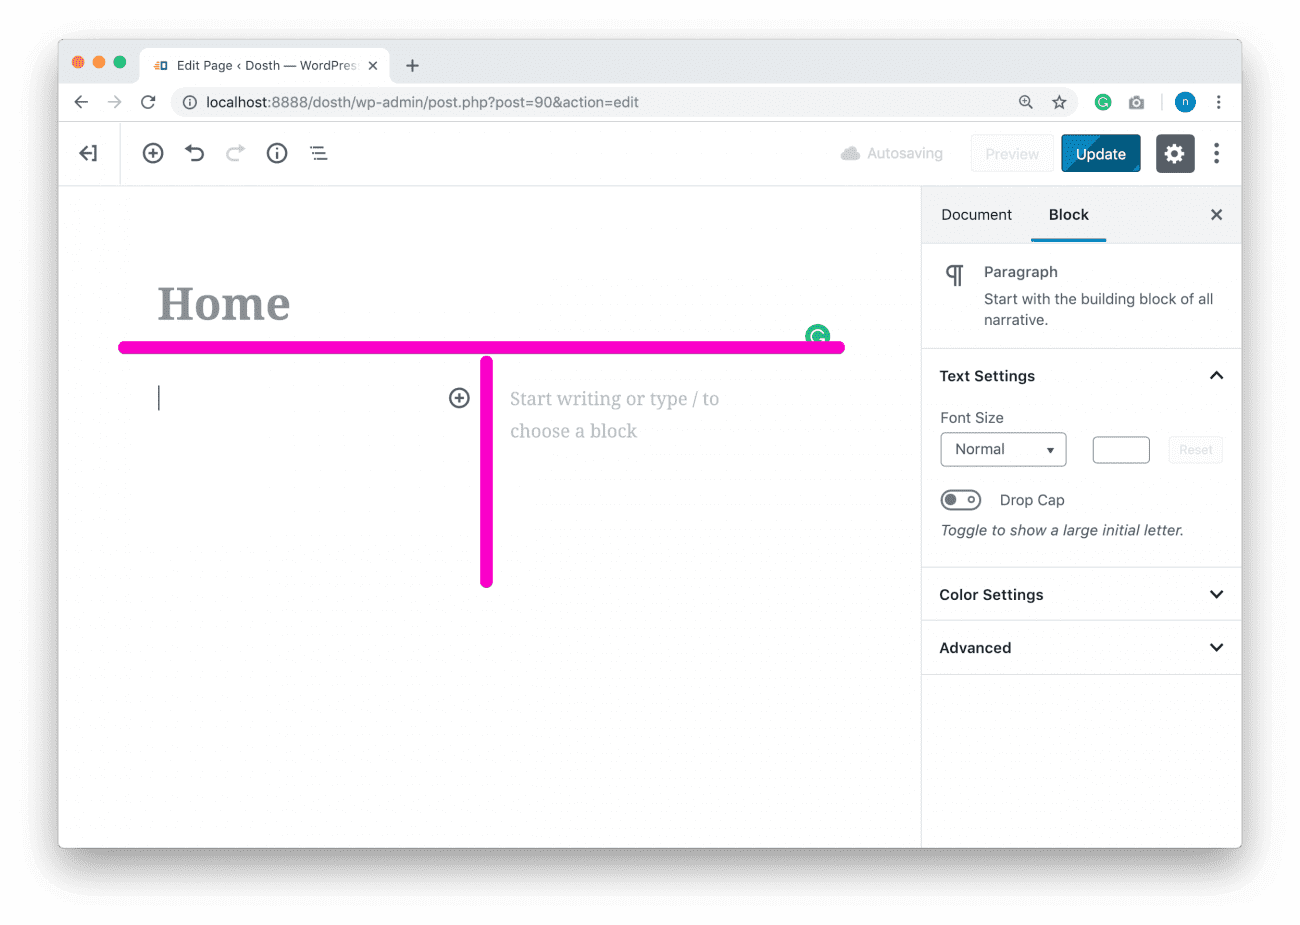
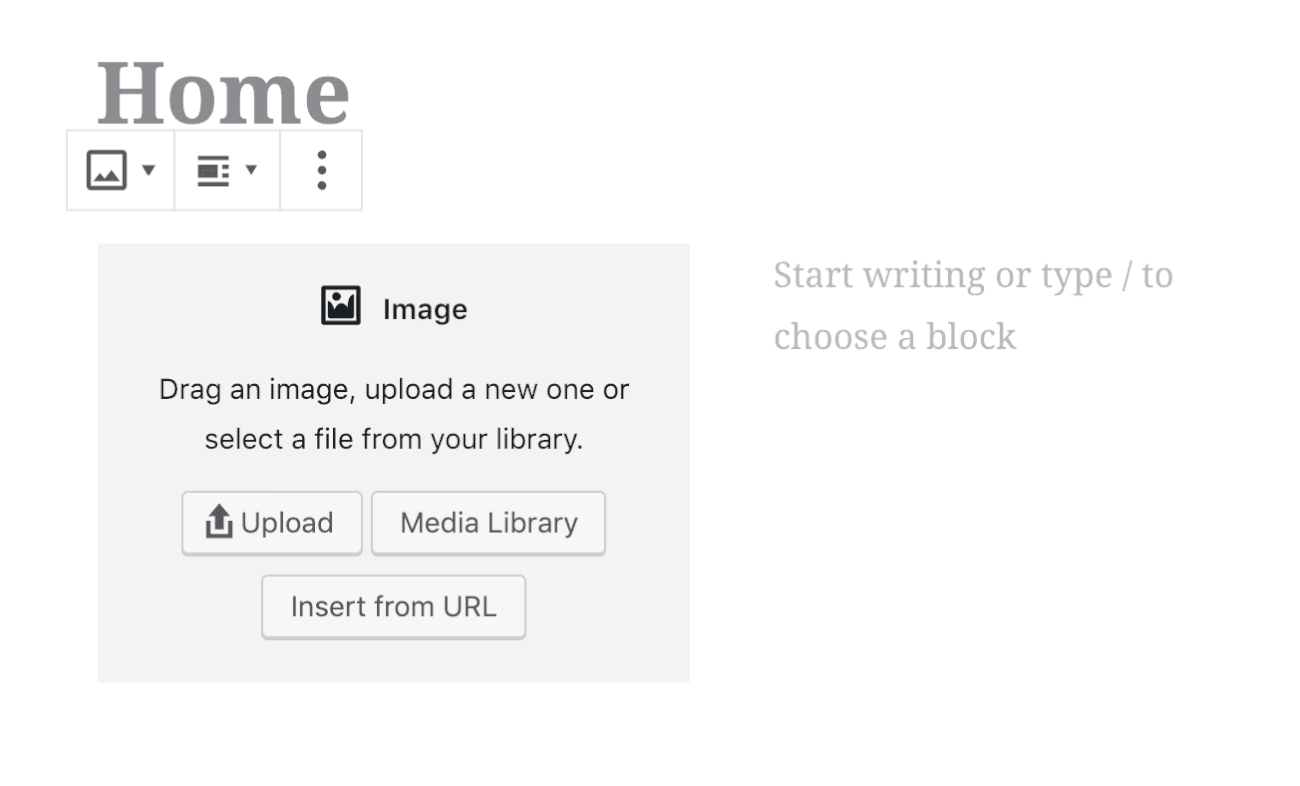
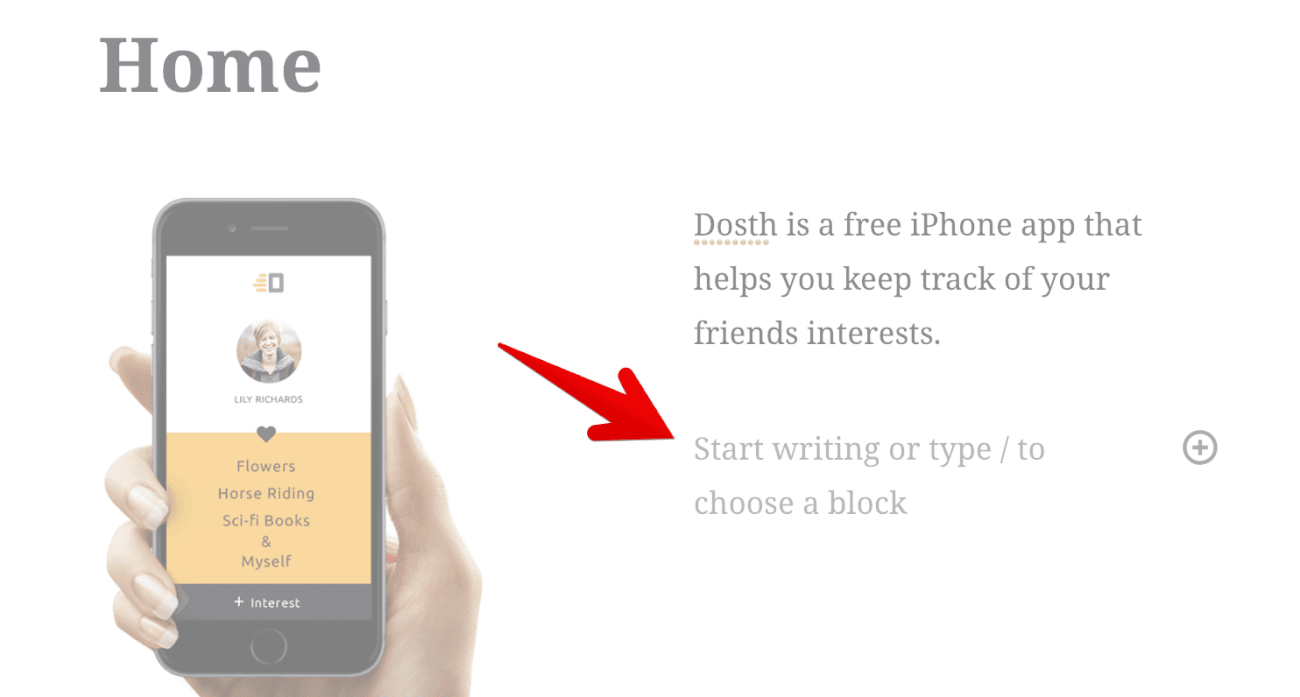
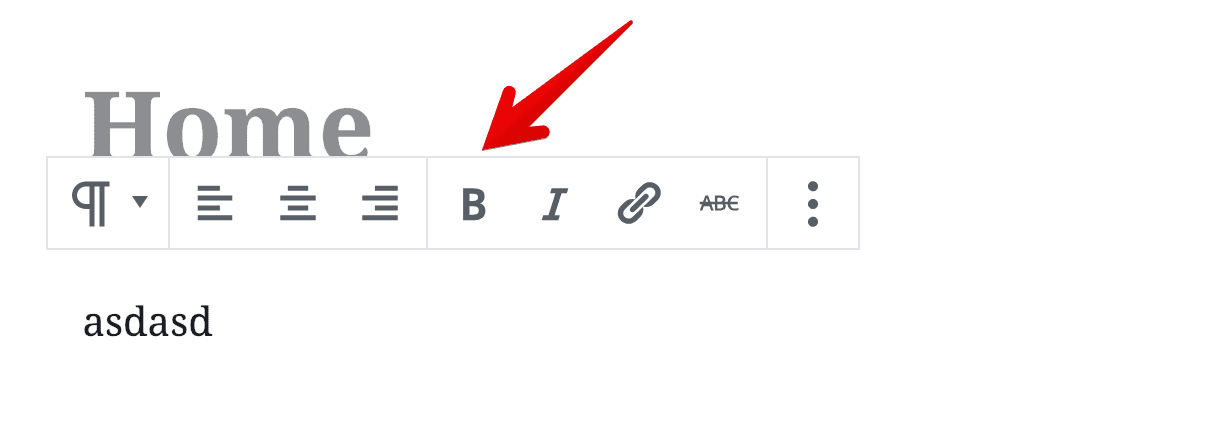
As you can see, currently the only content we have on the page is the Title of the Page. We entered this title when we created this page at the beginning of this course.
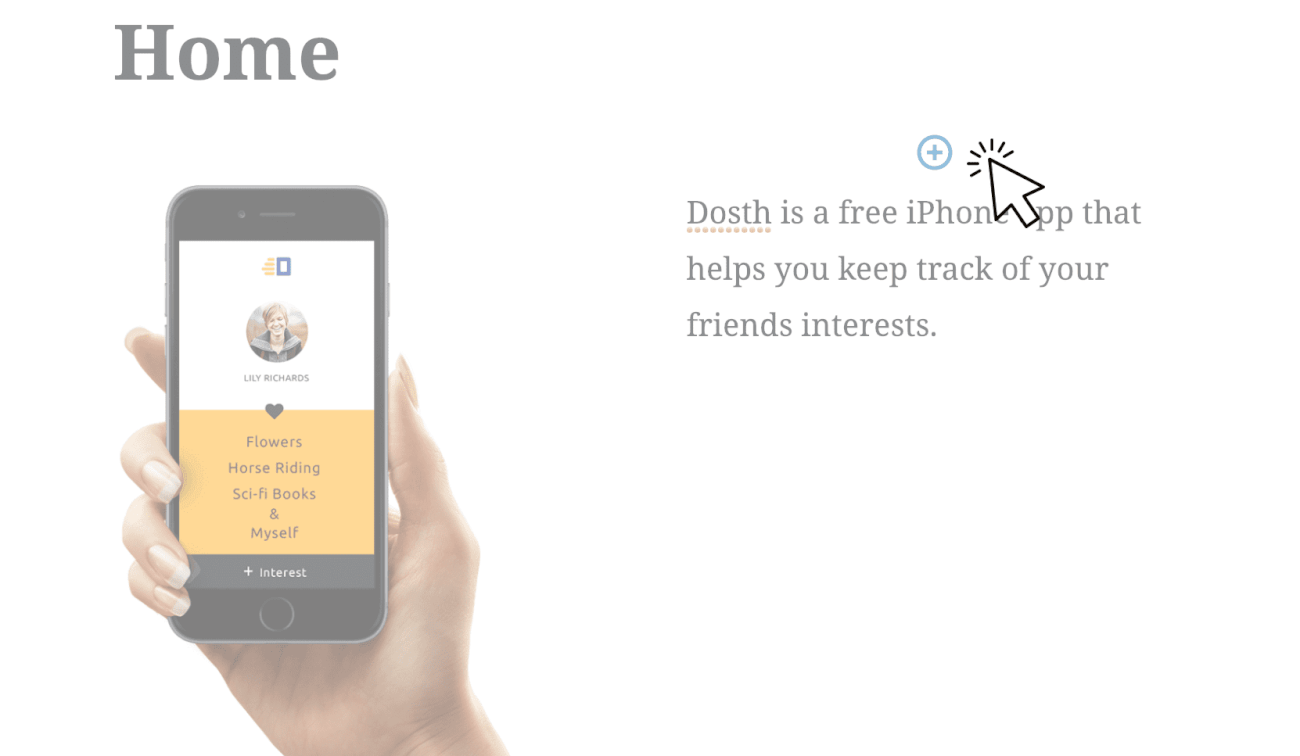
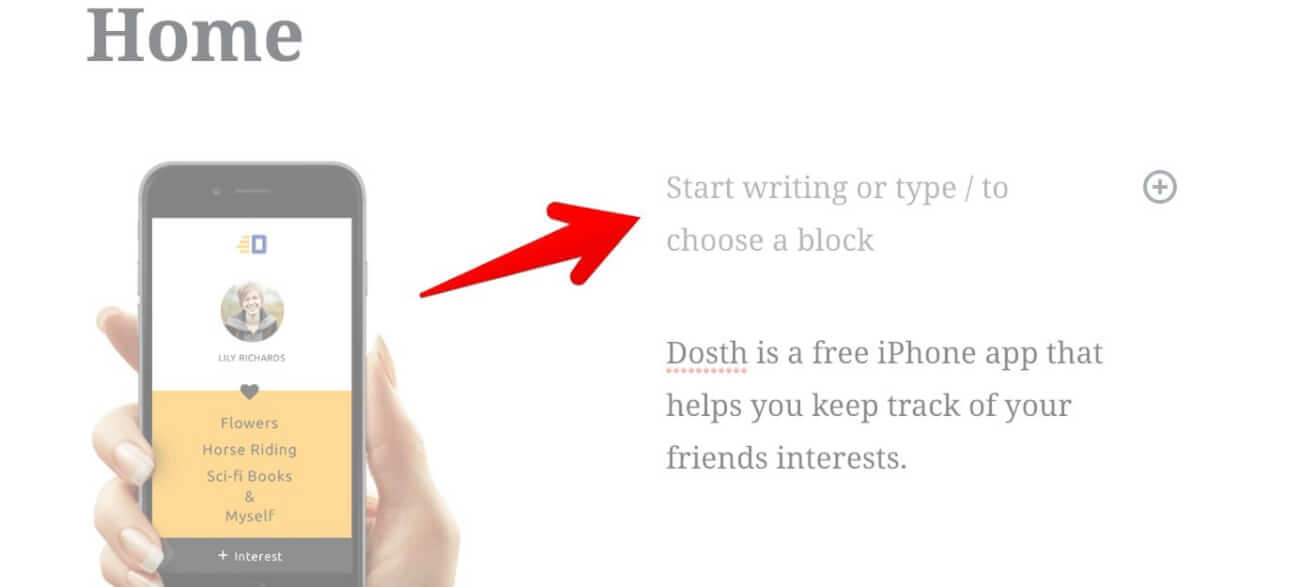
Just below the title, there is a placeholder which reads “Start writing or type….”. Go ahead and click on it start adding our main content.
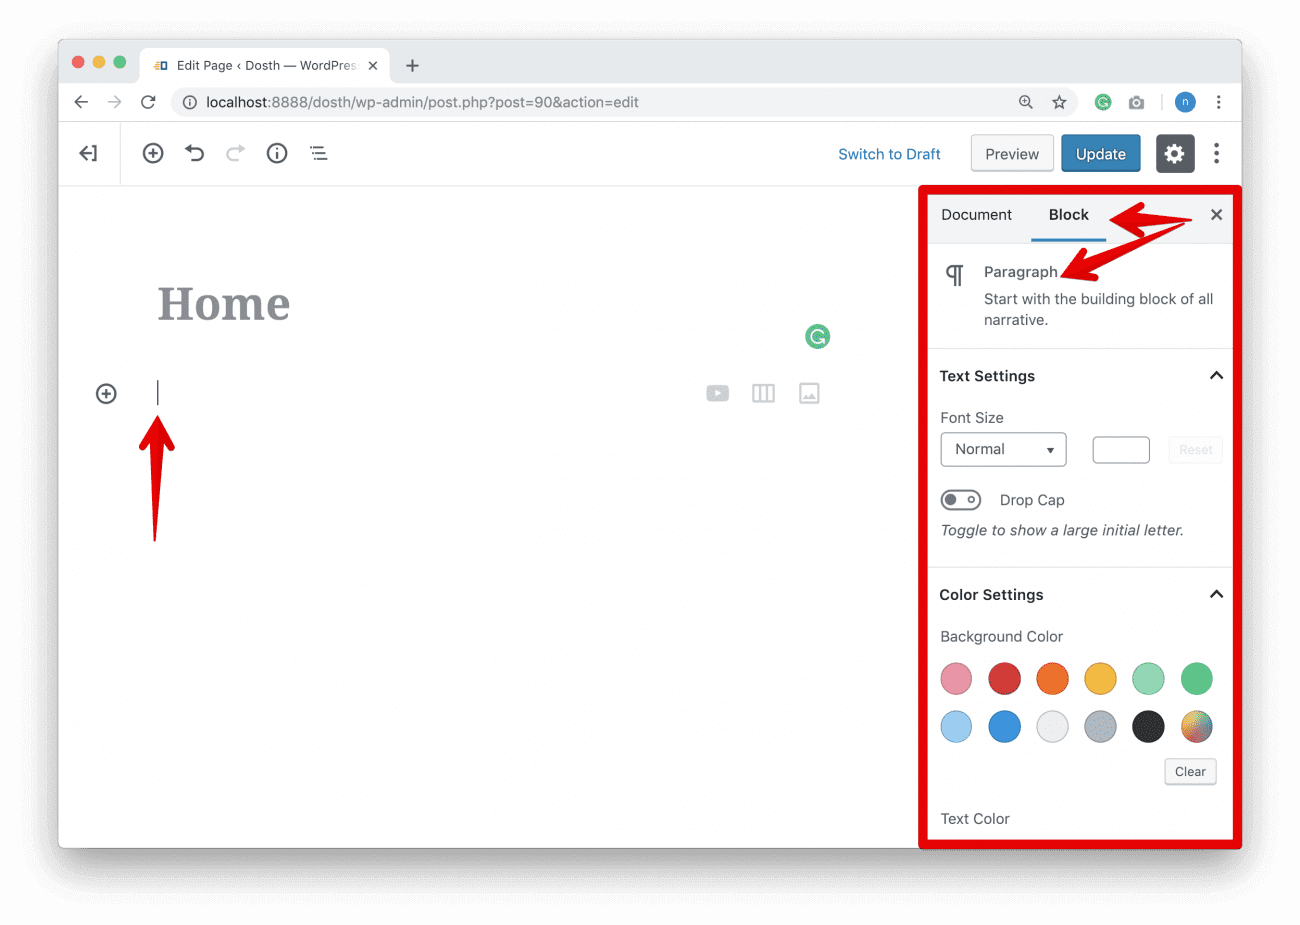
As soon as you click on it, the Gutenberg’s Paragraph Block will get activated and WordPress allows us to configure it using the options located on the right-hand side of the screen and the cursor starts blinking indicating you can start the typing a paragraph.
The options on the right-hand side of the screen belong to the individual block that is currently active.
“Wait! What is a Paragraph Block”?
Introducing Gutenberg’s Blocks
Before the release of WordPress 5.0, the content editor used to be pretty straight forward WYSIWYG editor. Not complicated at all.

I don’t know the exact reason behind the decision, but core WordPress developers Introduced the Gutenberg Editor replacing the old but neat classic editor.
The Gutenberg editor is a block-based editor. That means it’s a content editor which helps you build the page content using various types of Blocks.
Simply put, a Block is nothing but a page content element like a paragraph, image, blockquote, layout etc. and we use these blocks to build the content of the page.
In a way, blocks are Lego pieces and it’s up to us what we can build putting those pieces together. That’s all.

But just like the above illustration, Gutenberg Editor has some missing pieces which makes it not usable yet for building the pages with complex content.
Anyway, now that you understand the concept of blocks, here is the new Block based content breakdown of Homepage’s Above-The-Fold content design:
Now, let’s understand the Gutenberg Editor options while we build our “Above The fold” content.
How to replace the default Paragraph Block with another Block

By default, Gutenberg Editor launches with a Paragraph Block. If the Paragraph Block is what you want, click on the “Start writing or type…” text and start writing.
In our case, to achieve the two column layout, we need to replace the default Paragraph Block with the Columns Block.
To do this click on the Plus Icon on the left side of the Paragraph Block.
Clicking on this Plus Icon will open a Blocks Dropdowns in which they are neatly organized into nearly half a dozen sections, and by default, the “Most Used” section is active.
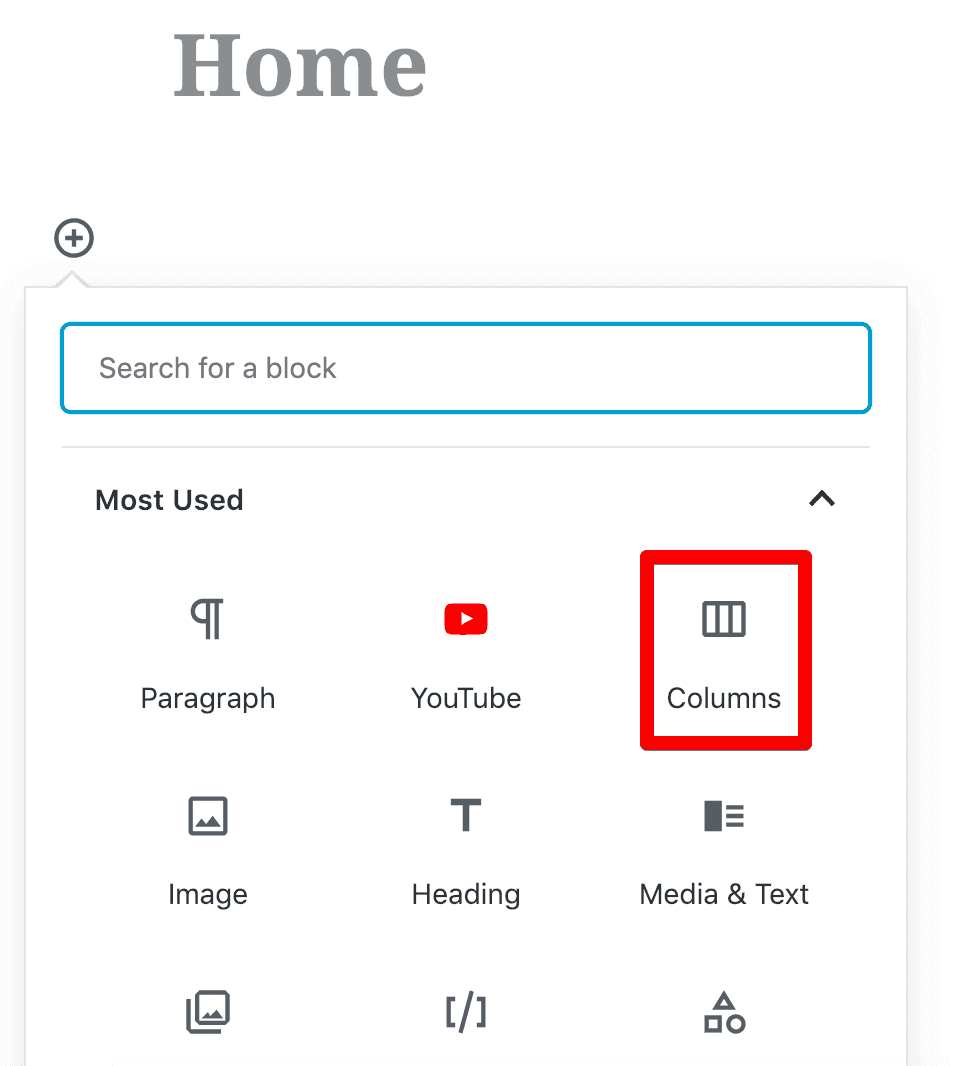
Next, find the “Columns” block and click on it.
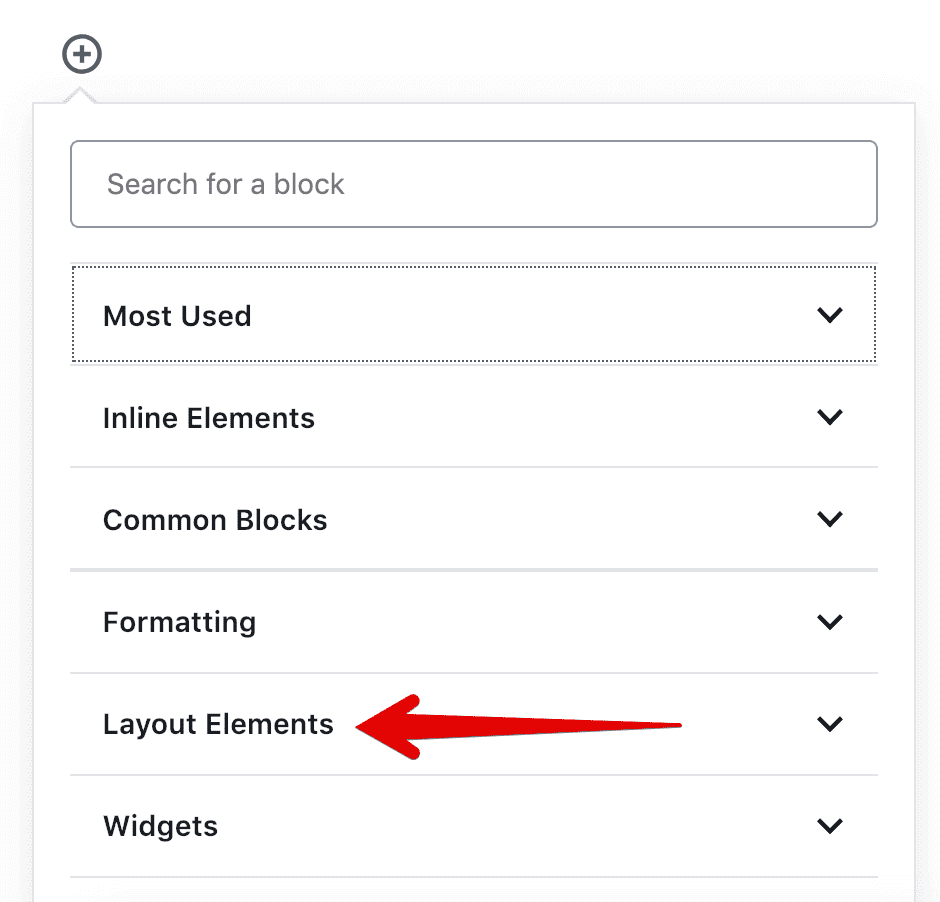
Your “Most Used” blocks section could have different blocks based on how often you access a particular Block. So, If you can’t find it in the “Most Used” section, scroll down a bit until you find “Layout Elements” section and click on it to find the Columns block.
As soon as click on the “Columns” block, WordPress creates a Two Column Layout Block and puts the paragraph block inside both of the columns by default.
If you want more than Two columns, click anywhere outside the “Paragraph” Block to come out of it.
Then put your cursor at the left-hand side of the “Columns” block where is there is no plus icon nor text and click.
Then, change the column count by adjusting the “Columns” field on the right-hand side of the screen to fit your needs.
But, when it comes to our design, we need a two column layout, so, I will keep these default options as is without modifying them.
How to replace the default Paragraph Block if you are inside the Column Block
If you want to replace the default Paragraph block that is placed inside the “Columns” Block, look for the Plus Icon on the right-hand side of the individual Column instead of the left-hand side.
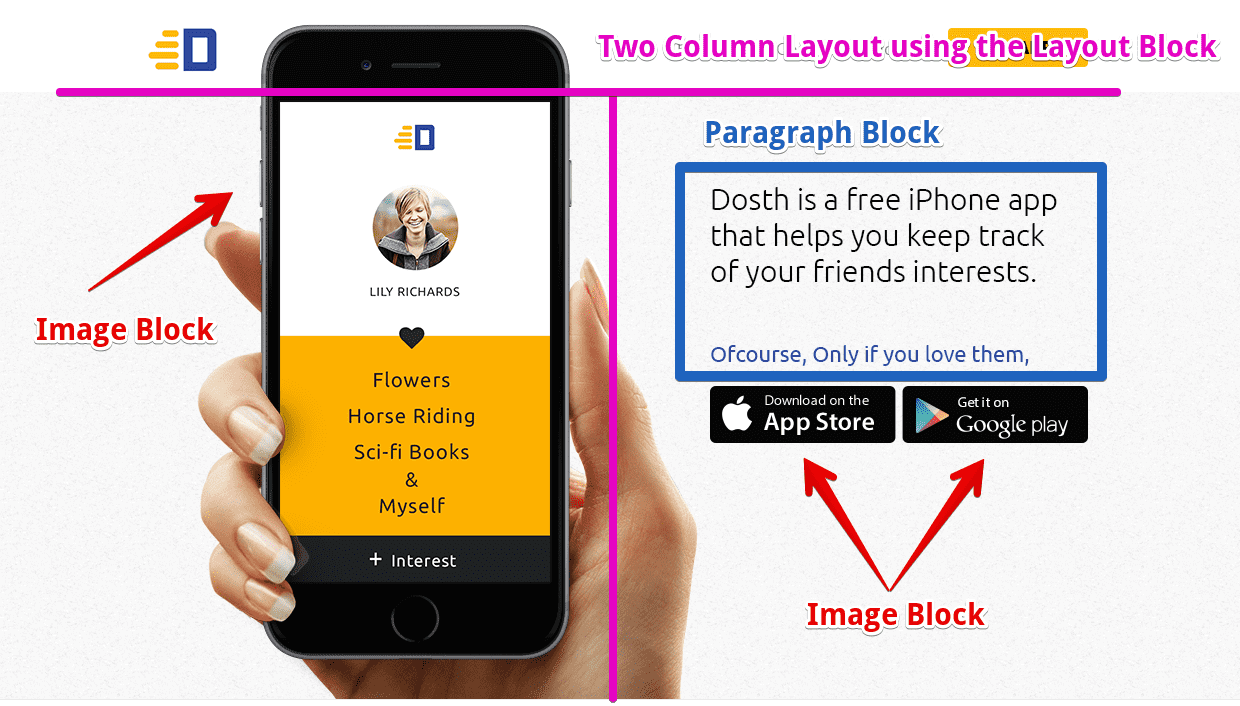
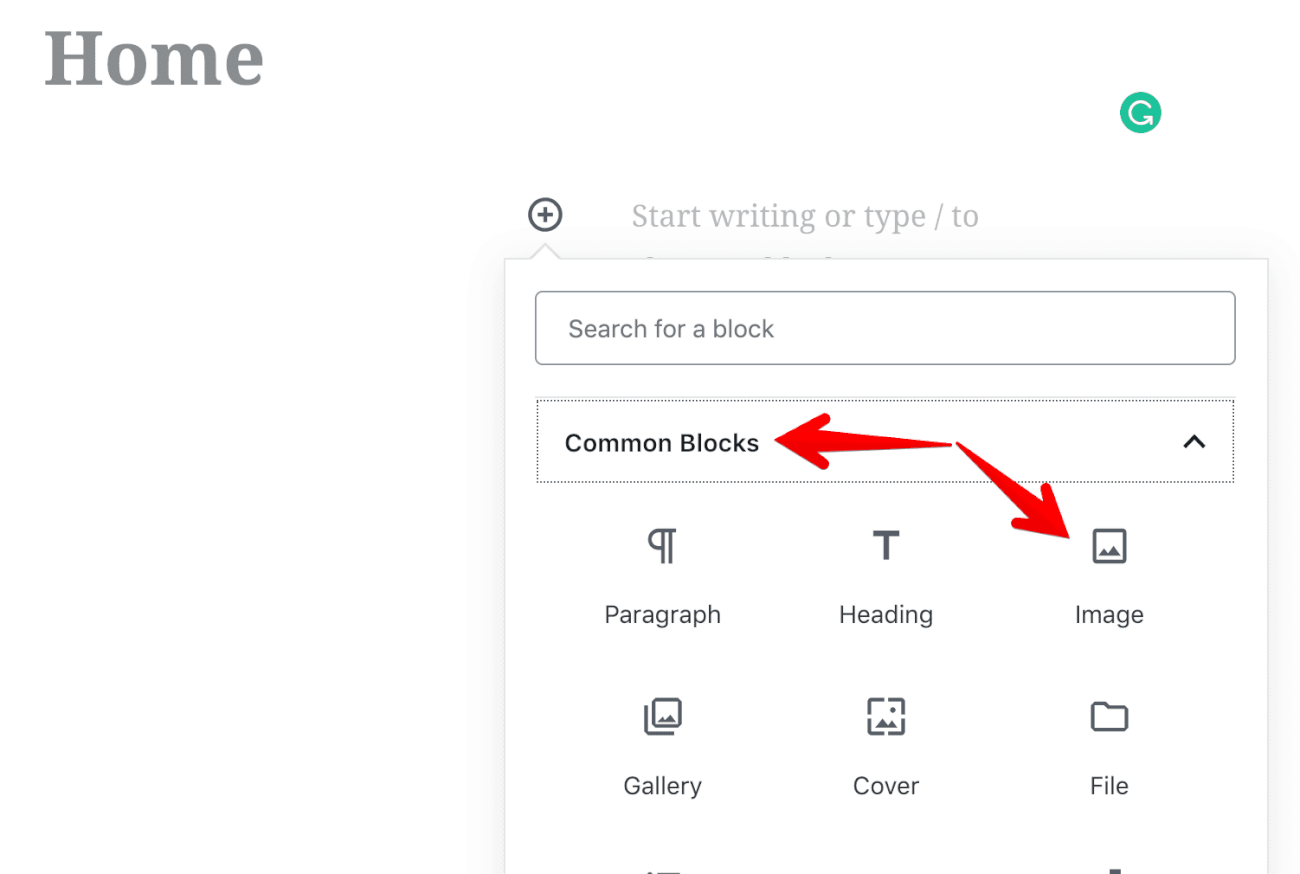
In our case, we don’t want a Paragraph Block inside the first column. We need an Image Block. The thing is, we can put any kind of Block inside a “Columns” Block. We can also put another “Columns” block. You are not limited at all.
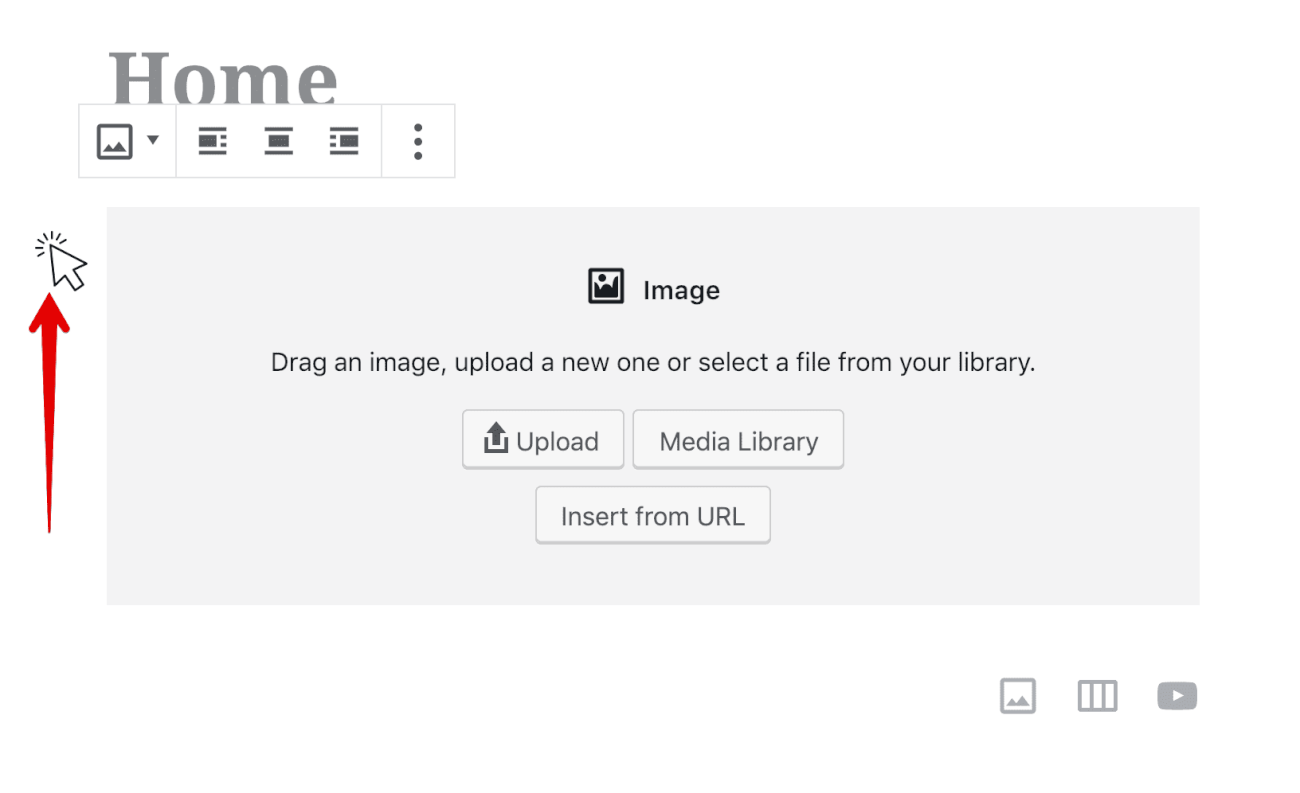
To do this, click on the Plus Icon on the right-hand side and choose the Image Block to add it to the First Column.
If you can not find the Image Block inside most used section, you can find it inside the “Common Blocks” section. Once if you find it, click on it to add it to the first column box.
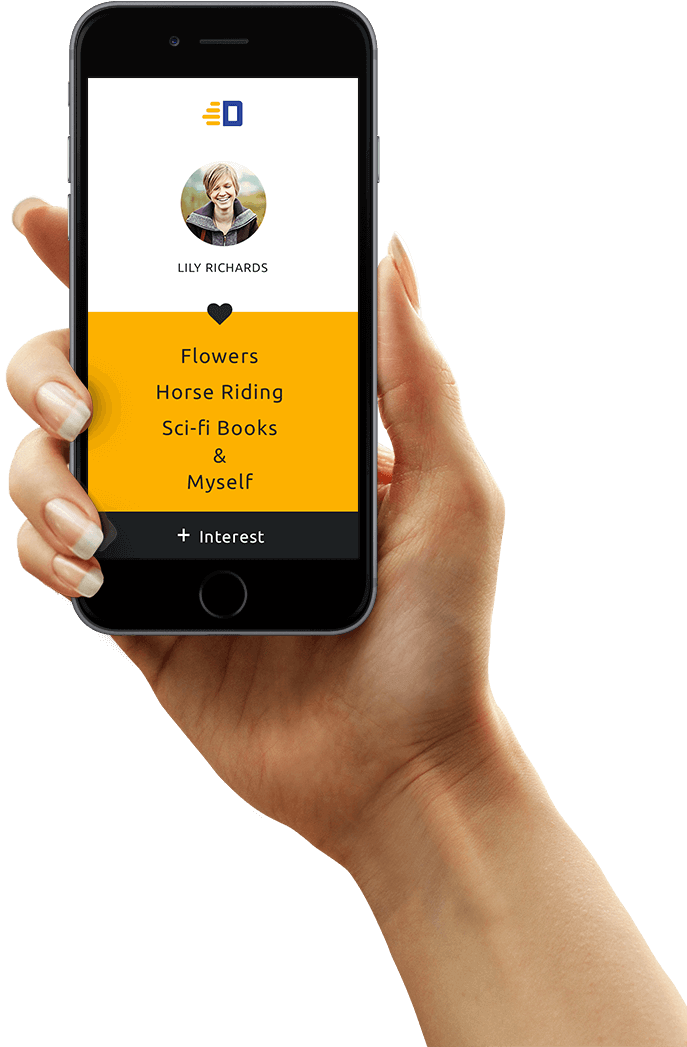
Once you added the Image Block, WordPress asks you to upload or select an existing image from the media library.
We haven’t uploaded this image yet, so download the following image and Upload it by clicking on the “Upload” button.
Once the upload is done, WordPress activates this Image Block so that we can configure it to our needs using the options on the right-hand side of the screen.
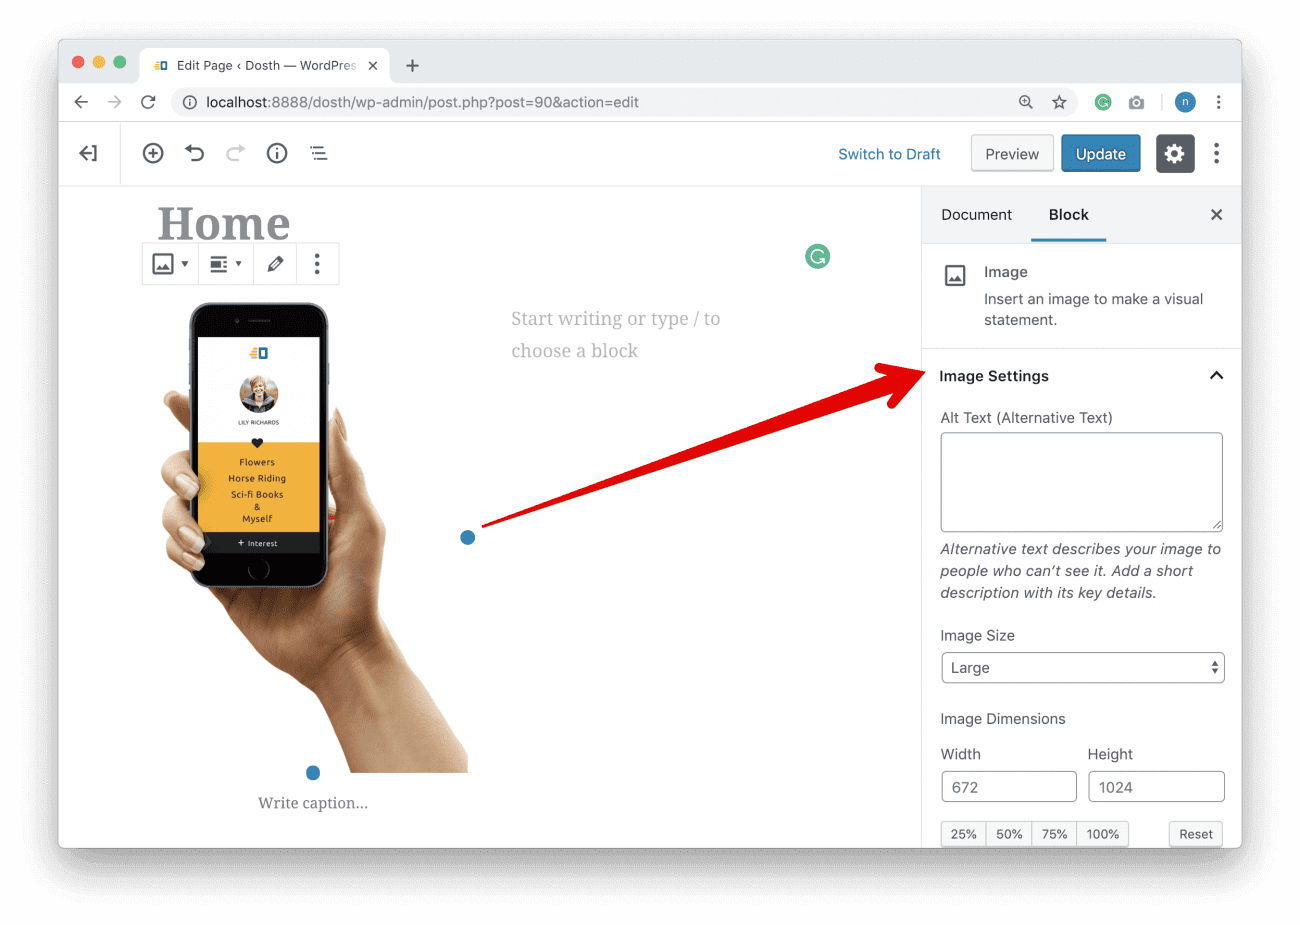
I can’t stress this enough, these options on the right-hand side of the screen belong to the individual block that is currently active.
The first setting inside the Image Settings is Alt Text, you can enter the alternative text, but that is rather soon, most of the time, the SEO team will ask me to add a text provided by them, So, I don’t touch this setting at all.
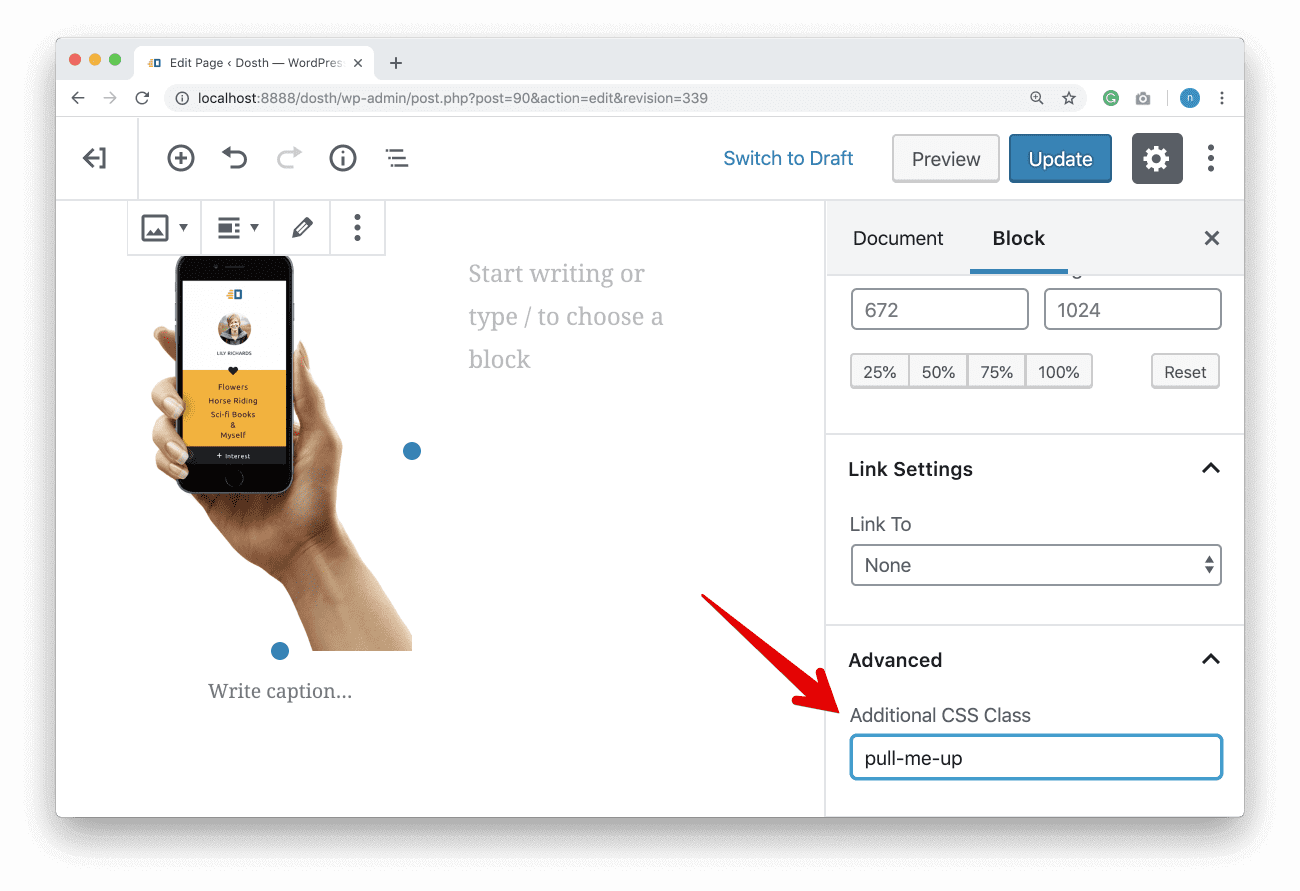
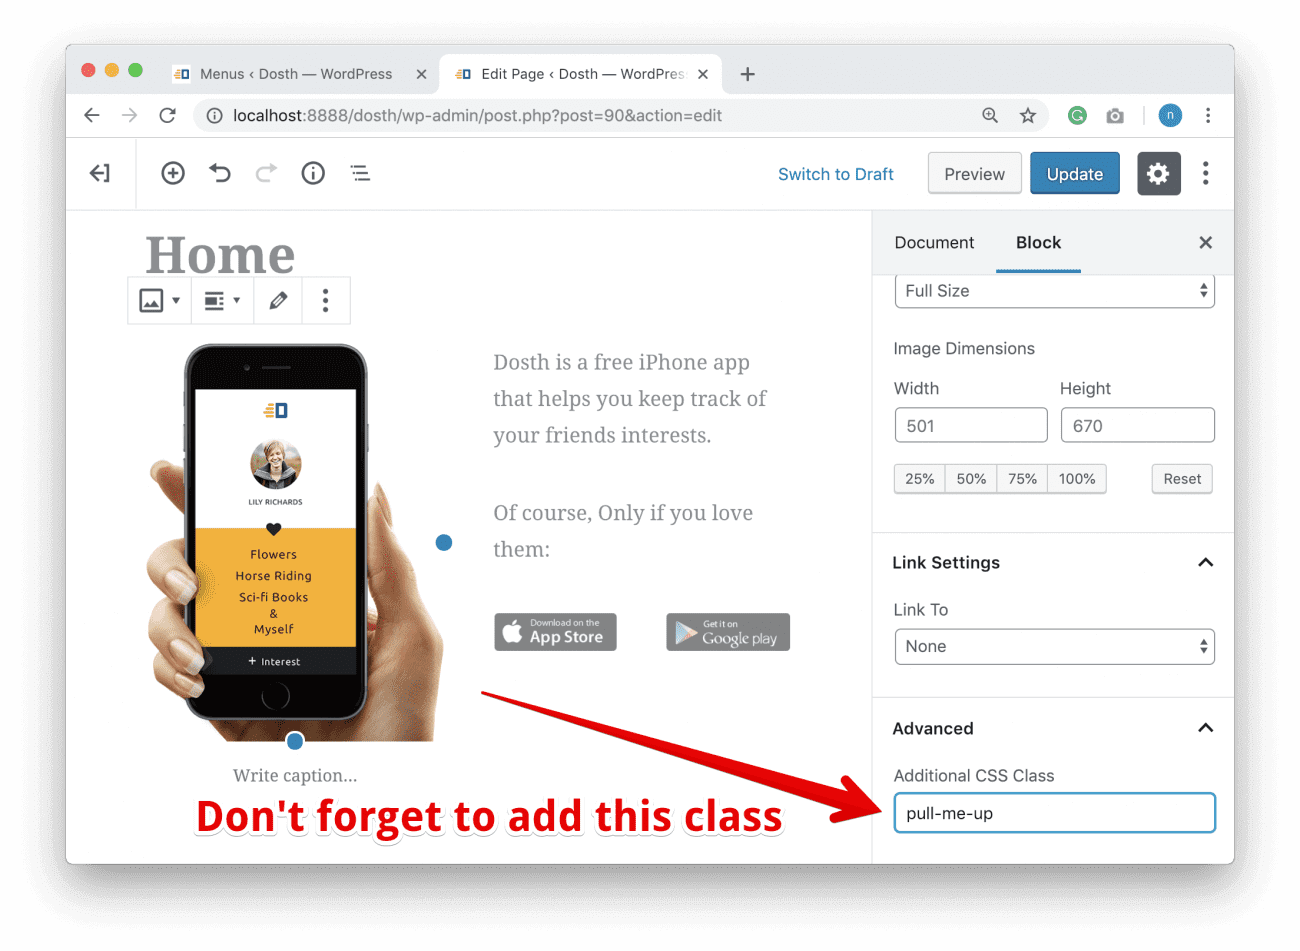
While the rest of the settings are looking good, I do want to add an additional class for this image because if you notice the design, this image is being pulled into the Header part.
To do this, scroll down to the bottom of the Image Settings and Click on the “Advanced” section to open it up and put the “pull-me-up” class name inside the “Additional CSS Class” field.
We are now good with the First Column box.
Next, click inside the Second Column box and put the following text inside it:
Dosth is a free iPhone app that helps you keep track of your friends interests.
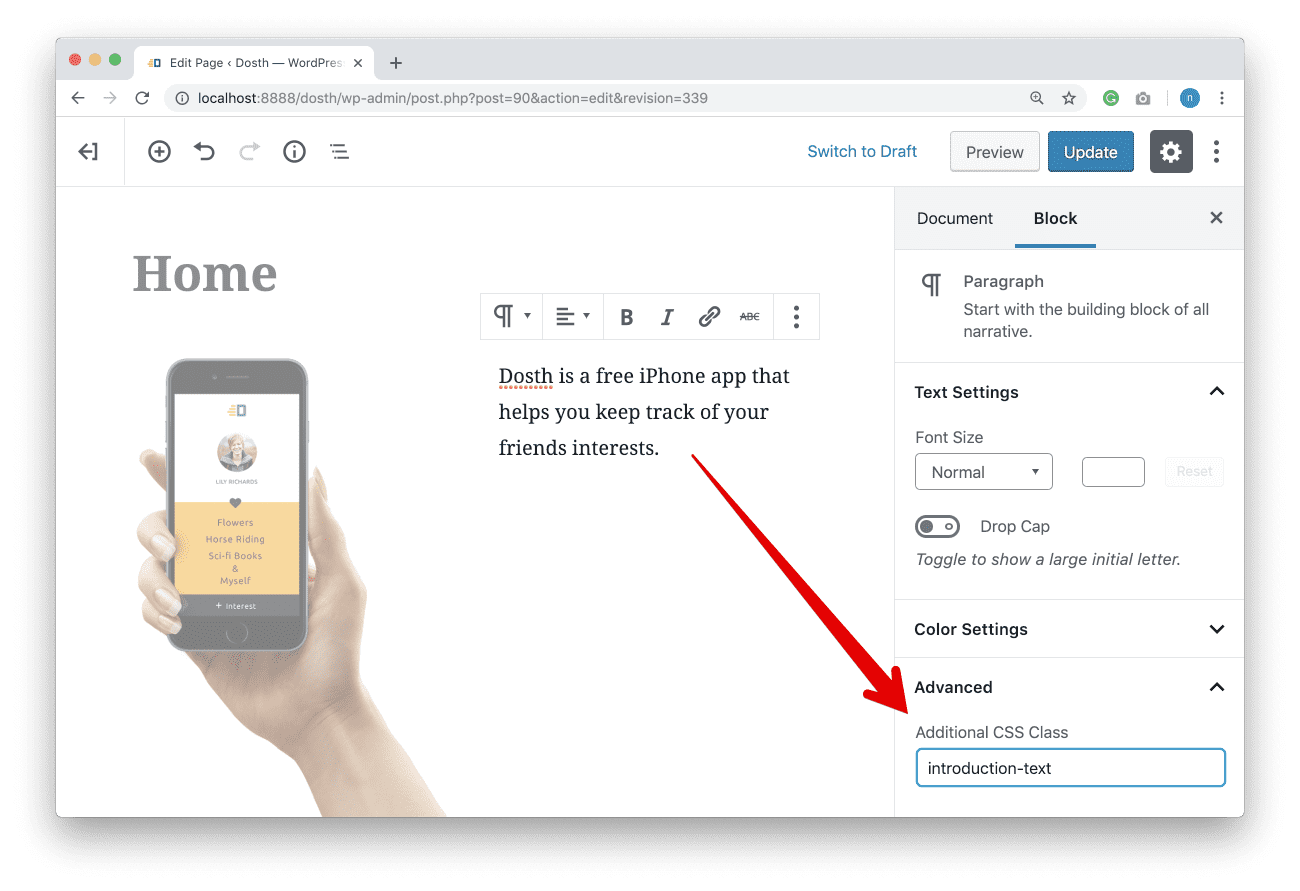
I don’t want to touch other Text settings, but again, let’s add “introduction-text” as an additional class to this Paragraph Block.
Because we are not writing our own HTML markup, we end up adding additional classes for almost all every time if you want to style a webpage element differently from others. So, don’t feel shy.
How to insert a new Block after the existing Block
Next, we need to put another separate Paragraph Block underneath the existing “Introduction Text” Block.
If you put the mouse cursor on top of the respective column box until the Plus Icon appears.
Don’t click on it, If you do so, WordPress adds the new block at the top column.
Instead, click on the First Paragraph Block to get access to the Action Links.
Then, click on the “Three Vertical Dots” icon and choose “Insert After” action link from the dropdown menu.
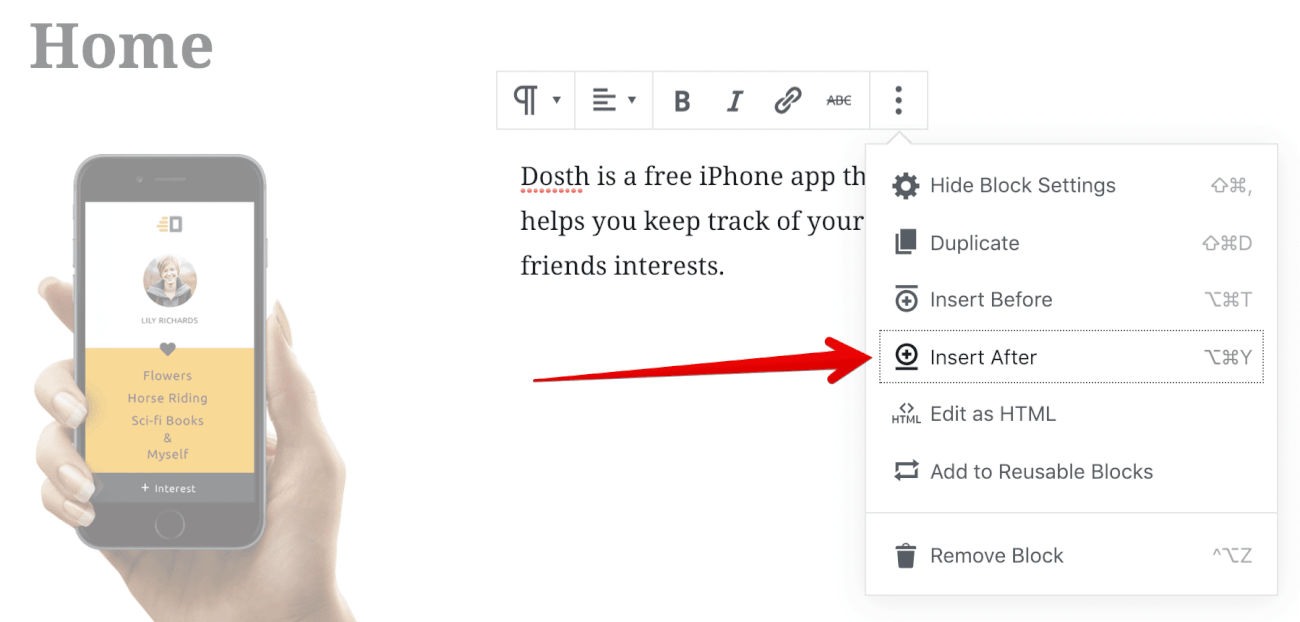
Always remember, WordPress always adds a default Paragraph block when we click on the Insert After or Insert Before action links.
If you want to replace it, you can always click on the Plus Icon located at the right side of the column.
In our case, we want the Paragraph block.
Anyway, put the following text inside it:
Of course, Only if you love them:
We want to style this text differently too, so, add “secondary-color” as an additional class to this Paragraph Block.
Now that we are done with both the paragraphs, let’s deal the App Store links.
How to create nested columns
If you notice the design, App Store Buttons are placed next to each other, so, to achieve this, let’s create nested columns.
So, click on the second Paragraph and choose the “Insert After” action from the Dropdown menu.
This time, replace the newly added Paragraph Block with the Columns Block.
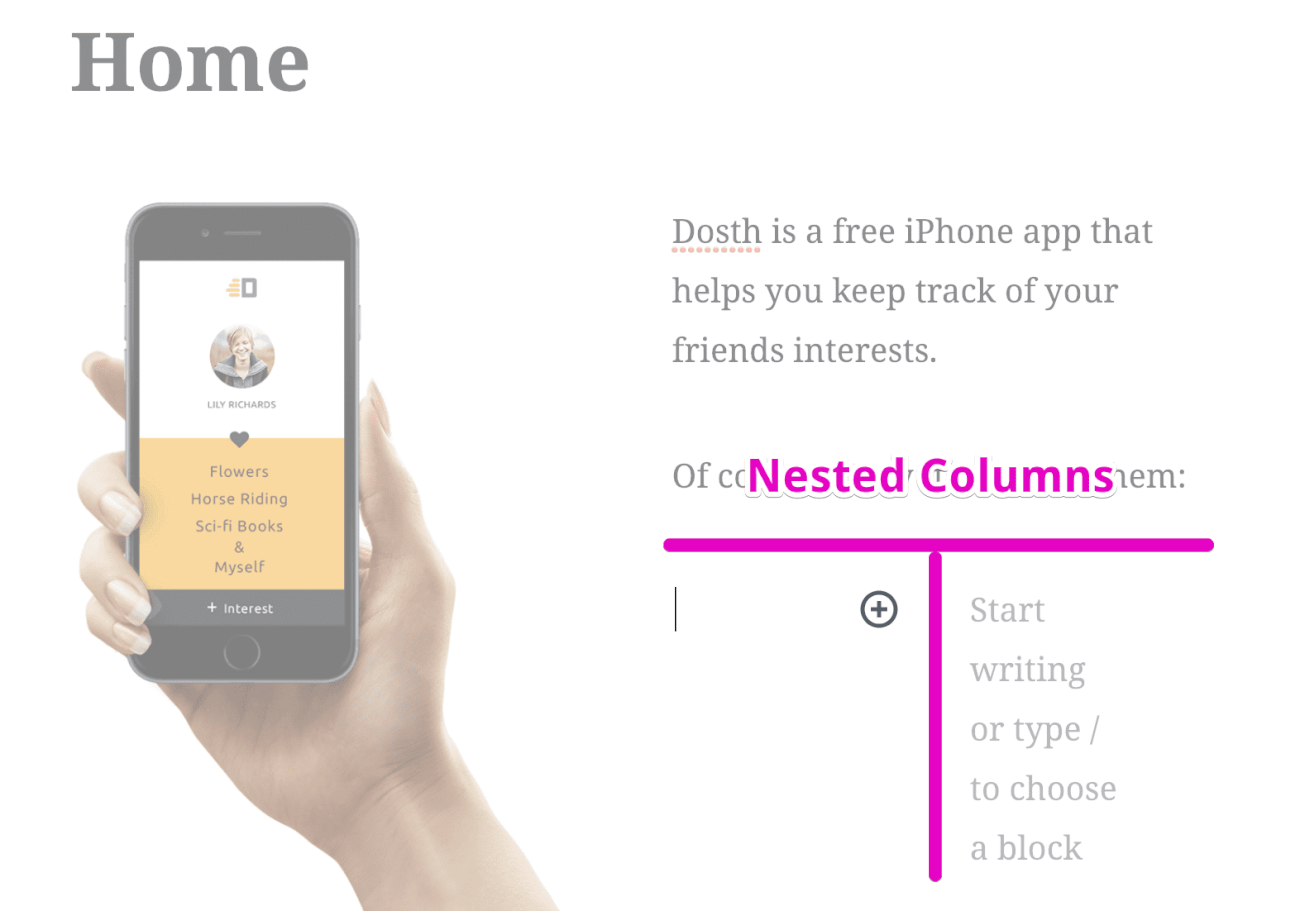
Tip: Add this exactly how we achieve the 50%/25%/25% layout using the Gutenberg editor. We got no other option but to use nested columns.
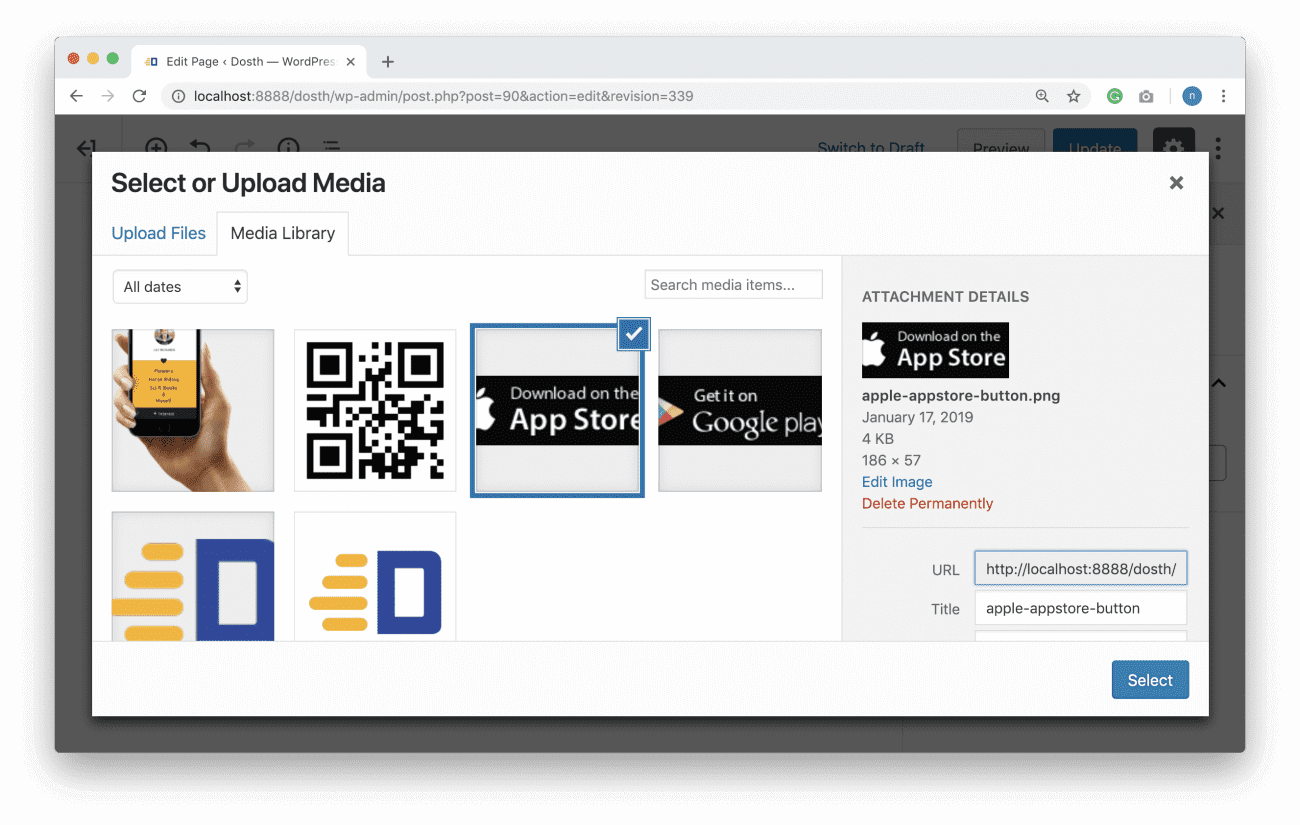
Anyway, put an image block inside the first nested column and choose the Apple App Store image button from the media library. If remember, we added this Image button when we built our Footer Section One.
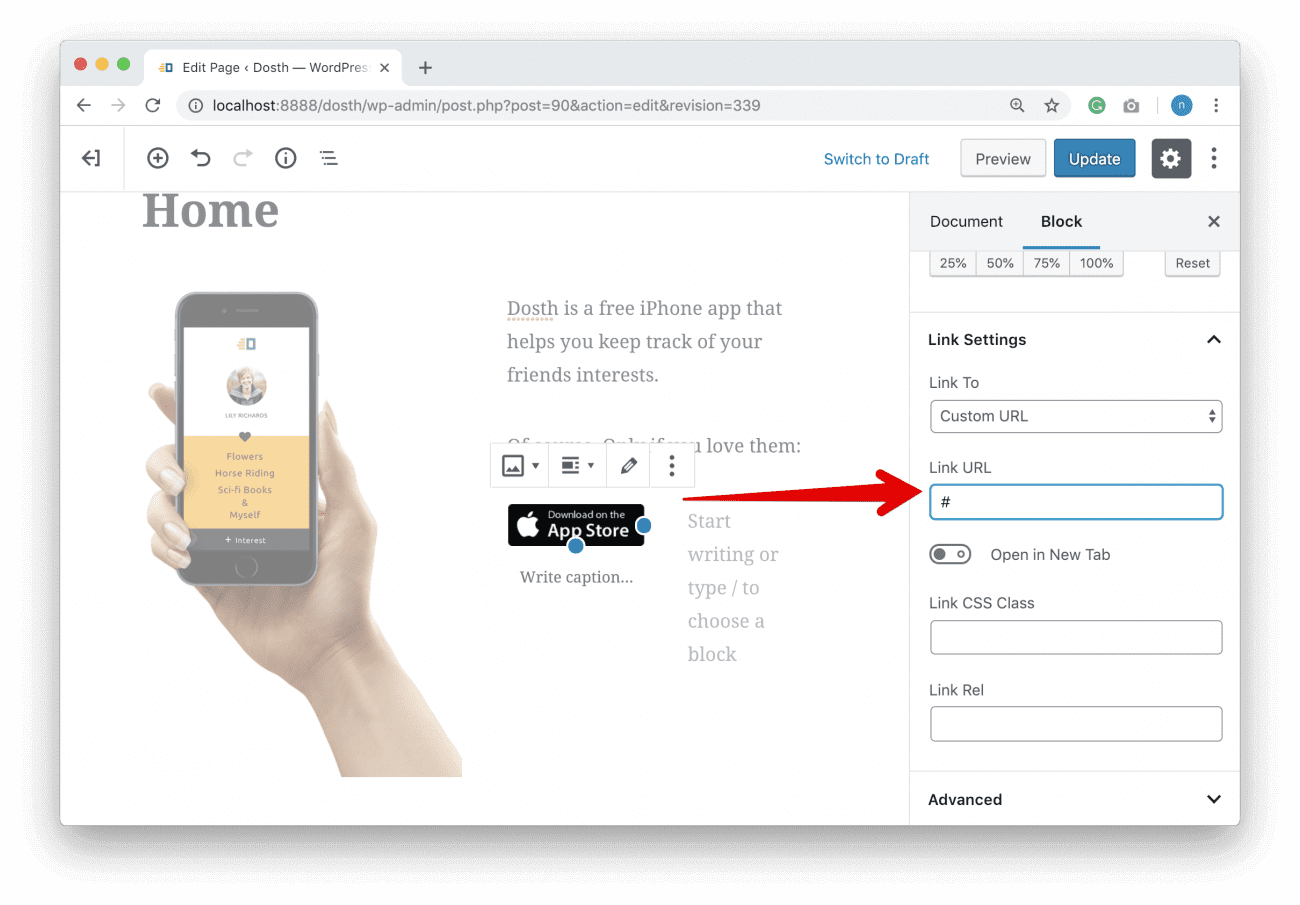
Also, we want this image to be a link that takes the visitor to the Apple’s App store, so go to the Link Settings section located under Image Settings.
Choose “Custom URL” for the “Link to” field and enter a custom URL. Since our App is a dummy, I put # for the custom URL.
Next, repeat the same steps to add the Google Play Store image to the Second nested column.

How to access Columns Block options
Finally, let’s add a class name to this entire nested Columns Block.
To do this, First, click anywhere outside the currently selected Block to come out of it.
Here comes the messy part, it is not that straight forward to select the Nested Columns block. It could take multiple attempts.
You have to keep clicking around or inside the nested Columns until you succeed and the nested Columns block is selected.
In my case, clicking between the images did the trick for me.

Once you select it, add “app-store-image-links” class to the “Additional CSS Class” field.
Next, let’s see how to remove a Block if we mess up something and start from scratch!
Note: I don’t want you to delete any blocks that I made you add above.
How to remove a New Block
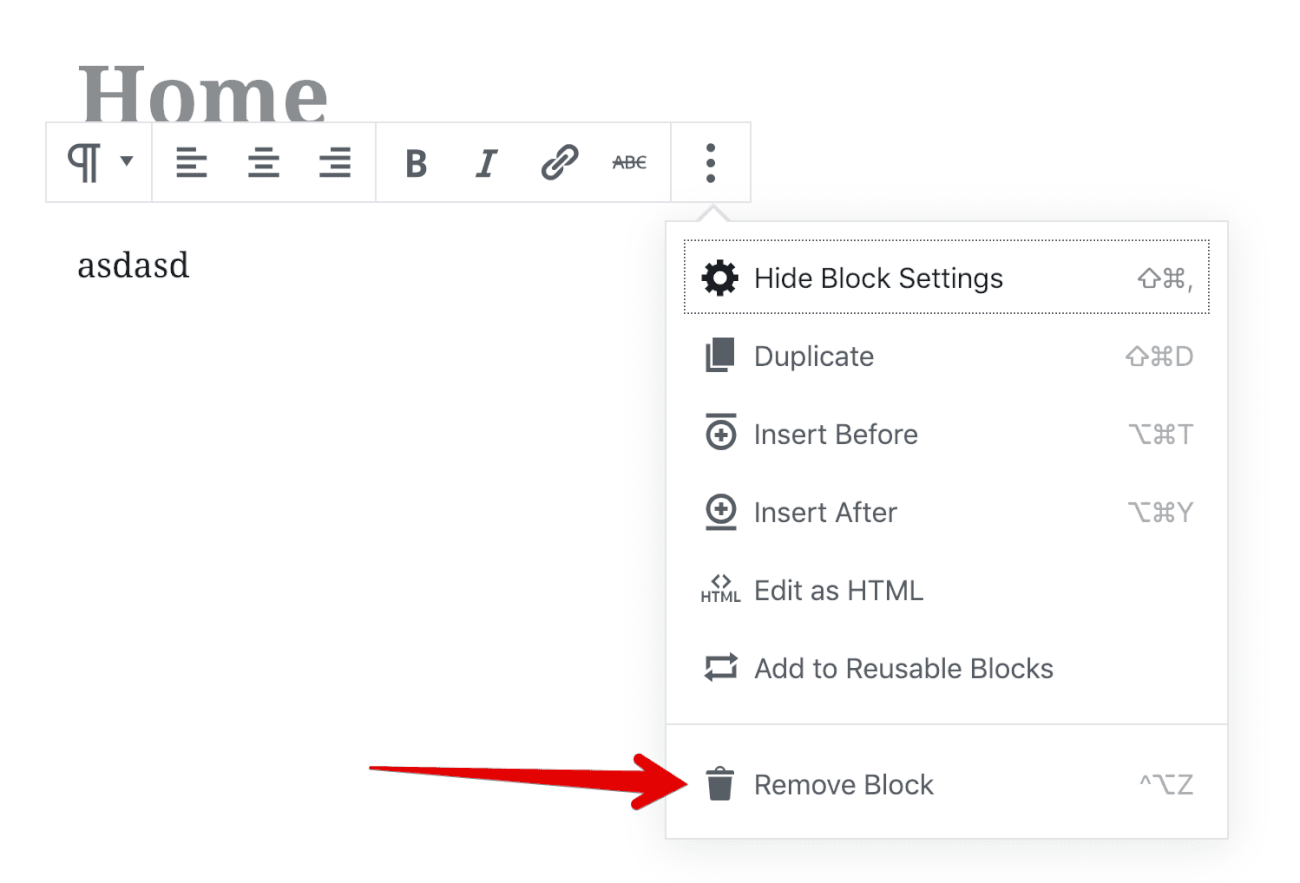
How to remove a Paragraph Block
To Remove a Paragraph Block, first, type some crap in it to get the formatting options.
Next, click on the “Three Vertical Dots” icon to access the dropdown with action links.
Finally, click on the “Remove Block” action Link.
How to remove the rest of the Blocks
To remove any Block other than Paragraph Block, click on the left-hand side of the Block like this to get the action links:
Finally, click on the “Three Vertical Dots” menu icon and then click on the “Remove Block” action link to remove the block.
The thing is, I accidentally uploaded the uncropped version of the iPhone-In-Hand image. The hand looks too big on the screen.
So, download the following Hand Image one more time:

And replace this existing hand image with this one.
Between you can also delete an Image Block by selecting the image and hitting the Backspace/Delete button on the keyboard.
Because you have added new Image by deleting the previous one, the “pull-me-up” class that we have added to old Image block is now gone. So, don’t forget to re-add this class to the new Image Block.
Anyway, the layout with smaller hand looks much better.
How to Undo your accidents
If you accidentally deleted some Block, you can undo it by using the following Keyboard shortcuts:
CMD + Z for the mac
CTRL + Z for the Windows
or you can click on the Undo button located at the Top Left side of the Screen.

How to Redo what you have Undone
You can come back to your actual mistake by redoing what you have undone by using the following Keyboard shortcuts
CMD + SHIFT + Z for the mac
CTRL + SHIFT + Z for the Windows
Ufff…This is pretty much how we use the Gutenberg editor.
Save the Changes
Finally, assuming you did not delete any blocks that I made you add :P, let’s save our page changes by clicking on the “Update” button located at the top-right corner of the Page.
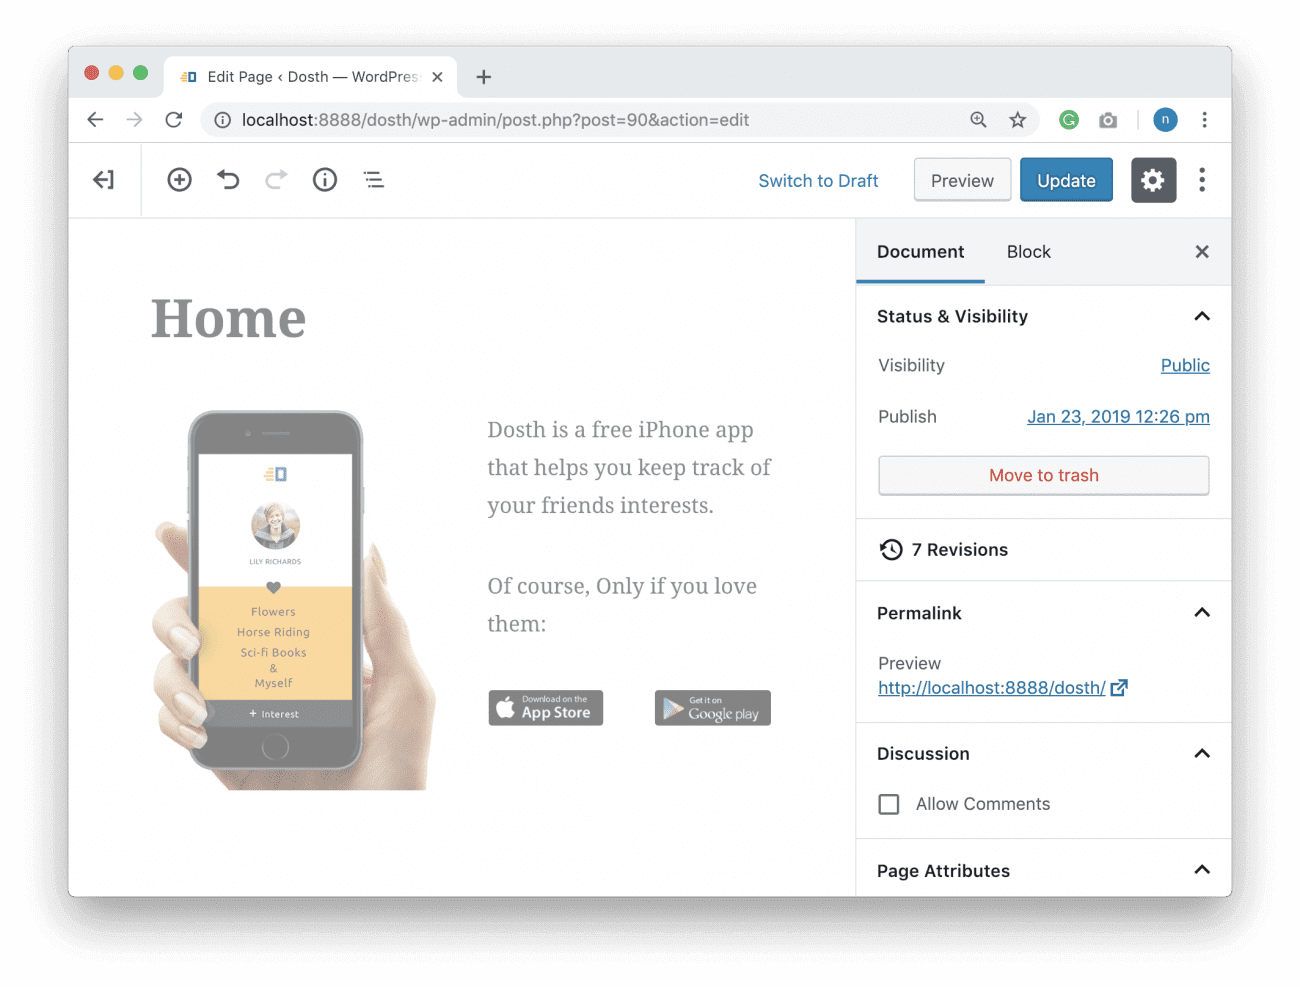
Here is our Final Gutenberg Editor after updating the Page:
This is why Most people hate Gutenberg Editor
Although the user interface looks pretty, it is not usable yet. Be it our clients or administrators, they need to get habituated to it.
And this is why most developers in the WordPress community hate Gutenberg Editor. It is not easy to use.
But nevertheless, we made the most important content of the Homepage editable and destructible proof.
In the next lesson, we will output this content to the frontend using “THE LOOP”.
 © 2026 UsableWP. A project by Naresh Devineni.