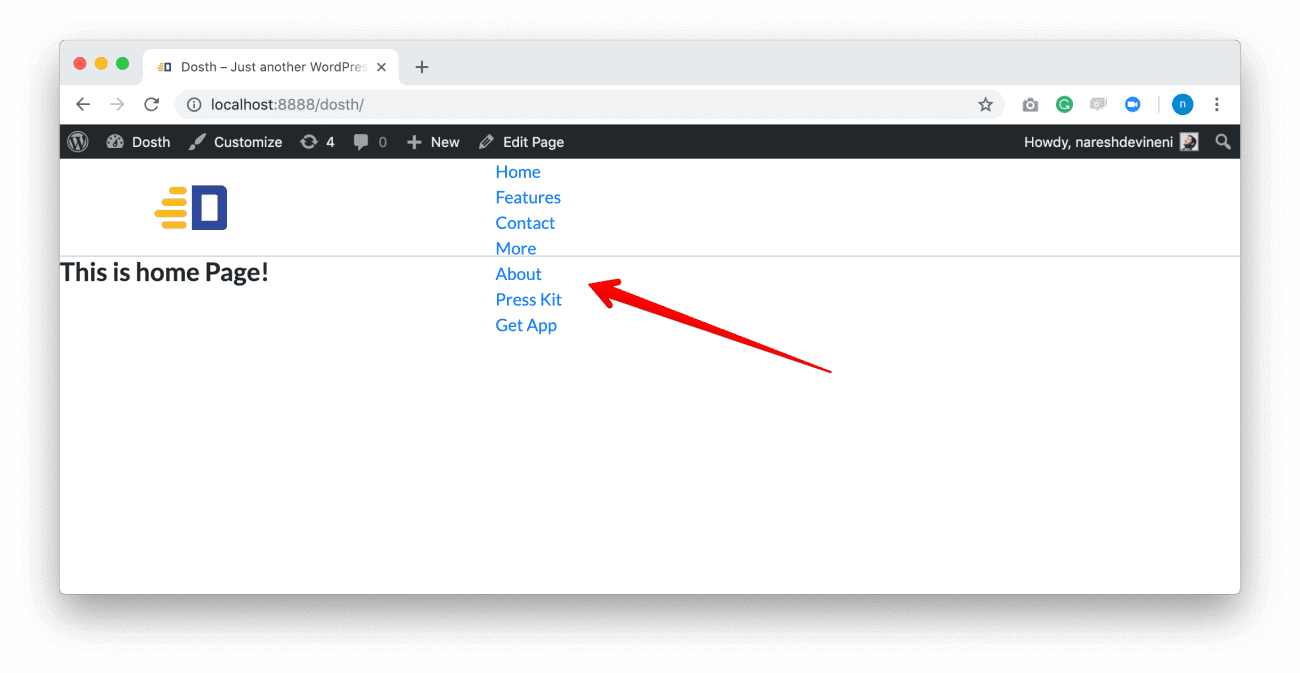
We did not style our header navigation yet! Right now, it looks like this:
And if we take look at the underlying markup, it looks like this:
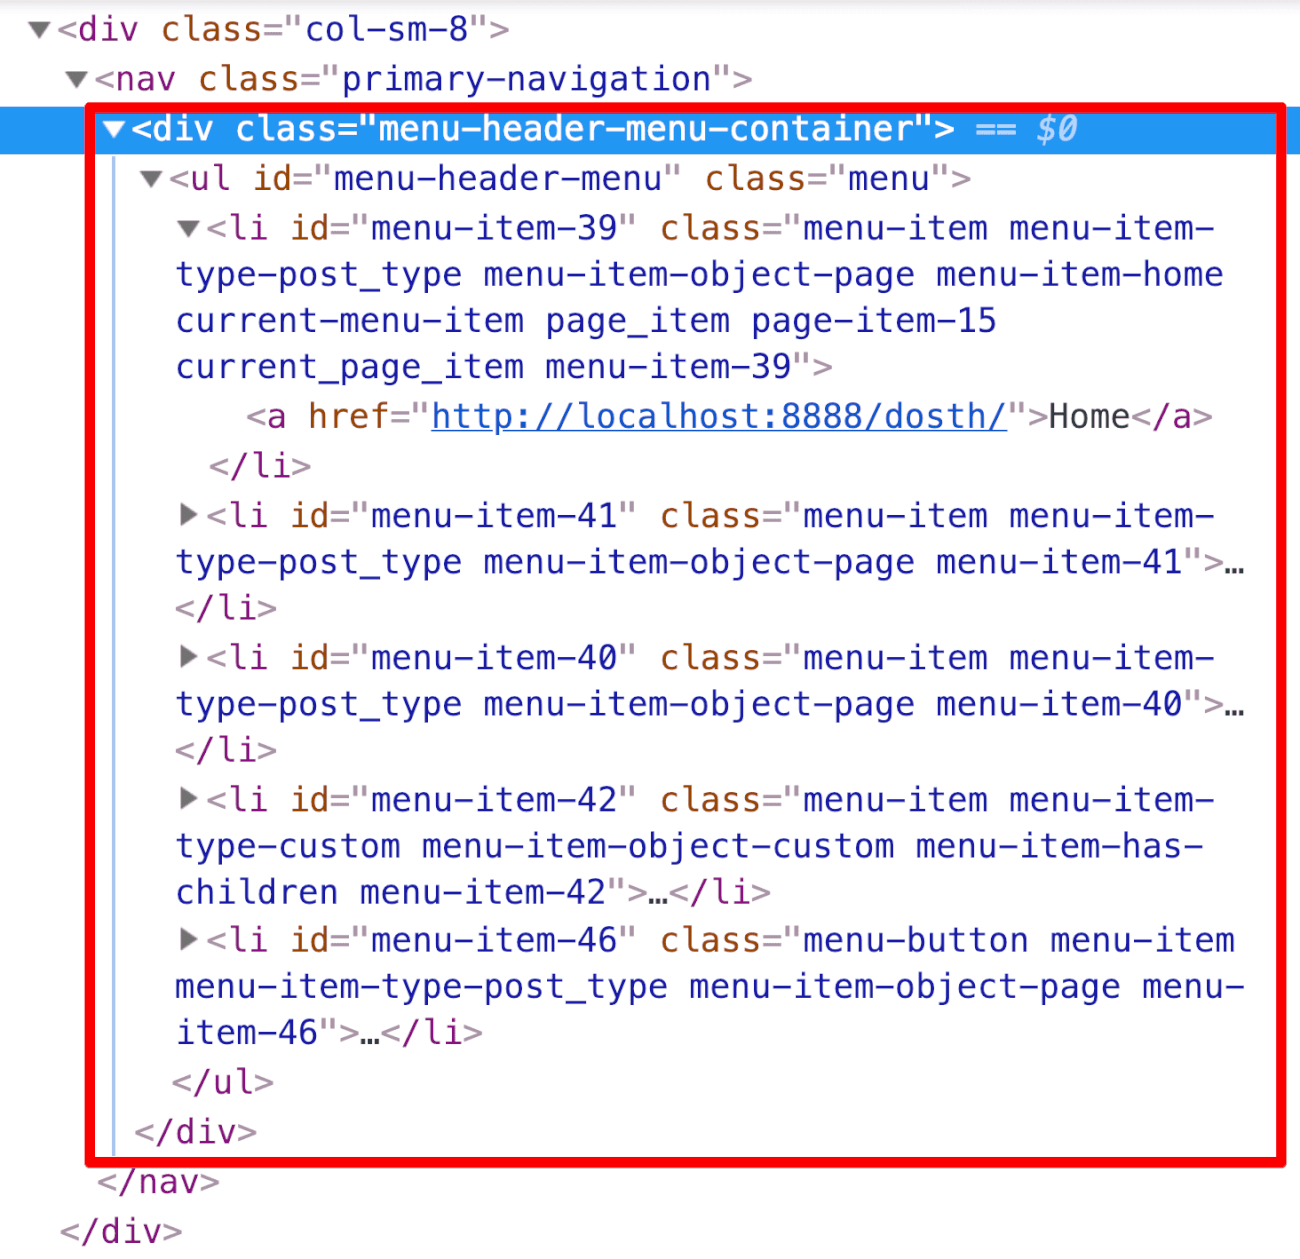
If you notice, it is a pretty standard navigation menu markup. And you can style it any way you want. You don’t need to style it in a special way just because WordPress is generating it.
So, let’s style our header menu by adding the following CSS to the style.css file.
/*-------------------------------------------------------------------------------
  4.Common Menu Styles
-------------------------------------------------------------------------------*/
.menu li {
    position: relative;
}
.menu li:hover > ul, .menu li.sfHover > ul {
    display: block;
}
.menu li:hover > a, .menu li a:focus {
    color: #fdb813;
}
.menu li ul {
    position: absolute;
    display: none;
    top: 100%;
    z-index: 1000;
    width: 150px;
    left: 1px;
    background-color: #f3f3f3;
}
.menu li ul a {
    display: block;
    text-transform: capitalize;
    border-width: 1px;
    line-height: 32px;
    font-size: 0.875em;
    color: #222;
}
.menu li ul a:hover, .menu li ul a:focus {
    background-color: #dadada;
    color: #222;
}
.menu li ul ul {
    left: 100%;
}
.menu li ul li {
    text-align: left;
}
.menu li ul li:last-child a {
    border-bottom: 0;
}
.menu a {
    display: block;
    padding-left: 10px;
    padding-right: 10px;
    color:#878787;
}
.menu > li {
    display: block;
    float: left;
}
.menu > li:last-child {
    margin-right: 0;
}
.menu > li > a {
    -moz-transition: 0.3s all;
    -webkit-transition: 0.3s all;
    transition: 0.3s all;
}
.menu-button{
    height: 92px;
}
.menu-button a{
    line-height: 38px;
    border-radius:4px;
    padding:0 20px;
    background-color:#fdb813;
    color: black;
    font-weight: bold;
    font-size:16px;
    margin-left:10px;
    position: relative;
    top: 50%;
    -webkit-transform: translateY(-50%);
    -moz-transform: translateY(-50%);
    transform: translateY(-50%);
}
.menu-button a:hover, .menu-button a:focus{
    background-color:#6e551a;
    color:white;
}
/*-------------------------------------------------------------------------------
  5.Header Menu Styles
-------------------------------------------------------------------------------*/
.primary-navigation{
    height: 92px;
    display:-webkit-box;
    display:-ms-flexbox;
    display:flex;
    -webkit-box-pack: end;
        -ms-flex-pack: end;
            justify-content: flex-end;
    -webkit-box-align: center;
        -ms-flex-align: center;
            align-items: center;
}
.primary-navigation .menu > li:not(.menu-button) >  a{
    line-height: 92px;
}
.current-menu-item a{
    color: #fdb813;
}
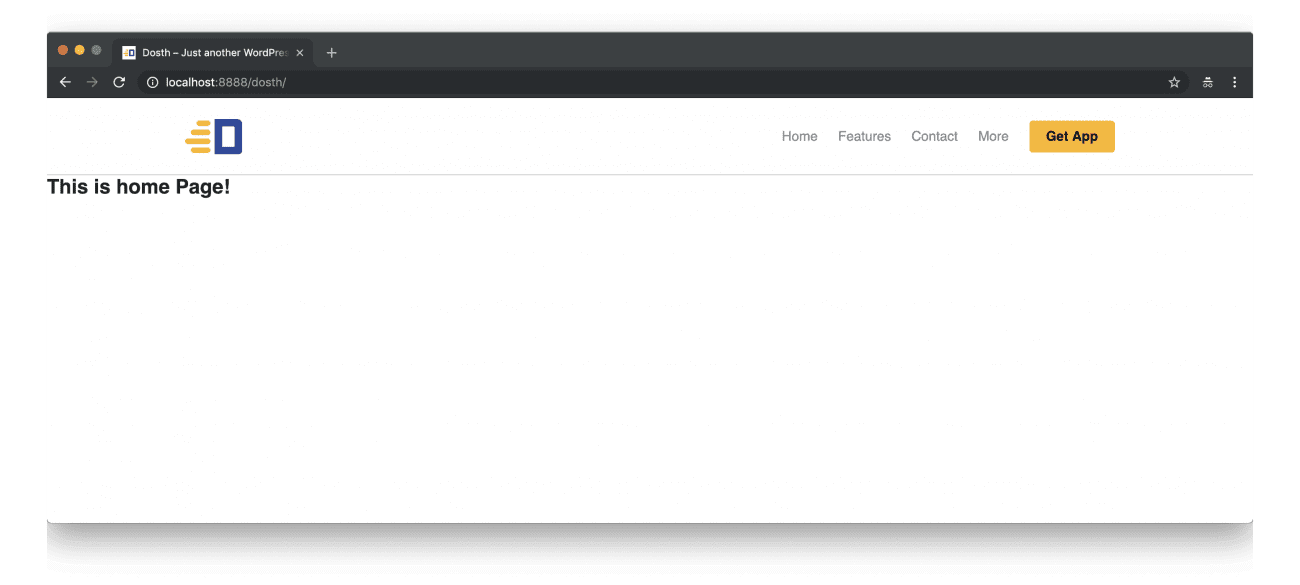
After adding the above CSS, here is how our header looks in the browser.
There is one more thing we need to take care of. We have to indicate our website visitors which page on the website they are currently on. A common technique we use to solve this problem is styling the current page’s menu link a bit differently from others.
Styling the current page link is a very big problem when we build websites using plain HTML / CSS. It is tedious. But with WordPress, it is a piece of cake. WordPress adds some special classes to the custom menu markup so that we can easily achieve this.
We are currently on the home page. so let’s style the Home menu link a bit differently.
Once again, let’s take a peek into the markup of the Home menu link.
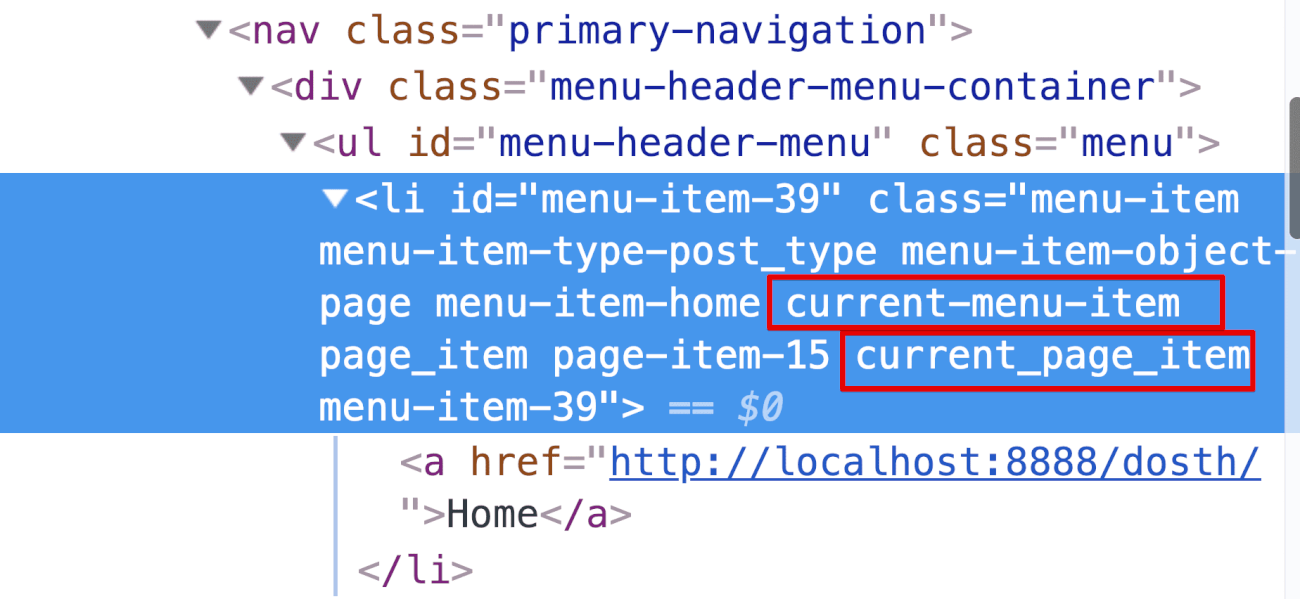
if you notice, WordPress added two special classes indicating that the Home menu link is the current page.
To get our job done, we can add the same style to both the above classes, but that is unnecessary. The current_page_item class is generated only when the user visits a page. This class doesn’t show up if we are on a category archive. tn the other hand, The current-menu-item class is a generic class which covers any current menu link, not just pages.
So, let’s style the current menu link by adding styles to the current-menu-item class. Put the following CSS code inside the the style.css file.
.current-menu-item a{
   color: #fdb813;
}
Now, if we switch back to the Home page in the browser and refresh it, Our current menu link is now styled in yellow!

WordPress saves us a lot of time, isn’t it?
Now, let’s take care of the dropdowns links. If you remember, we tucked some pages inside the “More” link.
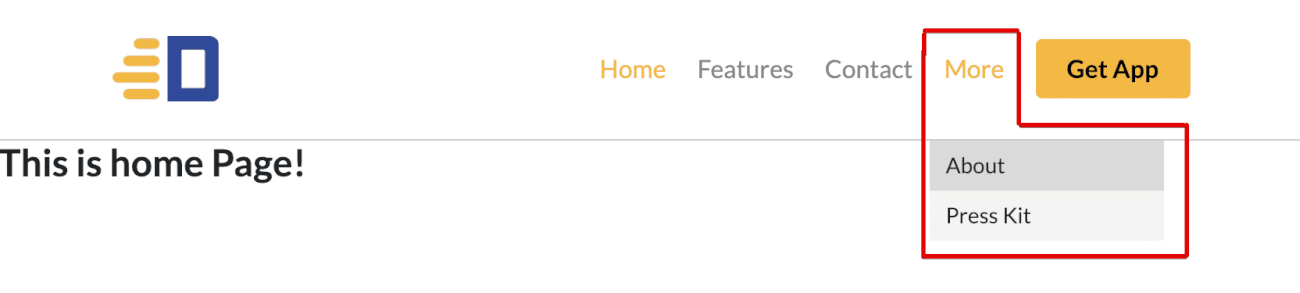
Since we can not totally depend on Javascript to display dropdowns, as a fallback, we have implemented a CSS based dropdown. This is the reason why the dropdown menu is working if you put your cursor on the More link.
CSS based dropdown is great, but it is not accessible for people with disabilities. For example, try to access the “More” dropdown by using your keyboard.
You can not!
This is where the Superfish Javascript plugin comes in. It allows us to create accessible dropdown menus. So go ahead and visit:
https://superfish.joelbirch.design/
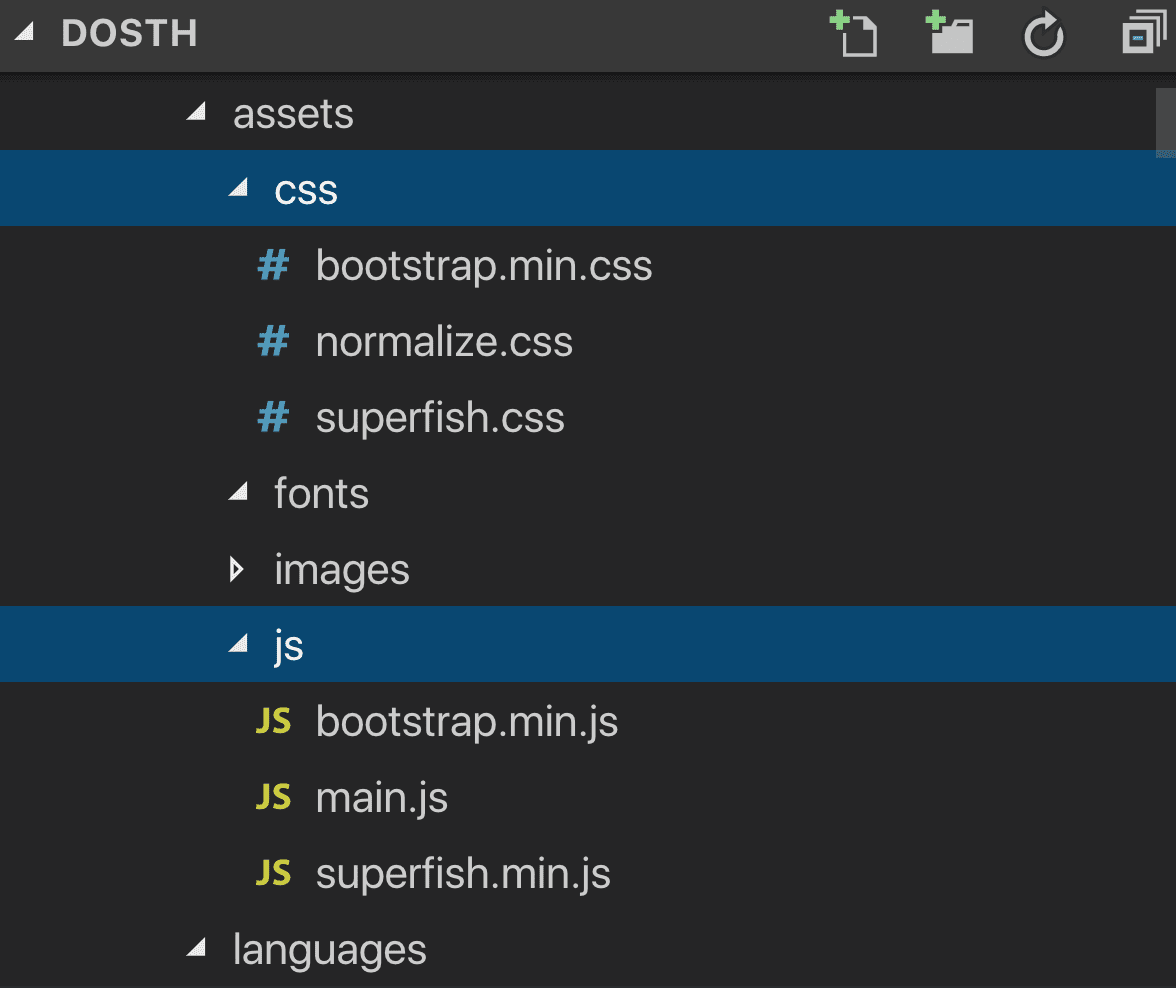
And, download the latest superfish zip file. Extract it so that you can copy the necessary files to our theme.
copy the superfish.cssfile to the assets/css directory.
Then, copy the superfish.min.jsfile to the assets/js directory.
Also, copy the bootstrap.min.jsfile to the assets/js directory.
And here is the updated version of the assets directory inside visual code editor.
Now that we have everything set up, go ahead and enqueue the superfish.cssfile and superfish.min.jsfile.
You already know how to enqueue both scripts and stylesheets. So, here is the updated nd_dosth_enqueue_stylesaction from the functions.phpfile.
<?php
function nd_dosth_enqueue_styles() {
    wp_enqueue_style(
        'normalize',
        get_stylesheet_directory_uri() . '/assets/css/normalize.css',
        array(),
        false,
        'all'
    );
    wp_enqueue_style(
        'bootstrap',
        get_stylesheet_directory_uri() . '/assets/css/bootstrap.min.css',
        array(),
        false,
        'all'
    );
    wp_enqueue_style(
        'superfish',
        get_stylesheet_directory_uri() . '/assets/css/superfish.css',
        array(),
        false,
        'all'
    );
    wp_enqueue_style(
        'main-stylesheet',
        get_stylesheet_uri(),
        array('normalize', 'bootstrap'),
        "2.0",
        'all'
    );
}
add_action( 'wp_enqueue_scripts', 'nd_dosth_enqueue_styles' );
The Superfish stylesheet is a third-party stylesheet, so I enqueued it just before our main stylesheet. Also, if you notice, I did not update the dependencies array of our main stylesheet. This is another neat technique for controlling the enqueue order. Since we are calling the Superfish plugin’s enqueue function just before the main stylesheet’s enqueue function, WordPress enqueues the Superfish stylesheet just before the main-stylesheet.
And, here is the updated nd_dosth_enqueue_scriptsaction from the functions.phpfile.
function nd_dosth_enqueue_scripts() {
    wp_enqueue_script(
        'superfish',
        get_stylesheet_directory_uri() . '/assets/js/superfish.min.js',
        array('jquery'),
        '1.0.0',
        true
    );
    wp_enqueue_script(
        'main-js',
        get_stylesheet_directory_uri() . '/assets/js/main.js',
        array('jquery'),
        '1.0.0',
        true
    );
}
add_action( 'wp_enqueue_scripts', 'nd_dosth_enqueue_scripts' );
The same enqueue order technique is being applied here too. Both our main script and the Superfish plugin depends on the jQuery plugin, so I added jQuery as a dependency to the Superfish plugin as well. And because we are calling the Superfish plugin’s enqueue function before the main script’s enqueue function, WordPress enqueues the Superfish plugin just before the main script.
Now that we have enqueued the Superfish script and the stylesheet, let’s initialize it inside our main.jsfile.
Open up the main.jsfile and put the following code init:
(function($){
   /* If this line runs, it means Javascript is enabled in the browser
    * so replace no-js class with js for the body tag
    */
   document.body.className = document.body.className.replace("no-js","js");


  /* -----------------------------------------------------------------*/
  /* Activate accessible superfish
  /* -----------------------------------------------------------------*/
  $('.primary-navigation').find('.menu').superfish({
      smoothHeight : true,
      delay : 600,
      animation : {
         opacity :'show',
         height  :'show'
      },
      speed : 'fast',
      autoArrows : false
  });

})(jQuery);
Let’s break it down.
First of all, we are replacing the “no-js” class with “js” class on the <body> tag. If you remember, we added the “no-js” class using the body_class() function call in the “Introducing the body_class() template tag function” lesson.
Next, we are initializing the Superfish plugin. And this is pretty much how we use any third-party javascript plugin inside our WordPress theme. Nothing special.
Now if you try to access the dropdown menu of “More” menu link using a keyboard, you can access it with ease.
And with this, we are done with the desktop version of the header.
We’ll deal with the mobile responsive menu once we are done with the footer of our site.
So, in the next lesson, we will see what it takes to build a footer of a WordPress website.
Hi, just a heads up the link to superfish files no longer looks it looks like the page is now: https://superfish.joelbirch.design/
Thanks Krisna, this is now fixed 🙂
I’m jumping back in after along time anyway my stylesheet seems to go from:
2. Header Styles
to:
4. Common Menu Styles
Am I missing section 3 or are we doing that later on?
Hi Krisna, If you notice the style.css from Github:
https://github.com/nareshdevineni/dosth/blob/master/style.css
Header styles is at 3 and General Styles is at 2. So, no section is missing.
Please go through the Github Code if you get stuck.
It’s a typo from my side while writing the CSS code for this project.
Sorry for the inconvinience!
I’ve been trying to get the main.js code to work for awhile now:
The Superfish seems to work everything tabs over with the tab key like expected despite my tag having a “no-js” class.
That should read my body tag has a “no-js” class.
“no-js” class doesn’t stop Javascript from getting executed if the browser supports Javascript.
Ideally, the above line of code should replace the “no-js” class with the “js” class on the body tag.
Can you please explain the problem with more detail?
I have the line in
document.body.className = document.body.className.replace(“no-js”, “js”);
in my main.js
but my body tag still says:
I am pretty sure main.js is properly enqueued because my source code does say:
I kinda wonder if it might be a caching issue. I am using Local not Wamp or Mamp.