Using the index.php to render the Blog posts index page
Open up the index.php file and remove the loop entirely.
This is the leftover code.
<?php
/**
 * The main template file
 *
 * This is the most generic template file in a WordPress theme
 * and one of the two required files for a theme (the other being style.css).
 * It is used to display a page when nothing more specific matches a query.
 * E.g., it puts together the home page when no home.php file exists.
 *
 * @link https://developer.wordpress.org/themes/basics/template-hierarchy/
 *
 * @package Dosth
 */
get_header();
?>
<?php get_footer(); ?>
Next, place the following code after the get_header() function call:
<div class="content-container">
    <?php if ( is_home() ) : ?>
        <h1 class="page-title"><?php single_post_title(); ?></h1>
    <?php endif; ?>
</div>
We could end up using the index.php file for rendering the various types of archives. But, we just want to display the “Blog” title if we are viewing the Blog Homepage.
So, with the help of is_home() function call, we are checking whether we are viewing the Blog Homepage or not. The is_home() returns true only when viewing the Blog Homepage.
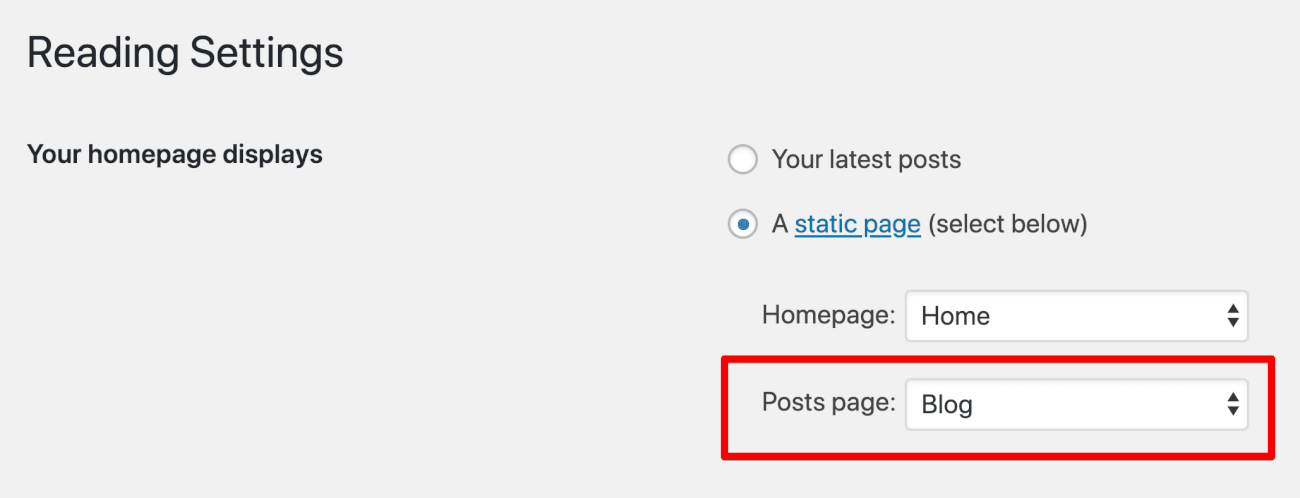
The is_home() is dependent on the “Your Homepage displays” option and if the “Posts Page” option is set to a particular page, this function will return true only on when viewing the page that is set as the “Posts page”.
However, if the “Your Homepage displays” option is set to “Your Latest Posts”, The is_home() returns true when someone visits the Homepage of our site as well.
In our case, we have set the “Blog” page as the “Posts page”, so is_home() function returns true when viewing the “Blog” page.
<div class="content-container">
    <?php if ( is_home() ) : ?>
        <h1 class="page-title"><?php single_post_title(); ?></h1>
    <?php endif; ?>
</div>
Then, only if the is_home() function returns true, we are printing the “Blog” page title with the help single_post_title() function.
The single_post_title() function will display the title of a particular static page when that static page is set to show blog posts index. So, we can not use this function to display the title of any other static page.
For example, if “Your Homepage displays” option is set to “Your Latest Posts”, Blog posts index will be shown when someone visits the Homepage. No static page with a title is involved here. So, the single_post_title() function will not print anything.
But, if “Your Homepage displays” option is set to “A Static Page” and if the “Posts Page” is set to some static page, the single_post_title() function will print the title of that static page.
In our case, We have set the “Blog” static page to show the blog posts index. Hence, the single_post_title() function is printing the title “Blog”.
That’s all. Nothing more. Nothing less. We call this a Single purpose function.
Common, let’s verify whether the code is working or not by visiting the “Blog” page on the frontend.
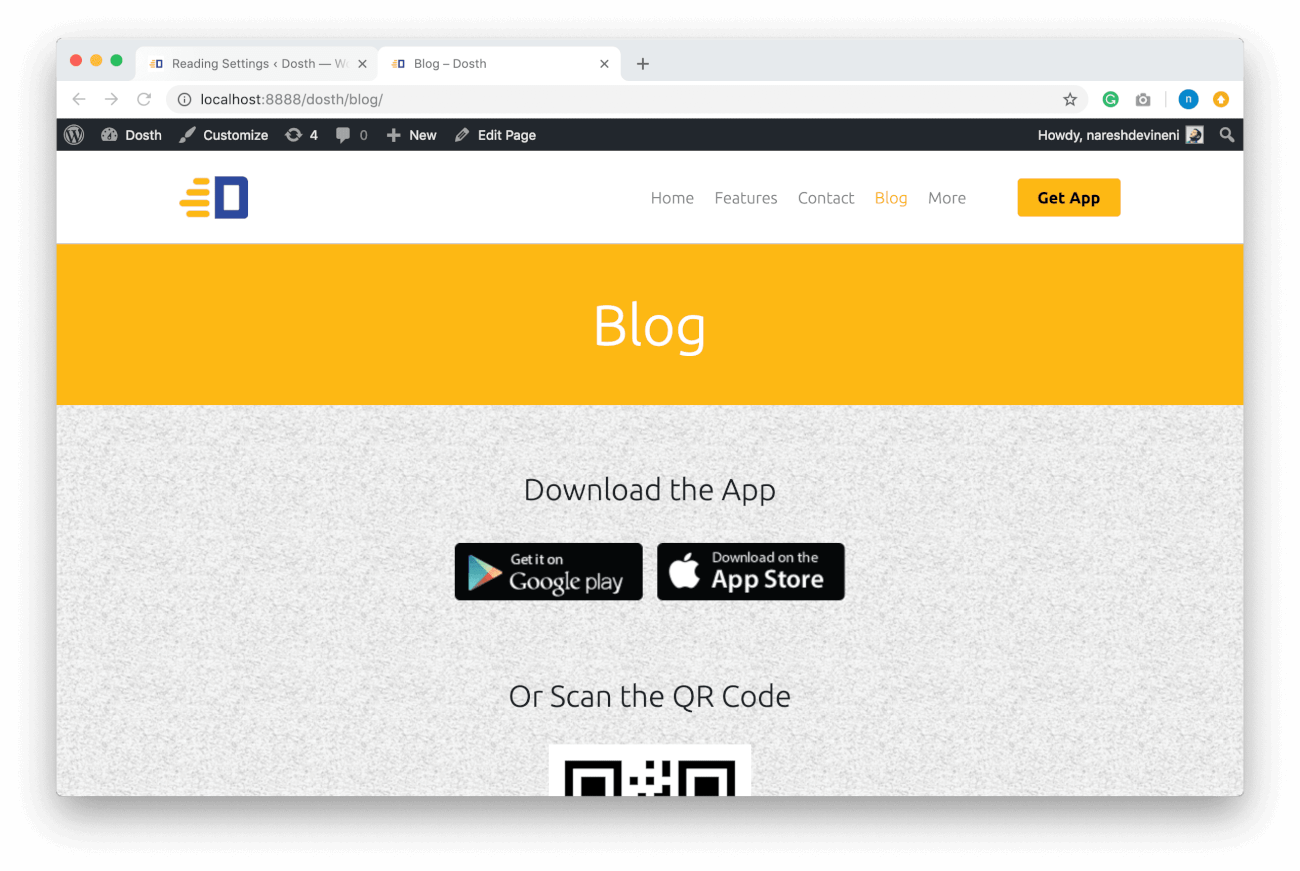
“Yay! It’s working!”
Yep! Let’s do one more verification.
Because, currently, there is no archive.php file inside our theme, WordPress will use the index.php file to render the category archive as well. So, if you visit the below archive URL for category “Advice”, you shouldn’t see the big yellow box with “Blog” as the title.
http://localhost:3000/dosth/category/advice/
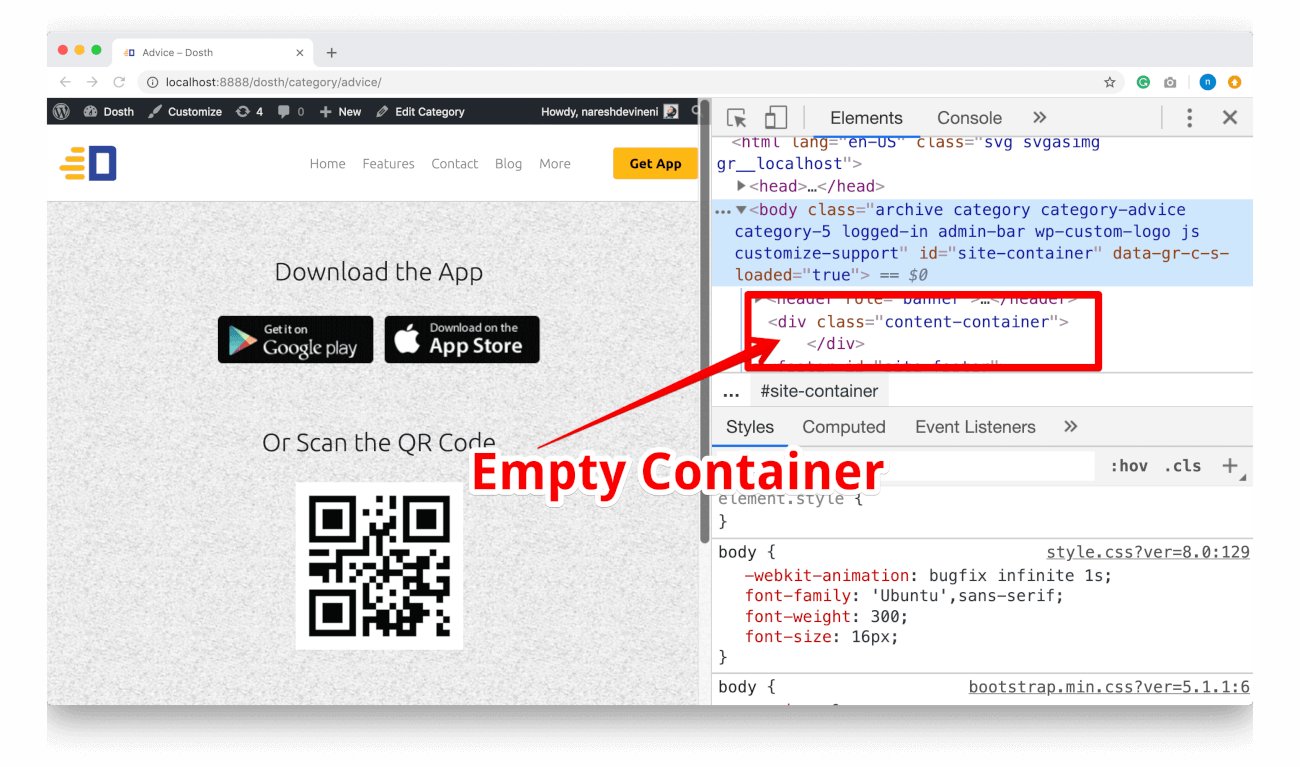
Indeed, we are not seeing the title.
“Yep! Now I understand the purpose of the is_home IF condition! “
Great!
What follows now is the usual Loop with a bunch of template tags
Put the following Loop code right after the IF condition and test it in the browser.
<div class="container">
<div class="row">
<div class="blog-posts col-md-8">
<?php if ( have_posts() ): ?>
<?php while( have_posts() ): ?>
<?php the_post(); ?>
<div class="blog-post">
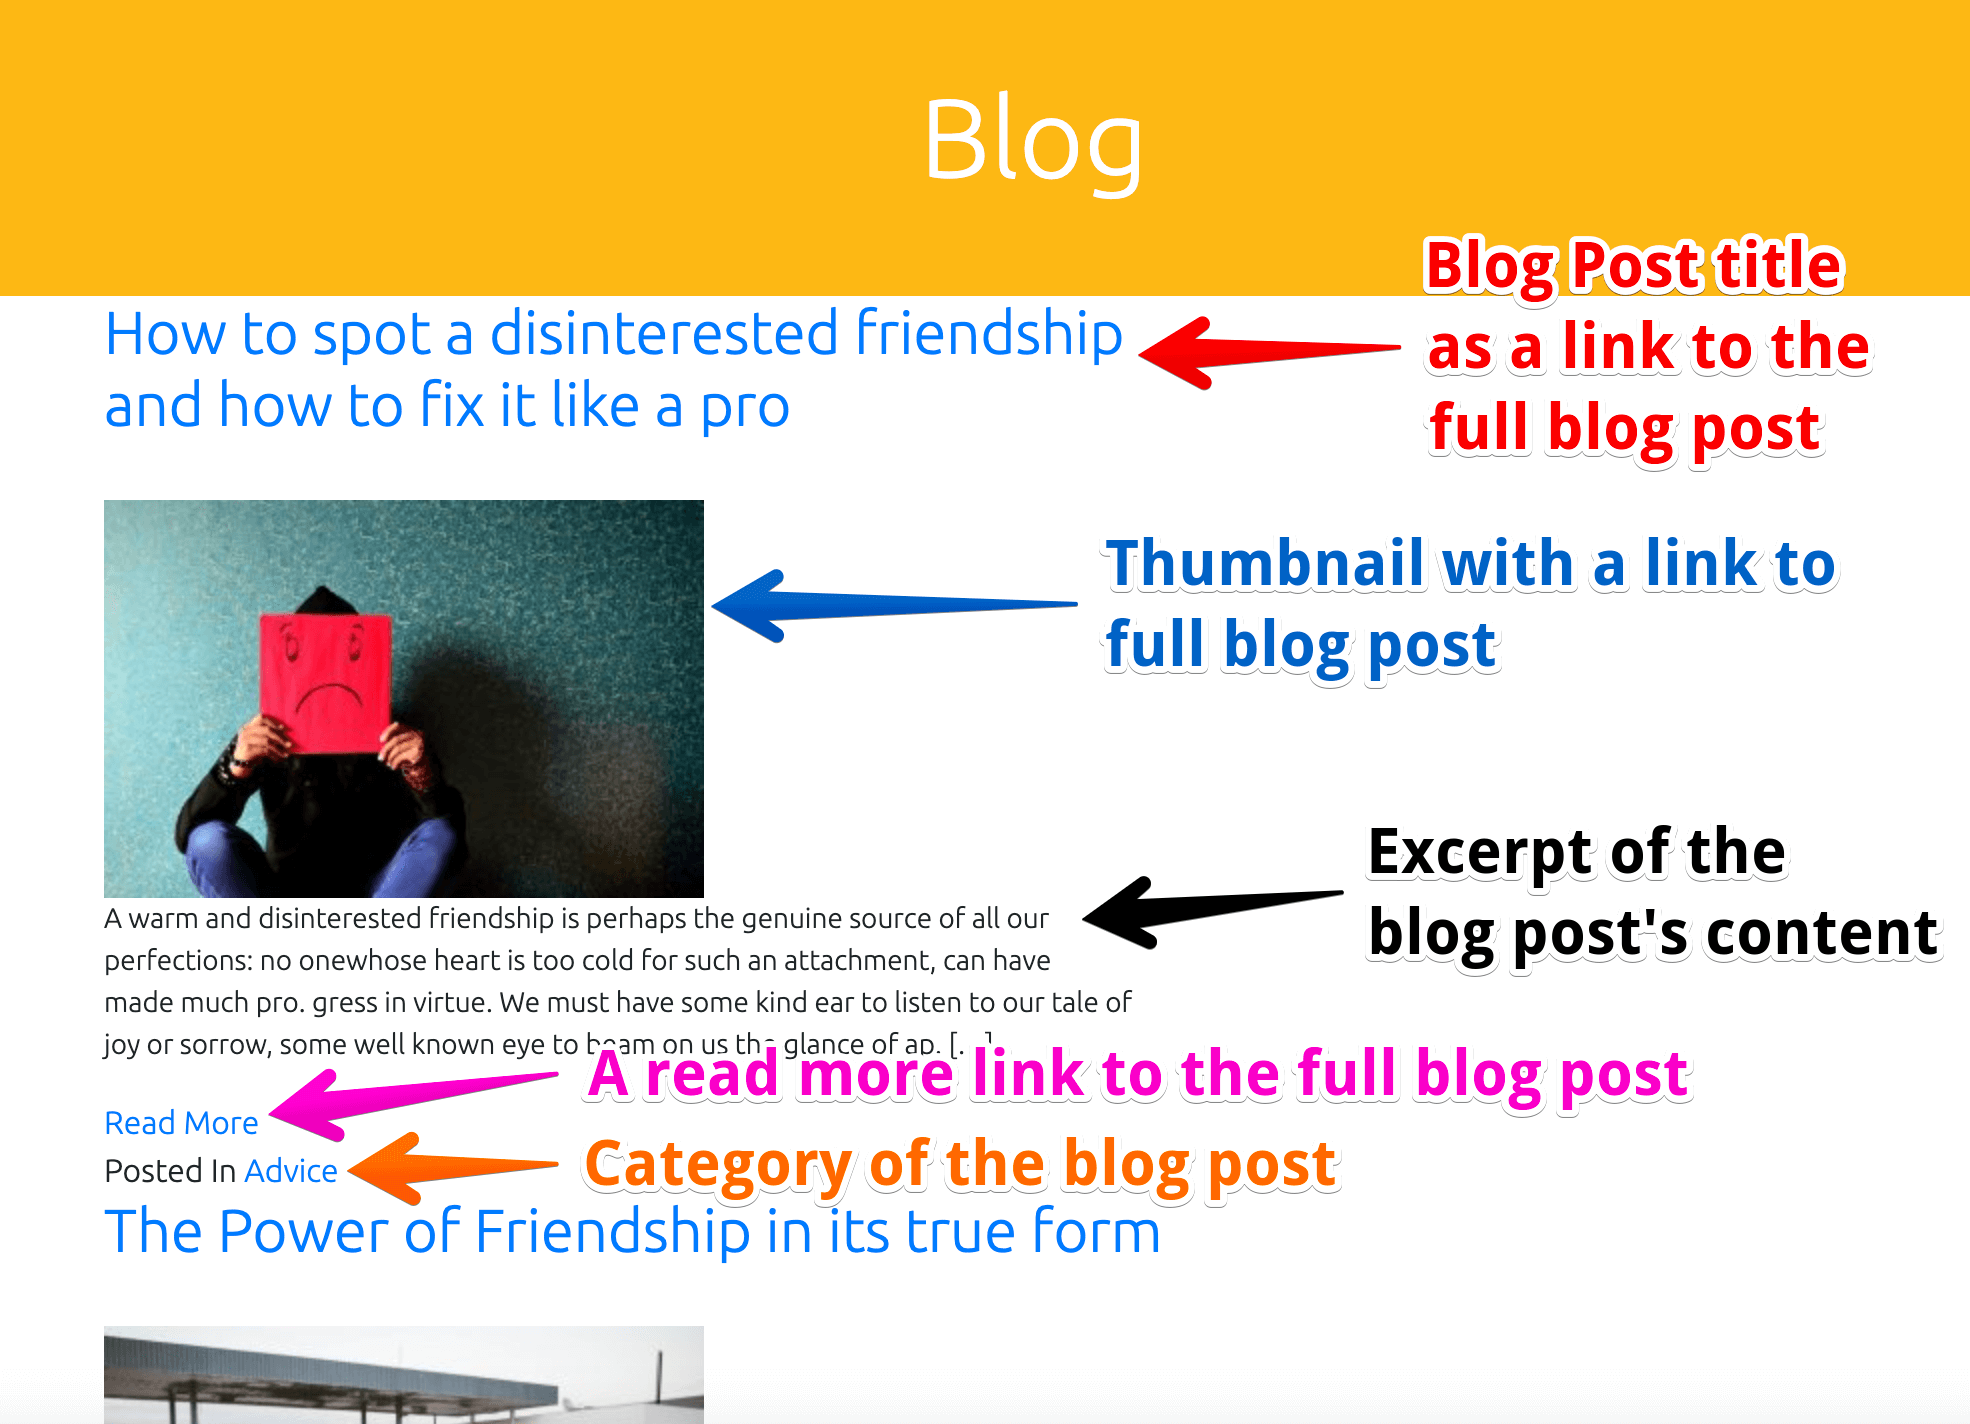
<h2><a href="<?php the_permalink(); ?>"><?php the_title(); ?></a></h2>
<?php if ( has_post_thumbnail() ) :
$featured_image = wp_get_attachment_image_src( get_post_thumbnail_id( get_the_ID() ), 'medium' ); ?>
<div class="blog-post-thumb">
<a href="<?php the_permalink(); ?>"><img src="<?php echo $featured_image[0]; ?>" alt='' /></a>
</div>
<?php endif; ?>
<?php the_excerpt(); ?>
<a class="read-more-link" href="<?php the_permalink(); ?>"><?php _e( 'Read More' ); ?></a>
<div class="posted-in">
<span><?php _e( 'Posted In', 'nd_dosth' ); ?></span>
<span><?php the_category( ', ' ); ?></span>
</div>
</div>
<?php endwhile; ?>
<?php else: ?>
<p><?php _e( 'No Blog Posts found', 'nd_dosth' ); ?></p>
<?php endif; ?>
</div>
<div id="blog-sidebar" class="col-md-4">
</div>
</div>
</div>
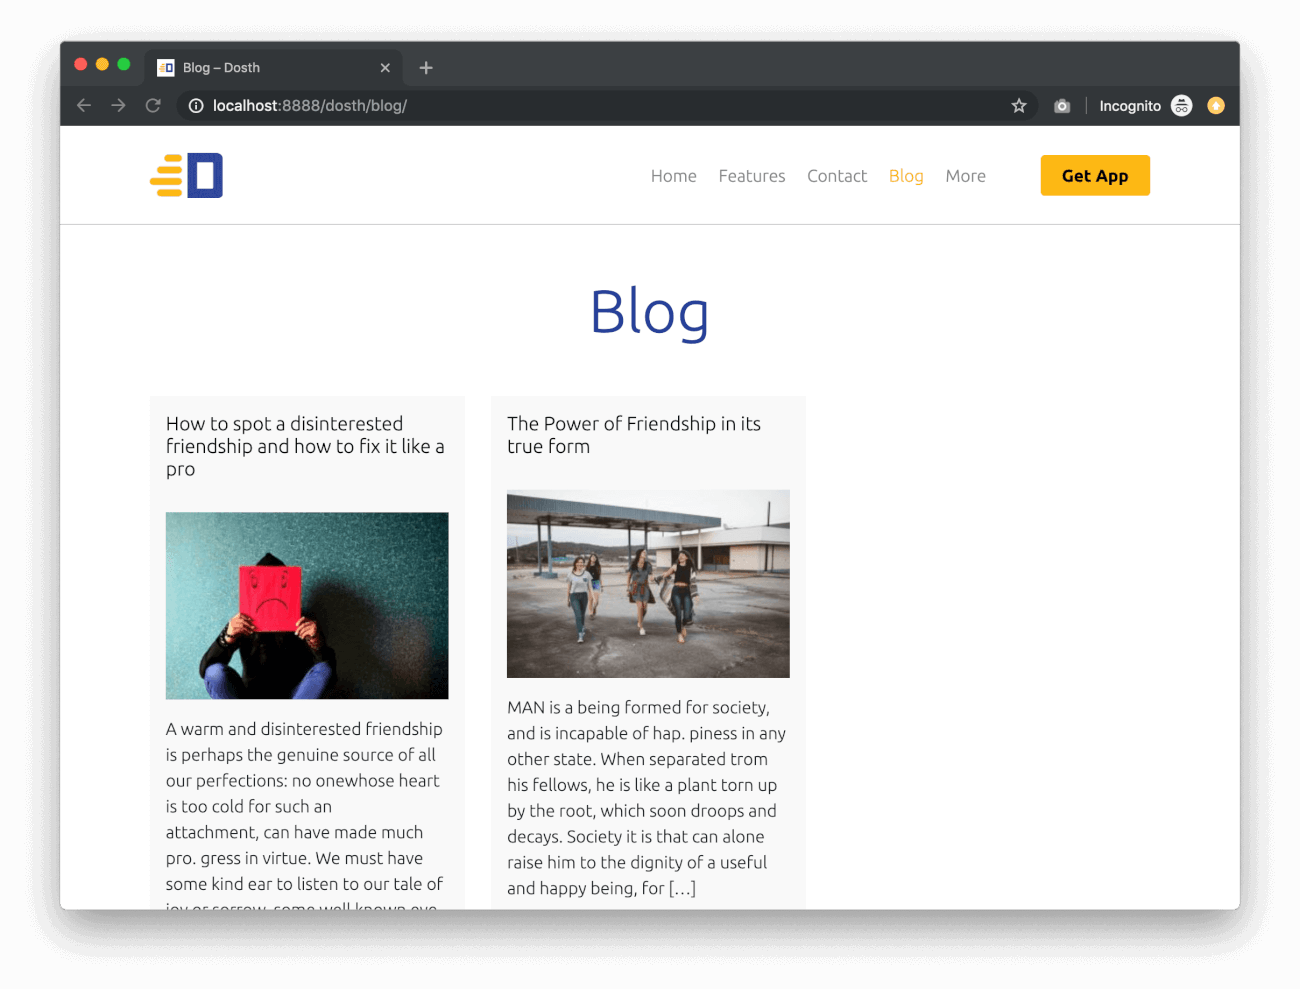
If you now visit the “Blog” page in the browser, you should see all the blog posts we have added till now:
So, Nothing much going on in the above code. Just a bootstrap based two column layout.
In the first column, we are outputting the blog posts with the help of the Loop.
Inside the second column, we will output the blog sidebar in the upcoming lesson.
Anyway, now let’s breakdown the above Loop code piece by piece.
First of all, we are checking whether are any blog post by using:
<?php if ( have_posts() ): ?>If there any blog posts, we will go inside the loop, but if there aren’t any, the else condition would get executed and prints “No Blog Posts found” text to the screen.
<?php else: ?>
      <p><?php _e( 'No Blog Posts found', 'nd_dosth' ); ?></p>
<?php endif; ?>
In our case, there are a handful of blog posts, so we are now inside the loop.
Introducing the_permalink() template tag
Once we are inside the Loop, we are outputting the title of the blog post. But this time, we are not simply outputting the title. Instead, we are wrapping the title inside a link that takes the visitor to the full blog post.
<h2><a href="<?php the_permalink(); ?>"><?php the_title(); ?></a></h2>
Inside the Loop, to get the permalink of the blog post, we use the_permalink() template tag. This function just outputs the permalink of the blog post, like this:
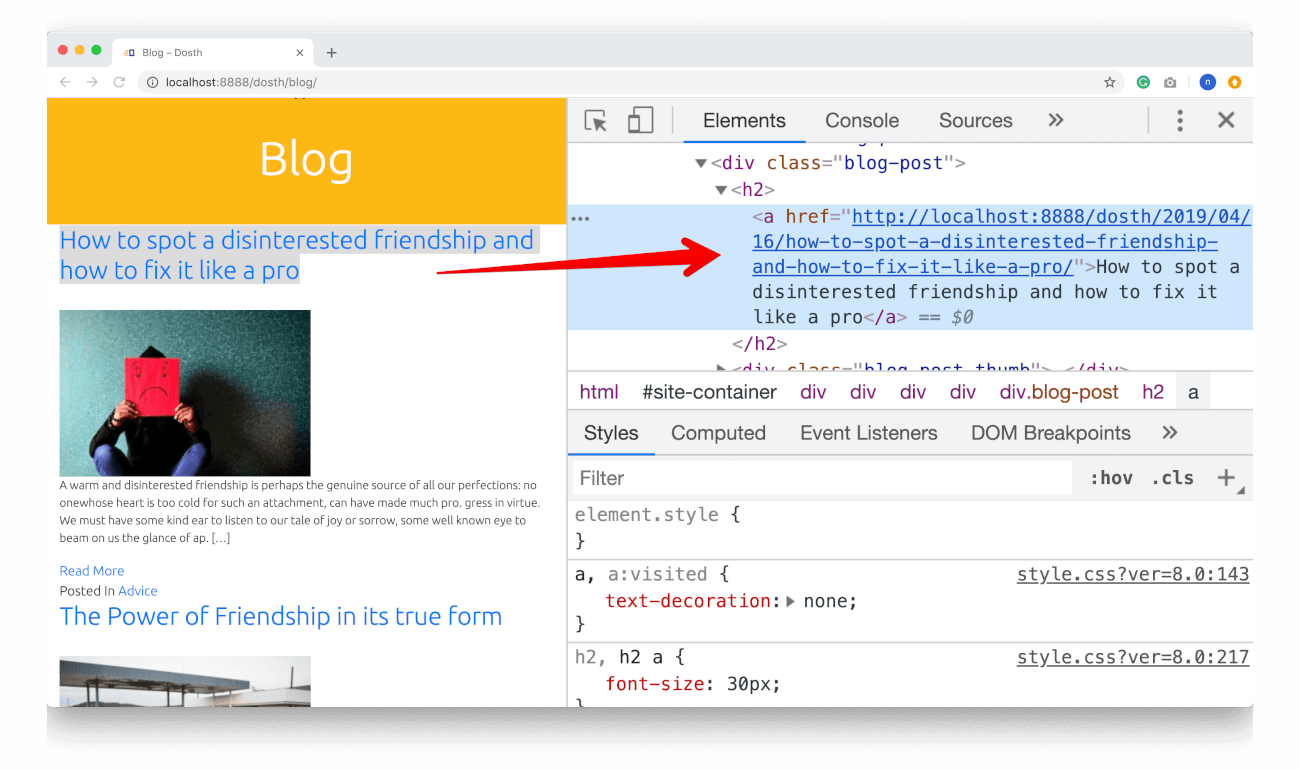
So, technically, we someone clicks on the title of a particular blog post, it will take them to the full blog post a.k.a single post in the terminology of WordPress.
Remember, in the eyes of WordPress, there are three types of posts.
- A blog post
- A page
- A custom post type like an event, a book, etc.
the_permalink() template tag works the same for just about any post type.
Dealing with the thumbnail
<?php if ( has_post_thumbnail() ) :
    $featured_image = wp_get_attachment_image_src( get_post_thumbnail_id( get_the_ID() ), 'medium' ); ?>
    <div class="blog-post-thumb">
        <a href="<?php the_permalink(); ?>"><img src="<?php echo $featured_image[0]; ?>" alt='' /></a>
    </div>
<?php endif; ?>
Nothing new happening with the thumbnail too. We are outputting a medium version of the featured image and wrapped the image inside a link so that when someone clicks on the image of a particular blog post, it will take them to the full blog post.
Introducing the_excerpt() template tag
<?php the_excerpt(); ?>
Next, we are outputting the trimmed down version of the blog post’s content with the help of the_excerpt() template tag.
The Excerpt of a blog post is nothing but the trimmed down version of the blog post’s content. Typically, the first few lines of the entire content. That’s all.
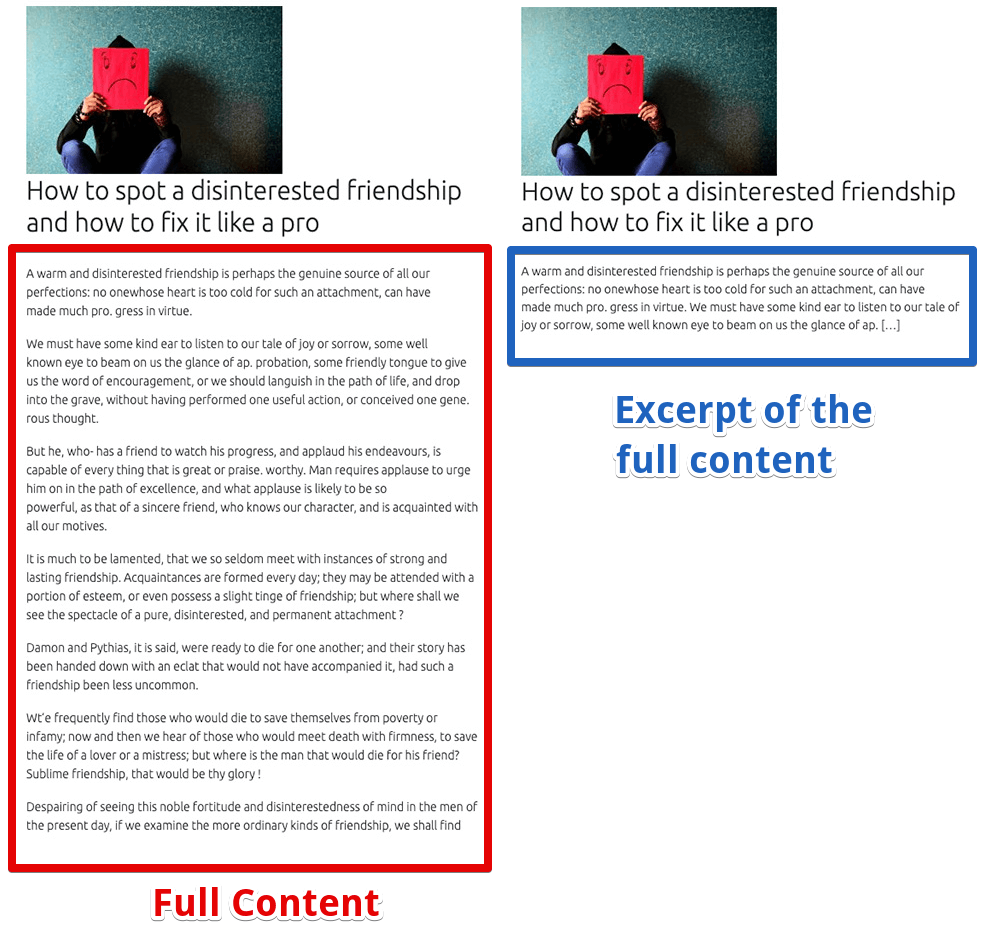
The thing with the_excerpt() template tag is, it first looks whether the Excerpt field in the Post edit screen is set. If it is set, it will the display that.
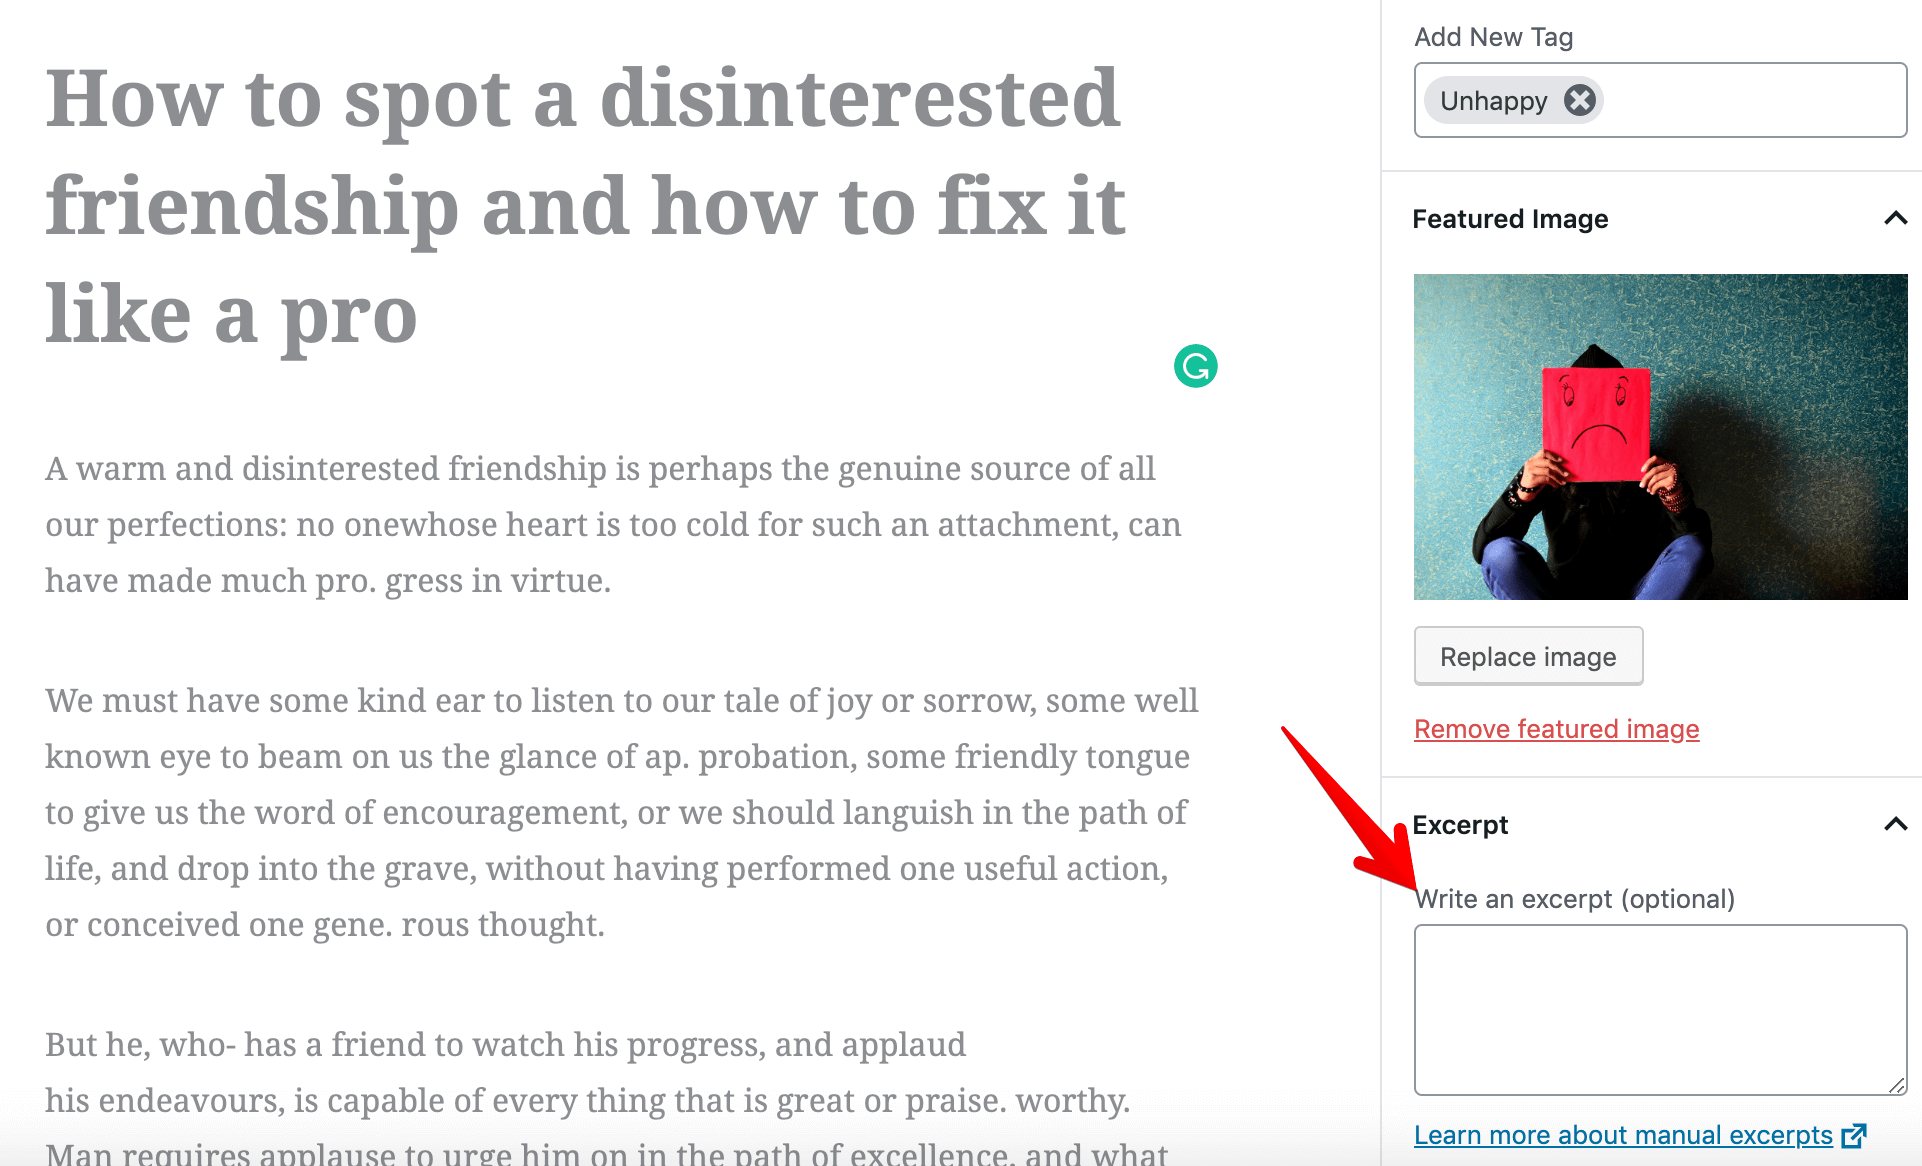
If the Excerpt field is empty, WordPress will automatically generate the excerpt from the first couple of paragraphs.
We usually display the excerpt of the individual blog post on the Homepage, blog posts index page and archive pages of the site to give the visitor a glimpse of the article.
You already know what’s happening with the “Read More” link, so I am gonna skip that.
Introducing the_category() template tag
<div class="posted-in">
    <span><?php _e( 'Posted In', 'nd_dosth' ); ?></span>
    <span><?php the_category( ', ' ); ?></span>
</div>
Finally, we are outputting the categories that a particular blog post is assigned to and if a particular blog is assigned to multiple categories, we are separating each category with a comma (,).
<?php the_category( ', ' ); ?>
Now, you don’t have to use comma (,). You can use any glyph you want.
Let’s fix the look and feel
As usual, the “Blog” page doesn’t look anything like the mockup and let’s write some CSS to fix it.
Now, we are not going to write CSS that is specific to the blog posts index of “Blog” page.
Remember? In the first lesson of this module, we saw the designs of the blog posts index page and various archive pages.
They all look the same from the design perspective.
So, we have to write universal CSS which applies to both blog posts index page and archive pages.
Don’t worry if you did not understand what I am saying. It will make sense by the end of this module.
Add the following CSS code to the end of the style.css file:
*-------------------------------------------------------------------------------
  13.Blog Index / Archive Styling
-------------------------------------------------------------------------------*/
.blog .page-title, .archive .page-title{
    background-color:transparent;
    color:#1a3794;
}
@media only screen and (min-width:767px){
    .blog-posts{
        display:flex;
        justify-content:space-between;
        flex-wrap: wrap;
    }
    .blog-posts .blog-post{
        width:48%;
    }
}
.blog-posts .blog-post{
    background-color:#f9f9f9;
    padding:15px;
    margin-bottom:20px;
}
.blog-posts .blog-post h2 a{
    color:black;
    font-size:18px;
}
.blog-posts .blog-post h2 a:hover{
    color:#1a3794;
}
.blog-posts .blog-post h2{
    line-height:1.2;
    font-size:18px;
}
.blog-post-thumb{
    margin-bottom:15px;
}
.blog-posts .blog-post p{
    font-size:16px;
}
.read-more-link, .posted-in a{
    color:#1a3794;
    margin-bottom:10px;
    display:inline-block;
    border-bottom:1px solid transparent;
}
.posted-in{
    font-size:12px;
}
.posted-in span{
    color:#ccc;
}
.read-more-link:hover, .posted-in a:hover{
    color:black;
    border-bottom-color:#333;
}
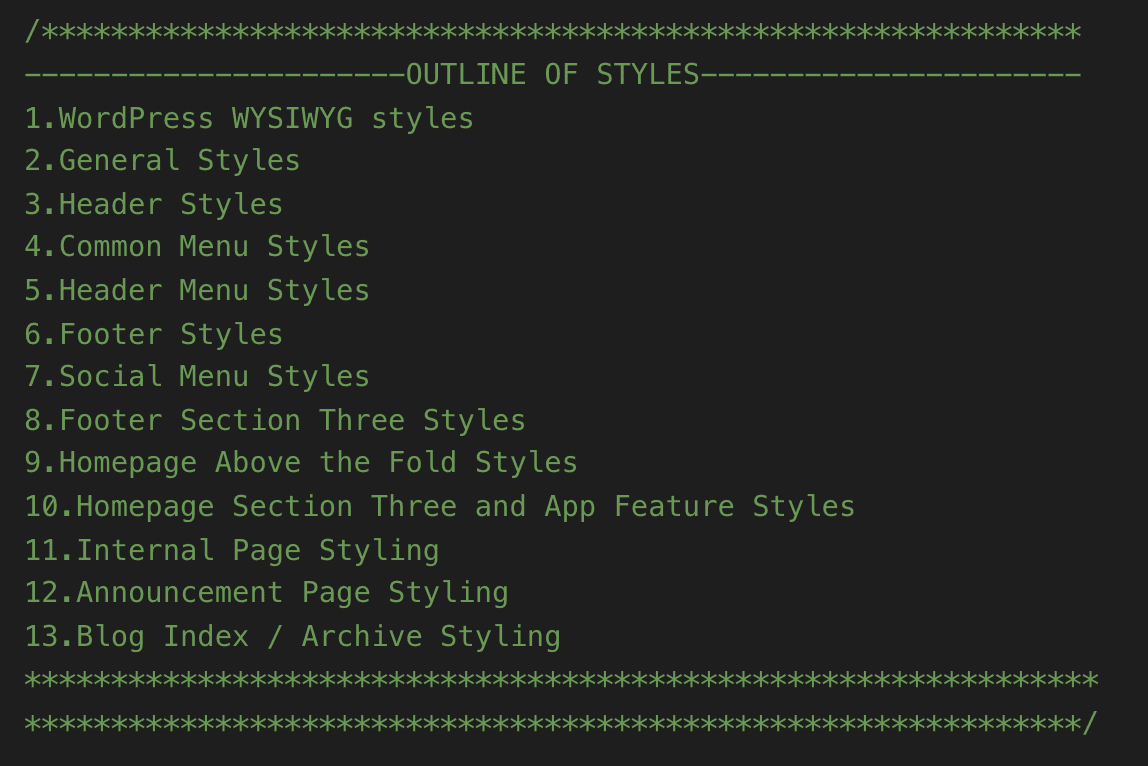
Here is the updated style.css outline:
And here is the output in the browser:
However, there a few problems we need to address before we build the sidebar. We will address them one by one in the subsequent lessons.
 © 2026 UsableWP. A project by Naresh Devineni.